
Dcui vmware что это
This will be a very brief section on VMware security I am not going to cover every aspect of security within VMware but will lightly touch on the commonly used area's. Both the ESXi standalone server and vCenter security is the same, the only difference is where the users and groups come from, if using a ESXi stand-alone configuration they are held locally on the ESXi server, however if you use vCenter you can take advantage of Active Directory (AD) in Windows plus it can be stored locally. Note that users and groups come from the underlying O/S, if using stand-alone ESXi server then the users/groups will be held locally on the server (/etc/passwd and /etc/group), if using a vCenter running on Windows 2008, then these will be local windows accounts or if part of a domain then these will be domain accounts, you cannot administer user accounts or group via VMware only roles.
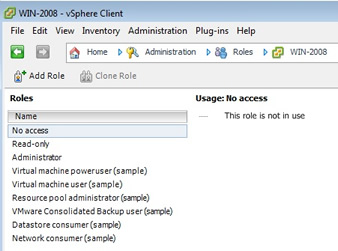
The VMware model of security involes three components: roles, groups and users, this type of setup is very similar to databases. First you create roles of responsibility then you can add users/groups to allow them to perform tasks. As vCenter has an organization of system folders, datacenter objects and subfolders, a system of inheritance does exist, if you set a role on a folder, it will pass your privileges down the folder hierarchy, vCenter does a good job of hiding objects that a user has no privilege to see. There are 11 predefined roles, I have highlighted which are available to vSphere client and to vCenter
Roles
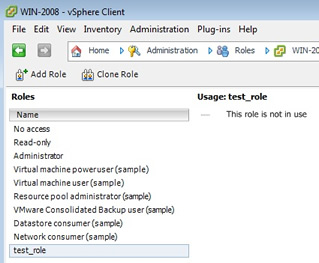
So lets create a role and assign some privileges
To create a role, from the home page in vCenter select "roles" from the administration section
select "add role", and type in a meaningful name, then start selecting the privileges for this role, I am not going to cover all the privileges here, I have just selected "virtual machine", this in itself greatly expands into many privileges.

As you can see the new role appears at the bottom
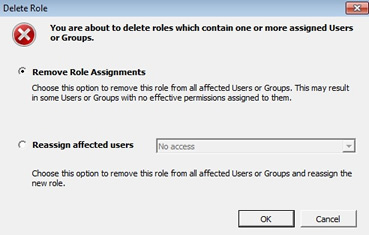
To remove a role just right-click that role and select remove, you also have the ability to clone roles and then change them a little
One note about removing roles you may see the below warning message, this is justing letting you know what you want to do about the existing users within this role, either leave them with no access or assign them to another role.
Using Roles and privileges to access a certain VM can a bit of a task as you need to create the privileges from the top down, first start with the datacenter folder, then down to the ESXi hosts and finally the VM itself
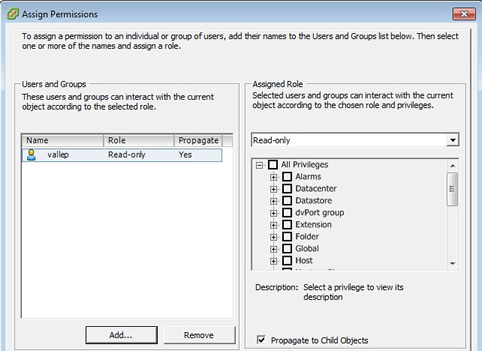
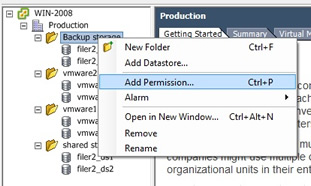
First select the area that you want to add a privilege to, this could be a folder, host or a VM, in the example below I have selected the production folder, the panel on the left is what appears first, you can change the assigned role to your newly created role, then you need to add users or groups, this is done by selecting the "add" button which produces the right-panel. here you can choose from your user/group list, remember these will either be local accounts or domain accounts depending what you have setup
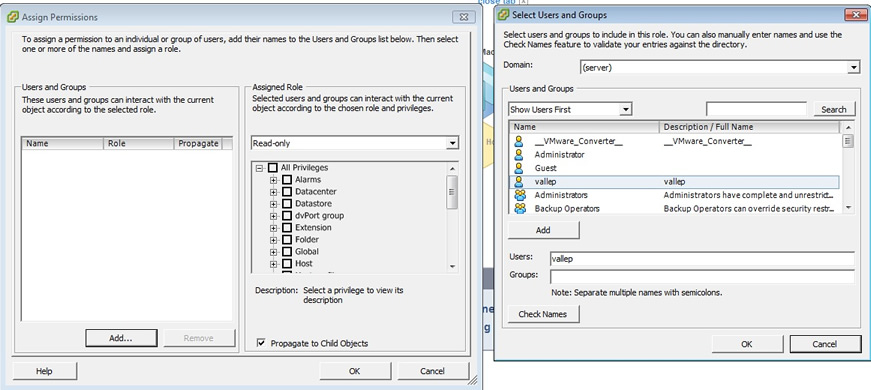
When you have choosen your users/group you should see something like below, here I have allowed a user called vallep to have read-only access, thus when I login via vSphere client or vCenter using the vallep account I will only have read-only access and will not be able to change anything.
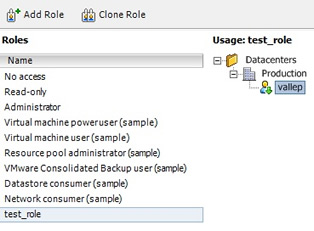
Once you have added some users or groups you can go back to the role home page and see the changes you have made, you can clearly see the hierarchy format used.
Personally I just stick to the already created roles and generally do not need to create additional roles, most of the time I can get away with using the administrator, virtual machine user and read-only roles. Lastly I just what to touch on the ESXi default accounts that are created there are 4 of them,
Datastore Access
If you want to improve on security regarding the datastores within vCenter, you should create folders and then drag and drop the datastore into the folder, after which you can assign permissions on that folder restricting the access to the datastore, here is what I have done with my test environment, I created four folders and placed the datastores into the folders, I could then place different permissions on each of the folders.
I will come back to this section at a later date to update it with advanced security features but thats all i am going to cover for now.
Для предоставления доступа различным категориям пользователей к их виртуальным машинам, как правило, используется представление VM and Templates и система папок, на которые, собственно, и назначаются права. Однако, в некоторых случаях этого бывает недостаточно, поскольку для некоторых действий пользователь должен иметь права и на объекты среды, отсутствующие в отображении VM and Templates. Например, для добавления виртуального жёсткого диска или клонирования ВМ нужны права Datastore.Allocate Space или роль Datastore Consumer на объект Datastore или Datastore Cluster. А для возможности изменения сетевого интерфейса — права Network.Assign Network или роль Network Administrator на соответствующие портгруппы. Далее детальнее об этом и других нюансах назначения прав доступа в vSphere. Информация актуальна для версий vSphere 5.1 и 5.5.
Ввиду наличия различных представлений объектов инфраструктуры виртуализации, права доступа к некоторым объектам (VM, vApps) могут наследоваться от нескольких предков (например, VM folder и Resource Pool). что стоит иметь ввиду. Общая схема наследования представлена на рисунке:

Соответственно, если кого-то нужно в правах ограничить, нужно убедиться, что отнятые в одном месте права не наследуются из другого объекта.
Помимо этого, можно столкнуться на практике, что человек, имеющий полномочия администратора на уровне рута, вдруг оказывается ограниченным пользовательскими правами на уровне конкретной папки. Дело в особенностях выбора действующих прав в ситуации наложения ролей. При предоставлении полномочий следует иметь их ввиду.
1) Права, выданные дочерним объектам игнорируют наследованные. Другими словами, если пользователь входит в группы vSphereAdmins и CitrixAdmins, при этом первая имеет права админа на уровне root, а вторая — VM User на уровне папки Citrix, то как раз получим ситуацию, описанную в вышеприведённом абзаце.
2) Права выданные на конкретного пользователя преобладают над правами, выданными на группу (если и те и другие выданы на один объект и пользователь входит в группу).
3) Если используются пользователи из AD или иных источников, отличных от встроенного каталога vCenter SSO, vCenter периодически проверяет наличие учётной записи поиском по имени. И если после назначения прав в vCenter, учётка была переименована или удалена, соответствующие ей права из vCenter удаляются. И если в случае удалённой учётки это даже хорошо, то в случае, если кто-то переименовал группу (группы), например в соответствие с новыми политиками именования в организации, это может привести к неблагоприятным последствиям.
4) vCenter SSO не наследует права вложенных групп, если их участники не входят в Identity Sources. Например, если домен AD не добавлен в Identity Sources, то группа Domain Admins этого домена не будет иметь никаких полномочий на vCenter, даже с учётом того, что она входит в local\Administrators сервера vCenter.
Немного рекомендаций лучших собаководов Best Practices по теме предоставления прав доступа.
- По возможности назначать права на группы, а не на конкретных пользователей. Контроль членства в группах можно делегировать и избавить себя от лишней работы. И даже если не делегировать, системой будет проще управлять.
- Выдавать права только там, где необходимо, тем, кому необходимо и с минимально необходимыми привилегиями. Опять же для понимания структуры, упрощения управления и должного контроля. Лучше сформировать заранее план необходимых полномочий и лиц, которым они нужны.
- Использовать папки для группировки объектов со схожими наборами прав. Папки, если что, можно создавать во всех представлениях, а не только в VM and Templates.
- Быть аккуратнее с предоставлением прав на корневом уровне. То есть на уровне самого vCenter в клиенте vSphere. Дело в том, что пользователь, имеющий права на этом уровне получает доступ не только к объектам инфраструктуры виртуализации, но и к управлению такими сущностями как лицензии, роли, интервалы сбора статистики, сессии и кастомизированные поля. А возможность модификации ролей может оказать влияние даже на те vCenter, на которые у пользователя вообще нет прав (при использовании Linked Mode).
- В большинстве случаев стоит включать наследование. Это гарантирует, что при добавлении нового объекта в определённую иерархию, пользователь, за него ответственный, получит к нему доступ.
- Для маскировки специфичных зон иерархии можно использовать роль «No Access»
- После перезагрузки и обновления vCenter стоит проверять наличие необходимых прав. Дело в том, что если на каком-то этапе возникли сетевые проблемы и vCenter не сможет верифицировать указанные группы или пользователей, они будут удалены и заменены local\Administrators.
- Удалить права на vCenter для локальной группы Administrators и пользователя Administrator сервера vCenter. Выдать права специализированной группе.
Напоследок упомяну о специализированных пользователях хостов ESXi. Спровоцировано тем, что коллега однажды решил убедиться, что сотрудники ИТ в некоторых регионах не наделали себе лазеек в инфраструктуре, и чуть было не вычистил ESXi-хосты от пользователя vpxuser.
vpxuser — специализированный пользователь, который создаётся при подключении хоста к vCenter и используется им для администрирования. Имеет, соответственно, административные права на хост и ни в коем случае не должен модернизироваться (не менять ни права ни пароль).
dcui user — ещё один специфичный пользователь, используемый в качестве агента при работе через Direct Console User Interface режиме lockdown mode хоста (в этом режиме любые подключения к хосту запрещены, кроме управления с помощью vCenter).
В качестве заключения хочу заметить, что никогда я настолько не осознавал значимости и актуальности AGDLP-подхода при назначении прав доступа к системе, как при разработке политики назначения прав на объекты vCenter. Ввиду вышеприведённых особенностей и большого количества ветвлений элементов иерархий.
Приветствую, дорогой читатель. Я начинаю цикл статей о том, как мы искали решение для применения подхода Infrastructure-as-Code в нашем виртуальном окружении VMware VSphere.
У нас есть система управления конфигурациями Puppet для Linux, есть (на данный момент) DSC для Windows Server.
Что касается Linux — практически все автоматизированно. Мы заносим конфигурации машин в nodes.yaml, мы заносим роли в Hiera, строим модули (или берем готовые), у нас есть PXE, IP адреса раздаются из DHCP по MAC адресу.
То есть с момента как Linux виртуалка стартует, до момента, когда виртуалка готова к эксплуатации — никаких действий не нужно. Попробуйте угадать, что в этой цепочке делается вручную? Верно, создание самой виртуальной машины в VSphere.
Когда я впервые поднял этот вопрос, мне сказали, что искали решение, пробовали варианты, но ничего не получилось. “К черту!” — подумал я и поспорил на ящик пива, что найду решение, которое будет работать по следующему сценарию: разработчик или инженер делает Pull Request, в котором у нас находится конфигурация виртуальной машины (ядра, память, сеть, шаблон и т.д.) — далее некая магия обращается в VSphere и создает машину, согласно настройкам в файле.
Позволь рассказать немного о нашем окружении, чтобы ты понял с чем мне приходится иметь дело.
У нас в качестве On-Premise виртуализации используется VMware VSphere — парочка датацентров, datastore-кластер и несколько Resource Pool’ов (RP) под каждую команду. Члены команды имеют права на создание виртуальных машин в пределах RP, ребята-инфраструктурщики им в этом не мешают и просто занимаются обслуживанием всей платформы, периодически напоминая разработчикам и инженерам убирать за собой неиспользуемые машины (ресурсы-то не резиновые).
У нас есть Windows виртуалки, Linux виртуалки, масштаб задач огромен — веб серверы, реверс прокси, балансировщики, контроллеры домена, серверы приложений и баз данных и нет им конца и края.
Теперь я поведаю тебе, какие инструменты я пытался применять, и почему они мне не подошли.
Выводы
Дорогой читатель, если у тебя однажды встанет задача автоматизировать создание виртуальных машин в VMware, то учти следующее:
- используешь ли ты Resource Pool’ы
- используешь ли ты Datastore кластеры
Если же у тебя такая же сложная инфраструктура, как и у нас, то лучше не изобретай велосипед, а осваивай PowerCLI.
В следующей части я расскажу, как мы сделали наш скрипт умнее, и научили его делать проверки на кастомизацию, количество ядер и других ресурсов и naming convention.
When ESXi was released and it did not have the traditional Linux-based service console operating system (COS), there was near-panic among VMware-Admins. ESXi has a very limited and simple menu-driven user interface that VMware calls the direct console user interface (DCUI). In this article I will show you what this interface looks like and demonstrate what you can do with it.
Terraform
Иная тулза, которая умеет создавать виртуалки в VMware это Terraform, продукт от HashiCorp. Изначально он заточен под взаимодействие с Packer и деплоит в AWS, но наши задачи он тоже решает. Вот собственно файл с конфигурацией:
terraform plan работает прекрасно.
Что так же здорово, можно задать IP адрес, доменное имя — то есть задать полноценную кастомизацию машинки из шаблона. Пробуем запустить…
Хм, не найден datastore. Как я уже говорил, у нас кластер, так что я попробую сделать по-грязному указав одну из нод кластера.
Что ж… снова неудача. Позже выяснилось, что Terraform не умеет работать с datastore-кластерами. Соответственный issue был создан на GitHub моим коллегой, но успехов на этот поприще тоже, увы, нет.
Accessing the hidden command line interface
If you REALLY need access to a command line on an ESXi server, there is a completely unsupported and hidden ESXi command line interface. To access it, on the server console, press Alt-F1 then type unsupported and press enter. From here, you will need to type the root password and you will get a command prompt that looks like this:
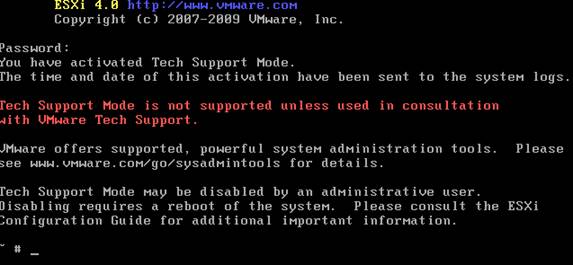
Figure 7: ESXi unsupported console
You can learn more about this hidden and unsupported console in my article: How to access the VMware ESXi hidden console.
In Summary
VMware ESXi has no Linux-based service console (COS) like ESX classic. Instead, VMware ESXi offers a direct console user interface (DCUI). In this article you learned what it offers you, how to configure a new ESXi server with it, how to manage ESXi remotely, and how to access the hidden ESXi CLI. ESXi and the DCUI are real simple once you have a quick introduction to them.
For more information on VMware ESXi Server, checkout my other articles about ESXi at:
The first screen after ESXi installation or boot is called ESXi DCUI (Direct Console User Interface). In this blog we will discuss some basic configurations of ESXi using DCUI. Although all the configuration can be done using vSphere Client, vCenter or SSH login but ESXi DCUI is used when there is some network issue in all remote options or in case of first time Static IP Address allocation to management interface.
First of all, just after installing ESXi we see a screen with Yellow and Grey background showing VMware ESXi version, CPU/Memory resources and the link to download the vSphere Client to manage that host in below format:
However you can also download the vSphere Client from VMware website (above links will also use the same VMware link to download).

There are only two options available, first “F2” to customize system/view logs and second “F12” to Shut Down/Restart ESXi host. To enter into the configuration page you need to press “F2” then it will ask for User Authentication (by default root user’s credential). Enter the password and it will open the System Customization page.

ESXi System Customization:
System Customization page provides the following features:
- Configure Password
- Configure Lockdown Mode
- Configure Management Network
- Restart Management Network
- Test Management Network
- Network Restore Options
- Configure Keyboard
- Troubleshooting Options
- View System Logs
- View Support Information
- Reset System Configuration
Features Details:
Modifying the root password is very simple, just select Configure Password and press Enter. It will ask for Old & New passwords to change the password. Enter the required details then press Enter.
Lockdown Mode is a security feature that prevents user to perform operations against the ESXi host directly. This feature is disabled by-default and only available on ESXi hosts that have been added to vCenter Server.
To configure Hostname, IP Address, DNS use Configure Management Network option and don’t forget to restart the management network as soon as you finished the network configurations. You can also Test the Management Network by entering the IP addresses the Gateway or other servers like NTP.

In case of some issue in existing network configuration or you want to change the entire network configuration of ESXi host, VMware ESXi gives you Network Restore options.
If you have chosen the wrong Keyboard layout during ESXi installation, Don’t worry you can change it any time using Configure Keyboard.
Troubleshooting Options facilitates you to enable or disable ESXi Shell and SSH, In addition to that you can also configure the timeouts for Shell, SSH and ESXi DCUI.
You can also see the various system logs along with support information.
And last but not least, if everything seems to be messed up and not under control. At this instant you can factory reset the ESXi hypervisor. As a result it will remove all the configurations including management IP address on ESXi host. But in production environment never ever try to use this option as it may impact your production.
PowerCLI
Претерпев неудачу в поисках рабочих инструментов от третьих лиц, я решил обратиться к вендорскому решению.
Вендор предлагает два решения — PowerCLI (надстройка над Powershell) и vmware-cli (командный интерфейс для *nix).
Заставить работать vmware-cli на CentOS 7 и OS X не удалось (один страдалец даже написал блог об этом), посему я решил сразу начать пользоваться инструментом, который работает.
Внимательный читатель может поинтересоваться, почему я потратил столько времени на Ansible и Terraform, в то время как PowerCLI уже давно используется. Причины просты — я не знаю Powershell на должном уровне, чтобы с наскоку начать пользоваться им, плюс это вынуждает меня использовать windows машину, которая будет заниматься чистым provision’ом. Впрочем, иных вариантов у меня и нет.
Беглое изучение документации дало мне достаточно навыков, чтобы написать простенький скрипт.
Этот скрипт рабочий и делает все необходимое. Запуск скрипта выглядит следующим образом:
Скрипт попросит меня предоставить логин и пароль, переиграет переменные и создаст машинку с помощью cmdlet’а new-vm. Читатель может поинтересоваться, почему присутствует вот эта строка:
Пусть меня поправят опытные powershell ребята, если я ошибаюсь. Get-Credential создает объект состоящий из логина, пароля и домена (если он есть). Пароль находится в состоянии SecureString. К сожалению, PowerCLI не умеет работать ни с объектом Get-Credential, ни с SecureString, потому приходится идти на подобные ухищрения, чтобы передать ему логин и пароль простой строковой переменной.
Ansible vsphere_guest
Как я уже писал в предыдущей статье, я очень люблю Ansible и в вопросах автоматизации я первым делом смотрю, можно ли его для этого использовать.
Согласно документации, есть хороший модуль vsphere_guest который может создавать и удалять виртуалки. То, что нужно. Вот так выглядит мой плейбук createvm.yaml
Я сознательно комментирую hostname esxi потому, что я создаю виртуалку непосредственно в RP, а не на хосте. DRS сам решит, куда виртуалку положить.
Если я запускаю плейбук, он ругается что необходимый параметр hostname не указан. Если я его раскоментирую, то он поругается на отсутствие прав на создание виртуалки на esx хосте (что очевидно, т.к. права у меня есть только на RP). Я создал соответствующий issue, так что надеюсь, ребята из Ansible это исправят, поскольку инструмент реально хороший.
How do you remotely manage VMware ESXi?
Just like any other ESX server, the primary application to manage ESXi remotely is the VMware vSphere client. You download it by going to your ESXi server’s web page.
Of course, another alternative for basic management tasks is VMware Web Access. You will also find that if you go to your ESXi server’s web page.
But, as there is no SSH interface, what most people are asking about when they ask how they will manage ESXi remotely is how they will perform command line commands or use scripts (read Scott Lowe’s Managing ESXi in a COS-less world).
Эмпирическим путем…
What does the VMware ESXi Direct Console User Interface (DCUI) offer?
Here is what the DCUI looks like:

Figure 1: VMware ESXi DCUI
Other than the hidden console (discussed below), what you see as an option on the menu in Figure 1 is all that the DCUI can do. To me, ESXi this simple interface is one of a number of reasons that ESXi is ideal for those new to virtualization. I say this because, besides this straightforward interface, ESXi is free and is the most powerful virtualization platform available today.
This DCUI interface offers the following:
- Configure Root password
- Configure Lockdown mode
- Configure Management network
- Restart Management Network
- Test or disable Management
- Configure Keyboard
- View Support Information
- View System Logs
- Restart Management Network
- Reset System Configuration
- Remove Custom Extensions
- Shutdown or Restart /Reboot the ESXi Server
To use these features, you navigate with your function keys, arrow keys, and the ENTER key (there is no mouse support). This console is not available to remote users. You must be at the server console to access it and configure these things. Let’s talk about remote management…
Using the DCUI to configure an ESXi server
Configuring the new ESXi server is easy with the DCUI. By default, the server will get its network information (IP address, etc) from DHCP. However, likely you don’t want a server using DHCP for long. Minimally, you should go in and configure the root username and password as well as static IP network information.
To login to the DCUI system customization screen, press F2. If a password is configured for root, you will enter it. If not you can just go ahead and configure a new root password, as you see me doing in Figure 2.

Figure 2: Configuring a Root username and password
From there, make sure that you go into the Configure Management Network section then into 3 areas:
- IP Configuration
- DNS Configuration
- Custom DNS Suffixes
Here you see me using a static IP address, subnet mask, and default gateway:
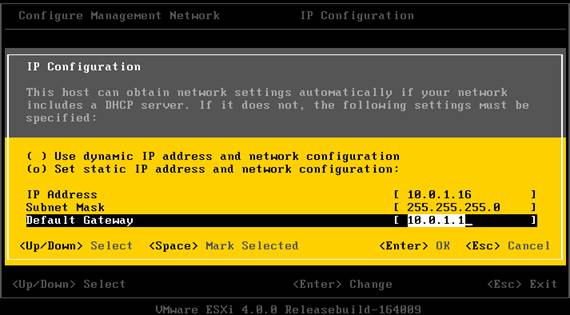
Figure 3: Configuring a static IP
From there, I configured DNS servers and DNS domain:
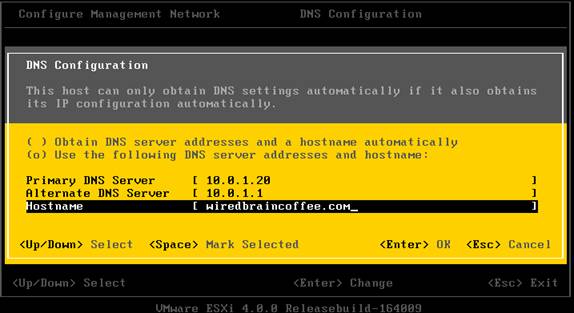
Figure 4: Configuring DNS settings in ESXi
And finally, the custom DNS suffix:

Figure 5: Custom DNS Suffix
Finally, when you press ESC you will be asked to restart the management network, as you see in Figure 6.
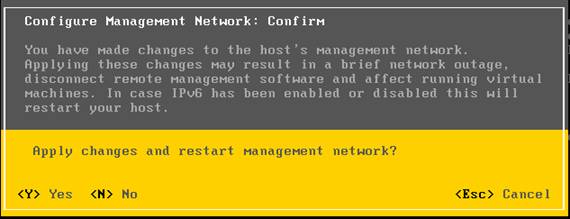
Figure 6: Restarting the ESXi management network
These are the minimal changes you will make on an ESXi server but I encourage you to explore other configurations that you can set and logs that you can view inside the DCUI.
Читайте также: