
Metered network warning in outlook исправить
If you see a warning message on your outlook 2016, 2019 and Office 365 versions saying that “We noticed the metered connection you’re on may charge extra. Outlook is working offline to prevent date charge,” and Outlook goes to offline mode without sending and receiving emails; this post shows how to fix it.
Once the Metered Network is active on Windows 10 or Windows 11 computers, even the OneDrive will stop syncing files and updating the changes.
What metered network is?
The idea of ‘Metered Network’ is to limit the usage of the 3G/4G/5G network on your Windows 10 laptop. If you have a mobile data package and using it on a computer, then these settings become sensible and handy to reduce the data usage and cost. But, what is the point in using it on normal Wi-Fi or cable network?
Windows 11 metered network is a feature that limits the amount of data you can download and upload over a period of time. It’s very useful for people with limited data plans, or those who want to save on their internet bill.
For some reason, if the Metered Network is enabled by the user accidentally or purposely, follow the below steps to disable it (if you are not using mobile data SIM-based internet)
The Warning and Status
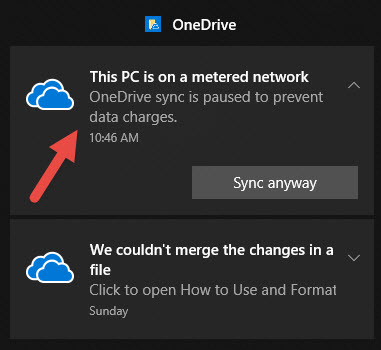
Here is the Outlook status. You can press ‘Connect Anyway’ to make it work. But, after some time it will stop again, or once you close and reopen the Outlook, it will go to offline mode with the same warning.

OneDrive goes to pause mode once it detects the Metered network.
The app may not indicate the reason, but you can view it in the notification area. If Outlook and OneDrive become offline at the same time, then Metered Network is the culprit.
How to Disable Metered Network in Windows 11/10 to Fix Outlook/OneDrive Issue
Verify the connection type your computer connected, is it Wi-Fi or cable LAN network?
Even you need to consider whether you are using the mobile phone data (4G/5G) SIM or connecting through the hotspot of a smartphone.
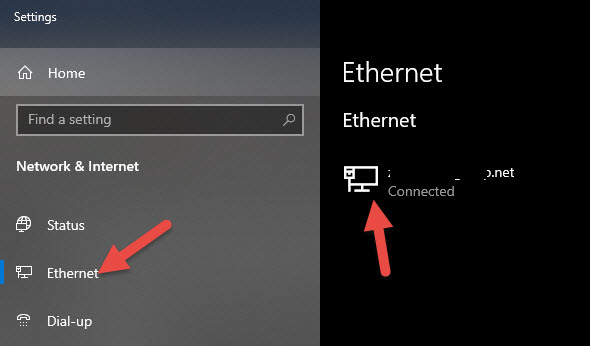
1) Search for ‘Network’ and go to the Network settings app.
2) Select the network type you are connected to; in this case, it is my local network via cable.
3) Opening the connection will take you to the next screen where you will see the Metered connection. It should be disabled here, if not, disable (off) it as below.
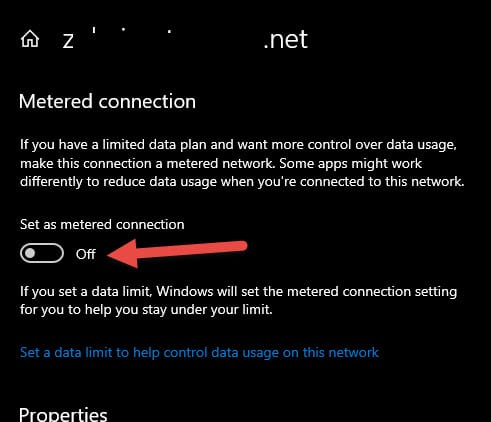
That was the easiest method to disable metered network on a Windows computer.
Other Solution
For some reason, if the GUI settings are not working to disable the Metered connection, follow the below registry modification. Make sure to take the backup of the Registry if you are modifying it the first time in your life.
a) Open Registry (type ‘Regedit’ to search) and locate the below location.
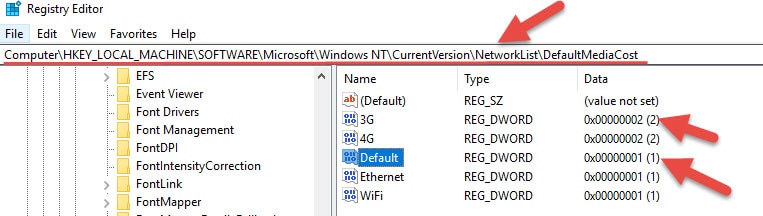
b) Under DefaultMediaCost, you will find the type of the possible connections and 1 or 2 as the data.
1 – it is an unmetered network
2 – it is a metered network.
c) Change the settings accordingly to the proper network connection. In my case, the Ethernet should have 1, which means it is unmetered. Since I changed it already via the GUI, it is 1 already. Identify your connection type and make it to 1 to disable the metered network. That will bring back your Outlook and Onedrive online.
Should you enable metered network or not?
The answer to this question really depends on your needs and preferences. If you have a limited data plan, then the metered network is definitely something you should consider using. It can help you save on your internet bill by limiting the amount of data you can download and upload. However, if you don’t have a limited data plan, the metered network may not be as useful for you.
In this blog post, we discussed what metered network is, how to disable it, and whether or not you should enable it. Also, both solutions provided in this guide will be useful to bring back the Outlook and OneDrive online on a Windows 11/10 computer. Luckily, without restarting the computer and application, the Outlook and OneDrive detected the changes and connected back to the Internet.
Dinesh
Dinesh is the founder of Sysprobs and written more than 400 articles. Enthusiast in Microsoft and cloud technologies with more than 15 years of IT experience.
In Outlook for Microsoft 365, Microsoft Outlook 2016, or Microsoft Outlook 2013, you experience one or more of the following symptoms:
New email messages aren't received.
When you try to send an email message, it isn't sent. Instead, it remains in the Outbox.
When you try to configure a new Outlook profile by using an IMAP account, you receive the following error message:
Internal MAPI error: The profile does not contain the requested service. Contact your administrator.
When you select File in Outlook 2016, the following warning messages are displayed:
- Tap or click the network icon and turn on Airplane mode to go offline
- Connect to a WiFi or LAN network that isn't metered
- Check the status of your data plan with your mobile operator
Upgrade in Progress
Your mailbox is currently being optimized as part of an upgrade to Outlook 2016. This one-time process may take more than 15 minutes to finish, and performance may be affected while the optimization is in progress.

Resolution
To fix these issues for Outlook for Microsoft 365, update your Office installation to version 2008 (Build 13127.20508) or a later version.
- Open any Office application, such as Outlook or Word.
- Select File, and then select Office Account or Account.
- Check the version number that is listed under Office Updates. If the version is earlier than 2008, select Update Options, and then select Update Now.
For more information about update channels for Office 365 clients, see Update history for Microsoft 365 Apps (listed by date).
If updating the Office installation does not fix the issues, use one of the methods that are listed in the "Workaround" section.
There is no resolution for Outlook 2016 and Outlook 2013 at this time. Use the appropriate workarounds for these products.
Workaround
For Outlook for Microsoft 365 and Outlook 2016
To work around these issues, try Method 1 first. If that doesn't fix the issues, try Method 2.
Method 1: Delete the SecurityManager key in the registry
The issues might be caused by the registry values under this subkey:
Delete the SecurityManager key and its subkeys in the registry.
Follow the steps in this section carefully. Serious problems might occur if you modify the registry incorrectly. Before you modify it, back up the registry for restoration in case problems occur.
Start Registry Editor.
- For Windows 10, Windows 8.1, and Windows 8: Press Windows logo key+R to open a Run dialog box. Type regedit.exe, and then select OK.
- For Windows 7: Select Start, type regedit.exe in the search box, and then press Enter.
In Registry Editor, locate the following subkey in the registry:
Right-click the SecurityManager key, and select Permissions.
Select Advanced, and select the Replace all child object permission entries with inheritable permission entries from this object check box.
Select OK.
Select yes if you receive the following notification: "This will replace explicitly defined permissions on all descendants of this object with inheritable permissions from . Do you wish to continue?
Select OK.
Right-click the SecurityManager key, and select Delete to delete the SecurityManager key and the subkeys.
Exit Registry Editor.
Repair the Office application, and check whether the issues have been resolved.
Method 2: Stop third-party applications that access MAPISVC.inf file
These issues may also be caused by third-party applications that access MAPISVC.inf and prevent Outlook from setting up the Account Manager. To mitigate this situation, stop the applications and processes that may be affecting MAPISVC.inf.
Use Process Monitor to see the processes that are accessing MAPISVC.inf. If a process displays a SHARING_VIOLATION on MAPISVC.inf, it indicates that the associated application is likely to be responsible for the issues. For instance, RepMgr.exe (C:\Program Files\Confer\RepMgr.exe) is an application that is known to cause these issues. Stop this process if you see it in Process Monitor.
Third-party information disclaimer
The third-party products that this article discusses are manufactured by companies that are independent of Microsoft. Microsoft makes no warranty, implied or otherwise, about the performance or reliability of these products.
For Outlook 2013
To work around these issues, try Method 1 first. If that doesn't fix the issues, try Method 2.
Method 1: Verify permissions in the registry
In some cases, the issues are related to a permissions issue in the registry. To determine whether this is the cause of the issues and then fix them, follow these steps:
Start Registry Editor.
- For Windows 10, Windows 8.1 and Windows 8: Press Windows logo key+R to open a Run dialog box. Type regedit.exe, and then select OK.
- For Windows 7: Select Start, type regedit.exe in the search box, and then press Enter.
In Registry Editor, locate and right-click the following subkey in the registry, and then select Permissions:
Under Group or user names, find your own user name or a group that you're a member of (such as Users or Administrators).
If you're unsure about which groups your user account is a member of, follow these steps:
Open Control Panel.
From Category view, select User Accounts, and then select User Accounts again.
Select Manage User Accounts.
In the User Accounts window, find your User Name, and review the groups that are listed in the Group column.
You may have to expand the Group column to view all the groups.
When you are finished, select Cancel.
If you do not see a group that you're a member of or your own user name listed in the permissions list, select Add, and then add your own user account.
Select OK.
Select your user name or the group that you're a member of.
View the permissions for your user name or group, and make sure that the Read permission has Allow selected.
Select OK.
Exit Registry Editor.
Method 2: Run a repair of Office
Follow the steps in the following article to repair your Office installation. This method is most appropriate for MSI-based installations of Office. To determine whether your Office installation is Click-to-Run or MSI-based, see the "More information" section.
More information
To determine whether your Office installation is Click-to-Run or MSI-based, follow these steps:
В Outlook для Microsoft 365 microsoft Outlook 2016 или Microsoft Outlook 2013 вы испытываете один или несколько следующих симптомов:
Внутренняя ошибка MAPI. Профиль не содержит запрашиваемую службу. Обратитесь к администратору.
Обновление в прогрессе
В настоящее время ваш почтовый ящик оптимизирован в рамках обновления Outlook 2016. Этот разовая процедура может занять более 15 минут, и производительность может быть затронута во время оптимизации.
Решение
Чтобы устранить эти проблемы для Outlook для Microsoft 365, обновите установку Office версии 2008 (сборка 13127.20508) или более поздней версии.
- Откройте приложение Office, например Outlook или Word.
- Выберите Файл, а затем Учетная запись Office или Учетная запись.
- Проверьте номер версии, указанный в Office Updates. Если версия находится раньше 2008 г., выберите Параметры обновления и выберите Update Now.
Дополнительные сведения о каналах обновления для Office 365 клиентов см. в Приложения Microsoft 365 обновления (перечислены по дате).
Если обновление Office не устраняет проблемы, используйте один из методов, перечисленных в разделе "Обходное решение".
Разрешение для Outlook 2016 и Outlook 2013 года в настоящее время не существует. Используйте соответствующие обходные пути для этих продуктов.
Обходной путь
Для Outlook для Microsoft 365 и Outlook 2016
Чтобы решить эти проблемы, сначала попробуйте метод 1. Если это не устраняет проблемы, попробуйте Метод 2.
Метод 1. Удаление ключа SecurityManager в реестре
Проблемы могут быть вызваны значениями реестра в этом подкайке:
Удалите ключ SecurityManager и его подзарядки в реестре.
Точно следуйте всем указаниям из этого раздела. Внесение неправильных изменений в реестр может привести к возникновению серьезных проблем. Перед его изменением необходимо создать реестр для восстановления в случае возникновения проблем.
Закройте приложение Outlook.
Начните редактор реестра.
- Для Windows 10, Windows 8.1 и Windows 8: нажмите клавишу Windows+R, чтобы открыть диалоговое окно Run. Введитеregedit.exe, а затем выберите ОК.
- Для Windows 7**: Выберите начните**, введитеregedit.exe в поле поиска и нажмите кнопку Ввод.
В редакторе реестра найдите в реестре следующие подкайки:
Щелкните правой кнопкой мыши клавишу SecurityManager и выберите Разрешения.
Выберите Advanced и замените все записи разрешений на объекты для детей на наследуемые записи разрешений из этого контрольного окна объекта.
Выберите да , если вы получите следующее уведомление: "Это заменит явно определенные разрешения для всех потомков этого объекта на наследуемые разрешения от . Хотите продолжить?
Щелкните правой кнопкой мыши клавишу SecurityManager и выберите Удаление , чтобы удалить ключ SecurityManager и подзарядки.
Редактор реестра exit.
Отремонтировать Office и проверить, устранены ли проблемы.
Метод 2. Остановка сторонних приложений, которые имеют доступ к файлу MAPISVC.inf
Эти проблемы также могут быть вызваны сторонними приложениями, которые имеют доступ к MAPISVC.inf и не Outlook настройки диспетчера учетных записей. Чтобы смягчить эту ситуацию, остановите приложения и процессы, которые могут повлиять на MAPISVC.inf.
Используйте process Monitor , чтобы увидеть процессы, которые имеют доступ к MAPISVC.inf. Если процесс отображает SHARING_VIOLATION MAPISVC.inf, это указывает на то, что связанное приложение, скорее всего, будет отвечать за проблемы. Например, RepMgr.exe (C:\Program Files\Confer\RepMgr.exe) — это приложение, которое, как известно, вызывает эти проблемы. Остановите этот процесс, если вы увидите его в Process Monitor.
Заявление об отказе от ответственности за сведения о продуктах сторонних производителей
В этой статье упомянуты программные продукты независимых производителей. Корпорация Майкрософт не дает никаких гарантий, подразумеваемых и прочих, относительно производительности и надежности этих продуктов.
Outlook 2013
Чтобы решить эти проблемы, сначала попробуйте метод 1. Если это не устраняет проблемы, попробуйте Метод 2.
Метод 1. Проверка разрешений в реестре
В некоторых случаях проблемы связаны с проблемой разрешений в реестре. Чтобы определить, является ли это причиной проблем, а затем устранить их, выполните следующие действия:
Закройте приложение Outlook.
Начните редактор реестра.
- Для Windows 10, Windows 8.1 и Windows 8: нажмите клавишу Windows+R, чтобы открыть диалоговое окно Run. Введитеregedit.exe, а затем выберите ОК.
- Для Windows 7**: Выберите начните**, введитеregedit.exe в поле поиска и нажмите кнопку Ввод.
В редакторе реестра найдите и щелкните правой кнопкой мыши следующую подки в реестре, а затем выберите Разрешения:
В соответствии с именами групп или пользователей найдите собственное имя пользователя или группу, в которую вы входите (например, пользователи или администраторы).
Если вы не уверены, в каких группах входит учетная запись пользователя, выполните следующие действия:
Откройте панель управления.
Из представления категории выберите учетные записи пользователей и снова выберите учетные записи пользователей.
Выберите Управление учетной записью пользователя.
В окне Учетные записи пользователей найдите имя пользователя и просмотрите группы, перечисленные в столбце Group .
Возможно, вам придется расширить столбец Group , чтобы просмотреть все группы.
По завершению выберите Отмена.
Если вы не видите группу, в которую вы входите, или собственное имя пользователя, перечисленное в списке разрешений, выберите Добавить, а затем добавить собственную учетную запись пользователя.
Выберите имя пользователя или группу, в которую вы входите.
Просмотр разрешений для имени пользователя или группы и убедитесь, что разрешение на чтение позволяет выбрано.
Закройте редактор реестра.
Метод 2. Выполнить ремонт Office
Выполните действия в следующей статье для восстановления Office установки. Этот метод наиболее подходит для установок на основе MSI Office. Чтобы определить, является ли Office установка на основе click-to-Run или MSI, см. в разделе "Дополнительные сведения".
Дополнительные сведения
Чтобы определить, является ли Office установка на основе click-to-Run или MSI, выполните следующие действия:
I’m using various Internet connection methods for my laptop depending on where I am. For instance I use:
- Shared LAN via a network cable
- Wifi/WLAN via an access station
- 3G/4G via a USB dongle
On some connections I get a metered network warning and Outlook doesn’t connect automatically to save costs. As I have Outlook running in the background, I often don’t even notice and miss my notifications.
How can I force Outlook to always connect regardless of the connection type?
Windows has the ability to assign “costs” to network connections and Outlook requests these costs before connecting to the mail server. When Windows doesn’t report “unrestricted” for the connection, then Outlook will show the Metered Network warning and doesn’t automatically connect.
Unfortunately, you can’t somehow whitelist Outlook for any or all of your connections or prevent Outlook from requesting the network costs before connecting.
However, you can change the “costs” setting for your network connection so it will no longer be a metered network. For most connections you can do this via a setting in Windows but for some settings, or to change the default, you must set it via the Registry.

Metered Network Warning in Outlook. (click on image to enlarge)
Turn off Metered Network for a wireless connection
For any wireless connection, you can switch the connection between metered and non-metered in the following way;
Windows 8
- Open the Charms bar by putting your mouse in the top right corner, swipe in from the right or by pressing CTRL+C.
- Select: Settings.
- In the bottom right choose: Change PC settings
- From the left, choose: Network
- From the left, choose: Connections
- Select the connection that you want to change.
- Set the “Set as a metered connection” option to off.
Windows 10
- Start-> Settings-> Network & Internet
- Click on the “Advanced options” link below your current connection.
- Set the “Set as a metered connection” option to off.

Metered Connection option for Wireless Networks in Windows 10.
Set default Metered Network setting for each connection method
When you frequently change connections you may want to change the default “costs” setting in the Registry. This also applies to certain USB modems that expose themselves as metered Ethernet connections which you can’t change via normal methods.
Key: HKEY_LOCAL_MACHINE\SOFTWARE\Microsoft\Windows NT\CurrentVersion\NetworkList\DefaultMediaCost
Value name: 3G
Value name: 4G
Value name: Default
Value name: Ethernet
Value name: Wifi
Value type: REG_DWORD
Value: 1
Setting the value to 1 means it is an unmetered network connection.
Setting the value to 2 means it is a metered network connection.

Default costs set in the Registry for each network connection method.
Users who are disturbed with Outlook Metered Network Warning in Windows 10 can now disable it in simple steps. The metered network warning often happens when the system is connected over wifi networks like a mobile hotspot. While working on Outlook the message is generally displayed the network connection is a metered network. Here are the steps on how you can turn off the metered network warning in windows 10.
Outlook and Windows 10 both are the product of Microsoft and the company thinks of its users while creating a product. Hence to simplify the process one can turn off metered network connection warning from Network settings. Users just simply follow the process in order and get rid of Outlook Metered Network Warning.
Also Read:
Turn Off Metered Network Connection in Windows 10
Method 1: Disable Metered Connection From Windows Settings
Hear how you can simply switch off the network warning in windows
- When you are on a Windows 10 system then go to start menu
- Now move the cursor to the settings tab and click on it
- Go to Network and Internet settings and look for the wifi you are connected to
- Click on the Wifi network to change the settings
- Now a list of options for the current network will appear
- Scroll down the screen and look for a metered connection
- Now slide the button towards off to turn off metered connection
- Click on the Apply button to make changes
Method 2: Editing Registry Key
One can also change the metered connection settings from the registry key editor also. Here are the steps involved-
Metered connection warning is generally displayed when we are connected to a network that has a limited data plan like your mobile hotspot. Turning it on reduces the data usage for some apps and they might behave abruptly. Show it is good to turn it off if you are not concerned with a data limit. Thus by following the above steps outlook users can disable metered connection warning in Windows 10.
Читайте также: