Как войти в bios microsoft surface
Нажмите и удерживайте кнопку увеличения громкости на планшете Surface. и одновременно нажмите и отпустите кнопку питания. Когда вы увидите логотип Surface, отпустите кнопку увеличения громкости. Меню UEFI отобразится в течение нескольких секунд.
Как попасть в меню загрузки на Surface?
После выключения Surface нажмите и удерживайте кнопку увеличения громкости. Удерживая нажатой кнопку увеличения громкости, нажмите и отпустите кнопку питания. Продолжайте удерживать кнопку увеличения громкости, пока логотип Surface или Windows не исчезнет с экрана. Теперь вы должны увидеть Surface UEFI.
Есть ли у Microsoft Surface BIOS?
Унифицированный расширяемый интерфейс микропрограмм Surface (UEFI) заменяет стандартная базовая система ввода / вывода (BIOS) с новыми функциями, включая более быстрый запуск и улучшенную безопасность. Вы можете использовать Surface UEFI для управления функциями микропрограммы на вашем Surface.
Что можно делать с Surface RT?
Windows RT включает в себя большинство стандартных настольных программ Windows, которые поставляются с Windows. Вы можете использовать Internet Explorer, Проводник, Удаленный рабочий стол, Блокнот, Краска, и другие инструменты, но нет проигрывателя Windows Media. Windows RT также поставляется в комплекте с настольными версиями Word, Excel, PowerPoint и OneNote.
Что такое режим UEFI?
Унифицированный расширяемый интерфейс микропрограмм (UEFI) общедоступная спецификация, определяющая программный интерфейс между операционной системой и прошивкой платформы.. … UEFI может поддерживать удаленную диагностику и ремонт компьютеров, даже если операционная система не установлена.
Что такое настройка BIOS?
Что такое БИОС? BIOS или базовая система ввода / вывода - самая важная программа запуска вашего ПК. встроенное программное обеспечение базового процессора, отвечающее за загрузку вашей системы. Обычно BIOS встраивается в ваш компьютер в виде микросхемы материнской платы и играет роль катализатора функциональных возможностей ПК.
Как попасть в меню загрузки на Surface Pro 3?
1 Как получить доступ к настройкам UEFI Surface Laptop 3?
- Выключите ноутбук Surface 3.
- Нажмите и удерживайте клавишу увеличения громкости (F4) на планшете Surface, затем нажмите и отпустите клавишу питания рядом с клавишей Del.
- Когда вы увидите логотип Surface, отпустите кнопку увеличения громкости. Экран Surface UEFI появится через несколько секунд.
Может ли Surface RT работать под управлением Windows 10?
Устройства Microsoft Surface под управлением Windows RT и Windows RT 8.1 не получат обновления Windows 10 компании, а вместо этого будут получать обновление только с некоторыми из его функций.
Сколько лет UEFI?
Первая итерация UEFI была задокументирована для общественности. в городе 2002 Intel за 5 лет до его стандартизации в качестве многообещающей замены или расширения BIOS, но также и в качестве собственной операционной системы.
Surface Unified Extensible Firmware Interface (UEFI) replaces the standard basic input/output system (BIOS) with new features including faster startup and improved security. You can use Surface UEFI to manage the firmware features on your Surface.
These Surface models use the new firmware UEFI interface:
Surface Pro 6, Surface Pro 7, Surface Pro 7+, Surface Pro 8, Surface Pro X
Surface Laptop 2, Surface Laptop 3, Surface Laptop 4, Surface Laptop Go, Surface Laptop Studio, Surface Laptop SE
Surface Studio 2
Surface Book 2, Surface Book 3
Surface Go 2, Surface Go 3
Note: If you don't see your device listed, switch to the Windows 10 tab at the beginning of this article.
Select the menu option that you want to learn more about.
Important: Under normal circumstances, there’s no need for you to change UEFI settings. If you change these settings, you risk the security and functionality of your Surface.
How to get to the UEFI settings on a Surface

Note: This video is available in English only.
You can adjust the UEFI settings only during system startup. To load the UEFI firmware settings menu:
Shut down your Surface and wait about 10 seconds to make sure it's off.
Press and hold the volume-up button on your Surface, and, at the same time, press and release the power button.
The Microsoft or Surface logo appears on your screen. Continue to hold the volume-up button. Release the button once the UEFI screen appears.
You can also load the UEFI firmware settings menu through Windows. To do this:
Select Start > Settings > System > Recovery .
Next to Advanced startup, select Restart Now.
Under Choose an option, select Troubleshoot > Advanced Options > UEFI Firmware Settings, and then select Restart.
UEFI menu options
The UEFI settings you can modify depend on which Surface you have.
PC information

In the PC information section, you can see important information about your Surface, such as the universally unique identifier (UUID), serial number, and firmware version. You can use this information for troubleshooting or for working with warranty support.
Security

In the Security section, you can set or change your UEFI password, turn Secure Boot on or off, and change your Simultaneous Multithreading (SMT) settings. Typically, only enterprises will need to change security settings—the default, out-of-the-box settings will be perfect for most users.
Note: UEFI passwords are used primarily by enterprises and IT professionals to limit the types of changes that employees can make to their devices. If you're part of an enterprise, contact your IT administrator if you have any questions or issues with your UEFI password. If you aren't part of an enterprise and choose to create a UEFI password, make sure to document your password in a safe place. You can't reset your UEFI password, and Microsoft can't retrieve it.
Devices

In the Devices section, you can turn on or off various connected devices and hardware on your Surface, such as the infrared (IR) camera, Bluetooth ® , and on-board audio.
If you turn off hardware in the Surface UEFI, you can’t turn it back on in Windows. You must turn it back on in the Surface UEFI.
The Devices menu doesn't appear on Surface Pro X.
Boot configuration

In the Boot configuration section, you can change how your Surface boots into Windows.
If your Surface is part of an enterprise, these settings may be locked or configured to your enterprise specifications. Contact your IT administrator for more information. If you aren't part of an enterprise, the default, out-of-the-box settings should be perfect for you.
Note: If you accidentally delete Windows Boot Manager from your Master Boot Record, simply restart your Surface and Windows Boot Manager will reinstall automatically. If you delete Windows Boot Manager and your Surface is part of an enterprise, contact your IT administrator for support.
Date and time

In the Date and Time section, you can manually enter a new date and time.
About

Displays regulatory information. For more info, see Product safety warnings and instructions.
Select Exit > Restart now to save your changes and restart your Surface.
Related topics
Surface Unified Extensible Firmware Interface (UEFI) replaces the standard basic input/output system (BIOS) with new features including faster startup and improved security. You can use Surface UEFI to manage the firmware features on your Surface.
These Surface models use the new firmware UEFI interface:
Surface Pro 4, Surface Pro (5th Gen), Surface Pro 6, Surface Pro 7, Surface Pro 7+, Surface Pro X
Surface Laptop (1st Gen), Surface Laptop 2, Surface Laptop 3, Surface Laptop 4, Surface Laptop Go
Note: Some products might not be available in your country or region.
Use the latest firmware interface, the Unified Extensible Firmware Interface (UEFI).
UEFI offers new features including faster startup and improved security. It replaces BIOS (basic input/output system).
More recent Surface devices use a new UEFI called Surface UEFI. For more info, including info about which specific devices use it, see How to use Surface UEFI.
For Surface Pro, Surface Pro 2, Surface Pro 3, and Surface 3
Important: Under normal circumstances, there’s no need for you to change UEFI settings. If you change these settings, you risk the security of your Surface. But if you ever need access to the firmware features of your Surface, here's the basic info:
What firmware features can I use?
You can access the following firmware features on any Surface Pro model or Surface 3:
Secure Boot Control. Secure Boot technology blocks the loading of uncertified bootloaders and drives.
Trusted Platform Module (TPM). TPM technology provides a major advancement over BIOS in hardware-based security features.
How do I get to the UEFI settings?
Video: Get to UEFI settings on a Surface
Note: This video is available in English only.
The UEFI settings can be adjusted only during system startup. To load the UEFI firmware settings menu:
Shut down your Surface.
Press and hold the volume-up button on your Surface and at the same time, press and release the power button.
When you see the Surface logo, release the volume-up button.
The UEFI menu will display within a few seconds.
UEFI menu options
Which UEFI settings you can modify depends on which Surface model you have.
Surface Pro or Surface Pro 2
Trusted Platform Module (TPM)
The currently configured state of TPM (Enabled or Disabled) is highlighted. To change the state, select the other one. When you’re finished, select Exit Setup > Yes.
Secure Boot Control
The currently configured state of Secure Boot (Enabled or Disabled) is highlighted. To change the state, select the other one. When you’re finished, select Exit Setup > Yes.
Delete All Secure Boot keys
To delete all of the installed Secure Boot keys, including the default ones that were installed with Windows, select Yes. When you’re finished, select Exit Setup > Yes.
Note: When Secure Boot keys are deleted, Windows displays a red screen during startup.
Install Default Secure Boot Keys
To reinstall all of the Secure Boot keys that were originally installed with Windows (and only those), select Yes. When you’re finished, select Exit Setup > Yes.
Surface Pro 3
Note: If you enter the administrator password incorrectly three times, you’ll be locked out of the UEFI. Restart your Surface to enter the password again.
Trusted Platform Module (TPM)
The currently configured state of TPM (Enabled or Disabled) is highlighted. To change the state, select the other one. When you’re finished, select Exit Setup > Yes.
Secure Boot Control
Select Secure Boot Control to enable or disable this feature. When Secure Boot Control is enabled, you have two additional options:
If Secure Boot keys are installed, you can delete them by selecting Delete All Secure Boot Keys.
If Secure Boot keys aren't installed, you can select Install All Factory Default Keys and select either Windows & 3rd-party UEFI CA (Default) or Windows only.
Configure Alternate System Boot Order
To choose the order in which your Surface boots, select Configure Alternate System Boot Order and select one of the following options:
Network -> USB -> SSD
USB -> Network -> SSD
Network -> SSD
Advanced Device Security
This option lets you disable ports and features you don’t want anyone to use. For example, you can disable the microSD card reader so no one can use a microSD card to copy data.
The current setting appears in bold. Select Advanced Device Security and select the option you want:
Note: Selecting Side USB disables the ability to boot from a USB device. The USB port remains enabled in Windows.
Note: Disabling Wi-Fi also disables the Bluetooth ® .
Network Boot
Docking Port
Front Camera
Rear Camera
OnBoard Audio
Device Information
This option displays your Surface’s universally unique identifier (UUID) and serial number.
Administrator Password
This option lets you create a password to prevent others from changing the UEFI settings. Organizations that need to protect sensitive information typically use an administrator password.
Save and exit. To save your changes and exit, select Exit Setup > Yes.
Exit without saving. To exit without saving your changes when you’re using a Surface Typing Cover, press Esc and select Yes. If you aren’t using a Cover, press the power button.
Surface 3
Trusted Platform Module (TPM)
The currently configured state of TPM (Enabled or Disabled) is highlighted. To change the state, select the other one. When you’re finished, select Exit Setup.
Secure Boot Control
Select Secure Boot Control to enable or disable this feature. While Secure Boot Control is enabled, you have the following additional option:
If Secure Boot keys are installed, you can delete them by selecting Delete All Secure Boot Keys.
Configure Alternate System Boot Order
To select the order in which your Surface boots, select Configure Alternate System Boot Order and select one of the following options:
Network -> USB -> SSD
USB -> Network -> SSD
Network -> SSD
Administrator Password
This option lets you create a password to prevent others from changing the UEFI settings. Organizations that need to protect sensitive information typically use an administrator password.
Save and exit. To save your changes and exit, select Exit Setup > Yes.
Exit without saving. To exit without saving your changes when you’re using a Surface Typing Cover, press Esc and select Yes.
Surface Unified Extensible Firmware Interface (UEFI) replaces the standard basic input/output system (BIOS) with new features including faster startup and improved security. You can use Surface UEFI to manage the firmware features on your Surface.
These Surface models use the new firmware UEFI interface:
Surface Pro 6, Surface Pro 7, Surface Pro 7+, Surface Pro 8, Surface Pro X
Surface Laptop 2, Surface Laptop 3, Surface Laptop 4, Surface Laptop Go, Surface Laptop Studio, Surface Laptop SE
Surface Studio 2
Surface Book 2, Surface Book 3
Surface Go 2, Surface Go 3
Note: If you don't see your device listed, switch to the Windows 10 tab at the beginning of this article.
Select the menu option that you want to learn more about.
Important: Under normal circumstances, there’s no need for you to change UEFI settings. If you change these settings, you risk the security and functionality of your Surface.
How to get to the UEFI settings on a Surface
Note: This video is available in English only.
You can adjust the UEFI settings only during system startup. To load the UEFI firmware settings menu:
Shut down your Surface and wait about 10 seconds to make sure it's off.
Press and hold the volume-up button on your Surface, and, at the same time, press and release the power button.
The Microsoft or Surface logo appears on your screen. Continue to hold the volume-up button. Release the button once the UEFI screen appears.
You can also load the UEFI firmware settings menu through Windows. To do this:
Select Start > Settings > System > Recovery .
Next to Advanced startup, select Restart Now.
Under Choose an option, select Troubleshoot > Advanced Options > UEFI Firmware Settings, and then select Restart.
UEFI menu options
The UEFI settings you can modify depend on which Surface you have.
PC information
In the PC information section, you can see important information about your Surface, such as the universally unique identifier (UUID), serial number, and firmware version. You can use this information for troubleshooting or for working with warranty support.
Security
In the Security section, you can set or change your UEFI password, turn Secure Boot on or off, and change your Simultaneous Multithreading (SMT) settings. Typically, only enterprises will need to change security settings—the default, out-of-the-box settings will be perfect for most users.
Note: UEFI passwords are used primarily by enterprises and IT professionals to limit the types of changes that employees can make to their devices. If you're part of an enterprise, contact your IT administrator if you have any questions or issues with your UEFI password. If you aren't part of an enterprise and choose to create a UEFI password, make sure to document your password in a safe place. You can't reset your UEFI password, and Microsoft can't retrieve it.
Devices
In the Devices section, you can turn on or off various connected devices and hardware on your Surface, such as the infrared (IR) camera, Bluetooth ® , and on-board audio.
If you turn off hardware in the Surface UEFI, you can’t turn it back on in Windows. You must turn it back on in the Surface UEFI.
The Devices menu doesn't appear on Surface Pro X.
Boot configuration
In the Boot configuration section, you can change how your Surface boots into Windows.
If your Surface is part of an enterprise, these settings may be locked or configured to your enterprise specifications. Contact your IT administrator for more information. If you aren't part of an enterprise, the default, out-of-the-box settings should be perfect for you.
Note: If you accidentally delete Windows Boot Manager from your Master Boot Record, simply restart your Surface and Windows Boot Manager will reinstall automatically. If you delete Windows Boot Manager and your Surface is part of an enterprise, contact your IT administrator for support.
Date and time
In the Date and Time section, you can manually enter a new date and time.
About
Displays regulatory information. For more info, see Product safety warnings and instructions.
Select Exit > Restart now to save your changes and restart your Surface.
Related topics
Surface Unified Extensible Firmware Interface (UEFI) replaces the standard basic input/output system (BIOS) with new features including faster startup and improved security. You can use Surface UEFI to manage the firmware features on your Surface.
These Surface models use the new firmware UEFI interface:
Surface Pro 4, Surface Pro (5th Gen), Surface Pro 6, Surface Pro 7, Surface Pro 7+, Surface Pro X
Surface Laptop (1st Gen), Surface Laptop 2, Surface Laptop 3, Surface Laptop 4, Surface Laptop Go
In this article, you will find out how to enter the Surface Laptop 3 UEFI/BIOS settings and how to manage device boot order, devices, security and more.
UEFI or Unified Extensible Firmware Interface is a new motherboard firmware standard that allows your PC boot faster and has more security features. Starting with Surface Pro 4, Microsoft has created its own Surface UEFI for using with its future devices. This new Surface UEFI is currently used on newer devices including Surface Go, Surface Pro, Surface Laptop, Surface Book and Surface Studio.
In this article, you will find out how to get to the Surface Laptop 3 UEFI settings. You will see also how to configure the UEFI settings to improve the device security, check your device information and more.
1 How to access Surface Laptop 3 UEFI settings?
You can enter the Surface Laptop 3 UEFI setup screen only while your device is starting up. Here is how you do that:
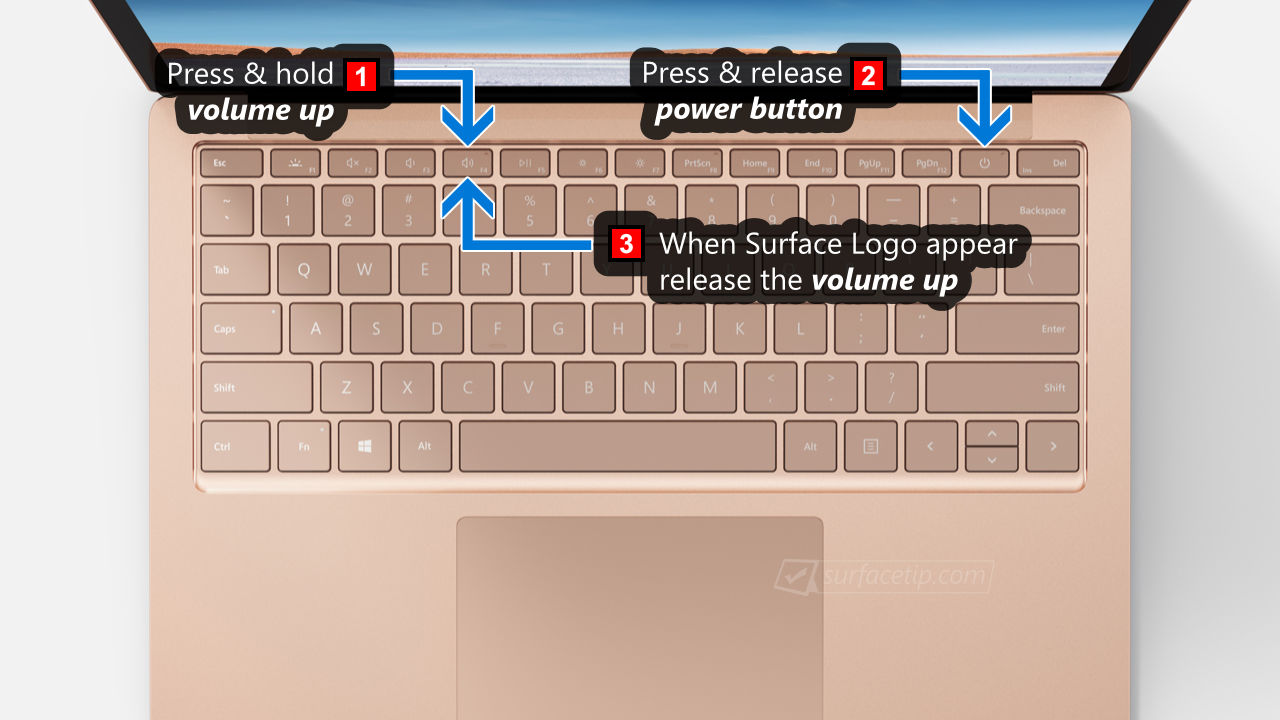
- Shut down your Surface Laptop 3.
- Press and hold the Volume Up (F4) key on your Surface, then press and release the Power Key next to the Del key.
- When you see the Surface logo appear, release the Volume Up button. The Surface UEFI screen will appear in a few seconds.
After you have made any changes to the UEFI settings, you can restart your Surface by:
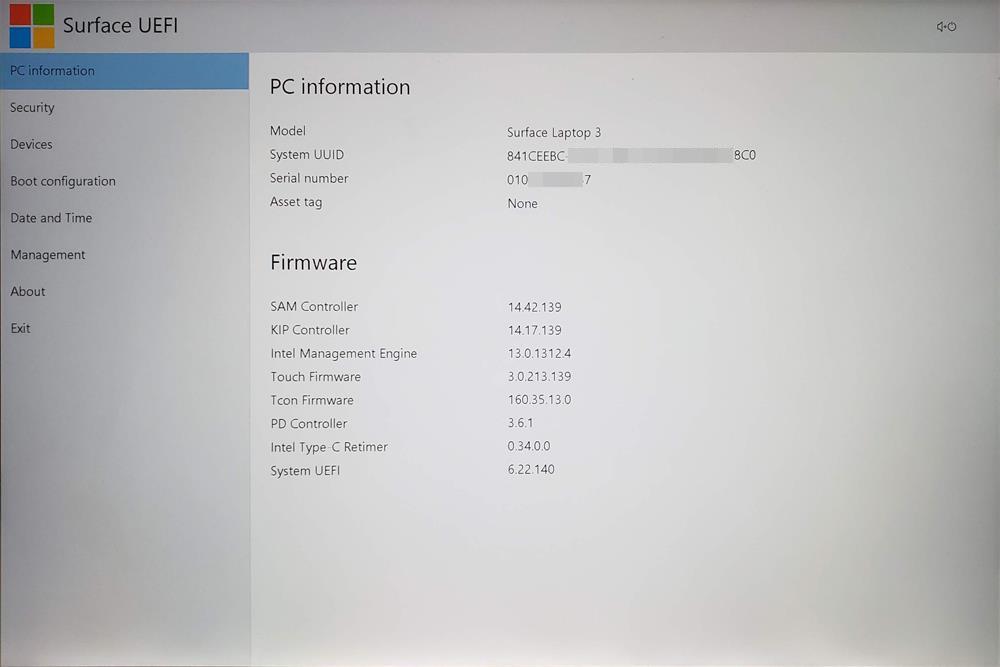
2 How to Check Your Surface Laptop 3 Device Information via UEFI settings?
The first displayed page when you enter UEFI settings is the PC information page. On the page, you can find out more information about your device identities such as Model, System UUID (Universally Unique Identifier), Serial Number, and Asset Tag. Moreover, it also displays all important system other components version that you might need for troubleshooting.
3 How to Configure Device Boot Order on the new Surface Laptop 3?
To change the alternate system boot order on your Surface Laptop 3:
On the “Configure boot device order” page, you can:
- Rearrange boot order by drag and drop any boot option available on the list.
- Enable or disable any boot option by using the checkbox
- Remove available boot options permanently by using the trash button.
Note if you accidentally delete Windows Boot Manager from your Master Boot Record, simply restart your Surface and Windows Boot Manager will reinstall automatically.
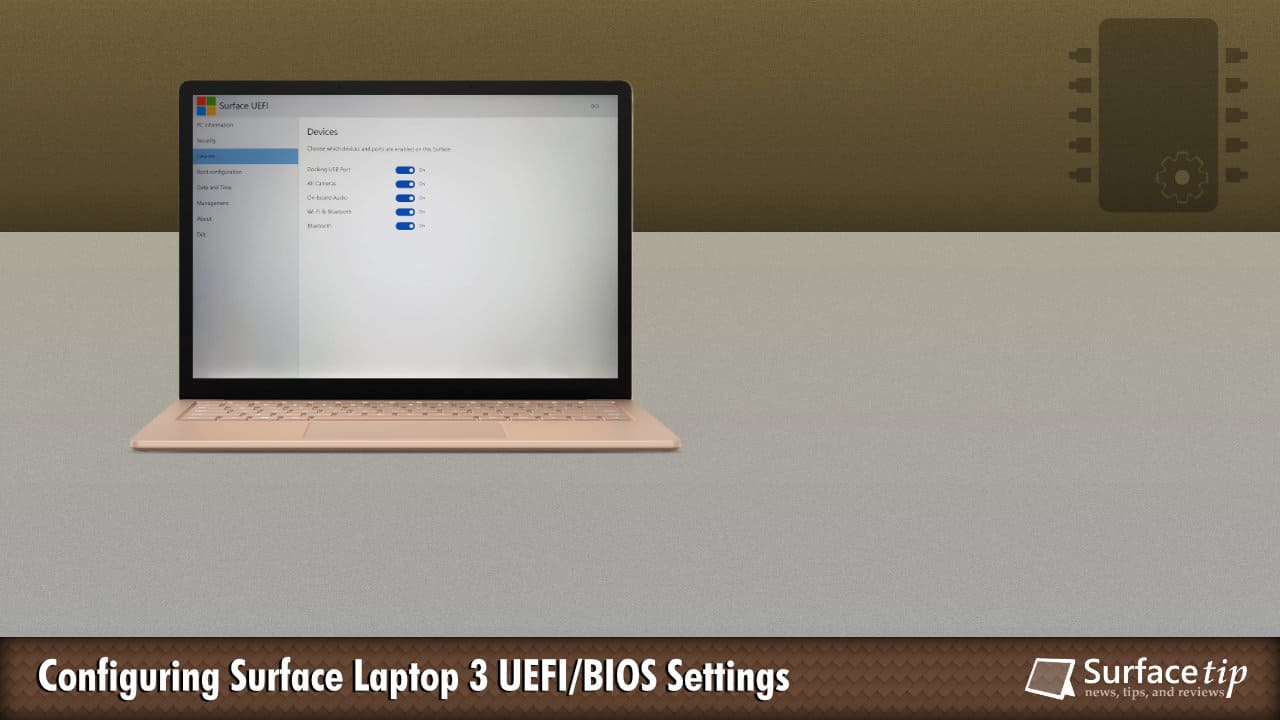
4 How to Manage Device Components on Surface Laptop 3?
Surface Laptop 3 allows you to disable some of your surface device components and features to meet your specific security requirements. You can enable or disable those components by:

- Access Surface UEFI settings as the instructions above.
- In Surface UEFI menu, go to Devices and you will see the following options:
- In my Surface Laptop 3 with System UEFI version 6.22.140, you can choose to enable or disable the following device’s components or ports:
- Docking USB Port
- All Cameras (Front Camera and IR Camera)
- On-board Audio
- Wi-Fi & Bluetooth
- Bluetooth
5 How to change your Surface Laptop 3 Date and Time via Surface UEFI?
The new Surface UEFI now allows you to set your Surface Laptop 3’s date and time right on the UEFI settings page. To check or set date and time for your Surface Laptop 3:
6 How to Protect UEFI settings with a password on Surface Laptop 3?
You can prevent others from changing your UEFI settings by setting an Administrator Password in UEFI settings. To do that:
- Enter Surface UEFI settings as the instructions above.
- Go to the Security section as below:
- To set UEFI password, click on Add or Change button and you will see the following requirements:
- You will need to enter a password in the box with your keyboard or the on-screen keyboard with the following criteria:
- Minimum Length: 6 characters
- Maximum Length: 128 characters
- May contain a combination of letters, numbers, and special characters.
Note If you enter the administrator password incorrectly three times, you’ll be locked out of the UEFI. Restart your Surface to enter the password again.
Important If you set a password for the UEFI, record it in a safe place. If you forget the password, you won’t be able to access the UEFI settings. You can only reset the administrator password from within the UEFI.
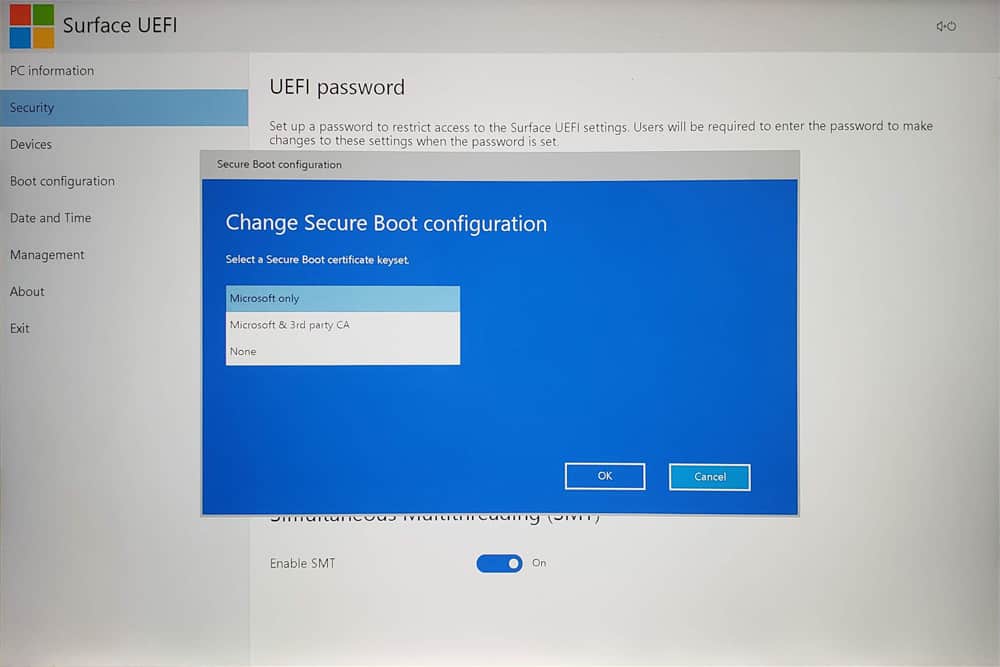
7 What is Secure Boot Control?
![Surface Laptop 3 UEFI - Security 03]()
The Secure Boot is a technology that blocks the loading of uncertified bootloaders and drives. It helps to prevent your Surface from being loaded with unauthorized operating systems and malicious software applications.
![Surface Laptop 3 UEFI - Security 04]()
If you desire to install other operating systems like Ubuntu, or other Linux distributions, you may need to disable this feature in the UEFI settings above.
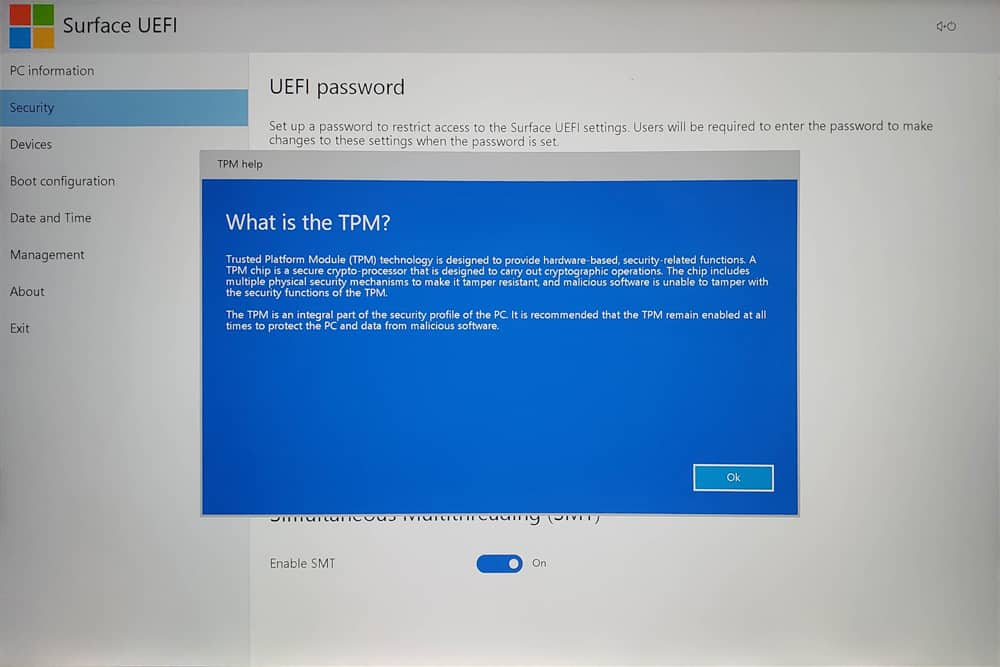
8 What is the Trusted Platform Module (TPM)?
![Surface Laptop 3 UEFI - Security 05]()
The Trusted Platform Module (TPM) is a technology that provides a major advancement over BIOS in hardware-based security features. It is a specialized chip that stores RSA encryption keys specific to each Surface device for hardware authentication.
TPM technology is a requirement of BitLocker disk encryption. The TPM helps you to encrypt/decrypt the entire disk without required your complex long passphrases. It means that the encryption key and decryption key are stored within the TPM chip. So your encrypted disks can’t be accessed on other devices.
Other Surface’s UEFI Settings
We have also covered this topic for other Surface PCs as well, to learn more about other Surface’s UEFI settings check the link below:
![Ultimate Tips and Tricks for Mastering Microsoft Surface Laptop 3]()
Ultimate Tips and Tricks for Mastering Microsoft Surface Laptop 3
Best Accessories for Microsoft Surface
With the right set of accessories, you can boost your Surface's productivity to the next level. Here we have some of the best accessories you should get for your Surface devices.
![SanDisk Extreme Micro SDXC UHS-I U3 A2 Card - 256 GB]()
SanDisk Extreme U3 A2 256GB (160MB/s)
![NEW Microsoft ARC Mouse – Sage]()
Surface Arc Mouse
![Microsoft Official Surface Pen 4096 Pressure Sensitivity, Tail Eraser, Barrel Button, Compatible for Surface Pro 5, Pro 6, Surface Go/Book/Studio/Laptop, Bluetooth 4.0 - Platinum]()
Surface Pen (4,096 pressures + tilt)
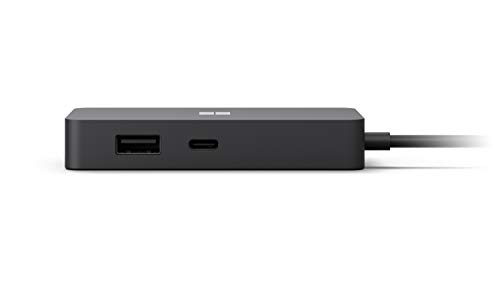
![Microsoft USB-C® 5-in-1 Travel Hub]()
Microsoft USB-C® 5-in-1 Travel Hub
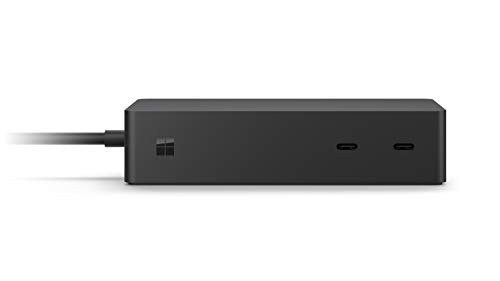
![Microsoft Surface Dock 2]()
Microsoft Surface Dock 2
![MakeTech Ultra Slim Rotatable USB Hub]()
4 Ports Rotatable USB 3.0 Hub
![Surfacekit USB Hub for Surface Pro 5/6]()
Surfacekit USB Hub
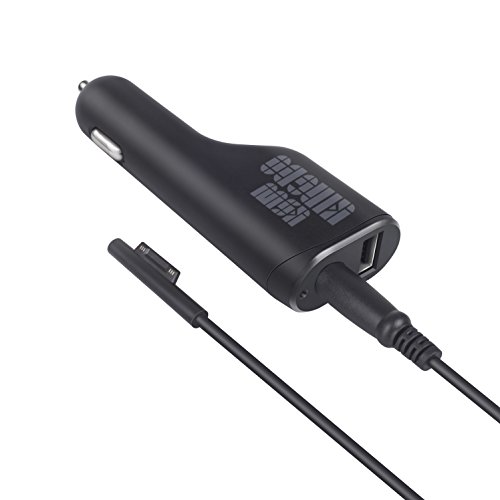
![KingDo 36W Surface Car Charger]()
36W Surface Car Charger
![Baseus 65W 20,000mAh Portable Charger]()
Baseus 20000mAh 60W PD Power Bank
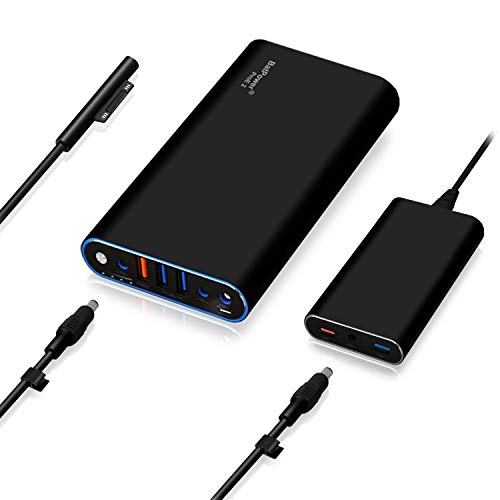
![BatPower ProE 2 External Battery Portable Charger Power Bank for Microsoft Surface]()
90W Portable Surface Charger
Those are the top must-have accessories for Microsoft Surface devices so far. With Surface Pen, Surface Dock, Surface Precision Mouse, and microSD card will significantly increase your Surface performance, storage, and productivity.
Evan Forrest
Evan Forrest is Editor-in-Chief of Surface Tip, researching and writing articles about Surface-related news, tips, and accessories. He has been using Surface devices since the first release of the original Surface Pro. He is currently using a Surface Laptop 3 as a full-time daily-driver machine. Besides that, he also owns multiple Surface devices including Surface RT, Surface 3, Surface Go/Go 2, Surface Pro 3, Surface Book, and a bunch of Surface accessories to help in research and writing articles.
COMMENTS
Let us know what you think!
We appreciate hearing your thoughts, questions, and ideas about “How to Configure Surface Laptop 3 UEFI/BIOS Settings”.
On my device Volume Up is on F4. F6 is not working as described in that case.
I have surface laptop 3 and its SSD drive was not working (showing only surface logo and stuck on that) and when try to install thru windows 10 USB it shows the disk but no option to select.
HDD replace windows installed its working fine, but when shut down and press power button after one hour it shows surace logo then off and keep on repeating it and after 10 to 15 attempts it start and works fine, Restart work fine and even if shut down and withing 5 to 10 min Start button pressed, it works fine, but only after some time it gave issue with start up.
Any one have any cluse wts the issue or any one have idea how to upgrade BIOS, its 9.106.140, 4/30/2021Leave a Reply Cancel reply
This site uses Akismet to reduce spam. Learn how your comment data is processed.
Читайте также: