
Как открыть blueprint в visual studio
Introductory information for gameplay programmers getting started with Unreal Engine.
C++ classes can be extended with Blueprints, allowing programmers to set up new gameplay classes in code that can be built upon and changed with Blueprints by level designers. There are a number of specifiers that change how a C++ class interacts with the Blueprint system, and some of them will be highlighted in this example.
Class Setup
For the first section of the class setup, a class called LightSwitchBoth is created using the C++ Class Wizard .
Most of the code setup in the LightSwitchBoth class is similar to the code in the C++ Only LightSwitch example . While you could extend the LightSwitchCodeOnly class with a Blueprint, the components, variables, and functions created in that class would not be accessible to Blueprint graphs. This example will go over the UPROPERTY() and UFUNCTION() specifiers that make LightSwitchBoth work as a template for the Blueprint that will derive from it.
You may find it helpful to first refer to the C++ Only LightSwitch example, to see how the header file and source file are set up to create the LightSwitchComponent, SphereComponent, DesiredIntensity variable, and OnOverlap function.
This header file is adapted from the C++ Only LightSwitch example to add the following functionality:
The PointLightComponent and the SphereComponent are BlueprintReadOnly, and will show up in the category Switch Components in the My Blueprint tab.
OnOverlapBegin and OnOverlapEnd are now BlueprintNativeEvents, and will show up in the category Switch Functions in the My Blueprint tab.
DesiredIntensity is BlueprintReadWrite, and will show up in the category Switch Variables in the My Blueprint tab.
DesiredIntensity is now EditAnywhere instead of VisibleAnywhere.
There is a Blueprintable specifier for the UCLASS() macro. It is not necessary in this case because LightSwitchBoth inherits directly from Actor, which is Blueprintable, and the Blueprintable specifier is inherited.
With the additional specifiers in the UPROPERTY() and UFUNCTION() macros, the header file for the LightSwitchBoth class looks like:
In the source file for LightSwitchBoth, the constructor remains the same. However, a change needs to be made to the OnOverlapBegin and OnOverlapEnd functions. These functions are now a BlueprintNativeEvent. This means that in a Blueprint derived from this class, events can be placed that override OnOverlapBegin and OnOverlapEnd , and are executed when the function would normally be called. If one of those events does not exist, the C++ implementation of the function executes instead. To make this setup work, the C++ functions need to be renamed OnOverlapBegin_Implementation and OnOverlapEnd_Implementation , respectively. The Blueprint setup will be covered later in this example.
With the change to the OnOverlapBegin and OnOverlapEnd definitions, the source file for LightSwitchBoth looks like:
If this is the first code class you have added to a blank project, you will need to close Unreal Editor, compile the project in Visual Studio or Xcode, and then open Unreal Editor and re-open the project to ensure that the game module is created and loaded properly. Also, it is important to make sure that the Build Configuration matches the version of the Unreal Editor executable you are using to open the project. Read more about build configurations and compiling projects in the Compiling Game Projects documentation.
If you are adding code to an existing C++ project, you can use the Hot Reload functionality to compile the new code within Unreal Editor.
After compiling this new class, it is possible to create a new Blueprint Class . In this case, LightSwitchBoth is chosen as the parent class for the Blueprint, which will be named LightSwitchBoth_BP.

The PointLightComponent and SphereComponent added in C++ also show in the Components tab in the Blueprint Editor. Their icons are dark blue to indicate that they are native components, inherited from the parent LightSwitchBoth class. Any new components added just to the LightSwitchBoth_BP Blueprint would have light blue icons instead. To learn more about adding and arranging components using the Components tab, see the Components tab documentation.

The Blueprint Editor's Graph panel is the core of Blueprint editing. In the Graph panel, you can add new variables , functions , and macros in the My Blueprint tab. You also have access to all the graphs contained within the Blueprint Class. In graphs, nodes are wired together to create design-time and gameplay functionality that can be driven by class variables, gameplay events, and even an Actor's surroundings.
The My Blueprint tab in Graph panel displays the PointLightComponent and the SphereComponent added in C++ to the LightSwitchBoth class. This is because of the BlueprintReadOnly specifier. Nodes for these components can be added to a graph by clicking and dragging from their names in the My Blueprint tab into the graph. These nodes can then be connected to nodes that change variables like visibility or light color. The DesiredIntensity variable also appears in the My Blueprint tab. Because it is a variable and not a component, the BlueprintReadWrite specifier was able to be used. This means it is possible to create nodes to both get and set the value of DesiredIntensity in a Blueprint graph. See the My Blueprint documentation for general usage information.
The components and variables from the parent LightSwitchBoth class might not display by default. The Show inherited variables checkbox at the bottom of the My Blueprint tab shows variables inherited from the parent class when checked.
Showing All Variables
Showing Only User-Created Variables


There are two graphs used to set up the LightSwitchBoth_BP class behavior. The first is the Construction Script graph, which contains a specialized Construction Script
Without the Construction Script setup, a new LightSwitchBoth_BP Actor would just use the LightSwitchBoth constructor. However, the Construction Script executes when the Actor is moved within the level, as well as when DesiredIntensity is changed. Using the Construction Script means that Actor variables exposed to Blueprints can be changed easily and the effects of these changes can be seen quickly.
In the LightSwitchBoth_BP class, the Construction Script event is connected to a Set Intensity node, so that the brightness of Point Light 1 (the PointLightComponent) is set to the value of DesiredIntensity when the Actor is added to or moved within the level or DesiredIntensity changes.

The other graph set up in the LightSwitch_BPOnly class is the EventGraph . Execution in the EventGraph begins from events. In this case, the OnOverlap event executes whenever the C++ function OnOverlap would be called. In the LightSwitchBoth source file, delegates were setup so OnOverlap will execute when an Actor enters or leaves the SphereComponent:
The OnOverlap event node is connected to a Set Light Color node. Whenever the event executes, it will cause the light color of the PointLightComponent to be set to a random color. This overrides the OnOverlap_Implementation function in the source file, which toggles the visibility of the PointLightComponent.
For more on events and working with graphs, see the Events , EventGraph , and Blueprint Class UI documentation.

The DesiredIntensity variable is set to EditAnywhere in the LightSwitchBoth header file, so it is visible in the Blueprint Editor's Defaults and can be edited by clicking the Class Defaults button to show the Class Defaults in the Details Panel. This also means that the variable can be changed for each instance of the class, so each Actor can have its own DesiredIntensity. Because DesiredIntensity is also BlueprintReadWrite and used in the Construction Script, updating it also causes the Construction Script to execute again.

Blueprinted classes can be extended with other Blueprint Classes, either using the dropdown button next to the class in the Class Viewer to create a new Blueprint, or by Right-clicking on the Blueprint and selecting Create New Blueprint Based on This.
The Blueprint Class LightSwitchBoth_BP is in the Content Browser , and can be dragged into the level from there. It is also in the Class Viewer . For more information on placing Actors in a level using the Content Browser or Class Viewer, see the Placing Actors documentation.
Help shape the future of Unreal Engine documentation! Tell us how we're doing so we can serve you better.
Часть 1. Введение. Создание класса и добавление свойств. Расширение класса С++ с помощью Blueprint.
Часть 2. Классы геймплея. Структуры. Отражение (reflection) в Unreal. Object/Actor итераторы. Менеджер памяти и сборщик мусора.
Часть 3. Префиксы в именах классов. Целочисленные типы. Типы контейнеров. Итераторы контейнеров. Цикл For-each, хеш-функции.
Часть 4. Бонусная. Unreal Engine 4 для Unity разработчиков.
Эта статья является переводом части документации по UE4. Оригинальную статью вы можете найти пройдя по это ссылке.
Это руководство покажет вам как писать код на С++ в Unreal Engine. Не переживайте, разработка на С++ в Unreal Engine весёлая, и совершенно не сложная, чтобы её начать. Нам нравится думать о Unreal C++ как о «помогающем C++» *, поскольку мы создали множество разных фич чтобы сделать C++ легче для всех!
* буду рад, если кто предложит лучший перевод «assisted C++», но пожалуйста в личку.
Если у вас совершенно нет опыта разработки, вы можете изучить гид по визуальному скриптингу при помощи Blueprint*. После изучения этого руководства, вы сможете создавать игры с помощью Blueprint**.
* Blueprint Visual Scripting guide
** далее, где написано Blueprint, подразумевается как Blueprints Visual Scripting так и «Blueprint-класс». Что конкретно подразумевается вам будет ясно из контекста.
Вы можете писать «старый добрый С++ код», но вы будете более продвинутым разработчиком, после прочтения этого руководства и изучении модели разработки в Unreal.
C++ и Blueprints
UE предоставляет два метода для создания элементов геймплея — C++ и Blueprint. С++ программисты добавляют основные блоки геймплея, таким образом, чтобы дизайнеры (тут имеется ввиду левел-дизайнер, а не художник) с помощью этих блоков мог создавать свои элементы геймплея для отдельного уровня или всей игры. В таком случае, программисты работают в своем (своей) любимой IDE (например — MS Visual Studio, Xcode), а дизайнер работает в Blueprint редакторе UE.
API геймплея и фреймворк классов полностью доступны из обоих систем. Обе системы можно использовать по отдельности, но используя их вместе вы получаете более мощную и гибкую систему. Это значит, что лучшей практикой будет слаженная работа программистов, которые создают основы геймплея и левел-дизайнеров, которые используют эти блоки для создания увлекательного геймплея.
С учетом всего вышесказанного, далее будет рассмотрен типичный рабочий процесс программиста C++, который создает блоки для дизайнера. В этом случает вы должны создать класс, который в дальнейшем будет расширен с помощью Blueprint, созданного дизайнером или другим программистом. В этом классе мы создадим различные свойства (переменные), которые сможет задать дизайнер. На основе этих заданных значений, мы собираемся извлечь новые значения созданных свойств. Данный процесс очень прост благодаря инструментам и макросам, которые мы предоставляем для вас.
Мастер классов

Самое первое что требуется сделать это воспользоваться мастером классов (class wizard) предоставляемый UE, для создания базы будущего С++ класса, который в дальнейшем будет расширен с помощью Blueprint. Ниже показано, каким образом происходит выбор при создании нового класса, дочернего от класса Actor.

Далее требуется ввести название вашего класса. Мы воспользуемся именем по умолчанию (MyActor).
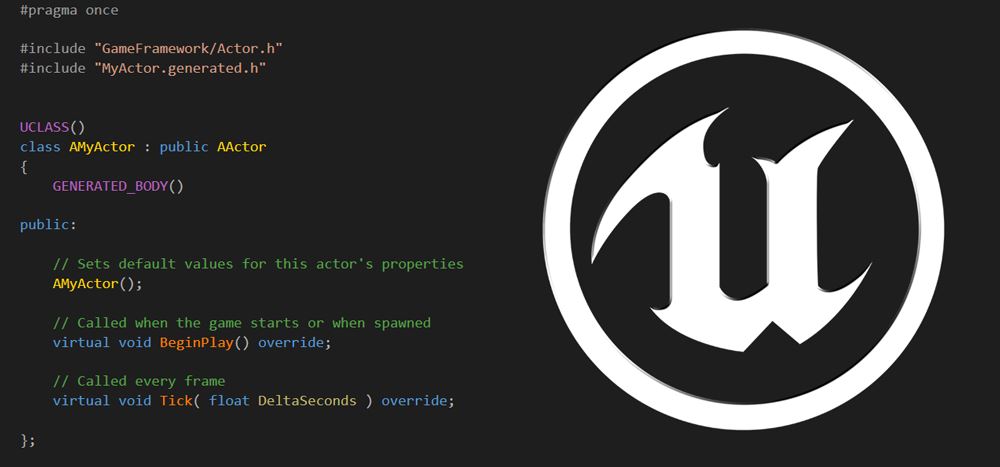
После того как вы создадите класс, мастер генерирует файлы и откроет IDE, таким образом что вы сразу можете начать редактировать его. Ниже приведен полученный таким образом код созданного класса. Для получения доп. информации о мастере классов, вы можете перейти по этой ссылке.
Мастер классов генерирует класс с методами BeginPlay() и Tick(), со спецификатором перегрузки (override). Событие BeginPlay() происходит когда Actor входит в игру, в состоянии разрешённом для игры (playable state). Хорошей практикой является инициирование геймплей-кода вашего класса в этом методе. Метод Tick() вызывается каждый кадр с параметром, который равен времени, прошедшему с последнего своего вызова. В этом методе должна содержаться постоянно повторяющаяся логика. Если у вас она отсутствует, то лучше всего будет убрать данный метод, что немного увеличит производительность. Если вы удалили код данного метода, убедитесь что вы так же удалили строку в конструкторе класса, которая указывает, что Tick() должен вызываться каждый кадр. Ниже приведет код конструктора с указанной строкой:
Создание свойств, отображающихся в редакторе
Теперь у нас есть собственный класс. Давайте создадим несколько свойств, которые могут быть использованы другими разработчиками, непосредственно в UE. Для отображения свойства в редакторе требуется использовать специальный макрос UPROPERTY(). Все что требуется сделать, это написать макрос UPROPERTY(EditAnywhere) перед объявлением переменной, как написано ниже:
Это все что требуется сделать, чтобы редактировать данное значение в редакторе. Есть еще несколько путей, для указания каким образом и где данная переменная редактируется. Это делается с помощью указания доп. опций в макросе. К примеру, если вы хотите чтобы данное свойство было сгруппировано в разделе с другими соответствующими свойствами, вы должны указать категорию, как это указанно ниже:
Теперь, пользователи будут видеть вашу переменную помещенную в категорию с заголовком «Damage». В этой категории так же могут быть другие свойства, у которых указана такая же категория. Это отличный способ размещать наиболее часто используемые переменные вместе.
Теперь сделаем свойство доступным из Bluerpint:
Как вы можете увидеть, мы указали специальный параметр, для возможности чтения и записи свойства. Вы так же можете использовать другую опцию — BlueprintReadOnly, чтобы ваши переменные в редакторе указывались как константные. Кроме этого доступны многие другие свойства, передаваемые макросу UPROPERTY, ознакомиться с которыми можно перейдя по ссылке.
Перед тем как перейдем к следующему разделу, давайте добавим несколько переменных нашему классу. У нас уже имеется переменная хранящая полный урон, который может нанести Actor, но давайте считать, что урон может производиться длительное время. Код ниже содержит одну новую переменную доступную для редактирования левел-дизайнером и одну недоступную для редактирования:

Как видно, DamageTimeInSeconds свойство, которое доступно для редактирования в редакторе. DamagePerSecond будет вычисляться, как вы увидите позднее, на основе значения заданного в DamageTimeInSeconds, например, левел-дизайнером. Флаг VisibleAnywhere указывает что свойство отображается, но не может быть изменено. Флаг Transient означает что это свойство нельзя сохранить или прочитать с диска, то есть полученное значение является непостоянным. На картинке ниже показано как отображаются эти свойства в разделе значений по умолчанию нашего класса.
Установки значений по умолчанию в конструкторе
Установка начальных значений переменных происходит как и в обыкновенном C++ классе — в конструкторе. Ниже приведены два примера, каким образом это можно сделать, оба примера эквиваленты по функциональности:

Вот тот же кусок окна, но уже с заданными значениями в конструкторе
Так же возможно задавать начальные значения основанные на значениях заданных в редакторе. Эти данные задаются после конструктора, для этого требуется использовать метод PostInitProperties(). В данном примере TotalDamage и DamageTimeInSeconds задаются левел-дизайнером. Независимо от того, заданны ли эти значения из редактора, вы по прежнему можете задать требуемые начальные значения, как мы сделали это ранее.
Заметка: если вы не задаете значения по умолчанию, они автоматически будут установлены в 0 или nullptr для значений указателей.

Тот же кусок окна, что и ранее, но уже после добавления PostInitProperties() в цепь вызовов.
Горячая перезагрузка.
UE 4 предоставляет возможность, которая возможно удивит вас, если вы привыкли к обычному программированию на C++ в других проектах. Вы можете скомпилировать добавленный вами С++ код без перезапуска редактора. Есть два пути сделать это:

1. Если редактор запущен, сделайте билд в Visual Studio или Xcode, как вы обычно это делаете. Редактор обнаружит новые скомпилированные DLL и перезагрузит ваши изменения сразу же.
Заметка: Если у вас приатачен дебаггер, вы должны открепить его, в начале, иначе VS не позволит вам сделать build.

2. Или просто нажмите на Compele в основном тулбаре в редакторе.
Вы можете использовать эту возможность по мере продвижения по данному руководству.
Расширение С++ класс с помощью Blueprint
До этого мы создали простой геймплей-класс, при помощи С++ мастера классов и добавили в него несколько переменных. Теперь мы изучим на то, как пользователь может создавать уникальные классы из наших скромных набросков.

Первое, что требуется сделать, это создать Blueprint класс из нашего AMyActor класса. Обратите внимание, что на изображении ниже имя базового класса указанно как MyActor, а не AMyActor. Это сделано для того, чтобы спрятать соглашения об именах, которое используется в наших инструментах от пользователя, делая имена более удобными для него.

После нажатия на Select, будет создан новый Blueprint с дефолтным именем. Мы зададим ему имя CustomActor1, как указанно на изображении из Content Browser'а ниже.

Это наш первый класс, который наш пользователь будет редактировать. Во-первых, поменяем значения наших переменных. В данном случае выставим TotalDamage равным 300 и время, в течении которого наносятся эти повреждения равным двум секундам. Вы можете увидеть это на картинки ниже:
Погодите… Наша расчетная величина не соответствует нашему ожиданию. Оно должно быть 150, но мы видим значение равное 200. Это происходит потому, что в данным момент мы вычисляем значения сразу после инициализации значений, которое происходит в момент загрузки. Но у нас происходят изменения времени выполнения в редакторе (runtime changes), которые не учитываются. Эту проблему легко решить, поскольку движок уведомляет целевой объект о событии, которое вызывается при изменении в редакторе. Код ниже показывает, что именно требуется добавить для расчета новых значений, полученных при изменении переменных в редакторе:

Заметьте, что метод PostEditChangeProperty расположен внутри директивы, которая указывает, работаем мы в редакторе или нет. Это сделано для того чтобы при билде, игра содержала только необходимый для неё код, без лишних строк, которые увеличивают размер исполняемого файла, без необходимости. Теперь, после перекомпиляции, значение DamagePerSecond будет соответствующим нашему ожиданию. Это указанно на картинки ниже.
Вызов C++ методов в Blueprint
До сих пор мы изучали работу с переменными. Кроме этого требуется изучить еще одну важную базовую вещь, перед тем как более детально изучать движок. В процессе создания геймплея, пользователь должен иметь возможность вызывать в Blueprint функции созданные C++ программистом. Для начала давайте сделаем чтобы метод CalculateValues() можно было вызывать из Bluerpint.

Макрос UFUNCTION() содержит описание, каким образом наша С++ функция обрабатывается системой рефлексии. Опция BlueprintCallable указывает возможность обработки данного метода в виртуальной машине Blueprint'ов (далее Blueprint VM). Для того, чтобы контекстное меню (вызываемое правой кнопкой мыши) работало должным образом, каждый метод, вызов которого разрешен редактором, должен содержать имя категории. Изображение ниже показывает как именно категории отображаются в контекстном меню:

Как видите, метод может быть выбран в категории Damage. Blueprint-код ниже показывает, каким образом происходят изменения в значении TotalDamage, с последующим вызовом метода для пересчета зависимых значений.
Тут мы используем метод, описанный ранее, для пересчета зависимых свойств. Большая часть методов движка доступны для вызова из Blueprint, при помощи макроса UFUNCTION(), так чтобы разработчики могли создавать игры без написания С++ кода. Тем не менее, более грамотным подходом будет использования С++ для создания основных блоков геймплея и кода, чья производительность критична, а применение Blueprint для кастомизирования созданного поведения или конструирование нового, в основе которого лежит созданный код.
Теперь, когда наши пользователи могут вызывать ваш C++ код, рассмотрим еще один способ вызова C++ кода в Blueprint. Этот подход позволяет вызывать в С++-коде функции реализованные в Blueprint. Таким образом можно уведомить пользователя о событиях, на которые они могут реагировать тем образом, которым считают нужным. Часто это бывает создание эффектов или другие графические взаимодействия, как показ/сокрытие объектов. Фрагмент кода ниже содержит метод, который реализован в Blueprint:
Эта функция вызывается как и обычная С++-функция. UE генерирует основу реализации С++ функции для правильного вызова ее в Blueprint VM. Обычно мы называем это Thunk(Преобразователь). Если Blueprint не реализует тело функции, то её поведение представляет С++-функцию с пустым телом, которое ничего не делает. Что делать, если мы хотим обеспечить С++ реализацию по умолчанию и сделать возможным переопределения ее в Bluerpint. Макрос UFUNCTION() имеет опцию для этого случая. Фрагмент кода ниже показывает, какие изменения в заголовочном файле нужно сделать, чтобы добиться этого:
Эта версия метода по-прежнему преобразует метод для его вызова в Blueprint VM. Каким образом мы должны обеспечить реализацию по умолчанию? Инструменты так же генерируют новое определение метода с постфиксом _Implementation(). Мы должны представить вашу версию этого метода или ваш проект не будет слинкован. Вот реализация для указанного выше определения:
Теперь этот метод вызывается когда Blueprint не переопределяет его. На заметку: в будущих версиях билд инструментов автосгенерированное определение _Implementation() будет убрано и его нужно будет явно добавлять в заголовок. В версии 4.7 автогенерация этого определения по-прежнему происходит.
Теперь вы изучили основы разработки геймплея и методы совместной работы с пользователями для создания более разнообразного геймплея. Пришло время вам выбрать ваши собственные приключения. Вы можете продолжить изучения разработки в следующих частях или вы можете ознакомиться с одним из примеров проектов, которые вы можете найти в лаунчере (стартовом экране), чтобы получить еще больше полезных навыков.
1) Текста достаточно много, постарался проверить пару раз, уверен что есть какие-то ошибки. Если найдете, прошу писать ЛС, как только, так сразу поправлю. Это же касается ошибок перевода каких-то идиом или терминов.
2) Лично мне не очень нравится описания, где предложения с одинаковым смыслом повторяются по 3и раза, как будто вам вдалбливают что-то. Но не мне спорить с создателями документации, я думаю им виднее.
3) Если переводы будут востребованы сообществом, то не буду останавливаться на этих 4 частях, а по возможности буду переводить все базовые куски документации.
Часть 1. Введение. Создание класса и добавление свойств. Расширение класса С++ с помощью Blueprint.
Часть 2. Классы геймплея. Структуры. Отражение (reflection) в Unreal. Object/Actor итераторы. Менеджер памяти и сборщик мусора.
Часть 3. Префиксы в именах классов. Целочисленные типы. Типы контейнеров. Итераторы контейнеров. Цикл For-each, хеш-функции.
Часть 4. Unreal Engine 4 для Unity разработчиков.
Часть 5.…

От Автора: Начало лето выдалось жарким на проекты, поэтому оформление перевода долго откладывал, дальше будет быстрее.
Эта статья является продолжением перевода части документации по UE4. Оригинальную статью вы можете найти пройдя по это ссылке.
Приятно видеть, что вы еще с нами. В следующих разделах мы будет изучать иерархию геймплей-классов. Мы начнем с базовых блоков и поговорим о том, как они связанны друг с другом. Так же, мы будем изучать как UE использует наследование и композицию, для создания кастомных особенностей геймплея.
Наиболее часто расширению подвергаются четыре основных геймплей-класса. Это UObject, AActor, UActorComponent и UStruct. Далее каждый из них будет подробно описан. Вы можете создавать типы, которые не расширяют ни один из этих классов, но они не позволят вам использовать большинство встроенных возможностей движка. Как правило, классы которые создаются вне UObject-иерархии (не являются наследниками любой глубины от UObject), существуют для следующих целей: интеграция сторонних библиотек, обертки особенностей операционной системы и т.п.
Unreal Objects (UObject)
- Рефлексия свойств и методов
- Сериализация свойств
- Сборщик мусора
- Поиск UObject по имени
- Настройка значений для свойств
- Поддержка сетевого режима для свойств и методов
Каждый наследуемый от UObject класс содержит UClass-синглтон, созданный для него. Этот класс содержит все метаданные о экземпляре класса. Возможности UObject и UClass лежат (совместно) в основе всего того, что геймплей-объект делает в течении жизненного цикла. Лучше всего думать о разнице между UClass и UObject как о том, что UClass описывает как именно выглядит экземпляр UObject, какие свойства доступны для сериализации, работы с сетью и т.д. В основном, разработка геймплея связанна не с наследованием напрямую от UObject, а с наследованием от классов AActor и UActorComponents. Вам не обязательно знать детали того, как работают UClass/UObject. Но знание о их существовании будет полезно.
AActor
Класс AActor представляет объект, который является частью игрового процесса. Экземпляр этого класса либо размещается дизайнером на уровне, либо создаются во время выполнения (при помощи систем геймплея). Все объекты, размещаемые на уровне, являются наследниками этого класса. Например — AStaticMeshActor, ACameraActor и APointLight. AActor наследуется от UObject, то есть, он использует стандартные функции, которые были перечислены в предыдущем разделе. AActor может быть уничтожен при помощи игрового кода (C++ или Blueprint) или стандартным механизмом сборки мусора (при выгрузки уровня из памяти). Он предоставляет высокоуровневое поведение наших игровых объектов, а так же является базовым типом, который предоставляет возможность репликации для сетевого режима. При репликации (в многопользовательском режиме), AActor так же дает доступ к информации о любом своем UActorComponent, которая требуется для поддержки работы сетевого режима.
AActor имеют свои собственные варианты поведения (специализируется при наследовании), но кроме этого, они являются контейнерами для иерархии UActorComponents (специализируется при композиции). Это можно сделать при помощи члена RootComponent нашего AActor. Он содержит один UActorComponent, который, в свою очередь, может содержать множество других. Перед размещением AActor на уровне, он должен содержать по крайней мере USceneComponent, который хранит положение, поворот и масштаб AActor'а.
AActor предоставляют доступ к нескольким событиям, которые вызываются в течении всего жизненного цикла AActor. Ниже короткий список некоторых из них:
| BeginPlay | Вызывается один раз, когда объект входит в игру |
| Tick | Вызывается каждый кадр, для выполнения кода в течении этого кадра |
| EndPlay | Вызывается, когда объект покидает игру |
Для более подробного изучения класса AActor, вы можете пройти по ссылке.
Продолжительность жизненного цикла
Если Actor просуществовал необходимое вам время, вы можете уничтожить его вызвав метод Destroy(). При этом, будет вызван метод EndPlay(), в котором вы можете написать необходимый код, выполняющийся при уничтожении объекта. Другим вариантом контроля жизни Actor'а является использования поля LifeSpan (время жизни). Вы можете установить это значение в конструкторе (или позже в run-time). При истечении указанного времени метод Destroy будет вызван автоматический.
Узнать больше о создание Actor'ов вы можете перейдя по ссылке.
UActorComponent
UActorComponent'ы имеют свое собственное поведение и, как правило, отвечают за функциональность, которая является общей для различных AActor'ов — например, отображение мешей, системы частиц, работа с камерой и физические взаимодействия. В отличие от AActor'ов,, которые предоставляют высокоуровневую логику своего поведения в вашей игре, UActorComponent'ы, как правило, выполняют индивидуальные задания, требуемые для поддержки более высокоуровневых объектов. Компоненты могут быть детьми других компонентам. Их можно прикреплять только к одному родительскому компоненту или Actor'у, но сам компонент может иметь множество дочерних компонентов. Можете редставить себе эти отношения, как дерево компонентов. Следует помнить, что дочерние компоненты имеют положение, вращение и масштаб относительно родительских компонентов или Actor'а.
Существует множество вариантов использовать Actor'ов и компонентов. Одни из способов представить себе отношений Actor'ов и компонентов следующий — Actor отвечает на вопрос «Что это за вещь? (what is this thing?)», а компоненты — на вопрос «Из чего это сделано? (what is this thing made of?)»
- RootComponent — Объект, который содержит компонент верхнего уровня в дереве компонентов AActor
- Ticking — Компонент, который обновляются каждый кадр (тикает), являются частью метода Tick() владеющего им AActor.
Препарируем First Person Character
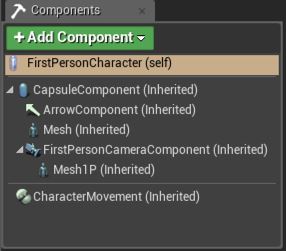
В предыдущих секциях было много слов без демонстраций. Для иллюстрации взаимосвязи AActor и его UActorComponent'ов, давайте изучим Blueprint, который генерируется при открытие проекта основанном на шаблоне First Person. На картинке ниже показанно дерево компонентов для FirstPersonCharacter Actor. Тут RootComponent это CapsuleComponent. Прикрепленные к CapsuleComponent компоненты это ArrowComponent, Mesh и FirstPersonCameraComponent. Наиболее глубоко вложенная вершина — компонент Mesh1P, родителем которого является FirstPersonCameraComponent. Это значит, что положение меша считается относительно данной камеры.
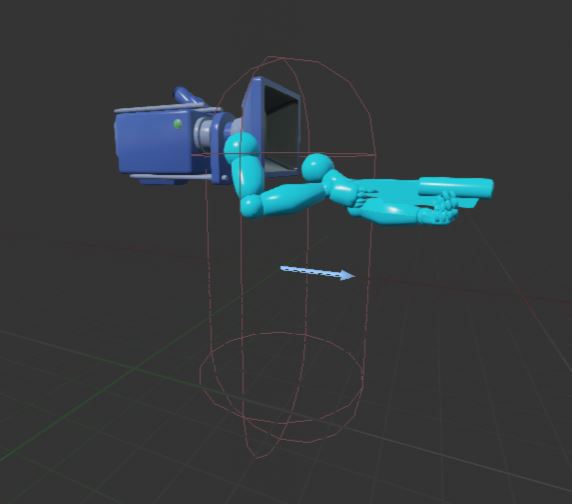
Графический это дерево компонентов выглядит так, как показано на картинке ниже, где вы можете видеть все компоненты в 3d пространстве (за исключением Mesh компонента)
Данное дерево компонентов прикреплено к одному actor-классу. Как мы видим, мы можем создавать комплексные объекты геймплея используя как наследование, так и композицию. Наследование стоит использовать при изменении существующего AActor или UActorComponent, а композицию, если множество типов AActor должны иметь схожий функционал.
UStruct
Для использования UStruct, вам не требуется наследование от какого-либо конкретного класса, достаточно отметить структуру макросом USTRUCT() и инструменты построения сделают основную работу для вас. В отличии от UObject, сборщик мусора не отслеживает UStruct. Если вы динамический создаете их экземпляры, то должны самостоятельно управлять их жизненным циклом. UStructs используются для того, чтобы POD-типы имели поддержку UObject-рефлексии для возможности редактирования в UE, управление через Blueprint, сериализация, работы с сетью и т.д.
Теперь после обсуждения основ иерархий для создания классов нашего геймплея, снова пришло время для выбора вашего пути. Вы можете подробнее изучить классы геймплея, исследовать наши примеры в поисках дополнительной информации или продолжить погружаться глубже в изучение особенностей С++ для создания игры.
Вы точно уверены что хотите знать больше. Мы будем продолжать изучать работу движка.
Система рефлексии Unreal
Классы геймплея используют специальную разметку, так что прежде чем переходить к ним, давайте рассмотрим некоторые базовые вещи из системы свойств Unreal. UE4 использую свою собственную систему рефлексии, которая предоставляет вам различные динамические возможности — сборщик мусора, сериализация, сетевая реплекация и взаимодействие Blueprint/C++. Эти возможности являются опциональными, то есть вы должны самостоятельно добавлять требуемую разметку для ваших типов, в противном случае Unreal игнорирует их и не генерирует необходимые данные для рефлексии. Ниже приведет короткий обзор основных элементов разметки:
- UCLASS() — используется для генерации данных рефлексии для класса. Класс должен быть наследником UObject
- USTRUCT() — используется для генерации данных рефлексии для структуры
- GENERATED_BODY() — UE4 заменяет это на весь необходимый шаблонный код который создается для типа.
- UPROPERTY() — разрешает использовать переменную-члена UCLASS или USTRUCT как UPROPERTY. UPROPERTY имеет множество вариантов использования, Этот макрос позволяет сделать переменную возможной для репликации, сериализации и доступной из Blueprint. Так же используется сборщиком мусора для отслеживания количества ссылок на UObject.
- UFUNCTION() — позволяет методу класса UCLASS или USTRUCT быть использованным как UFUNCTION. UFUNCTION может позволить методу быть вызванным из Blueprint и использоваться как RPCs, и т.д.
Пример определения класса UCLASS:
Вы впервые можете заметить включение заголовка «MyClass.generated.h». Unreal будет размещать все cгенерированные данные для рефлексии в этом файле. В декларации вашего типа (в списке включенных файлов) этот файл должен располагаться последним.
- Blueprintable — Класс может быть расширен с помощью Blueprint.
- BlueprintReadOnly — Свойство доступно только для чтения из Blueprint, и не доступно для записи.
- Category — Определяет секцию в которой свойство отображаются в Details view в редакторе. Используется для организации.
- BlueprintCallable — Функция может быть вызвана из Blueprint.
- Список спецификаторов UCLASS
- Список спецификаторов UPROPERTY
- Список спецификаторов UFUNCTION
- Список спецификаторов USTRUCT
Object/Actor итераторы
Итераторы объектов очень полезный инструмент для перебора всех экземпляров конкретного типа UObject и его подклассов.
Вы можете ограничить поиск, предоставляя более конкретный тип итератора. Предположим, что у вас есть класс именуемый UMyClass, унаследованный от UObject. Вы можете найти все экземпляры этого класса (и все, которые являются его наследниками) следующим образом:
ПРЕДУПРЕЖДЕНИЕ: Использование итераторов объектов в PIE (Play in Editor) может приводить к неожиданным результатам. Пока редактор загружен, итератор объектов вернет все UObject'ы созданные для вашего экземпляра игрового мира, в дополнении к тем, что используются в редакторе.
Итераторы Actor'ов работают схожим образом, как и итераторы объектов, но работают только для наследников от AActor. Итераторы Actor'ов не имеют проблему указанную выше и возвращают только те объекты, которые используются в текущем экзамепляре игрового мира.
Когда создается итератор Actor'а, ему требуется передать указатель на экземпляр UWorld. Множество дочерних классов от UObject, например, APlayerController предоставляют этот метод. Если вы не уверены, вы можете проверить возвращаемое значения метода ImplementsGetWorld, чтобы понять, поддерживает ли конкретный класс метод GetWorld.
Поскольку AActor является наследником от UObject, вы можете использовать TObjectIterator так же чтобы найти все экземпляры AActors. Но будьте осторожны в PIE!
Actor'ы обычно не собираются сборщиком мусора. Вы должны вручную вызывать метод Destroy, после порождения Actor'а. Удаление произойдет не сразу, а только в течении следующей фазы сборки мусора.
Этот случай наиболее общий, если у вас Actor'ы со свойствами UObject.
Когда мы вызываем данную функцию, мы порождаем Actor'а в нашем мире. Его конструктор создает два объекта. Один с меткой UPROPERTY, другой — обычный указатель. Пока Actor'ы являются частью корневого объекта, SafeObject не будет собираться сборщиком мусора, так как к нему могут обращаться из этого корня. DoomedObject, однако, будет иметь другой жизненный цикл. Поскольку он не отмечен как UPROPERTY, сборщик мусора не знает ничего о ссылках на него и в конечном итоге он будет уничтожен.
Когда UObject собирается сборщиком мусора, все UPROPERTY ссылки получат значения nullptr. Это делается для безопасной проверки, является ли объект уничтоженным сборщиком мусора или нет.
Это важное замечание, поскольку, как говорилось ранее — актеры, для которых был вызван метод Destroy() не удаляются до следующей фазы сборки мусора. Вы можете проверить, ожидает ли UObject удаления, с помощью метода IsPendingKill(). Если метод возвращает true, объект считается мертвым и не должен быть использован.
UStructs
Как говорилось ранее UStructs — легковесный вариант UObject'а. UStructs не может быть собран сборщиком мусора. Если вы используете динамический экземпляр UStructs, вы можете использовать умные указатели, о которых мы поговорим позже.
Ссылки не на UObject
Обычно не-UObject'ы так же могут иметь возможность добавлять ссылку на объект для предотвращения их удаления сборщиком мусора. Чтобы сделать это, объект должен быть наследником FGCObject и переопределить метод AddReferencedObjects.
Мы используем FReferenceCollector, чтобы вручную добавить жесткую ссылку на требуемый UObject, который не должен быть собран сборщиком мусора. Когда объект удаляется (срабатывает деструктор), все добавленные им ссылки будут удалены.
PS: Прошу все предложения по исправлению ошибок и неточностей присылать в личку.
Create your first code project and add a new C++ class.


In order to understand and use the content on this page, make sure you are familiar with the following topics:

In this Quick Start Guide, you will learn how to setup a C++ project in the Unreal Engine and program your first C++ gameplay class in Visual Studio. By the time you've completed this tutorial, you will know how to do the following:
Create a new C++ Project
Create a new Actor class in C++
Edit that C++ class in your development environment, adding visual representation and functionality
Compile your project
Test your new Actor in the Unreal Editor
This guide assumes that you have already set up Visual Studio as your programming environment. If not, please refer to Setting Up Visual Studio for the Unreal Engine for instructions on how to install it and get it set up for programming with the Unreal Engine. We also assume that you have some familiarity with using the Unreal Editor before starting this guide, but for your convenience we will walk through all the steps necessary to create and manage C++ classes from the editor. The end product of this guide will be a cube that floats softly in mid-air and continually rotates, giving you a simple object to test as you learn to use the development environment for programming.
This guide assumes that you have already set up XCode as your programming environment. We also assume that you have some familiarity with using the Unreal Editor before starting this guide, but for your convenience we will walk through all the steps necessary to create and manage C++ classes from the editor. The end product of this guide will be a cube that floats softly in mid-air and continually rotates, giving you a simple object to test as you learn to use the development environment for programming.
1. Required Setup
Launch the Unreal Editor. When the Project Browser comes up, click Games Project category and select a Blank template. Make sure that you have C++ and Starter Content enabled, choose your preferred Save Location and Name for this project, and then click Create Project. In our instance, we're naming our project QuickStart.
This will automatically create a simple, blank project with only essential C++ code in the solution, and it will automatically open inside both the Unreal Editor and Visual Studio. For more information on managing and creating Projects, please refer to the Project Browser page.
This will automatically create a simple, blank project with only essential C++ code in the solution, and it will automatically open inside both the Unreal Editor and XCode. For more information on managing and creating Projects, please refer to the Project Browser page.
Any Blueprint project can be converted to a C++ project. If you have a Blueprint project that you want to add C++ to, create a new C++ class per the next section, and the editor will set up your code environment for you. Also note that using a C++ project does not prevent you from using Blueprint. C++ projects simply set up the base classes for your project in C++ instead of Blueprint.
2. Create a New C++ Class
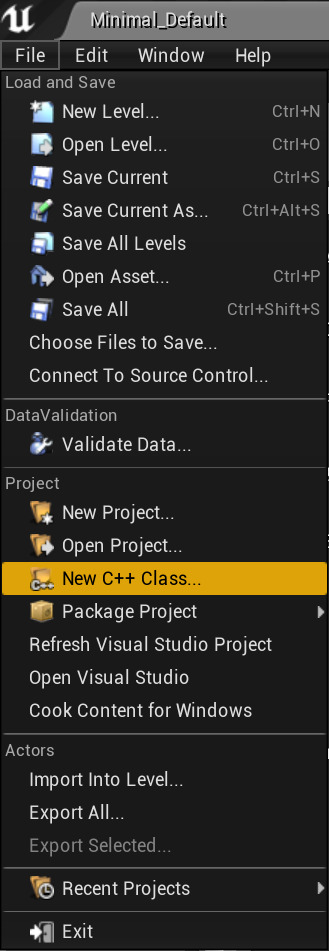
In the Unreal Editor, click the File drop-down menu, then select the New C++ Class. command.
Click image for full size.
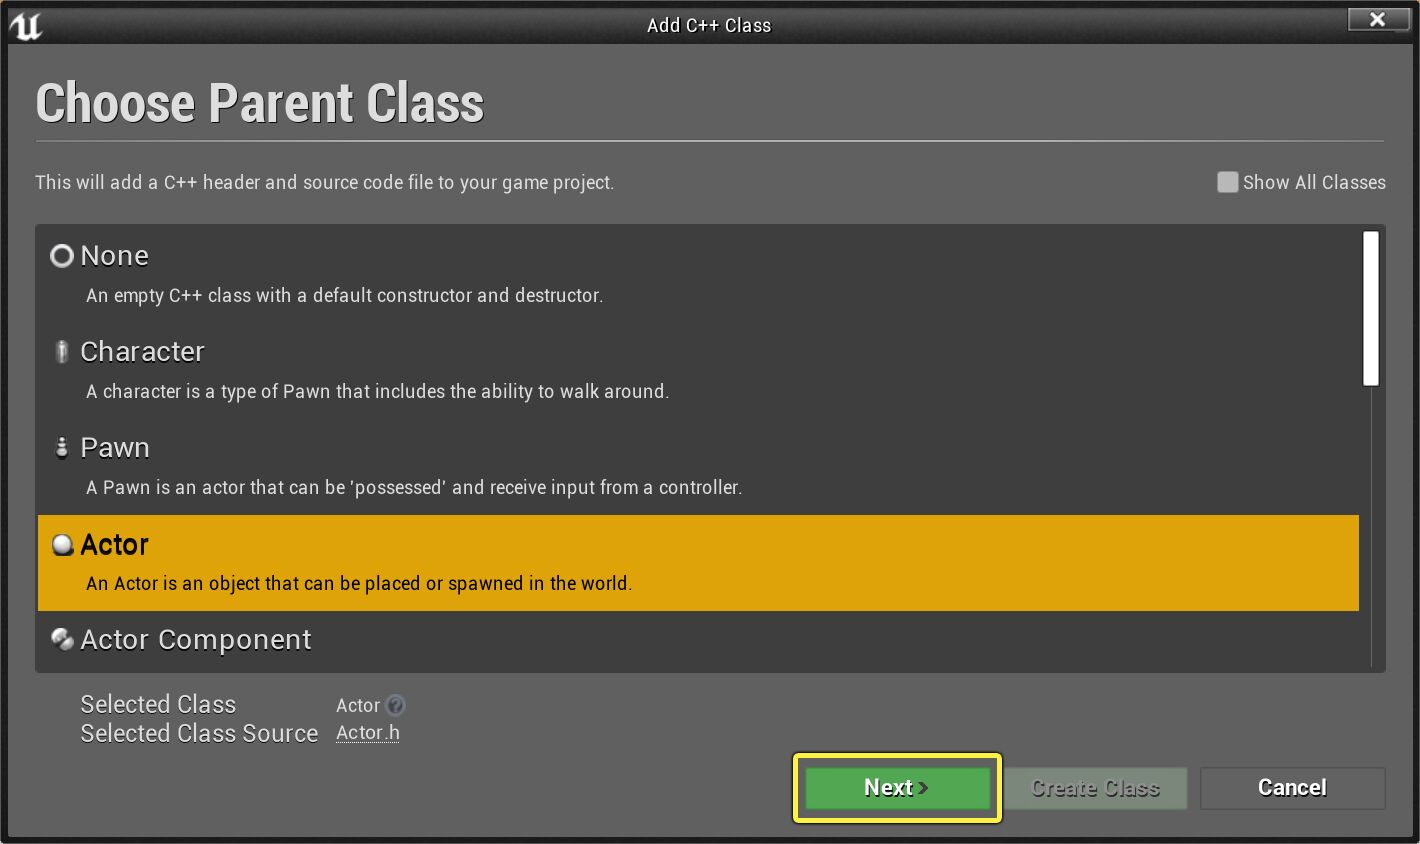
The Choose Parent Class menu will display. You can choose an existing class to extend, adding its functionality to your own. Choose Actor, as it is the most basic type of object that can be placed in the world, then click Next.

Click image for full size.
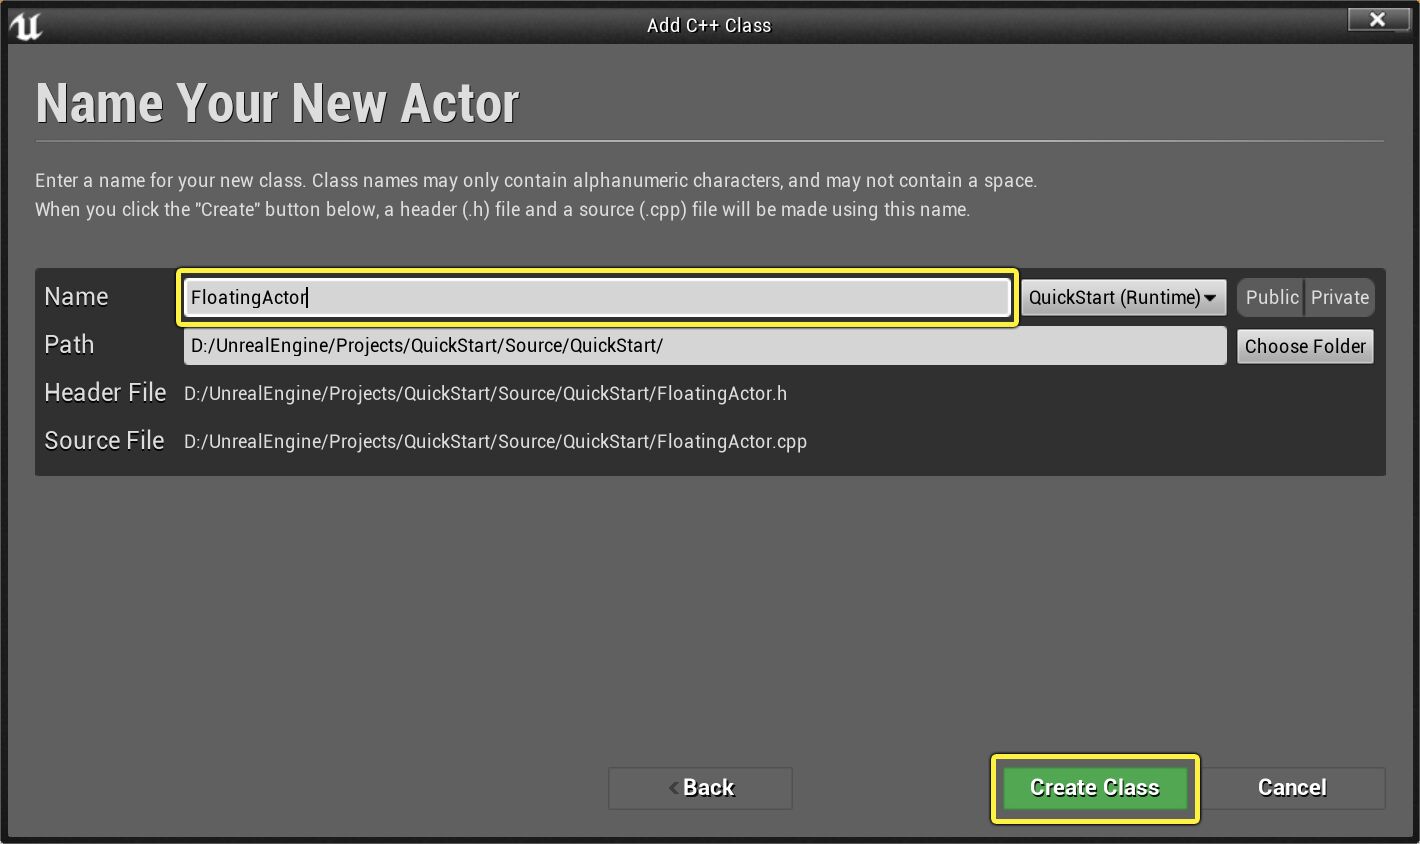
In the Name Your New Actor menu, name your Actor FloatingActor and click Create Class.

Click image for full size.
The Unreal Engine will automatically compile and reload with our new class selected in the Content Browser, and your programming environment will automatically open with FloatingActor.cpp .
3. Edit Your C++ Class
Now that we have created our C++ Class, we're going to switch over to Visual Studio and edit our code.
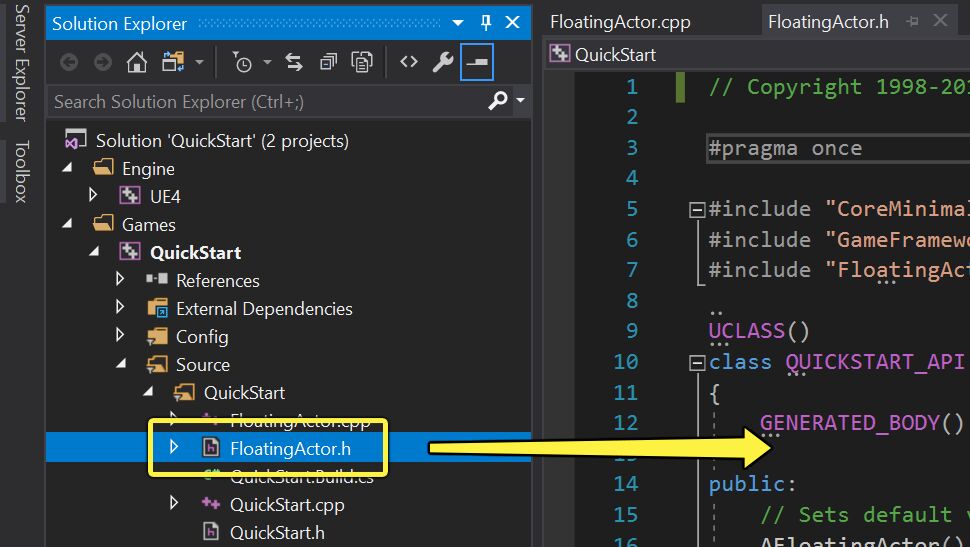
In Visual Studio, locate the Solution Explorer, which by default is on the left side of the window, then use it to locate FloatingActor.h . In our project, it will be located under Games > QuickStart > Source > QuickStart.

Double-click FloatingActor.h to open it and bring it into focus in the text editor.
This is a header file. You can think of it as being sort of like a table of contents for a C++ class. Before we can start building any new functionality, we must declare any new Variables or Functions that we're using in this file.
Add the following code underneath the declaration for AFloatingActor():
Here we're declaring a StaticMeshComponent, which will act as our visual representation for our object. Note that it uses a UProperty macro, which makes it visible inside the Unreal Editor. For more information on UProperty and its specifiers, see the page on Properties .
Now open FloatingActor.cpp and add the following code inside of AFloatingActor::AFloatingActor(), just before the closing bracket:
This function is the constructor, and it tells the class how to initialize itself when it is first created. The code we have added will fill our VisualMesh reference in with a new StaticMeshComponent, attach it to our Actor, and set it to the cube mesh from the Starter Content assets. For more information about attaching components in code, refer to our guide for Creating and Attaching Components .
Add the following code inside of **AFloatingActor::Tick(float DeltaTime), just before the closing bracket:
The Tick function is where we add code that we want to execute in real-time. In this case, it will make our cube simultaneously rotate while also floating up and down. For more information about Ticking actors, see Actor Ticking .
Now that we have created our C++ Class, we're going to switch over to XCode and edit our code.
In XCode, locate the Project Navigator, which by default is on the left side of the window, then use it to locate FloatingActor.h . In our project, it will be located under Games > QuickStart > Source > QuickStart.

Double-click FloatingActor.h to open it and bring it into focus in the text editor. This is a header file. You can think of it as a table of contents for a C++ class. Before we can start building any new functionality, we must declare any new Variables or Functions that we're using in this file.
Add the following code underneath the declaration for AFloatingActor():
Here we're declaring a StaticMeshComponent, which will act as our visual representation for our object. Note that it uses a UProperty macro, which makes it visible inside the Unreal Editor. For more information on UProperty and its specifiers, see the page on Properties .
Now open FloatingActor.cpp and add the following code inside of AFloatingActor::AFloatingActor(), just before the closing bracket:
This function is the constructor, and it tells the class how to initialize itself when it is first created. The code we have added will fill our VisualMesh reference in with a new StaticMeshComponent, attach it to our Actor, and set it to the cube mesh from the Starter Content assets. For more information about attaching components in code, refer to our guide for Creating and Attaching Components .
Add the following code inside of **AFloatingActor::Tick(float DeltaTime), just before the closing bracket:
The Tick function is where we add code that we want to execute in real-time. In this case, it will make our cube simultaneously rotate while also floating up and down. For more information about Ticking actors, see Actor Ticking .
4. Compile and Test Your C++ Code
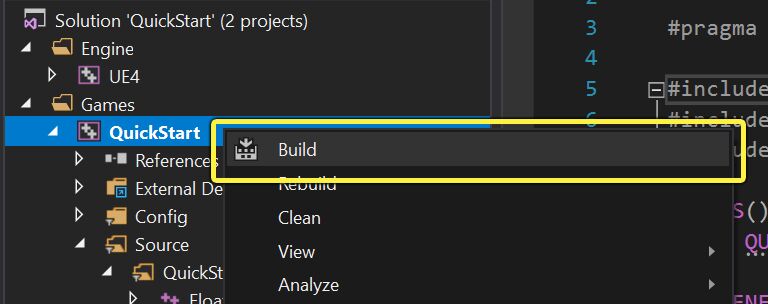
Save your work in both FloatingActor.h and FloatingActor.cpp . Then, in the Solution Explorer, right-click the project, click the Build command in the context menu, and wait for the project to finish compiling.

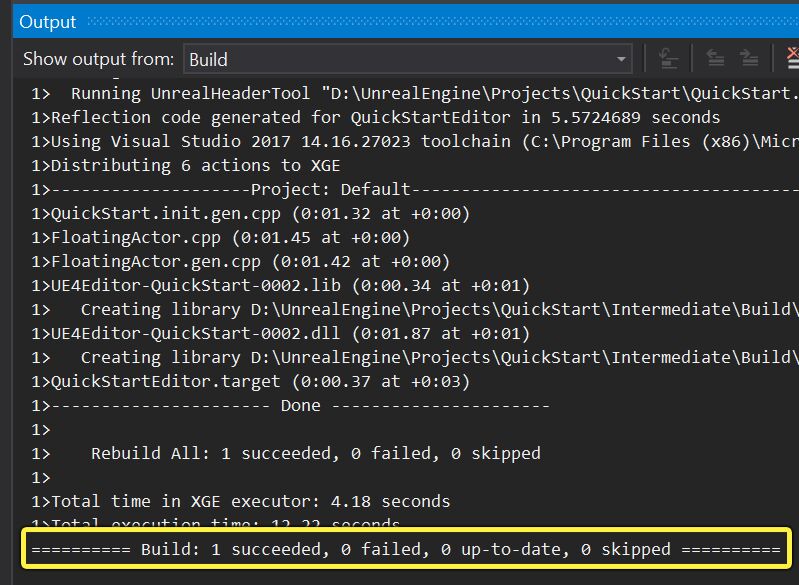
You should see a message that says "Succeeded" in the Output log at the bottom of the window.

Alternatively, you can go back to the Unreal Editor and click the Compile button in the toolbar at the top of the screen.

You should always save your work before attempting to compile, otherwise the changes you make in your code will not take effect.
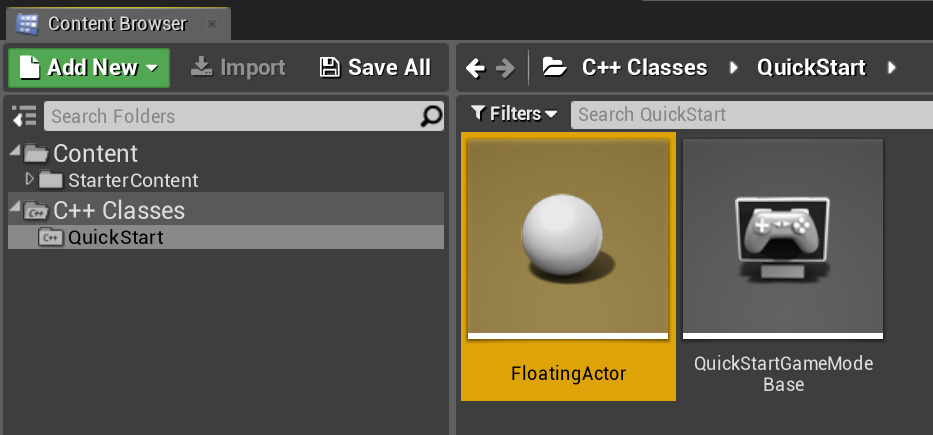
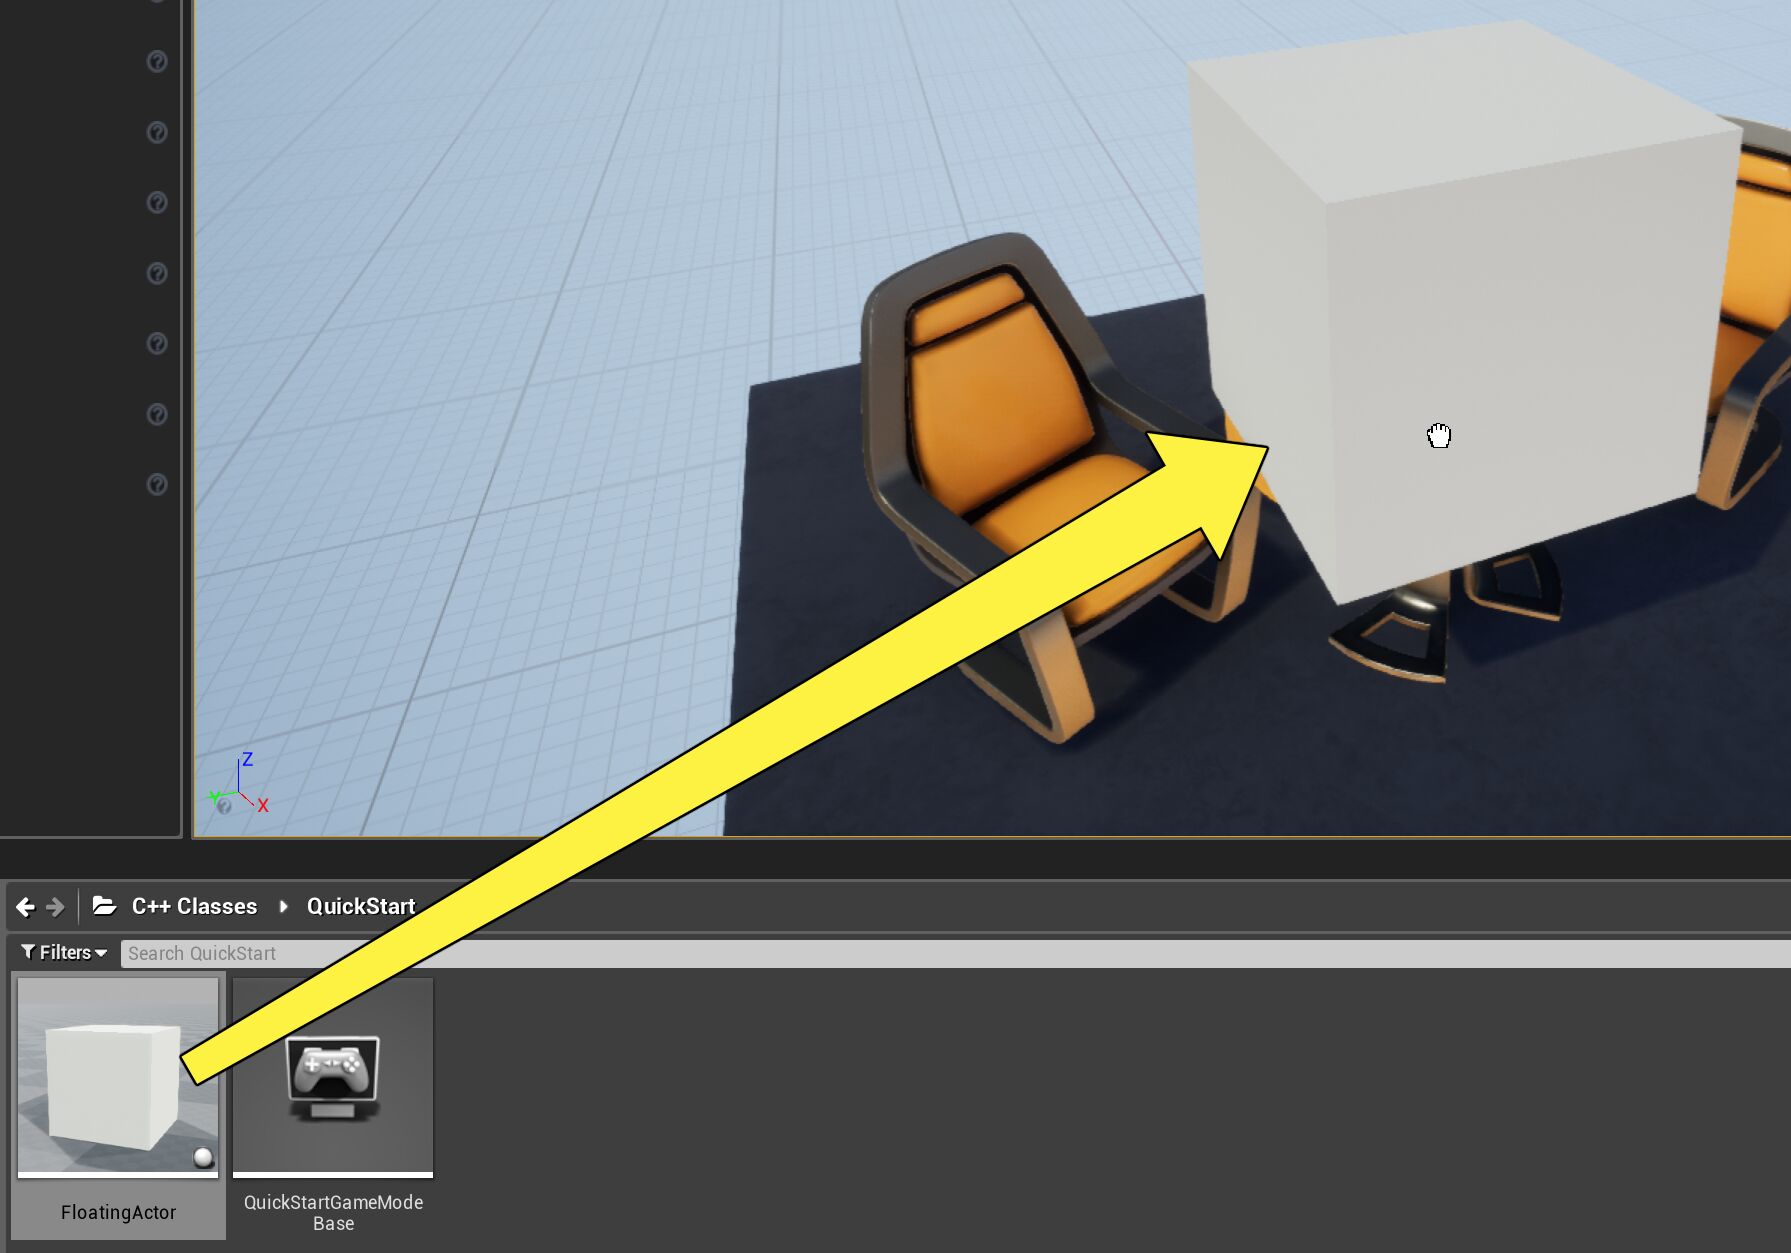
In the Unreal Editor, go back to the Content Browser, unfold C++ Classes, and then locate FloatingActor. It will be located in the folder that has the same name as your project, in our case, QuickStart.

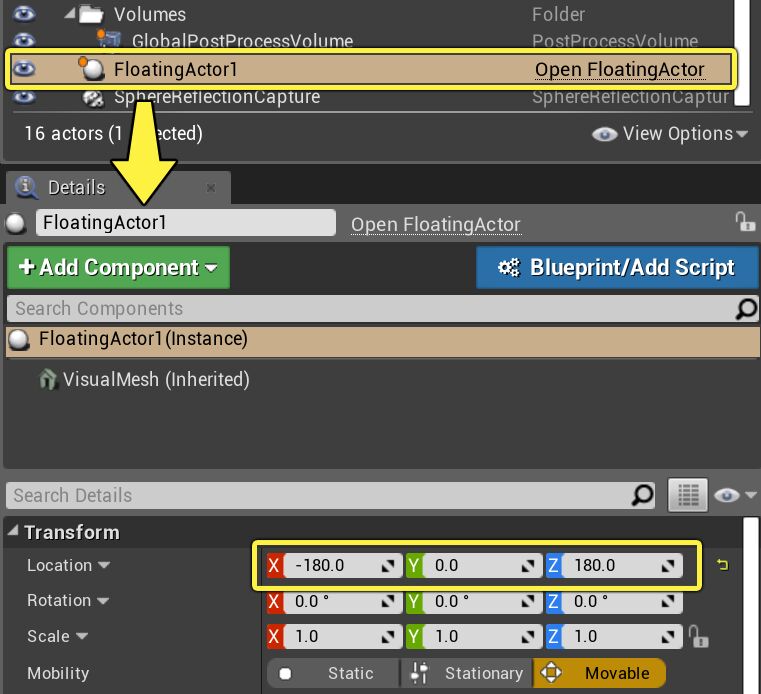
Click and drag FloatingActor into the Perspective Viewport to create an instance of FloatingActor. It will be selected in the World Outliner as "FloatingActor1" and its properties will be visible in the Details Panel.

For more information about navigating the Viewport and placing Actors in the World, refer to the Level Designer Quick Start .
In the Details Panel for FloatingActor1, set your Actor's Location to (-180, 0, 180). This will place it directly over the table in the default scene.
Alternatively, you can use the Move gizmo to move it there manually.

Press the Play In Editor button at the top of the screen.

Save your work in both FloatingActor.h and FloatingActor.cpp . Then, click the Product drop-down menu at the top of the screen, select the Build command, and wait for the project to finish building.

You should see a message that says "Succeeded" in the Output log at the bottom of the window. Alternatively, you can go back to the Unreal Editor and click the Compile button in the toolbar at the top of the screen.
You should always save your work before attempting to compile, otherwise the changes you make in your code will not take effect.
In the Unreal Editor, go back to the Content Browser, unfold C++ Classes, and then locate FloatingActor. It will be located in the folder that has the same name as your project, in our case, QuickStart.
Click and drag FloatingActor into the Perspective Viewport to create an instance of FloatingActor. It will be selected in the World Outliner as "FloatingActor1" and its properties will be visible in the Details Panel.
For more information about navigating the Viewport and placing Actors in the World, refer to the Level Designer Quick Start .
In the Details Panel for FloatingActor1, set your Actor's Location to (-180, 0, 180). This will place it directly over the table in the default scene.
Alternatively, you can use the Move gizmo to move it there manually.
Press the Play In Editor button at the top of the screen.
5. End Result
You should now see your cube gently floating up and down over the table while it slowly rotates.
Congratulations! You've created your first Actor class entirely with C++! While this represents a very simple object and only scratches the surface of what you can do with C++ source code, you have at this point touched on all the essentials of creating, editing, and compiling C++ code for your game. You are now ready for more complex gameplay programming challenges, and we suggest a few below.
6. On Your Own!
Now that you know how to build a simple C++ Actor, try making it more configurable. For instance, you can add variables to control its behavior:
In FloatingActor.h:
In FloatingActor.cpp:
By adding these variables in the header and replacing the float values we were using to scale DeltaHeight and DeltaRotation in the .cpp, we can now edit the float and rotation speed in the Details Panel when we select our Actor.

You can experiment by adding other kinds of behavior to the Tick function using Location, Rotation, and Scale.
You can also try attaching other kinds of components in C++ to create a more complex object. Refer to the Creating and Attaching Components guide for examples of different types of components you have available, and try adding a Particle System Component to add a bit of flare to your floating object.

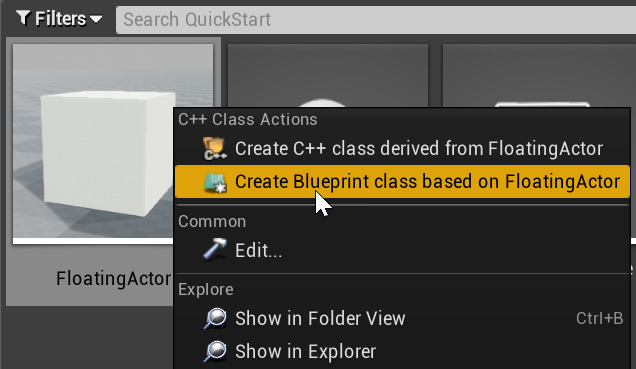
Finally, if you right-click your own Actor class in the Content Browser, you will find the option to extend it, either in C++ or in Blueprint, enabling you to create new variations of it.

You can have a whole library of FloatingActors, each substituting different Meshes or parameters as you so choose.
Create your first code project and add a new C++ class.
Choose your operating system:
In order to understand and use the content on this page, make sure you are familiar with the following topics:

In this Quick Start Guide, you will learn how to setup a C++ project in the Unreal Engine and program your first C++ gameplay class in Visual Studio. By the time you've completed this tutorial, you will know how to do the following:
Create a new C++ Project
Create a new Actor class in C++
Edit that C++ class in your development environment, adding visual representation and functionality
Compile your project
Test your new Actor in the Unreal Editor
This guide assumes that you have already set up Visual Studio as your programming environment. If not, please refer to Setting Up Visual Studio for the Unreal Engine for instructions on how to install it and get it set up for programming with the Unreal Engine. We also assume that you have some familiarity with using the Unreal Editor before starting this guide, but for your convenience we will walk through all the steps necessary to create and manage C++ classes from the editor. The end product of this guide will be a cube that floats softly in mid-air and continually rotates, giving you a simple object to test as you learn to use the development environment for programming.
This guide assumes that you have already set up XCode as your programming environment. We also assume that you have some familiarity with using the Unreal Editor before starting this guide, but for your convenience we will walk through all the steps necessary to create and manage C++ classes from the editor. The end product of this guide will be a cube that floats softly in mid-air and continually rotates, giving you a simple object to test as you learn to use the development environment for programming.
1. Required Setup
Launch the Unreal Editor. When the Project Browser comes up, click Games Project category and select a Blank template. Make sure that you have C++ and Starter Content enabled, choose your preferred Save Location and Name for this project, and then click Create Project. In our instance, we're naming our project QuickStart.
This will automatically create a simple, blank project with only essential C++ code in the solution, and it will automatically open inside both the Unreal Editor and Visual Studio. For more information on managing and creating Projects, please refer to the Project Browser page.
This will automatically create a simple, blank project with only essential C++ code in the solution, and it will automatically open inside both the Unreal Editor and XCode. For more information on managing and creating Projects, please refer to the Project Browser page.
Any Blueprint project can be converted to a C++ project. If you have a Blueprint project that you want to add C++ to, create a new C++ class per the next section, and the editor will set up your code environment for you. Also note that using a C++ project does not prevent you from using Blueprint. C++ projects simply set up the base classes for your project in C++ instead of Blueprint.
2. Create a New C++ Class
In the Unreal Editor, click the File drop-down menu, then select the New C++ Class. command.

Click image for full size.
The Choose Parent Class menu will display. You can choose an existing class to extend, adding its functionality to your own. Choose Actor, as it is the most basic type of object that can be placed in the world, then click Next.
Click image for full size.
In the Name Your New Actor menu, name your Actor FloatingActor and click Create Class.
Click image for full size.
The Unreal Engine will automatically compile and reload with our new class selected in the Content Browser, and your programming environment will automatically open with FloatingActor.cpp .
3. Edit Your C++ Class
Now that we have created our C++ Class, we're going to switch over to Visual Studio and edit our code.
In Visual Studio, locate the Solution Explorer, which by default is on the left side of the window, then use it to locate FloatingActor.h . In our project, it will be located under Games > QuickStart > Source > QuickStart.
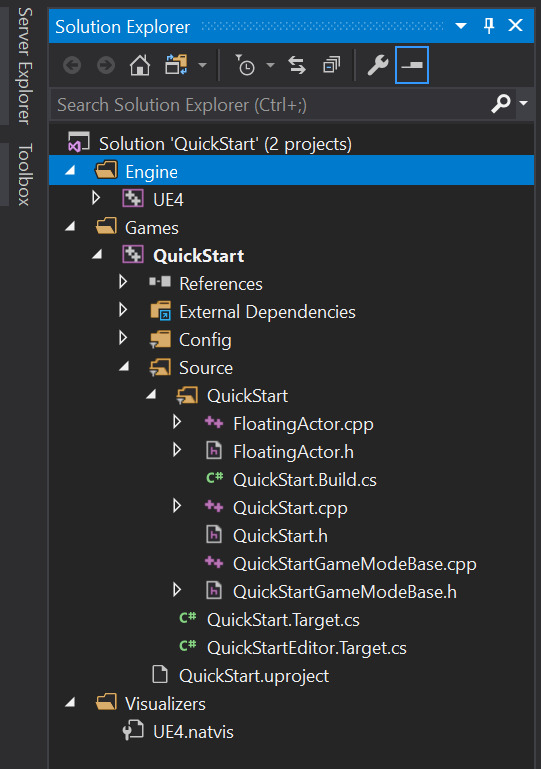
Double-click FloatingActor.h to open it and bring it into focus in the text editor.

This is a header file. You can think of it as being sort of like a table of contents for a C++ class. Before we can start building any new functionality, we must declare any new Variables or Functions that we're using in this file.
Add the following code underneath the declaration for AFloatingActor():
Here we're declaring a StaticMeshComponent, which will act as our visual representation for our object. Note that it uses a UProperty macro, which makes it visible inside the Unreal Editor. For more information on UProperty and its specifiers, see the page on Properties .
Now open FloatingActor.cpp and add the following code inside of AFloatingActor::AFloatingActor(), just before the closing bracket:
This function is the constructor, and it tells the class how to initialize itself when it is first created. The code we have added will fill our VisualMesh reference in with a new StaticMeshComponent, attach it to our Actor, and set it to the cube mesh from the Starter Content assets. For more information about attaching components in code, refer to our guide for Creating and Attaching Components .
Add the following code inside of AFloatingActor::Tick(float DeltaTime), just before the closing bracket:
The Tick function is where we add code that we want to execute in real-time. In this case, it will make our cube simultaneously rotate while also floating up and down. For more information about Ticking actors, see Actor Ticking .
Now that we have created our C++ Class, we're going to switch over to XCode and edit our code.
In XCode, locate the Project Navigator, which by default is on the left side of the window, then use it to locate FloatingActor.h . In our project, it will be located under Games > QuickStart > Source > QuickStart.

Double-click FloatingActor.h to open it and bring it into focus in the text editor. This is a header file. You can think of it as a table of contents for a C++ class. Before we can start building any new functionality, we must declare any new Variables or Functions that we're using in this file.
Add the following code underneath the declaration for AFloatingActor():
Here we're declaring a StaticMeshComponent, which will act as our visual representation for our object. Note that it uses a UProperty macro, which makes it visible inside the Unreal Editor. For more information on UProperty and its specifiers, see the page on Properties .
Now open FloatingActor.cpp and add the following code inside of AFloatingActor::AFloatingActor(), just before the closing bracket:
This function is the constructor, and it tells the class how to initialize itself when it is first created. The code we have added will fill our VisualMesh reference in with a new StaticMeshComponent, attach it to our Actor, and set it to the cube mesh from the Starter Content assets. For more information about attaching components in code, refer to our guide for Creating and Attaching Components .
Add the following code inside of AFloatingActor::Tick(float DeltaTime), just before the closing bracket:
The Tick function is where we add code that we want to execute in real-time. In this case, it will make our cube simultaneously rotate while also floating up and down. For more information about Ticking actors, see Actor Ticking .
4. Compile and Test Your C++ Code
Save your work in both FloatingActor.h and FloatingActor.cpp . Then, in the Solution Explorer, right-click the project, click the Build command in the context menu, and wait for the project to finish compiling.
You should see a message that says "Succeeded" in the Output log at the bottom of the window.
Alternatively, you can go back to the Unreal Editor and click the Compile button in the toolbar at the top of the screen.

You should always save your work before attempting to compile, otherwise the changes you make in your code will not take effect.
In the Unreal Editor, go back to the Content Browser, unfold C++ Classes, and then locate FloatingActor. It will be located in the folder that has the same name as your project, in our case, QuickStart.
Click and drag FloatingActor into the Perspective Viewport to create an instance of FloatingActor. It will be selected in the World Outliner as "FloatingActor1" and its properties will be visible in the Details Panel.
For more information about navigating the Viewport and placing Actors in the World, refer to the Level Designer Quick Start .
In the Details Panel for FloatingActor1, set your Actor's Location to (-180, 0, 180). This will place it directly over the table in the default scene.

Alternatively, you can use the Move gizmo to move it there manually.

Press the Play In Editor button at the top of the screen.

Save your work in both FloatingActor.h and FloatingActor.cpp . Then, click the Product drop-down menu at the top of the screen, select the Build command, and wait for the project to finish building.

You should see a message that says "Succeeded" in the Output log at the bottom of the window. Alternatively, you can go back to the Unreal Editor and click the Compile button in the toolbar at the top of the screen.
You should always save your work before attempting to compile, otherwise the changes you make in your code will not take effect.
In the Unreal Editor, go back to the Content Browser, unfold C++ Classes, and then locate FloatingActor. It will be located in the folder that has the same name as your project, in our case, QuickStart.
Click and drag FloatingActor into the Perspective Viewport to create an instance of FloatingActor. It will be selected in the World Outliner as "FloatingActor1" and its properties will be visible in the Details Panel.
For more information about navigating the Viewport and placing Actors in the World, refer to the Level Designer Quick Start .
In the Details Panel for FloatingActor1, set your Actor's Location to (-180, 0, 180). This will place it directly over the table in the default scene.
Alternatively, you can use the Move gizmo to move it there manually.
Press the Play In Editor button at the top of the screen.
5. End Result
You should now see your cube gently floating up and down over the table while it slowly rotates.
Congratulations! You've created your first Actor class entirely with C++! While this represents a very simple object and only scratches the surface of what you can do with C++ source code, you have at this point touched on all the essentials of creating, editing, and compiling C++ code for your game. You are now ready for more complex gameplay programming challenges, and we suggest a few below.
6. On Your Own!
Now that you know how to build a simple C++ Actor, try making it more configurable. For instance, you can add variables to control its behavior:
In FloatingActor.h:
In FloatingActor.cpp:
By adding these variables in the header and replacing the float values we were using to scale DeltaHeight and DeltaRotation in the .cpp, we can now edit the float and rotation speed in the Details Panel when we select our Actor.

You can experiment by adding other kinds of behavior to the Tick function using Location, Rotation, and Scale.
You can also try attaching other kinds of components in C++ to create a more complex object. Refer to the Creating and Attaching Components guide for examples of different types of components you have available, and try adding a Particle System Component to add a bit of flare to your floating object.

Finally, if you right-click your own Actor class in the Content Browser, you will find the option to extend it, either in C++ or in Blueprint, enabling you to create new variations of it.
You can have a whole library of FloatingActors, each substituting different Meshes or parameters as you so choose.
Читайте также: