
Sql перенос filestream на другой диск
В некоторых случаях, возникает необходимость перенести файлы баз данных на другой диск. Например, базы лежат в каталоге по умолчанию на системном диске С:, который:
- Имеет маленький размер
- Сильно нагружен ОС и системными запросами
- Довольно медленный
- Помирает
Все эти факторы влияют как на отказоустойчивость, так и на скорость обработки запросов SQl-сервером, а следовательно и на работоспособность комплекса в целом!
Теперь, когда вы прониклись важностью момента, можно приступить к практическим действиям. Итак:
Предоставление разрешения на доступ к файловой системе идентификатору безопасности службы
С помощью проводника Windows перейдите в папку файловой системы, в которой находятся файлы базы данных. Правой кнопкой мыши щелкните эту папку и выберите пункт Свойства.
На вкладке Безопасность щелкните Изменитьи затем ― Добавить.
В диалоговом окне Выбор пользователей, компьютеров, учетных записей служб или групп щелкните Расположения, в начале списка расположений выберите имя своего компьютера и нажмите кнопку ОК.
В поле Введите имена объектов для выбора введите имя идентификатора безопасности службы. В качестве идентификатора безопасности службы компонента Компонент Database Engine используйте NT SERVICE\MSSQLSERVER для экземпляра по умолчанию или NT SERVICE\MSSQL$InstanceName — для именованного экземпляра.
В поле имен Группа или пользователь выберите имя идентификатора безопасности службы, а затем в поле Разрешения для установите флажок Разрешить для параметра Полный доступ.
Вот теперь, точно всё. Спасибо за внимание!
P.S. В зависимости от конкретной ОС, конкретной версии SQL сервера, вашей кармы и наличия солнечных вспышек, что-то может пойти не так. Прежде чем приступать к вышеописанным действиям, убедитесь, что:
а) оно вам действительно надо
б) вы морально готовы
ц) вы понимаете, что вы делаете
д) у вас вся ночь впереди, чтобы переустановить SQL заново и развернуть бэкап.
detach_db2.PNG Просмотреть (31,7 КБ) Станислав Середницкий, 22/03/2018 17:27
detach_db.PNG Просмотреть (62,9 КБ) Станислав Середницкий, 22/03/2018 17:28
detach_db3.PNG Просмотреть (87,3 КБ) Станислав Середницкий, 22/03/2018 17:56
attach_db.PNG Просмотреть (84,4 КБ) Станислав Середницкий, 22/03/2018 18:05
System_DB_files_moving.sql Просмотреть (993 байта) Станислав Середницкий, 22/03/2018 18:49
sql_conf_man.PNG Просмотреть (31,7 КБ) Станислав Середницкий, 22/03/2018 19:14
start_param.PNG Просмотреть (15,3 КБ) Станислав Середницкий, 22/03/2018 19:18
Перенос самой системной базы данных master
Да, еще у нас осталась самая системная из всех системных баз - master
- путь, прописанный для этой базы, будет путем по умолчанию для всех вновь создающихся баз на данном сервере. Впрочем, для пользователей Digispot это не очень актуально. Тем более, что мы уже умеем менять пути любым базам.
1. Для изменения пути к БД master, нам понадобится оснастка SQL Server Configuration Manager (Диспетчер конфигурации SQL Server). Запускаем ее и открываем свойства SQL Server:
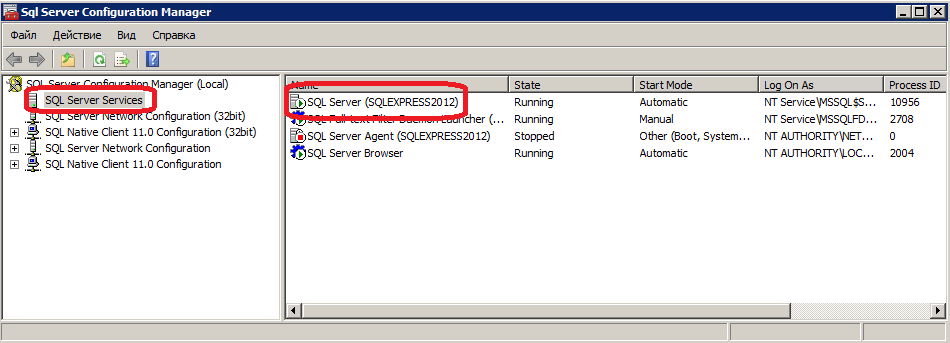
2. В свойствах SQL Server`а открываем вкладку Startup Parameters (Параметры запуска):

и по очереди меняем все указанные пути на новые.
- каждая строка начинается со своего символа -d, -e или -l. Ни в коем случае не меняйте их и не удаляйте!
3. Каждое изменение пути подтверждаем нажатием кнопки Update.
4. Теперь останавливаем сервис, копируем файлы master.mdf и mastlog.ldf из старого каталога в новый. После чего запускам сервис. ERRORLOG можно не копировать. Он создастся заново.
Moving a SQL Server FILESTREAM database to another location
We might need to move the FILESTREAM database to another location. It might be due to the space-related issues or any requirement from the storage side. Suppose we need to move the FILESTREAM database so normally DBA follow the below approaches
- Detach and attach method
- Alter database command to move the database files
We should be having the database files details before we plan to move the database from one location to another. We can get the list of all database files using the sys.database_files. We should run this under the database context.

As shown above, we have the Primary database file (.MDF), the transaction log file (.ldf) and the FILESTREAM database file.
Detach and Attach Method
Let us move the SQL Server FILESTREAM database using the Detach and Attach method first. Follow the below steps to move this FILESTREAM database using this approach.
Detach the database: Right click on the database and then follow Tasks -> Detach

We should not have any active connection for the database to detach it.

We can get more information from the hyperlink in the message tab. Below information is displayed once we click on the hyperlink.

We can close all the active connections by using the KILL command or from the Activity Monitor in SSMS. Once we have closed all active connections, its status becomes as ‘Ready’ in the detach database wizard.

Click ‘Ok’ to detach the database. We can also use the below query to detach FILESTREAM database. Once database is detached, it will not show the database in the database list of SSMS.
Copy the database files into a new folder: In this example, we want to move the database files to the location ‘C:\MoveDB’. We have copied all the files into the new location as shown below

Attach the FILESTREAM database from the new location: To attach the database, right click on the databases node and click ‘Attach’

Click on ‘Add’ and provide the MDF files from the new path. It the below section, you can notice that it identifies the corresponding log file. It does not show any SQL Server FILESTREAM file in this wizard.

Let us try to attach this database. We get the below error if the SQL Server is not able to access the files due to permissions.

We can provide the permission for the SQL Service account for the new folder and then try again the attach database process. It works fine this time. Let us view the location of database files again.

In the above screenshot, we can see.MDF and.LDF files are pointing to a new location but FILESTREAM still pointing to the old location. We want the FILESTREAM to point to the new location as well.
Let us detach the database again and rename the FILESTREAM container name to ‘DemoSQL_Old’ at the file system level.

If we try to attach the FILESTREAM database again with SSMS, you get the below error.

It is not able to locate the SQL Server FILESTREAM folder because we have renamed it. We did not get any option in SSMS to modify the FILESTREAM folder location. We need to do it using T-SQL only.
In the command, we can specify the location of the .MDF, .LDF and the FILESTREAM container. SQL Service account should be having the access on all these files and container. Execute the below command to attach the FILESTREAM database. You can get the file and container name from the sys.databases output we shown earlier.
Перенос пользовательской базы данных
1. Договариваемся с творческой частью коллектива, что в определенное время все перестают работать с базой. А именно, прекращают что-то туда добавлять и/или изменять.
2. Останавливаем сервисы, которые работают с МБД в автоматическом режиме, например:
- DB Import - импорт новостных лент
- DDB - распределенная база данных
- Sch_to_DB - репликация расписаний
иначе, есть вероятность потерять часть информации.
3. Запускаем Microsoft SQL Server Management Studio.
4. Самым первым делом всегда делаем бэкап базы!
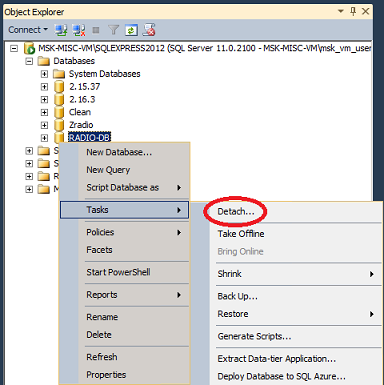
5. Далее, смотрим, где лежат файлы нужной нам базы данных (в нашем примере это будет МБД под названием "RADIO-DB"). Для этого, нажимаем на ней ПКМ и открываем Properties (Свойства). Заходим в раздел Files (Файлы) и смотрим раздел Path (Путь):

6. Далее, нажимаем ПКМ на целевой базе и выбираем пункт Tasks\Detach (Задачи\Отсоединить):
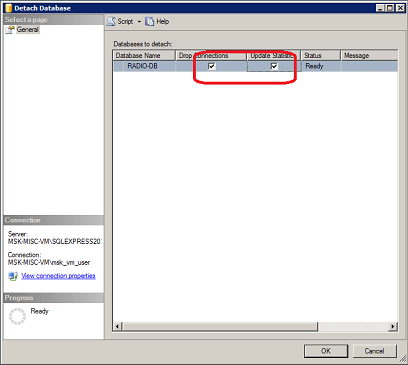
7. В открывшемся окне ставим обе галочки и нажимаем ОК. После чего, МБД пропадет из списка:
8. Через обычный проводник заходим в каталог, где лежат нужные нам файлы. В нашем примере, это C:\Program Files\Microsoft SQL Server\MSSQL11.SQLEXPRESS2012\MSSQL\DATA.
9. Копируем эти файлы в новый каталог на новый диск и снова открываем Microsoft SQL Server Management Studio.
10. Нажимаем ПКМ на разделе Databases (Базы данных), выбираем пункт Attach (Присоединить) и в открывшемся окне нажимаем кнопку Add (Добавить) и выбираем нужный нам файл RADIO-DB.mdf уже из нового каталога:
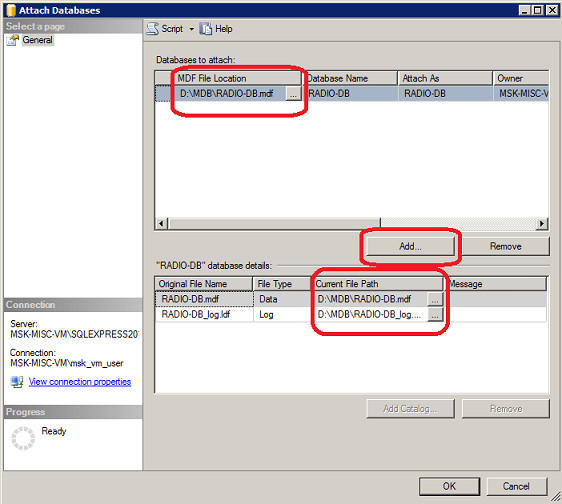
Убеждаемся, что пути у нас теперь новые и нажимаем ОК.
Всё, пользовательская база данных переехала на новый диск. Не нужно ничего перезапускать и т.д. Убеждаемся, что рабочие места переподключились к МБД и разрешаем им снова работать в штатном режиме.
Как перенести файлы базы данных SQL Server в другой каталог или на другой диск

Рассмотрим пример перемещения файлов пользовательской базы данных SQL Server в новое месторасположение. В рассматриваемом примере все файлы одной отдельно взятой БД с именем EffectOffice будут перенесены с одного логического диска на другой (с диска T:\ на диск U:\ ).
Перед началом процедуры переноса файлов базы данных остановим cервисы и приложения, работающие с этой базой данных.
Подключимся к экземпляру SQL Server, на котором расположена интересующая нас база данных и выясним текущее размещение файлов БД с помощью запроса:

Выполним запрос на закрытие всех соединений к БД и перевод БД в одно-пользовательский режим:
Переведём базу данных в Offline-режим:
Выполним копирование файлов БД в новое место-расположение с помощью утилиты командной строки robocopy, которая позволит нам сохранить все разрешения на каталоги и файлы на уровне NTFS.
В нашем примере файлы БД копируются из каталога T:\DBCL02-EffectOffice в каталог U:\DBCL02-EffectOffice . Каталог назначения при этом будет создан в процессе копирования и на него будут скопированы все атрибуты исходного каталога.
Выполним замену путей к файлам на уровне SQL Server запросом вида (отдельный запрос по каждому файлу):

Переведём базу данных в Online-режим и обратно включим многопользовательский режим работы с БД
Запустим сторонние службы и приложения, использующие базу данных и убедимся в штатной работе с данными.
После успешного запуска БД и проверок, можем удалить файлы с их исходного местоположения ( T:\DBCL02-EffectOffice )
Дополнительные источники информации:
Проверено на следующих конфигурациях:
| Версия SQL Server |
|---|
| Microsoft SQL Server 2016 Standard Edition SP2 CU14 (13.0.5830.85) |

Автор первичной редакции:
Алексей Максимов
Время публикации: 24.09.2020 09:15
You may want to move a database containing “File Stream” data to another disk with the detach attach method.
Moving a database containing “File Stream” data with the detach attach method is slightly different from the normal detach attach method.
In the article titled “How To Change The Disk Files On Database Files“, I explained the process of changing the database’s disks with the detach attach method.
In this article we will also do this for databases that contain file stream data.
Before reading this article, I recommend you read the article titled “What is File Stream in SQL Server“.
In some cases, there may not be space on the discs where the database files are located.
For this reason, you may need to transfer some or all of the database files to other disks.
There are several ways to do this. We will talk about the two most commonly used ways in this article.
Before you do detach, you need to save the result of the following script in order to save database file’s paths.
As shown in the following figure, right click on the database and select detach from the task tab to disconnect the database from the sql server first.

If we click on the Detach tab and there is a connection on the database, we need to select Drop Connections as below so that these connections are terminated before detach.

If detach is not performed again, you should run the above script by clicking on the Script and adding the following script to the top of the script created by SQL Server.
Before detach, you need to make sure that there are no requests for the application.
The best way to be sure of this is to discuss with application developers, ask them to stop the application, and then disable Login.
From the Security-> Logins tab of SQL Server Management Studio, right-click the login using the application and select Properties.
Then from the pop-up, we select Disabled from the Status tab as shown below and press OK.

After the detach process is finished, you need to move the database files using the copy paste method.
If we want to attach in normal ways after the move is finished, we will get an error like below.
Because when we want to Attach on SSMS, the FileStream data does not appear.
Msg 5120, Level 16, State 105, Line 3
Unable to open the physical file “C:\MSSQL\FileStreamVeri”. Operating system error 2: “2(The system can not find the specified file.)”.
Msg 5105, Level 16, State 14, Line 3
A file activation error occurred. The physical file name ‘C:\MSSQL\FileStreamVeri’ may be incorrect. Diagnose and correct additional errors, and retry the operation.
Msg 1813, Level 16, State 2, Line 3
Could not open new database ‘FileStreamDB’. CREATE DATABASE is aborted.
Therefore, we need to perform this operation with the help of the following script.
In our example, we moved the filestream data from the “C:\MSSQL” folder to the “C:\MSSQL\FileStreamUpdate” folder and later attached it.

SQL Server FILESTREAM allows storing the Varbinary (Max) objects in the file system instead of placing them inside the database. In the previous article – FILESTREAM in SQL Server, we took an overview of the FILESTREAM feature in SQL Server and process to enable this feature in SQL Server Instance.
Before we move further in this article, ensure you follow the first article and do the following:
- Enable FILESTREAM from the SQL Server Configuration Manager
- Specify the SQL Server FILESTREAM access level using the sp_configure command or from SSMS instance properties
In this article, first, we will be creating a FILESTREAM enabled SQL Server database. To do this, connect to the database instance and right click on ‘Databases’ and then ‘New Database’ to create a new FILESTREAM database.

In the general page, specify the Database name and the location of the MDF and LDF files. In the demo, our database file and log file location is ‘C: \sqlshack\SQLDB.’

Click on the ‘Filegroups’ page from the left menu, and you can see a separate group for the FILESTREAM.
We need to add the SQL SERVER FILESTREAM filegroup here, but in the screenshot, you can see that the ‘Add Filegroup’ option is disabled. If we do not restart the SQL Service after enabling the FILESTREAM feature at the instance level from SQL Server Configuration Manager, you will not be able to add the FILESTREAM filegroup.

Restart the SQL Server service now and then again follows the steps above. You can see in below screenshot that the ‘Add filegroup’ option is now enabled.

Click on ‘Add FileGroup’ in the FILESTREAM section and specify the name of the SQL Server FILESTREAM filegroup.

Click ‘OK’ to create the database with this new filegroup. Once the database is created, open the database properties to add the file in the newly created ‘DemoFileStream’ filegroup.
Specify the Database file name and select the file type as ‘FILESTREAM Data’ from the drop-down option. In the filegroup, it automatically shows the SQL Server FILESTREAM filegroup name. We also need to specify the path where we will store all the large files such as documents, audio, video files etc. You should have sufficient free space in the drive as per the space consumption of these big files.

We can generate the script using the ‘Script’ option as highlighted below.

We can see the below scripts for the adding a SQL Server FILESTREAM filegroup and add a file into it.
SQL Server FILESTREAM is a great feature to store unstructured data into the file system with the metadata into SQL Server database. In the article, FILESTREAM in SQL Server, we wrote to enable the FILESTREAM feature at the instance level. We created the new database for the FILESTREAM and insert sample data into it in the Managing data with SQL Server FILESTREAM tables.
Sometimes we might have a requirement to add the FILESTREAM data to an existing table. In this article, we will learn to fulfil this requirement. Before we move further, we will assume that the following tasks are already completed.
- FILESTREAM feature is enabled at the instance level, you can verify it from the SQL Service properties in the SQL Server Configuration Manager
- You have configured the filestream_access_level at the instance level using the sp_configure command
Worked example
Let us create a new database and create a sample table into it.
Below are the steps to add the FILESTREAM column into existing table.
Step 1: Add FILESTEAM filegroup: We need to add the FILESTEAM file group into existing database and specify that it will contain the FILESTREAM objects. Run the below query to add FILESTREAM filegroup.
Step 2: Add the file into the FILESTEAM filegroup: In this step, we are going to add a database file into the FILESTREAM filegroup. Execute the below query in the sample database.
ALTER DATABASE DemoSQL ADD FILE ( NAME = N 'DemoSQLFiles' , FILENAME = N 'C:\sqlshack\DemoSQL\FS' ) TO FILEGROUP FILESTREAM_grp
Step 4: ADD FILESTREAM Column to an existing table: In this step, we can add the column into an existing table using the alter table command. (Note: To show the below error message, I added the step 4 before)
We get the below error message with this query.

Step 3: ADD non-null unique column with ROWGUIDCOL property: We need to add the new column into the existing table with ROWGUIDCOL property. We can execute the below command to alter the table for this.
We can verify the table property using the sp_help ‘tablename’ command. It creates the unique non-clustered index along with the unique, default constraint on this new column. It ensures the unique values in the table. It also ensures the performance benefit as well due to the non-clustered index.

Now let us go back to step 4 as mentioned above and run the query to add SQL Server FILESTREAM column into the existing table.
We can verify the FILESTREAM column into the existing table as shown below.

Insert the data into the table to verify it has no issues.

You can see the object in the FILESTREAM container as well.

Перенос системных баз данных
Но, остались еще системные базы данных (спрятаны в разделе System Databases). Это msdb, model и tempdb, которые в общем-то тоже будет неплохо перенести на быстрый и отказоустойчивый диск. Тем более, что среди них есть одна, очень для нас важная база - tempdb. Именно через нее проходят все запросы, прежде чем попасть в пользовательскую МБД. Перенести системные базы ничуть не сложнее, чем пользовательские. И для этого надо:
1. Используя Microsoft SQL Server Management Studio, выполнить следующий скрипт:
Его также можно скачать из этого описания и запустить непосредственно на SQl-сервере.
2. Останавливаем службу SQL.
3. Копируем из старого каталога (помним наш пример: C:\Program Files\Microsoft SQL Server\MSSQL11.SQLEXPRESS2012\MSSQL\DATA) все файлы, указанные в скрипте выше, в новый каталог, который мы прописали в том же скрипте.
4. Обязательно добавляем учетную запись группы безопасности. Подробно о том, как это сделать, читайте в конце данной статьи, в разделе "Предоставление разрешения на доступ к файловой системе идентификатору безопасности службы".
5. Запускаем службу SQL.
6. Убедиться, что мы все сделали правильно, можно, посмотрев в свойствах каждой системной БД раздел Files (Файлы). Там должны быть новые пути к обоим файлам (самой БД и логу).
Читайте также: