
Vmware в virtualbox конвертировать
Recently I had migrated laptops and I wanted to move my VMware workstation VMs to VirtualBox. All of my VMs were in the .vmware folder so I just copied that to my laptop. Here are the contents of that folder:
There are only two VMs: UCSPM (the UCS Manager Emulator) and Windows XP Professional (My Windows XP machine). I am just going to convert my Windows XP machine. Inside that folder, I saw the following:
Pretty standard stuff, but I realized that when I created that VM I used the 2GB Split Sparse VMDK format. I don’t even know why I did that. I was probably thinking that if I was backing up to a FAT32 partition then this might help out. But who uses FAT partitions anymore? :)
So the first thing I wanted to do, was to convert the 2GB Split Spare VMDKs into a single monolithic VMDK (also reffered to as Monolithic Sparse VMDK). You can check out all the VMDK formats in the Virtual Disk Programming Guide Virtual Disk Development Kit (VDDK) 5.1. Here is a table from that pdf:

Step2 - Export the appliance
Browse to the OVFTool folder. If you are using VMware Player, you will find it at C:\Program Files (x86)\VMware\VMware Player\OVFTool. If you are using VMware Workstation you will find it at C:\Program Files (x86)\VMware\VMware Workstation\OVFTool.
Hold Shift, right-click inside the OVFTool folder, and select Open command window here.

Run ovftool with the following command:
Now it's time to wait. Depending on the virtual machine size and the PC power this will take some time.

Convert Split Sparse VMDK to a Monolithic Sparse VMDK
Looking over a couple of sites, it looks like vmware-vdiskmanager is the way to go:
The vmware-vdiskmanager is packaged with the “Virtual Disk Development Kit” which you can download from here. Here is screenshot of the available downloads after I logged into the VMware portal:

After I downloaded the archive, I had the following file:
So I went ahead and extracted the contents:
Now let’s go ahead and install the package:
After the install, I tried to check the consistency of my files and I ran the following:
I then re-read the “Virtual Disk API Programming Guide”, and saw the following:
- On the Download page, choose the binary tar.gz for either 32‐bit Linux or 64‐bit Linux.
Unpack the archive, which creates the vmware-vix-disklib-distrib subdirectory.
So I went ahead and created a file /etc/ld.so.conf.d/vmware-vix-64.conf with the following contents:
I then ran ldconfig to apply the changes:
and I can see the new libraries are now included. If you don’t want to mess with the system’s libraries you can always just set the LB_LIBRARY_PATH variable. Another person had issues by changing the ld.so.conf files and ended going that route. The issue and steps around it are described in this VMware’s Communities page.
Now re-running my consistency check, I saw the following:
That looks good. Now let’s go ahead and convert it. Checking out the vmware-vdiskmanager --help output, I saw the following:
And here are the available disk types:
So the command for the conversion, looked like this:
and that went on for a little bit. Notice that the destination VMDK is called Windows_XP.vmdk. After the conversion is finished we will see this:
Checking out the final file, I saw the following:
and then checking the old files:
The size matched up, which is perfect.
From this point on, I could’ve probably just added the vmdk to VirtualBox, but I wanted to preserve all the Memory and CPU settings. To save those settings we can package the VMX and VMDK into an OVA template and then import it into VirtualBox.
Конвертация из VMware в Hyper-V
На мой взгляд VMware и Hyper-V - самые популярные гипервизоры. Именно их мы и рассмотрим в первую очередь.
Существует несколько способов конвертации. Компания Microsoft, понимая актуальность данной процедуры, предлагает два варианта решения проблемы. Первый способ - использовать средства конвертации, встроенные в Virtual Machine Manager (VMM).
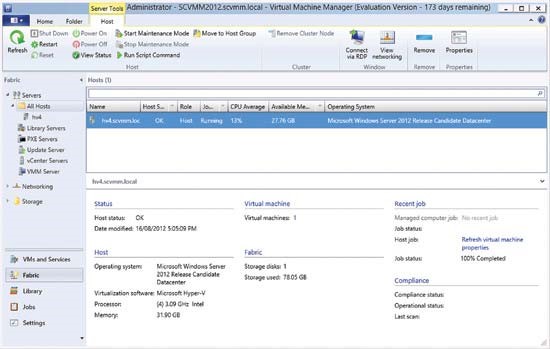
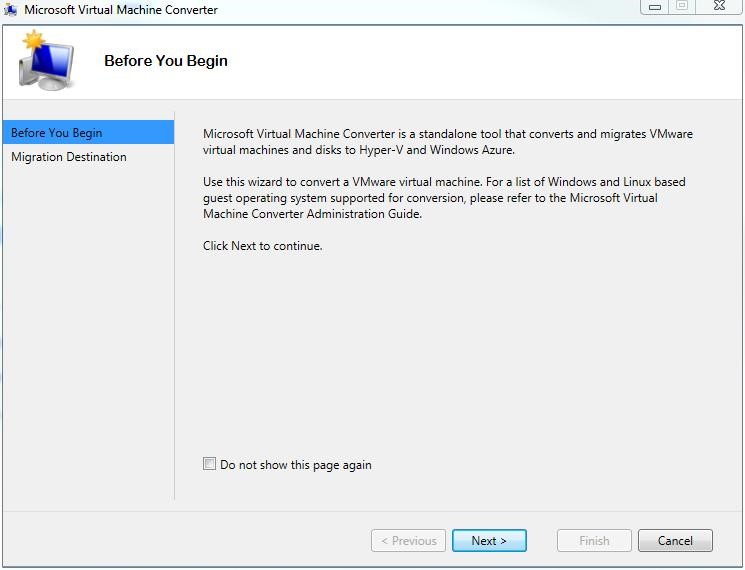
Подробную информацию об этом способе можно найти в статье MSDN. Второй способ - использовать отдельную утилиту Microsoft Virtual Machine Converter.
Сторонние производители программного обеспечения не остались в стороне. Выпускаемые ими продукты превосходят средства, предлагаемые компанией Microsoft, как в скорости конвертации, так и в удобстве использования.
Для примера рассмотрим два программных продукта: StarWind V2V Converter и 5nine V2V Easy Converter.

StarWind V2V Converter позволяет конвертировать виртуальные жесткие диски форматов: vmdk (формат виртуальных жестких дисков VMware), vhd и vhdx (формат виртуальных жестких дисков Hyper-V) и формат img для поддержки продукта StarWind Virtual SAN™. Интерфейс программы и процесс использования предельно просты. Имеется визард, который проведет вас по всему процессу конвертации. Одной из особенностей работы программы является возможность после конвертации включить Windows Repair Mode. Это позволит системе автоматически адаптироваться к внесенным изменениям со стороны гипервизора. Так же стоит отметить что конвертация происходит в любом направлении.

5nine V2V Easy Converter отличается принципом работы. Он позволяет выполнять почти "живую" миграцию. Интерфейс так же прост и не должен вызывать затруднений. Для начала работы необходимо указать параметры подключения к серверу VMware. После подключения будет представлен список виртуальных машин, доступных для переноса. На следующем шаге необходимо указать параметры подключения к серверу Hyper-V, выделить на нем ресурсы переносимой виртуальной машине и начать процесс переноса. Этот программный продукт не позволит вам конвертировать непосредственно сам виртуальный жесткий диск, он позволит мигрировать виртуальную машину из одного гипервизора в другой.
Step3 - Import the appliance
Once the process is complete, you can import the .ovf file into VirtualBox.

Select the .OVF file and press Next to continue.

You can edit the virtual machine details. Press Import to start the import.

Now it's time to wait again. Depending on the virtual machine size and the PC power this will take some time.

After the process completes, you should uninstall VMware Tools from the Control Panel inside the virtual machine, and install VirtualBox Guest Additions from the virtual machine's menu. This will activate the sharing tools between the host and the guest.
If you already have your virtual machines set up using VirtualBox, you don't necessarily have to install them from scratch if you need it to be used in VMware, the solution is to migrate your existing virtual machines.
VirtualBox and VMware use different virtual machine formats, but each supports the standard Open Virtualization Format. Converting your existing virtual machine to OVF or OVA you will be able to import it into another virtual machine program.
![]()
Виртуальная машина, VMware, Hyper-V, VirtualBox. Знакомые вещи, не так ли?
Думаю, что не ошибусь, если скажу, что большинство людей, связанных с разработкой, тестированием и администрированием давно привыкли к виртуальным машинам. Воспринимают их как что-то давно знакомое, а главное - полезное. Ведь если у вас есть относительно мощный компьютер с достаточным объемом оперативной памяти, можно параллельно работать в двух, а то и в трех разных операционных системах.
А теперь представьте ситуацию: вы или ваша организация использует, к примеру, Hyper-V. Ваш партнер хочет передать вам на тестирование или для ознакомления какое-то решение, установленное и настроенное на виртуальной машине. Но так случилось, что партнер использует VMware. У вас возникает вопрос: как переделать виртуальную машину? А можно ли это вообще? Об этом и пойдет речь дальше.
Что же представляет из себя виртуальная машина? Вне зависимости от гипервизора, виртуальная машина состоит из двух частей: виртуальной машины (файла или набора файлов с описанием конфигурации, параметров запуска и другой служебной информации) и виртуального жесткого диска. Именно виртуальный жесткий диск в большинстве случаев и надо конвертировать. Именно на нем установлена операционная система и весь набор программного обеспечения.
А теперь важное лирическое отступление. После установки виртуальной машины гипервизор, в большинстве случаев, предлагает установить пакет программного обеспечения. Этот пакет повышает производительность виртуальной машины и ее управляемость. Так же он может содержать набор драйверов, оптимизированных для работы в виртуальной среде. Процесс конвертации подразумевает смену гипервизора. Поэтому все пакеты программного обеспечения, поставляемые гипервизором, с которого планируется переход, необходимо удалить. Сделать это лучше заранее, до конвертации.
Конвертация из Hyper-V в VMware
Для конвертации виртуальной машины из Hyper-V в VMware можно использовать уже рассмотренный в этой статье программный продукт StarWind V2V Converter. Но это не единственное решение. Как и у компании Microsoft, у VMware есть свой конвертер. Имя ему VMware vCenter Converter Standalone.

Это поистине многофункциональны продукт. Одна только инструкция к нему занимает 102 страницы печатного текста. Но не стоит отчаиваться! Для начинающих администраторов имеется простой и функциональный визард.
Import an OVA Template into VirtualBox
We can use the VBoxManage to import an OVA Template. From the command line:
So let’s use -n to see all the options:
That looks perfect. There is only one Virtual Disk and the Memory, CPU, and other settings are there as well.
Running without the -n (dry run) option looked like this:
Initially I had an issue with the OVA template, another user ran into the issues and it’s described in this VirtualBox forum. I got around the issue by re-creating another OVA template. If you still have issues just extract the OVA into a folder and then import the OVF instead. That process seems to be more stable, here is the command you would run if you had extracted the OVA template under a folder called test:
After the import is finished, start VirtualBox and you will see you newly imported VM:

If you want to keep it command line, you can run:
And that will show you a lot of information regarding the VM that you just imported. Here is a shorter version:
After powering on the VM, I saw the following:

Create an OVA Template from a VMware Workstation VM
The VMX file is where all the configurations are stored, and my VMX file was still pointing at the old Split Sparse VMDK:
I edited the VMX file and pointed to the newly converted VMDK. After I was done, I had the following:
Now that my VM is ready to be imported into an OVA, let’s check out the OVF Tool User Guide. From the guide, here is the install process:
- Download VMware OVF Tool as an installer or an archive (zipped/compressed) file:
- Install using the method for your operating system:
Here is the download page for the ovftool application. After I logged in, here were the downloads that I saw:

When I was done with the download, I had the following file:
Now let’s install the ovf tool:
At this point a GUI installer will come up, like so:

Just hit “Install” and the process with go through pretty quickly. After it’s finished you will see the following:

In the OVF User Guide there are good examples of how to use ovftool. Here is what I ran to create my OVA template:
It started to create the template. The extension is actually important, if I specify an “ovf” extension then it will create an OVF file along with VMDKs. Where the ‘.ova’ extension encompasses both. From the guide:
Converting a VMX to an OVF
To convert a virtual machine in VMware runtime format (.vmx) to an OVF package, use the following syntax:
| The result is located in /ovfs/my_vapp.[ovf | vmdk] |
Converting a VMX to an OVA
To convert a VMX to an OVA file, use the following syntax:
Also from the same guide:
Supports both import and generation of OVA packages (OVA is part of the OVF standard, and contains all the files of a virtual machine or vApp in a single file.)
Here is also a table comparison:

After the process was done, I saw the following:
Now checking for the OVA file:
To get information about the OVA file you can also use ovftool in “probe mode”:
As a last note, an OVA file is just a tar archive, and you can check the contents of the OVA file like so:
All of the above looks good, now let’s import the OVA template into VirtualBox.
Step 1 - Power off
Before migrating a virtual machine from VirtualBox to VMware, ensure it's "powered off" in VirtualBox - not suspended. If it's suspended, launch the virtual machine and shut it down.

Step2 - Export the appliance
Select File --> Export Appliance.

From the virtual machines list select the virtual machine you want to export and click Next.

Provide the file location and click next.
Note: I did several tests with various virtual machines and I notice that the most success rate I had when I used OVF 1.0.

You can edit the Virtual Appliance details if needed. Press Export to start.

Now it's time to wait. Depending on the VM size and your computer performance this operation it might take some time. For me, it took about 30 min, even if the estimation was much higher.

Migrate from VMware to VirtualBox
To migrate from VMware to VirtualBox, you first need to export the VM in an .ovf file. To do that open the VMware folder located inside the “Programs Files” folder in the C drive. Once you are there, open the “OVFTool” folder. Press “Shift + right-click,” and then select the “Open Command Prompt here” option.

In the command prompt window, use the below command, and press the Enter button. Don’t forget to change the path of the .vmx file of the VM you want to export and the destination for the new .ovf file.
As soon as you execute the command, the VM will be exported as an .ovf file to the marked destination.

Note: if you are using VMware Workstation, you can also export the VM as an .ovf file by navigating to “File” and then selecting the option “Export to OVF.”
Now, open up the VirtualBox and select the option “Import Appliance.”

The above action will open the “Appliance to Import” window. Here, browse and select the exported .ovf file, and click on the “Next” button.

In this window VirtualBox will show you all the VM settings. Leave them as is; you can always change them later. Just click on the “Import” button to continue.

The above action will start the import process.

Once the importing has been done, you will see your imported virtual machine in the VM VirtualBox Manager. Just select the VM, and click on the “Start” button to power on the VM.

You’ve successfully imported VM from VMware to VirtualBox.

Troubleshooting Import Errors in VirtualBox
If you are receiving importing errors, then follow the below steps.
1. Open the “export.ovf” file with your favorite text editor, find all instances of “ElementName” and replace it with “Caption.”
2. Next, find the instance of “vmware.sata.ahci” and replace it with “AHCI.”
3. Finally, calculate the SHA1 hash value of the “export.ovf” file using this online tool, and replace the old hash value with the new one found in the “export.mf” file. You can open it with any text editor.
Note: you need to replace the hash value of “SHA1(export.ovf).”

Once you are done with the changes, try importing again. This should solve the import errors. If not, you should probably create a new VM from ground up.
Fixing “Error loading operating system” After Migrating XP VM
The first that I did was change the Disk Controller from SCSI to IDE. Here is how the Storage settings initially after the migration:

Then I changed the Contoller to IDE and also added my XP ISO, so I could boot from it. Here is how the settings looked like after the changes:

Reboot the VM and you will see “Press any key to boot from the CD..”. I pressed “Enter” and it started booting from the CD and then you will see this screen:

At this point I typed “R” to bring up the “Recovery Command Prompt”. At the command prompt, I ran the following:
Here is how that looks like:

That should re-install the MBR on the disk. After I rebooted the error was gone, but it just showed a black screen like so:

At this point I booted from the Vista Recovery Disk. The disk used to be available for free from “Windows Vista Recovery Disc Download”, but now you have to pay for it. If you have a Vista Install CD, you can use that as well. Here is how my storage settings looked after I added the new ISO:

Rebooting the VM and pressing “Enter” at the “Press any key to boot from CD….”, I saw the following screen:

I then clicked “Next” and saw the following screen:

Then I clicked “Repair your Computer” and I saw the following:

At that screen I clicked “Next” and that yielded this screen:

I then clicked “Command Prompt” and in the command prompt I fixed the MBR again (just for good measure) with following commands:
Here is how it looked like:

Looking around some settings, I noticed that the partition is not active, I then ran the following to activate the partition:
Here is how it looked like in the prompt:

Notice the “*” (star) next to the partition after making it active. Then I rebooted and I saw a successful Windows boot process:
Вместо заключения
Изначально статья планировалась мной в большей степени как практическая. По мере написания я решил, что вся практическая часть легко ищется в интернете по ключевым словам. Поэтому статья приобрела в большей степени теоретический характер. В ней описаны не все способы и методы переноса виртуальных машин из одного гипервизора в другой. Я постарался описать самые популярные, доступные и реализуемые без обращения к командной строке.

Virtual machines are helpful in many ways. You can use them to try out new operating systems, test software, run old applications, etc.
Two of the most popular virtual machine software are VMware and VirtualBox. Both have their own pros and cons, and most of us spend a good amount of time and effort to create and maintain a virtual machine in either software. The good thing is that you can even migrate your VM from VirtualBox to VMWare, and vice versa, without having to recreate from the ground up. Here is how to do it.
Note:
- For this demonstration I’m using VMware Workstation as my other virtual machine software. Even if you are using VMware Player, the procedure is the same.
- Before starting the migration process, make sure that the VM you want to export is in “Power Off” state and not in Suspended or Paused state. This applies to both VMware and VirtualBox.
Also read: How to Install macOS in VirtualBox
References

report this ad
Migrate from VirtualBox to VMware
Migrating from VirtualBox to VMware is easy as well. Open the VirtualBox application, and select the option “Export Appliance” from the “File” menu.

The above action will open the export wizard. Here, select the VM you want to export, and click on the “Next” button to continue.

Here in this screen, select the destination, and click on the “Save” button.

VirtualBox will now show you the storage settings. Leave the defaults as is, and click on the “Next” button.

Check all the appliance settings, and click on the “Export” button to start the exporting process.

Depending on the size of the VM, the exporting process may take some time.

Once you are done exporting the VM, you can import it to VMware. To do that, open up VMware Player/Workstation, and select the “Open” option from the “File” menu.

Now select the exported .ova file.

In this screen click on the “Import” button to start the importing process.

If you receive an error saying that the import has failed to due to hardware compliance issues, simply click on the “Retry” button. This action should start the importing process.
Note: if the above action didn’t solve the problem, then you have to create a new virtual machine from ground up.

If everything goes as planned, VMware starts importing the VM. Again, the process may take some time to complete.

Once the importing has been completed, turn on the VM by clicking on the option “Power on this virtual machine.”

You’ve successfully imported or migrated your VM from VirtualBox to VMware.

Also read: How to Fix Ubuntu Freezing in VirtualBox
Do comment below sharing your thoughts and experiences about using the above method to migrate from VMware to VirtualBox and vice versa. We also have some more virtual machine features on the site, such as how to import and export OVA files on Linux. Also check out our whole list of the best sandbox applications for Windows 10.
Our latest tutorials delivered straight to your inbox
Vamsi is a tech and WordPress geek who enjoys writing how-to guides and messing with his computer and software in general. When not writing for MTE, he writes for he shares tips, tricks, and lifehacks on his own blog Stugon.
If you already have your virtual machines set up using VMware, you don't necessarily have to install them from scratch if you need it to be used in VirtualBox, the solution is to migrate your existing virtual machines.
VMware and VirtualBox use different virtual machine formats, but each supports the standard Open Virtualization Format (OVF). Converting your existing virtual machine to OVF or OVA, you will be able to import it into another virtual machine program.
Step 1 - Power off
Before migrating a virtual machine from VMware to VirtualBox, ensure it's "powered off" in VMware - not suspended. If it's suspended, launch the virtual machine and shut it down.
If you are using VMware Workstation:

If you are using VMware Player:

Конвертация из VirtualBox в VMware или в Hyper-V
Самый простой способ перенести виртуальную машину из VirtualBox в VMware - воспользоваться экспортом виртуальной машины из VirtualBox в формат OVA (Open Virtualization Format Archive, файл .ova) и импортом этого архива в VMware. В таком варианте конвертации виртуальная машина перенесется целиком, со всеми параметрами выделенной памяти и процессорных ресурсов. Этот способ недоступен для переноса виртуальной машины в Hyper-V, так как Hyper-V напрямую не способен импортировать формат ova. Так же для конвертации можно использовать менеджер виртуальных носителей (меню "Файл", пункт "Менеджер виртуальных носителей"). Встроенный конвертер позволяет преобразовывать из одних форматов в другие все поддерживаемые программой файлы виртуальных жёстких дисков — VDI, VHD, VMDK, HDD, QED, QCOW. Этот способ более универсальный, подходит для переноса в Hyper-V, но требует повторной детальной настройки виртуальной машины в новом гипервизоре.
Конвертация из VMware или Hyper-V в VirtualBox
Встроенный в VirtualBox конвертер позволяет преобразовывать виртуальные жесткие диски в обеих направлениях, а экспортировать виртуальные машины в формат OVA умеет не только VirtualBox, но и VMware. Поэтому процесс переноса или конвертации диаметрально противоположен процессу, описанному в предыдущем абзаце.
Step3 - Import the appliance
To start the import right-click on the .ova file and select Open with --> VMware Workstation or Open with --> VMware Player, depends what version you have installed.

Select the path for the new virtual machine and click Import.

Warning: Unfortunately, this may not always work, as VirtualBox and VMware both seem to use slightly different OVA/OVF implementations that aren't entirely compatible. If this doesn't work, the only option id to do reinstall your virtual machine's guest operating system from scratch. To increase the chance of success use OVF 1.0 on the export step.

If you see this warning press Retry, it might work. If there is no error after this, you are on the good path.
Again, it's time to wait. Depending on the VM size and your computer performance this operation it might take some time. For me, it took about less than the export: 15 min. Highly influenced by the fact that the destination was on SSD drive.

After the operation is finished you are ready to edit the details if needed and start the VM in the new format.
Additional, you should uninstall VirtualBox Guest Additions from the Control Panel inside the virtual machine, and install VMware Tools from the virtual machine's menu. This will activate the sharing tools between the host and the guest.
Convert Split Sparse VMDK to a Monolithic Sparse VMDK
Looking over a couple of sites, it looks like vmware-vdiskmanager is the way to go:
The vmware-vdiskmanager is packaged with the “Virtual Disk Development Kit” which you can download from here. Here is screenshot of the available downloads after I logged into the VMware portal:
After I downloaded the archive, I had the following file:
So I went ahead and extracted the contents:
Now let’s go ahead and install the package:
After the install, I tried to check the consistency of my files and I ran the following:
I then re-read the “Virtual Disk API Programming Guide”, and saw the following:
- On the Download page, choose the binary tar.gz for either 32‐bit Linux or 64‐bit Linux.
Unpack the archive, which creates the vmware-vix-disklib-distrib subdirectory.
So I went ahead and created a file /etc/ld.so.conf.d/vmware-vix-64.conf with the following contents:
I then ran ldconfig to apply the changes:
and I can see the new libraries are now included. If you don’t want to mess with the system’s libraries you can always just set the LB_LIBRARY_PATH variable. Another person had issues by changing the ld.so.conf files and ended going that route. The issue and steps around it are described in this VMware’s Communities page.
Now re-running my consistency check, I saw the following:
That looks good. Now let’s go ahead and convert it. Checking out the vmware-vdiskmanager --help output, I saw the following:
And here are the available disk types:
So the command for the conversion, looked like this:
and that went on for a little bit. Notice that the destination VMDK is called Windows_XP.vmdk. After the conversion is finished we will see this:
Checking out the final file, I saw the following:
and then checking the old files:
The size matched up, which is perfect.
From this point on, I could’ve probably just added the vmdk to VirtualBox, but I wanted to preserve all the Memory and CPU settings. To save those settings we can package the VMX and VMDK into an OVA template and then import it into VirtualBox.
Читайте также: