
Sketchup создание модели по фото
Until you get the hang of Match Photo, you may suspect that SketchUp dumped a box of rainbow spaghetti on your model like a toddler bored with pasta crafts. Match Photo is a bit confusing at first, but this article gives you the tips and steps that you need to use Match Photo in the magical way its developers intended. When you’re first learning how to use Match Photo, orient yourself to the color-coded tools that Match Photo spills onto your screen and check out what photos work well with the Match Photo feature. Then try your hand at matching a photo, following the detailed steps in the following sections.
Tip: In this YouTube video, you see Match Photo in action. Although the demo uses an older version of SketchUp, the process in current versions of SketchUp is similar.
Table of Contents
Creating a 3D model from a photo
If you have a photo of something you want to model, Match Photo can help you draw the 3D model.
Tip: This process works best for objects with parallel lines, such as the top and bottom of a rectangular window.
To draw a model with the help of a photo and SketchUp’s Match Photo feature, follow these steps:
-
Follow the steps in the preceding section, “Matching a photo with an existing model,” to set up your axis origin, vanishing point bars, and scale. The only difference is that you don’t need to worry about opening the model that goes with your photo or projecting textures onto a not-yet-existing model. These steps explain how to draw the model based on your photo.
Tip: To help you set the scale of your photo, insert one of SketchUp’s 2D people, as shown in the figure. If you don’t already see one of these folks in your model already, find them in the Components panel.
Tip: The process of modeling from a photo is iterative. You’ll likely do a little drawing, check your model against the photo, do a little more drawing, and so on.
Как ввести размеры в SketchUp

Программа 3D-дизайна Google SketchUp предлагает пользователям как минимум два способа ввода размеров. Один из них заключается в наборе размеров фигуры во время или сразу после рисования .
Deleting a matched photo
If your matched photo didn’t work out or you don’t need it any more, you simply delete the Match Photo scene. Here are two ways to do so:
Зима отличное время года - вечером за компьютером можно например легко и быстро научиться пользоваться простым и интуитивным 3D редактором SketchUp. Если у вас есть дача, или вы любите что то делать своими руками, а может вы просто мечтаете в будущем о своем доме или он уже у вас есть, и летом начнется новый строительный сезон - вам однозначно пригодится умение пользоваться этим 3D редактором. Программа бесплатная для личного использования и очень простая в освоении.

Это реклама! Я так опережаю некоторые комментарии. Да это реклама, но мне за нее не заплатили и не просили писать этот текст ради чего либо в замен. Я просто искренне хочу поделиться с вами и возможно побудить к освоению данной программы, которая уверен не раз пригодится вам в вашей жизни (если вы человек творческий или любите что то делать своими руками). Кстати - даже для тех кто предпочитает заплатить за работу другим, но при этом принимает участие в процессе (контролирует его и организовывает) данная программа тоже вам поможет. Я не настаиваю именно на этой программе, суть в том чтобы показать что такого рода программы могут вам помочь. И освоить их реально, причем весьма быстро.
Из названия программы следует что это набросок. За это я ее и ценю. Можно весьма быстро составить модель того, что вы хотите сделать - и не важно тумбочка ли это или сарай, или же вы проектируете планировку дома (ищите идеальный вариант), либо решили провести ландшафтные работы.
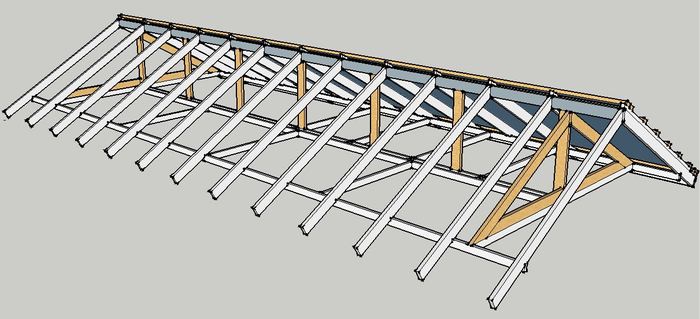
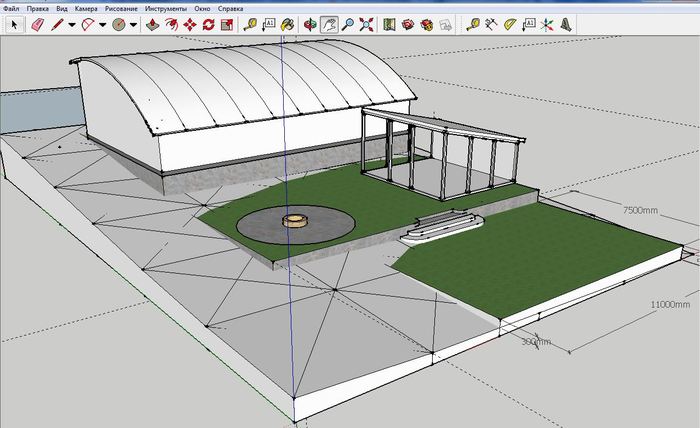
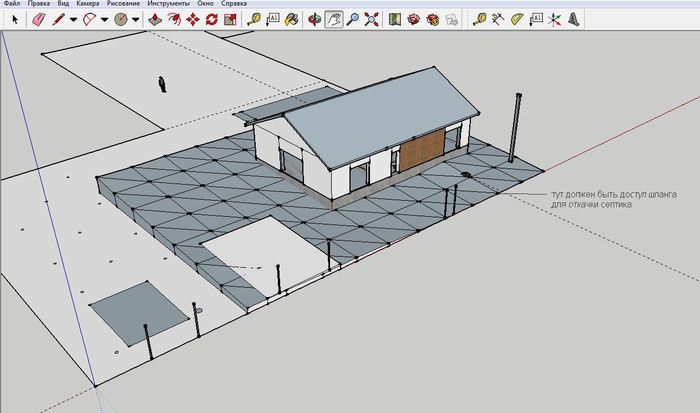
Нет смысла в данной статье проводить обучение, для этого полно контента - в том числе и видео уроков. Для того чтобы начать, вам буквально понадобится посмотреть три-четыре видео ролика. Но я просто покажу одну из первых моделей, что я сделал, а именно наброски каркаса своего дачного домика с большой террасой:
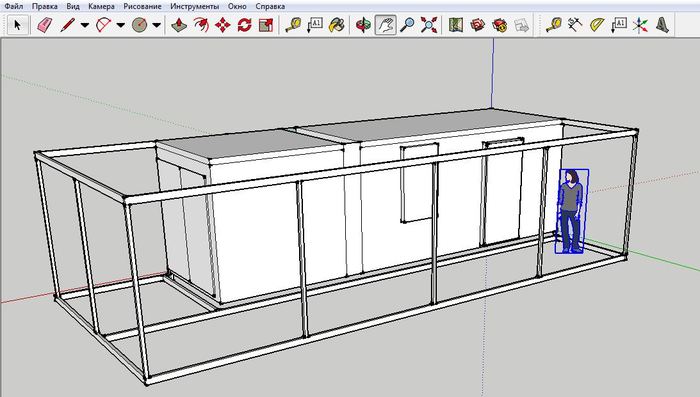
Итак первая причина почему я рекомендую освоить 3D редактор - сделав модель мы снизите вероятность допустить ошибку. Ошибки все равно будут, но их будет меньше, если вы как бы виртуально построите то что хотите сделать. Вы вынуждено уже будите продумывать узлы примыкания, компоновки и тд. И скорее всего уже на этом этапе у вас будут внесены какие либо корректировки.
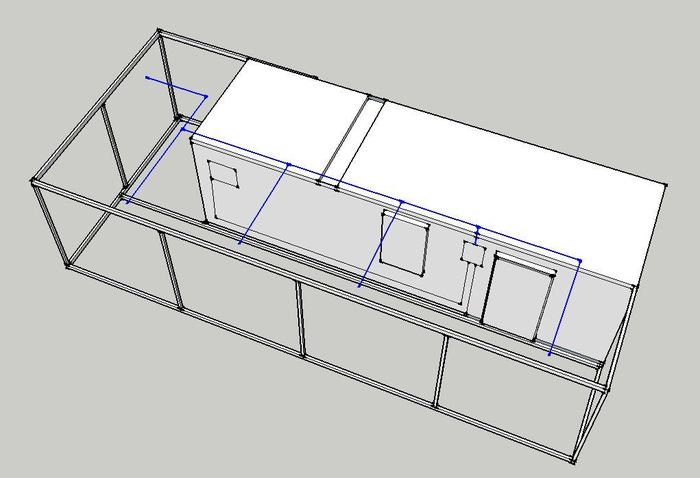
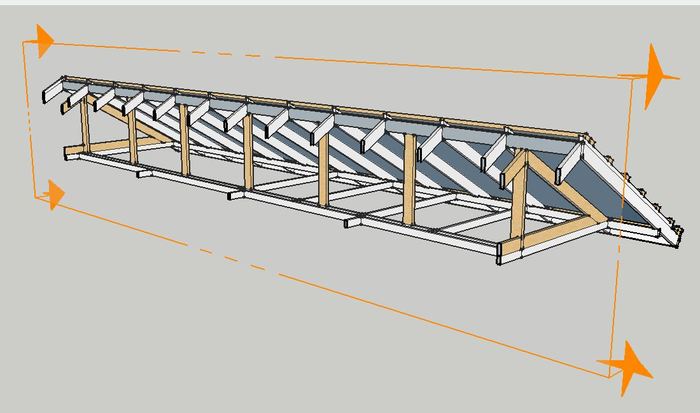
Вторая причина - это удобно. Имея готовую модель, вы можете легко рассчитать что либо. Например количество материала для отделки. Или как на примере ниже, длину проводов для освещения (синим на изображении ниже). В любой момент, вам даже не надо ехать на объект для этого
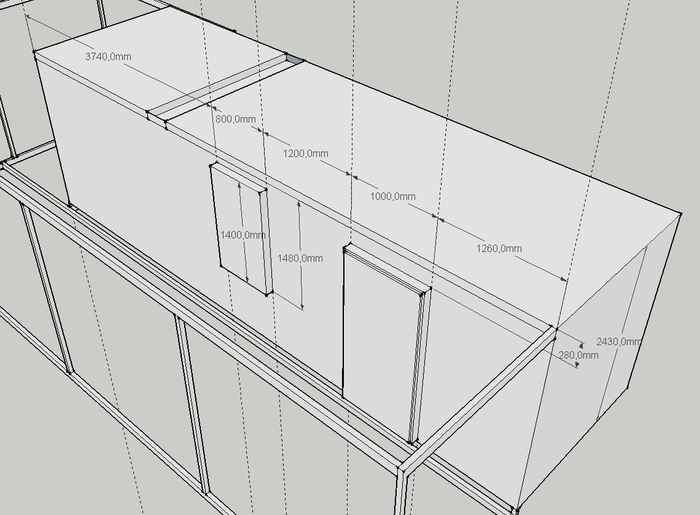
Причина третья - вы легко распечатаете нужные наброски с размерами для самоконтроля, либо сможете передать их кому либо (кто будет воплощать задуманные вами планы). Сюда же идет простой расчет нужных материалов. Или же кратность скажем листов под обшивку. Вы легко поймете сколько вам надо, какие будет обрезки и как лучше расположить различные элементы, чтобы упросить задачу.
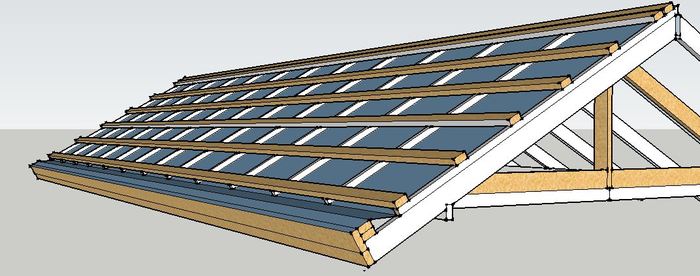
Вот так - первый раз в жизни, я создал сначала 3D модель будущей крыши, а потом воплотил планы в реальность.
И разрез, это реально все просто. Я вас уверяю - я обычный человек, просто берете и рисуете.
Причина четвертая - упрощает расчеты. Особенно это ощущается на сложных местах сочленения. Скажем в примере выше - я изначально определился какой должен быть уклон крыши, и начал рисовать под таким уклоном стропилы. А все сочленения уже получились по факту. Мне осталось только сделать наброски и указать размеры, что бы потом на месте просто нарезать все элементы крыши у нужный размер.
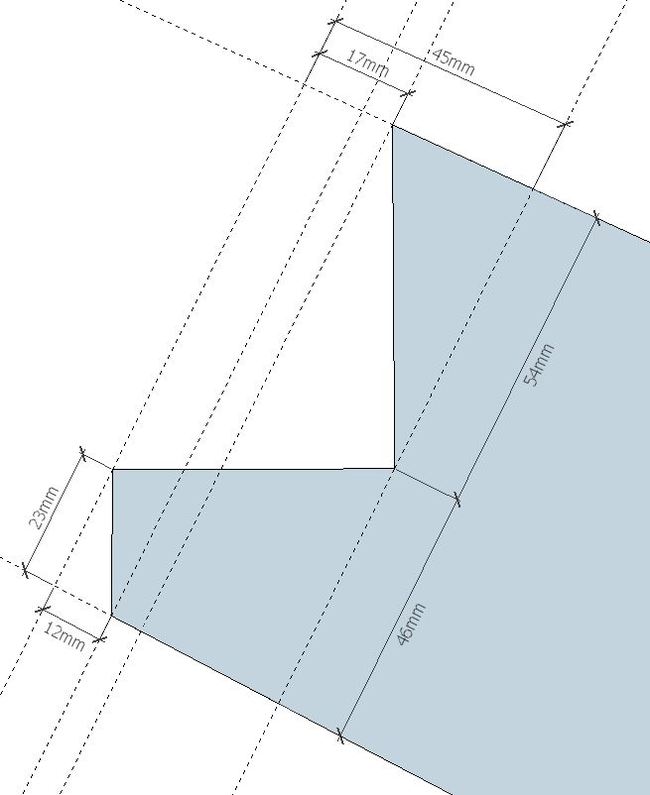
Для понимания, вот наброски лестницы на террасу, с комментариями для себя:
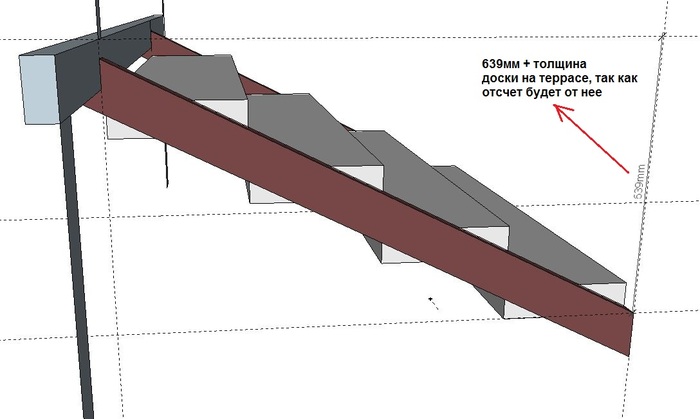
Коричневым изображена стальная труба 100х50х3. Она примыкает в каркасу террасы. Вот так. Такая сложность связана с тем, чтобы добиться удобного шага на лестнице для каждого порожка, в тч для перехода непосредственно на террасу уже.

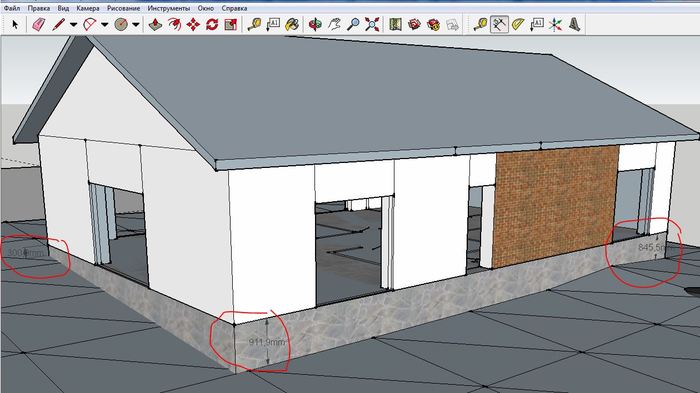
Все эти сложные примыкания были созданы уже по факту, те я не делал расчеты сложные, а просто снял и распечатал вот такие размеры:
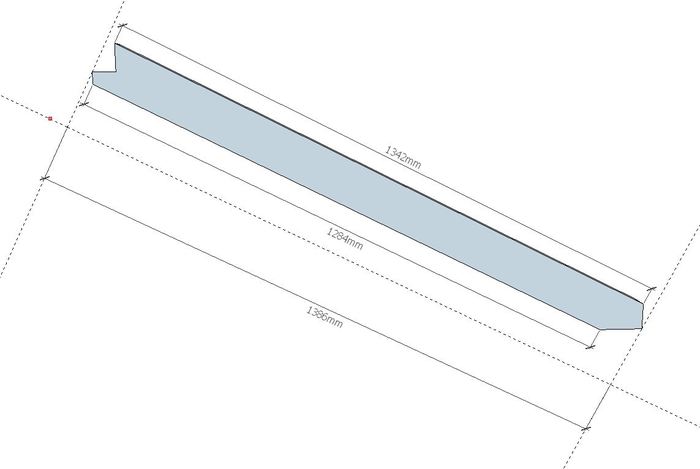
И другая сторона:
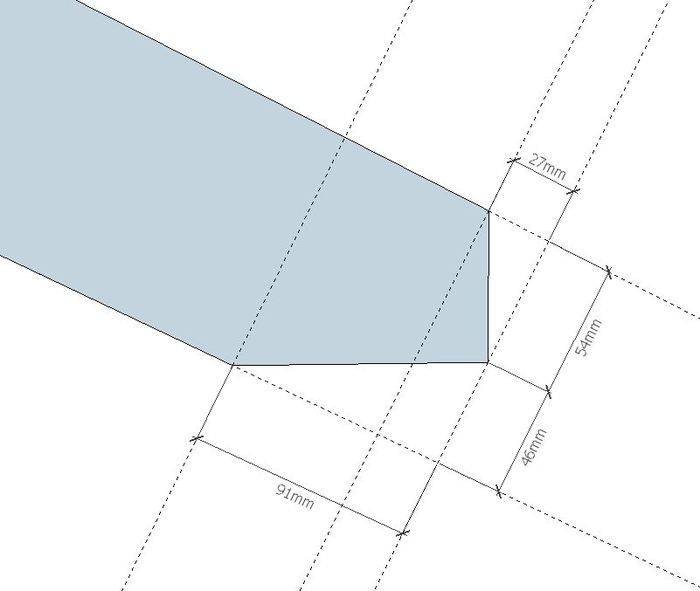
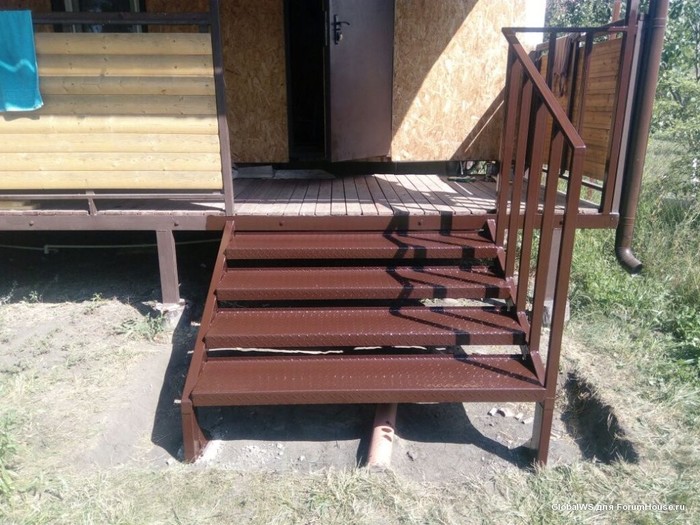
Можно заметить, я специально не использовал в размера градусы и не обзначал углы. Смысл был в том, чтобы имея обычную линейку сделать весьма точную разметку. Все тоже самое было сделано скажем и для перил. Просто рисовал в программе, а потом снимал размеры с деталей. Результат ниже:
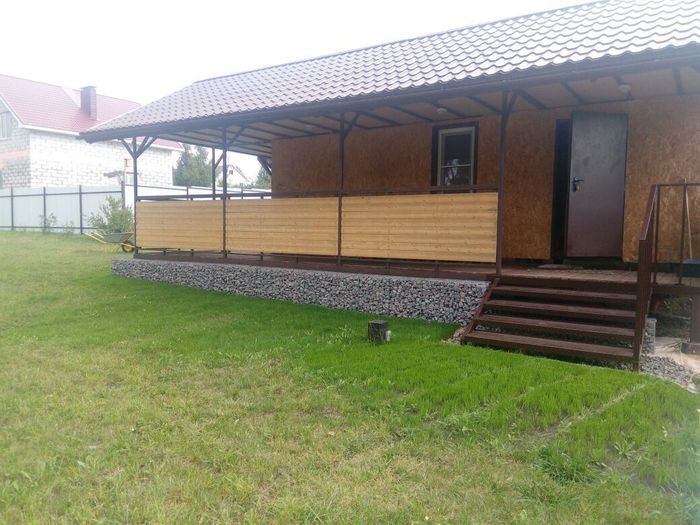
А потом габион + отсыпка черноземом и трава, и вот это уже показывал в другой теме.
Но вернемся к программе.
Вот моя сарайка. Нарисовал фундамент, создал модель блока (с учетом шфа кладочного на клей), сохранил его и начал выкладывать кипричиками. Очень просто.
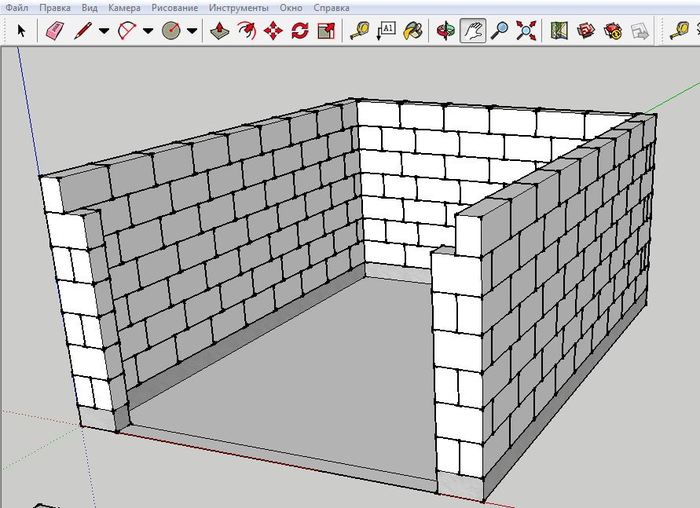
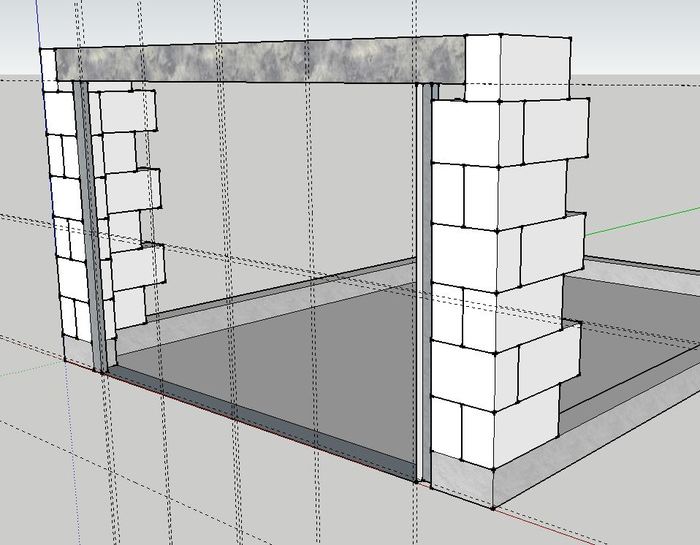
Узнал сколько нужно блоков, прикинул где лучше делать подрезку и как это будет выглядеть. А вот тут уже прикидываю как буду варить ворота, а точнее какой у них будет каркас и размеры:
А вот уже прикидываю как будет выглядеть стропильная система, а жена пристально наблюдает, контроль:
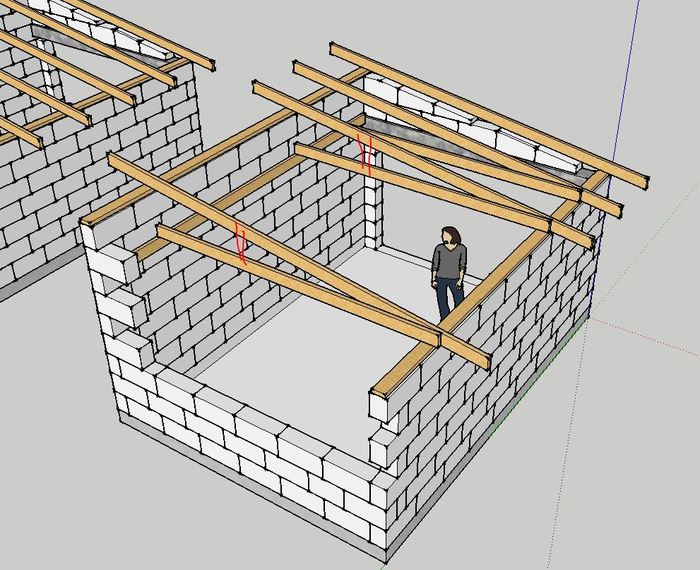
Это все очень и очень просто. Еще не убедил?
Как на счет создать модель всего участка (у меня их два, и они смежные)? Снимем перепад высот скажем с шагом 3х3 метра. Вот что получается на малом участке:
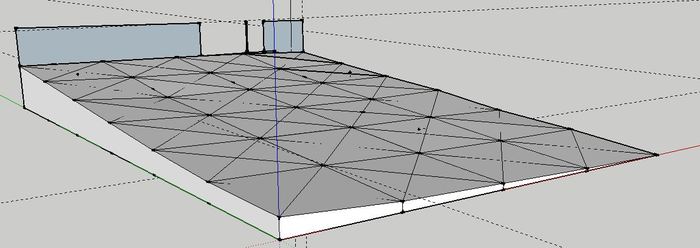
Не слабый перепад, 2.5 метра в крайних точках. Ну и не беда, этот участок для отдыха будет. Ну что погнали рисовать?
и с другой стороны

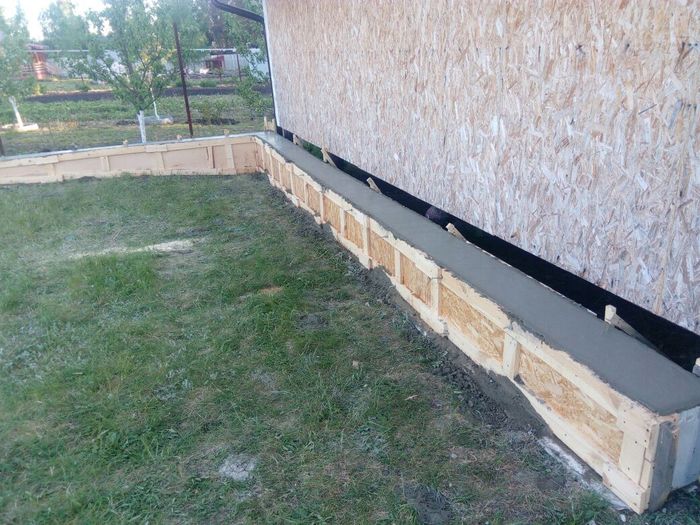
Имея весьма точные размеры перепада, зимой прикинул где лучше залить подпорные стенки, чтобы выровнять несколько участков под зоны отдыха. В прошлом году сделал нижнуюю площадку. Большое здание - возможно когда то мастерскую сделаю, но это потом - возможно =) Но на плане место уже для нее есть, и это замечательно.
Вот кстати уже залит бетон первой подпорной стенки:
А вот только собираю опалубку для нее, кстати угадайте как я узнал сколько надо мне листов осб и фанеры? =) Все очень просто набросал в редакторе
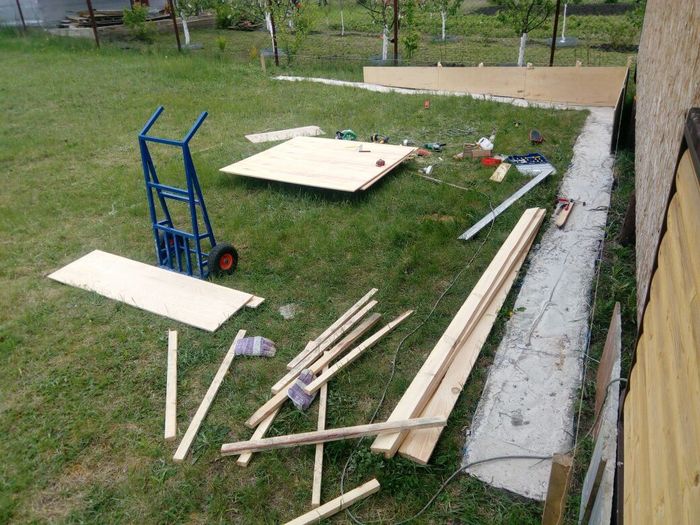
Кстати телега на фото самодельная, вот часть модели (без платформы), кстати очень крутая - рекомендую:
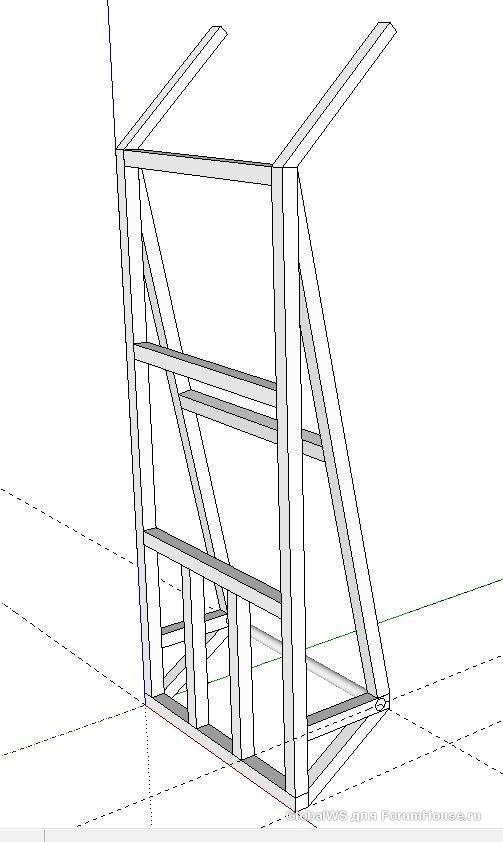
Просто нарисовал, а потом снял размеры у получившихся деталей и сварил. Вот реально - очень очень просто.
Наверно пора заканчивать, потому иначе это будет продолжаться почти бесконечно. Вот модель основного участка. Прикидываю где будет дом - забор, площадка для авто, и какие то уже комментарии для себя отметил. Участок тоже отражает рельеф.
Да это наброски, но уже помогают принимать какие то решения дальнейшие.
Надеюсь хоть несколько человек попробуют освоить 3D редактор, и уверен это прилично им поможет в дальнейшем.
Introducing Match Photo’s color-coded tools
To start using Match Photo, select Camera > Match New Photo. Select the photo you want to use, and your screen looks something like the following figure, which shows an image captured from Google Street View. The following list identifies all the tools that appear on-screen:

- Scene tab: A scene is a saved camera view of your model that’s associated with a tab. If you orbit away from this particular view, the matched photo disappears. But you can click the Match Photo scene tab to return to the view with the photo.
- Match Photo view: When the camera is in Match Photo view, you see Match Photo in the upper left of the drawing window.
- Vanishing point bar: You see two green bars and two red bars with dashed lines and a square grip on each end. You click and drag the grips to align these bars with elements in your photo.
- Horizon line: This yellow line aligns with the horizon in your model. Typically, if you set the vanishing point bars, the horizon line takes care of itself.
- Axis bars: The solid green, red, and blue lines represent each axis. As you adjust the vanishing point bars, the axis bars move, too, so you usually don’t need to adjust these manually. You can click and drag up and down the blue axis bar to roughly scale your photo.
- Axis origin: The origin is where the three axes meet. If you start with a Match Photo-compatible image, Match Photo does a pretty good job of locating the origin for you, but you might need to adjust it a bit. In the example, the origin needs to move down a bit so the axis origin is at the corner where the walls and ground meet. (If the photo looks down on a building, try a corner where the roof and walls instead.) For a photo taken indoors, place the origin where the walls and ceiling or the walls and floor meet in a corner.
Tip: The Match Photo dialog box is another important tool that appears when you enter Match Photo view. Find out how and when to choose features in the dialog box as you walk through the steps for matching a photo with an existing model or creating a 3D model from a photo.
Как сделать двухмерный чертеж рельефа в SketchUp

Google SketchUp - это инструмент для 3D-моделирования, разработанный, чтобы предложить архитекторам, инженерам и художникам способ быстрого создания и визуализации 3D-моделей. SketchUp предлагает пользователям возможность .
Видео: 3D Модель и Чертежи из картинки или фото. SketchUp, BigPrint. (Май 2022).
Хотя SketchUp в основном используется для создания 3D-моделей, его также можно использовать как быстрый и простой способ рисовать планы этажей, фасады и другие двумерные элементы. Программа Google SketchUp известна тем, что она исключительно удобна для пользователя и даст вам возможность создавать 2D-чертежи практически мгновенно. Создав 2D-чертеж в SketchUp, вы можете использовать его в качестве основы для создания 3D-модели или просто использовать 2D-создание как есть.

кредит: Ciaran Griffin / Lifesize / Getty Images
Deleting a matched photo
If your matched photo didn’t work out or you don’t need it any more, you simply delete the Match Photo scene. Here are two ways to do so:
Until you get the hang of Match Photo, you may suspect that SketchUp dumped a box of rainbow spaghetti on your model like a toddler bored with pasta crafts. Match Photo is a bit confusing at first, but this article gives you the tips and steps that you need to use Match Photo in the magical way its developers intended. When you’re first learning how to use Match Photo, orient yourself to the color-coded tools that Match Photo spills onto your screen and check out what photos work well with the Match Photo feature. Then try your hand at matching a photo, following the detailed steps in the following sections.
Tip: In this YouTube video, you see Match Photo in action. Although the demo uses an older version of SketchUp, the process in current versions of SketchUp is similar.
Table of Contents
Creating a 3D model from a photo
If you have a photo of something you want to model, Match Photo can help you draw the 3D model.
Tip: This process works best for objects with parallel lines, such as the top and bottom of a rectangular window.
To draw a model with the help of a photo and SketchUp’s Match Photo feature, follow these steps:
-
Follow the steps in the preceding section, “Matching a photo with an existing model,” to set up your axis origin, vanishing point bars, and scale. The only difference is that you don’t need to worry about opening the model that goes with your photo or projecting textures onto a not-yet-existing model. These steps explain how to draw the model based on your photo.
Tip: To help you set the scale of your photo, insert one of SketchUp’s 2D people, as shown in the figure. If you don’t already see one of these folks in your model already, find them in the Components panel.
Tip: The process of modeling from a photo is iterative. You’ll likely do a little drawing, check your model against the photo, do a little more drawing, and so on.
Introducing Match Photo’s color-coded tools
To start using Match Photo, select Camera > Match New Photo. Select the photo you want to use, and your screen looks something like the following figure, which shows an image captured from Google Street View. The following list identifies all the tools that appear on-screen:
- Scene tab: A scene is a saved camera view of your model that’s associated with a tab. If you orbit away from this particular view, the matched photo disappears. But you can click the Match Photo scene tab to return to the view with the photo.
- Match Photo view: When the camera is in Match Photo view, you see Match Photo in the upper left of the drawing window.
- Vanishing point bar: You see two green bars and two red bars with dashed lines and a square grip on each end. You click and drag the grips to align these bars with elements in your photo.
- Horizon line: This yellow line aligns with the horizon in your model. Typically, if you set the vanishing point bars, the horizon line takes care of itself.
- Axis bars: The solid green, red, and blue lines represent each axis. As you adjust the vanishing point bars, the axis bars move, too, so you usually don’t need to adjust these manually. You can click and drag up and down the blue axis bar to roughly scale your photo.
- Axis origin: The origin is where the three axes meet. If you start with a Match Photo-compatible image, Match Photo does a pretty good job of locating the origin for you, but you might need to adjust it a bit. In the example, the origin needs to move down a bit so the axis origin is at the corner where the walls and ground meet. (If the photo looks down on a building, try a corner where the roof and walls instead.) For a photo taken indoors, place the origin where the walls and ceiling or the walls and floor meet in a corner.
Tip: The Match Photo dialog box is another important tool that appears when you enter Match Photo view. Find out how and when to choose features in the dialog box as you walk through the steps for matching a photo with an existing model or creating a 3D model from a photo.
Choosing photos that work with Match Photo
Match Photo works best when your photo meets certain criteria. When you’re taking or choosing photos to use with SketchUp’s Match Photo feature, keep the following tips in mind:
- Match Photo works best with structures made mostly of right angles. You definitely need at least one right angle for Match Photo to work.
- Use photos taken at a roughly a 45-degree angle from a corner. The preceding figure from Google Street View is an example of an image taken at a 45-degree angle. If you’re taking photos, you can use Match Photo on several parts of your model if you take photos of each corner.
- Do not crop photos. Although it may seem possible to use a cropped image, typically vertical lines don’t align well across a cropped image, and you won’t like the result.
- Avoid warped or distorted photos if you can. Match Photo doesn’t work best with images that an image editor or specialized camera has warped. For example, because the Google Street View camera warped the image of the preceding building a bit as the camera went around the corner, the vanishing point bars, axes, and horizon may not line up precisely. However, the school house photos used later in this article match up exactly with the model, because the photos had no distortion at all.
Tip: Sometimes an image editor can remove barrel distortion or issues where straight lines are bent away from the center of the image. Barrel distortion typically occurs on wide angle lens cameras.
Matching a photo with an existing model
To apply a photo to an existing model with SketchUp’s Match Photo feature, have your model and your photo on your hard drive. When you’re ready, follow these steps:

- Select File > Open and select the model you want to open in the drawing area. This example uses the following model of a schoolhouse.
- Select Camera > Match New Photo.
- In the Select Background Image File dialog box that appears, navigate to your image file and click Open. The camera switches to Match Photo view, so your photo appears in the drawing area, as shown in the following figure, and your camera angle is automatically saved to a scene tab, which appears in the upper left.

Tip: When a Match Photo is active, you can context-click any Match Photo tool to open a context menu. Select Start Over or Cancel Match if your photo matching goes awry. Select Zoom Matched Photo to fit your photo in the drawing area. Zoom Vanishing Points zooms so that all the vanishing points fit in the drawing area.
Tip: You can adjust the grid to suit your preferences and help you align and scale your photo. Select the Auto radio button to make the grid appear only when you’re adjusting one of the matching tools. (The vanishing point bars, horizon bar, and axes are always visible in Match Photo view.) Use the Planes options to select whether you want the grid to show the red/green, red/blue, or green/blue planes. Type a value in the Spacing text box to set the size of the grid spacing, which can help you scale your model to a multiple of the actual structure’s size.
Tip: Window frames, door frames, and roof lines are handy reference points for aligning the vanishing point bars. Also, the longer the vanishing point bar extends, the better your results.
Note: If your model already contains materials, SketchUp asks whether you want to replace the existing materials. You may also see the Trim partially visible faces? message. If so, click Yes to apply photo textures only to the visible portion of faces in your model. Click No to apply textures to an entire face, even only a part of the face is visible.
Tip: In the Match Photo dialog box, you can click Edit Matched Photo (the gear icon at the top) to adjust the Match Photo tools.
Note: If you’ve taken several photos that you’re matching to each corner of a building, context-click a Match Photo tool and choose Rotate 90 Right or Rotate 90 Left. These commands move the red and green axes 90 degrees. If the commands don’t work well with your model and photo, simply move the axes in the opposite direction, and click New Matched Photo button (the plus sign icon in the upper left of the Match Photo dialog box). A new Match Photo scene appears, and you can then place a new photo and set the origin point manually.
Шаг 3
Нажмите на значок на панели инструментов стандартного вида, который показывает крышу дома. Этот вид называется «Верх» и является единственным видом, который необходимо использовать при создании 2D-чертежа в SketchUp.
Creating a 3D model from a photo
If you have a photo of something you want to model, Match Photo can help you draw the 3D model.
Tip: This process works best for objects with parallel lines, such as the top and bottom of a rectangular window.
To draw a model with the help of a photo and SketchUp’s Match Photo feature, follow these steps:
-
Follow the steps in the preceding section, “Matching a photo with an existing model,” to set up your axis origin, vanishing point bars, and scale. The only difference is that you don’t need to worry about opening the model that goes with your photo or projecting textures onto a not-yet-existing model. These steps explain how to draw the model based on your photo.
Tip: To help you set the scale of your photo, insert one of SketchUp’s 2D people, as shown in the figure. If you don’t already see one of these folks in your model already, find them in the Components panel.
Tip: The process of modeling from a photo is iterative. You’ll likely do a little drawing, check your model against the photo, do a little more drawing, and so on.
Шаг 2
Откройте SketchUp и убедитесь, что стандартные виды находятся на вашей панели инструментов. Значки стандартного вида представляют собой маленькие домики, каждый из которых имеет свое направление. Если вы не видите этого на панели инструментов, попробуйте развернуть окно SketchUp. Если панель инструментов по-прежнему отсутствует, вы можете добавить ее, щелкнув правой кнопкой мыши на панели инструментов и выбрав «Настроить». Перетащите панель инструментов стандартного вида из всплывающего меню на верхнюю панель инструментов в окне SketchUp.
Choosing photos that work with Match Photo
Match Photo works best when your photo meets certain criteria. When you’re taking or choosing photos to use with SketchUp’s Match Photo feature, keep the following tips in mind:
- Match Photo works best with structures made mostly of right angles. You definitely need at least one right angle for Match Photo to work.
- Use photos taken at a roughly a 45-degree angle from a corner. The preceding figure from Google Street View is an example of an image taken at a 45-degree angle. If you’re taking photos, you can use Match Photo on several parts of your model if you take photos of each corner.
- Do not crop photos. Although it may seem possible to use a cropped image, typically vertical lines don’t align well across a cropped image, and you won’t like the result.
- Avoid warped or distorted photos if you can. Match Photo doesn’t work best with images that an image editor or specialized camera has warped. For example, because the Google Street View camera warped the image of the preceding building a bit as the camera went around the corner, the vanishing point bars, axes, and horizon may not line up precisely. However, the school house photos used later in this article match up exactly with the model, because the photos had no distortion at all.
Tip: Sometimes an image editor can remove barrel distortion or issues where straight lines are bent away from the center of the image. Barrel distortion typically occurs on wide angle lens cameras.
Introducing Match Photo’s color-coded tools
To start using Match Photo, select Camera > Match New Photo. Select the photo you want to use, and your screen looks something like the following figure, which shows an image captured from Google Street View. The following list identifies all the tools that appear on-screen:
- Scene tab: A scene is a saved camera view of your model that’s associated with a tab. If you orbit away from this particular view, the matched photo disappears. But you can click the Match Photo scene tab to return to the view with the photo.
- Match Photo view: When the camera is in Match Photo view, you see Match Photo in the upper left of the drawing window.
- Vanishing point bar: You see two green bars and two red bars with dashed lines and a square grip on each end. You click and drag the grips to align these bars with elements in your photo.
- Horizon line: This yellow line aligns with the horizon in your model. Typically, if you set the vanishing point bars, the horizon line takes care of itself.
- Axis bars: The solid green, red, and blue lines represent each axis. As you adjust the vanishing point bars, the axis bars move, too, so you usually don’t need to adjust these manually. You can click and drag up and down the blue axis bar to roughly scale your photo.
- Axis origin: The origin is where the three axes meet. If you start with a Match Photo-compatible image, Match Photo does a pretty good job of locating the origin for you, but you might need to adjust it a bit. In the example, the origin needs to move down a bit so the axis origin is at the corner where the walls and ground meet. (If the photo looks down on a building, try a corner where the roof and walls instead.) For a photo taken indoors, place the origin where the walls and ceiling or the walls and floor meet in a corner.
Tip: The Match Photo dialog box is another important tool that appears when you enter Match Photo view. Find out how and when to choose features in the dialog box as you walk through the steps for matching a photo with an existing model or creating a 3D model from a photo.
Matching a photo with an existing model
To apply a photo to an existing model with SketchUp’s Match Photo feature, have your model and your photo on your hard drive. When you’re ready, follow these steps:
- Select File > Open and select the model you want to open in the drawing area. This example uses the following model of a schoolhouse.
- Select Camera > Match New Photo.
- In the Select Background Image File dialog box that appears, navigate to your image file and click Open. The camera switches to Match Photo view, so your photo appears in the drawing area, as shown in the following figure, and your camera angle is automatically saved to a scene tab, which appears in the upper left.
Tip: When a Match Photo is active, you can context-click any Match Photo tool to open a context menu. Select Start Over or Cancel Match if your photo matching goes awry. Select Zoom Matched Photo to fit your photo in the drawing area. Zoom Vanishing Points zooms so that all the vanishing points fit in the drawing area.
Tip: You can adjust the grid to suit your preferences and help you align and scale your photo. Select the Auto radio button to make the grid appear only when you’re adjusting one of the matching tools. (The vanishing point bars, horizon bar, and axes are always visible in Match Photo view.) Use the Planes options to select whether you want the grid to show the red/green, red/blue, or green/blue planes. Type a value in the Spacing text box to set the size of the grid spacing, which can help you scale your model to a multiple of the actual structure’s size.
Tip: Window frames, door frames, and roof lines are handy reference points for aligning the vanishing point bars. Also, the longer the vanishing point bar extends, the better your results.
Note: If your model already contains materials, SketchUp asks whether you want to replace the existing materials. You may also see the Trim partially visible faces? message. If so, click Yes to apply photo textures only to the visible portion of faces in your model. Click No to apply textures to an entire face, even only a part of the face is visible.
Tip: In the Match Photo dialog box, you can click Edit Matched Photo (the gear icon at the top) to adjust the Match Photo tools.
Note: If you’ve taken several photos that you’re matching to each corner of a building, context-click a Match Photo tool and choose Rotate 90 Right or Rotate 90 Left. These commands move the red and green axes 90 degrees. If the commands don’t work well with your model and photo, simply move the axes in the opposite direction, and click New Matched Photo button (the plus sign icon in the upper left of the Match Photo dialog box). A new Match Photo scene appears, and you can then place a new photo and set the origin point manually.
Choosing photos that work with Match Photo
Match Photo works best when your photo meets certain criteria. When you’re taking or choosing photos to use with SketchUp’s Match Photo feature, keep the following tips in mind:
- Match Photo works best with structures made mostly of right angles. You definitely need at least one right angle for Match Photo to work.
- Use photos taken at a roughly a 45-degree angle from a corner. The preceding figure from Google Street View is an example of an image taken at a 45-degree angle. If you’re taking photos, you can use Match Photo on several parts of your model if you take photos of each corner.
- Do not crop photos. Although it may seem possible to use a cropped image, typically vertical lines don’t align well across a cropped image, and you won’t like the result.
- Avoid warped or distorted photos if you can. Match Photo doesn’t work best with images that an image editor or specialized camera has warped. For example, because the Google Street View camera warped the image of the preceding building a bit as the camera went around the corner, the vanishing point bars, axes, and horizon may not line up precisely. However, the school house photos used later in this article match up exactly with the model, because the photos had no distortion at all.
Tip: Sometimes an image editor can remove barrel distortion or issues where straight lines are bent away from the center of the image. Barrel distortion typically occurs on wide angle lens cameras.
Шаг 1
Как сделать потолки в SketchUp

Когда вы работаете в Google SketchUp над дизайном дома, квартиры или офиса, вы должны приложить все усилия, чтобы заполнить все детали дизайна. Есть одна область, которая .
Matching a photo with an existing model
To apply a photo to an existing model with SketchUp’s Match Photo feature, have your model and your photo on your hard drive. When you’re ready, follow these steps:
- Select File > Open and select the model you want to open in the drawing area. This example uses the following model of a schoolhouse.
- Select Camera > Match New Photo.
- In the Select Background Image File dialog box that appears, navigate to your image file and click Open. The camera switches to Match Photo view, so your photo appears in the drawing area, as shown in the following figure, and your camera angle is automatically saved to a scene tab, which appears in the upper left.
Tip: When a Match Photo is active, you can context-click any Match Photo tool to open a context menu. Select Start Over or Cancel Match if your photo matching goes awry. Select Zoom Matched Photo to fit your photo in the drawing area. Zoom Vanishing Points zooms so that all the vanishing points fit in the drawing area.
Tip: You can adjust the grid to suit your preferences and help you align and scale your photo. Select the Auto radio button to make the grid appear only when you’re adjusting one of the matching tools. (The vanishing point bars, horizon bar, and axes are always visible in Match Photo view.) Use the Planes options to select whether you want the grid to show the red/green, red/blue, or green/blue planes. Type a value in the Spacing text box to set the size of the grid spacing, which can help you scale your model to a multiple of the actual structure’s size.
Tip: Window frames, door frames, and roof lines are handy reference points for aligning the vanishing point bars. Also, the longer the vanishing point bar extends, the better your results.
Note: If your model already contains materials, SketchUp asks whether you want to replace the existing materials. You may also see the Trim partially visible faces? message. If so, click Yes to apply photo textures only to the visible portion of faces in your model. Click No to apply textures to an entire face, even only a part of the face is visible.
Tip: In the Match Photo dialog box, you can click Edit Matched Photo (the gear icon at the top) to adjust the Match Photo tools.
Note: If you’ve taken several photos that you’re matching to each corner of a building, context-click a Match Photo tool and choose Rotate 90 Right or Rotate 90 Left. These commands move the red and green axes 90 degrees. If the commands don’t work well with your model and photo, simply move the axes in the opposite direction, and click New Matched Photo button (the plus sign icon in the upper left of the Match Photo dialog box). A new Match Photo scene appears, and you can then place a new photo and set the origin point manually.
Deleting a matched photo
If your matched photo didn’t work out or you don’t need it any more, you simply delete the Match Photo scene. Here are two ways to do so:
Until you get the hang of Match Photo, you may suspect that SketchUp dumped a box of rainbow spaghetti on your model like a toddler bored with pasta crafts. Match Photo is a bit confusing at first, but this article gives you the tips and steps that you need to use Match Photo in the magical way its developers intended. When you’re first learning how to use Match Photo, orient yourself to the color-coded tools that Match Photo spills onto your screen and check out what photos work well with the Match Photo feature. Then try your hand at matching a photo, following the detailed steps in the following sections.
Tip: In this YouTube video, you see Match Photo in action. Although the demo uses an older version of SketchUp, the process in current versions of SketchUp is similar.
Table of Contents
Шаг 4
Начните рисовать свой 2D элемент. Используйте основные инструменты для начала, если вы только изучаете программу. Нажмите на значок карандаша, чтобы нарисовать прямую линию или используйте инструмент дуги, чтобы создать изогнутую линию. Используйте значок прямоугольника, если вы хотите создать квадрат или прямоугольник. Выбор значка круга позволит вам легко создать круг. Вы можете вращать или смещать элементы, выбирая соответствующие инструменты, и вы можете стереть любые ошибки, сделанные с помощью розового значка ластика. Если вы решите добавить цвет, материал или текстуру к своему 2D-изображению, вы можете сделать это, нажав на иконку с краской. Откроется небольшое окно, из которого вы можете выбрать цвета и материалы.
Читайте также: