
Отключить hardware accelerated decoding в vlc
Summary: This post shares the best solutions to fix video freezing, buffering or audio lag in VLC Media Player. In some cases, if troubleshooting the VLC Player doesn’t fix the video freezing issue, try Stellar Repair for Video. The software fixes corruption in video frames, slider movement, etc.
VLC Media Player is one of the most compatible and user-friendly media player. It can play almost all video file types from any source stored in hard drives, SD cards, CD/ DVD, and others.
But as technical glitches can occur anytime, videos may start to stutter, freeze, or show audio lags in VLC Player. This is commonly reported while playing large-sized HD or UHD videos, such as movies, animated films, etc. The HD or UHD videos don’t play smoothly and skips frames or freeze in VLC.
‘When I watch 1080p H265 .mp4 movie file, the VLC Player freezes randomly after about 5 minutes. However, I can hear the audio track, but the video lags. Can I fix this?’
Here are the best six solutions to fix Video Stuck or Freeze in VLC.
More VLC Medai player Settings
Method 2: Increase cache values in VLC Player
VLC Player preloads video cache files in the computer’s RAM to access and play the video properly. You can try to fix the video buffering issue by increasing the cache value. This would increase the number of seconds videos are cached to play in VLC Player.
Steps to increase cache value in VLC:
- Open VLC Player.
- Go to Tools >Preferences.
- At the bottom-left corner under Show settings, select ‘All.’

- In the left pane, click Input/ Codecs from the list.
- On the right pane, scroll down to the Advanced section.

- In the Advanced section, across File caching (ms), change the value to 1000 or above.
- Click Save. Next, restart VLC Player and check if the videos are playing properly.
Windows
Since VLC version 1.1.0, DirectX Video Acceleration (DxVA) is supported in DxVA 2.0. It is available in Windows Vista (or Windows 2008) or any later Windows version; it is not available for Windows XP/2003 (and never will be).
The following video codecs are supported: MPEG-1, MPEG-2, WMV3, VC-1 and H.264 (MPEG-4 AVC).
Windows
To check your DxVA compatibility, please download DxVA Checker
nVidia
For nVidia GPU, you are required to use a GPU supporting PureVideo in its 2nd generation (VP2 or newer), which means that you need an ION, GeForce 8, GeForce 9 (recommended), GeForce 200 or newer.
We strongly recommend a VP3 or VP4 GPU.
To be sure, check your GPU against this table on Wikipedia and check if you are VP2 or newer.
For ATI GPUs, you NEED Catalyst 10.7, that is just out.
Then, you are required to use a GPU supporting Unified Video Decoder.
We believe you need a GPU supporting UVD2, like HD4xxx, 5xxx, 6xxx or 3200. One might have success with UVD+ GPU, like some HD 3xxx, but this isn't tested.
Intel
Latest Intel GMA should work. Tested on GNU/Linux (Ubuntu 13.10) and hardware acceleration definitely works for Intel HD Graphics 3000 (dropped CPU usage for HD720 (1280 x 720, H.264, 24fps) from 12-13% to 6%).
Если вы замечаете прерывистое воспроизведение в VLC Media Player при воспроизведении видеофайлов высокого разрешения, при определенных обстоятельствах вы можете воспользоваться ускоренным декодированием GPU в медиаплеере для сглаживания. Теоретически эта функция использует вычислительную мощность графической карты для снижения нагрузки на процессор системы, что, в свою очередь, делает воспроизведение видеофайла более плавным.
Существует несколько заблуждений по этому поводу, но их необходимо устранить, прежде чем вы сможете принять обоснованное решение о включении этой функции.
Во-первых, согласно странице декодирования графического процессора VLC, он доступен для потоков H.264, MPEG-1, MPEG-2, MPEG-4, WMV3, VC-1 только в Windows. В Mac OS X в настоящее время поддерживается только H.264, а в Linux это зависит от того, используется ли графическая карта Intel или Broadcom или AMD или Nvidia.
Для первого поддерживаются MPEG-1, MPEG-2, MPEG-4 Visual, WMV3, VC-1 и H.264, а для второго - MPEG-1, MPEG-2, MPEG-4 Visual (и, возможно, H .263), WMV3, VC-1 и H.264 (MPEG-4 AVC, поддерживаются).
Во-вторых, данные декодируются с помощью графического процессора на этапе декодирования, а затем передаются обратно на проигрыватель, чтобы можно было обрабатывать другие этапы, например, фильтрацию и потоковую передачу. Это означает, что в некоторых случаях он может работать медленнее, чем раньше (без включения ускорения графического процессора).
И последнее, но не менее важное: декодирование с помощью графического процессора доступно только для некоторых операционных систем. В то время как Windows Vista и более новые версии операционной системы Microsoft поддерживаются, Windows XP на данный момент не работает. Большинство графических карт должно поддерживать аппаратное ускорение. Убедитесь, что вы установили последние версии драйверов.
Method 3: Disable Hardware Decoding in VLC Player
VLC Media Player can use the GPU of a computer to accelerate video decoding in high-quality videos. However, your PC’s drivers may behave abruptly, resulting in video playback or streaming issues. You can try disabling hardware decoding to fix Video Stuck or Freeze in the VLC player.
Steps to disable hardware decoding in VLC:
Guide for basic VLC Settings
- Open Preferences Window from Tools > Preferences.
Simple Preferences settings
2. Audio Settings
Preferred audio language : Here user can set the languages which will be used for selection of audio tracks in specified language. If audio tracks in specified in preferred language exist in the video file then it will be selected in the order user has entered it.
You need to enter the two or three letter language codes (ISO 639-2) separated by comma.
language codes for some languages:
- English : eng, en
- Arabic : ara
- Chinese : chi, zh
- Finnish : fin, fi
- French : fre, fr
- German : ger, de
- Korean : kor, ko
- Russian : rus, ru
- Hindi : hin. hi
Graphic card compatibility
3. Video Settings
- Display > Output : Here user can select the Video renderer which will be use by the VLC.
- Set Output to Automatic if you are not sure what to select. VLC will automatically select the video renderer.
- Direct3D11 video output : Uses Direct3D 11 API . Recommended for window 8 and 10.
- Direct3D9 video output : Uses Direct3D 9 API . Recommended for window vista , 7,8 and 10.
- DirectX (DirectDraw) video output : Uses Directdraw API . Recommended for window XP.
- OpenGL video output for Windows : Uses OpenGL API .
- Set Output to Direct3D11 video output.
macOS
Video Decoding Acceleration (VDA) comes with macOS X.6.3 and later (see API). This is somewhat supported in VLC 2.1.0.
Only H.264 (MPEG-4 AVC) is supported currently.
1 Comments

Are these settings a general guide without regard to the video card in use? If so, what benefit is there between Open GL (as shown in Move VLC Player Settings) versus the initially suggested, Direct3D11?
Also, for audio output mode if I'm using headphones that support 7.1 Dolby Surround sound is it still better to select Stereo?
Finally, for Display gamma, there is a Pure power gamma 2.8 but it's better to select 2.2?
If there can be some explanation so as to better adjust to my own system it would be extremely helpful, the more it's understood why you chose certain options, the more I can better judge whether or not those suggestions apply to me. (i.e. If you chose stereo versus Dolby Surround because most users don't have speakers to support 7.1 or because most video files won't utilize dolby surround unless watching DVDs, etc. then it would make more sense to use the guide instead of blindly following them with a risk of seeing no improvement and being in the same position as before! If not it's understandable, thank you for sharing!
If you are noticing choppy playback in VLC Media Player when playing high resolution video files, you may under certain circumstances benefit from gpu accelerated decoding in the media player to smooth things out. The feature in theory uses the processing power of the graphic card to lighten the load on the processor of the system which in turn makes playback of the video file smoother.
There are a couple misconceptions about this though that need to be addressed first before you can make an educated decision about turning the feature on.
First, according to VLC's GPU Decoding page, it is available for H.264, MPEG-1, MPEG-2, MPEG-4, WMV3, VC-1 streams only on Windows. On Mac OS X only H.264 is supported right now and on Linux, it depends on whether an Intel or Broadcom graphics card, or an AMD or Nvidia graphics card is used.
For the former, MPEG-1, MPEG-2, MPEG-4 Visual, WMV3, VC-1 and H.264 are supported, and for the latter, MPEG-1, MPEG-2, MPEG-4 Visual (and possibly H.263), WMV3, VC-1 and H.264 (MPEG-4 AVC, are supported.
Second, the data is decoded with the help of the GPU at the decoding stage and then transferred back to the player so that the other stages, filtering and streaming for instance, can be processed. This means that it can under circumstances be slower than before (without gpu acceleration enabled).
Last but not least, GPU decoding is only available for select operating systems. While Windows Vista and newer versions of the Microsoft operating system are supported, Windows XP is not at this point in time. The majority of graphic cards should support hardware acceleration just fine. Make sure you have installed the latest drivers though.
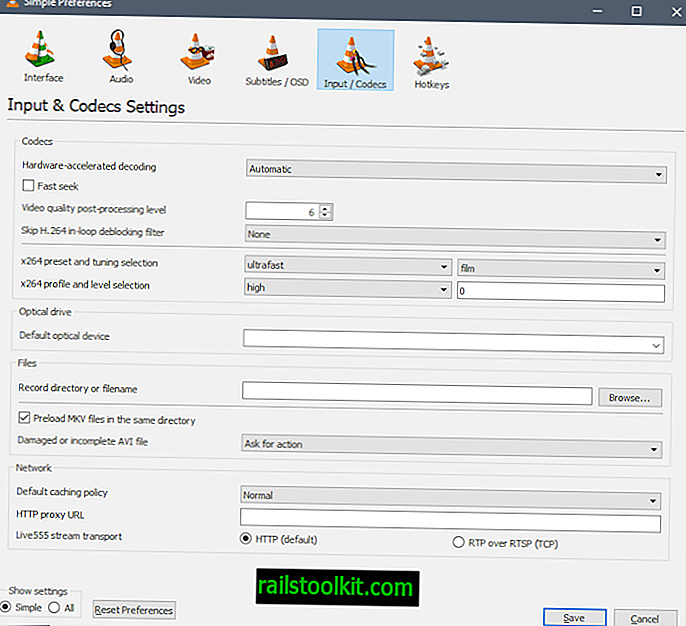
5. Input & Codecs Settings
Hardware-accelerated decoding : User can select which hardware decoding technique will be used for decoding the video.
Hardware-accelerated decoding options :
- Automatic : VLC will decide which Hardware Decoder to use.
- Direct3D11 Video Acceleartion: Selecting this will use Direct3D 11 Graphics technology for Video decoding. Supports Nvidia, AMD and Intel GPU.
- DirectX video Acceleration (DXVA) 2.0 : Selecting this will use DirectX Video Acceleration (DXVA) 2.0 for Video Decoding. Supports Nvidia, AMD and Intel GPU.
- Disable : Hardware-accelerated decoding will not be used.
- Select Save button to save the settings
Activation
To enable hardware accelerated decoding, use the VLC preferences. By default, hardware acceleration is disabled (and consequently, hardware acceleration is not yet available to external application via libVLC).
In VLC version 2.1, you can select which acceleration method you wish to use among those available for your operating system (if any). In earlier versions, there was simply a check box as shown below:

4. Subtitle & On screen Display Settings
Preferred subtitle language : Here user can set the languages which will be used for selection of subtitle track in specified language. If subtitles in specified in preferred language exist in the video file then it will be selected in the order user has entered it to be shown along with the video file.
You need to enter the two or three letter language codes (ISO 639-2) separated by comma.
language codes for some languages:
- English : eng, en
- Arabic : ara
- Chinese : chi, zh
- Finnish : fin, fi
- French : fre, fr
- German : ger, de
- Korean : kor, ko
- Russian : rus, ru
- Hindi : hin, hi
Enabling hardware acceleration in VLC

Open VLC Media Player and click on Tools > Preferences or press Ctrl-P to open the settings window of the program.
If you are using the simple settings interface, click on Input & Codecs on the left sidebar and make sure Hardware-accelerated decoding is set to Automatic. If you notice issues, try setting it to one of the available decoding options. On Windows, those are Direct3D11 Video Acceleration or DirectX Video Acceleration.
Tip: you can deactivate the feature here as well if you notice playback issues after enabling it.
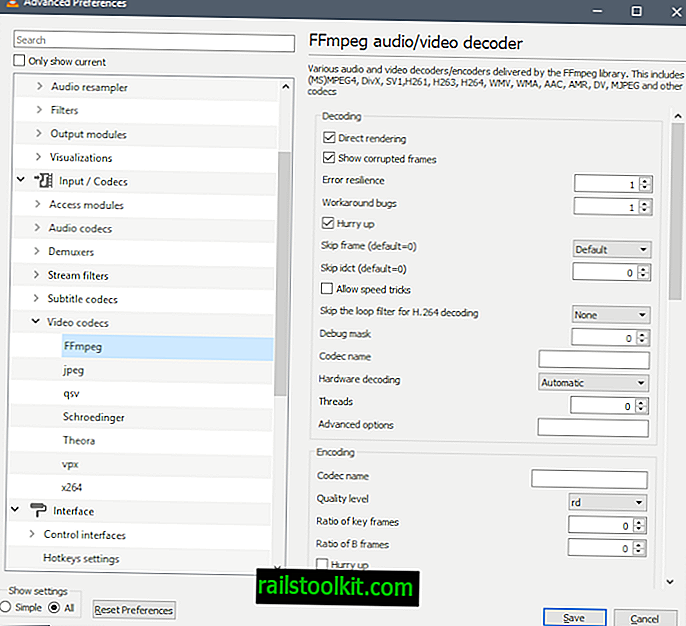
If you are using the "all" settings interface select Input/Codecs > Video Codecs > FFmpeg and make sure that Hardware decoding is set to automatic instead to enable acceleration this way.

Click on the save button afterward and restart the media player to work with the new setting.
Try playing several video files that use different formats to see if hardware acceleration makes a difference in terms of playback. If it does, keep the setting enabled. If it does not, just go back to the settings to modify the option or disable it right away instead.
Advanced preferences
- Open Preferences Window from Tools > Preferences.
- Set Show settings to All.
- Select Advanced tab.
- Check Increase the priority of the process.
- Select Audio tab.
- Set Audio output volume step to 5.00
- Set Stereo audio output mode to Stereo.

- Select Audio > Output modules tab.
- Set Audio output module to Windows Multimedia Device output.
- Select Audio > Output modules > MMDevice tab.
- Set Output back-end to Windows Audio Session API output. This setup uses Mirosoft WASAPI audio interface.

If you want VLC media player window to remain at top of all other windows then do the following:

1. Interface Settings
- Menu Languages : Set the language which will be used to show the menus in VLC Media Player.
- Uncheck Resize interface to video size.
Operating system support
2 comments
Thank you but now I cant see any subtitles in VLC 🙁
Hi Thomas,
We are glad that using the above-mentioned methods to fix the video stuck in VLC, you were able to fix the issue.
As for the subtitles, they can also be added externally in simple steps if the embedded subtitles are not showing after the fix.
While playing any video just go to the Subtitles tab and select “Add Subtitle File”. Pick the file from the resulting dialog box to display your captions/subtitles. To switch between languages, go to Subtitles Track and select the preferred option.
The VLC media player framework can use your graphics chip (a.k.a. GPU) to accelerate decoding of video streams depending on the video codec, graphic card model and operating system. In some cases, it can let the graphic card perform post-processing and rendering of the decoded video. In any case, this frees the main processor (i.e. CPU) of some of the most computationally heavy sub-tasks involved in playing digital video.
1. Video Output Module Settings
Users can also use OpenGL video output.
- Select Video > Output modules tab.
- Set Video output module to OpenGL video output for Windows.
- Select Video > Output modules > OpenGL tab as shown below.
- Set Display primaries to ITU-R Rec. BT.2020 (UltraHD).
- Set Display gamma / transfer function to Pure power gamma 2.2.
- Select Save button.
X11 (GNU/Linux, FreeBSD, etc.)
On Linux/X11, there are two competing interfaces for hardware video decoding, VA-API from Intel, and VDPAU from NVIDIA. Generally, VAAPI is used for Intel and Broadcom graphic cards, while VDPAU is used for AMD/ATI and NVIDIA cards.
VA-API
VA-API is supported for decoding only since VLC version 1.1.0. Refer to VLC VAAPI for more details.
On modern Ubuntu distributions, first install the hardware support (packages i965-va-driver, libva-intel-vaapi-driver and vainfo) and then activate GPU hardware acceleration in Preferences → Input&Codecs.
Install via the terminal command:
VDPAU
VDPAU is supported for decoding since VLC version 2.1.0, and for post-processing and rendering since VLC 2.2.0 (still in development as of late 2013).
The following video codecs are supported for decoding: MPEG-1, MPEG-2, MPEG-4 Visual (and possibly H.263), WMV3, VC-1 and H.264 (MPEG-4 AVC). Almost all video codecs are supported for post-processing and rendering.
Best Selling Products

Stellar Data Recovery Professional for Windows
Stellar Data Recovery has the right Windows Recovery tool for all your data recovery

Stellar Data Recovery Professional for Mac
Stellar Data Recovery for Mac program performs safe..

Stellar Photo Recovery
A comprehensive photo recovery software to restore photos, music & video files

Stellar Repair for Video
Powerful video repair tool for repairing corrupt or damaged MOV and other video files
Method 4: Change FFmpeg settings in VLC Player
Making changes in the FFmpeg video codec in VLC Player has worked for some. You can also try to resolve video stuttering and freezing with this technique.

- At the bottom-left corner, under Show settings, select ‘All.’

- In the left pane, click Input/ Codecs from the list.
- Click Video Codecs > FFmpeg.

- Under FFmpeg audio/video decoder, scroll down to Skip the loop filter for H.264 decoding option. Set it to ‘All.’

Solutions to fix video stuck, stuttering, buffering or lagging in VLC Media Player
Although there isn’t a set solution, changing the VLC media player’s settings can work. You may have to try various methods shared here to fix the video freeze or lag issues in VLC Media Player.
You can apply the solutions here to play high quality, HD/ UHD/ HDR, 8k, or H.265 videos of any size and file format.
Method 6: Repair your video using Stellar Repair for Video
If the above methods using VLC Media Player don’t fix video freeze, lag, or stuttering issues, the video file may be corrupt. To confirm corruption, see if your video freezes while playing in another media player.
If yes, try video repair software that can fix corruption in the file header, frames, and slider movement that may result in video freeze or stuttering.
Stellar Repair for Video is one such tool, which can easily repair damaged videos and fix Video Stuck or Freeze in VLC player. You can download the free trial to evaluate the software capabilities and preview the repaired videos before saving them.


Step 3: Click the ‘Repair’ button to begin the repair process.

Step 4: Preview the repaired videos before saving them to your desired location. Select videos and click on Save Repaired Files.

About The Author
Nishat Paiker is an expert technical writer and editor with over 8 years of experience. She has deep knowledge about data recovery and loves to explore new technology and DIY tools. Nishat has keen interest in photography. You will often find her giving photography tips and hacks.
Включение аппаратного ускорения в VLC
Откройте VLC Media Player и нажмите Инструменты> Настройки или нажмите Ctrl-P, чтобы открыть окно настроек программы.
Совет : вы также можете отключить эту функцию, если заметите проблемы с воспроизведением после ее включения.
Если вы используете интерфейс настроек «все», выберите «Ввод / Кодеки»> «Видеокодеки»> «FFmpeg» и убедитесь, что аппаратное декодирование установлено вместо автоматического, чтобы включить ускорение таким способом.
Затем нажмите кнопку «Сохранить» и перезапустите медиаплеер, чтобы работать с новыми настройками.
Попробуйте воспроизвести несколько видеофайлов, которые используют разные форматы, чтобы увидеть, имеет ли аппаратное ускорение разницу с точки зрения воспроизведения. Если это так, оставьте настройку включенной. Если это не так, просто вернитесь к настройкам, чтобы изменить параметр или сразу же отключить его.
Tutorial for setup of VLC Media Player for better playback.

- Software : VLC Media Player 3.0.11
- Operating System : Microsoft Windows 10 Pro x64
Method 5: Switch video output to DirectX DirectDraw in VLC
Try switching between output video stream settings in the VLC media player. You can either set the output video module to Direct 3D video output, DirectX DirectDraw, or Open GL video output.
Steps to change video output in VLC:
- In the Preferences window, click on Reset Preferences.

- In the confirmation dialog box, click OK.
- Again, go to Tools > Preferences.
- In the Preferences window, at the bottom left, under the Show Settings section, select the ‘All’ option.
- Now, scroll down and click on Video.
- On the right pane, Video options appear. Uncheck Drop late frames and Skip frames.

-
On the left pane, under the Video section, select Output modules.

Now, check if VLC Player can play your videos without freeze or other interruption.
Читайте также: