
Netbeans подключение к oracle
This tutorial covers how to configure NetBeans and deploy applications to Oracle Cloud.
Time to Complete
Approximately 1 hour
Introduction
Oracle Cloud is a public, enterprise platform-as-a-service (Paas) offering. Two services provided by Oracle Cloud are particularly interesting to Java applications developers: Oracle Java Cloud Service and Oracle Database Cloud Service. You can configure these services through a web interface, a command-line tool, or an integrated development environment (IDE) such as NetBeans.
Scenario
In this tutorial, you configure NetBeans with a local instance of Oracle WebLogic Server 11 g (10.3.6) and with a remote instance of Oracle Cloud. Next, you deploy a simple Java Platform, Enterprise Edition (Java EE) application locally, and then you deploy the same application to Oracle Cloud with a simple change to the project configuration file.
Prerequisites
Before starting this tutorial, you should:
To complete this tutorial, you will need the following resources.
Notes:
This document assumes you have some basic knowledge of, or programming experience with HTML, CSS, and JavaScript.
Knowledge of the JavaScript frameworks Knockout and Require is helpful for working through this tutorial, though not mandatory. However, these two popular open source JavaScript libraries play a central role in JET. Hence, the more you are familiar with them, the easier will be your journey into JET.
In NetBeans IDE 8.1, you need to install the Oracle JET Support plugin. In NetBeans IDE 8.2, this plugin is pre-installed and so you do not need to look for it or install it yourself. You are recommended to use NetBeans IDE 8.2.
It is helpful to install the Chrome Connector Plugin for NetBeans into the Chrome browser. Using the Chrome browser, together with the plugin, with NetBeans IDE 8.2 adds a number of handy features, such as automatic refresh of the browser when you save a file in NetBeans IDE, as well as the possibility to explore the live DOM from within NetBeans IDE.
To use the same look and feel in NetBeans IDE as used in this tutorial, install the Darcula LAF for NetBeans, which is also available in the Plugin Manager, under Tools | Plugins.
Разработка приложений на локальном компьютере
Мы рекомендуем выполнять разработку приложений на локальном компьютере и периодически развертывать их в облаке. Хотя вполне возможно выполнять разработку веб-приложений полностью в Oracle Cloud, локальная разработка является предпочтительным способом по следующим причинам.
Локальное развертывание занимает всего несколько секунд на запущенном сервере. Развертывание в облаке может занять несколько минут.
Поэтапное развертывание доступно только локально.
Отладка доступна только локально.
Также существуют риски, связанные с локальной разработкой и развертыванием в Oracle Cloud. Приложения, разработанные локально, могут не запускаться на удаленном сервере Oracle Cloud. Для обеспечения безопасности рекомендуется выполнять разработку локально на сервере Oracle WebLogic Server 11g, т.е. на том же сервере, что и удаленный сервер Oracle Cloud.
Необходимо вручную изменить сервер веб-приложений между локальным сервером и сервером Oracle Cloud. Не существует автоматического способа разработки на локальном уровне и периодического развертывания в облаке.
Чтобы изменить сервер веб-приложения между локальным сервером и Oracle Cloud:
В окне 'Проекты' щелкните правой кнопкой мыши узел приложения и выберите 'Свойства'.

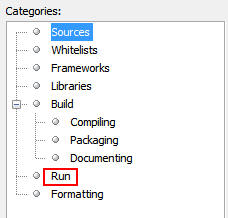
В окне 'Свойства проекта' выберите категорию 'Выполнить'.

Adding WebLogic Server 11 g to NetBeans
Oracle Java Cloud Service is powered by WebLogic Server 11g with some specific additions and exclusions (white-listed APIs and services). As an application developer, you may want to create and test applications locally before deploying the application to Oracle Java Cloud Service.
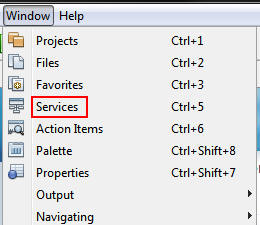
In NetBeans, select Windows > Services to open the Services window.
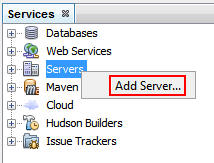
Right-click Servers and select Add Server.
In the Add Server Instance dialog box, perform the following steps:
a. Select Oracle WebLogic Server from the Server list
b. Modify the name of the server to reflect the server version; for example, add 10.3.6 to the name.
c. Click Next.

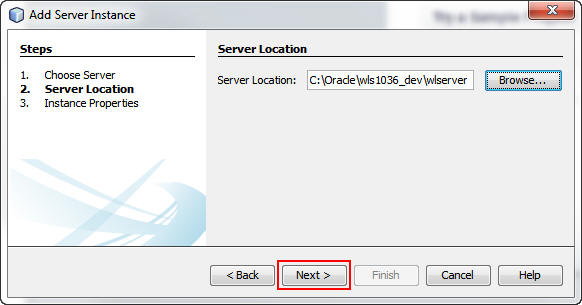
On the next screen, perform the following steps:
a. Click Browse to locate the directory where you installed the WebLogic Server instance. Be sure to include the wlserver directory in the path.
b. Click Next.
On the next screen, perform the following steps to complete the installation:
a. Enter the password for the server.
b. Click Enable JPA 2.0 to add support for the Java Persistence API (JPA) to the WebLogic Server instance.
c. Click Finish.

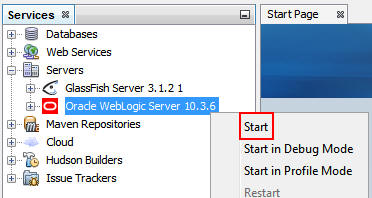
Expand Servers in the Services window.
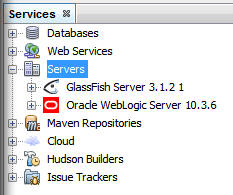
Right-click the Oracle WebLogicServer 10.3.6 instance and select Start.
The following message is displayed in the Output window: Server started in RUNNING mode.
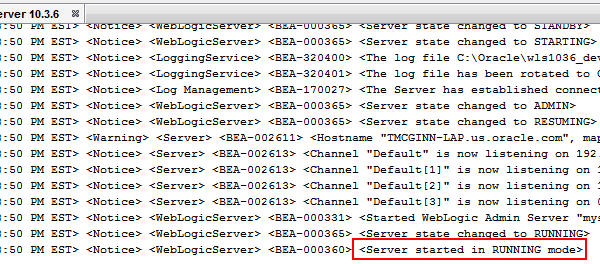
You successfully added a WebLogic Server 11g instance to NetBeans.
Загрузка Oracle Java Cloud Service SDK
Для разработки веб-приложений в Oracle Cloud требуется локальная копия Oracle Java Cloud Service SDK. Oracle Java Cloud Service SDK можно загрузить на домашней странице Oracle Cloud.
Для загрузки Oracle Java Cloud Service SDK:
Поместите окно браузера на домашнюю страницу Oracle Cloud.
Разверните раскрывающийся список Ресурсы в главном меню и щелкните Загрузки.
Щелкните Загрузить Oracle Java Cloud Service SDK в разделе Oracle Java Cloud Service SDK.
На странице загрузки Oracle Java Cloud Service SDK прочтите и примите условия лицензионного соглашения OTN для активации ссылки на загрузку.
Загрузите и извлеките SDK в локальную систему.
Establishing a Connection to Oracle Database
In this exercise you will test and create a new connection to the database.
Start the Oracle database.
Open the Services window (Window > Services or Ctrl-5;⌘-5 on Mac). In the Services window, right-click the Databases node and choose New Connection.

In the New Connection wizard, select Oracle Thin in the Driver dropdown list.
Click Add and locate the ojdbc6.jar file that you previously downloaded. Click Next.
In the Customize Connection panel of the wizard, enter the following values and click Next.
Oracle Thin (with Service ID (SID))
localhost or 127.0.0.1. Note: In the case of a remote connection, provide the IP address or resolvable hostname of the machine where the database is installed.
XE (default SID for Oracle Database XE). Note: If you are connecting to a remote database, ask the database administrator to provide you with the database SID.
Enter the username. For the purpose of our tutorial, enter system (the default database administrator account) and password that you used during database installation.
Enter the password for the selected username.
Click Test Connection to confirm that the IDE is able to connect to the database. Click Next.
If the attempt is successful, the message "Connection succeeded" is displayed in the wizard.

Select HR in the Select Schema dropdown list. Click Finish.
| You need to unlock the HR schema before you can access it in NetBeans. Unlocking the HR database is described in the Oracle Database XE Getting Started tutorial. |
The new connection will appear under the Databases node in the Services window. You can expand it and start browsing the database object’s structure. Change the display name for the connection node: choose Properties from the node’s popup menu and click the ellipsis button for the Display Name property. Enter OracleDB as the Display Name and click OK.

| Although the steps above demonstrate the case of connecting to a local database instance, the steps for connecting to a remote database are the same. The only difference is that instead of specifying localhost as the hostname, enter the IP address or hostname of the remote machine where Oracle Database is installed. |
Adding an Oracle Java Cloud Server Instance to NetBeans
The Oracle Cloud plugin enables NetBeans to recognize Oracle Java Cloud Server as a server instance that can be added to the IDE. In this section, you add your Oracle Java Cloud Server instance to NetBeans.
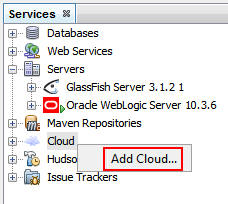
On the Services tab, right-click Cloud and select Add Cloud.
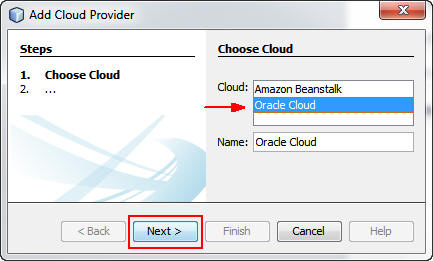
In the Add Cloud Provider dialog box, select Oracle Cloud and click Next.
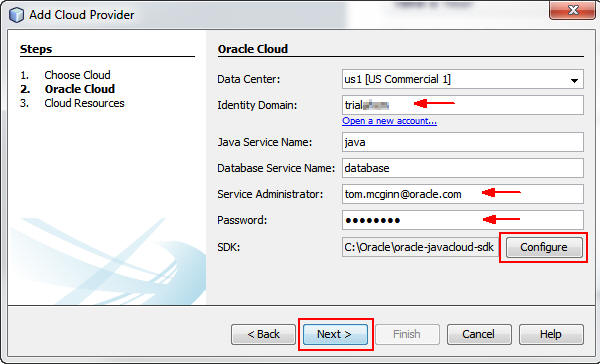
On the next screen, perform the following steps:
a. Enter the name of your Oracle Cloud identity domain in the Identity Domain field.
c. Enter the password for your Oracle Cloud account.
d. Enter the path to the Oracle Cloud SDK or click Configure to browse to the path.
e. Click Next.
On the next screen, click Finish.
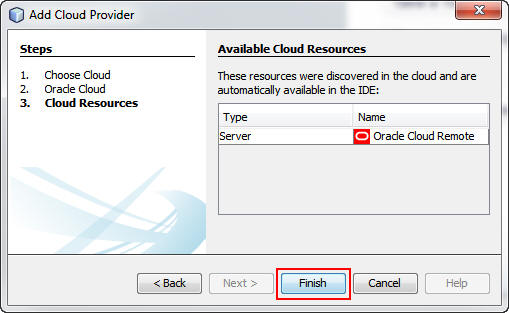
Oracle Cloud Remote is added to the list of servers on the Services tab.

Right-click Oracle Cloud Remote and select Properties.
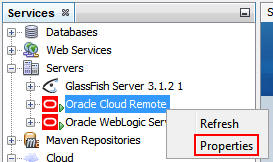
Make sure that the classpath is set to Oracle WebLogic Server 10.3.6 and click Close.
Установка подключения к базе данных Oracle
В этом упражнении мы создадим и протестируем новое подключение к базе данных.
Запустите базу данных Oracle.
Откройте окно "Службы", выбрав меню "Окно" > "Службы" или Ctrl-5;⌘-5 в Mac. В окне 'Службы' щелкните правой кнопкой мыши узел 'Базы данных' и выберите 'Создать подключение'.
В мастере создания подключений выберите Oracle Thin из раскрывающегося списка Driver ("Драйвер").
На панели Customize Connection ("Настроить подключение") мастера введите следующие значения и нажмите кнопку Next ("Далее").
Oracle Thin (с идентификатором службы (SID))
localhost или 127.0.0.1. Примечание. В случае удаленного соединения, укажите IP-адрес или разрешаемое имя узла компьютера, на котором установлена база данных.
1521 (по умолчанию)
Идентификатор службы (SID)
XE (SID по умолчанию для базы данных Oracle XE). Примечание. В случае подключения к удаленной базе данных запросите SID у администратора базы данных.
Введите имя пользователя. В целях данного учебного курса введите system (учетная запись по умолчанию администратора базы данных) и пароль, использованный во время установки базы данных.
Введите пароль для выбранного имени пользователя.
| До получения доступа к NetBeans необходимо разблокировать схему HR. Разблокирование базы данных HR описано в Руководстве по началу работы с базой данных Oracle XE. |
Новое подключение появится в узле Databases ("Базы данных") окна Services ("Службы"). Его можно будет развернуть и приступить к просмотру структуры объекта базы данных. Измените отображаемое имя для узла подключения: выберите Properties ("Свойства") из всплывающего меню узла и нажмите кнопку многоточия, чтобы вывести свойство Display Name ("Отображаемое имя"). Введите OracleDB в качестве отображаемого имени и нажмите кнопку OK.
| Хотя приведенные выше шаги описывают случай подключения к экземпляру локальной базы данных, шаги для подключения к удаленной базе данных такие же. Единственное отличие состоит в том, что вместо указания localhost как имени узла следует ввести IP-адрес или имя узла удаленного компьютера, на котором установлена база данных Oracle. |
Перед началом работы
Перед началом прохождения данного учебного курса обратите внимание на следующее:
В данном учебном курсе описано подключение к экземпляру базы данных Oracle XE на локальном компьютере, но те же действия также могут быть применены при подключении к удаленному экземпляру. В случае подключения к локальном экземпляру необходимо загрузить и установить базу данных Oracle XE. Процесс установки прост и интуитивен, но если все же возникнут проблемы, ознакомьтесь с Руководством по установке базы данных Oracle XE для своей платформы.
Существуют две категории драйверов JDBC Oracle: OCI и JDBC Thin.
Драйвер Oracle JDBC Thin основан на Java и не зависит от платформы. Этот автономный драйвер не требует присутствия других библиотек Oracle и обеспечивает прямое подключение к базе данных Oracle. Он используется для подключения к базе данных Oracle в данном учебном курсе. Перед прохождением данного учебного курса необходимо загрузить файл ojdbc6.jar и сохранить его на своей системе.
| Windows может изменить расширение загруженного файла с .jar на .zip. Но он при этом остается файлом .jar. Расширение можно просто заменить на .jar. |
Драйвер OCI Oracle использует встроенные клиентские библиотеки Oracle для связи с базами данных. Эти библиотеки входят в состав Oracle Instant Client. Хотя драйвер Thin являеся достаточным в большей части случаев, также рекомендуется использовать драйвер OCI путем выполнения шагов, описанных в разделе Использование драйвера OCI JDBC с IDE NetBeans. Хорошим примером использования драйвера OCI является подключение к удаленной базе данных Oracle из приложения PHP с помощью библиотек Oracle Instant Client. Дополнительные сведения о включении расширения OCI8 для PHP см. в разделе этого учебного руководства OCI 8 и IDE NetBeans для PHP.
Если вы не использовали базу данных Oracle XE ранее, прочитайте Руководство по началу работы с базой данных Oracle XE.
Предупреждение для пользователей GlassFish. Домашняя страница базы данных Oracle XE, используемая для администрирования базы данных, использует по умолчанию порт 8080. Oracle GlassFish Application Server также использует по умолчанию 8080. Если запустить обе программы одновременно, база данных Oracle XE заблокирует доступ браузеров к GlassFish на localhost:8080. В этом случае все приложения, развернутые на GlassFish, будут возвращать ошибку 404. Проще всего отключать базу данных Oracle XE, если она не нужна во время работы с GlassFish. Если нужно использовать обе эти программы одновременно, измените порт по умолчанию, используемый базой данных Oracle XE. Это проще, чем изменить порт GlassFish по умолчанию. В Интернете можно найти много описаний процесса изменения порта базы данных Oracle XE по умолчанию, включая одно на форумах Oracle.
Creating a Custom JET Module
In this exercise you will configure your application to benefit from the modularity features provided by JET. Then you will create your first JET module and load it into the application.
Right-click on the js/viewModels folder and go to New | Other. The New File dialog opens, showing templates for creating JET modules, as shown below:

Select "Empty JET Module", as shown above, and click Next. Type the name of the JET module, which by convention starts with a lowecase letter, such as home, shown below:

Click Finish. Notice that home.js is created in js/viewModels and that home.html is created in js/views, as shown below:

Open the two files that have been created. The JavaScript file is a define block, using Require.js syntax, as shown below:
The HTML file has the following content:
Load the JET module into the application by tweaking the Router setup and Navigation setup in the src/js/appController.js file, as shown below in bold:
You can now run the application and you should see the "home" menu item in the menubar.
Congratulations! Your application is configured correctly and you have created and loaded your first custom module.
Табличные пространства в базах данных Oracle
Табличное пространство – это блок логической памяти во всех базах данных Oracle. На самом деле, все данные баз данных хранятся в табличных пространствах. Таблицы создаются внутри выделенных табличных пространств. Если табличное пространство по умолчанию не выделяется пользователю напрямую, то, по умолчанию, используется табличное пространство системы (этой ситуации лучше избегать).
Дополнительные сведения о концепции табличного пространства см. Часто задаваемые вопросы по Oracle: табличные простнранства
See Also
"Learn" section on the Oracle JET site. A set of official Oracle JET learning resources.
Working with CSS Style Sheets in HTML5 Applications. A document that continues with the application that you created in this tutorial that demonstrates how to use some of the CSS wizards and windows in the IDE and how to use the Inspect mode in the Chrome browser to visually locate elements in your project sources.
Debugging and Testing JavaScript in HTML5 Applications. A document that demonstrates how the IDE provides tools that can help you debug and test JavaScript files in the IDE.
Oracle Cloud - это корпоративная облачная среда для бизнеса. Oracle Cloud предлагает бизнес-приложения самообслуживания, поставляемые в интегрированной разработке и платформе внедрения со средствами для быстрого расширения и создания новых услуг. Подробнее об Oracle Cloud см. на домашней странице Oracle Cloud.
В этом документе описывается регистрация Oracle Cloud в IDE NetBeans и некоторые функции Oracle Cloud, которые поддерживаются в IDE. В этом документе рассматриваются некоторые преимущества и недостатки работы только с облачной средой по сравнению с работой с локальным сервером и последующим развертыванием в облачной среде. В конце создается простое веб-приложение согласно инструкциям в разделе Введение в веб-приложения и выполняется его запуск в Oracle Cloud.
Также рекомендуем ознакомиться со серией руководств Разработка Oracle Cloud с использованием NetBeans и Eclipse (OEPE) в блоге Java Training Beat.

Для работы с этим учебным курсом требуется следующее программное обеспечение и ресурсы.
Версия 7.3, 7.4, 8.0, Java EE
Подключаемый модуль Oracle Cloud
Доступен из центра обновлений NetBeans с помощью диспетчера подключаемых модулей NetBeans
Служба Oracle Java Cloud
Зарегистрируйтесь на домашней странице Oracle Cloud Public Availability
Oracle Java Cloud Service SDK
Загрузите с домашней страницы Oracle Cloud.
Сервер Oracle WebLogic (для локальной разработки и тестирования приложений)
Версия указана в главе 4 руководства пользователей по службе Oracle Java Cloud Этот документ можно просмотреть, выбрав 'Ресурсы' > вкладка 'Документация' + в активированной службе Java Cloud+.
Сервер базы данных OracleXE (для локальной разработки и тестирования приложений)
Просмотр заданий и журналов
Все запросы, передаваемые IDE NetBeans в Oracle Cloud приводят к созданию задания. Каждое задание имеет состояние (передано, запущено, сбой, завершено) и может иметь один или несколько файлов журналов (журнал проверки белого списка, журнал сканирования на антивирусы, журнал развертывания). Можно просматривать последние задания и их журналы с помощью действия 'Просмотр заданий и журналов'.

Удаленный сервер Oracle Cloud
Удаленный сервер Oracle Cloud представляет собой экземпляр Oracle WebLogic, запущенный в Oracle Cloud. Разверните узел удаленного Oracle Cloud и просмотрите список приложений, запущенных на этом сервере. Можно щелкнуть правой кнопкой мыши приложение, чтобы открыть контекстное меню, которое содержит команды для запуска, остановки и отмены развертывания приложения. Можно нажать в меню 'Просмотр', чтобы открыть домашнюю страницу приложения в браузере.

Чтобы обновить список развернутых приложений, щелкните правой кнопкой мыши узел удаленного узла Oracle Cloud и выберите 'Обновить'.

(Optional) Configuring NetBeans to Use a Proxy
This section is optional. If your machine is behind a firewall or inside a corporate network, you must configure NetBeans to communicate to the Internet through a proxy.
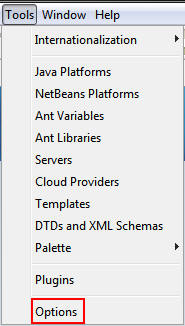
Select Tools > Options to display the Options dialog box.
On the General tab, perform one of the following steps:
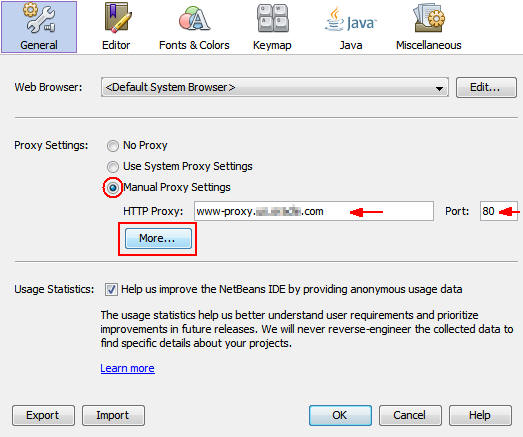
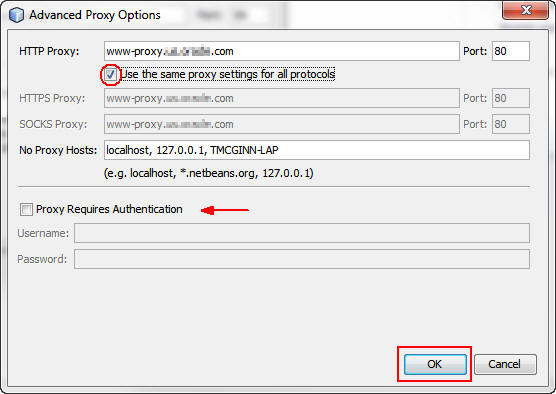
In the Advanced Proxy Options dialog box, perform the following steps:
a. Select the Use the same proxy settings for all protocols check box.
b. If your proxy requires a user name and password, select the Proxy Requires Authentication check box and populate the Username and Password fields appropriately.
c. Click OK.
Click OK to close the Options dialog box.
Before You Begin
Before you start walking through this tutorial, consider the following:
This tutorial demonstrates how to connect to an Oracle Database XE instance installed on your local system, but the steps can also be applied when you are connecting to a remote instance. If you are connecting to a local instance you need to download and install Oracle Database XE. The installation process is simple and intuitive, but if you have questions, refer to the Oracle Database XE installation guide for your platform.
There are two categories of Oracle JDBC drivers: OCI and JDBC Thin.
Oracle’s JDBC Thin driver is based on Java and is platform independent. This standalone driver does not require the presence of other Oracle libraries and allows a direct connection to an Oracle Database. This tutorial uses this driver to show how to connect to Oracle Database. Before walking through the tutorial, you need to download the ojdbc6.jar file and save it on your system.
| Windows may change the extension of the downloaded file from .jar to .zip. It is still a .jar file, however. You can rename the file to .jar. |
Oracle’s OCI driver uses Oracle’s native client libraries to communicate with databases. These libraries are obtained as part of the Oracle Instant Client. Although the Thin driver is sufficient in most cases, you might also want to use the OCI driver by following the steps in Using OCI JDBC Driver with the NetBeans IDE. A good example of the OCI driver use is accessing a remote Oracle database from a PHP application using the Oracle Instant Client libraries. See the OCI 8 and the NetBeans IDE for PHP section in this tutorial for information on how to enable the OCI8 extension for PHP.
If you have not used Oracle Database XE before, take the Oracle Database XE Getting Started tutorial.
| For Windows users: the Oracle Database XE homepage, which you use to administer the database, uses port 8080 by default. Oracle GlassFish Application Server also uses port 8080 by default. If you run both programs at the same time, Oracle Database XE blocks browsers from accessing GlassFish at localhost:8080. All applications deployed on GlassFish return 404 in this case. The simple solution is to shut down Oracle Database XE if you do not need it when you are running GlassFish. If you need to run both at the same time, change the default port that Oracle Database XE uses. This is easier than changing the GlassFish default port. There are many sets of instructions on the Internet for changing the Oracle Database XE default port, including one in Oracle forums. |
Создание приложения CRUD с JSF
IDE NetBeans и Oracle Cloud могут быть использованы при наличии серверной части базы данных Oracle, управляемой с помощью веб-приложения, размещенного на сервере Oracle WebLogic. IDE NetBeans обеспечивает возможность создания логических объектов для существующей базы данных Oracle и создания страниц JavaServer Faces (JSF) для полученных классов логических объектов. Этот сценарий требует локальной установки сервера базы данных OracleXE и сервера приложений Oracle WebLogic.
*Важно! *Удаленный сервер Oracle Cloud WebLogic не поддерживает JPA 2.0. Если на локальном сервере WebLogic поддержка JPA 2.0 не включена, следует либо отключить JPA 2.0, либо использовать поставщик сохранения JPA 1.0 для приложений CRUD.
*Примечание. *Этот документ дает лишь краткие указания по созданию классов логических объектов и страниц JSF. Подробнее см. раздел Создание приложения JavaServer Faces 2.0 CRUD на основе базы данных.
Создание приложения CRUD с JSF:
Включите поддержку образцов схемы HR на используемом сервере баз данных OracleXE и зарегистрируйте схему в IDE NetBeans. Подробнее см. в разделе Подключение к базе данных Oracle Database из IDE NetBeans.
Используйте имя пользователя и пароль HR при регистрации схемы HR в IDE NetBeans.
Создайте веб-приложение Java с использованием Java EE5 и локальной установки сервера WebLogic. Включите поддержку платформы JSF для приложений.


В окне 'Проекты' щелкните правой кнопкой мыши корневой узел проекта и выберите 'Создать' > 'Классы логических объектов из баз данных'. Откроется мастер создания логических объектов на основе баз данных.
В мастере создания логических объектов на основе баз данных выберите 'Новый источник данных' из раскрывающегося списка 'Источники данных'. Откроется диалоговое окно 'Создать источник данных'.


В мастере создания логических объектов на основе баз данных поле 'Доступные таблицы' заполняется именами таблиц схем HR. Выберите одну из таблиц, например EMPLOYEES, и нажмите 'Добавить'. Щелкните в остальных частях мастера, задав произвольное имя для пакета, содержащего классы логических объектов, и приняв все значения по умолчанию в других полях.
На панели 'Классы логических объектов' нажмите 'Выделить все' и нажмите кнопку 'Далее'.
На панели 'Создание страниц и классов JSF' задайте соответствующие имена для пакетов и папки файла JSF и нажмите кнопку 'Готово'.
В окне 'Проекты' щелкните правой кнопкой мыши корневой узел проекта и выберите пункт 'Выполнить'. IDE создает проект и развертывает его на локальном сервере WebLogic. Браузер открывается на целевой странице проекта.
Теперь у вас есть локальная версия веб-приложения Java, использующая CRUD и JSF. Можно проверить и настроить приложение локально. Когда приложение находится в конечном состоянии, разверните его в Oracle Cloud.
Развертывание приложений CRUD/JSF приложений в Oracle Cloud
В окне 'Проекты' щелкните правой кнопкой мыши корневой узел проекта и выберите 'Свойства'.

В окне 'Проекты' разверните узел проекта 'Файлы конфигурации' и дважды щелкните ` persistence.xml`. Файл откроется в режиме конструктора редактора XML.
В разделе 'Стратегия поколений таблицы' выберите пункт 'Создать'.

Если на локальном сервере WebLogic включена поддержка JPA 2.0 , необходимо изменить поставщика сохранения c заданного по умолчанию EclipseLink, который использует JPA 2.0, на поставщика, который использует JPA 1.0, такого как OpenJPA.
*Примечание. *Если на локальном сервере WebLogic не включена поддержка JPA 2.0, выполняется откат EclipseLink к JPA 1.0. В этом случае не нужно менять поставщиков сохранения.
В окне 'Проекты' щелкните правой кнопкой мыши корневой узел проекта и выберите пункт 'Выполнить'. В IDE создается проект и он развертывается на удаленном сервере Oracle Cloud. Можно отслеживать ход выполнения развертывания в окне 'Выходные данные' в IDE на вкладке 'Удаленное развертывание в Oracle Cloud'.
*Предостережение. *Oracle Cloud в настоящее время не поддерживает загрузку таблиц баз данных. Поэтому данные недоступны для используемых приложений при их нахождении в Oracle Cloud.
Создание веб-приложения
Перейдите к разделу Введение в разработку веб-приложений и завершите этот учебный курс. Разработка веб-приложений на локальном сервере Oracle WebLogic. После завершения работы с приложением измените сервер на удаленный сервер Oracle Cloud и запустите приложение.
Примечание. Необходимо установить сервер Oracle WebLogic локально и зарегистрировать сервер в IDE. Подробнее см. в разделе Видеоролик развертывания веб-приложений на сервере Oracle WebLogic.
Перед тем как развернуть приложение на удаленном сервере Oracle Cloud, откройте окно 'Выходные данные' ('Окно'> 'Выходные данные'> 'Выходные данные' или нажмите Ctrl-4). Обратите внимание на вкладку 'Удаленное развертывание на Oracle Cloud' в окне выходных данных. На этой вкладке показывается ход развертывания.

Setting Up
In this exercise you set up the Oracle JET QuickStart Basic template.
Adding the Oracle Cloud Plugin to NetBeans
In this section, you install a plugin that allows NetBeans to create a remote connection to your Oracle Cloud account as though it is a WebLogic Server instance.
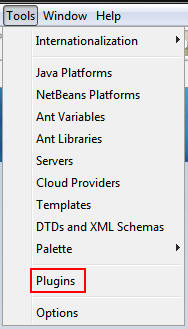
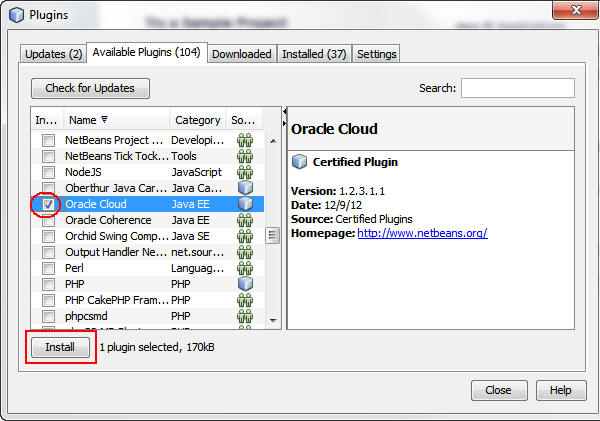
Select Tools > Plugins to open the Plugins dialog box.
Click Available Plugins.
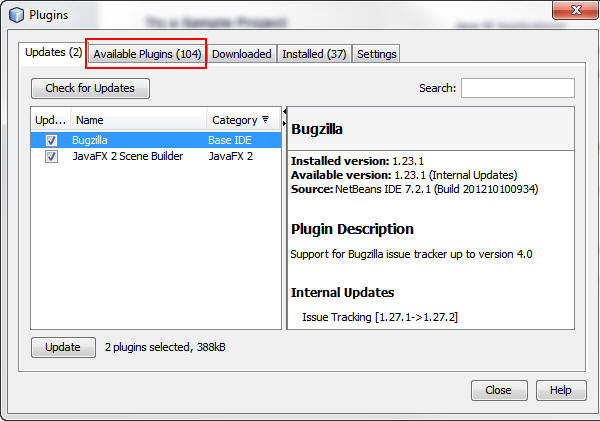
Note: The number of available plugins may be different in your installation.
Select Name to change the sort order of the table from Category to Name .

Perform the following steps:
a. Scroll to the Oracle Cloud plugin.
b. Select the Oracle Cloud check box.
c. Click Install.
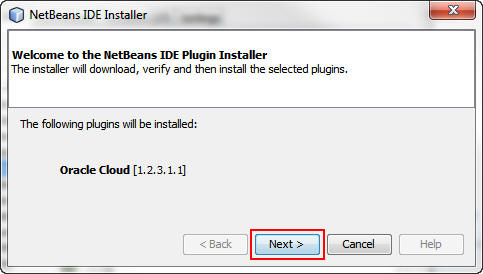
In the Installer dialog box, click Next.
Accept the license and click Install.

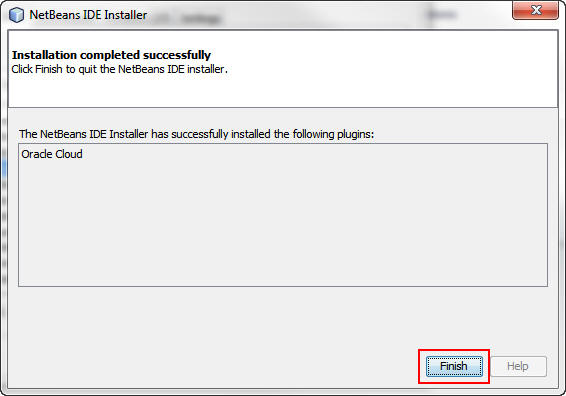
Click Finish to close the Installer dialog box.
In the Plugins dialog box, click Close.
Configuring WebLogic Server to Use JSF 2.0 Libraries
You can configure WebLogic Server 11g to use JavaServer Faces (JSF) 2.0 libraries by creating an application that requires JSF 2.0 libraries. Going forward, the NetBeans IDE automatically updates the server libraries to include JSF 2.0 and JavaServer Pages Standard Tag Library (JSTL) 1.2. The key step is creating a project that requires JSF 2.0 so that NetBeans configures WebLogic Server.
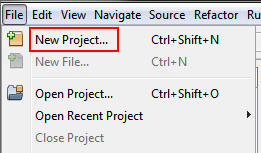
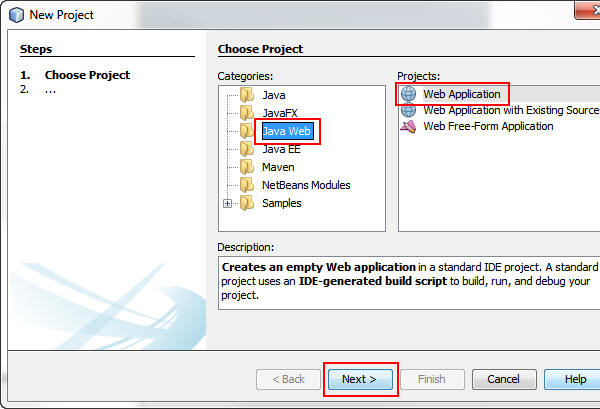
Select File > New Project.
In the New Project dialog box, perform the following steps:
a. Select Java Web from the Categories list.
b. Select Web Application from the Projects list.
c. Click Next.
Enter temp as the project name and click Next.

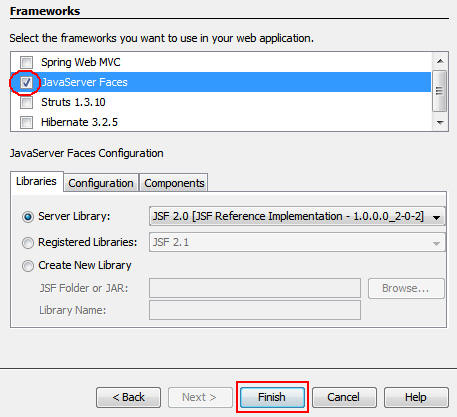
Select Oracle WebLogic Server 10.3.6 as the Server and click Next.

On the next screen, select JavaServer Faces as the framework and click Finish.
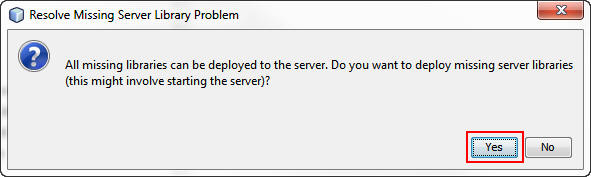
In the Resolve Missing Server Library Problem dialog box, click Yes to add the necessary missing libraries to the server.
In the Projects window, right-click the temp project and select Delete.

In the Delete Project dialog box, select the check box to delete the sources and click Yes.
Setting Up Intermodular Communication
You may need to reference properties across different JET modules. There are three different ways to do so, as outlined below.
Use $root within an HTML file to access global variables from main.js. Details here.
Use ko.dataFor within a JavaScript file to access global variables from main.js. Details here.
Use knockout-postbox to set up a loosely coupled publish/subscribe mechanism. Details here. Send Feedback on This Tutorial
Установка подключаемого модуля Oracle Cloud
Чтобы включить поддержку службы Oracle Java Cloud в IDE, необходимо установить подключаемый модуль Oracle Cloud в центре обновлений NetBeans. Можно использовать диспетчер подключаемых модулей NetBeans для установки подключаемого модуля Oracle Cloud.
Для установки подключаемого модуля Oracle Cloud выполните следующие действия.
Выберите 'Сервис' > 'Подключаемые модули' в главном меню, чтобы открыть диспетчер подключаемых модулей.
Выберите вкладку 'Доступные подключаемые модули' в диспетчере подключаемых модулей.
При щелчке 'Установить IDE' открывается программа установки IDE NetBeans. Для установки подключаемого модуля нужно выполнить действия, описанные в мастере установки.
После установки подключаемого модуля Oracle Cloud в мастере добавления поставщиков облачных услуг в списке поддерживаемых поставщиков облачных услуг будет отображаться Oracle Cloud.
Перед началом использования Oracle Cloud его необходимо зарегистрировать в окне 'Службы' IDE. Обратите внимание, что требуется отдельная установка SDK службы Oracle Java Cloud.
Примечание. Для работы с Oracle Cloud в IDE NetBeans требуется учетная запись пользователя в Oracle Cloud.
Чтобы зарегистрировать Oracle Cloud в IDE, выполните следующие действия.
Откройте окно 'Службы' в IDE ('Окно' > 'Службы' или Ctrl-5).
Щелкните правой кнопкой мыши узел Cloud и выберите пункт 'Добавить облако', чтобы открыть мастер добавления поставщика облачных услуг.

В поле 'Выбрать облако' выберите Oracle Cloud и нажмите кнопку 'Далее', чтобы открыть панель Oracle Cloud.

После нажатия кнопки 'Далее' IDE проверяет подключение к облаку. Если соединение прошло успешно, отображается перечень облачных служб. В настоящее время доступен только удаленный сервер Oracle Cloud (Oracle WebLogic).
Примечание. После регистрации поставщика Oracle Cloud можно изменить данные облака в его свойствах. Откройте окно 'Свойства', щелкнув правой кнопкой мыши узел Oracle Cloud и выберите 'Свойства'.
Сейчас Oracle Cloud указан в узле 'Облако' в окне 'Службы'. Можно щелкнуть правой кнопкой мыши узел Oracle Cloud, чтобы открыть контекстное меню, которое содержит команды для обновления списка служб, открыв список заданий и журналов и удалив экземпляр облака или просмотрев свойства облака.

При регистрации Oracle Cloud в IDE экземпляр узла удаленного сервера Oracle Cloud также отображается в узле 'Серверы'. (Если он не отображается, щелкните правой кнопкой мыши узел Oracle Cloud и выберите 'Обновить').

Можно развернуть удаленный узел Oracle Cloud, чтобы просмотреть список приложений, развернутых на удаленном сервере.
Tablespaces in Oracle Databases
A tablespace is a logical database storage unit of any Oracle database. In fact, all of the database’s data is stored in tablespaces. You create tables within allocated tablespaces. If a default tablespace is not explicitly assigned to a user, the system tablespace is used by default (it is better to avoid this situation)
For more information about the tablespace concept, see Oracle FAQ: Tablespace
Управление данными в базе данных Oracle
Обычными способами взаимодействия с базами данных является выполнение команд SQL в редакторе SQL или использование интерфейсов управления базами данных. Например, у базы данных Oracle XE имеется интерфейс на основе браузера, посредством которого можно осуществлять администрирование базы данных, управлять объектами базы данных и манипулировать данными.
Хотя пользователи могут выполнить большую часть задач, связанных с базами данных с помощью интерфейса управления базами данных Oracle в этом учебном руководстве демонстрируется использование редактора SQL в IDE NetBeans для выполнения некоторых из этих задач. В приведенных ниже упражнениях показано, как создавать новых пользователей, быстро воссоздавать таблицы и копировать данные таблиц.
Создание таблицы
Существует несколько способов создания таблицы в базе данных с помощью IDE NetBeans. Например, можно запустить файл SQL (щелкните правой кнопкой мыши файл и выберите 'Запустить файл'), выполните команду SQL (щелкните правой кнопкой мыши узел подключения и выберите 'Выполнить команду') или используйте диалоговое окно 'Создать таблицу' (щелкните правой кнопкой мыши узел 'Таблицы' и выберите 'Создать таблицу'). В этом упражнении мы воссоздадим таблицу, используя структуру другой таблицы.
В данном примере нам нужно, чтобы пользователь jim создал копию таблицы Departments в своей схеме, воссоздав таблицу из базы данных hr . Перед созданием таблицы будет необходимо отключиться от сервера и войти в систему как пользователь jim .
Щелкните правой кнопкой мыши узел подключения OracleDB в окне Services ("Службы") и выберите Disconnect ("Отключить").
Щелкните правой кнопкой мыши узел подключения OracleDB , выберите Connect ("Подключить") и войдите как jim .
Разверните узел Tables ("Таблицы") под схемой HR и убедитесь, что только таблица Departments доступна пользователю jim .
При создании пользователя jim право выполнения выбора было ограничено таблицей Departments .

Щелкните правой кнопкой мыши узел таблицы Departments и выберите Grab Structure ("Копировать структуру"). Сохраните файл .grab у себя на диске.
Раверните схему JIM , щелкните правой кнопкой мыши узел Таблицы и выберите 'Повторно создать таблицу'. Укажите на созданный файл .grab .


При нажатии кнопки "ОК" новая таблица DEPARTMENTS будет создана и появится под узлом схемы JIM . При щелчке правой кнопкой мыши узла таблицы и выборе 'Просмотреть данные' будет видно, что таблица пустая.
Если нужно скопировать данные из исходной таблицы Departments в новую таблицу, данные можно ввести вручную в редактор таблиц, либо выполнить сценарий SQL для заполнения новой таблицы.
Для ввода данных вручную выполните следующие действия.
Щелкните правой кнопкой мыши таблицу DEPARTMENTS в схеме JIM и выберите View Data ("Просмотр данных").
Щелкните значок Insert Records ("Вставить записи") на панели инструментов View Data ("Просмотр данных"), чтобы открыть окно вставления записей.

Например, можно ввести следующие значения из исходной таблицы DEPARTMENTS .
NetBeans IDE includes built-in support for Oracle Database. You can easily establish a connection from inside the IDE and begin working with the database. This tutorial demonstrates how to use a local installation of Oracle Database 10_g_ Express Edition (Oracle Database XE), a lightweight database that is free to develop, deploy, and distribute.
This document shows how to set up a connection to a local installation of Oracle Database XE from the NetBeans IDE, use the IDE’s built-in SQL editor to handle the database data, and how to enable the OCI 8 PHP extension to write PHP code that connects to an Oracle database.
To follow this tutorial, you need the following software and resources.
10 g Express Edition
Monitoring Deployment Activities and Running Applications in Oracle Cloud
You can monitor the result of a deployment and any messages sent to the server log within NetBeans.
On the Services tab, expand the Oracle Cloud Remote Server instance to see the deployed applications.

When you right-click an application, you can select any of the following options:
View: Open the application in a browser.
Start: Restart the application if it is currently stopped.
Stop: Stop a running application.
Undeploy: Remove the application from Oracle Cloud.

Under Cloud in the Services window, right-click Oracle Cloud and select View Jobs and Logs to open the Jobs and Logs window.

The Jobs tab logs the deployment activities to your Oracle Java Cloud Server instance.
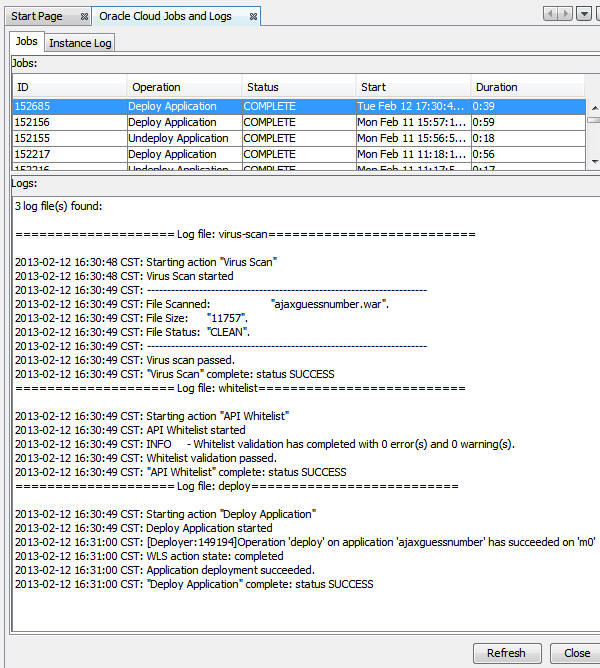
Click Instance Log to see the messages logged by your Oracle Java Cloud Service instance.
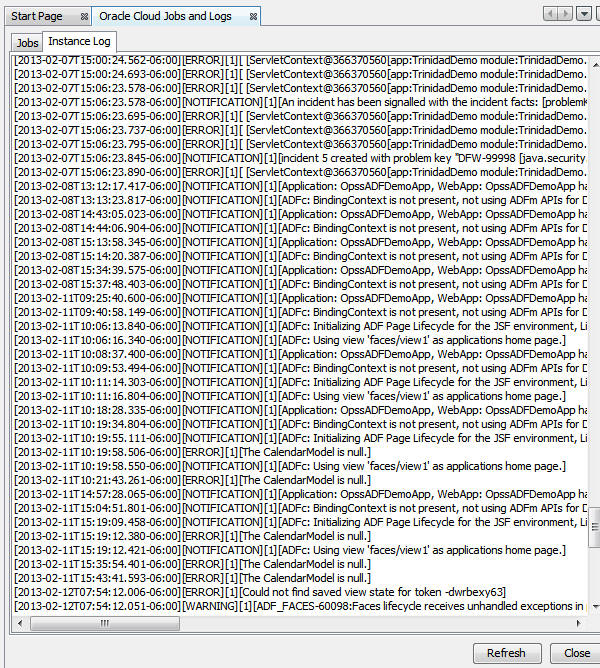
These messages are similar to those recorded in the local log file of your local WebLogic Server instance.
Click Close to close the Oracle Cloud Jobs and Logs window.
Creating a User
Let’s create a new database user account to manipulate tables and data in the database. To create a new user, you must be logged in under a database administrator account, in our case, the default system account created during database installation.
In the Services window, right-click the OracleDB connection node and choose Execute Command. This opens the NetBeans IDE’s SQL editor, in which you can enter SQL commands that will be sent to the database.

To create a new user, enter the following command in the SQL Editor window and click the Run SQL button on the toolbar.

This command creates a new user jim with the password mypassword . The default tablespace is users and the allocated space is unlimited.
The next step is to grant the jim user account privileges to do actions in the database. We need to allow the user to connect to the database, create and modify tables in user’s default tablespace, and access the Employees table in the sample hr database.
In real life, a database administrator creates custom roles and fine tunes privileges for each role. However, for the purpose of our tutorial, we can use a predefined role, such as CONNECT . For more information about roles and privileges, see Oracle Database Security Guide.
Using JET Components
In this section, you learn about a variety of different ways of creating JET components.
Creating a Table
There are several ways to create a table in the database through the NetBeans IDE. For example, you can run an SQL file (right-click the file and choose Run File), execute an SQL Command (right-click the connection node and choose Execute Command) or use the Create Table dialog box (right-click the Tables node and choose Create Table). In this exercise you will recreate a table by using the structure of another table.
In this example, you want the user jim to create a copy of the Departments table in his schema by recreating the table from the hr database. Before you create the table you will need to disconnect from the server and log in as user jim .
Right-click the OracleDB connection node in the Services window and choose Disconnect.
Right-click the OracleDB connection node and choose Connect and log in as jim .
Expand the Tables node under the HR schema and confirm that only the Departments table is accessible to user jim .
When you created the user jim , the Select privilege was limited to the Departments table.
Right-click the Departments table node and select Grab Structure. Save the .grab file on your disk.
Expand the JIM schema, right-click the Tables node and choose Recreate Table. Point to the .grab file that you created.
Review the SQL script that will be used to create the table. Click OK.
When you click OK, the new DEPARTMENTS table is created and appears under the JIM schema node. If you right-click the table node and choose View Data you will see that the table is empty.
If you want to copy the data from the original Departments table to the new table, you can enter the data manually in the table editor or run an SQL script on the new table to populate the table.
| To enter the data manually, perform the following steps. |
Right-click the DEPARTMENTS table under the JIM schema and choose View Data.
Click the Insert Records icon on the View Data toolbar and to open the Insert Record window.
Type in the fields to enter the data. Click OK.
For example, you can enter the following values taken from the original DEPARTMENTS table.
Setting Up the Oracle JET QuickStart Basic Template
The Oracle JET QuickStart Basic template provides all the JavaScript libraries and CSS stylesheets that provide the absolute minimum starting point of creating JET applications. In this section, you set up the Oracle JET QuickStart Basic in the IDE as the basis of a new Oracle JET application.
In NetBeans IDE, open the New Project dialog (Ctrl-Shift-N), select the Samples category, then the HTML5/JavaScript category and then select Oracle JET QuickStart Basic, as shown below.

Type the name of the application, such as CustomerVisualizer, and select a location to store it, as shown below.

Click Finish to complete the wizard.
When you click Finish, the IDE creates the project, which might take a moment, since several JavaScript libraries are included in the ZIP file. When the unzip process is complete, the IDE displays a node for the project in the Projects window.
You now have a new HTML5/JavaScript project created from the Oracle JET QuickStart Basic template.

Spend some time exploring the project structure of the application. For example, look in js/libs and you will see the JavaScript libraries that constitute Oracle JET, while js/viemodels contains the JavaScript files, with their matching views in js/views.
Right-click the project and choose Run. The browser opens and displays the template, as shown below.

Spend some time exploring the template in the browser. For example, resize the browser and notice that responsive design is built into the template. When the browser is sized for mobile devices, notice the menu along the top disappears and is replaced by a mobile menu instead, as shown below.

Summary
In this tutorial, you learned how to:
- Add a local instance of WebLogic Server 11g to your NetBeans installation
- Configure WebLogic Server 11g to provide the support for JSF 2.0 and JPA 2.0
- Add the Oracle Cloud plugin to NetBeans to enable NetBeans to add an Oracle Cloud instance
- Add an instance of Oracle Cloud to your NetBeans installation as a remote server
- Deploy and run applications locally to your WebLogic Server 11g instance
- Deploy and run applications to your Oracle Cloud instance
- Monitor Oracle Cloud deployments and run applications from NetBeans
Resources
- Oracle Cloud documentation
- NetBeans documentation
- WebLogic Server 11g documentation
- To learn more about Oracle Cloud, refer to additional OBEs in the Oracle Learning Library
Credits
To help navigate this Oracle by Example, note the following:
Hiding Header Buttons: Click the Title to hide the buttons in the header. To show the buttons again, simply click the Title again. Topic List Button: A list of all the topics. Click one of the topics to navigate to that section. Expand/Collapse All Topics: To show/hide all the detail for all the sections. By default, all topics are collapsed Show/Hide All Images: To show/hide all the screenshots. By default, all images are displayed. Print: To print the content. The content currently displayed or hidden will be printed.
To navigate to a particular section in this tutorial, select the topic from the list.
This document provides a step-by-step set of instructions guiding you through the process of getting started with the Oracle JavaScript Extension Toolkit (JET). JET empowers developers by providing a modular toolkit based on modern JavaScript, CSS3, and HTML5 design and development principles.
Manipulating Data in Oracle Database
A common way of interacting with databases is running SQL commands in an SQL editor or by using database management interfaces. For example, Oracle Database XE has a browser-based interface through which you can administer the database, manage database objects, and manipulate data.
Although you can perform most of the database-related tasks through the Oracle Database management interface, in this tutorial we demonstrate how you can make use of the SQL Editor in the NetBeans IDE to perform some of these tasks. The following exercises demonstrate how to create a new user, quickly recreate a table, and copy the table data.
Deploying the Sample Application to Your Oracle Cloud Instance and Testing It
In this section, you modify the NetBeans ajaxguessnumber project to deploy it to your Oracle Cloud instance.
Right-click the project and select Properties to open the Project Properties dialog box.

In the Categories section, select Run.
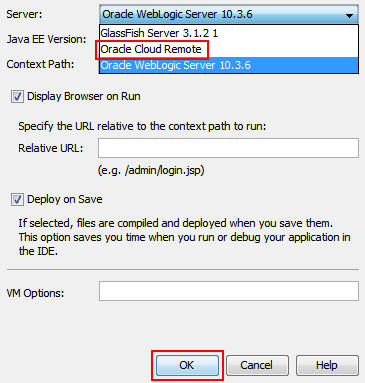
Select Oracle Cloud Remote from the Server list and click OK.
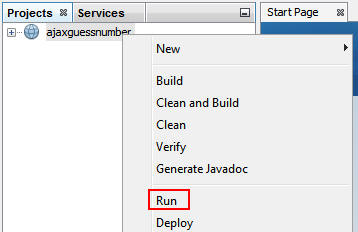
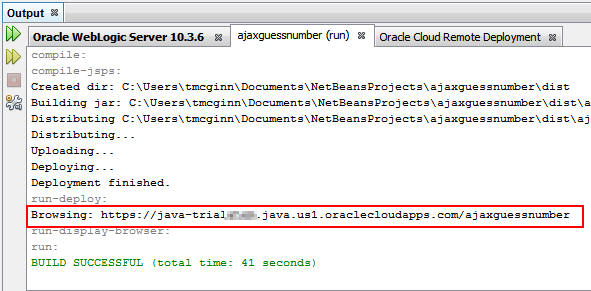
Right-click the project and select Run.
In the Output window, the ajaxguessnumber (run) tab displays the URL of the application in the Oracle Java Cloud Service. Because you ran the project, the URL is automatically sent to your default browser. The application opens in a browser window, but you must first log in with your Oracle Cloud credentials.
Enter your user name, password, and identity domain and then click Sign in.

Enter a number and click Submit to check your guess.
Opening the Sample Application and Testing It Locally
In this section, you open the ajaxguessnumber project provided in this tutorial and test it with WebLogic Server 11g.
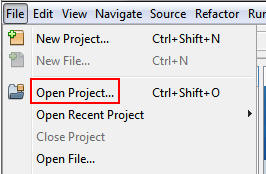
Select File > Open Project.
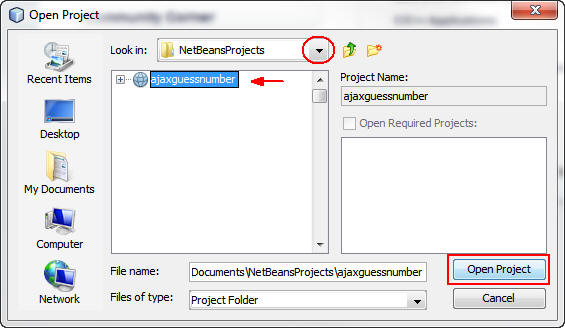
In the Open Project dialog box, perform the following steps:
a. In the “Look in” list, select the directory where you unzipped the ajaxguessnumber project.
b. Select the ajaxguessnumber project.
c. Click Open Project.
Right-click the project and select Run.

The project is compiled and deployed to WebLogic Server 10.3.6. After deployment, the application opens in a browser window.

Note: The correct number is written to the Oracle WebLogic Server 10.3.6 output window.
Creating Additional JET Modules
Using the steps described in Creating a First Module, create some more empty JET modules. Use the "Empty JET Module" wizard, as well as the "Knockout JET Module" wizard:

Compare the code between the two. In the latter case, you will see the Hello World sample code from the Knockout.js documentation site.
In each case, you will need the following when creating a new JET module:
A JavaScript file that provides a define block, in js/viewModels.
An HTML file that has the same name as the JavaScript file, in js/views.
An update to the Router setup and Navigation setup in src/js/appController.js, to load the JET module.
Experiment by creating multiple empty JET modules, e.g., a footer module and a header module.
Тестирование поддержки соответствия белому списку
Oracle Cloud не поддерживает некоторые стандартные методы API Java, такие как System.exit() . Все разрешенные методы определяются в whitelist Oracle Cloud. Во время развертывания приложений в Oracle Cloud сервер Cloud выполняет тестирование на соответствие стандартам белого списка. При нарушении соответствия стандартам белого списка облачный сервер запрещает развертывание приложения.
IDE NetBeans позволяет предотвратить появление ошибок, связанных с белым списком, путем уведомления пользователей о нарушениях стандартов белого списка при написании кода. Функция автозавершения кода ограничена белым списком, и нарушения его стандартов выделяются в коде. Выполните действие 'Проверка' в веб-приложении, развернутом на удаленном сервере Oracle Cloud, и в окне 'Выходные данные' отобразятся все нарушения соответствия стандартам белого списка.
Проверка на соответствие стандартам белого списка:
В окне 'Проекты' щелкните правой кнопкой мыши созданное веб-приложение и выберите 'Создать' > 'Сервлет'. Откроется мастер создания сервлетов.

Задайте для сервлета произвольное имя, выберите существующий пакет для него и нажмите кнопку 'Готово'. Класс сервлета открывается в редакторе.
Найдите метод сервлета processRequest , введите System.ex в теле метода и нажмите сочетание клавиш Ctrl-Space, чтобы открыть функцию автозавершения кода. Функция автозавершения кода не обеспечивает возможности завершения System.exit , потому что System.exit запрещен в белом списке Oracle Cloud. В IDE отображается exit с линией, проходящей через него.

Завершите ввод System.exit(1); . Отобразится предупреждение. Наведите курсор на значок предупреждения, и появится подсказка о том, что java.lang.System.exit запрещен.

В окне 'Проекты' щелкните правой кнопкой мыши узел приложения и выберите 'Проверить'. Откройте окно 'Выходные данные' ('Окно' > 'Выходные данные' > 'Выходные данные' или сочетание клавиш Ctrl-4). Окно 'Выходные данные' включает в себя вкладку 'Белый список', в которой отображаются ошибки, связанные с ограничениями белого списка.

Откройте окно 'Элементы действий' ('Окно' > 'Элементы действий' или сочетание клавиш Ctrl-6). Нарушения соответствия стандартам белого списка отображаются как отдельная группа элементов действий.
Совет. Включите 'Элементы действий группы' по категориям (нижняя кнопка слева), чтобы сразу увидеть нарушения стандартов белого списка.

. В окне 'Проекты' щелкните правой кнопкой мыши узел приложения и выберите 'Свойства'. Откроется окно 'Свойства проекта' приложения. Выберите категорию 'Белые списки'. Отобразится список активных белых списков. В этом диалоговом окне можно отключить белый список.
Когда сервер веб-приложений настроен как удаленный сервер Oracle Cloud, белый список Oracle Cloud применяется как к этому проекту, так и ко всем подпроектам этого проекта. Например, для корпоративного приложения, настроенного для запуска на удаленном сервере Oracle Cloud, имеется белый список Oracle Cloud, который применяется к самому корпоративному приложению и ко всем модулям EJB и веб-приложениям, которые являются частью этого корпоративного приложения. У обоих проектов и его подпроектов имеется категория 'Белый список' в их 'Свойствах проекта'. Можно использовать диалоговое окно 'Свойства проекта' для настройки белых списков по отдельности для проектов и их отдельных подпроектов.
IDE NetBeans включает встроенную поддержку для баз данных Oracle. Пользователь может без труда установить подключение к ней из среды IDE и начать работу в базе данных. В данном учебном курсе показано, как использовать локально установленный экземпляр базы данных Oracle 10_g_ Express Edition (Oracle Database XE), упрощенной базы данных, открытой для бесплатных развертывания, распространения и разработки для нее.
В этом документе описывается настройка соединения для локальной установки базы данных Oracle XE из IDE NetBeans, использования встроенного редактора SQL IDE для обработки данных базы данных, а также включения расширения PHP OCI 8 для написания кода PHP, выполняющего соединения с базой данных Oracle.
Для работы с этим учебным курсом требуется следующее программное обеспечение и ресурсы.
7.2, 7.3, 7.4, 8.0, пакет Java EE
10 g Express Edition
Using the JET Cookbook
In this section, you learn how easy it is to use the Oracle JET Cookbook, which describes all the JET components, while also providing complete code snippets that you can copy/paste into your JET applications.
Browse through the JET components in the Oracle JET Cookbook and get an idea of what’s available.
Take a look at the Bar Chart component. 4. In the lower part of the page, copy the content of the HTML Editor into your application, within the home.html file.
Notice that there is component-specific code-completion, and documentation, press Ctrl-Space within ojChart to see it:

Similarly, press Ctrl-Space on a property and you will see code completion, and documentation, too:

Note: Notice that the properties shown in the code completion are context-sensitive to the currently used Oracle JET component. For example, instead of ojChart above, use a different component and then press Ctrl-Space over the properties and you will see that only properties that are applicable to the currently used Oracle JET component are shown.
In the Output window (Ctrl-4), notice the error messages, because the home.js JavaScript file does not yet define the variables you have referenced in your HTML file, as shown below:

In home.js, below var self = this;, copy the body of the code in the JS Editor section, near the end of the Bar Chart page.
Note: Be careful not to copy everything in the JS Editor, because the JS Editor has code in a require block, while your home.js contains a define block.
To enable the JET Chart component to be loaded into the application, include the ojs/ojchart reference in your define block, in your home.js file, as shown below:
. Open the application in a browser and you should see the following:

Modify and tweak the page as needed, for example, change the H1 element from home to something more meaningful, such as Chart Data.
As an exercise, choose some other JET components from the Oracle JET Cookbook and integrate them into your application.
Создание пользователя
Давайте создадим новую учетную запись пользователя базы данных для управления таблицами и данными в базе данных. Чтобы создать нового пользователя, необходимо войти в систему, используя учетную запись администратора базы данных, в нашем случае учетную запись по умолчанию system , созданную при установке базы данных.
В окне 'Службы' щелкните правой кнопкой мыши узел подключения OracleDB и выберите 'Выполнить команду'. При этом открывается редактор SQL IDE NetBeans, в котором можно указать команды, которые будут отправлены базе данных.
Чтобы создать нового пользователя, введите приведенную ниже команду в окне редактора SQL и нажмите кнопку Run SQL ("Выполнить SQL") на панели инструментов.
В результате выполнения данной команды будет создан новый пользователь jim с паролем mypassword . Табличным пространством по умолчанию является users , а выделенное пространство не ограничено.
Следующий этап – предоставить jim права учетной записи пользователя на выполнение действий с базой данных. Необходимо разрешить пользователю подключаться к базе данных, создавать и изменять таблицы в табличном пространстве пользователя по умолчанию и выполнять доступ к таблице Employees в примере базы данных hr .
На практике администратор базы данных обычно создает особые роли и аккуратно настраивает полномочия для каждой из них. Но в целях нашего учебного курса мы можем использовать заранее определенную роль, такую как CONNECT . Дополнительные сведения о ролях и полномочиях приведены в документе Oracle Database Security Guide ("Руководство по безопасности базы данных Oracle").
Читайте также: