
Mozilla thunderbird фильтрация мусора
Message filters allow you to set up Thunderbird to organize your messages automatically. Each account has its own set of filters. Filters can move messages to folders, delete them, forward them to other email addresses, and more.
Настройка спам-фильтра
Саму процедуру нельзя назвать чересчур сложной. Но для новичков она покажется именно такой. Человек, который только начал разбираться в премудростях почтового клиента может и в интерфейсе запутаться.
Кстати, процесс создания папки и настройки фильтра действительно может показаться слишком запутанным. Поэтому мы предоставим подробную инструкцию с четким алгоритмом действий. Она поможет сделать все правильно и не совершить ошибки:

Вот и все. Пресловутый спам-фильтр настроен. Теперь бесполезная корреспонденция будет перемещаться прямо в созданный каталог и уничтожаться по истечении заданного промежутка времени. Очень удобно, не правда ли?
Volunteer
Grow and share your expertise with others. Answer questions and improve our knowledge base.
В последнее время на почту стало приходить много спама . (Спам — это массовая рассылка почтовых писем - лицам, не выражавшим желания их получать).
Все настройки Анти-спам фильтра сводятся к тому что бы создать папку в почтовом клиенте и нажать несколько галочек в настройках почтового клиента. Вся документация будет расписана по шагам и рассчитана на не опытного пользователя.
Наша статья будет состоять из двух разделов:
1)Настройка Анти-Спам фильтра,
2)Работа с Анти-Спам фильтром
Настройка Анти-Спам фильтра
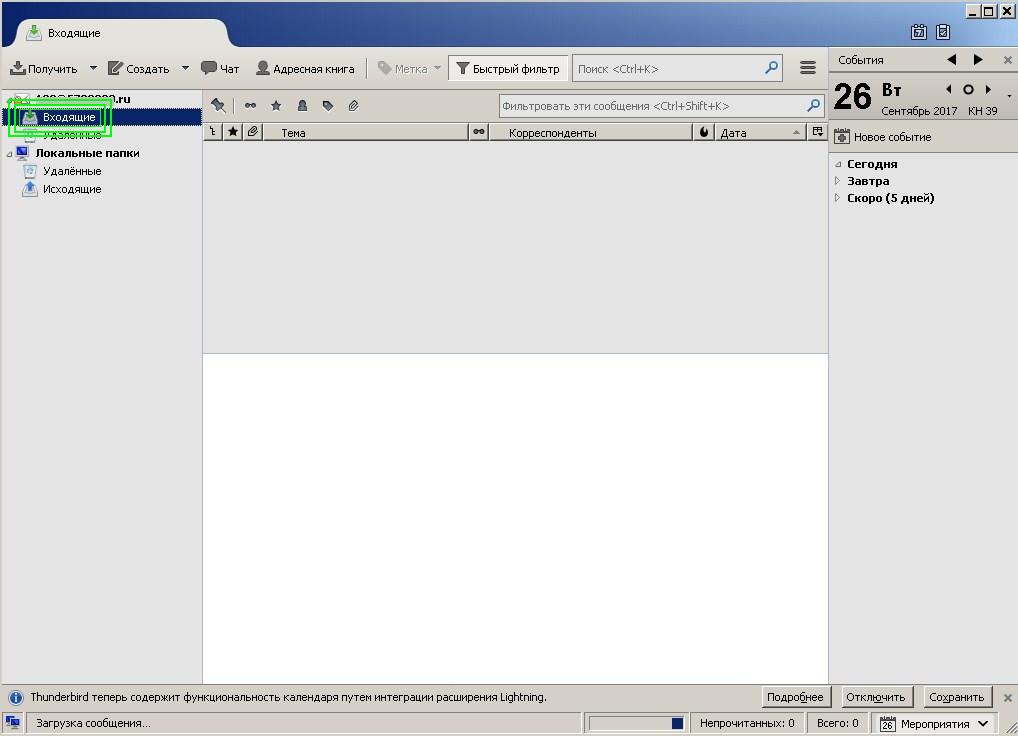
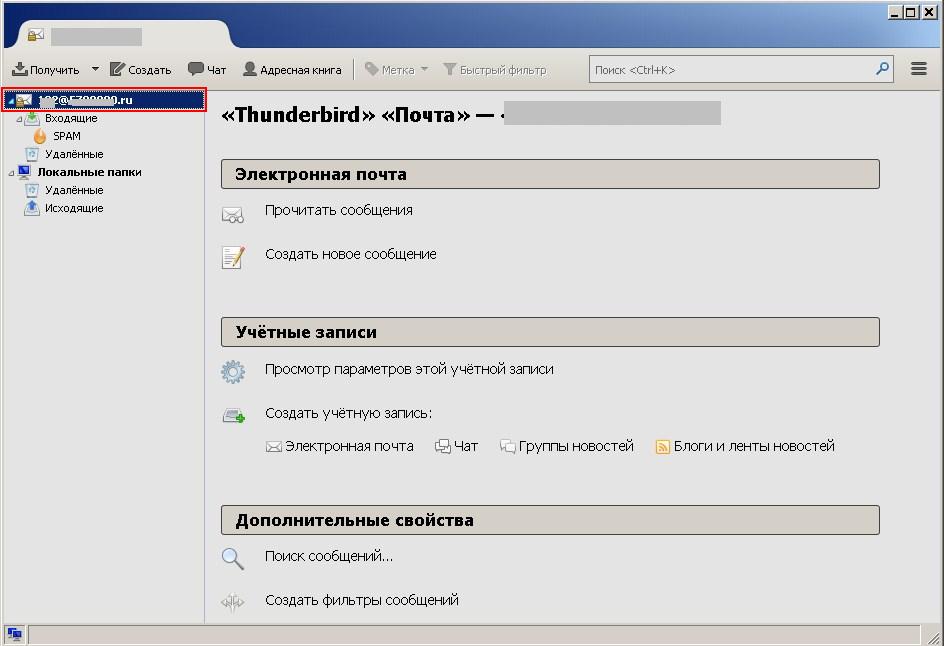
1.Запускаем наш почтовый клиент (предполагается, что наш почтовый клиент уже работает, и нам приходят письма).
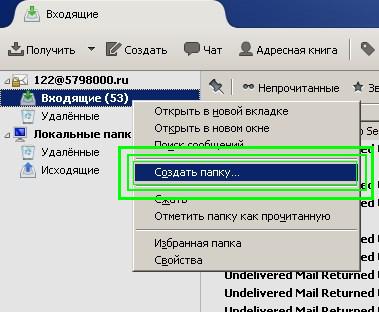
3. Далее у нас откроется следующее окно где нам необходимо выбрать строчку «Создать папку», как показано ниже.
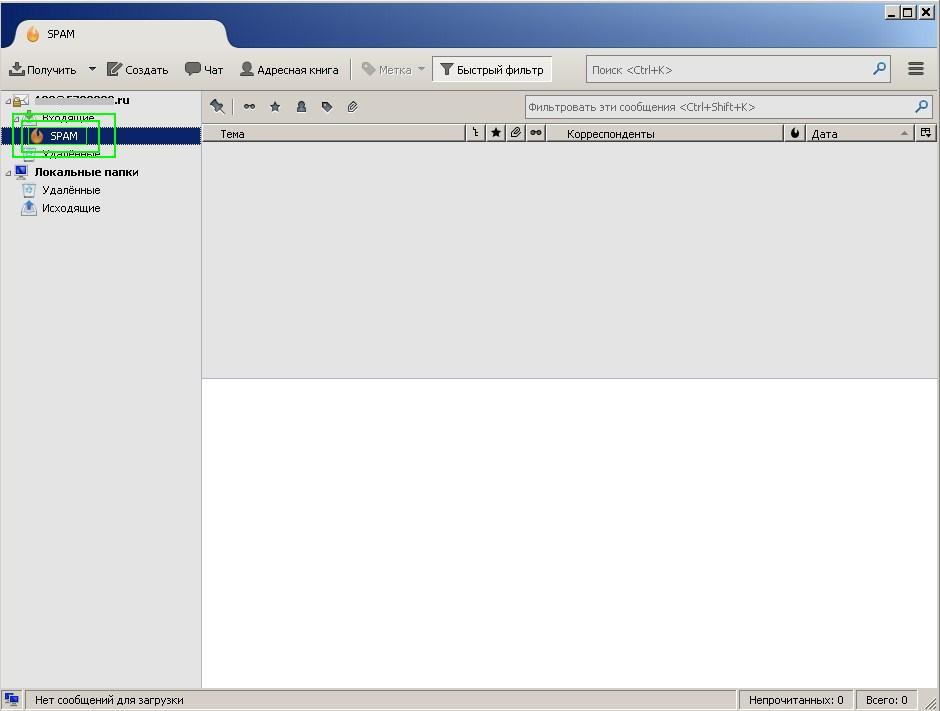
4.У нас откроется окошко «Создать папку» здесь мы в пустом окошке «Имя» напишем как будет называться наша папка, не важно как будет называться наша папка, но что бы было понятно для нас, назовём её «SPAM» см.ниже.
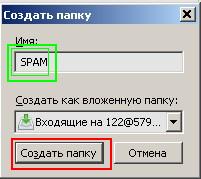
и далее нажимаем кнопку «Создать папку».
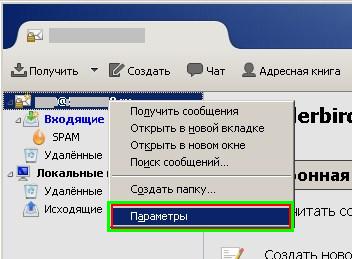
6. Далее по нашей учётной записи нажимаем правой кнопкой мыши как показано ниже
7.У нас открывается окошко в котором мы выбираем строчку «Параметры»
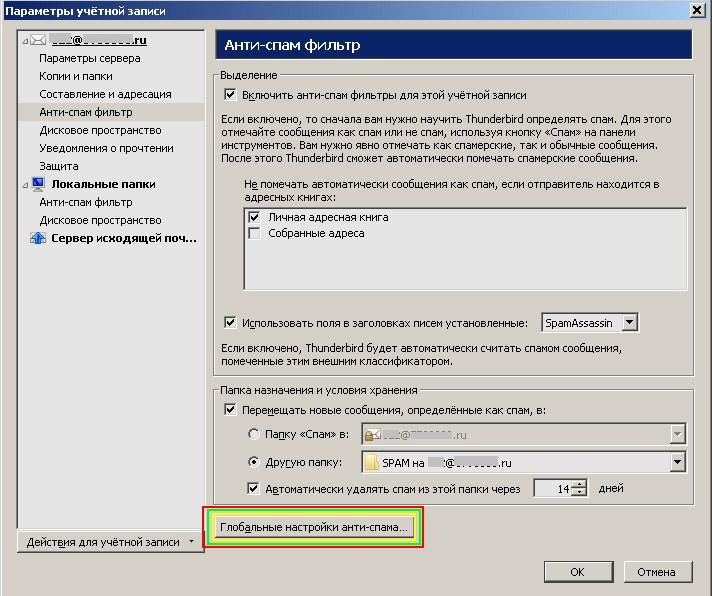
8.Далее в открывшемся окошке «Параметры учётной записи» в левом столбце находим строчку «Анти-спам фильтр», жмём на неё, а с правой стороны окошка ставим галочки, как показано ниже.
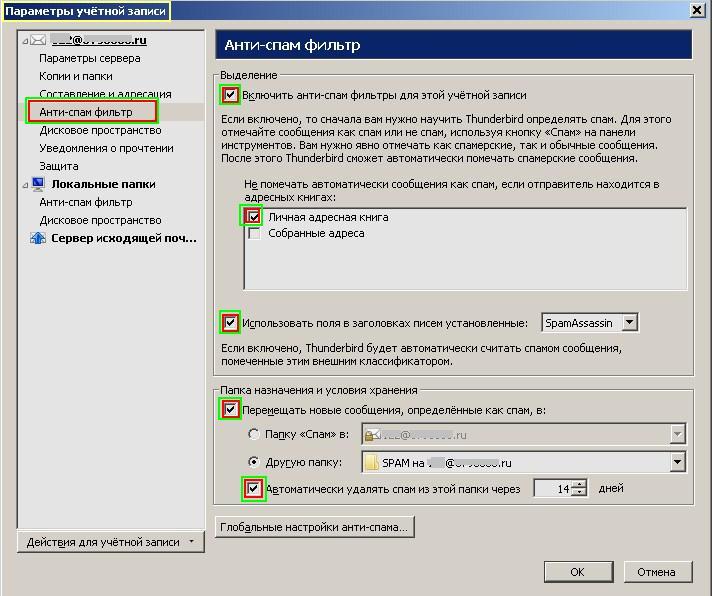
9. Далее в этом же окошке ниже справа выбираем строчку «Другую папку», и справа треугольничком открываем наше дерево папок и переходим к нашей папке «SPAM» нажимая на неё, тем самым мы производим выбор нашей созданной папки, смотрим ниже.

10. Далее здесь же чуть ниже нажимаем на кнопку «Глобальные настройки анти-спама. », как показано ниже.
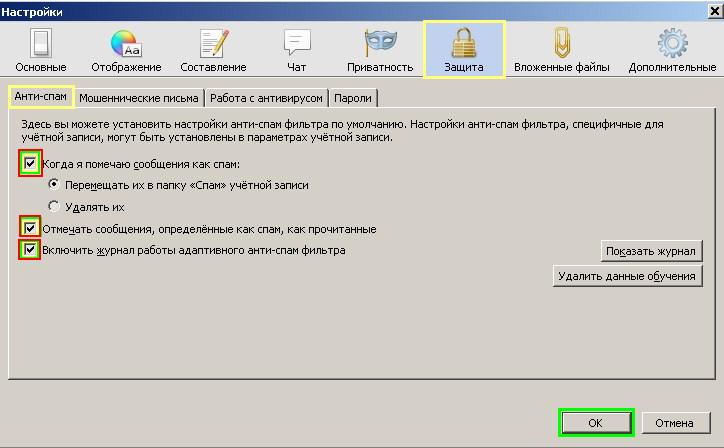
11. У нас открылось окно в котором нужно проставить галочки как показано ниже, после нажимаем кнопку «OK».
12. В следующем окошке тоже нажимаем «ОК», смотрим ниже.
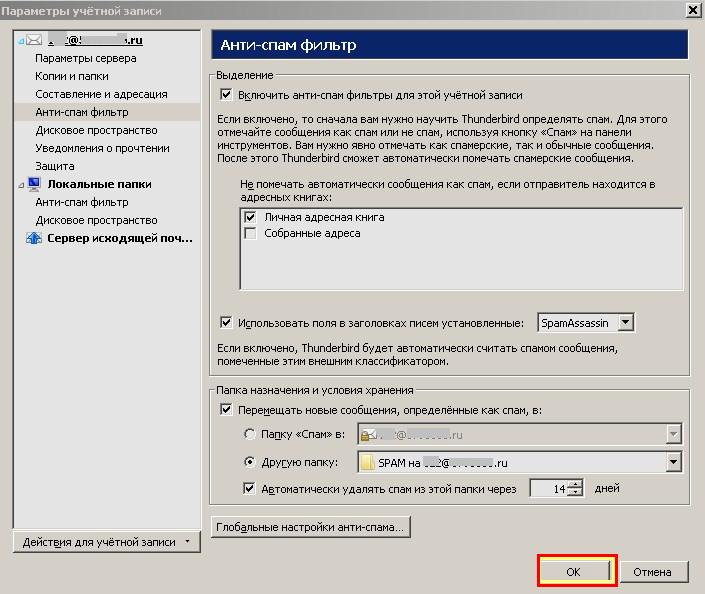
Наш Анти-спам фильтр настроен.
Работа с Анти-Спам фильтром
1.Как показано на рисунках ниже - напротив каждого письма у нас есть значок «Огня» бледно-серого цвета, как только мы нажмём на этот значок, наше спам-письмо попадёт в папку «SPAM», и все последующие письма от этого отправителя будут попадать в папку «SPAM».
Как в Mozilla Thunderbird настроить папку Спам? Этот вопрос чаще всего задают те, кто только недавно начал осваивать данный почтовый клиент. Поэтому в статье мы попытаемся расставить все точки над «i» и рассказать об этой процедуре подробнее.
Оглавление
При отправке почты - Когда выбрано Применять фильтр при: После отправки почты. Эти фильтры применяются только к отправляемой электронной почте.

При выборе запуска фильтра вручную, вы также можете применить фильтр к определенной папке. Это недоступно при автоматическом применении фильтров.
Автоматически применяемые фильтры применяются только к входящим письмам, за исключением Архивации и фильтров "после отправки", которые применяются соответственно только к письмам, подлежащим архивации или отправке. Другие типы папок не затрагиваются.
2. Нажмите Создать . Появится диалоговое окно Правила фильтрации.
3. В поле "Имя фильтра" введите имя вашего фильтра.
4. Под "Применять фильтр при:" отметьте один из вариантов или оба.
Примечание: В большинстве случаев, вам не захочется изменять значения в настройках по умолчанию "Получении новой почты" и "Запуске вручную".
5. В выпадающем меню "Получении новой почты:" выберите либо Фильтровать перед анализом на спам или Фильтровать после анализа на спам.
6. Выберите параметр, условие и значение для каждого правила, которое вы хотите применить:
Примечание: Чтобы добавить еще одно правило, нажмите Добавить новое правило + в конце последнего правила. Чтобы удалить правило, нажмите кнопку Удалить это правило – .
Что это такое и зачем оно нужно
В папку с названием «Спам» попадают те письма, которые заведомо содержат в себе неприемлемый контент, вредоносные вложения или какую-нибудь запрещенную информацию. То есть то, что пользователь обычно удаляет не читая.

Примерно то же самое существует и в Thunderbird. Только здесь автоматика работает немного хуже. Поэтому пользователю приходится настраивать фильтры вручную с той целью, чтобы ничего неприятного на глаза не попалось.
Хорошо работающий фильтр такого плана – это когда вы думаете, что спама вам вообще не шлют. Но стоит открыть соответствующую папку, как вы ужаснетесь от увиденного. Поэтому спам-фильтр – обязательная штука для каждого почтового клиента.
И это приводит нас к вопросу о том, как правильно настроить этот самый фильтр в программе Mozilla Thunderbird. Ведь никому не интересно получать тонны бесполезной корреспонденции. О настройке мы поговорим в следующей главе.
Перемещение в папку
Во-первых, создайте папку с именем "Акции" (или что-то подобное), нажав Файл > Создать > Вложенную папку . Затем можно создать фильтр вроде этого:
- Полученные с адреса sales@software.biz или
- Имеют слово «скидка» в теме письма или
- Имеют слово "клиент" где-то в адресе или отображаемом имени ( "Сервис Клиентов", "Поддержка Клиентов" и т.д.)
Примечание: Хотя вы можете использовать фильтры, чтобы отлавливать и избавляться от нежелательной почты - то есть, почты, на которую вы не подписывались - это не рекомендуется. Вместо этого, подумайте об использовании элементов управления нежелательной почты в Thunderbird, которые были специально разработаны для этой цели.
Эти прекрасные люди помогли написать эту статью:

Tell Thunderbird what is JUNK
In order for Thunderbird's junk filter to be effective, you must train it to recognize messages that you consider to be junk and messages that you consider to be not junk. So it is important to mark messages as junk before deleting them.
There are several ways of marking messages as junk.
- You can click on the little icon in the "junk" column of the message list:

- You can also click the Junk button on the message header toolbar:
- Or you can press J on your keyboard to mark one or more selected messages as junk.
Thunderbird's junk filter has been designed to learn from the training data which you provide. Marking more messages as junk or not junk (see below) will improve the accuracy of your junk filter by adding more training data.
Global junk preferences
Junk filtering is enabled by default. You can set global junk preferences to control what should happen to messages marked as junk. These settings will be used by all of your email accounts (although some settings can be overridden in the account settings, as shown below).
≡ > Preferences > Privacy & Security > Junk

Tell Thunderbird what is NOT JUNK
Sometimes Thunderbird's junk filter might get it wrong and mark good messages as junk. Therefore, it is just as important to tell the filter which messages are not junk, especially on a new installation of Thunderbird.
Note: You should frequently (daily or weekly) check your Junk folder for good messages wrongly marked as junk by Thunderbird and mark them as not junk. This will recover the good messages and improve the correctness of the filter for the future.
There are several ways of marking messages as not junk.
- Click on the Not junk button in the yellow junk notification below the message header:

- Click on the orange junk icon in the junk column of the message list to toggle the junk status of a message:
- Or press Shift + J on your keyboard to mark one or more messages as not junk.
Furthermore, you should regularly train the filter by marking a number of good messages as not junk - messages in your Inbox and messages that have been filtered into other folders. In this case, you can only use the keyboard shortcut Shift + J , because the Not Junk button appears only for messages that have already been marked as junk. Marking several messages per week will be sufficient. You can select several messages and mark all of them at the same time. Unfortunately nothing in the user interface indicates whether a message has already been marked as "not junk".
Thunderbird's adaptive junk filter is not an absolute barrier against messages from a specific address or specific types of messages. If you need a stronger mechanism to stop unwanted messages, consider Blocking a sender. You can also create a filter to block messages based on subject or other criteria.
These fine people helped write this article:
Table of Contents
Table of Contents
When you receive new mail - This is when Getting New Mail is selected (the default). Filters are applied to new mail in the inbox. This can occur either before Thunderbird does its assessment of the mail as junk, or after. If you have difficulty with filtering the message body, select after classification.
When you send mail - This is when you select After Sending. These filters only apply to an email being sent.
When you archive email - This is when you select Archiving and applies to all mail included in the archive action.
Filters are executed in the order they appear in the list of filters, except when that order is not possible, in which case you will see the message Note: Filter actions will be run in a different order, and the link See execution order. If you click the link, you will see which order is used. For example: If you have a filter that moves a message to another folder, and then further down the list a filter that replies, the reply filter will not work because the message is gone from the folder. In this case, Thunderbird will change the order, so the reply filter will be executed before the move filter.
When you select to run a filter manually you can apply the filter to a specific folder. This is not possible for the automatic execution of filters.
Automatically applied filters are applied only to the inbox, with the exception of Archive and after send filters, which apply only to the mails involved in the action to send or archive. Other folder types are not affected.
2. Click New . A Filter Rules dialog box will appear.
3. In the "Filter Name" field, type a name for your filter.
4. Under "Apply filter when", check one of the options or both.
Note: In most cases, you won’t want to change from the default “Getting New Mail” and “Manually Run” options.
5. In the "Getting New Mail: " dropdown menu, choose either Filter before Junk Classification or Filter after Junk Classification.
6. Choose a property, a test and a value for each rule you want to apply:
- A property is a message element or characteristic such as “Subject” or “From”
- A test is a check on the property, such as “contains” or “is in my address book”
- A value completes the test with a specific detail, such as an email address or keyword
7. Choose one or more actions for messages that meet those criteria.
Note: To add another rule, click Add a new rule + at the end of the last rule. To delete a rule, click Remove this rule – .
9. In the Message Filters dialog box, at the top line, select the account (from the dropdown list) that the filters are to apply to
10. Click Run Now if you want the new filter to be applied to messages you’ve already received. The filter will automatically be applied to all new messages after it's saved.
Заключение
А теперь пришла пора подвести итоги, обобщить всю полученную информацию и сделать соответствующие выводы. В рамках данного материала мы поговорили о том, что такое анти-спам фильтр в Mozilla Thunderbird и как его правильно настроить.
Оказалось, что этот фильтр оберегает пользователя от нежелательного контента и весьма неплохо выполняет свою работу. Однако настроить его – целая трагедия. Именно поэтому мы предоставили подробную инструкцию с четким алгоритмом действий. Необходимо ей следовать.
Add a star
You might want to automatically add a star to all messages from your workplace domain, making them stand out from the rest of your Inbox messages. You could create this filter:
Tip: You can create a filter using a sender’s email address directly from one of that sender’s messages. In the message header, right-click on the sender’s address and click on “Create Filter From.” By default, the new filter begins with the rule From | Is | (sender’s email address).
Per account settings
The junk settings in the account settings for each of your email accounts will override similar settings in the global junk preferences described above. In this section, you can also select address books which will be used as a whitelist. Any messages from senders whose email address is in a whitelisted address book will not be marked as junk by Thunderbird.
≡ > Account Settings > Your Account > Junk Settings

Станьте волонтёром
Растите и делитесь опытом с другими. Отвечайте на вопросы и улучшайте нашу базу знаний.
To deal with the large amount of unsolicited email ("spam" or "junk mail") that most people have to cope with, Thunderbird uses an adaptive filter that learns from your actions which messages are legitimate and which are junk.
Добавить звездочку
Move to a folder
You may like to filter out lower-priority messages from your Inbox to reduce clutter. For example you may have chosen to receive notifications from businesses you patronize, but like to keep them in a separate folder.
First, create a folder called “Promotions” (or something similar) by clicking File > New > Folder . You could then create a filter like this:
Because you selected the "Match any of the following option", all messages that meet any one of these criteria will be automatically be moved from the Inbox to the Promotions folder:
Note: While you can also use filters to catch and dispose of junk email – that is, promotions you DIDN’T sign up for – it’s not recommended. Instead, consider using Thunderbird's junk mail controls, which were specially designed for this purpose.
Tip: If you have trouble with one of your filters, try starting small and working your way up. For example, you might have written a filter to move certain new messages to a different folder and it doesn't seem to do anything. Modify the message filter to make it add a star to all new messages. If that works, modify the filter to add the star only for those messages that you want to move to a folder. If that works, modify the filter to move the messages instead of adding a star.
These fine people helped write this article:
Volunteer
Grow and share your expertise with others. Answer questions and improve our knowledge base.
Читайте также: