
Mikrotik could not resolve dns name при обновлении
DNS cache is used to minimize DNS requests to an external DNS server as well as to minimize DNS resolution time. This is a simple DNS cache with local items.
Contents
Description
The MikroTik RouterOS has an embedded DNS server feature in DNS cache. It allows you to link the particular domain names with the respective IP addresses and advertize these links to the DNS clients using the router as their DNS server. This feature can also be used to provide fake DNS information to your network clients. For example, resolving any DNS request for a certain set of domains (or for the whole Internet) to your own page.
The server is capable of resolving DNS requests based on POSIX basic regular expressions, so that multiple requets can be matched with the same entry. In case an entry does not conform with DNS naming standards, it is considered a regular expression and marked with ‘R’ flag. The list is ordered and is checked from top to bottom. Regular expressions are checked first, then the plain records.
Flushing DNS cache
Example
Description
This menu provides a complete list with all DNS records stored on the server
Cache Monitoring
Description
This menu provides a list with all address (DNS type "A") records stored on the server
Property Description
Static DNS Entries
Command Description
Notes
Reverse DNS lookup (Address to Name) of the regular expression entries is not possible. You can, however, add an additional plain record with the same IP address and specify some name for it.
Remember that the meaning of a dot (.) in regular expressions is any character, so the expression should be escaped properly. For example, if you need to match anything within example.com domain but not all the domains that just end with example.com, like www.another-example.com, use regexp=".*\\.example\\.com\$"
Regular expression matching is significantly slower than of the plain entries, so it is advised to minimize the number of regular expression rules and optimize the expressions themselves. Example
It is also possible to forward specific DNS requests to a different server using FWD type. This will fordward all subdomains of "example.com" to server 10.0.0.1:
Note: regexp entries are case sensitive, but since DNS requests are not case sensitive, RouterOS converts DNS names to lowercase, you should write regex only with lowercase letters.
All DNS Entries
Property Description
Property Description
Specifications
- Packages required: system
- License required: Level1
- Submenu level: /ip dns
- Standards and Technologies: DNS
- Hardware usage: Not significant
DNS Cache Setup
Sub-menu: /ip dns
DNS facility is used to provide domain name resolution for router itself as well as for the clients connected to it.
Properties
| Property | Description |
|---|---|
| allow-remote-requests (yes | no; Default: no) | Specifies whether to allow network requests |
| cache-max-ttl (time; Default: 1w) | Maximum time-to-live for cache records. In other words, cache records will expire unconditionally after cache-max-ttl time. Shorter TTL received from DNS servers are respected. |
| cache-size (integer[64..4294967295]; Default: 2048) | Specifies the size of DNS cache in KiB |
| max-concurrent-queries (integer; Default: 100) | Specifies how much concurrent queries are allowed |
| max-concurrent-tcp-sessions (integer; Default: 20) | Specifies how much concurrent TCP sessions are allowed |
| max-udp-packet-size (integer [50..65507]; Default: 4096) | Maximum size of allowed UDP packet. |
| query-server-timeout (time; Default: 2s) | Specifies how long to wait for query response from one server |
| query-total-timeout (time; Default: 10s) | Specifies how long to wait for query response in total. Note that this setting must be configured taking into account query-server-timeout and number of used DNS server. |
| servers (list of IPv4/IPv6 addresses; Default: ) | List of DNS server IPv4/IPv6 addresses |
| Property | Description |
|---|---|
| cache-used (integer) | Shows the currently used cache size in KiB |
| dynamic-server (IPv4/IPv6 list) | List of dynamically added DNS server from different services, for example, DHCP. |
When both static and dynamic servers are set, static server entries are more preferred, however it does not indicate that static server will always be used (for example, previously query was received from dynamic server, but static was added later, then dynamic entry will be preferred).
Note: If allow-remote-requests is used make sure that you limit access to your server over TCP and UDP protocol.
Example
To set 159.148.60.2 as the primary DNS server and allow the router to be used as a DNS server, do the following:
Description
A MikroTik router with DNS feature enabled can be set as a DNS server for any DNS-compliant client. Moreover, MikroTik router can be specified as a primary DNS server under its dhcp-server settings. When the remote requests are enabled, the MikroTik router responds to TCP and UDP DNS requests on port 53.
Example
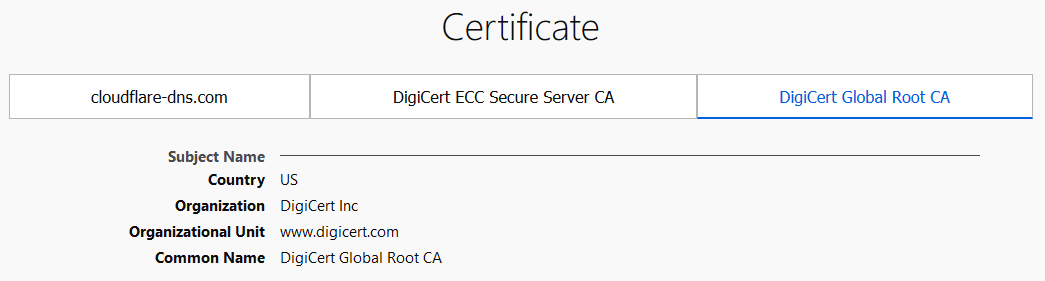
It is advised to import the root CA certificate of the DoH server you have chosen to use for increased security.
Warning: We strongly suggest not use third-party download links for certificate fetching. Use the Certificate Authority's own website.
There are various ways to find out what root CA certificate is necessary. The easiest way is by using your WEB browser, navigating to the DoH site and checking the websites security. Using Firefox we can see that DigiCert Global Root CA is used by CloudFlare DoH server. You can download the certificate straight from the browser or navigate to DigiCert website and fetch the certificate from a trusted source.
Download the certificate and import it:
Configure the DoH server:
Note that you need at least one regular DNS server configured for the router to resolve the DoH hostname itself. If you do not have any dynamical or static DNS server configured, you can configure a static DNS entry like this:
Note: RouterOS prioritize DoH over DNS server if both are configured on the device.
Thu Apr 30, 2020 12:05 pm
A have a pair of Mikrotik devices - RB2011UiAS working as router and switch, and RBcAPGi-5acD2nD (cAP ac) working as access point in WISP AP mode.
The second one is not accessible via web interface, configuring with Winbox.
When trying to check for updates in System - Packages tab it returns 'ERROR: could not resolve DNS name'. Pinging 8.8.8.8 in CLI returns 'no route to host'.
But AP is working - all devices connected on both frequencies get internet connection. What should I do to get updates?
Thank you in advance.
Thu Apr 30, 2020 1:51 pm
- Configure default route in /ip route using main router's LAN IP address as gateway
- Configure DNS servers in /ip dns . use same IP addresses as usual LAN clients use
Thu Apr 30, 2020 2:26 pm
Other option (don't know if the above will work) is to add a DHCP client. Or add an IP address manually (and set the gateway/DNS servers)). Think is required to make the update work.
Thu Apr 30, 2020 2:29 pm
- Configure default route in /ip route using main router's LAN IP address as gateway
I've tried to set router adress as default route with checking, and it's marked as unreachable. AP is also unable to ping router with 'no route to host'.
Thu Apr 30, 2020 3:13 pm
On both devices, get to command line (in Winbox, it's the [Terminal] button), export the configuration to a file using /export hide-sensitive file=device_name, download the files, anonymise them following the hint in my automatic signature right below, and post both. Your cAP may have no IP address at all.
Off-topic, if your uplink bandwidth is more than 100 Mbit/s, it may be useful to make the cAP ac a router, because its CPU is much more powerful than the one of the 2011.
Don't write novels, post /export hide-sensitive file=x. Use find&replace in your favourite text editor to systematically replace all occurrences of each public IP address potentially identifying you by a distinctive pattern such as my.public.ip.1.
Thu Apr 30, 2020 7:15 pm
Thu Apr 30, 2020 7:24 pm
What ROS Version your 2011 has?
Your router has its LAN IP address configured on a slave Interface, which is wrong.
Thu Apr 30, 2020 7:36 pm
You haven't configured any IP address on the /interface bridge named bridge on the cAP ac manually, and the /interface bridge filter rule action=drop chain=input dst-port=68 in-interface=ether1 ip-protocol=udp mac-protocol=ip prevents responses from the DHCP server running at the 2011 from reaching the client on the cAP ac. Has this rule been added by Quickset or have you added it yourself with something particular in mind?
Depending on what you choose (to set an IP address manually or to remove the bridge filter rule to allow the DHCP to work), you may remove the static default route as the DHCP client will get it from the 2011's DHCP server; however, the DHCP server doesn't indicate any DNS, so again, either keep it set manually on the cAP ac, or set dns-server=192.168.1.1 at the only row of /ip dhcp-server network on the 2011.
Don't write novels, post /export hide-sensitive file=x. Use find&replace in your favourite text editor to systematically replace all occurrences of each public IP address potentially identifying you by a distinctive pattern such as my.public.ip.1.
![]()
so both responses seem incorrect. I tried to disable all firewall rules but still cannot fetch any updates due to dns error.
Here is the complete config, I hope someone is able to find something wrong.
add band=2ghz-b/g/n control-channel-width=20mhz frequency=2412 name="2 - c1"
add band=5ghz-a/n/ac control-channel-width=20mhz frequency=5180 name="5 - c36"
add admin-mac=C4:AD:34:5D:A2:BE auto-mac=no comment=defconf name=bridge
add bridge=bridge client-to-client-forwarding=yes name=datapath1
add authentication-types=wpa-psk,wpa2-psk encryption=aes-ccm name=security1 \
add channel="2 - c1" country=poland datapath=datapath1 distance=indoors mode=ap \
name=c2 rx-chains=0,1 security=security1 ssid=xxx tx-chains=0,1
add channel="5 - c36" country=poland datapath=datapath1 distance=indoors mode=\
ap name=c5 rx-chains=0,1 security=security1 ssid=xxx tx-chains=0,1
add comment=defconf name=WAN
add comment=defconf name=LAN
/interface wireless security-profiles
set [ find default=yes ] supplicant-identity=MikroTik
add name=dhcp ranges=0.0.0.1-0.0.0.254
add address-pool=dhcp conflict-detection=no interface=bridge lease-time=521w3d \
add action=create-dynamic-enabled hw-supported-modes=gn,b,g \
add action=create-dynamic-enabled hw-supported-modes=ac,a,an \
/interface bridge port
add bridge=bridge comment=defconf interface=ether2
add bridge=bridge comment=defconf interface=ether3
add bridge=bridge comment=defconf interface=ether4
add bridge=bridge comment=defconf interface=ether5
add bridge=bridge comment=defconf interface=ether6
add bridge=bridge comment=defconf interface=ether7
add bridge=bridge comment=defconf interface=ether8
add bridge=bridge comment=defconf interface=ether9
add bridge=bridge comment=defconf interface=ether10
add bridge=bridge comment=defconf interface=sfp1
add bridge=bridge interface=ether1
/ip neighbor discovery-settings
/interface list member
add comment=defconf interface=ether1 list=WAN
add interface=ether2 list=LAN
add interface=ether3 list=LAN
add interface=ether4 list=LAN
add interface=ether5 list=LAN
add interface=ether6 list=LAN
add interface=ether7 list=LAN
add interface=ether8 list=LAN
add interface=ether9 list=LAN
add interface=ether10 list=LAN
add interface=sfp1 list=LAN
add address= 192.168.88.1/24 comment=defconf interface=ether2 network=\
add address= 192.168.1.168/24 disabled=yes interface=ether1 network= 192.168.1.0
add dhcp-options=hostname,clientid interface=bridge
/ip dhcp-server config
/ip dhcp-server network
add address= 0.0.0.0/24 comment=defconf dns-server= 192.168.88.1 gateway= 0.0.0.0 \
set allow-remote-requests=yes cache-size=8192KiB servers= 8.8.8.8 , 8.8.4.4
/ip firewall filter
add action=accept chain=input comment=\
"defconf: accept established,related,untracked" connection-state=\
add action=drop chain=input comment="defconf: drop invalid" connection-state=\
add action=accept chain=input comment="defconf: accept ICMP" protocol=icmp
add action=drop chain=input comment="defconf: drop all not coming from LAN" \
add action=accept chain=forward comment="defconf: accept in ipsec policy" \
add action=accept chain=forward comment="defconf: accept out ipsec policy" \
add action=fasttrack-connection chain=forward comment="defconf: fasttrack" \
add action=accept chain=forward comment=\
"defconf: accept established,related, untracked" connection-state=\
add action=drop chain=forward comment="defconf: drop invalid" connection-state=\
/ip firewall nat
add action=masquerade chain=srcnat comment="defconf: masquerade" ipsec-policy=\
add action=redirect chain=dstnat comment="proxy dns" dst-port=53 protocol=tcp \

Сразу приведу список проблем, а потом пошагово разберём то, как эти проблемы устранять.
- Пустой пароль администратора.
- Открытый в интернет DNS-сервер (ваш микротик могут использовать для усиления DDoS-атак).
- Открыты в интернет сервисы для управления микротиком.
- После обновления прошивки микротик автоматически не обновляет загрузчик.
Итак, пойдём по порядку.
Пароль администратора задать совсем просто, для этого нужно зайти в меню System, подменю Users.

В открывшемся окне кликнуть правой клавишей мыши по пользователю admin и выбрать кнопку Password.

В открывшемся окне 2 раза вписываем новый пароль и нажимаем «OK».
Теперь можно закрыть DNS сервер от злоумышленников.
Вариантов это сделать есть два:
- Отключить удалённые запросы к DNS на микротик (IP-DNS, снять галку Allow Remote Requests), но делать мы так не будем, т.к. выдаём собственный DNS в локальную сеть.
- Закрыть доступ к DNS извне нашей локальной сети.
Для этого нам потребуется зайти в IP – Firewall.

Нажимаем на + и создаём ещё одно правило, запрещающее входящий трафик (Chain: input) по протоколу UDP (Protocol: udp) на 53й порт (Dst. Port: 53) интерфейса провайдера (In. Interface: ether1).

На вкладке Action выбираем действие drop.

Нажимаем «ОК» и перетаскиваем его мышкой на 2ю позицию, т.к. правила firewall применяются по порядку, сверху вниз, пока пакет не попадёт под условия одного из правил.

Ещё одна неприятная вещь закрыта.
Теперь займёмся лишними сервисами. Идём в меню IP – Services, тут мы видим все доступные в данный момент сервисы и порты, на которых они работают.

Кроме winbox нам другие сервисы в принципе не нужны, можно выделить их и нажать красный крест в верхней части окна, что отключит их.

При желании, можно кликнуть на сервис winbox и выполнить тонкую настройку данного сервиса (изменить порт, задать список ip-адресов или подсетей из которых к нему можно подключаться).
Итак, последний пункт нашей сегодняшней статьи – обновление загрузчика нашего оборудования.
Идём в пункт System – Routerboard.

Тут мы видим модель нашей железки, её серийный номер и версии загрузчика (заводская, текущая и та, на которую можно обновиться).
К сожалению, у меня не было под рукой оборудования с не обновлённым загрузчиком, поэтому просто скажу, что нужно нажать на кнопку Upgrade в правой части окна и через некоторое время просто перезагрузить роутер.
В следующей статье я расскажу, как включить и правильно настроить WiFi на нашем роутере.
Если вам нужна помощь в настройке оборудования или серверов, наши специалисты всегда готовы вам помочь.
Статью подготовил технический директор компании Первый Сервисный Провайдер Гавриш Артём.
Вообще я очень люблю фирму Микротик. Их роутеры и коммутаторы у меня везде и всюду и даже дома. Фишка в том, что эти роутеры очень надежные и по факту их можно один раз настроить и забыть что они существуют. Но настроек там так много, что новичку все осилить за раз крайне сложно. Так вот пост для тех ребят кто купили роутеры, но так и не воткнули в их настройку, ведь они и из коробки работают хорошо, а там есть серьезный проеб.
Именно такой стоит у меня дома (1350 руб в свое время), но существенной разницы в настройке нет, так как у всех моделей интерфейс один.
Преамбула: Я простой эникей, однако за пару лет набил оскомину с этими роутерами на работе, убивая и восстанавливая все заново по раз 5, однако никак не трогал домашний роутер (1.5 года без сбоев). Но последнее время у меня как то добавились фризы и лаги в сетевых играх. Зайдя на роутер с телефона обнаружил что проц загружен на 100%. Перезагрузил. И снова получил такую же загрузку. Тут точно было что то не так. Зайдя в интерфейсы я увидел это:

То есть домашние устройства в сумме кушали 68 кбайт/с, а вот на внешнем канале творилось что то аж на 5 мегабайт. Это "жжжж!", точно было не с проста. Если роутер хакнули (подбором обычно), то вполне вероятно что сейчас вы уже ДДОСите какой то сервер, сами того не зная. Однако это был не мой случай, потому что (IP->Services):

Советую и вам так сделать. Это означает что к роутеру можно присоедениться только через винбокс и только из внутренней сети (вместо 192.168.10.0 — должна стоять ваша сеть).
К делу: Не буду вас особо грузить поисками. В конце концов я просто вспомнил что у Микротик по-умолчанию включен вот такой пункт (IP->DNS):

Allow Remote Requests заставляет слушать DNS-сервис на всех портах маршрутизатора. Таким образом при включении сервиса мы становились отличным хостом для атаки ботами и прочей нечистью из Интернетов.
А так как у меня была статика IP последние 2 месяца, то я был вообще идеальным DNS.
(к слову на работе все галки были сняты сразу, так как на тот момент я про нее уже знал).
После снятия галочки, картина такая:

На пикабу я часто встречал ребят с микротиками, в которые они не втыкали и надеюсь что это кому-нибудь поможет. Лично у меня фризы как рукой сняло и чутка упал пинг.
Читайте также: