
Метод drag and drop в экселе
Булат,
У Вас два вопроса в одном. Ответ - да, можно, но какими силами зависит от того что нужно реализовать . Загрузка файла, ссылка на него и открытие по клику- не проблема. Drag and drop - наверно не просто, но тоже можно, вопрос , есть ли смысл в этом или достаточно стандартного диалого открытия файла.
Булат,
У Вас два вопроса в одном. Ответ - да, можно, но какими силами зависит от того что нужно реализовать . Загрузка файла, ссылка на него и открытие по клику- не проблема. Drag and drop - наверно не просто, но тоже можно, вопрос , есть ли смысл в этом или достаточно стандартного диалого открытия файла. bmv98rus
Sub tt()
Dim x
x = GetFolderPath("Кидайте сюда!", "c:\Temp")
End Sub
Function GetFolderPath(Optional ByVal Title As String = "Выберите папку", Optional ByVal InitialPath As String = "c:\") As String
GetFolderPath = "": PS = Application.PathSeparator
With Application.FileDialog(msoFileDialogFolderPicker)
.ButtonName = "Выбрать": .Title = Title: .InitialFileName = InitialPath
If .Show = -1 Then GetFolderPath = .SelectedItems(1): If Not Right$(GetFolderPath, 1) = PS Then GetFolderPath = GetFolderPath & PS
End With
End Function
Скорей всего я Вам ответил на cyberforum:
(Здорово, работает, но к сожалению есть минусы:
- при выполнении макроса, сам Excel блокируется, что не позволит, например, перетащить файл с рабочего стола.
- ну самая печалька, что файла то не видно в папке, я имею виду в окне "Кидай сюда!")
Скорей всего я Вам ответил на cyberforum:
(Здорово, работает, но к сожалению есть минусы:
- при выполнении макроса, сам Excel блокируется, что не позволит, например, перетащить файл с рабочего стола.
- ну самая печалька, что файла то не видно в папке, я имею виду в окне "Кидай сюда!") Булат
Скорей всего я Вам ответил на cyberforum:
(Здорово, работает, но к сожалению есть минусы:
- при выполнении макроса, сам Excel блокируется, что не позволит, например, перетащить файл с рабочего стола.
- ну самая печалька, что файла то не видно в папке, я имею виду в окне "Кидай сюда!") Автор - Булат
Дата добавления - 22.01.2017 в 03:51
Спасибо Вам за прозорливость.
Спасибо Вам за прозорливость. Булат
Спасибо Вам за прозорливость. Автор - Булат
Дата добавления - 22.01.2017 в 03:57
Суть в том, что с основным файлом будут работать, разные, простите меня, "косячники" и надо чтобы они не искали папку в которую надо положить файл а просто перетащили в окошко, нажали "ок" и все.
А еще есть такие пользователи, для которых создание простой гиперссылки на файл, вообще верх совершенства по владению Excel (это к теме если не заморачиваться с Drag and drop)
Суть в том, что с основным файлом будут работать, разные, простите меня, "косячники" и надо чтобы они не искали папку в которую надо положить файл а просто перетащили в окошко, нажали "ок" и все.
А еще есть такие пользователи, для которых создание простой гиперссылки на файл, вообще верх совершенства по владению Excel (это к теме если не заморачиваться с Drag and drop) Булат
Суть в том, что с основным файлом будут работать, разные, простите меня, "косячники" и надо чтобы они не искали папку в которую надо положить файл а просто перетащили в окошко, нажали "ок" и все.
А еще есть такие пользователи, для которых создание простой гиперссылки на файл, вообще верх совершенства по владению Excel (это к теме если не заморачиваться с Drag and drop) Автор - Булат
Дата добавления - 22.01.2017 в 04:07
Булат, где ещё Вы разбросали свой вопрос? Читайте Правила форума, в частности, п.5s Автор - Pelena
Дата добавления - 22.01.2017 в 07:27
Прошу простить меня великодушно, обещаю больше так не делать, честно, честно
Прошу простить меня великодушно, обещаю больше так не делать, честно, честно Булат
Прошу простить меня великодушно, обещаю больше так не делать, честно, честно Автор - Булат
Дата добавления - 22.01.2017 в 07:41
Булат,
Вы меня не поняли немного. Предложенный вариант от Hugo, и есть использование стандартного диалого открытия файла. Обработать полученный путь, перенести указанный файл в "хранилище" и оформить туда ссылку каким-либо образом -это фопрос реализации скрипта , и это возможно. Drag and Drop реализуем при определенных умениях через дополнительные Controls
Булат,
Вы меня не поняли немного. Предложенный вариант от Hugo, и есть использование стандартного диалого открытия файла. Обработать полученный путь, перенести указанный файл в "хранилище" и оформить туда ссылку каким-либо образом -это фопрос реализации скрипта , и это возможно. Drag and Drop реализуем при определенных умениях через дополнительные Controls bmv98rus
Замечательный Временно просто медведь , процентов на 20.
Я думаю что если использовать диалог для указания файла - то этому неумёхе-пользователю придётся в этом диалоге искать по дереву свой файл, что не факт что получится
Но если заранее известно что файл будет всегда в одном каталоге - то можно сразу этот каталог и подставить, и так обычно и делают.
Ну а как там на самом деле будет происходить процесс - нам неведомо.
Я думаю что если использовать диалог для указания файла - то этому неумёхе-пользователю придётся в этом диалоге искать по дереву свой файл, что не факт что получится
Но если заранее известно что файл будет всегда в одном каталоге - то можно сразу этот каталог и подставить, и так обычно и делают.
Ну а как там на самом деле будет происходить процесс - нам неведомо. Hugo
Я думаю что если использовать диалог для указания файла - то этому неумёхе-пользователю придётся в этом диалоге искать по дереву свой файл, что не факт что получится
Я думаю что если использовать диалог для указания файла - то этому неумёхе-пользователю придётся в этом диалоге искать по дереву свой файл, что не факт что получится
Я думаю что если использовать диалог для указания файла - то этому неумёхе-пользователю придётся в этом диалоге искать по дереву свой файл, что не факт что получится
Даа, согласен Автор - Булат
Дата добавления - 24.01.2017 в 04:43
Я понял Вас и согласен, что тему можно было закрыть ответом "Да, возможно" , просто увидел, что идея осуществима, вот и начал развивать
Я понял Вас и согласен, что тему можно было закрыть ответом "Да, возможно" , просто увидел, что идея осуществима, вот и начал развивать Булат
Я понял Вас и согласен, что тему можно было закрыть ответом "Да, возможно" , просто увидел, что идея осуществима, вот и начал развивать Автор - Булат
Дата добавления - 24.01.2017 в 04:46
Успехов.
P.S. Странно, сдела все форме Access. DragAndDrop Работает. Сделал в Excel то что делал день назад и неработало - тоже заработало.
Успехов.
P.S. Странно, сдела все форме Access. DragAndDrop Работает. Сделал в Excel то что делал день назад и неработало - тоже заработало. bmv98rus
Замечательный Временно просто медведь , процентов на 20.
Успехов.
P.S. Странно, сдела все форме Access. DragAndDrop Работает. Сделал в Excel то что делал день назад и неработало - тоже заработало. Автор - bmv98rus
Дата добавления - 24.01.2017 в 08:12
Excel drag and drop option, also known as “Fill Handle,” is the plus (+) icon that appears when moving the mouse or cursor to the right bottom of the selected cell. Using this plus icon, we can drag to the left, to the right, to the top, and the bottom from the active cell. Also, using this drag and drop option, we can do many smart things in Excel.
For example, look at the below image.

Examples to use Drag and Drop in Excel
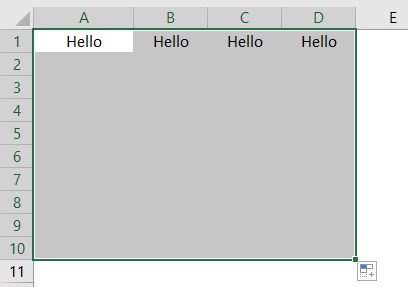
For example, assume you have a certain value in the A1 cell.
Here, we have three options: “Copy Cells,” “Fill Formatting Only,” and “Fill Without Formatting.” We have dragged and dropped from the active cell to the range A1 to D5, and it has taken everything from the active cell (A1).
But using this option, we can fill only formatting, i.e., without value from an active cell. We can also fill without formatting, i.e., the only value from the active cell without any formatting.
- Let us see how it looks when selecting “Fill Formatting Only.”
- Now, see “Fill Without Formatting.”
Using this drag and drop, we can also insert serial numbers. For this first, we need to enter at least two consecutive numbers.

We have entered two consecutive serial numbers in cells A1 and A2. Now, select these two cells and place a cursor to the right bottom of the cell to see the drag and drop symbol.

Using this, drag and drop until the row number we want is the serial number. In this case, we have dragged until row 10, so our serial numbers will be from 1 to 10.
How does this Work?
The first thing we did was we had entered two consecutive serial numbers, 1 and 2. Using this sample, Excel identifies the increment number from one cell to another. In this case, the increment number is by 1, so every time we drag the value to the next new cell, it will increment the value by 1. Since we have dragged until the 10th row, it has incremented the value by ten times from the first cell value, 1.
For example, look at the below image now.
We have entered 1 and 3 in the first two cells. We will drag and drop until the 10th row and see what happens.
We did not get consecutive serial numbers. Instead, we got all the odd numbers from 1 to 19. That is because, in the first two cells, our values are 1 and 3. However, from the first cell to the second cell, the value is incremented by 2, so when we use drag and drop, Excel identifies the pattern as it has to increment by 2 every time it goes to the new cell.
We can also insert serial numbers without entering two consecutive numbers. Instead, just enter 1 in any of the cells.

Now drag and drop until the 10 th row.
Now, click on the “AutoFill” options box.

We must choose the “Fill Series” option to get serial numbers incremented by 1.
So, we got serial numbers which are incremented by 1.
We can fill the formula from one cell to all the below cells using the drag and drop option. For example, look at the below image.
- To arrive at GP ( Gross ProfitGross ProfitGross Profit shows the earnings of the business entity from its core business activity i.e. the profit of the company that is arrived after deducting all the direct expenses like raw material cost, labor cost, etc. from the direct income generated from the sale of its goods and services.read more ), we need to enter the formula as Sales – COGS.
- We usually copy the formula from one cell and paste it to the below cells but this time, place a cursor to the right bottom of the formula cell, the D2 cell.
- When we see the “Drag & Drop” option, we need to double click to apply the formula to the below cells.
Things to Remember
- Drag and Drop are often called a fill handleFill HandleThe fill handle in Excel allows you to avoid copying and pasting each value into cells and instead use patterns to fill out the information. This tiny cross is a versatile tool in the Excel suite that can be used for data entry, data transformation, and many other applications.read more .
- The drag and drop is the alternative available to the copy and paste method.
- We can drag and drop to a single row and a single column at a time.
Recommended Articles
This article is a guide to Drag and Drop in Excel. Here, we learn some excellent uses of the Excel drag and drop option, also known as “Fill Handle,” along with some practical examples and a downloadable Excel template. You may learn more about Excel from the following articles: –
FREE INVESTMENT BANKING COURSE Learn the foundation of Investment banking, financial modeling, valuations and more.
Join Wallstreetmojo Youtube
FREE EXCEL COURSE Learn MS Excel right from scratch. Master excel formulas, graphs, shortcuts with 3+hrs of Video.
Join Wallstreetmojo Instagram

FREE FINANCE MODELING COURSE Learn Financial Modeling in Excel with this Step by Step Guide (Colgate Case Study)
Excel for Microsoft 365 Excel for Microsoft 365 for Mac Excel for the web Excel 2021 Excel 2021 for Mac Excel 2019 Excel 2019 for Mac Excel 2016 Excel 2016 for Mac Excel 2013 Excel 2010 Excel 2007 Excel for Mac 2011 Excel Starter 2010 More. Less
When you move or copy rows and columns, by default Excel moves or copies all data that they contain, including formulas and their resulting values, comments, cell formats, and hidden cells.
You can use the Cut command or Copy command to move or copy selected cells, rows, and columns, but you can also move or copy them by using the mouse.
By default, Excel displays the Paste Options button. If you need to redisplay it, go to Advanced in Excel Options. For more information, see Advanced options.
Select the cell, row, or column that you want to move or copy.
Do one of the following:
To move rows or columns, on the Home tab, in the Clipboard group, click Cut or press CTRL+X.
To copy rows or columns, on the Home tab, in the Clipboard group, click Copy or press CTRL+C.
Right-click a row or column below or to the right of where you want to move or copy your selection, and then do one of the following:
When you are moving rows or columns, click Insert Cut Cells.
When you are copying rows or columns, click Insert Copied Cells.
Tip: To move or copy a selection to a different worksheet or workbook, click another worksheet tab or switch to another workbook, and then select the upper-left cell of the paste area.
Note: Excel displays an animated moving border around cells that were cut or copied. To cancel a moving border, press Esc.
By default, drag-and-drop editing is turned on so that you can use the mouse to move and copy cells.
Select the row or column that you want to move or copy.
Do one of the following:
Cut and replace Point to the border of the selection. When the pointer becomes a move pointer , drag the rows or columns to another location. Excel warns you if you are going to replace a column. Press Cancel to avoid replacing.
Copy and replace Hold down CTRL while you point to the border of the selection. When the pointer becomes a copy pointer , drag the rows or columns to another location. Excel doesn't warn you if you are going to replace a column. Press CTRL+Z if you don't want to replace a row or column.
Cut and insert Hold down SHIFT while you point to the border of the selection. When the pointer becomes a move pointer , drag the rows or columns to another location.
Copy and insert Hold down SHIFT and CTRL while you point to the border of the selection. When the pointer becomes a move pointer , drag the rows or columns to another location.
Note: Make sure that you hold down CTRL or SHIFT during the drag-and-drop operation. If you release CTRL or SHIFT before you release the mouse button, you will move the rows or columns instead of copying them.
Note: You cannot move or copy nonadjacent rows and columns by using the mouse.
If some cells, rows, or columns on the worksheet are not displayed, you have the option of copying all cells or only the visible cells. For example, you can choose to copy only the displayed summary data on an outlined worksheet.
Select the row or column that you want to move or copy.
On the Home tab, in the Editing group, click Find & Select, and then click Go To Special.
Under Select, click Visible cells only, and then click OK.
On the Home tab, in the Clipboard group, click Copy or press Ctrl+C. .
Select the upper-left cell of the paste area.
Tip: To move or copy a selection to a different worksheet or workbook, click another worksheet tab or switch to another workbook, and then select the upper-left cell of the paste area.
On the Home tab, in the Clipboard group, click Paste or press Ctrl+V.
If you click the arrow below Paste , you can choose from several paste options to apply to your selection.
Excel pastes the copied data into consecutive rows or columns. If the paste area contains hidden rows or columns, you might have to unhide the paste area to see all of the copied cells.
When you copy or paste hidden or filtered data to another application or another instance of Excel, only visible cells are copied.
Select the row or column that you want to move or copy.
On the Home tab, in the Clipboard group, click Copy or press Ctrl+C.
Select the upper-left cell of the paste area.
On the Home tab, in the Clipboard group, click the arrow below Paste , and then click Paste Special.
Select the Skip blanks check box.
Double-click the cell that contains the data that you want to move or copy. You can also edit and select cell data in the formula bar.
Select the row or column that you want to move or copy.
On the Home tab, in the Clipboard group, do one of the following:
To move the selection, click Cut or press Ctrl+X.
To copy the selection, click Copy or press Ctrl+C.
In the cell, click where you want to paste the characters, or double-click another cell to move or copy the data.
On the Home tab, in the Clipboard group, click Paste or press Ctrl+V.
Note: When you double-click a cell or press F2 to edit the active cell, the arrow keys work only within that cell. To use the arrow keys to move to another cell, first press Enter to complete your editing changes to the active cell.
When you paste copied data, you can do any of the following:
Paste only the cell formatting, such as font color or fill color (and not the contents of the cells).
Convert any formulas in the cell to the calculated values without overwriting the existing formatting.
Paste only the formulas (and not the calculated values).
Select the row or column that you want to move or copy.
On the Home tab, in the Clipboard group, click Copy or press Ctrl+C.
Select the upper-left cell of the paste area or the cell where you want to paste the value, cell format, or formula.
On the Home tab, in the Clipboard group, click the arrow below Paste , and then do one of the following:
To paste values only, click Values.
To paste cell formats only, click Formatting.
To paste formulas only, click Formulas.
When you paste copied data, the pasted data uses the column width settings of the target cells. To correct the column widths so that they match the source cells, follow these steps.
Select the row or column that you want to move or copy.
On the Home tab, in the Clipboard group, do one of the following:
To move cells, click Cut or press Ctrl+X.
To copy cells, click Copy or press Ctrl+C.
Select the upper-left cell of the paste area.
Tip: To move or copy a selection to a different worksheet or workbook, click another worksheet tab or switch to another workbook, and then select the upper-left cell of the paste area.
On the Home tab, in the Clipboard group, click the arrow under Paste , and then click Keep Source Column Widths.
You can use the Cut command or Copy command to move or copy selected cells, rows, and columns, but you can also move or copy them by using the mouse.
Select the cell, row, or column that you want to move or copy.
Do one of the following:
To move rows or columns, on the Home tab, in the Clipboard group, click Cut or press CTRL+X.
To copy rows or columns, on the Home tab, in the Clipboard group, click Copy or press CTRL+C.
Right-click a row or column below or to the right of where you want to move or copy your selection, and then do one of the following:
When you are moving rows or columns, click Insert Cut Cells.
When you are copying rows or columns, click Insert Copied Cells.
Tip: To move or copy a selection to a different worksheet or workbook, click another worksheet tab or switch to another workbook, and then select the upper-left cell of the paste area.
Note: Excel displays an animated moving border around cells that were cut or copied. To cancel a moving border, press Esc.
Select the row or column that you want to move or copy.
Do one of the following:

Cut and insert Point to the border of the selection. When the pointer becomes a hand pointer , drag the row or column to another location
Cut and replace Hold down SHIFT while you point to the border of the selection. When the pointer becomes a move pointer , drag the row or column to another location. Excel warns you if you are going to replace a row or column. Press Cancel to avoid replacing.
Copy and insert Hold down CTRL while you point to the border of the selection. When the pointer becomes a move pointer , drag the row or column to another location.
Copy and replace Hold down SHIFT and CTRL while you point to the border of the selection. When the pointer becomes a move pointer , drag the row or column to another location. Excel warns you if you are going to replace a row or column. Press Cancel to avoid replacing.
Note: Make sure that you hold down CTRL or SHIFT during the drag-and-drop operation. If you release CTRL or SHIFT before you release the mouse button, you will move the rows or columns instead of copying them.
Note: You cannot move or copy nonadjacent rows and columns by using the mouse.
Double-click the cell that contains the data that you want to move or copy. You can also edit and select cell data in the formula bar.
Select the row or column that you want to move or copy.
On the Home tab, in the Clipboard group, do one of the following:
To move the selection, click Cut or press Ctrl+X.
To copy the selection, click Copy or press Ctrl+C.
In the cell, click where you want to paste the characters, or double-click another cell to move or copy the data.
On the Home tab, in the Clipboard group, click Paste or press Ctrl+V.
Note: When you double-click a cell or press F2 to edit the active cell, the arrow keys work only within that cell. To use the arrow keys to move to another cell, first press Enter to complete your editing changes to the active cell.
When you paste copied data, you can do any of the following:
Paste only the cell formatting, such as font color or fill color (and not the contents of the cells).
Convert any formulas in the cell to the calculated values without overwriting the existing formatting.
Paste only the formulas (and not the calculated values).
Select the row or column that you want to move or copy.
On the Home tab, in the Clipboard group, click Copy or press Ctrl+C.
Select the upper-left cell of the paste area or the cell where you want to paste the value, cell format, or formula.
On the Home tab, in the Clipboard group, click the arrow below Paste , and then do one of the following:
To paste values only, click Paste Values.
To paste cell formats only, click Paste Formatting.
To paste formulas only, click Paste Formulas.
You can move or copy selected cells, rows, and columns by using the mouse and Transpose.
Select the cells or range of cells that you want to move or copy.
Point to the border of the cell or range that you selected.
When the pointer becomes a , do one of the following:
Drag the cells to another location.
Hold down OPTION and drag the cells to another location.
Note: When you drag or paste cells to a new location, if there is pre-existing data in that location, Excel will overwrite the original data.
Select the rows or columns that you want to move or copy.
Point to the border of the cell or range that you selected.
When the pointer becomes a , do one of the following:
Move rows or columns
Drag the rows or columns to another location.
Copy rows or columns
Hold down OPTION and drag the rows or columns to another location.
Move or copy data between existing rows or columns
Hold down SHIFT and drag your row or column between existing rows or columns. Excel makes space for the new row or column.
Copy the rows or columns that you want to transpose.
Select the destination cell (the first cell of the row or column into which you want to paste your data) for the rows or columns that you are transposing.
On the Home tab, under Edit, click the arrow next to Paste, and then click Transpose.
Note: Columns and rows cannot overlap. For example, if you select values in Column C, and try to paste them into a row that overlaps Column C, Excel displays an error message. The destination area of a pasted column or row must be outside the original values.
In this video, we'll look at shortcuts related to drag and drop in Excel.
To drag and drop in Excel, just make a selection and hover the mouse over the edge of the selection. When the cursor changes, you can drag the selection to a new location.
With this method, drag and drop is equivalent to cut and paste. The content of selected cells is moved, and the selection you drag will completely overwrite the destination cells.
You can hold down the shift key to drag and insert. The difference is that the cells you drag are inserted rather than pasted. they don't overwrite existing cells.
If you want to copy cells, instead of move them, hold down the control key in windows, and the option key on a Mac, while you drag. You'll see the cursor change into a plus (+) symbol.
When you release the mouse, a copy of the cells will be placed at the destination.
Drag and drop is a really handy way to quickly reorganize rows and columns in a table. Just hold down the shift key to insert.
Notice also that you can work with entire rows and columns.
Also, with drag and drop, you can insert and copy at the same time.
In Windows, use Control + Shift, and on a Mac, use Option + Shift.
You can also drag a selection to another worksheet using Alt in Windows, and Command on a Mac.
Drag and drop also works on objects, which is mostly useful when you want to duplicate objects that float above the grid.
When you're moving objects around on the worksheet, you can use the Alt key in Windows, and Command on a Mac to cause the object to snap to the cell grid.
Once you have an object moving in a vertical or horizontal direction, you can hold down the shift key restrict movement to that plane.
Finally, you can use drag and drop to copy entire worksheets.
On windows, click and drag a worksheet with the Control key down.
On a Mac, hold down the Option key.
One nice advantage to using drag and drop to duplicate worksheets is that you can put the new worksheet anywhere you want.

Drag and Drop is an alternative to Copy and Paste in MS Excel. It is a way to move or duplicate data. Excel Drag and Drop option is also known as “Fill Handle”. The plus (+) icon appears when the cursor is moved or hovered to the right bottom of a selected cell. The below image illustrates this option.
Excel functions, formula, charts, formatting creating excel dashboard & others
This plus icon can be dragged to top, bottom, left, or right.
How to Drag and Drop in Excel?
Let us see a few examples to drag and drop data in excel.
Let us say we have a value in cell A1 and we wish to fill or copy and paste this value to some other cells as well, say A1 through D10.
Let us see below how we can do this:
- Place the cursor to the right bottom of cell A1. Now the plus icon use to drag this value to the right and down of cell A1.
- After doing this, we can see that there is a small square icon to the right bottom of these cells. When we click on this icon, we see the below available options.

So we can see in the above screenshot that the “Auto-Fill” icon has a dropdown with three options. In the above case, we have dragged and dropped from A1 through D10 by taking the value from A1 only.
On selecting this option, we would get a visual as below:
MS Excel Training Bundle 13 Online Courses | 100+ Hours | Verifiable Certificates | Lifetime Validity
4.5 (303 ratings)
Now for A1 through D10, let’s see how these dragged cells (i.e. A2:D10) look like when the option of Fill Without Formatting” is selected.
On selecting this option, we would get a visual as below:
We can even insert or fill serial numbers with the “Fill Handle” option. Let us see how this works.
- Firstly two consecutive numbers are to be entered.
So we have entered two consecutive numbers: 1 and 2 in cells: A1 and A2.
- Now we select these two cells and then hover the cursor to the right bottom of these.
- Now drag and drop up to the row number; we require the serial number. So let’s say we require serial numbers from 1 to 10, so we drag and drop up to row number 10.
So let’s see the working of this in Excel. Using the two numbers: 1 and 2 entered, Excel identifies the increment value from the first cell to the second cell. In this case, the increment value is 1 (from 1 to 2). So every time a value is dragged to the next cell, the next value is incremented by 1. Thus, we get serial numbers: 1 to 10 in this case since we have dragged up to row number 10.
Now let’s say we enter 2 and 4 as two consecutive numbers in cells: C1 and C2. We now wish to drag and drop and fill these multiples of 2 up to row number 10. Let us see below how this works:
So, in this case, Excel identifies the increment value from the first cell to the second cell using the two numbers entered: 2 and 4. The increment value is 2 (from 2 to 4). So every time a value is dragged to the next cell, the next value is incremented by 2. Thus, we get multiples of 2: 2 to 20 in this case since we have dragged up to row number 10.
We can even insert or fill serial numbers without guiding Excel with any predefined pattern using the “Fill Handle” option. Let’s say we require serial numbers from 1 to 10. Let us see how this works.
- Now we select this cell and then hover the cursor to the right bottom of this.
- Now drag and drop up to the row number; we require the serial number. So let’s say we require serial numbers from 1 to 10, so we drag and drop up to row number 10.
After doing this, we can see that there is a small square icon, i.e. the “Auto-Fill” option, to the right bottom of the dragged cells. When we click on this icon, we see the below available options.
So in order to get serial numbers incremented by 1, we choose the option: “Fill Series”. Now let’s see how these dragged cell values change when we select this option: So we get serial numbers from 1 to 10.

Now we wish to copy this formula to the other two cells, but not using the copy-paste option but using the “Drag and Drop” option. To do this, select the initial or topmost cell containing the formula and then hover the cursor to the right bottom of this.
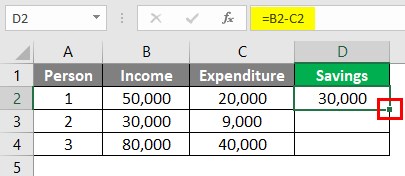
- Now we just need to double click on this position in order to drag and drop this formula to all the below cells.
So we can see in the above screenshot that the formula for savings is copied to the other two cells as well.
Things to Remember About Excel Drag and Drop
- Excel Drag and Drop option is often called “Fill Handle”.
- The drag and drop option can be used to paste or drag to a single row or column at a time.
- It is a technique to pick up a selection of cells and then drop those to a new place on the worksheet.
Recommended Articles
This is a guide to Excel Drag and Drop. Here we discuss How to Drag and Drop data in excel along with practical examples and a downloadable excel template. You can also go through our other suggested articles –
Читайте также: