
Какой файл отвечает за конфигурацию dispatcherservlet при конфигурировании через xml
In this article, we will examine the Spring DispatcherServlet's request processing workflow and how to implement several of the interfaces that participate in this workflow.
3. HandlerAdapter Interfaces
In the following sections, we will explore a few of the most important and commonly used HandlerAdapters in greater detail.
4. Conclusion
In this tutorial, we've reviewed Spring's DispatcherServlet and several ways to configure it.
As always, the source code used in this tutorial is available over on Github.
Spring's web MVC framework is, like many other web MVC frameworks, request-driven, designed around a central servlet that dispatches requests to controllers and offers other functionality that facilitates the development of web applications. Spring's DispatcherServlet however, does more than just that. It is completely integrated with the Spring IoC container and as such allows you to use every other feature that Spring has.
The request processing workflow of the Spring Web MVC DispatcherServlet is illustrated in the following diagram. The pattern-savvy reader will recognize that the DispatcherServlet is an expression of the “ Front Controller ” design pattern (this is a pattern that Spring Web MVC shares with many other leading web frameworks).

The requesting processing workflow in Spring Web MVC (high level)
In the preceding example, all requests ending with .form will be handled by the example DispatcherServlet . This is only the first step in setting up Spring Web MVC. You now need to configure the various beans used by the Spring Web MVC framework (over and above the DispatcherServlet itself).
As detailed in Section 3.13, “Additional Capabilities of the ApplicationContext”, ApplicationContext instances in Spring can be scoped. In the Web MVC framework, each DispatcherServlet has its own WebApplicationContext , which inherits all the beans already defined in the root WebApplicationContext . These inherited beans defined can be overridden in the servlet-specific scope, and you can define new scope-specific beans local to a given servlet instance.
Upon initialization of a DispatcherServlet , the framework looks for a file named [servlet-name]-servlet.xml in the WEB-INF directory of your web application and create the beans defined there, overriding the definitions of any beans defined with the same name in the global scope.
Consider the following DispatcherServlet servlet configuration (in the web.xml file):
With the above servlet configuration in place, you will need to have a file called /WEB-INF/ golfing -servlet.xml in your application; this file will contain all of your Spring Web MVC-specific components (beans). You can change the exact location of this configuration file through a servlet initialization parameter (see below for details).
The WebApplicationContext is an extension of the plain ApplicationContext that has some extra features necessary for web applications. It differs from a normal ApplicationContext in that it is capable of resolving themes (see Section 15.7, “Using themes”), and that it knows which servlet it is associated with (by having a link to the ServletContext ). The WebApplicationContext is bound in the ServletContext , and by using static methods on the RequestContextUtils class you can always look up the WebApplicationContext if you need access to it.
The Spring DispatcherServlet uses special beans to process requests and render the appropriate views. These beans are part of Spring Framework. You can configure them in the WebApplicationContext , just as you configure any other bean. However, for most beans, sensible defaults are provided so you initially do not need to configure them. These beans are described in the following table.
Table 15.1. Special beans in the WebApplicationContext
| Bean type | Explanation |
|---|---|
| controllers | Form the C part of the MVC. |
| handler mappings | Handle the execution of a list of pre-processors and post-processors and controllers that will be executed if they match certain criteria (for example, a matching URL specified with the controller). |
| view resolvers | Resolves view names to views. |
| locale resolver | A locale resolver is a component capable of resolving the locale a client is using, in order to be able to offer internationalized views |
| Theme resolver | A theme resolver is capable of resolving themes your web application can use, for example, to offer personalized layouts |
| multipart file resolver | Contains functionality to process file uploads from HTML forms. |
| handler exception resolvers | Contains functionality to map exceptions to views or implement other more complex exception handling code. |
After you set up a DispatcherServlet , and a request comes in for that specific DispatcherServlet , the DispatcherServlet starts processing the request as follows:
The WebApplicationContext is searched for and bound in the request as an attribute that the controller and other elements in the process can use. It is bound by default under the key DispatcherServlet.WEB_APPLICATION_CONTEXT_ATTRIBUTE .
The locale resolver is bound to the request to enable elements in the process to resolve the locale to use when processing the request (rendering the view, preparing data, and so on). If you do not need locale resolving, you do not need it.
The theme resolver is bound to the request to let elements such as views determine which theme to use. If you do not use themes, you can ignore it.
An appropriate handler is searched for. If a handler is found, the execution chain associated with the handler (preprocessors, postprocessors, and controllers) is executed in order to prepare a model or rendering.
If a model is returned, the view is rendered. If no model is returned, (may be due to a preprocessor or postprocessor intercepting the request, perhaps for security reasons), no view is rendered, because the request could already have been fulfilled.
Handler exception resolvers that are declared in the WebApplicationContext pick up exceptions that are thrown during processing of the request. Using these exception resolvers allows you to define custom behaviors to address exceptions.
The Spring DispatcherServlet also supports the return of the last-modification-date , as specified by the Servlet API. The process of determining the last modification date for a specific request is straightforward: the DispatcherServlet looks up an appropriate handler mapping and tests whether the handler that is found implements the LastModified interface. If so, the value of the long getLastModified(request) method of the LastModified interface is returned to the client.
You can customize Spring's DispatcherServlet by adding context parameters in the web.xml file or servlet initialization parameters. See the following table.
Фреймворк Spring MVC обеспечивает архитектуру паттерна Model — View — Controller (Модель — Отображение (далее — Вид) — Контроллер) при помощи слабо связанных готовых компонентов. Паттерн MVC разделяет аспекты приложения (логику ввода, бизнес-логику и логику UI), обеспечивая при этом свободную связь между ними.
- Model (Модель) инкапсулирует (объединяет) данные приложения, в целом они будут состоять из POJO («Старых добрых Java-объектов», или бинов).
- View (Отображение, Вид) отвечает за отображение данных Модели, — как правило, генерируя HTML, которые мы видим в своём браузере.
- Controller (Контроллер) обрабатывает запрос пользователя, создаёт соответствующую Модель и передаёт её для отображения в Вид.

Вам будет необходимо связать (замапить) запросы, которые Вы хотите обработать при помощи DispatcherServlet, используя мапинг URL в файле web.xml. Ниже приведён пример объявления и мапинга DispatcherServlet'а HelloWeb:
Файл web.xml будет находиться в каталоге WebContent/WEB-INF. После инициализации HelloWeb, фреймворк попытается загрузить контекст приложения из файла с именем [servlet-name]-servlet.xml, находящегося в каталоге WebContent/WEB-INF. В нашем случае, это будет HelloWeb-servlet.xml.
Далее, тэг указывает, какие веб-адреса обрабатываются каким DispatcherServlet'ом. В нашем случае, все HTTP-запросы, заканчивающиеся на ".jsp", будут обработаны HelloWeb.
Если Вы не хотите использовать [servlet-name]-servlet.xml / WebContent/WEB-INF в качестве файла и директории по умолчанию, Вы можете настроить имя файла и директорию, добавив слушатель сервлета (servlet listener) ContextLoaderListener в web.xml, как показано ниже:
Теперь давайте проверим конфигурацию для HelloWeb-servlet.xml, размещённую в каталоге WebContent/WEB-INF:
Ниже приведены важные моменты в HelloWeb-servlet.xml:
- Файл [servlet-name]-servlet.xml будет использоваться для создания обозначенных бинов, с переопределением определений каждого бина, определённых с тем же именем в глобальной области.
- Тэг будет использован для для активации функции сканирования аннотаций Spring MVC, позволяющей использовать аннотации, такие как Controller, @RequestMapping и проч.
- Имена Видов (View) будут определяться при помощи InternalResourceViewResolver. В соответствии с указанным выше правилом, Вид с именем hello будет реализован по адресу /WEB-INF/jsp/hello.jsp
DispatcherServlet отправляет запрос контроллерам для выполнения определённых функций. Аннотация @Controllerannotation указывает, что конкретный класс является контроллером. Аннотация @RequestMapping используется для мапинга (связывания) с URL для всего класса или для конкретного метода обработчика.
Вы можете написать вышеуказанный Контроллер по-другому, указав дополнительные атрибуты для аннотации @RequestMapping следующим образом:
Атрибут «value» указывает URL, с которым мы связываем данный метод (value = "/hello"), далее указывается, что этот метод будет обрабатывать GET-запросы (method = RequestMethod.GET). Также, нужно отметить важные моменты в отношении приведённого выше контроллера:
- Вы определяете бизнес-логику внутри связанного таким образом служебного метода. Из него Вы можете вызывать любые другие методы.
- Основываясь на заданной бизнес-логике, в рамках этого метода Вы создаёте Модель (Model). Вы можете добавлять аттрибуты Модели, которые будут добавлены в Вид (View). В примере выше мы создаём Модель с атрибутом «message».
- Данный служебный метод возвращает имя Вида в виде строки String. В данном случае, запрашиваемый Вид имеет имя «hello».
Spring MVC поддерживает множество типов Видов для различных технологий отображения страницы. В том числе — JSP, HTML, PDF, Excel, XML, Velocity templates, XSLT, JSON, каналы Atom и RSS, JasperReports и проч. Но чаще всего используются шаблоны JSP, написанные при помощи JSTL.
Давайте напишем простой Вид «hello» в /WEB-INF/hello/hello.jsp:
В данном случае, переменная $ выводит тот самый атрибут, установленный нами в Контроллере. Внутри Вида Вы можете отобразить любое количество атрибутов.
Основываясь на приведённых выше концепциях, предлагаю выполнить несколько важных уроков, которые в дальнейшем помогут нам создавать приложения Spring Web:
Spring MVC Hello World Example
Пример, разъясняющий написание простейшего приложения Hello World.
Spring Static Pages Example
Получаем доступ к статическим страницам вместе с динамическими.
This part of the documentation covers support for Servlet-stack web applications built on the Servlet API and deployed to Servlet containers. Individual chapters include Spring MVC, View Technologies, CORS Support, and WebSocket Support. For reactive-stack web applications, see Web on Reactive Stack.
3.7. The HandlerExceptionResolver Interface
Spring's HandlerExceptionResolver provides uniform error handling for an entire web application, a single controller, or a set of controllers.
To provide application-wide custom exception handling, create a class annotated with @ControllerAdvice:
Any methods within that class annotated with @ExceptionHandler will be available on every controller within dispatcher's area of responsibility.
Implementations of the HandlerExceptionResolver interface in the DispatcherServlet's ApplicationContext are available to intercept a specific controller under that dispatcher's area of responsibility whenever @ExceptionHandler is used as an annotation, and the correct class is passed in as a parameter:
The handleException() method will now serve as an exception handler for FooController in our example above if either exception CustomException1 or CustomException2 occurs.
Here's an article that goes more in-depth about exception handling in a Spring web application.
3.3. The ViewResolver Interface
A ViewResolver is attached to a DispatcherServlet as a configuration setting on an ApplicationContext object.
A ViewResolver determines both what kind of views are served by the dispatcher and from where they are served.
Here's an example configuration which we'll place into our AppConfig for rendering JSP pages:
Very straight-forward! There are three main parts to this:
- setting the prefix, which sets the default URL path to find the set views within
- the default view type which is set via the suffix
- setting a view class on the resolver which allows technologies like JSTL or Tiles to be associated with the rendered views
One common question involves how precisely a dispatcher's ViewResolver and the overall project directory structure are related. Let's take a look at the basics.
Here's an example path configuration for an InternalViewResolver using Spring's XML configuration:
For the sake of our example, we'll assume that our application is being hosted on:
This is the default address and port for a locally hosted Apache Tomcat server.
Assuming that our application is called dispatcherexample-1.0.0, our JSP views will be accessible from:
The path for these views within an ordinary Spring project with Maven is this:
The default location for views is within WEB-INF. The path specified for our InternalViewResolver in the snippet above determines the subdirectory of ‘src/main/webapp' in which your views will be available.
1. Spring Web MVC
Spring Web MVC is the original web framework built on the Servlet API and has been included in the Spring Framework from the very beginning. The formal name, “Spring Web MVC,” comes from the name of its source module ( spring-webmvc ), but it is more commonly known as “Spring MVC”.
Parallel to Spring Web MVC, Spring Framework 5.0 introduced a reactive-stack web framework whose name, “Spring WebFlux,” is also based on its source module ( spring-webflux ). This section covers Spring Web MVC. The next section covers Spring WebFlux.
For baseline information and compatibility with Servlet container and Java EE version ranges, see the Spring Framework Wiki.
3.1. Mappings
To understand mappings, we need to first look at how to annotate controllers since controllers are so essential to the HandlerMapping interface.
The SimpleControllerHandlerAdapter allows for the implementation of a controller explicitly without a @Controller annotation.
The RequestMappingHandlerAdapter supports methods annotated with the @RequestMapping annotation.
We'll focus on the @Controller annotation here, but a helpful resource with several examples using the SimpleControllerHandlerAdapter is also available.
The @RequestMapping annotation sets the specific endpoint at which a handler will be available within the WebApplicationContext associated with it.
Let's see an example of a Controller that exposes and handles the ‘/user/example' endpoint:
The paths specified by the @RequestMapping annotation are managed internally via the HandlerMapping interface.
The URLs structure is naturally relative to the DispatcherServlet itself – and determined by the servlet mapping.
Thus, if the DispatcherServlet is mapped to ‘/', then all mappings are going to be covered by that mapping.
If, however, the servlet mapping is ‘/dispatcher‘ instead, then any @RequestMapping annotations are going to be relative to that root URL.
Remember that ‘/' is not the same as ‘/*' for servlet mappings! ‘/' is the default mapping and exposes all URL's to the dispatcher's area of responsibility.
‘/*' is confusing to a lot of newer Spring developers. It does not specify that all paths with the same URL context are under the dispatcher's area of responsibility. Instead, it overrides and ignores the other dispatcher mappings. So, ‘/example' will come up as a 404!
For that reason, ‘/*' shouldn't be used except in very limited circumstances (like configuring a filter).
As a side note, the main difference between @Controller and @RestController is how the response is generated – the @RestController also defines @ResponseBody by default.
A writeup where we go into much greater depth regarding Spring's controllers can be found here.
1.1. DispatcherServlet
Spring MVC, as many other web frameworks, is designed around the front controller pattern where a central Servlet , the DispatcherServlet , provides a shared algorithm for request processing, while actual work is performed by configurable delegate components. This model is flexible and supports diverse workflows.
The DispatcherServlet , as any Servlet , needs to be declared and mapped according to the Servlet specification by using Java configuration or in web.xml . In turn, the DispatcherServlet uses Spring configuration to discover the delegate components it needs for request mapping, view resolution, exception handling, and more.
The following example of the Java configuration registers and initializes the DispatcherServlet , which is auto-detected by the Servlet container (see Servlet Config):
| In addition to using the ServletContext API directly, you can also extend AbstractAnnotationConfigDispatcherServletInitializer and override specific methods (see the example under Context Hierarchy). |
| For programmatic use cases, a GenericWebApplicationContext can be used as an alternative to AnnotationConfigWebApplicationContext . See the GenericWebApplicationContext javadoc for details. |
The following example of web.xml configuration registers and initializes the DispatcherServlet :
| Spring Boot follows a different initialization sequence. Rather than hooking into the lifecycle of the Servlet container, Spring Boot uses Spring configuration to bootstrap itself and the embedded Servlet container. Filter and Servlet declarations are detected in Spring configuration and registered with the Servlet container. For more details, see the Spring Boot documentation. |
1.1.1. Context Hierarchy
DispatcherServlet expects a WebApplicationContext (an extension of a plain ApplicationContext ) for its own configuration. WebApplicationContext has a link to the ServletContext and the Servlet with which it is associated. It is also bound to the ServletContext such that applications can use static methods on RequestContextUtils to look up the WebApplicationContext if they need access to it.
For many applications, having a single WebApplicationContext is simple and suffices. It is also possible to have a context hierarchy where one root WebApplicationContext is shared across multiple DispatcherServlet (or other Servlet ) instances, each with its own child WebApplicationContext configuration. See Additional Capabilities of the ApplicationContext for more on the context hierarchy feature.
The root WebApplicationContext typically contains infrastructure beans, such as data repositories and business services that need to be shared across multiple Servlet instances. Those beans are effectively inherited and can be overridden (that is, re-declared) in the Servlet-specific child WebApplicationContext , which typically contains beans local to the given Servlet . The following image shows this relationship:

The following example configures a WebApplicationContext hierarchy:
| If an application context hierarchy is not required, applications can return all configuration through getRootConfigClasses() and null from getServletConfigClasses() . |
The following example shows the web.xml equivalent:
| If an application context hierarchy is not required, applications may configure a “root” context only and leave the contextConfigLocation Servlet parameter empty. |
1.1.2. Special Bean Types
The DispatcherServlet delegates to special beans to process requests and render the appropriate responses. By “special beans” we mean Spring-managed Object instances that implement framework contracts. Those usually come with built-in contracts, but you can customize their properties and extend or replace them.
The following table lists the special beans detected by the DispatcherServlet :
Map a request to a handler along with a list of interceptors for pre- and post-processing. The mapping is based on some criteria, the details of which vary by HandlerMapping implementation.
The two main HandlerMapping implementations are RequestMappingHandlerMapping (which supports @RequestMapping annotated methods) and SimpleUrlHandlerMapping (which maintains explicit registrations of URI path patterns to handlers).
Help the DispatcherServlet to invoke a handler mapped to a request, regardless of how the handler is actually invoked. For example, invoking an annotated controller requires resolving annotations. The main purpose of a HandlerAdapter is to shield the DispatcherServlet from such details.
Strategy to resolve exceptions, possibly mapping them to handlers, to HTML error views, or other targets. See Exceptions.
Resolve logical String -based view names returned from a handler to an actual View with which to render to the response. See View Resolution and View Technologies.
Resolve the Locale a client is using and possibly their time zone, in order to be able to offer internationalized views. See Locale.
Resolve themes your web application can use — for example, to offer personalized layouts. See Themes.
Abstraction for parsing a multi-part request (for example, browser form file upload) with the help of some multipart parsing library. See Multipart Resolver.
Store and retrieve the “input” and the “output” FlashMap that can be used to pass attributes from one request to another, usually across a redirect. See Flash Attributes.
1.1.3. Web MVC Config
Applications can declare the infrastructure beans listed in Special Bean Types that are required to process requests. The DispatcherServlet checks the WebApplicationContext for each special bean. If there are no matching bean types, it falls back on the default types listed in DispatcherServlet.properties .
In most cases, the MVC Config is the best starting point. It declares the required beans in either Java or XML and provides a higher-level configuration callback API to customize it.
| Spring Boot relies on the MVC Java configuration to configure Spring MVC and provides many extra convenient options. |
1.1.4. Servlet Config
In a Servlet 3.0+ environment, you have the option of configuring the Servlet container programmatically as an alternative or in combination with a web.xml file. The following example registers a DispatcherServlet :
WebApplicationInitializer is an interface provided by Spring MVC that ensures your implementation is detected and automatically used to initialize any Servlet 3 container. An abstract base class implementation of WebApplicationInitializer named AbstractDispatcherServletInitializer makes it even easier to register the DispatcherServlet by overriding methods to specify the servlet mapping and the location of the DispatcherServlet configuration.
This is recommended for applications that use Java-based Spring configuration, as the following example shows:
If you use XML-based Spring configuration, you should extend directly from AbstractDispatcherServletInitializer , as the following example shows:
AbstractDispatcherServletInitializer also provides a convenient way to add Filter instances and have them be automatically mapped to the DispatcherServlet , as the following example shows:
Each filter is added with a default name based on its concrete type and automatically mapped to the DispatcherServlet .
The isAsyncSupported protected method of AbstractDispatcherServletInitializer provides a single place to enable async support on the DispatcherServlet and all filters mapped to it. By default, this flag is set to true .
Finally, if you need to further customize the DispatcherServlet itself, you can override the createDispatcherServlet method.
1.1.5. Processing
The DispatcherServlet processes requests as follows:
The WebApplicationContext is searched for and bound in the request as an attribute that the controller and other elements in the process can use. It is bound by default under the DispatcherServlet.WEB_APPLICATION_CONTEXT_ATTRIBUTE key.
The locale resolver is bound to the request to let elements in the process resolve the locale to use when processing the request (rendering the view, preparing data, and so on). If you do not need locale resolving, you do not need the locale resolver.
The theme resolver is bound to the request to let elements such as views determine which theme to use. If you do not use themes, you can ignore it.
An appropriate handler is searched for. If a handler is found, the execution chain associated with the handler (preprocessors, postprocessors, and controllers) is run to prepare a model for rendering. Alternatively, for annotated controllers, the response can be rendered (within the HandlerAdapter ) instead of returning a view.
If a model is returned, the view is rendered. If no model is returned (maybe due to a preprocessor or postprocessor intercepting the request, perhaps for security reasons), no view is rendered, because the request could already have been fulfilled.
The HandlerExceptionResolver beans declared in the WebApplicationContext are used to resolve exceptions thrown during request processing. Those exception resolvers allow customizing the logic to address exceptions. See Exceptions for more details.
You can customize individual DispatcherServlet instances by adding Servlet initialization parameters ( init-param elements) to the Servlet declaration in the web.xml file. The following table lists the supported parameters:
Class that implements ConfigurableWebApplicationContext , to be instantiated and locally configured by this Servlet. By default, XmlWebApplicationContext is used.
String that is passed to the context instance (specified by contextClass ) to indicate where contexts can be found. The string consists potentially of multiple strings (using a comma as a delimiter) to support multiple contexts. In the case of multiple context locations with beans that are defined twice, the latest location takes precedence.
Namespace of the WebApplicationContext . Defaults to [servlet-name]-servlet .
Whether to throw a NoHandlerFoundException when no handler was found for a request. The exception can then be caught with a HandlerExceptionResolver (for example, by using an @ExceptionHandler controller method) and handled as any others.
By default, this is set to false , in which case the DispatcherServlet sets the response status to 404 (NOT_FOUND) without raising an exception.
Note that, if default servlet handling is also configured, unresolved requests are always forwarded to the default servlet and a 404 is never raised.
1.1.6. Path Matching
The Servlet API exposes the full request path as requestURI and further sub-divides it into contextPath , servletPath , and pathInfo whose values vary depending on how a Servlet is mapped. From these inputs, Spring MVC needs to determine the lookup path to use for handler mapping, which is the path within the mapping of the DispatcherServlet itself, excluding the contextPath and any servletMapping prefix, if present.
The servletPath and pathInfo are decoded and that makes them impossible to compare directly to the full requestURI in order to derive the lookupPath and that makes it necessary to decode the requestURI . However this introduces its own issues because the path may contain encoded reserved characters such as "/" or ";" that can in turn alter the structure of the path after they are decoded which can also lead to security issues. In addition, Servlet containers may normalize the servletPath to varying degrees which makes it further impossible to perform startsWith comparisons against the requestURI .
This is why it is best to avoid reliance on the servletPath which comes with the prefix-based servletPath mapping type. If the DispatcherServlet is mapped as the default Servlet with "/" or otherwise without a prefix with "/*" and the Servlet container is 4.0+ then Spring MVC is able to detect the Servlet mapping type and avoid use of the servletPath and pathInfo altogether. On a 3.1 Servlet container, assuming the same Servlet mapping types, the equivalent can be achieved by providing a UrlPathHelper with alwaysUseFullPath=true via Path Matching in the MVC config.
The above issues can be addressed more comprehensively by switching from PathMatcher to the parsed PathPattern available in 5.3 or higher, see Pattern Comparison. Unlike AntPathMatcher which needs either the lookup path decoded or the controller mapping encoded, a parsed PathPattern matches to a parsed representation of the path called RequestPath , one path segment at a time. This allows decoding and sanitizing path segment values individually without the risk of altering the structure of the path. Parsed PathPattern also supports the use of servletPath prefix mapping as long as the prefix is kept simple and does not have any characters that need to be encoded.
1.1.7. Interception
All HandlerMapping implementations support handler interceptors that are useful when you want to apply specific functionality to certain requests — for example, checking for a principal. Interceptors must implement HandlerInterceptor from the org.springframework.web.servlet package with three methods that should provide enough flexibility to do all kinds of pre-processing and post-processing:
preHandle(..) : Before the actual handler is run
postHandle(..) : After the handler is run
afterCompletion(..) : After the complete request has finished
The preHandle(..) method returns a boolean value. You can use this method to break or continue the processing of the execution chain. When this method returns true , the handler execution chain continues. When it returns false, the DispatcherServlet assumes the interceptor itself has taken care of requests (and, for example, rendered an appropriate view) and does not continue executing the other interceptors and the actual handler in the execution chain.
See Interceptors in the section on MVC configuration for examples of how to configure interceptors. You can also register them directly by using setters on individual HandlerMapping implementations.
Note that postHandle is less useful with @ResponseBody and ResponseEntity methods for which the response is written and committed within the HandlerAdapter and before postHandle . That means it is too late to make any changes to the response, such as adding an extra header. For such scenarios, you can implement ResponseBodyAdvice and either declare it as an Controller Advice bean or configure it directly on RequestMappingHandlerAdapter .
1.1.8. Exceptions
If an exception occurs during request mapping or is thrown from a request handler (such as a @Controller ), the DispatcherServlet delegates to a chain of HandlerExceptionResolver beans to resolve the exception and provide alternative handling, which is typically an error response.
The following table lists the available HandlerExceptionResolver implementations:
A mapping between exception class names and error view names. Useful for rendering error pages in a browser application.
Resolves exceptions by invoking an @ExceptionHandler method in a @Controller or a @ControllerAdvice class. See @ExceptionHandler methods.
Chain of Resolvers
You can form an exception resolver chain by declaring multiple HandlerExceptionResolver beans in your Spring configuration and setting their order properties as needed. The higher the order property, the later the exception resolver is positioned.
The contract of HandlerExceptionResolver specifies that it can return:
a ModelAndView that points to an error view.
An empty ModelAndView if the exception was handled within the resolver.
null if the exception remains unresolved, for subsequent resolvers to try, and, if the exception remains at the end, it is allowed to bubble up to the Servlet container.
The MVC Config automatically declares built-in resolvers for default Spring MVC exceptions, for @ResponseStatus annotated exceptions, and for support of @ExceptionHandler methods. You can customize that list or replace it.
Container Error Page
If an exception remains unresolved by any HandlerExceptionResolver and is, therefore, left to propagate or if the response status is set to an error status (that is, 4xx, 5xx), Servlet containers can render a default error page in HTML. To customize the default error page of the container, you can declare an error page mapping in web.xml . The following example shows how to do so:
Given the preceding example, when an exception bubbles up or the response has an error status, the Servlet container makes an ERROR dispatch within the container to the configured URL (for example, /error ). This is then processed by the DispatcherServlet , possibly mapping it to a @Controller , which could be implemented to return an error view name with a model or to render a JSON response, as the following example shows:
При разрабокте приложения мы будем использовать утилиту Ant для автоматизации действий и изучим, как писать простой тест с помощью библиотеки JUnit. Весь код будем писать в Eclipse IDE.
Статья написана на основе первой части руководства «Introduction to Spring MVC». Вам достаточно иметь лишь общее представление о Spring, чтобы прочитать статью с пользой.
Так что милости просим :)
Для конфигурирования приложения в Spring можно использовать несколько спобов. Наиболее популярный путь – вынесение конфигурации в xml-файлы. Также это наиболее традиционный путь, который используется в фреймворке с первого релиза. С введением аннотаций в языке Java 5 появилась возможность настраивать фреймворк с помощью них (с версии 2.5). В данной статье мы будем использовать традиционный XML-стиль.
Необходимые инструменты
- Java SDK 1.5,
- Apache Tomcat 6,
- Ant 1.7,
- Junit 4.x,
- Eclipse 3.
1. Создание структуры проекта

На установленный Eclipse поставим плагин Spring IDE. Создадим Spring-проект springapp, добавим папку war.
2. Создадим index.jsp
В папке war создадим WEB-INF, и разместим в ней web.xml.
springapp/war/WEB-INF/web.xml
3. Деплоим приложение в Tomcat
Для развертывания приложения на сервере воспользуемся ant-скриптом (для начала работы с Ant достаточно прочитать заметку о нем в Википедии). Скрипт будет содержать цели для компиляции, построения и переноса приложения.
springapp/build.xml
springapp/build.properties
Установите корректно переменную appserver.home. У меня она указывает на C:/Program Files/Apache Software Foundation/Tomcat 6.0/.
Для создания пользователя Tomcat в файле appserver.home/conf/tomcat-users.xml сделайте запись:
Выполним build-скрипт: Контекстное меню файла build.xml > Run As > Ant Build > Выбрать цели build, deploy во вкладке Targets.
4. Проверим работоспособность приложения

Запустите Tomcat и откройте в браузере страницу localhost:8080/springapp/.
5. Скачиваем Spring Framework
Скачайте фреймворк, если вы ещё этого не сделали, и распакуйте его.
На этом настройка окружения закончена. Далее мы приступаем к конфигурированию самого приложения на Spring MVC.
6. Изменим web.xml в папке WEB-INF
Мы определим сервлет-дисптечер DispatcherServlet (также называемый Front Controller). Его цель – диспетчеризация поступающих запросов. Сделаем для этого сервлета маппинг. Мы решили все запросы с урлами вида '.htm' направлять на сервлет-дисптечер.
springapp/war/WEB-INF/web.xml
Создадим файл springapp-servlet.xml. Этот файл содержит описания бинов (Java-файлов), которые будет использовать DispatcherServlet. Иными словами файл определяет контекст сервлета (WebApplicationContext). По стандартному соглашению именования для Spring Web MVC, сервлет springapp будет иметь файл описания бинов с именем springapp-servlet.xml.
Добавим описание бина (bean entry) '/hello.htm' с классом springapp.web.HelloController. Эта запись определяет Контроллер, который будет использовать приложение для обслуживания запроса с урлом '/hello.htm'. Для маппинга урла на объект, что его будет обрабатывать, фреймворк Spring Web MVC использует класс, реализующий интерфейс HandlerMapping. По умолчанию для маппинга используется класс BeanNameUrlHandlerMapping.
В отличие от DispatcherServlet, HelloController ответственный за обработку запроса на конкретную страницу. Его также называют 'Page Controller'.
springapp/war/WEB-INF/springapp-servlet.xml
7. Скопируем библиотеки в 'WEB-INF/lib'
- spring.jar (из spring-framework-2.5/dist);
- spring-webmvc.jar (из spring-framework-2.5/dist/modules);
- commons-logging.jar (из spring-framework-2.5/lib/jakarta-commons);
- junit-4.4.jar (из spring-framework-2.5/lib/ junit).
- Контекстное меню проекта > Build Path > Configure Build Path > Add External JARs > 'war/WEB-INF/lib';
- Контекстное меню проекта > Build Path > Configure Build Path > Add Library > Server Runtime > Tomcat.
8. Создадим Контроллер
Создадим Контроллер HelloController в пакете springapp.web.
springapp/src/springapp/web/HelloController.java
public class HelloController implements Controller <
protected final Log logger = LogFactory.getLog(getClass());
Это очень упрощенная реализация Контроллера. Мы будем её расширять в дальнейшем, и также будем использовать готовые реализации контроллеров из фреймворка.
В модели MVC Контроллер обрабатывает запрос и возвращает Модель-и-Вид (ModelAndView) – в нашем случае страницу 'hello.jsp'. Модель, которую возвращает Контроллер, на самом деле разрешается через ViewResolver. Так как мы не указали явно ViewResolver, то будет использоваться резолвер по-умолчанию, который просто направляет запрос на адрес ресурса, указанный в Модели-и-Виде. В дальнейшем мы это изменим.
Также мы указали логгер, с помощью которого сможем проверить выполненную приложением работу. При использовании Tomcat журнал работы приложения мы сможем просмотреть в файле catalina.out, который можно найти по адресу $/log.
9. Напишем тест для Контроллера
Тестирование – это один из самых важных этапов разработки сложных программных систем. Также это основополагающая практика при Agile software development. Многие считают, что наилучшее время написания тестов – втечение разработки, а не после. Так что, несмотря на простоту разработанного нами контроллера, мы напишем к нему тест.
Создадим тест HelloControllerTests, расширяющий класс TestCase из библиотеки Junit: New > Other > JUnit > JUnit Test Case.

Это модульный тест (unit test). Он проверяет, совпадает ли имя Вида, возвращаемое через handleRequest() с Видом, которое мы ожидаем: 'hello.jsp'.
springapp/src/springapp/web/HelloControllerTests.java
import org.springframework.web.servlet.ModelAndView;
import springapp.web.HelloController;
import static org.junit.Assert.*;
import org.junit.Test;
public class HelloControllerTests
@Test
public void testHandleRequestView() throws Exception <
HelloController controller = new HelloController();
ModelAndView modelAndView = controller.handleRequest( null , null );
assertEquals( «hello.jsp» , modelAndView.getViewName());
>
>

Для запуска теста используем меню: Run > Run As > JUnit Test.
Результат выполнения теста:
Ещё одной практикой Agile-разработки является непрерывная интеграция (Continuous Integration). Хорошей идеей будет запуск тестов с каждым билдом (build), для того, чтобы быть уверенным в правильном поведении своего кода (в идеальном варианте тесты запускаются автоматически при каждом билде).
10. Создадим Вид
Настало время создать Вид. В нашем случае это будет JSP-страница hello.jsp.
springapp/war/hello.jsp
11. Скомпилируем и развернём приложение на сервере
Для файла build.xml добавим в Classpath библиотеку springapp\war\WEB-INF\lib\junit-4.4.jar, и выполним цели Build и Deploy (Контекстное меню файла build.xml > Run As > Ant Build… > вкладки Targets, Classpath).
12. Попробуем запустить приложение
13. Резюме
- Стартовая страница приложения – index.jsp. Служит для того, чтобы удостовериться в правильности установки окружения. Позднее мы ее изменим.
- Сервлет-диспетчер (DispatcherServlet или Front controller) с соответствующим файлом описания springapp-servlet.xml.
- Контроллер (Page controller) HelloController с базовой функциональностью – просто возвращает Модель-И-Вид. На данный момент Модель пустая. Полная реализация Модели будет сделана в дальнейшем.
- Модульный тест для контроллера HelloControllerTests, проверяющий, соответствует ли имя вида ожидаемому.
- Вид приложения – hello.jsp.

Ниже представлена структура проекта, которая должна быть после выполнения всех инструкций.
3.5. The ThemeResolver Interface
Spring provides stylistic theming for our views.
Let's take a look at how to configure our dispatcher to handle themes.
First, let's set up all the configuration necessary to find and use our static theme files. We need to set a static resource location for our ThemeSource to configure the actual Themes themselves (Theme objects contain all of the configuration information stipulated in those files). Add this to AppConfig:
Requests managed by the DispatcherServlet can modify the theme through a specified parameter passed into setParamName() available on the ThemeChangeInterceptor object. Add to AppConfig:
The following JSP tag is added to our view to make the correct styling appear:
The following URL request renders the example theme using the ‘theme' parameter passed into our configured ThemeChangeIntercepter:
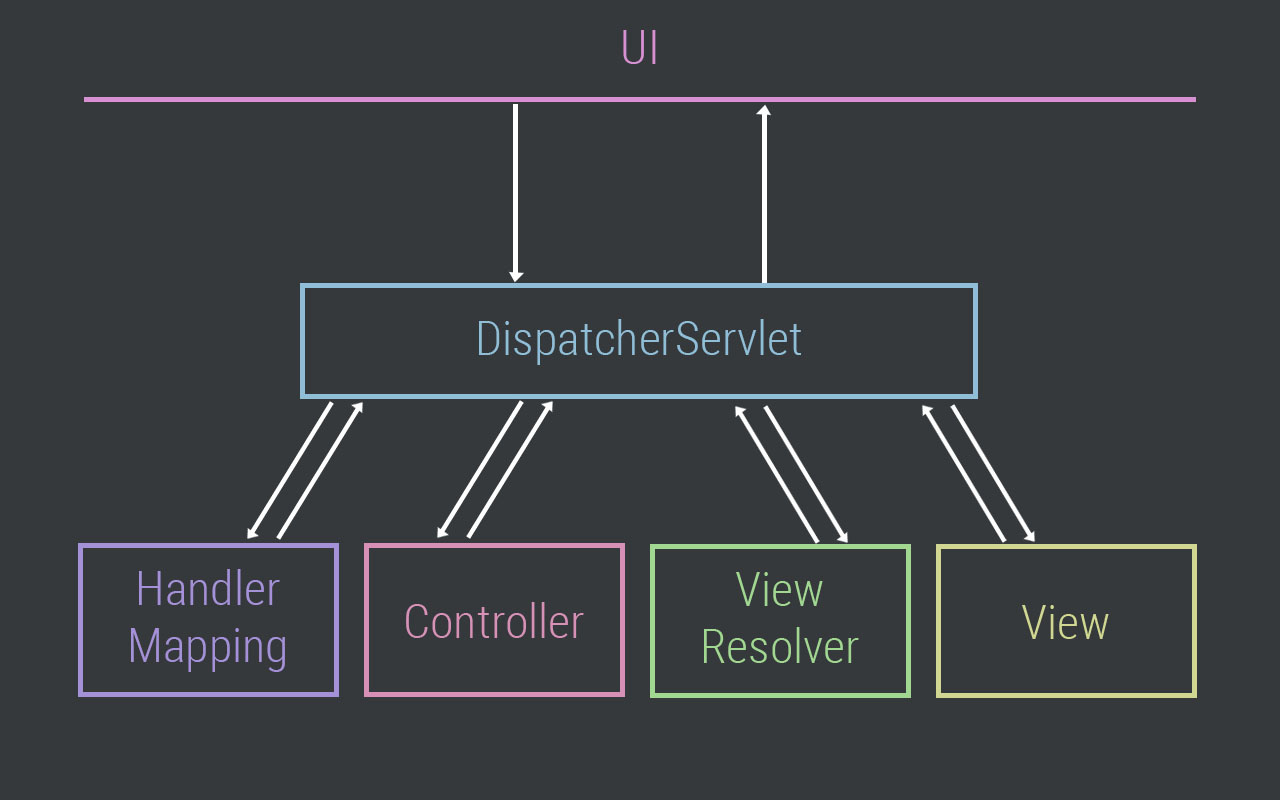
2. DispatcherServlet Request Processing
Let's get more in-depth about how a DispatcherServlet processes a component:
You can learn more about all the ways to register and set up a DispatcherServlet here.
3.6. The MultipartResolver Interface
Now that we've configured our MultipartResolver bean, let's set up a controller to process MultipartFile requests:
We can use a normal form to submit a file to the specified endpoint. Uploaded files will be available in ‘CATALINA_HOME/bin/uploads'.
3.4. The LocaleResolver Interface
The primary way to customize session, request, or cookie information for our dispatcher is through the LocaleResolver interface.
SessionLocaleResolver allows for session-specific configuration in a stateful application.
The setDefaultLocale() method represents a geographical, political, or cultural region, whereas setDefaultTimeZone( ) determines the relevant TimeZone object for the application Bean in question.
Both methods are available on each of the above implementations of LocaleResolver.
Читайте также: