
Экспортировать из revit в sketchup
It’s a common workflow for designers to turn to Sketchup during the early phases of a building design because jumping straight into Revit model is often more time consuming. In this post, we will cover the less common workflow of going from Revit to Sketchup and discuss some recommended techniques and some common errors to watch out for.
In part one, we’ll cover the process from the Revit side of the workflow, where you will prep your model for export.
1. Prep Your Revit Model
On the surface, it can seem fairly simple to export Revit to Sketchup, but here are some techniques that should make your life a little easier before importing to Sketchup.
Model Lines for Reference
I highly recommend that you draw a set of model lines around your Revit model to use as a reference after imported to Sketchup. As shown later in this tutorial, it can be difficult to align the multiple models in Sketchup without these lines to snap to.
Export Models by Model Category
Another technique that can help when exporting Revit to Sketchup is to export multiple models which contain a few model categories rather than one model containing all model categories . Although Sketchup maintains layers for visibility, it is still much easier to manage when individual models contain a common model category.

In the screenshot to the right, you can see that I’ve created an individual 3D view for Doors, Roofs, Walls and Windows, however the view named “Export – Site” actually has the Parking, Planting, and Topography model categories set to visible because for this project, it makes sense to have all site elements in one exported model.
There are a number of ways to control visibility in Revit , so I’ll leave it up to you to decide what works best for you.
2. Export from Revit
Now that you have your model prepped, you are ready to export your 3D views as individual model as the next step in transitioning from Revit to Sketchup.
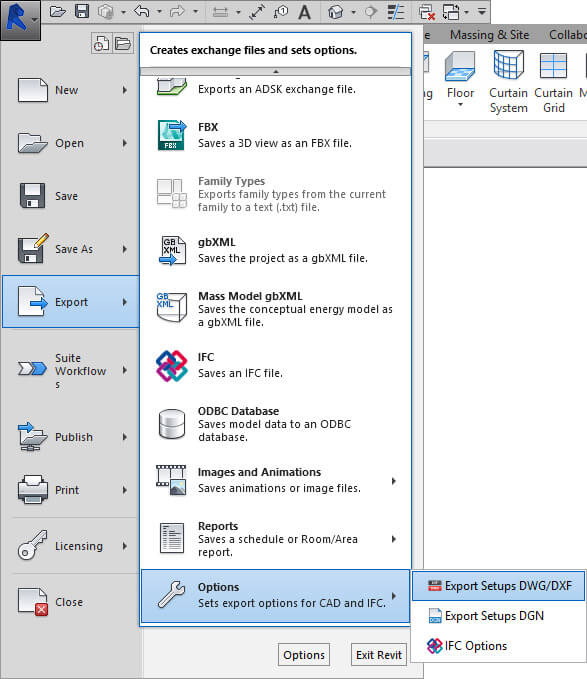
Export to DWG
Within Revit, navigate to the File menu and choose Export > CAD Formats > DWG.
In this DWG Export window, you are presented with several options including the option to select multiple views to be exported in batch. If you don’t see the 3D views that you created in step one, you might need to change the Export dropdown to and the Show in list dropdown to Views in Model as shown in the screenshot below. Once the relevant views are displayed, simply check the box under the Include column to select the 3D views to be exported from Revit to Sketchup.
AutoCAD DWG Version
One important detail that often gets overlooked when transitioning your model from Revit to Sketchup is the DWG file version. Sketchup typically doesn’t support newer versions of CAD file types, so you’ll want to make sure you have a compatible version of the AutoCAD DWG after export.
To change this setting, click the Modify Export Setup button. It is the obscure ellipsis button in the Select Export Setup section of the DWG Export window (see screenshot below).
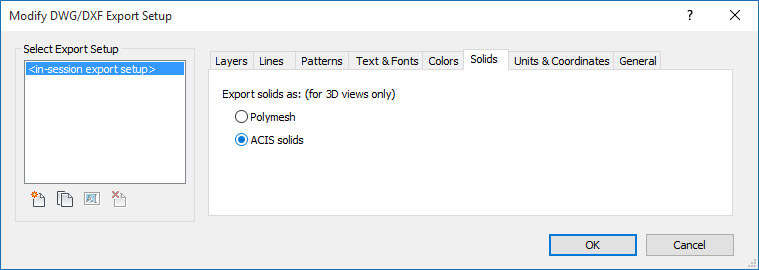
In the Modify DWG/DXF Export Setup window, I typically change the “Export to file format” way back to AutoCAD 2007 Format. This way you’ll be sure that it is compatible with most current versions of Sketchup.
Now that you’ve adjusted all of your settings, you are ready to export. Click the Next button in the DWG Export window. You will then be prompted to save the DWG files. Browse to an appropriate target folder location to save the files.
Conclusion
Now that you have successfully exported your CAD files, you are ready to complete the process of converting your model from Revit to Sketchup. Click here to learn how to do this in part 2.
В Revit перейдите в меню «Файл» и выберите «Экспорт» > «Форматы САПР» > «DWG». В этом окне «Экспорт в DWG» вам предлагается несколько параметров, включая возможность выбора нескольких видов для пакетного экспорта.
Как экспортировать 3D PDF из Revit?
Перейдите на вкладку «Надстройки Revit» и нажмите кнопку «Создать PDF». Это активирует диалоговое окно, как показано на рис. 3. Оставьте все настройки по умолчанию и нажмите OK, и в программе Adobe Acrobat будет создан 3D PDF.
Подходит ли Revit для дизайна интерьера?
Revit — отличный инструмент для профессиональных дизайнеров интерьера. Это то, что большинство дизайнеров интерьеров в архитектурных и интерьерных фирмах используют для строительных чертежей. … Если вы хотите работать над большими или сложными проектами и/или в большинстве фирм, вам следует работать в Revit.
Как экспортировать модель Revit?
Экспорт модели Revit в файл STL
- Выберите вкладку «Надстройка» панель «STL Exporter» («STL Exporter for Revit»).
- На вкладке «Общие» укажите параметры файла STL.
- На вкладке «Категории» укажите, какие категории элементов будут экспортироваться в файл STL.
- Нажмите «Сохранить», чтобы создать файл STL, или нажмите «Отмена», чтобы закрыть программу экспорта STL.
Customer Reviews
Malisimo, te ponen marca de agua por encima de las texturas, te obliga a hacerte una cuenta y a subir tu contenido a la nube. No lo recomiendo para nada
It used to be simple to convert and export. Now it pushes the export to the cloud, and you wait for an email to give a link to download it. Why?!
It used to be very straightforward, now forces you to upload the file to the cloud to get the model converted and once it's downloaded the model has the company logo advertising the product.
It uploads the model to the server without asking. And after inputting lots of personal information, just 1 chance to try.
Hi Bob, Sorry to hear you didn't enjoy rvt2skp. Our latest update makes the plugin more efficient by taking the heavy lifting off your PC and into the cloud; this eliminates lag times and makes almost all future updates automatic. We do not store your converted models on any server. As with any SaaS, we require a sign-in so that you can redeem your license and easily access our other tools for Revit. -Nathan
These very simple tool brings me immediate cost and time savings. Essential .
. slow guessing need to find another pluging now
Do you have tools to import SKP/rhino/max to REVIT , or do you plan to develop them?
This is a fastest plugin for revit to SU.
My JOB is make construction drawing design in China.
IN china revit is not very popular to do the design,so,i need finish the construction drawing with REVIT and transfer it to sketch to the design company.
But the resulting model is flexible and cannot be edited.I can use cad then import sketch,but it need long time .
Thanks to this plugin for saving my time.
But now it's not free, and it's too expensive.
It was great. Now I can't find the free add-in
What happened to the free rvt2skp add-in? Do I have to pay for the pro version when my 3 free exports are done? I had a rvt2skp version downloaded to Revit 2018. I've upgraded to Revit 2019 so I need to download the add-in again.
Thank you for that great tool
Great for exporting parts of our models to sketchup where we show complex junctions with sketchups modelling and texture tools
After upgrading to Revit 2019 I lost the option to use the rvt2skp export. Do you have any plans for supporting Revit 2019?
This plugin does a good job at exporting all geometries including textures / materials. There are some negative comments that show a lack of exploration and knowledge of the difference between Revit and Sketchup. Many of the issues mention can be easily remedied with additional SketchUp scripts: triangulated mesh output - use "CleanUp 3" Plugin By Thomas Thomassen. material layers - "layers_materials" by Didier Bur
i had big project and sketchup to twinmotion worked very well. But for lumion i had to export as .3ds from sketchup. Its very usefull thanks a lot for this plugin
This Plugin Keep the instances, and the triangulated faces could be cleaned By the "CleanUp 3" Plugin By Thomas Thomassen.
a lot of triangles. no layers. std dwg export work better
triangulated all flat surfaces of my model, and the units on the material exports were all over the place. really hard to work the model, its cleaner and less time consuming to bring a dwg. Not the perfect tool yet.
it works great in small file size.but i did not try it in large file. thanks for app.
Sketchup is unfortunately not built to handle the amount of triangles that Revit produces, so a plugin that wants to bridge this gap needs a ton of optimizations. Unfortunately, a lot of these seem to be missing right now: - there's a ton of triangulation. For example: simple square columns or windows come in triangulation. There needs to be an optimization script to minimize this. Where it's impossible to prevent (curves etc), the edges of the resulting triangles should be hidden. - There needs to be smart instancing. An identical chair should be the same group repeated x 100, not 100 unique groups - Grouping should happen per Revit obect. Now, if you have chair the groups are split up by material, making it very hard to move that chair - Support for decals and painted materials would be great as well
The eporter seems to group faces into components which caues the file to be extremely large and everything is on the same layer. I would elements by layer and make them components at the object level not the face level. I find the DWG exporter is faster and makes smaller files in skethcup.
Imported in sketchup, but triangulation and lots of lots of objects/ groups makes it cumbersome to work on. for viewing once a while may work. I suggest if control over import in groups/ layers is possible with triangulation removal
Hi, I like the idea of the plugin. The ability to export 3D geometry from Revit directly into SU is something I've wanted for ages to avoid the whole export to 3D dwg and then import thing. BUT. The plugin explodes everything (!!) making the resulting SU model a dog to work with. The more complex the Rvt model, the worse it is. Probably explains why the exporter is so slow as well perhaps? I contacted Kubity support who confirmed that the exploding was "normal". think it's needs some work folks.
I guess it doesn't work well with complex models. I left it for 24hrs and it was still not finished.
Exporting to sketchup triagulates flat geometry. Makes the resulting sketchup file almost unworkable unless those redundant geometry lines are deleted first. It is faster than the traditional way of exporting to DWG to SKP.
I am constantly encountering this error while trying to export the model
it's going fine so far export a simple geometry though am very annoyed when i open up my sketchup to see a kubity watermark on my view screen. any way to remove it?
Yeah this is very annoying indeed. There are no settings whatsoever for this plug in
Just open a new su project and import the ecported file instead of opening. Watermark gone.
Hi, thanks for the feedback. This issue will be fixed in an upcoming update, it will be released very soon. Thanks!
Did the update to remedy this issue happen yet? I'm having problems with the watermark too:/
Как сохранить вид Revit?
Revit — как сохранить 3D-вид
- Ориентируйте модель на вид, который вы хотите сохранить. Когда вас удовлетворит 3D-вид, щелкните правой кнопкой мыши куб вида, чтобы открыть контекстное меню:
- Выберите «Сохранить представление» и дайте своему представлению имя.
- Ваш недавно созданный 3D-вид теперь должен быть доступен в браузере проекта.
Method 1 – Revit Plugin: SimLab SKP Exporter
Plugin Details: Single ($99) or floating license ($299) available.
After installation, the plugin is available in the add-ins menu inside Revit.
Control
Detail level of the model is controlled by the setting in the 3D view (course, medium & fine). The model is always exported with textures, and can be changed to shaded, hidden line or wireframe using the view styles in SketchUp. Additional alterations made to textures, such as transparency, stain or tint are not carried over, as these features are not built-in to SketchUp. Model location is also not transferred in the export. The SketchUp file is saved as version 8, to retain maximum compatibility.
Left: Model in Revit, Right: Model in SketchUp, using SimLab SKP Exporter
Как экспортировать модель Revit?
Экспорт модели Revit в файл STL
- Выберите вкладку «Надстройка» панель «STL Exporter» («STL Exporter for Revit»).
- На вкладке «Общие» укажите параметры файла STL.
- На вкладке «Категории» укажите, какие категории элементов будут экспортироваться в файл STL.
- Нажмите «Сохранить», чтобы создать файл STL, или нажмите «Отмена», чтобы закрыть программу экспорта STL.
Как экспортировать 3D-модель в Revit?
Как поделиться файлом Revit?
Включить совместную работу
- Откройте файл проекта (RVT) для использования в качестве модели из хранилища.
- Выберите вкладку «Совместная работа» панель «Управление совместной работой» («Рабочие наборы»). …
- При желании переименуйте рабочие наборы.
- В диалоговом окне «Совместная работа» нажмите «ОК». …
- В диалоговом окне «Рабочие наборы» нажмите «ОК». …
- Щелкните Сохранить как (проект).
Подходит ли Revit для дизайна интерьера?
Revit — отличный инструмент для профессиональных дизайнеров интерьера. Это то, что большинство дизайнеров интерьеров в архитектурных и интерьерных фирмах используют для строительных чертежей. … Если вы хотите работать над большими или сложными проектами и/или в большинстве фирм, вам следует работать в Revit.
Как скопировать сцены из одного файла SketchUp в другой?
Вы можете использовать расширение Advanced Camera Tools для создания объектов камеры из ваших представлений, а затем копировать и вставлять их в другие модели. Для быстрого копирования вида камеры на другие модели также есть этот полезный плагин.
Можно ли преобразовать Revit в AutoCAD?
Если вам нужно преобразовать 3D-модель Revit в 3D AutoCAD, вот вам. Это очень просто, но не забудьте нажать одну кнопку, чтобы убедиться, что вы работаете с твердыми телами ACAD… Открыв модель Revit, щелкните меню приложения («Большой R»)> «Экспорт»> «Форматы CAD»> выберите «DWG».
Trial Description
Convert your first project FREE (with watermark).
Method 2 – Export to DWG
Details: Uses Revit’s built-in DWG export feature.
Step 1
From the file menu, go to export > options > exports setups dwg/dxf.
Click on the solids tab, and select ACIS solids.
Step 3
Hit OK, and return to the export menu > CAD formats > DWG. Make sure you are in the 3D orthographic view when you export the model.
Step 4
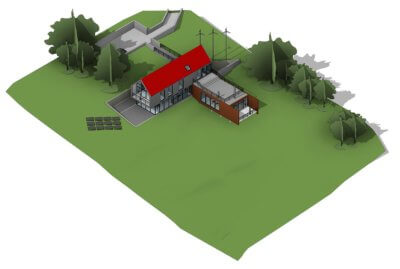
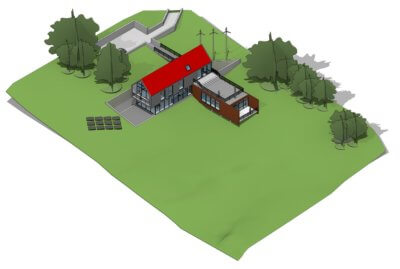
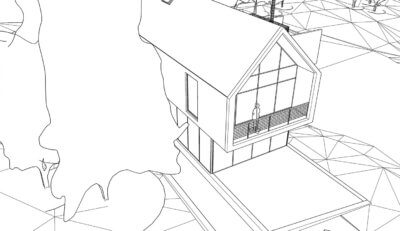
Import the model into SketchUp Pro. Here is what the Revit 2019 example house looks like after the import.
Left: Raw geometry imported into SketchUp, Right: Geometry after the topography has been smoothed.
Tip: In most cases, all geometry should reside on layer 0 (read SketchUp Layers: Part One – The Sacred Layer0 to find out why). Use the Geometry to Layer0 command in the CleanUp 3 plugin for SketchUp to automate this task.
Можно ли анимировать объекты в SketchUp?
Первые шаги. Редактор клипов: это основной инструмент, с помощью которого вы можете добавлять и редактировать анимацию объектов, настраивать сцены с камеры и упорядочивать анимацию в желаемой последовательности. Проигрыватель клипов: показывает предварительный просмотр вашей полной анимации в SketchUp.
Можно ли экспортировать сцены в SketchUp?
Screenshots and Videos

Что лучше SketchUp или Revit?
Revit и Sketchup: различия
В целом Revit нацелен на более сложные проекты целых инфраструктур. Sketchup тоже справился бы с таким проектом, но он гораздо лучше подходит для дизайна интерьера благодаря инструментам 3D-визуализации. Sketchup достаточно прост в освоении, и вы можете начать изучать его с помощью наших руководств.
Можно ли экспортировать модель Revit в SketchUp?
В этом руководстве показано, как экспортировать файл Revit в SketchUp. Существует два способа передачи модели. Первый — с помощью подключаемого модуля, а второй — путем экспорта в файл DWG с последующим импортом в SketchUp. … Совет. Для экспорта любым из этих методов вы должны находиться в 3D-виде.
Как экспортировать 3D-модель из Revit в SketchUp?
Подробности: использует встроенную в Revit функцию экспорта в DWG.
- В меню «Файл» выберите «Экспорт» > «Параметры» > «Экспорт настроек dwg/dxf». Нажмите на вкладку твердых тел и выберите тела ACIS.
- Нажмите OK и вернитесь в меню экспорта > Форматы САПР > DWG. …
- Импортируйте модель в SketchUp Pro.
Как поделиться моделью Revit?
На панели eTransmit вкладки Надстройки щелкните Передать модель. Выберите модели для передачи. Нажмите «Обзор модели» и перейдите к местоположению модели Revit, которую необходимо передать. Нажмите «Обзор папок» и перейдите к папке, содержащей модели Revit, которые вы хотите передать.
Revit проще, чем AutoCAD?
Управлять изменениями в Revit намного проще, так как одно изменение сразу отражается на всех существующих видах; в AutoCAD изменения часто вынуждают все группы обновлять свою работу вручную. Revit также является очень мощным инструментом для расчета списков материалов или подготовки проектных предложений.
Как экспортировать выборку в Revit?
Экспорт одного или нескольких видов и листов в формат DWG или DXF.
- Выберите вкладку «Файл» «Экспорт в форматы САПР (DWG) или (DXF)».
- В диалоговом окне «Экспорт в DWG (или DXF)» в поле «Выбрать настройку экспорта» выберите требуемую настройку. …
- Выберите виды и листы для экспорта. …
- Если вы готовы к экспорту, нажмите «Далее».
Используют ли архитекторы SketchUp?
SketchUp — это интеллектуальный инструмент для проектов 3D-моделирования в области дизайна интерьера, архитектурного дизайна и ландшафтного дизайна.

Export your Autodesk® Revit® file to a SketchUp file in one simple step.
Rvt2skp conserves geometry, materials, textures, and linked models of the 3D model.
Supports Revit 2015, 2016, 2017, 2018, 2019, 2020 and 2021, including Autodesk® Revit® Architecture, Autodesk® Revit® Structure, and Autodesk® Revit® MEP.
Method 1 – Revit Plugin: SKP2RVT Plugin
Plugin Details: Single ($99 / year) available.
After installation, the plugin is available in the add-ins menu inside Revit.
Control
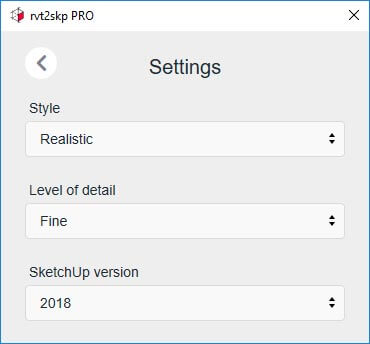
Visual style, detail level and SketchUp file version is controlled by the exporter settings menu. Model appearance and geometry is identical to the previously mentioned plugin, while location and sun settings are preserved.
Можно ли открывать файлы Revit в AutoCAD?
Нет, это невозможно напрямую. Вам нужно будет экспортировать файл rvt в dwg.
About This Version
Plugin Vs. DWG Comparison
As mentioned above, there is a trade off between materials and editability when deciding on which method to use. The geometry exported using the two plugins above is triangulated, and faces that share a common edge in Revit result in two edges that are very close together in SketchUp. A box that normally has 6 faces and 12 edges will have 12 faces and 30 edges. This causes a large increase in the number of edges and faces, and geometry cannot be pushed and pulled, as neighboring faces are not joined. A downside to the DWG export is that subregions in topography are not separated from each other, which makes applying materials time consuming. If the topo surface is left white, all of the lines that form the surface, including the subregions, are hidden, which means that any roads, sidewalks or other areas will not be visible in SketchUp. To create an ideal model with readable topography and editable buildings, export any toposurfaces out using the plugins above, while using the DWG export method for any buildings that should remain editable. Statistics for two case study files are presented below.
Model Statistics for the Revit 2019 Example House
| Export Method | Detail Level | Edges | % Change | Faces | % Change | File Size (MB) | % Change | Layers | Materials |
|---|---|---|---|---|---|---|---|---|---|
| DWG Export | Course | 301,669 | 150,948 | 17.1 | 31 | 1 | |||
| DWG Export | Fine | 328,297 | 9% | 162,825 | 8% | 18.1 | 6% | 30 | 1 |
| Plugin Export | Course | 441,948 | 47% | 216,857 | 44% | 37.2 | 118% | 1 | 63 |
| Plugin Export | Fine | 520,267 | 73% | 242,700 | 61% | 33.3 | 33% | 1 | 65 |
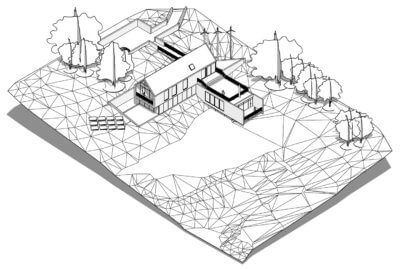
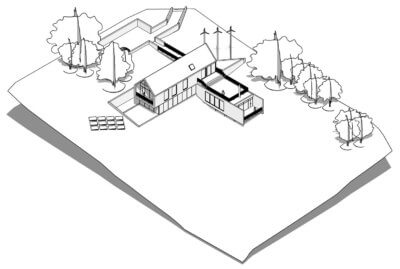
The image to the left shows edges and faces of the exported DWG file in SketchUp, while the right image is the file generated from the plugins.
Model Statistics for a 195 Acre Campus with Buildings
Note: Course and fine detail level produced the same results, as only topography and generic models were exported.
В этом руководстве показано, как экспортировать файл Revit в SketchUp. Существует два способа передачи модели. Первый — с помощью подключаемого модуля, а второй — путем экспорта в файл DWG с последующим импортом в SketchUp. … Совет. Для экспорта любым из этих методов вы должны находиться в 3D-виде.
Revit проще, чем AutoCAD?
Управлять изменениями в Revit намного проще, так как одно изменение сразу отражается на всех существующих видах; в AutoCAD изменения часто вынуждают все группы обновлять свою работу вручную. Revit также является очень мощным инструментом для расчета списков материалов или подготовки проектных предложений.
ArchiCAD проще, чем Revit?
ArchiCAD, безусловно, лучший инструмент для архитектурного проектирования. Revit имеет гораздо больше возможностей для проектирования зданий, но, откровенно говоря, как инструмент проектирования он довольно дерьмовый. Оба хороши в автоматизации производства документов, но ArchiCAD намного проще и сложнее по своим возможностям в этом отношении.
This tutorial will show you how to export a Revit file to SketchUp. There are two methods for transferring a model. The first is by using a plugin, and the second is by exporting to a DWG file, then importing into SketchUp. Both methods have their pros and cons. Using the plugin, the model retains it’s original materials, but editability is sacrificed. Exporting to DWG retains maximum editability while no materials are preserved. Two case studies are used to demonstrate the capability of both methods, and a comparison of geometry complexity and file size are included at the end of this tutorial.
Time Required: 5 Minutes
Difficulty: Easy
Tip: You must be in a 3D view to export with either method. If there are model components (topo contours) or overlays (DWG files) that you don’t want in the SketchUp file, turn them off before exporting. The section box should be used to exclude any part of the building or topography that you don’t want.
Что лучше Revit или SketchUp?
Revit и Sketchup: различия
В целом Revit нацелен на более сложные проекты целых инфраструктур. Sketchup тоже справился бы с таким проектом, но он гораздо лучше подходит для дизайна интерьера благодаря инструментам 3D-визуализации. Sketchup достаточно прост в освоении, и вы можете начать изучать его с помощью наших руководств.
Как экспортировать 3D-модель из Revit в AutoCAD?
- Откройте 3D-вид проекта для экспорта.
- Выберите вкладку «Файл» «Экспорт форматов САПР (файлы DWG)».
- В диалоговом окне «Экспорт DWG» нажмите («Изменить параметры экспорта»).
- На вкладке «Тела» диалогового окна «Изменить параметры экспорта DWG/DXF» выберите «Экспортировать как объекты AutoCAD Architecture и AutoCAD MEP». …
- Для предпочтения: …
- Нажмите "Далее.
Можно ли экспортировать Revit в AutoCAD?
Экспортируйте виды из модели Revit в формат *. чертеж Вставьте экспортированные файлы DWG (из Revit) в новый чертеж, созданный с использованием пользовательского шаблона AutoCAD. (Это перенесет экспортированную геометрию в ваш шаблон).
Читайте также: