
Ардуино леонардо подключение к компьютеру
The Arduino Leonardo, Leonardo ETH and Micro boards use an ATmega32U4 to offer you more functionalities compared to Uno.
The Leonardo, Leonardo ETH and Micro are programmed using the Arduino Software (IDE), our Integrated Development Environment common to all our boards and running both online and offline. For more information on how to get started with the Arduino Software visit the Getting Started page.
Подключение и настройка
Для работы с платой Arduino Leonardo ETH в операционной системе Windows скачайте и установите на компьютер интегрированную среду разработки Arduino — Arduino IDE.
Плата Arduino Leonardo ETH выпускается компанией Arduino SRL. Поэтому для её подключения по USB подойдёт только Arduino IDE от Arduino SRL.
Порты ввода/вывода
Цифровые входы/выходы: пины 0 – 13
Логический уровень единицы — 5 В, нуля — 0 В. Максимальный ток выхода — 40 мА. К контактам подключены подтягивающие резисторы, которые по умолчанию выключены, но могут быть включены программно.
АЦП: пины A0 – A5 , A6 – A11 (на цифровых пинах 4, 6, 8, 9, 10 и 12).
В Arduino Leonardo есть 12 аналоговых входов, каждый из которых может представить напряжение в виде 10-битного кода (1024 значений). Разрядность АЦП — 10 бит.
TWI/I²C: пины SDA и SCL
Для общения с периферией по синхронному протоколу, через 2 провода с использованием библиотеки Wire .
SPI: пины разъёма ICSP
Выводы позволяют осуществлять связь по интерфейсу SPI. Обратите внимание, что линии SPI выведены только на разъём ICSP и не соединены с выводами платы, как на Arduino Uno. Те SPI-платы расширения, у которых нет 6-контактного разъёма ICSP для подсоединения к Leonardo — работать не будут.
UART: пины 0(RX) и 1(TX)
Используется для коммутации платы Arduino с другими устройствами через класс Serial1 . Для связи Arduino Leonardo с компьютером через порт micro-USB, используйте класс Serial
Что-то пошло не так?
Use your Leonardo, Leonardo ETH and Micro on the Arduino Desktop IDE
If you want to program your Leonardo, Leonardo ETH and Micro while offline you need to install the Arduino Desktop IDE.
Installing drivers for Leonardo, Leonardo ETH and Micro
Drivers should be automatically installed plugging with an USB cable the board to your PC, but with some version of the Windows operative system (like Windows 7, Vista and 10) it can happen that your board won't be recognized and you will get the message Unknown USB device. It is so necessary to manually install them following the guide Manually install Drivers on Windows.
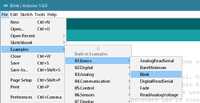
Open the Blink example
Now that you've set up your online IDE let's make sure your computer can talk to the board, it's time to make sure you can upload a program. To do that let's open the LED blink example sketch: File > Examples > 1.Basics > Blink.

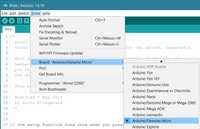
Select your board
You'll need to select your board in the Tools > Board menu:
Arduino Leonardo ETH
according to the board you have.
Select your serial port
Select the serial device of the board from the Tools > Serial Port menu.

Upload and Run your first Sketch
Click the Upload button in the upper left to load and run the sketch on your board:

After the compilation and upload process, you should see the message Done Uploading and the built-in LED of the board should start blinking.
Разъём внешнего питания
Разъём для подключения внешнего питания от 7 В до 12 В.
Светодиодная индикация
| Имя светодиода | Назначение |
|---|---|
| RX и TX | Мигают при обмене данными между Arduino Leonardo и ПК. |
| L | Светодиод выводу 13 . При отправке значения HIGH светодиод включается, при отправке LOW – выключается. |
| ON | Индикатор питания Arduino Leonardo. |
Порты ввода/вывода
Цифровые входы/выходы: пины 0 – 13
Логический уровень единицы 5 В, нуля — 0 В. Максимальный ток выхода 40 мА. К контактам подключены подтягивающие резисторы, которые по умолчанию выключены, но могут быть включены программно.
АЦП: пины A0 – A5 , A6 – A11 (на цифровых пинах 4, 6, 8, 9, 10 и 12).
В Arduino Uno есть 12 аналоговых входов, каждый из которых может представить аналоговое напряжение в виде 10-битного числа (1024 значений). Разрядность АЦП — 10 бит.
TWI/I²C: пины SDA и SCL
Для общения с периферией по синхронному протоколу по 2 проводам с использованием библиотеки Wire .
SPI: пины разъема ICSP
Данные выводы позволяют осуществлять связь по интерфейсу SPI. Обратите внимание, что линии SPI выведены только на разъем ICSP и не соединены с выводами платы, как на Arduino Uno. SPI-платы расширения без шестиконтактного разъема ICSP для соединения с Leonardo — работать не будут.
UART: пины 0(RX) и 1(TX)
Используется для коммутации платы Arduino с другими устройствами через класс Serial1 . Для связи Arduino Leonardo с компьютером через порт micro-USB, используйте класс Serial .
Please read.
Good Coding Practice With the Leonardo, Leonardo ETH and Micro
A word of caution on using the USB Mouse and Keyboard Libraries: if the Mouse or Keyboard library is constantly running, it will be difficult to program your board. Functions such as Mouse.move() and Keyboard.print() will move your cursor or send keystrokes to a connected computer and should only be called when you are ready to handle them. It is recommended to use a control system to turn this functionality on, like a physical switch or only responding to specific input you can control. When using the Mouse or Keyboard library, it may be best to test your output first using Serial.print(). This way, you can be sure you know what values are being reported. Refer to the Mouse and Keyboard examples for some ways to handle this.
Using the serial monitor effectively: Since serial is going through only one processor, the board is capable of filling your computer's serial buffer faster than the Uno or earlier boards. You may notice that if you send serial continually, for example like this:
the Serial Monitor in the IDE slows down considerably as it tries to keep up. If you encounter this, add a short delay to your loop so that the computer's serial buffer is not filled as fast. Even a millisecond delay will help:
Serial applications using native libraries other than RXTX library read the serial buffer faster, so you may not encounter this error much outside of the Serial Monitor, Processing, or other RXTX-based serial applications.
Differences from the Arduino Uno
In general, you program and use the Leonardo, Leonardo ETH and Micro as you would other Arduino boards. There are, however, a few important differences.
Single processor for sketches and USB communication
The Leonardo, Leonardo ETH and Micro differ from other Arduino boards in that they use a single microcontroller to both run your sketches and for USB communication with the computer. The Uno and other boards use separate microcontrollers for these two functions, meaning that the USB connection to the computer remains established regardless of the state of the main microcontroller. By combining these two functions onto a single processor, the Leonardo allows for more flexibility in its communication with the computer. It also helps to lower the cost of the board by removing the need for an additional processor.
Serial re-enumeration on reset. Since the boards do not have a dedicated chip to handle serial communication, it means that the serial port is virtual -- it's a software routine, both on your operating system, and on the board itself. Just as your computer creates an instance of the serial port driver when you plug in any Arduino, the Leonardo/Micro creates a serial instance whenever it runs its bootloader. The board is an instance of USB's Connected Device Class (CDC) driver.
This means that every time you reset the board, the USB serial connection will be broken and re-established. The board will disappear from the list of serial ports, and the list will re-enumerate. Any program that has an open serial connection to the Leonardo will lose its connection. This is in contrast to the Arduino Uno, with which you can reset the main processor (the ATmega328P) without closing the USB connection (which is maintained by the secondary ATmega8U2 or ATmega16U2 processor). This difference has implications for driver installation, uploading, and communication; these are discussed below.
No reset when you open the serial port. Unlike the Arduino Uno, the Leonardo and Micro won't restart your sketch when you open a serial port on the computer. That means you won't see serial data that's already been sent to the computer by the board, including, for example, most data sent in the setup() function.
This change means that if you're using any Serial print(), println() or write() statements in your setup, they won't show up when you open the serial monitor. To work around this, you can check to see if the serial port is open after calling Serial.begin() like so:
Keyboard and mouse emulation. One advantage of using a single chip for your sketches and for USB is increased flexibility in the communication with the computer. While the board appears as a virtual serial port to your operating system (also called CDC) for programming and communication (as with the Arduino Uno), it can also behave as a (HID) keyboard or mouse. See the "Good Coding Practice" section below for a warning about using this functionality.
Separation of USB and serial communication. On the Leonardo, Leonardo ETH and Micro, the main Serial class refers to the virtual serial driver on the board for connection to your computer over USB. It's not connected to the physical pins 0 and 1 as it is on the Uno and earlier boards. To use the hardware serial port (pins 0 and 1, RX and TX), use Serial1. (See the Serial reference pages for more information.)
Differences in pin capabilities. The Leonardo, Leonardo ETH and Micro has some slight differences in the capabilities and assignments of various pins (especially for SPI and TWI). These are detailed on the hardware page.
Uploading Code to the Leonardo, Leonardo ETH and Micro
In general, you upload code to the Leonardo or Micro as you would with the Uno or other Arduino boards. Click the upload button in the Arduino IDE and your sketch will be automatically uploaded onto the board and then started. This works more or less the same way as with the Uno: the Arduino software initiates a reset of the board, launching the bootloader - which is responsible for receiving, storing, and starting the new sketch.
However, because the serial port is virtual, it disappears when the board resets, the Arduino software uses a different strategy for timing the upload than with the Uno and other boards. In particular, after initiating the auto-reset of the Leonardo, Leonardo ETH or Micro (using the serial port selected in the Tools > Serial Port menu), the Arduino software waits for a new virtual (CDC) serial / COM port to appear - one that it assumes represents the bootloader. It then performs the upload on this newly-appeared port.
These differences affect the way you use the physical reset button to perform an upload if the auto-reset isn't working. Press and hold the reset button on the Leonardo or Micro, then hit the upload button in the Arduino software. Only release the reset button after you see the message "Uploading. " appear in the software's status bar. When you do so, the bootloader will start, creating a new virtual (CDC) serial port on the computer. The software will see that port appear and perform the upload using it. Again, this is only necessary if the normal upload process (i.e. just pressing the uploading button) doesn't work. (Note that the auto-reset is initiated when the computer opens the serial port at 1200 baud and then closes it; this won't work if something interferes with the board's USB communication - e.g. disabling interrupts.)
The text of the Arduino getting started guide is licensed under a Creative Commons Attribution-ShareAlike 3.0 License. Code samples in the guide are released into the public domain.
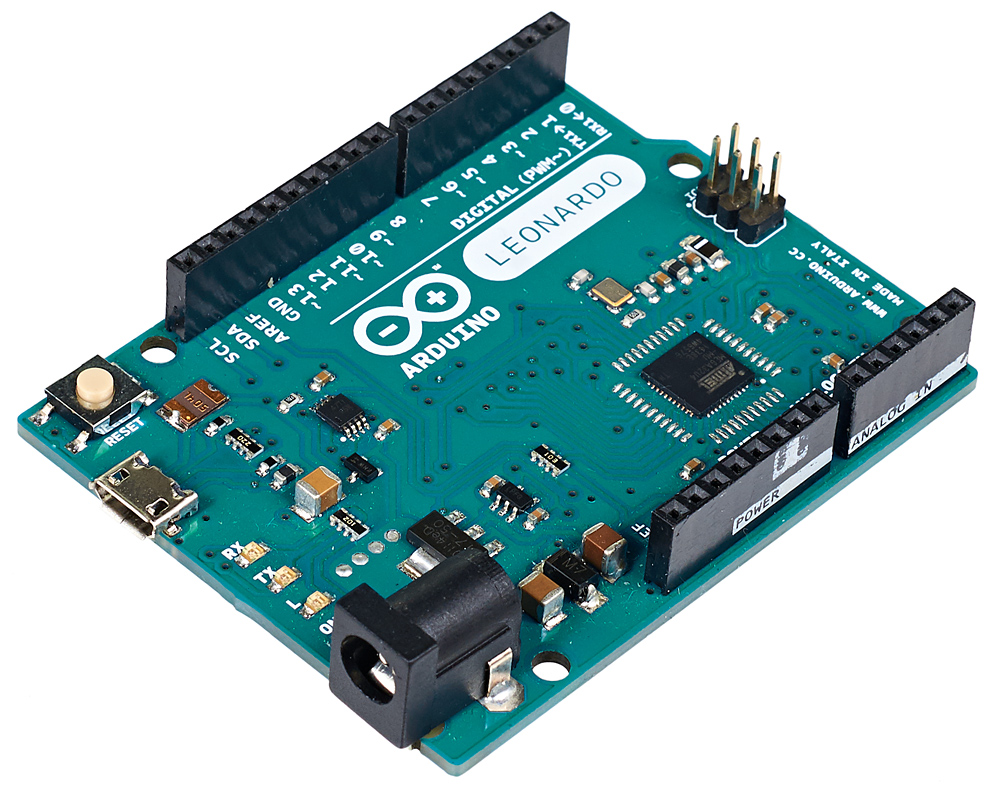
Arduino Leonardo — платформа для разработки на базе микроконтроллера ATmega32U4. На плате предусмотрены: 20 цифровых входов/выходов (7 из них могут работать в качестве ШИМ-выходов, 12 — в качестве аналоговых входов), кварцевый резонатор на 16 МГц, разъём микро-USB, разъём питания, разъём для внутрисхемного программирования ICSP (In-Circuit Serial Programming) и кнопка сброса.
Отличие Arduino Leonardo от других плат в том, что его USB-контроллер встроен непосредственно в микроконтроллер ATmega32U4, исключая необходимость в дополнительном процессоре. При подключении к компьютеру Leonardo определяется HID устройство (вроде клавиатуры или мыши) — сделать на основе Arduino Leonardo новый компьютерный эмулятор значительно проще, чем с другими платами.
Светодиодная индикация
| Имя светодиода | Назначение |
|---|---|
| RX и TX | Мигают при обмене данными между Arduino Leonardo и ПК. |
| L | Светодиод выводу 13 . При отправке значения HIGH светодиод включается, при отправке LOW – выключается. |
| ON | Индикатор питания Arduino Leonardo. |
Пины питания
VIN: Напряжение от внешнего источника питания (не связано с 5 В от USB или другим стабилизированным напряжением). Через этот вывод можно как подавать внешнее питание, так и потреблять ток, когда устройство запитано от внешнего адаптера.
5V: На вывод поступает напряжение 5 В от стабилизатора платы. Стабилизатор обеспечивает питание микроконтроллера ATmega32U4. Питать устройство через вывод 5V не рекомендуется — в этом случае не используется стабилизатор напряжения, что может привести к выходу платы из строя.
IOREF: Этот вывод предоставляет платам расширения информацию о рабочем напряжении микроконтроллера. В зависимости от напряжения, плата расширения может переключиться на соответствующий источник питания либо задействовать преобразователи уровней, что позволит ей работать как с 5 В, так и с 3,3 В устройствами.
Элементы платы

Что-то пошло не так?
ICSP-разъём
ICSP-разъем предназначен для внутрисхемного программирования микроконтроллера ATmega32U4. Также с применением библиотеки SPI данные выводы могут осуществлять связь по интерфейсу SPI. Обратите внимание линии SPI не продублированы на цифровых контактах, как например на Arduino Uno. Это означает, что если плата расширения использует SPI и не имеет снизу ICSP-разъёма ответного к этим штырькам на Arduino, она работать не будет.
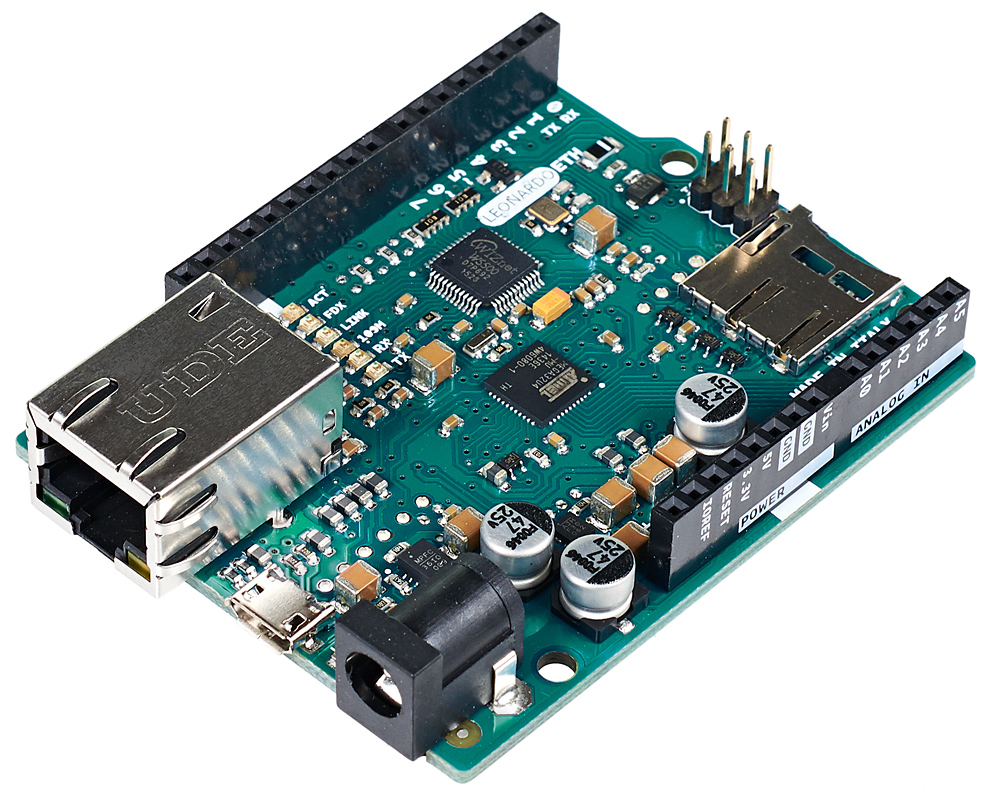
Arduino Leonardo ETH — это совмещённые на одной плате Arduino Leonardo и Ethernet Shield 2. Основной микроконтроллер платформы — ATmega32U4, чип для работы с Ethernet — Wiznet W5500.
Arduino Ethernet ETH отличается от других плат Arduino наличием microSD-кардридера и Ethernet-контроллера Wiznet.
На плате предусмотрено всё необходимое для начала работы: 20 цифровых входов/выходов (7 из которых могут работать в качестве ШИМ-выходов, 12 — в качестве аналоговых входов), кварцевый резонатор на 16 МГц, разъём для microSD, разъём Ethernet, разъём микро-USB, разъём питания, разъём для внутрисхемного программирования ICSP (In-Circuit Serial Programming) и кнопка сброса.
Разъём micro-USB
Разъём micro-USB предназначен для прошивки платформы Arduino Leonardo с помощью компьютера.
Порты ввода/вывода
Цифровые входы/выходы: пины 0 – 13
Логический уровень единицы — 5 В, нуля — 0 В. Максимальный ток выхода — 40 мА. К контактам подключены подтягивающие резисторы, которые по умолчанию выключены, но могут быть включены программно.
АЦП: пины A0 – A5 , A6 – A11 (на цифровых пинах 4, 6, 8, 9, 10 и 12).
В Arduino Leonardo есть 12 аналоговых входов, каждый из которых может представить напряжение в виде 10-битного кода (1024 значений). Разрядность АЦП — 10 бит.
TWI/I²C: пины SDA и SCL
Для общения с периферией по синхронному протоколу, через 2 провода с использованием библиотеки Wire .
SPI: пины разъёма ICSP
Выводы позволяют осуществлять связь по интерфейсу SPI. Обратите внимание, что линии SPI выведены только на разъём ICSP и не соединены с выводами платы, как на Arduino Uno. Те SPI-платы расширения, у которых нет 6-контактного разъёма ICSP для подсоединения к Leonardo — работать не будут.
UART: пины 0(RX) и 1(TX)
Используется для коммутации платы Arduino с другими устройствами через класс Serial1 . Для связи Arduino Leonardo с компьютером через порт micro-USB, используйте класс Serial
Разъём micro-USB
Разъём micro-USB предназначен для прошивки платформы Arduino Leonardo с помощью компьютера.
Чип W5500
W5500 — это функционально законченный чип встраиваемого Ethernet-контроллера для обеспечения проводного соединения TCP/IP. Аппаратный стек TCP/IP поддерживает TCP, UDP, IPv4, ICMP, ARP, IGMP, PPPoE. Связан с линией SPI и 10 пином на микроконтроллере ATmega32U4.
Use your Leonardo, Leonardo ETH and Micro on the Arduino Web IDE
All Arduino boards, including this one, work out-of-the-box on the Arduino Web Editor, you only need to install Arduino Create Agent to get started.
The Arduino Web Editor is hosted online, therefore it will always be up-to-date with the latest features and support for all boards. Follow this simple guide to start coding on the browser and upload your sketches onto your board.
Use your Leonardo, Leonardo ETH and Micro on the Arduino Desktop IDE
If you want to program your Leonardo, Leonardo ETH and Micro while offline you need to install the Arduino Desktop IDE.
Installing drivers for Leonardo, Leonardo ETH and Micro
Drivers should be automatically installed plugging with an USB cable the board to your PC, but with some version of the Windows operative system (like Windows 7, Vista and 10) it can happen that your board won't be recognized and you will get the message Unknown USB device. It is so necessary to manually install them following the guide Manually install Drivers on Windows.
Open the Blink example
Now that you've set up your online IDE let's make sure your computer can talk to the board, it's time to make sure you can upload a program. To do that let's open the LED blink example sketch: File > Examples > 1.Basics > Blink.
Select your board
You'll need to select your board in the Tools > Board menu:
Arduino Leonardo ETH
according to the board you have.

Select your serial port
Select the serial device of the board from the Tools > Serial Port menu.

Upload and Run your first Sketch
Click the Upload button in the upper left to load and run the sketch on your board:

After the compilation and upload process, you should see the message Done Uploading and the built-in LED of the board should start blinking.
Подключение и настройка
Для работы с платой Arduino Leonardo в операционной системе Windows скачайте и установите на компьютер интегрированную среду разработки Arduino IDE.
Микроконтроллер ATmega32U4
Разъём для внешнего питания
Разъём для подключения внешнего питания от 7 В до 12 В.
ICSP-разъём
ICSP-разъем предназначен для внутрисхемного программирования микроконтроллера ATmega32U4. Также с применением библиотеки SPI данные выводы могут осуществлять связь по интерфейсу SPI. Обратите внимание линии SPI не продублированы на цифровых контактах, как например на Arduino Uno. Это означает, что если плата расширения использует SPI и не имеет снизу ICSP-разъёма ответного к этим штырькам на Arduino, она работать не будет.
Arduino Leonardo — платформа для разработки на базе микроконтроллера ATmega32U4. На плате предусмотрены: 20 цифровых входов/выходов (7 из них могут работать в качестве ШИМ-выходов, 12 — в качестве аналоговых входов), кварцевый резонатор на 16 МГц, разъём микро-USB, разъём питания, разъём для внутрисхемного программирования ICSP (In-Circuit Serial Programming) и кнопка сброса.
Отличие Arduino Leonardo от других плат в том, что его USB-контроллер встроен непосредственно в микроконтроллер ATmega32U4, исключая необходимость в дополнительном процессоре. При подключении к компьютеру Leonardo определяется HID устройство (вроде клавиатуры или мыши) — сделать на основе Arduino Leonardo новый компьютерный эмулятор значительно проще, чем с другими платами.
Пины питания
VIN: Напряжение от внешнего источника питания (не связано с 5 В от USB или другим стабилизированным напряжением). Через этот вывод можно как подавать внешнее питание, так и потреблять ток, когда устройство запитано от внешнего адаптера.
5V: На вывод поступает напряжение 5 В от стабилизатора платы. Стабилизатор обеспечивает питание микроконтроллера ATmega32U4. Питать устройство через вывод 5V не рекомендуется — в этом случае не используется стабилизатор напряжения, что может привести к выходу платы из строя.
IOREF: Этот вывод предоставляет платам расширения информацию о рабочем напряжении микроконтроллера. В зависимости от напряжения, плата расширения может переключиться на соответствующий источник питания либо задействовать преобразователи уровней, что позволит ей работать как с 5 В, так и с 3,3 В устройствами.
Что-то пошло не так?
Элементы платы

Tutorials
Now that you have set up and programmed your Leonardo, Leonardo ETH or Micro board, you may find inspiration in our Project Hub tutorial platform.
More examples on the following library pages will help you in making very cool things!
Keyboard - Send keystrokes to an attached computer.
Mouse - Control cursor movement on a connected computer.
Ethernet for connecting to the internet using the Arduino Ethernet Shield, Arduino Ethernet Shield 2 and Arduino Leonardo ETH
Разъём для внешнего питания
Разъём для подключения внешнего питания от 7 В до 12 В.
Please read.
Good Coding Practice With the Leonardo, Leonardo ETH and Micro
A word of caution on using the USB Mouse and Keyboard Libraries: if the Mouse or Keyboard library is constantly running, it will be difficult to program your board. Functions such as Mouse.move() and Keyboard.print() will move your cursor or send keystrokes to a connected computer and should only be called when you are ready to handle them. It is recommended to use a control system to turn this functionality on, like a physical switch or only responding to specific input you can control. When using the Mouse or Keyboard library, it may be best to test your output first using Serial.print(). This way, you can be sure you know what values are being reported. Refer to the Mouse and Keyboard examples for some ways to handle this.
Using the serial monitor effectively: Since serial is going through only one processor, the board is capable of filling your computer's serial buffer faster than the Uno or earlier boards. You may notice that if you send serial continually, for example like this:
the Serial Monitor in the IDE slows down considerably as it tries to keep up. If you encounter this, add a short delay to your loop so that the computer's serial buffer is not filled as fast. Even a millisecond delay will help:
Serial applications using native libraries other than RXTX library read the serial buffer faster, so you may not encounter this error much outside of the Serial Monitor, Processing, or other RXTX-based serial applications.
Differences from the Arduino Uno
In general, you program and use the Leonardo, Leonardo ETH and Micro as you would other Arduino boards. There are, however, a few important differences.
Single processor for sketches and USB communication
The Leonardo, Leonardo ETH and Micro differ from other Arduino boards in that they use a single microcontroller to both run your sketches and for USB communication with the computer. The Uno and other boards use separate microcontrollers for these two functions, meaning that the USB connection to the computer remains established regardless of the state of the main microcontroller. By combining these two functions onto a single processor, the Leonardo allows for more flexibility in its communication with the computer. It also helps to lower the cost of the board by removing the need for an additional processor.
Serial re-enumeration on reset. Since the boards do not have a dedicated chip to handle serial communication, it means that the serial port is virtual -- it's a software routine, both on your operating system, and on the board itself. Just as your computer creates an instance of the serial port driver when you plug in any Arduino, the Leonardo/Micro creates a serial instance whenever it runs its bootloader. The board is an instance of USB's Connected Device Class (CDC) driver.
This means that every time you reset the board, the USB serial connection will be broken and re-established. The board will disappear from the list of serial ports, and the list will re-enumerate. Any program that has an open serial connection to the Leonardo will lose its connection. This is in contrast to the Arduino Uno, with which you can reset the main processor (the ATmega328P) without closing the USB connection (which is maintained by the secondary ATmega8U2 or ATmega16U2 processor). This difference has implications for driver installation, uploading, and communication; these are discussed below.
No reset when you open the serial port. Unlike the Arduino Uno, the Leonardo and Micro won't restart your sketch when you open a serial port on the computer. That means you won't see serial data that's already been sent to the computer by the board, including, for example, most data sent in the function.
This change means that if you're using any Serial print(), println() or write() statements in your setup, they won't show up when you open the serial monitor. To work around this, you can check to see if the serial port is open after calling like so:
Keyboard and mouse emulation. One advantage of using a single chip for your sketches and for USB is increased flexibility in the communication with the computer. While the board appears as a virtual serial port to your operating system (also called CDC) for programming and communication (as with the Arduino Uno), it can also behave as a (HID) keyboard or mouse. See the "Good Coding Practice" section below for a warning about using this functionality.
Separation of USB and serial communication. On the Leonardo, Leonardo ETH and Micro, the main Serial class refers to the virtual serial driver on the board for connection to your computer over USB. It's not connected to the physical pins 0 and 1 as it is on the Uno and earlier boards. To use the hardware serial port (pins 0 and 1, RX and TX), use Serial1. (See the Serial reference pages for more information.)
Differences in pin capabilities. The Leonardo, Leonardo ETH and Micro has some slight differences in the capabilities and assignments of various pins (especially for SPI and TWI). These are detailed on the hardware page.
Uploading Code to the Leonardo, Leonardo ETH and Micro
In general, you upload code to the Leonardo or Micro as you would with the Uno or other Arduino boards. Click the upload button in the Arduino IDE and your sketch will be automatically uploaded onto the board and then started. This works more or less the same way as with the Uno: the Arduino software initiates a reset of the board, launching the bootloader - which is responsible for receiving, storing, and starting the new sketch.
However, because the serial port is virtual, it disappears when the board resets, the Arduino software uses a different strategy for timing the upload than with the Uno and other boards. In particular, after initiating the auto-reset of the Leonardo, Leonardo ETH or Micro (using the serial port selected in the Tools > Serial Port menu), the Arduino software waits for a new virtual (CDC) serial / COM port to appear - one that it assumes represents the bootloader. It then performs the upload on this newly-appeared port.
These differences affect the way you use the physical reset button to perform an upload if the auto-reset isn't working. Press and hold the reset button on the Leonardo or Micro, then hit the upload button in the Arduino software. Only release the reset button after you see the message "Uploading. " appear in the software's status bar. When you do so, the bootloader will start, creating a new virtual (CDC) serial port on the computer. The software will see that port appear and perform the upload using it. Again, this is only necessary if the normal upload process (i.e. just pressing the uploading button) doesn't work. (Note that the auto-reset is initiated when the computer opens the serial port at 1200 baud and then closes it; this won't work if something interferes with the board's USB communication - e.g. disabling interrupts.)
The text of the Arduino getting started guide is licensed under a Creative Commons Attribution-ShareAlike 3.0 License. Code samples in the guide are released into the public domain.
The Arduino Leonardo, Leonardo ETH and Micro boards use an ATmega32U4 to offer you more functionalities compared to Uno.
The Leonardo, Leonardo ETH and Micro are programmed using the Arduino Software (IDE), our Integrated Development Environment common to all our boards and running both online and offline. For more information on how to get started with the Arduino Software visit the Getting Started page.
Микроконтроллер ATmega32U4
Слот карт microSD
Слот предназначен для подключения карт microSD. Карта памяти будет полезна для хранение файлов медиа-данных для раздачи по сети и длинных лог-файлов. Работу с microSD облегчает библиотека SD . При работе с библиотекой не забудьте, что линия SS соединена с выводом 4 .
Use your Leonardo, Leonardo ETH and Micro on the Arduino Web IDE
All Arduino boards, including this one, work out-of-the-box on the Arduino Web Editor, you only need to install Arduino Create Agent to get started.
The Arduino Web Editor is hosted online, therefore it will always be up-to-date with the latest features and support for all boards. Follow this simple guide to start coding on the browser and upload your sketches onto your board.
Разъём micro-USB
Разъём micro-USB предназначен для прошивки платформы Arduino Leonardo с помощью компьютера.
Use your Leonardo, Leonardo ETH and Micro on the Arduino Web IDE
All Arduino boards, including this one, work out-of-the-box on the Arduino Web Editor, you only need to install Arduino Create Agent to get started.
The Arduino Web Editor is hosted online, therefore it will always be up-to-date with the latest features and support for all boards. Follow this simple guide to start coding on the browser and upload your sketches onto your board.
ICSP-разъём
ICSP-разъем предназначен для внутрисхемного программирования микроконтроллера ATmega32U4. Также с применением библиотеки SPI данные выводы могут осуществлять связь по интерфейсу SPI. Обратите внимание линии SPI не продублированы на цифровых контактах, как это сделано на Arduino Uno. Это означает, что если плата расширения использует SPI и не имеет снизу ICSP-разъёма ответного к этим штырькам на Arduino, она работать не будет.
Ethernet-разъём
Arduino Leonardo ETH можно подключить к проводной сети через Ethernet-разъём RG-45. Для облегчения и скрытия всех тонкостей протокола реализована библиотека Ethernet2 .
Светодиодная индикация
| Имя светодиода | Назначение |
|---|---|
| RX и TX | Мигают при передаче данных между Arduino Leonardo ETH и USB компьютера. |
| L | Светодиод вывода 13 . При отправке значения HIGH светодиод включается, при отправке LOW – выключается. |
| ON | Горит при подключении питания к Arduino Leonardo ETH. |
Пины питания
На плате предусмотрены следующие пины питания:
VIN: Напряжение, поступающее в Arduino непосредственно от внешнего источника питания (не связано с 5 В от USB или другим стабилизированным напряжением). Через этот пин можно подавать внешнее питание и потреблять ток, когда устройство подключено к внешнему адаптеру.
5V: На вывод поступает напряжение 5 В от стабилизатора напряжения на плате, независимо от того, как запитано устройство — от адаптера (7–12 В), от USB (5 В) или через вывод VIN (7–12 В). Данный стабилизатор обеспечивает и питание микроконтроллера ATmega32U4. Подключать питание устройства через вывод 5V не рекомендуется — в этом случае не используется стабилизатор напряжения, что может привести к выходу платы из строя.
IOREF: Вывод предоставляет платам расширения информацию о рабочем напряжении микроконтроллера. В зависимости от напряжения на пине IOREF, плата переключается на соответствующий источник питания или задействует преобразователи уровней, что позволит ей работать как с 5 В, так и с 3,3 В устройствами.
Элементы платы
Tutorials
Now that you have set up and programmed your Leonardo, Leonardo ETH or Micro board, you may find inspiration in our Project Hub tutorial platform.
More examples on the following library pages will help you in making very cool things!
Keyboard - Send keystrokes to an attached computer.
Mouse - Control cursor movement on a connected computer.
Ethernet for connecting to the internet using the Arduino Ethernet Shield, Arduino Ethernet Shield 2 and Arduino Leonardo ETH
Микроконтроллер ATmega32U4
Подключение и настройка
Для работы с платой Arduino Leonardo в операционной системе Windows скачайте и установите на компьютер интегрированную среду разработки Arduino IDE.
Читайте также: