
Visual studio unity нет подсказок
В этом разделе рассмотрены решения по устранению проблем, типичных для набора средств Visual Studio для Unity, приведено описание известных проблем и показано, как улучшить функционирование набора средств Visual Studio для Unity с помощью отчетов об ошибках.
Устранение неполадок соединения между Unity и Visual Studio
Проверка Editor Attaching включена или Code Optimization On Startup имеет значение Debug
В меню Unity выберите Edit / Preferences .
В зависимости от используемой версии Unity:
- Убедитесь, что Code Optimization On Startup задано значение Debug .
- Или выберите вкладку External Tools . Убедитесь, что Editor Attaching флажок включен.
Не удается подключить
- Попробуйте временно отключить антивирусную программу или создать правила исключения для VS и Unity.
- Попробуйте временно отключить брандмауэр или создать правила, разрешающие сетевое взаимодействие между VS и Unity по протоколам TCP/UDP.
- Некоторые программы, например Team Viewer могут препятствовать обнаружению процессов. Попробуйте временно остановить все лишнее программное обеспечение, чтобы выяснить, повлияет ли это на что-либо.
- Не переименовывайте основной исполняемый файл Unity, так как VSTU отслеживают только процессы "Unity.exe".
Сбои Visual Studio
Эта проблема может быть вызвана повреждением кэша MEF в Visual Studio.
Попробуйте удалить следующую папку, чтобы сбросить кэш MEF (перед этим закройте Visual Studio):
Visual Studio не отвечает
Некоторые подключаемые модули Unity, такие как Parse, FMOD, UMP (Universal Media Player), ZFBrowser или Embedded Browser, используют собственные потоки. Эта проблема возникает, когда подключаемый модуль подключает собственный поток к среде выполнения, что блокирует вызовы ОС. Это означает, что Unity не может прервать этот поток для отладчика (или перезагрузки домена) и перестает отвечать на запросы.
Для FMOD существует обходной путь. Вы можете передать флаг инициализации FMOD_STUDIO_INIT_SYNCHRONOUS_UPDATE , чтобы отключить асинхронную обработку и выполнять всю обработку в основном потоке.
Если вы разрабатываете собственный подключаемый модуль, рекомендуется использовать асинхронные вызовы процедур (APC) и особенно SleepEx , , SignalObjectAndWait или MsgWaitForMultipleObjectsEx``WaitForMultipleObjectsEx``WaitForSingleObjectEx функции для правильного взаимодействия с Unity и Mono, когда отладчику необходимо приостановить потоки.
Несовместимый проект в Visual Studio
Очень важно знать, что Visual Studio сохраняет состояние "Несовместимо" в параметрах проекта и не будет пытаться перезагрузить проект, пока вы не будете явно использовать Reload Project . Поэтому после каждого шага устранения неполадок убедитесь, что вы попытаетесь повторно открыть решение и попытаетесь щелкнуть правой кнопкой мыши все несовместимые проекты и выбрать Reload Project .
Дополнительные перезагрузки или закрытие всех открытых окон в Visual Studio
Никогда не работайте с файлами проектов непосредственно из обработчика ресурсов или иного средства. Если вам действительно необходимо совершить операции с файлом проекта, мы предоставляем для этого интерфейс API. См. раздел Проблемы со ссылками на сборку.
В случае исключений не происходит останов отладчика
В новой среде выполнения Unity (эквивалентной версии .NET 4.6) появился новый способ управления пользовательскими исключениями. В результате все исключения считаются "обработанными пользователем", даже если они произошли вне блока try/catch. Поэтому их необходимо явным образом задавать в окне параметров исключений, если требуется останов отладчика.
В ОС Windows система Visual Studio предлагает скачать целевую платформу Unity
Проблемы со ссылкой на сборку или свойством проекта
В последних версиях Visual Studio и Unity лучше всего использовать пользовательский Directory.Build.props файл вместе с созданными проектами. После этого вы сможете внести свой вклад в структуру проекта, не вмешиваясь в процесс создания.
Точки останова с предупреждением
Если Visual Studio не удается найти исходное расположение для определенной точки останова, рядом с ней отображается предупреждение. Убедитесь, что используемый вами скрипт правильно загружен и используется в текущей сцене Unity.
Точки останова не срабатывают
Не удается выполнить отладку проигрывателей Android
Мы используем для обнаружения проигрывателей многоадресную рассылку (это стандартный механизм, применяемый в Unity), но затем применяется простое соединение TCP для подключения отладчика. Этап обнаружения — основная проблема для устройств Android.
Связь через Wi-Fi универсальна, однако она слишком медленная по сравнению с USB из-за задержки. Мы наблюдали отсутствие должной поддержки многоадресной рассылки у некоторых маршрутизаторов или устройств (этим известна серия Nexus).
Связь по USB обладает отличной скоростью для отладки. Инструменты Visual Studio для Unity теперь могут обнаруживать устройства USB и согласовывать с сервером ADB правильную переадресацию портов для отладки.
Проблемы с intelliSense или цветом кода
Попробуйте обновить Visual Studio до последней версии. Выполните те же действия по устранению неполадок, что и для несовместимых проектов.
Известные проблемы
При отладке Unity иногда аварийно завершает работу.
При отладке Unity иногда зависает.
Пошаговая отладка с заходом и выходом из методов иногда ведет себя некорректно, особенно в итераторах или внутри инструкций switch.
Отчеты об ошибках
Помогите нам улучшить качество набора средств Visual Studio для Unity: отправляйте нам отчеты об ошибках при аварийном выходе, зависании или в случае других ошибок. Эти сведения помогают нам определять причину и устранять проблемы в наборе средств Visual Studio для Unity. Спасибо!
Как сообщить об ошибке в случае зависания Visual Studio
Существуют отчеты о том, что иногда Visual Studio зависает при отладке с помощью набора средств Visual Studio для Unity, но чтобы разобраться в проблеме, нам требуется больше данных. Вы можете помочь нам разобраться с проблемой, если выполните следующие действия.
Создание отчета о зависании Visual Studio во время отладки с помощью набора средств Visual Studio для Unity
Откройте новый экземпляр Visual Studio.
Откройте диалоговое окно "Присоединение к процессу". В новом экземпляре Visual Studio в главном меню выберите Отладка, Присоединение к процессу.
Присоедините отладчик к замороженному экземпляру Visual Studio. В диалоговом окне Присоединение к процессу выберите замороженный экземпляр Visual Studio в таблице Доступные процессы , а затем нажмите кнопку Присоединить .
Приостановите отладчик. В новом экземпляре Visual Studio в главном меню выберите Отладка, Прервать все или просто нажмите CTRL+ALT+BREAK.
Создайте дамп потока. В окне командной строки введите следующую команду и нажмите клавишу ВВОД:
Возможно, сначала будет нужно отобразить окно Команда . В Visual Studio в главном меню выберите Представление, Другие окна, Командное окно.
Откройте терминал и получите идентификатор процесса Visual Studio для Mac:
Запустите отладчик lldb.
Подключитесь к экземпляру Visual Studio для Mac, используя идентификатор процесса:
Извлеките трассировку стека для всех потоков:
Here you can see the missing functionality:
As seen, the transform object does not open the autocomplete menu.
Unity version: 5.5.2f1
Visual studio 2015
Visual Studio Tools for Unity is installed
33 Answers 33
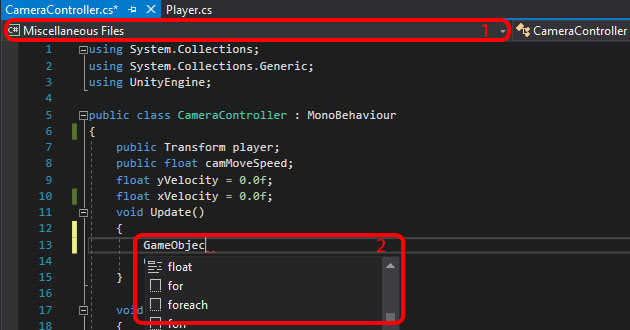
There is no auto-completion because the script says "Miscellaneous Files" instead of the of the name of the Project. Take a look at the image below that came from the video in your question:

The "Miscellaneous Files" message can happen for many reasons:
This can also happen because Unity crashed while Visual Studio is still open therefore corrupting some files.
It can happen because Unity was closed then re-opened but is no longer connected to Visual Studio. When Visual Studio is opened you get "Miscellaneous Files" and no auto-completion.
This can happen when Visual Studio Tools for unity is not installed.
When you create a script from Unity then quickly open it before Unity finish processing it or before the round icon animation stuff finish animating.
Most of the times, restarting Unity and Visual Studio should fix this.
I can't tell which one is causing the problem but I will cover the most likely solution to fix this.
Fix Part 1:
Download and Install Visual Studio Tools for unity from this link. Do this while Unity and Visual Studio are both closed.
From Unity Editor, go to Edit → Preferences. → External Tools. On the External Script Editor drop down menu, change that to Visual Studio 2015.
Fix Part 2:
From Visual Studio, go to Tools → Options. → Tools for Unity → Miscellaneous. Under Show connectivity icon, set it to true then restart Visual Studio.
Fix Part 3:
Still not fixed?
Close Visual Studio.
From Unity, re-import project by going to Assets → Reimport All.
Fix Part 4:
Still not fixed?
Click on Show All Files icon.
Select the script that doesn't do auto-complete then right-click and select Include In Project.
Fix Part 5:
Credit goes to chrisvarnz for this particular solution which seems to have worked for multiple people.
Close Visual Studio
Go your project directory and delete all the generated Visual Studio files.
These are the files extensions to delete:
Let's say that the name of your Project is called Target_Shoot , these are what the files to delete should look like:
Do not delete anything else.
Double click on the script again from Unity which should generate new Visual Studio file then open Visual Studio. This may solve your problem.
Fix Part 6:
If not working, check if you are having this error:
The "GetReferenceNearestTargetFrameworkTask" task was not found
Install Nuget PackageManager from here.
Restart Visual Studio.
See this answer for more information.
Fix Part 7
Thanks for the miscellaneous files pointer! Closing VS, deleting the VS projects and sln, and then double-clicking a script in Unity (therefore regenerating the project files and reopening VS) fixed it for me. I'd recommend trying that before the "reimport all" button as that is lunch/overnight for non-trivial projects.
This is most times caused by creating new scripts or moving them to different folders within Unity. Whenever restarting Unity and VS doesn't solve it, I simoly also delete the *.csproj and *.sln files and start Unity than. This usually works
@gollumullog Good. Since that worked for multiple people, I have updated my answer to also include that.
In Unity Editor Go to Menu, Click on Edit -> Preferences -> External Tools -> External Script Editor. Set it to Visual Studio (your installed version of VS).
Now if Visual Studio is running already go to Visual Studio, it will ask to reload project. Reload the project. Check if it works, if not close Visual Studio. Now Open cs file from Unity Editor, and now it should work.
This worked for me too. Also, one additional thing I did in Unity 2020.2.0a13 was uncheck and check again the mark at Edit/Project Settings/Player/Other Settings: Auto Graphics API. After restart of Visual Studio, autocomplete was back :D
I found another way to fix this issue in a more convenient manner:
- Select the broken file in Solution Explorer.
- Open its Properties.
- Switch field "Build Action" from "Compile" to "None".
- Then switch it back to "Compile".
This will kill the synchronization between Unity and Visual Studio somehow.
The next time Visual Studio will reload the project, it will prompt a warning. Just click on "Discard".

If you have done all of the above and still isn't working , just try this: Note: you should have updated VS.
I hope it helps you too.
Great for people who had visual studio installed before Unity, this worked for me after also installing the VS tool for Unity.
Unload and reload the project, in Visual Studio:
- right click your project in Solution Explorer
- select Unload Project
- select Reload Project
I found this solution to work the best (easiest), having run into the problem multiple times.
Thanks for the help! This worked, but I feel that we are back in '90s and we need to restart Windows, only this time it's VS 2017.
This page helped me fix the issue.

In the Unity Editor, select the Edit > Preferences menu.
Select the External Tools tab on the left.
For External Script Editor, Choose the Visual Studio version you have.
Click regenerate Files
- Select project in Visual Studio
- Click "Refresh" button

Whoa! Nothing else helped for me; Re-Install of VS, even reinstalling Unity so that it reinstalled VS, deleting .sln and .cjsproj files so that they were regenerated. nothing helped .. but finally a simple click in the solution explorer to show folders seemed to do it :o
I hit the same issues today using Visual Studio 2017 15.4.5 with Unity 2017.
I was able to fix the issue by right clicking on the project in Visual Studio and changing the target framework from 3.5 to 4.5.
Hope this helps anyone else in a similar scenario.
Two Alternative Options:
Fix 1
@singleton pointed me in this direction. Instead of changing the target in Visual Studio you should change it in Unity since the project is auto-generated.
Then from within Unity go to PlayerSettings and under 'Other Settings' change the 'Scripting Runtime Version' from Stable 3.5 to Experimental 4.6.
However, that didn't fix it for me.
Fix 2
I noticed all of the references to Unity related code was marked with a yellow warning. Check your error logs and see if this is the case. In particular see if you get the following error: getreferenceNearestTargetframeworkTask
If so try: Start Visual Studio Installer again.
On the Build Tools 2017, click Modify,
Ensure that "Nuget targets and build tasks" are ticked. This should become ticked if you click on Universal Windows Platform development.
If you are our Patreon, log in to enjoy an ad-free reading experience and access Patreon-exclusive articles.
Get in Touch
Recent Posts
Find Posts by Category
Published on 09 Nov 2020, 02:32 PM (+0800) ,
Last updated 16 Feb 2022, 11:13 PM (+0800)
Own this article ?
If you like our article, do take some time to check out the rest of our site! We have plenty of Unity-related posts, tutorials and even some content on web development!
One of the biggest perks of using Microsoft’s Visual Studio to write your Unity scripts is IntelliSense — a code completion aid in Visual Studio that offers suggestions as you write your code, and contextually presents you with information about classes, properties and methods that you are working with.
Given Unity’s enormous scripting API, IntelliSense is a tremendously helpful feature, especially for coders who are beginning their foray into developing games and software with Unity; and while we’d love to say that IntelliSense is automatically set up and linked to Unity’s API when you install it with the Unity Editor, sometimes that’s just not the case. So, if you’ve got both Unity and Visual Studio set up, but find that IntelliSense is still not offering Unity API suggestions, then this guide is for you.
There can be many reasons why IntelliSense is failing to work properly on your device, and we are assuming that you’ve already scoured the Internet a fair bit before stumbling on our article. Hence, we’ve put together a table of contents of sorts below, so if you’ve already tried some of the solutions we have, you can skip right through them.
If you prefer watching a video instead of reading, do check out our video guide for this post too.
Article continues after the advertisement:
1. Is my IntelliSense not working?
For IntelliSense to detect and work with Unity’s API, Visual Studio needs to:
- Be linked to the Unity Editor, and;
- Have the appropriate extensions installed (read further to find out what they are)
If you’ve installed Visual Studio via Unity Hub, this can have been automatically set up, but not always. Due to the bevy of ways which you can install Unity and Visual Studio, misconfigurations can happen, and you might end up with Visual Studio not integrating itself into Unity, and an IntelliSense feature that is not properly linked to Unity’s API.
We’ve found that, when installing some versions of Unity 2019 and 2020, Visual Studio does not always integrate with Unity’s API by default. So if things are not working properly, it might not be caused by misconfiguration on your end.
If you see these things, then IntelliSense hasn’t been set up on your device.
To check if IntelliSense is properly set up, open any script from the Unity Editor, and look out for 2 things:
- Whether the top-left dropdown says Miscellaneous Files. If it does, then IntelliSense is not set up.
- Try declaring a Unity variable, like a GameObject . If IntelliSense is properly set up, Visual Studio should have an auto-complete suggestion for you before you finish typing.
2. Getting IntelliSense working
So if IntelliSense isn’t working for you, what should you do?
a. Open your scripts from Unity
Before you try anything else from here, first make sure that your scripts are opened from within Unity, i.e. whenever you want to edit your scripts, double-click on them in the Unity Editor so that Visual Studio is opened by Unity.
If IntelliSense still doesn’t work when you do this, then continue onto the steps below:
b. Setting Unity’s External Script Editor
From the Unity Editor, access the Preferences window from Edit > Preferences. Then, click on 1) the External Tools tab.
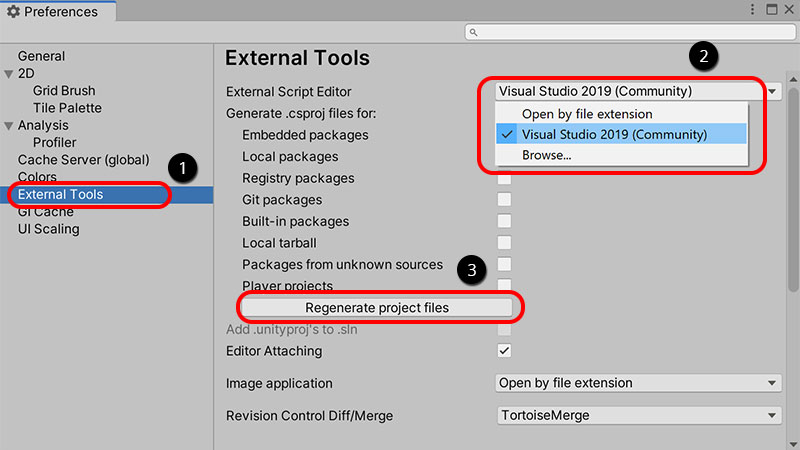
You’ll need to set the External Script Editor.
Set 2) the External Script Editor to the version of Visual Studio that you installed alongside Unity, then click on 3) the Regenerate project files button (if it’s there).
Once that’s done, restart Visual Studio and see if IntelliSense now works. If it still doesn’t, then you might be missing…
If Visual Studio doesn’t appear on the dropdown, you will have to use the Browse… option (pictured above) to find it. It’s typically under C:\Program Files (x86)\Microsoft Visual Studio\2019\Community\Common7\IDE\devenv.exe for Windows devices.
Article continues after the advertisement:
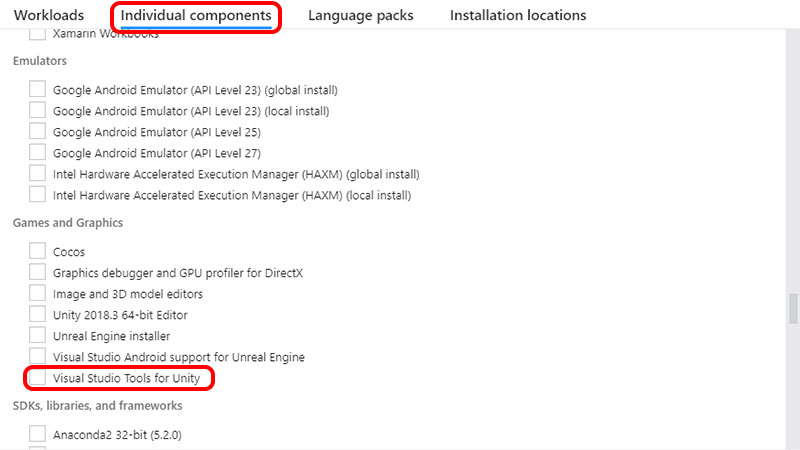
c. Visual Studio Tools for Unity
To install this, open Visual Studio and go to Tools > Get Tools and Features.
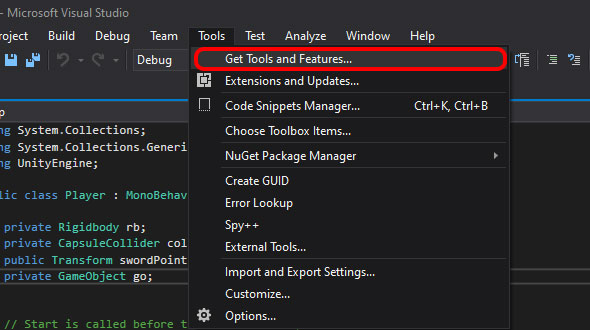
This opens the Visual Studio Installer.
Note: You’ll need administrator permissions to open this window, as it makes changes to the Visual Studio installation on your computer.
Once the installer is open, go to Workloads and find Game development with Unity. Check the box, and then click on the Modify button on the bottom-right corner to begin installation.
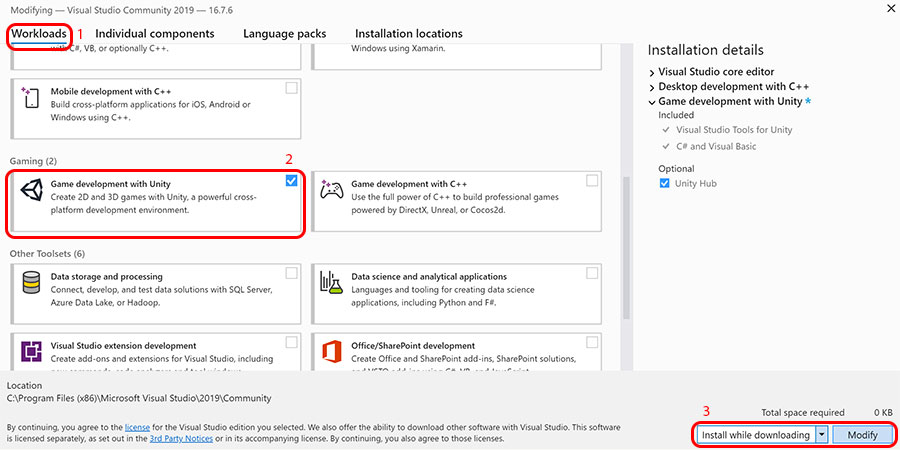
Install the Game development with Unity workload.
A popup may ask you to close certain processes before beginning installation. If this happens, close your Visual Studio project and the Unity Editor application.
When installation completes, restart both Unity and Visual Studio, then check to see if IntelliSense now works.
Article continues after the advertisement:
If IntelliSense still refuses to work, you can open the Unity Editor and head to Edit > Project Settings and access the Player (or Player Settings) tab. Scroll down to the Other Settings sub-tab, and find the Api Compatibility Level dropdown under the Configuration heading.
You want to set the Api Compatibility Level to a different option, and see which is the one that works for your device.
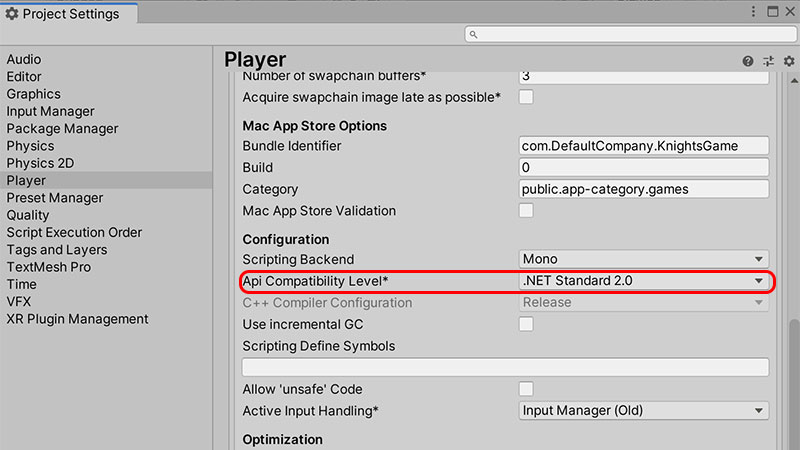
The Api Compatibility Level setting is nested quite deep in.
e. Regenerating your Unity project files
If the above solutions we’ve proposed did not work for you, you can also try this solution from one of our comment contributions.
Note: Back up your Unity project before trying this, as we are deleting some essential project files and letting Unity regenerate them.
3. Conclusion
As with the other articles on the blog, we’d love if you leave a comment below, especially if you:
- Find any errors in this article, or;
- Find an IntelliSense fix that is not listed in this article
Your comments will add on to the information that is already here, and help other future readers!
4. Video guide
Is this post not visual enough? Perhaps our video guide of this post can help.
Article continues after the advertisement:
There are 14 comments:
This works for me! I had been trying a lot of possible solutions but nothing worked until your post, thanks!
I’ve tried all the proposed solutions, but it still does not work.
I couldn’t try the “Games development with Unity” because on Mac I didn’t find the tab “Get Tools and Features”.
Right click the solution explorer in visual studio, the solution also worked for me
I thought I had selected Visual Stuio as my External Script Editor – but apparently I hadn’t, and when I did it worked :)
Thank you very much!
I already has VS2019 16.11.1 installed and working perfectly and also the Unity tools.
I installed Unity from a download link in a tutorial which pointed to 2017.1.0f. Unity changed this to the latest free version 2020.3.16f and I had the problem described.
Even though the Unity objects did not highlight and had no auto-complete, the scripts worked fine?
All I had to do was set the external editor in Unity and then close VS.
The next time, I opened the script from Unity, which opened VS and magically everything now works.
Great tips, thanks
Thanks for the article. Point e (e. Regenerating your Unity project files) was the final step I had to do.
Thank you! Your instructions were concise, easy-to-follow, and in my case completely solved this problem. Much appreciated.
I followed this guide and about 5 others that where exactly the same and nothing worked.
what did work, was right clicking the project and clicking “reload with dependencies”.. This literally fixed it right away.
Might be worth putting this into the guide.. Because I just nearly started eating my keyboard.
Thanks for taking time out to post this. Is the “reload with dependencies” option in Unity, or in Visual Studio? I want to add your tip into the article, but I don’t know where to find this.
I figured this out taking the hint from the original poster. You right click the project in VS, and select “Load Direct Dependencies of Project” and it instantly worked for me too.
Приветствую всех друзья! В прошлой статье я рассказал о настройках времени, настройки очереди выполнения скриптов и настройки тегов и слоев. Сегодня речь пойдет об интеграции Visual Studio и Unity.
Преимущества использования Visual Studio.
Visual Studio - это комплексная среда разработки кода. Подумайте о плюсах умного автозавершения кода, умной подсветки синтаксиса и многом другом.
Разница между лицензиями Visual Studio.
Visual Studio - это инструмент интегрированной среды разработки (IDE ) от Microsoft . Visual Studio выпускается в трех версиях: Community (бесплатное использование) Professional (платное) и Enterprise (платное). Сравнение различий функций между версиями доступно на веб-сайте Visual Studio .
Использование Visual Studio с Unity.
Выполните следующие действия, чтобы настроить редактор Unity для использования Visual Studio в качестве среды IDE по умолчанию:
В Unity перейдите в меню Edit/Preferences и убедитесь, что Visual Studio выбран в качестве предпочтительного внешнего редактора.
Вы можете отредактировать файл, сохранить его и переключиться обратно в Unity, чтобы проверить свои изменения.
Несколько вещей, которые нужно остерегаться
Unity автоматически создает и поддерживает Visual Studio .sln и .csproj файлы. Всякий раз, когда кто-то добавляет/переименовывает/перемещает/удаляет файл из Unity, Unity восстанавливает его .sln и .csproj файлы. Вы также можете добавлять файлы в свое решение из Visual Studio . Затем Unity импортирует эти новые файлы, и в следующий раз, когда Unity снова создаст файлы проекта, он будет создавать их вместе с этим новым файлом.
На сегодня это все. Следующая статья будет посвящена интеграции между RenderDoc и Unity. Спасибо всем, кто дочитал эту статью до конца, подписывайтесь на канал, ставьте лайки, а для тех, у кого появились вопросы - спрашивайте в комментариях! А если вы хотите помочь данному каналу в развитии – делитесь этой статьей с друзьями в социальных сетях!
[Code::Blocks 10.05] не работают подсказки
Что-то случилось и перестали работать эти самые подсказки(в настройках не лазил). Переустановил.
vs code подсказки
Ребят, пишу программу на go lang дело, такое подсказки стандартных библиотек показывает, а вот.
Реализация подсказки для кодов (Code Insight)
в программе notepad++ да и в самой делфи при написании кода есть такая хорошая функция как.
Visual Studio Code подсказки CSS в файле PHP
Не знаю где создать подобную тему, пишу сюда. Может кто знает как в редакторе Visual Studio Code.
Добавлено через 1 минуту
Тут кароче он показал как установить ассет, но он поменялся. Прочитай в папке, которую ты импортировал файл README
Тут кароче он показал как установить ассет, но он поменялся. Прочитай в папке, которую ты импортировал файл README
Установил, почитал, появился раздел VSCode поставил галочку использовать его. Он мне пишет не найден cmd фаил.
Теперь его выбрать нельзя. Он автоматом перебрасывает на Code.cmd. А этого фаила нет. Может вы мне скинете этот фаил?
Не понимаю твоей проблемы, нужно в выборе файла зайти в папку где у тебя VSCode, и выбрать в нем Code cmd
Не понимаю твоей проблемы, нужно в выборе файла зайти в папку где у тебя VSCode, и выбрать в нем Code cmd
В общем все ошибки устранил, плагин установил, но подсказок в VSCode как не было так и нет. Уже не знаю. что делать?
В VS есть вкладка "Решения" заходишь в "Управление решеняими" там "Деспетчер перемещаемых решений", жмешь по "Visual studio Tools for Unity" и жмешь "включить" подсказки появляются
В VS есть вкладка "Решения" заходишь в "Управление решеняими" там "Деспетчер перемещаемых решений", жмешь по "Visual studio Tools for Unity" и жмешь "включить" подсказки появляются
VScode plugin для unity это костыль, кривой и устаревший.
Он там не нужен.
OUTPUT а в фильтре выбираешь OmniSharp Log.
После того, как он найдет в папке файлы .csproj и парсинга их, в output должно появиться что то вроде
[info]: OmniSharp.MSBuild.ProjectManager
Update project: Unity.VSCode.Editor
[info]: OmniSharp.MSBuild.ProjectManager
Update project: Unity.2D.Psdimporter.Editor
[info]: OmniSharp.MSBuild.ProjectManager
Update project: Unity.2D.PixelPerfect.Editor
[info]: OmniSharp.MSBuild.ProjectManager
Update project: Unity.Mathematics.Editor
[info]: OmniSharp.MSBuild.ProjectManager
Update project: Unity.InternalAPIEditorBridge.001
Если будет [fail] значит ты не ребутал машину после переустановки 4.7.x devoloper, ибо надо.
Читайте также: