
Trim path after effects где
Auto-suggest helps you quickly narrow down your search results by suggesting possible matches as you type.
- Home
- After Effects
- Discussions
- Where is "Trim Path" in After Effects?
/t5/after-effects-discussions/where-is-quot-trim-path-quot-in-after-effects/td-p/9396946 Nov 01, 2017 Nov 01, 2017
Copy link to clipboard
I was trying to follow a tutorial elsewhere for animating the drawing of a circle using a trim path on a hand-drawn vector circle I drew. The tutorial only says, "add a Trim Path from the Add menu." I typed in "trim path" into the help search bar in AE, and I cannot find any "Trim Path" option anywhere. Can someone help me find this? I'm using After Effects version 14.2.1.34 on a Macbook Pro running OS X El Capitan.
Be kind and respectful, give credit to the original source of content, and search for duplicates before posting. Learn more
1 Correct answer
Copy link to clipboard
To find instructions on how to use trim paths or any path animator simply type Trim Paths in the search help field and read the instructions. You will remember it better that way.
Just as with Text animators, shape animators are found in under the Add button in the Modes or Switches column.
Be kind and respectful, give credit to the original source of content, and search for duplicates before posting. Learn more
Copy link to clipboard
Unfortunately, I tried this, as I described in my original post.
For example, even when just typing in the basic term, "Trim," yields no options, as does "Trim Path:
Results for searching only, "Trim" :

Results for searching, "Trim Path" :
Be kind and respectful, give credit to the original source of content, and search for duplicates before posting. Learn more
Copy link to clipboard
Ust the search help field at the top right corner of AE not the Help menu.
Create a shape layer, press the U key twice to reveal the modified properties of the layer, just to the right of the Contents row in the Switches or Modes column you will find the Add button.
When you have done that spend a little time here learning the UI: Basic AE. You will waste months if not years trying to learn AE by just poking around in the app and asking questions on forums.
Be kind and respectful, give credit to the original source of content, and search for duplicates before posting. Learn more
Copy link to clipboard
"Ust the search help field at the top right corner of AE not the Help menu."
It's not there as the original poster already said.
Be kind and respectful, give credit to the original source of content, and search for duplicates before posting. Learn more
Copy link to clipboard
this is not the search field. this is:

Be kind and respectful, give credit to the original source of content, and search for duplicates before posting. Learn more
Copy link to clipboard
Here's a visual cue:

Be kind and respectful, give credit to the original source of content, and search for duplicates before posting. Learn more
Copy link to clipboard
Thanks everyone for the helpful commentary on the importance of 'not poking around to learn' of 'searching for help before asking'.
I always start with a search. guess what? That's how I ended up on this thread. Guess what else? I've been using AE for 18 years and this is the first time I've needed trim path. So, there's that.
BIG hats off to Tolstoy. Thanks for the answer, which is kind what we wanted to begin with.
Be kind and respectful, give credit to the original source of content, and search for duplicates before posting. Learn more
Copy link to clipboard
Nobody said search for help, they said search THE Help, doing so will turn up step by step instruction, which is true.
Truth is it's just easier to ask on the forums. as long as you don't mind people telling you that you can search the help.
So it's a choice really:
Search THE help which can require exposure to things other than what you're looking for and a little time to pin down the relevant data.
Or ask on the forum and suffer the indignity of people suggesting you make use of the THE help.
The amount of time you've been using After Effects without needing trim paths is not relevant to anything.
However the fact that you've been using it for 18 years and have not yet worked out how to effectively utilize THE help is interesting.
Auto-suggest helps you quickly narrow down your search results by suggesting possible matches as you type.
- Home
- After Effects
- Discussions
- Where is "Trim Path" in After Effects?
/t5/after-effects-discussions/where-is-quot-trim-path-quot-in-after-effects/td-p/9396946 Nov 01, 2017 Nov 01, 2017
Copy link to clipboard
I was trying to follow a tutorial elsewhere for animating the drawing of a circle using a trim path on a hand-drawn vector circle I drew. The tutorial only says, "add a Trim Path from the Add menu." I typed in "trim path" into the help search bar in AE, and I cannot find any "Trim Path" option anywhere. Can someone help me find this? I'm using After Effects version 14.2.1.34 on a Macbook Pro running OS X El Capitan.
Be kind and respectful, give credit to the original source of content, and search for duplicates before posting. Learn more
1 Correct answer
Copy link to clipboard
To find instructions on how to use trim paths or any path animator simply type Trim Paths in the search help field and read the instructions. You will remember it better that way.
Just as with Text animators, shape animators are found in under the Add button in the Modes or Switches column.
Be kind and respectful, give credit to the original source of content, and search for duplicates before posting. Learn more
Copy link to clipboard
Unfortunately, I tried this, as I described in my original post.
For example, even when just typing in the basic term, "Trim," yields no options, as does "Trim Path:
Results for searching only, "Trim" :
Results for searching, "Trim Path" :
Be kind and respectful, give credit to the original source of content, and search for duplicates before posting. Learn more
Copy link to clipboard
Ust the search help field at the top right corner of AE not the Help menu.
Create a shape layer, press the U key twice to reveal the modified properties of the layer, just to the right of the Contents row in the Switches or Modes column you will find the Add button.
When you have done that spend a little time here learning the UI: Basic AE. You will waste months if not years trying to learn AE by just poking around in the app and asking questions on forums.
Be kind and respectful, give credit to the original source of content, and search for duplicates before posting. Learn more
Copy link to clipboard
"Ust the search help field at the top right corner of AE not the Help menu."
It's not there as the original poster already said.
Be kind and respectful, give credit to the original source of content, and search for duplicates before posting. Learn more
Copy link to clipboard
this is not the search field. this is:
Be kind and respectful, give credit to the original source of content, and search for duplicates before posting. Learn more
Copy link to clipboard
Here's a visual cue:
Be kind and respectful, give credit to the original source of content, and search for duplicates before posting. Learn more
Copy link to clipboard
Thanks everyone for the helpful commentary on the importance of 'not poking around to learn' of 'searching for help before asking'.
I always start with a search. guess what? That's how I ended up on this thread. Guess what else? I've been using AE for 18 years and this is the first time I've needed trim path. So, there's that.
BIG hats off to Tolstoy. Thanks for the answer, which is kind what we wanted to begin with.
Be kind and respectful, give credit to the original source of content, and search for duplicates before posting. Learn more
Copy link to clipboard
Nobody said search for help, they said search THE Help, doing so will turn up step by step instruction, which is true.
Truth is it's just easier to ask on the forums. as long as you don't mind people telling you that you can search the help.
So it's a choice really:
Search THE help which can require exposure to things other than what you're looking for and a little time to pin down the relevant data.
Or ask on the forum and suffer the indignity of people suggesting you make use of the THE help.
The amount of time you've been using After Effects without needing trim paths is not relevant to anything.
However the fact that you've been using it for 18 years and have not yet worked out how to effectively utilize THE help is interesting.
Здравствуйте. И для начала импортируйте в панель Project изображение карты, по которой желаете проложить путь.

Шаг 2.
Теперь создадим новую композицию. Для этого выполните команду Composition => New Composition, или нажмите сочетание клавиш Ctrl+N.

Перед Вами появится окно с настройками новой композиции. Измените настройки «под себя» и нажмите ОК.

Шаг 3.
Кликните по файлу с картой на панели Project и, удерживая кнопку мыши, перенесите карту на панель Timeline. Карта перенесётся туда отдельным слоем.


Шаг 4.
Создайте новую фигуру. Для этого выполните команду Layer => New => Shape Layer.

Слой с фигурой появился на панели Timeline (пока этот слой пуст).
Шаг 5.
Изменим настройки нового слоя с фигурой. Обратите внимание, что над панелью Composition появилось несколько новых настроек. Их мы и будем менять.

Для начала кликните по надписи Fill (Заливка) и в появившемся окошке выберите пункт None (Без заливки).

Теперь кликните по параметру Stroke (Обводка). В появившемся окне выберите пункт Solid (Сплошная).

Кликните по прямоугольнику справа от надписи Stroke и выберите красный (тёмно-красный) цвет.

Измените толщину обводки на 12 px.

Всё, с настройками мы разобрались.
Шаг 6.
Выберите инструмент Pen Tool

. Убедитесь что в панели Timeline выбран слой с фигурой. Далее перейдите к панели Composition и кликните мышью в том месте, где должен начаться Ваш путь.

Далее кликните мышью в следующем месте, где должен пройти Ваш путь. Между точками появится красная прямая линия.

Таким образом Вы можете проставить сколь угодно много точек по всему Земному шару (я ограничился тремя).

Итак, путь нарисован. Давайте теперь отредактируем его.
Шаг 7.
Кликните и удерживайте кнопку мыши на инструменте Pen Tool в палитре Tools, пока не появится выпадающее меню. В нём выберите инструмент Convert Vertex Tool

Кликните по любой из точек, которые мы проставляли в предыдущем пункте. По бокам от точки появятся дополнительные маркеры. Перетаскивая эти маркеры Вы можете управлять кривизной прямых, соединяющих точки. С первого раза может не получится, но поупражнявшись некоторое время Вы с лёгкостью проделаете это задание.

Вот что у меня получилось в итоге.

Шаг 8.
Выберите слой с фигурой на панели Timeline. Кликните по серому треугольнику слева от имени слоя, чтобы раскрыть его свойства. Напротив группы свойств Contents кликните по кнопке Add (Добавить) и в выплывающем списке выберите пункт Trim Paths.

Добавится новое свойство Trim Paths. Раскройте его.

Смысл параметров Start, End и Offset я объяснять не буду. Просто поиграйтесь с их значениями и Вы сами всё поймёте.
Шаг 9.
Добавим анимации нашему пути. Для этого переместите индикатор текущего времени в начальную позицию. Анимируйте параметр End, кликнув по изображению секундомера слева от его имени. Измените значение параметра End в начальной точке на 0.

В начальной позиции появится ключевой кадр.
Шаг 10.
Переместите индикатор текущего времени в конец временной шкалы и измените значение параметра End на 100. Появится новый ключевой кадр. Теперь наш путь прорисовывается с течением времени.
Шаг 11.
С анимацией мы закончили. Теперь давайте изменим внешний вид линий. У слоя с фигурой выберите группу свойств Contents, в ней группу Shape 1, далее раскройте группу Stroke 1. Здесь выберите параметр Dashes (Штрихи) и напротив него нажмите на кнопку «плюс».

В итоге линии из сплошных превратились в пунктирные. При помощи параметра Dash отредактируйте длину штриха.

Шаг 12.
В заключении измените режим наложения на панели Timeline с Normal на Multiply. Делается это при помощи меню Mode.


Если меню Mode не отображается кликните по кнопке Toggle Switches/ Modes в нижней части панели Timeline.

На этом всё. Надеюсь у Вас всё получилось. До встречи в следующих уроках и курсах After Effects!
С августа 2016 года изучаю AE, начала работать в сфере моушен-дизайна, помимо иллюстраций.
Я подготовила урок для блога с простой анимацией фигур и линий. Этот урок предназначен для тех, кто уже более или менее хорошо ориентируется в After Effects, поэтому если вам он покажется сложным, то рекомендую посмотреть базовые уроки в сети. Например этот мини курс: Вводный курс Illustrator + After Effects.
Совсем недавно я закончила и выложила проект с анимированными линиями-выносками (callouts), и в своем уроке я расскажу вам, как я это делала на самом простом примере.
1. Создаем в Adobe Illustrator векторный файл с рисунком. У нас callout. Все линии без заливки, только обводка. Сделайте как на рисунке, чтобы было понятнее выполнять анимацию. Сохраните файл в ai формате.

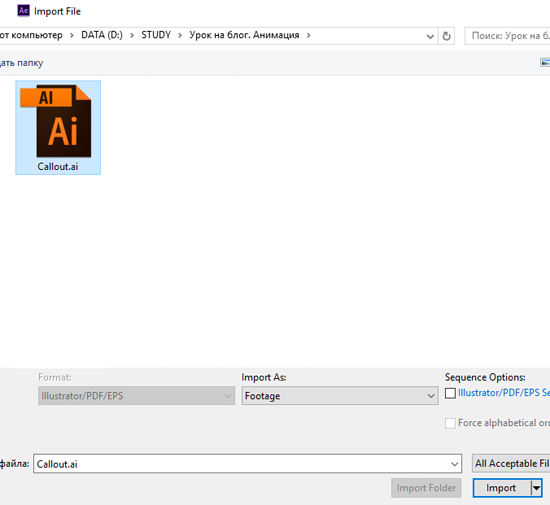
2. Импорт в After Effects. Есть несколько способов. Двойной клик в окошке Project и выбрать файл в выпадающем окне. Либо через проводник - выбрать файл и перетащить мышью в окно Project. Ещё можно в Меню File > импорт > файл, и выбираем наш файл. Обратите внимание! Должно стоять footage в поле Import As и никаких галочек мы не ставим.
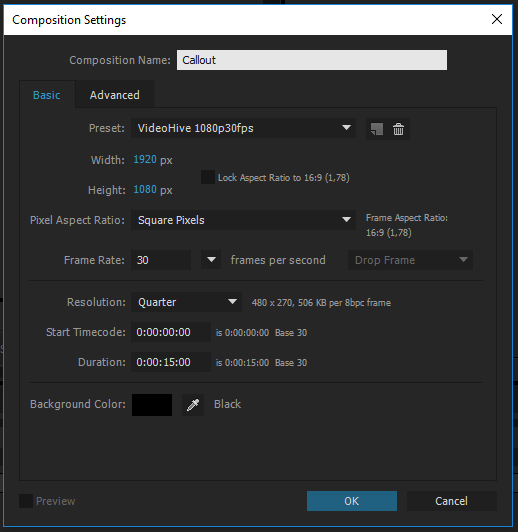
3. Создаем новую композицию в After Effects. CTRL + N или через меню Composition > New Composition. Задаем настройки - пишем название, у нас 30 кадров (frame rate) и 15 секунд (Duration) длительность анимации, задаем также размеры самой композиции 1920x1080. Жмем — OK.
4. Перетаскиваем мышкой импортированный векторный файл с окна Project на time line - нижний раздел рабочей области, где, собственно, мы и будем анимировать наши линии.
5. Выделяем слой с файлом. Идем в меню Effect > Generate > Fill.

Цвет выбираем белый.

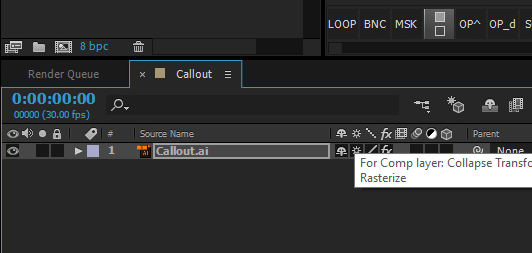
6. Слой выделен. Далее нажимаем на вторую по счету иконку Rasterize рядом с названием слоя (если не видно иконок, то внизу тайм лайна есть Toggle Swiches/Modes - нажмите и вид слоя измениться - появятся справа иконки).
Теперь наши линии хорошо видно. Нужно задать им Scale масштаб. Можно раскрыть слой и в параметрах Transform > Scale ввести значение, я поставила 450 на 450. Или горячая клавиша S - сразу отображает только один масштаб из всех параметров трансформации объекта. Горячие клавиши есть на все функции и это очень удобно. Да, каждый слой или объект можно трансформировать и эти настройки есть в каждом слое.
7. Затем разместим наш callout по центру. Как и в иллюстраторе: сначала стрелочка выделение Selection Tool(V), затем двигаем объект.
8. Выделяем наш слой, идем в меню Layer > Create Shapes from Vector Layer.
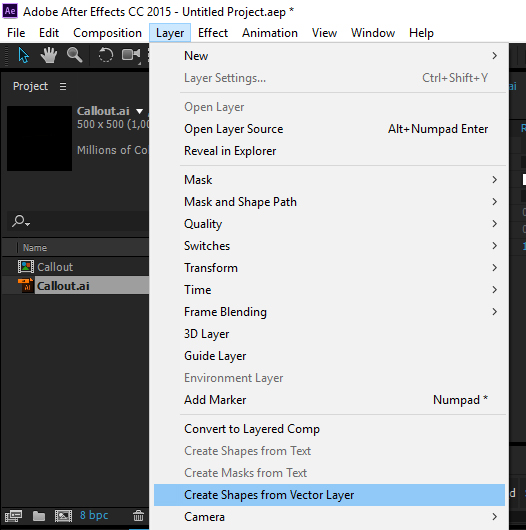
И после этого действия у нас будет уже 2 слоя. Первый наш векторный оригинальный слой мы можем удалить. Выделяем и клавишу DELETE. Не забудем сохранить проект — Ctrl+Shift+S. Совет - периодически нажимайте волшебные Ctrl+S.
9. Теперь нам нужно разбить один слой на несколько — ведь у нас несколько линий. Можно вручную, но это долго и скучно. Лучше скачать и установить бесплатный скрипт ZI_ExplodeShapesLayers (улучшенная новая версия). Выделяем слой и идем как и в иллюстраторе File > Scripts. Жмем кнопку Explode!
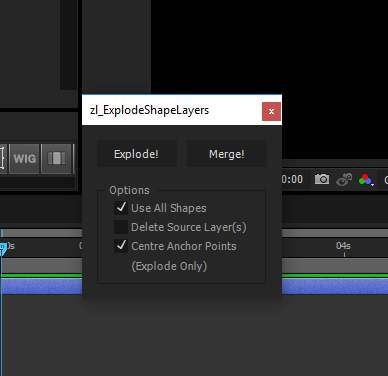
Все слои разбились отдельно и можно опять удалить наш оригинальный слой, он самый нижний получается. А вручную пришлось бы копировать (копирование слоя - CTRL+D) слой столько раз сколько подслоев - линий, затем удалять лишние подслои у нового скопированного слоя и переименовывать.
Подробнее, кто не нашел или не захотел качать скрипт:
У нас 4 подслоя, значит нужно еще 3 копии, делаем их. Затем у первого слоя удаляем 2,3,4 группы. А дальше по аналогии. Затем переименовываем — выделяем слой — ENTER – вводим новое имя - ENTER или в пустое место клик. Должно получиться 4 слоя с отдельными линиями.
10. Можно слои расположить в порядке анимации — сначала кружок, потом линии, потом квадратик. А можно и так оставить, по вашему желанию. Ну, все приготовления закончены. Теперь самое интересное — анимация вектора. Начнем с кружочка — с маркера callout.
11. Анимация круга. Анимируем Scale.
Можно включить соло на слое, тогда будет видно только круг (значок кружочка или точки). Затем проставляем ключи — это и будет наша анимация. Передвигаем индикатор времени (вот эту линию с синим наконечником — Current Time Indicator) на 0 секунд 15 кадров и ставим ключик — щелкаем по секундомеру рядом со Scale, значение оставляем (у меня 450).
Далее у меня в уроке большие скриншоты. Поэтому нажимайте на картинку, чтобы открыть её на весь экран, у кого мелковато видно.

Передвигаем в начало композиции на ноль — и изменяем значение на ноль (сразу вбиваем значение размера и автоматически проставляется новый ключик). Далее продвигаемся на 3 секунды — 450, на 3 секунды 15 кадров — 300, еще через 5 кадров — это будет 3 секунды 20 кадров — 450, и снова повторяем на 6 секундах, 6,15 и 6,20 — ставим те же значения — 450/300/450. Далее так же на 9 и 12 секундах примерно на одном и том же расстоянии. А теперь делаем затухание в конце композиции — 14 секунды 15 кадров — 450, на 15 секундах в самом конце - 0. Затем нажмите F9 – сгладить ключи.

Можно добавить ключик еще одним способом — кликнуть по ромбику рядом с секундомером и затем изменять значение) . Передвигаться по шкале времени можно клавишами PAGE UP и PAGE ON. Аккуратнее двигайте индикатор! Не сдвигайте сам слой! Если что CTRL + Z вам в помощь.
Ну вот теперь наш круг ожил — появляется в начале, плавно мигает в процессе и плавно затухает в конце композиции. Для просмотра нажмите ноль 0 и для окончания просмотра также ноль 0.
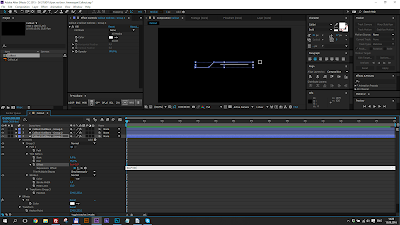
12. Анимация главной линии.
Выделяем следующий слой с главной линией. Нажимаем дважды U и раскрывается все содержимое слоя. Используется, когда нужно открыть те подслои, которые были изменены. Очень удобно. Закрыть — еще раз U. В процессе работы сами все поймете. Далее выделяем подслой Group 3 — Add – Trim Path.

Раскрываем параметры Trim Path и задаем значение у END. Я поставила 75%. Этот показатель отвечает за то на сколько процентов будет отображаться в анимации линия: 100 % - полностью, 0% - соответственно линия не будет отображаться. Оптимально — примерно от 50 до 95%. Индикатор стоит в начале композиции. Далее анимируем. Зажимаем ALT и кликаем по секундомеру параметра Offset (прямо под End) и вводим в появившейся строке выражение — time*n (где n – число, обозначающее количество оборотов или скорость движения анимации).
Проиграйте композицию (ноль) и посмотрите что вышло. Можно изменить значение END и сравнить анимацию, выражение при этом изменять не нужно. Таким образом, добейтесь наиболее интересного и оптимального результата. Теперь добавим линии также появление и затухание. Можно это сделать и при помощи прозрачности Opacity. Выделяем слой — жмем клавишу T и на 1 секунде, задаем значение 100, на нуле в начале композиции — 0. Далее двигаемся на 14 секунд — 100 и в конце композиции ставим 0. F9 – сглаживаем. Кстати чтобы выделить все ключи сразу можно выделить их мышкой аккуратно и нажать F9 или же проще всего выделить сам параметр Opacity и все ключики выделятся сразу.
13. Анимация второй линии.
Сейчас научимся с вами работать с настройками самой линии. Сделаем из обычной прямой пунктирную линию и анимируем ее. Дважды U по слою с линией, находим Stroke и раскроем его значения, нажав на стрелочку. Находим параметр Dashes и нажимаем на плюсик + два раза. Появятся значения Dash (количество точек), Gap (расстояние между точками), Offset (анимировать точки). Введем, предположим, значения 5 и 5. Теперь снова ALT + клик по секундомеру у параметра Offset и вводим time*n (у меня значение 35).

Теперь выделим Contens — Add – Trim Path и на 1 секунде на End ключ 100, на нуле 0, на 14 секунде 100 и в конце 0. И выделяем ключики и сглаживаем F9.
14. Анимация квадрата. Вращение.
Выделяем слой с квадратом, горячая клавиша R (rotation). Выделяем rotation и ALT + клик по секундомеру. В строке ввода выражения пишем time*n (у меня значение 250). Можно и с помощью ключиков вручную — в начале ключик с нулевыми начальными значениями и в конце ключик (вводим количество оборотов 0х и градусы +0,0) допустим 8 оборотов и 360 градусов. Выражения значительно облегчают и автоматизируют работу. Ну и по аналогии добавляем прозрачность в начале появления (на 1 секунде 100 и на нуле 0) и в конце затухание ( на 14 секунде 100 и в конце 0) и F9. Или же делаем появление и затухание через Trim Path.
Все! Анимация готова! Наш callout ожил! Теперь сохраняемся. Делаем рендер.
Нажимаем горячие клавиши CTRL + M (или идем в меню).

Нажимаем напротив Output Module прямо на стрелочку и выбираем формат у меня MOV+PNG+ALPHA (или же MOV+PNG). И нажимаем Render, ждем пока идет рендер. Потом смотрим результат. Видео сохранится в ту же папку, где и ваш проект.

Подпишитесь на нашу рассылку, чтобы не пропустить ничего нового:
In this video tutorial, we cover how to harness the power of this simple, hidden feature in Adobe After Effects — Trim Paths.
Trim Paths is a tool in Adobe After Effects that allows you to make precise adjustments to shape layer paths. However, new users may not know about it because it is hidden away under a shape layer submenu. So, what can you accomplish with this handy, little animator? Let’s have a look at five fun, useful projects.
1. Infographic

Creating an infographic can seem complex; however, it only takes a few simple steps. For a basic bar graph, I’ll first create a two-point path via the Pen tool, placing the first point at the bottom of the frame. Next, I’ll turn off the fill, and set the stroke to 150 pixels. Finally, I’ll add a Trim Path animator via the Add dropdown menu and animate the End property from 0% to 100%. To have a number dynamically change as the graph grows, I’ll add a text layer and parent the source text to the end property of the Trim Path. Lastly, I’ll add a simple value expression to round the numbers out to absolute values. And voilà — a dynamic infographic. ( Check out my full tutorial on how to create infographics in After Effects here.)
2. Map Route

Maps are fun, and you can quickly create an animated route with Trim Paths. First, I’ll add points and a path to a map via the Pen tool, with the stroke at 5 pixels and no fill. I can customize and stylize my map route via the properties of the stroke element. For this example, I’ll add some dashes and change the Line Cap property. Once I’m happy with the look, I’ll add the Trim Path animator and animate the end position. For a full tutorial on how to animate a map route, check out my “ Create a Map Path Inspired by Indiana Jones in After Effects “ tutorial. (That tutorial belongs in a museum.)
3. Text Box

You can use Trim Paths to quickly add detail to a lower third — or another text element. A popular look for lower thirds, and other graphics, is the animated bounding box. To create one, I’ll simply grab the Rectangle Shape tool and set the stroke to 10 pixels, with no fill. Then, I’ll create a rectangle and align it with my text. Now, I can animate the end in conjunction with the Offset for some truly desirable results. (This also works great with simple underline elements.)
4. Text Stroke

Another popular look is the animated text stroke. As opposed to creating a simple box or line element, adding and animating a text stroke can be a bit more tricky. For this, I’ll first take my text and select Layer > Create > Create Shapes from Text. To change the stoke of all the characters at once, select the layer, and use the Stroke option at the top of the interface. Once I’m happy with the look of my stroke, I can add Trim Paths and animate the range to get the look I want. (Check out my stand-alone tutorial on “ How to Animate a Text Stroke in Adobe After Effects .”)
5. Circle Bursts

The circle burst is a fun animation element that creates simple movement, and Trim Paths can help bring these to life. Let’s create a quick circle burst and add it to a star-shaped animation. First, I’ll create a simple path (via the Pen tool) coming out from the top of the star. Next, I’ll add the Trim Path’s animator. To have the line shoot out from the center, I’ll animate both the start and end attributes, slightly offsetting each. Finally, I’ll add a Repeater with 9 copies, a Position of 0, and a Rotation of 40. Now, I can change the Y Position of the shape element to place it perfectly. (For more circle burst madness, check out this tutorial.)
Читайте также: