
Создание проекта angular node js в visual studio code
This blog post will help you to kick off your angular development by setting up Angular application and running it using Visual Studio Code. This will also explain some Angular basics.
What is Angular?
The Angular framework is an opensource developed by Google.
The Angular is a platform and framework for building client applications in HTML and Typescript libraries. Angular framework helps you to develop SPA or Single Page Applications where your entire applications work with only one page and part of the page gets refreshed depending on the functionality required by the user.
Steps for setting up Environment for Angular App
Install Node.JS and NPM
Node.JS has tool NPM which allows you to download required Angular2 libraries. It is not required to install NodeJS but Without NPM or similar tool you will have to download libraries and it's dependencies manually which is really a cumbersome and time-consuming task.
To install Node.JS on your windows machine go through Install Node.Js and NPM.
Once the installation is done open Node.JS command prompt with Administrator rights from the Windows Start menu and execute below command.
This command shows your current version of Node.JS and NPM installed on your machine as shown in the following pic.

Configure Proxy to use Angular CLI
If your organization internet is secured by the proxy server, you will have to configure your proxy details. Execute the following command with your details from Windows / Node.Js command prompt. If you are working using a personal machine and there is no proxy server you must skip this step.
Install Angular CLI
Angular CLI stands for Command Line Interface. It is a command line tool for creating and managing Angular applications. Angular CLI will help you to install and configure all required dependencies.
From Node.Js command prompt execute the following command
Install Visual Studio Code
This will help you in detail to set up an Angular environment.
Steps to Create Angular Application using VS Code
VS Code Integrated Terminal
Open Visual Studio Code -> Terminal -> New Terminal. It shows a terminal at the bottom of VS Code window. Using this terminal you can execute Angular CLI commands.

ng new FirstAngularApp
In this step, you will create an Angular application. Execute below Angular CLI commands in sequence in VS Code terminal.
- mkdir AngularApp
- AngularApp
- ng new FirstAngularApp
The first command creates a directory with name AngularApp, the second command navigates terminal pointer to newly created command and the third command creates a new Angular Application.
You will see a question - Would you like to add angular routing? Enter 'Y' to add a routing module to the application.
The next question will be - Which StyleSheet format would you like to use? Select LESS by arrow keys and press enter.
This will take few minutes to install all required dependencies, once it is done you should be able to compile and execute FirstAngularApp application.
Launch FirstAngularApp
Now your application is ready with default configuration, Angular Component, Angular directives, modules. Using below command you will navigate to application directory.
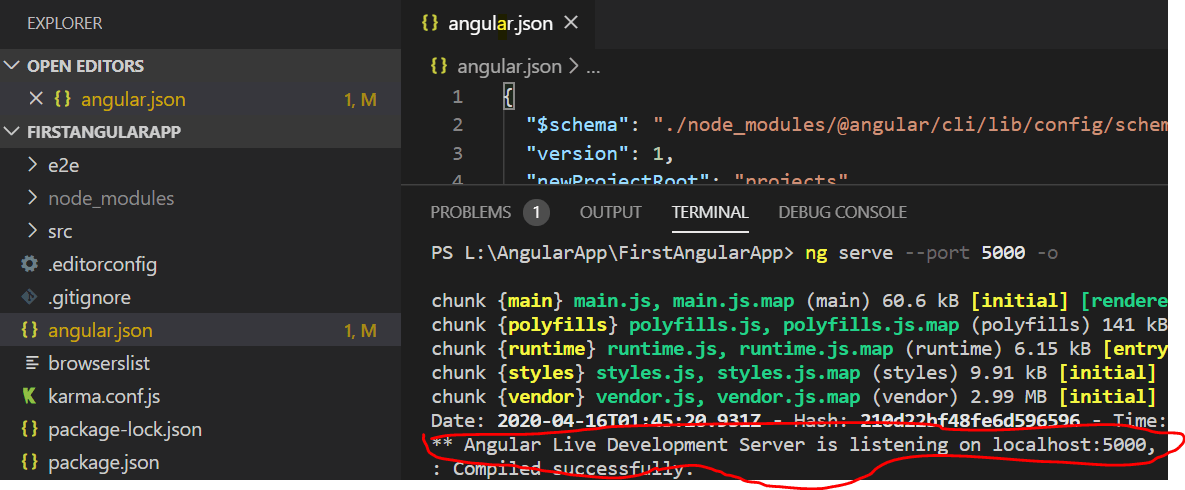
Following Angular CLI command will launch your application in your default browser. Execute this command in the terminal.
Update code files in VS Code
Once you launch Angular application, the terminal still shows the previous command and it will not let you execute any other CLI command. To stop your angular application use the following command.
This command will ask you to Terminate batch job(Y/N)?. Type Y and press Enter key.
To update angular components, directives or modules use below CLI command.
Edit Angular Component with custom message
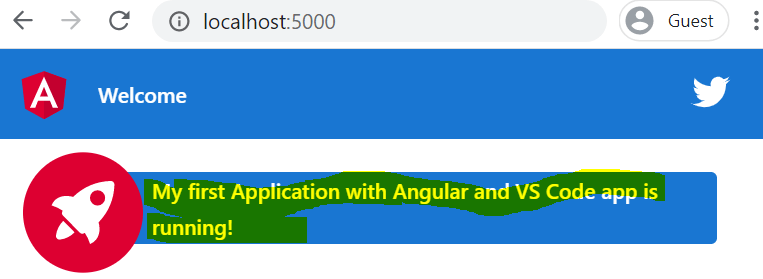
Replace code title = 'FirstAngularApp'; with title = 'My first Application with Angular and VS Code'; and launch the application by ng serve -o
To customize or add more features to your application use Angular Component, Angular Directives, Modules.
Open a development command prompt in the project folder and create the project:
Add Docker files to the project
Open the project folder in VS Code.
Open the Command Palette ( ⇧⌘P (Windows, Linux Ctrl+Shift+P ) ) and use Docker: Add Docker Files to Workspace. command:

Select Node.js when prompted for the application platform.
Select either Yes or No when prompted to include Docker Compose files. Compose is typically used when running multiple containers at once.
Enter 3000 when prompted for the application port.
The extension creates Dockerfile and .dockerignore files. If you elected to include Docker Compose files, docker-compose.yml and docker-compose.debug.yml will be generated as well. Finally, the extension will create a set of VS Code tasks in .vscode/tasks.json for building and running the container (in both debug- and release-configurations) and a launch debug configuration in .vscode/launch.json for debugging the service within the container.
Add an environment variable to the image
The Docker extension helps you author Dockerfiles by using IntelliSense to provide auto-completions and contextual help. To see this feature in action, add an environment variable to your service image by following these steps:
Open the Dockerfile file.
Use ENV instruction to add an environment variable to the service container image.

Note how the Docker extension lists all available Dockerfile instructions and describes the syntax.
The Docker extension uses the base stage of the Dockerfile to create a debug version of the container image for your service. Put the environment variable definition in the base stage to have this variable available in both debug and release versions of the container image.
Save the Dockerfile file.
Run the service locally
Open a terminal ( ⌃` (Windows, Linux Ctrl+` ) ).
Enter npm run start to start the application:

When done testing, type Ctrl+C in the terminal.
Build the service image
Open the Command Palette ( ⇧⌘P (Windows, Linux Ctrl+Shift+P ) ) and select the Docker Images: Build Image. command.
Open the Docker Explorer and verify that the new image is visible in the Images tree:

Run the service container
Right-click on the image built in the previous section and select Run or Run Interactive. The container should start and you should be able to see it in the Docker Containers tree:

When done testing, right-click the container in the Containers tree and select Stop.
Debug in the service container
When the Docker extension adds files to the application, it also adds a VS Code debugger configuration in .vscode/launch.json for debugging the service when running inside a container. The extension detects the protocol and port used by the service and points the browser to the service.
Set a breakpoint in the get() handler for the '/' route in routes/index.js .
Make sure the Docker Node.js Launch debugger configuration is selected.

Start debugging (use the F5 key).
- The Docker image for the service builds.
- The Docker container for the service runs.
- The browser opens to the (random) port mapped to the service container.
- The debugger stops at the breakpoint in index.js .
Note that, because the debugger attaches after the application starts, the breakpoint may missed the first time around; you might have to refresh the browser to see the debugger break on the second try.
You can configure the application to wait for the debugger to attach before starting execution by setting the inspectMode property to break in the docker-run: debug task in tasks.json under the node object.
View the application logs
You can view the logs in VS Code by using the View Logs command on the container:
Navigate to the Docker Explorer.
In the Containers tab, right-click on your container and choose View Logs.
Angular is a popular web development platform developed by Google. The Visual Studio Code editor supports Angular IntelliSense and code navigation out of the box.

Welcome to Angular
We'll be using the Angular CLI for this tutorial. To install and use the command line interface as well as run the Angular application server, you'll need the Node.js JavaScript runtime and npm (the Node.js package manager) installed. npm is included with Node.js which you can install from Node.js downloads.
Tip: To test that you have Node.js and npm correctly installed on your machine, you can type node --version and npm --version .
To install the Angular CLI, in a terminal or command prompt type:
This may take a few minutes to install. You can now create a new Angular application by typing:
my-app is the name of the folder for your application. This may take a few minutes to create the Angular application in TypeScript and install its dependencies.
Let's quickly run our Angular application by navigating to the new folder and typing ng serve to start the web server and open the application in a browser:
To open your Angular application in VS Code, open another terminal (or command prompt) and navigate to the my-app folder and type code . :
Syntax highlighting and bracket matching

IntelliSense
As you hover your mouse over text in the file, you'll see that VS Code gives you information about key items in your source code. Items such as variables, classes and Angular decorators are a few examples where you'll be presented with this information.


You can click the information button ( i ) to see a flyout with more documentation.

VS Code uses the TypeScript language service for code intelligence (IntelliSense) and it has a feature called Automatic Type Acquisition (ATA). ATA pulls down the npm Type Declaration files ( *.d.ts ) for the npm modules referenced in the package.json .
Go to Definition, Peek definition

Press Escape to close the Peek window.
Hello World!
Let's update the sample application to "Hello World". Go back to the app.component.ts file and change the title string in AppComponent to "Hello World".
Once you save the app.component.ts file, the running instance of the server will update the web page and you'll see "Welcome to Hello World!!".
Tip: VS Code supports Auto Save, which by default saves your files after a delay. Check the Auto Save option in the File menu to turn on Auto Save or directly configure the files.autoSave user setting.

Debugging Angular
To debug the client side Angular code, we'll use the built-in JavaScript debugger.
Note: This tutorial assumes you have the Edge browser installed. If you want to debug using Chrome, replace the launch type with pwa-chrome . There is also a debugger for the Firefox browser.
Set a breakpoint

Configure the debugger
We need to initially configure the debugger. To do so, go to the Run view ( ⇧⌘D (Windows, Linux Ctrl+Shift+D ) ) and click on the gear button or Create a launch.json link to create a launch.json debugger configuration file. Choose Edge: launch from the Select Environment dropdown list. This will create a launch.json file in a new .vscode folder in your project which includes a configuration to launch the website.
We need to make one change for our example: change the port of the url from 8080 to 4200 . Your launch.json should look like this:
Press F5 or the green arrow to launch the debugger and open a new browser instance. The source code where the breakpoint is set runs on startup before the debugger was attached so we won't hit the breakpoint until we refresh the web page. Refresh the page and you should hit your breakpoint.

You can step through your source code ( F10 ), inspect variables such as AppComponent , and see the call stack of the client side Angular application.

For more information about the debugger and its available options, check out our documentation on browser debugging.
Popular Starter Kits
In this tutorial, we used the Angular CLI to create a simple Angular application. There are lots of great samples and starter kits available to help build your first Angular application.
Recipes
The VS Code team has created recipes for more complex debugging scenarios. There you'll find the Debugging with Angular CLI recipe which also uses the Angular CLI and goes into detail on debugging the generated project's unit tests.
MEAN Starter
If you'd like to see a full MEAN (MongoDB, Express, Angular, Node.js) stack example, look at MEAN.JS. They have documentation and an application generator for a sample MEAN project. You'll need to install and start MongoDB, but you'll quickly have a MEAN application running. VS Code also has great MongoDB support through the Azure Databases extension.
React
React is a library for building user interfaces and it is more minimal than angular. If you'd like to see an example of React working with VS Code, check out the Using React in VS Code tutorial. It will walk you through creating an React application and configuring the launch.json file for the JavaScript debugger.
Angular Extensions
In addition to the features VS Code provides out of the box, you can install VS Code extensions for greater functionality.
Click on an extension tile above to read the description and reviews on the Marketplace.
To find other Angular extensions, open the Extensions view ( ⇧⌘X (Windows, Linux Ctrl+Shift+X ) ) and type 'angular' to see a filtered list of Angular extensions.

The community has also created "Extension Packs" which bundle useful extensions together (for example, a linter, debugger, and snippets) into a single download. To see available Angular extension packs, add the "extension packs" category to your filter (angular @category:"extension packs").
Node.js is a platform for building fast and scalable server applications using JavaScript. Node.js is the runtime and npm is the Package Manager for Node.js modules.
Visual Studio Code has support for the JavaScript and TypeScript languages out-of-the-box as well as Node.js debugging. However, to run a Node.js application, you will need to install the Node.js runtime on your machine.
To get started in this walkthrough, install Node.js for your platform. The Node Package Manager is included in the Node.js distribution. You'll need to open a new terminal (command prompt) for the node and npm command-line tools to be on your PATH.
To test that you have Node.js installed correctly on your computer, open a new terminal and type node --version and you should see the current Node.js version installed.
Linux: There are specific Node.js packages available for the various flavors of Linux. See Installing Node.js via package manager to find the Node.js package and installation instructions tailored to your version of Linux.
Windows Subsystem for Linux: If you are on Windows, WSL is a great way to do Node.js development. You can run Linux distributions on Windows and install Node.js into the Linux environment. When coupled with the Remote - WSL extension, you get full VS Code editing and debugging support while running in the context of WSL. To learn more, go to Developing in WSL or try the Working in WSL tutorial.
Hello World
Let's get started by creating the simplest Node.js application, "Hello World".
Create an empty folder called "hello", navigate into and open VS Code:
Tip: You can open files or folders directly from the command line. The period '.' refers to the current folder, therefore VS Code will start and open the Hello folder.
From the File Explorer toolbar, press the New File button:

and name the file app.js :

By using the .js file extension, VS Code interprets this file as JavaScript and will evaluate the contents with the JavaScript language service. Refer to the VS Code JavaScript language topic to learn more about JavaScript support.
Create a simple string variable in app.js and send the contents of the string to the console:
Note that when you typed console. IntelliSense on the console object was automatically presented to you.

Also notice that VS Code knows that msg is a string based on the initialization to 'Hello World' . If you type msg. you'll see IntelliSense showing all of the string functions available on msg .

After experimenting with IntelliSense, revert any extra changes from the source code example above and save the file ( ⌘S (Windows, Linux Ctrl+S ) ).
Running Hello World
It's simple to run app.js with Node.js. From a terminal, just type:
You should see "Hello World" output to the terminal and then Node.js returns.
Integrated Terminal
VS Code has an integrated terminal which you can use to run shell commands. You can run Node.js directly from there and avoid switching out of VS Code while running command-line tools.

For this walkthrough, you can use either an external terminal or the VS Code integrated terminal for running the command-line tools.
Debugging Hello World
As mentioned in the introduction, VS Code ships with a debugger for Node.js applications. Let's try debugging our simple Hello World application.
To set a breakpoint in app.js , put the editor cursor on the first line and press F9 or click in the editor left gutter next to the line numbers. A red circle will appear in the gutter.

To start debugging, select the Run View in the Activity Bar:
You can now click Debug toolbar green arrow or press F5 to launch and debug "Hello World". Your breakpoint will be hit and you can view and step through the simple application. Notice that VS Code displays a different colored Status Bar to indicate it is in Debug mode and the DEBUG CONSOLE is displayed.

Now that you've seen VS Code in action with "Hello World", the next section shows using VS Code with a full-stack Node.js web app.
Note: We're done with the "Hello World" example so navigate out of that folder before you create an Express app. You can delete the "Hello" folder if you want as it is not required for the rest of the walkthrough.
An Express application
Express is a very popular application framework for building and running Node.js applications. You can scaffold (create) a new Express application using the Express Generator tool. The Express Generator is shipped as an npm module and installed by using the npm command-line tool npm .
Tip: To test that you've got npm correctly installed on your computer, type npm --help from a terminal and you should see the usage documentation.
Install the Express Generator by running the following from a terminal:
The -g switch installs the Express Generator globally on your machine so you can run it from anywhere.
We can now scaffold a new Express application called myExpressApp by running:
This creates a new folder called myExpressApp with the contents of your application. The --view pug parameters tell the generator to use the pug template engine.
To install all of the application's dependencies (again shipped as npm modules), go to the new folder and execute npm install :
At this point, we should test that our application runs. The generated Express application has a package.json file which includes a start script to run node ./bin/www . This will start the Node.js application running.
From a terminal in the Express application folder, run:

Great code editing
Close the browser and from a terminal in the myExpressApp folder, stop the Node.js server by pressing CTRL+C .
Now launch VS Code:
Note: If you've been using the VS Code integrated terminal to install the Express generator and scaffold the app, you can open the myExpressApp folder from your running VS Code instance with the File > Open Folder command.
The Node.js and Express documentation does a great job explaining how to build rich applications using the platform and framework. Visual Studio Code will make you more productive in developing these types of applications by providing great code editing and navigation experiences.

VS Code uses TypeScript type declaration (typings) files (for example node.d.ts ) to provide metadata to VS Code about the JavaScript based frameworks you are consuming in your application. Type declaration files are written in TypeScript so they can express the data types of parameters and functions, allowing VS Code to provide a rich IntelliSense experience. Thanks to a feature called Automatic Type Acquisition , you do not have to worry about downloading these type declaration files, VS Code will install them automatically for you.
You can also write code that references modules in other files. For example, in app.js we require the ./routes/index module, which exports an Express.Router class. If you bring up IntelliSense on index , you can see the shape of the Router class.

Debug your Express app
You will need to create a debugger configuration file launch.json for your Express application. Click on the Run icon in the Activity Bar and then the Configure gear icon at the top of the Run view to create a default launch.json file. Select the Node.js environment by ensuring that the type property in configurations is set to "node" . When the file is first created, VS Code will look in package.json for a start script and will use that value as the program (which in this case is "$\\bin\\www ) for the Launch Program configuration.
Save the new file and make sure Launch Program is selected in the configuration dropdown at the top of the Run view. Open app.js and set a breakpoint near the top of the file where the Express app object is created by clicking in the gutter to the left of the line number. Press F5 to start debugging the application. VS Code will start the server in a new terminal and hit the breakpoint we set. From there you can inspect variables, create watches, and step through your code.

Deploy your application
If you'd like to learn how to deploy your web application, check out the Deploying Applications to Azure tutorials where we show how to run your website in Azure.
Next steps
There is much more to explore with Visual Studio Code, please try the following topics:
Ознакомьтесь с инструкциями по разработке и отладке проекта на JavaScript в Node.js с помощью Visual Studio.
Подготовка среды
Установите git. Интеграция Visual Studio Code с git предоставляет возможность управления Системой управления версиями на боковой панели.
Добавьте необходимые переменные среды. В примерах в этой статье используется строка подключения к базе данных mongoDB.
Если у вас нет доступной базы данных mongoDB, вы можете:
- Запустить этот локальный проект в конфигурации с несколькими контейнерами. При такой конфигурации один из контейнеров должен являться базой данных mongoDB. Установите Docker и расширение Remote — Containers, чтобы получить конфигурацию с несколькими контейнерами, при которой на одном контейнере будет выполнятся локальная база данных mongoDB.
- Выберите создание ресурса базы данных Azure Cosmos DB для базы данных MongoDB. Дополнительные сведения см. в этом учебнике.
Клонирование проекта
Чтобы приступить к работе, клонируйте пример проекта, выполнив следующие действия.
Откройте Visual Studio Code.
Нажмите клавишу F1, чтобы отобразить палитру команд.
В строке палитры команд введите gitcl , выберите команду Git: клонировать и нажмите клавишу ВВОД.

Выберите (или создайте) локальный каталог, в который нужно клонировать проект.

Установка зависимостей
В этом проекте Node.js сначала необходимо установить все зависимости проекта из npm.
Нажмите клавиши CTRLShift + + ` , чтобы отобразить интегрированный терминал Visual Studio Code.
Чтобы установить зависимости, используйте следующую команду:
Переход к файлам и коду проекта
Чтобы ориентироваться в базе кода, поэкспериментируем с возможностями навигации в среде Visual Studio Code.
Нажмите клавиши CTRLP + .
Введите .js , чтобы отобразить файлы JavaScript/JSON рядом с родительской папкой каждого файла.
Выберите файл server.js, который является скриптом запуска приложения.
Наведите указатель мыши на метку времени в строке 11. Эта возможность быстро проверять переменные, модули и типы в файле полезна во время разработки проектов.

Щелчок мыши на переменной , например метка времени , позволяет просматривать все ссылки на эту переменную в одном файле. Чтобы просмотреть все ссылки на переменную в проекте, щелкните переменную правой кнопкой мыши и в контекстном меню выберите Найти все ссылки.

Использование функции автозаполнения в mongoDB
Откройте файл data.js
В строке 84 введите новое использование переменной db , введя db. . Visual Studio Code отображаются db доступные члены API.

Автозаполнение работает, потому что Visual Studio Code использует TypeScript в фоновом режиме (даже для JavaScript), чтобы передавать информацию о вводе, которая может передаваться в список завершения при вводе. Это автоматическое приобретение типов работает для более чем 2000 сторонних модулей, таких как React, подчеркивание и Экспресс.
Модули, которые поддерживает эта функция автозаполнения, можно увидеть в созданном сообществом проекте DefinitelyTyped, который является источником для всех определений типов TypeScript.
Выполнение локального приложения Node.js
После изучения кода пора запустить приложение. Чтобы запустить приложение из Visual Studio Code, нажмите клавишу F5 . При запуске кода с помощью F5 (режим отладки) Visual Studio Code запускает приложение и показывает окно консоли отладки, отображающее StdOut для приложения.

Кроме того, консоль отладки подключается к только что запущенному приложению, чтобы вы могли вводить выражения JavaScript, которые будут обрабатываться в приложении. В этой консоли также есть функция автоматического заполнения. Чтобы увидеть это поведение, введите в консоли process.env :

Отладка локального приложения Node.js
Кроме того что в Visual Studio Code можно запустить приложение и взаимодействовать с ним через консоль, вы также можете задавать точки останова непосредственно в коде. Например, введите CTRLP + , чтобы отобразить средство выбора файлов. После отображения средства выбора файлов выберите файлserver.js .
Установите точку останова в строке 53, которая является оператором if в маршруте для добавления нового элемента. Чтобы задать точку останова, щелкните область слева от номера строки в редакторе, как показано на следующем рисунке.

Помимо стандартных точек останова, средство Visual Studio Code поддерживает условные точки останова, которые позволяют указать время остановки приложения. Чтобы задать условную точку останова, щелкните правой кнопкой мыши область слева от строки, в которой нужно приостановить выполнение, выберите Add Conditional Breakpoint (Добавить условную точку останова) и укажите выражение JavaScript (например, foo = "bar" ) или число операций выполнения, определяющих условие, при котором приложение должно быть остановлено.
После установки точки останова вернитесь к работающему приложению в браузере и добавьте запись. Это действие немедленно приводит к приостановке выполнения приложения в строке 28, где задается точка останова:

Когда приложение будет приостановлено, можно навести указатель мыши на выражения кода, чтобы просмотреть их текущие значения, проверить локальные переменные или контрольные значения и стек вызовов, а также использовать панель инструментов отладки для пошагового выполнения кода. Нажмите клавишу F5, чтобы возобновить выполнение приложения.
Локальная полностековая отладка в Visual Studio Code
Интерфейсная и серверная части написаны с помощью JavaScript. То есть, если вы выполняете отладку серверного кода (Node/Express), в определенный момент может потребоваться отладить код интерфейса (Angular).
Хотя вы смогли запустить и отладить код Node.js без какой-либо конфигурации Visual Studio Code, для отладки интерфейсного веб-приложения необходимо использовать файл launch.json, который указывает, Visual Studio Code как запустить приложение.
Этот пример приложения включает launch.json следующие параметры отладки:
Средство Visual Studio Code определило, что скриптом запуска приложения является server.js.
Откройте файл launch.json, нажмите кнопку Добавить конфигурацию (внизу справа) и щелкните Chrome: запустить с использованием userDataDir.

Добавление новой конфигурации запуска для Chrome позволяет отладить внешний код JavaScript.
Наведите указатель мыши на любой заданный параметр, чтобы увидеть его функцию. Кроме того, обратите внимание, что Visual Studio Code автоматически определяет URL-адрес приложения. Задайте для свойства webRoot значение $/public , чтобы отладчик Chrome знал, где найти внешние ресурсы приложения:
Чтобы запустить и выполнить отладку внешнего и внутреннего кода одновременно, необходимо создать комплексную конфигурацию запуска, которая сообщает средству Visual Studio Code, какой набор конфигураций нужно выполнять параллельно.
Добавьте следующий фрагмент кода в качестве свойства верхнего уровня в файл launch.json (как одноуровневое свойство имеющегося свойства configurations).
Строковые значения, указанные в массиве compounds.configurations, ссылаются на имя отдельных записей в списке конфигураций. Если вы уже изменили эти имена, внесите соответствующие изменения в массив. Например, перейдите на вкладку "Отладка" и выберите для выбранной конфигурации значение Full-Stack (Полный стек) (имя составного конфигурации) и нажмите клавишу F5 для запуска.

Нажмите клавиши CTRL+P и введите (или выберите) значение todos.js, которое является основным контроллером Angular внешней части приложения.
Установите точку останова на строке 11, которая является точкой входа для создаваемой записи из списка задач.
Вернитесь к выполняемому приложению и добавьте новую запись. Вы увидите, что средство Visual Studio Code приостановило выполнение кода Angular.

Как и во время отладки Node.js, можно навести указатель мыши на выражения, просмотреть локальные переменные и контрольные значения, обработать выражения в консоли и т. д.
Есть две прохладные вещи, которые следует заметить:
В области Стек вызовов отображаются два разных стека: Node и Chrome. При этом указано, какой из стеков приостановлен.
Вы можете переходить между внешним и внутренним кодом, нажав клавишу F5, чтобы запустить и активировать точку останова, заданную ранее в маршруте Express.
После этого вы можете эффективно отладить внешний и внутренний код JavaScript или код полного стека JavaScript непосредственно в Visual Studio Code.
Концепция комплексного отладчика не ограничивается только двумя целевыми процессами и кодом JavaScript. Поэтому, если вы работаете с приложением-микрослужбой (это может быть polyglot), можно использовать тот же рабочий процесс (после установки соответствующих расширений для языка или платформы).
Читайте также: