Создание локального сервера visual studio
В данной теме показано решение задачи создания базы данных типа SQL Server с помощью MS Visual Studio . Рассматриваются следующие вопросы:
- работа с окном Server Explorer в MS Visual Studio ;
- создание локальной базы данных типа SQL Server Database ;
- создание таблиц в базе данных;
- редактирование структур таблиц;
- связывание таблиц базы данных между собой;
- внесение данных в таблицы средствами MS Visual Studio .
Содержание
- Условие задачи
- Выполнение
- 1. Загрузить MS Visual Studio .
- 2. Активировать окно Server Explorer .
- 3. Создание базы данных “ Education ”.
- 4. Объекты базы данных Education .
- 5. Создание таблицы Student .
- 6. Создание таблицы Session .
- 7. Редактирование структуры таблиц.
- 8. Установление связей между таблицами.
- 9. Ввод данных в таблицы.
Поиск на других ресурсах:
Условие задачи
Используя средства MS Visual Studio создать базу данных типа MS SQL Server с именем Education. База данных содержит две таблицы Student и Session. Таблицы между собой связаны по некоторыму полю.
Структура первой таблицы «Student».
![02_02_00_014_table01_r]()
Структура второй таблицы “ Session ”.
![02_02_00_014_table02_r]()
Выполнение
1. Загрузить MS Visual Studio .
2. Активировать окно Server Explorer .
Для работы с базами данных корпорация Microsoft предлагает облегченный сервер баз данных Microsoft SQL Server . Существуют разные версии Microsoft SQL Server , например: Microsoft SQL Server 2005 , Microsoft SQL Server 2008 , Microsoft SQL Server 2014 и прочие версии.
Этот сервер отлично подходит для работы с базами данных. Он бесплатен и имеет графический интерфейс для создания и администрирования баз данных с помощью SQL Server Management Tool .
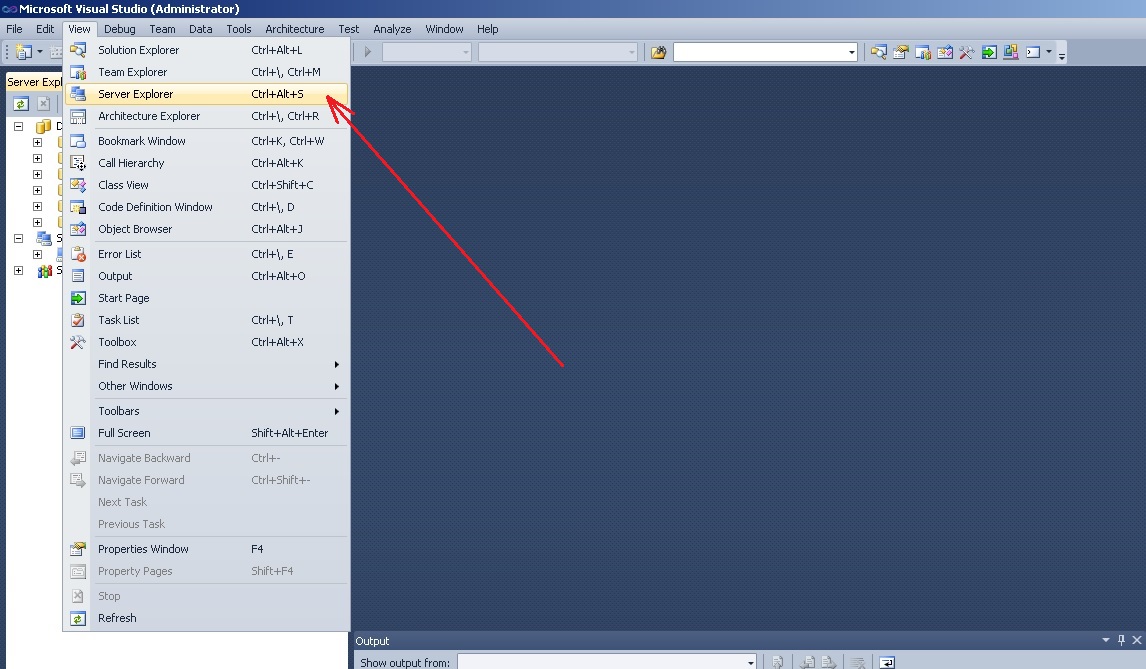
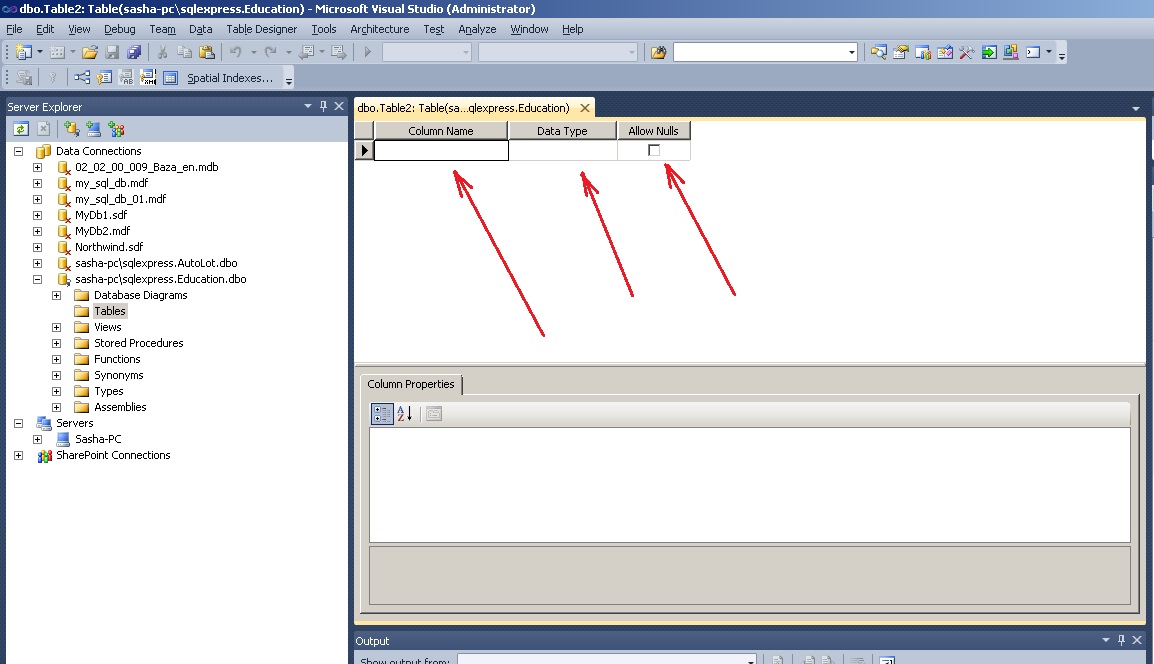
Прежде всего, перед созданием базы данных, нужно активировать утилиту Server Explorer . Для этого, в MS Visual Studio нужно вызвать (рис. 1)
![База данных Server Explorer команда]()
Рис. 1. Вызов Server Explorer
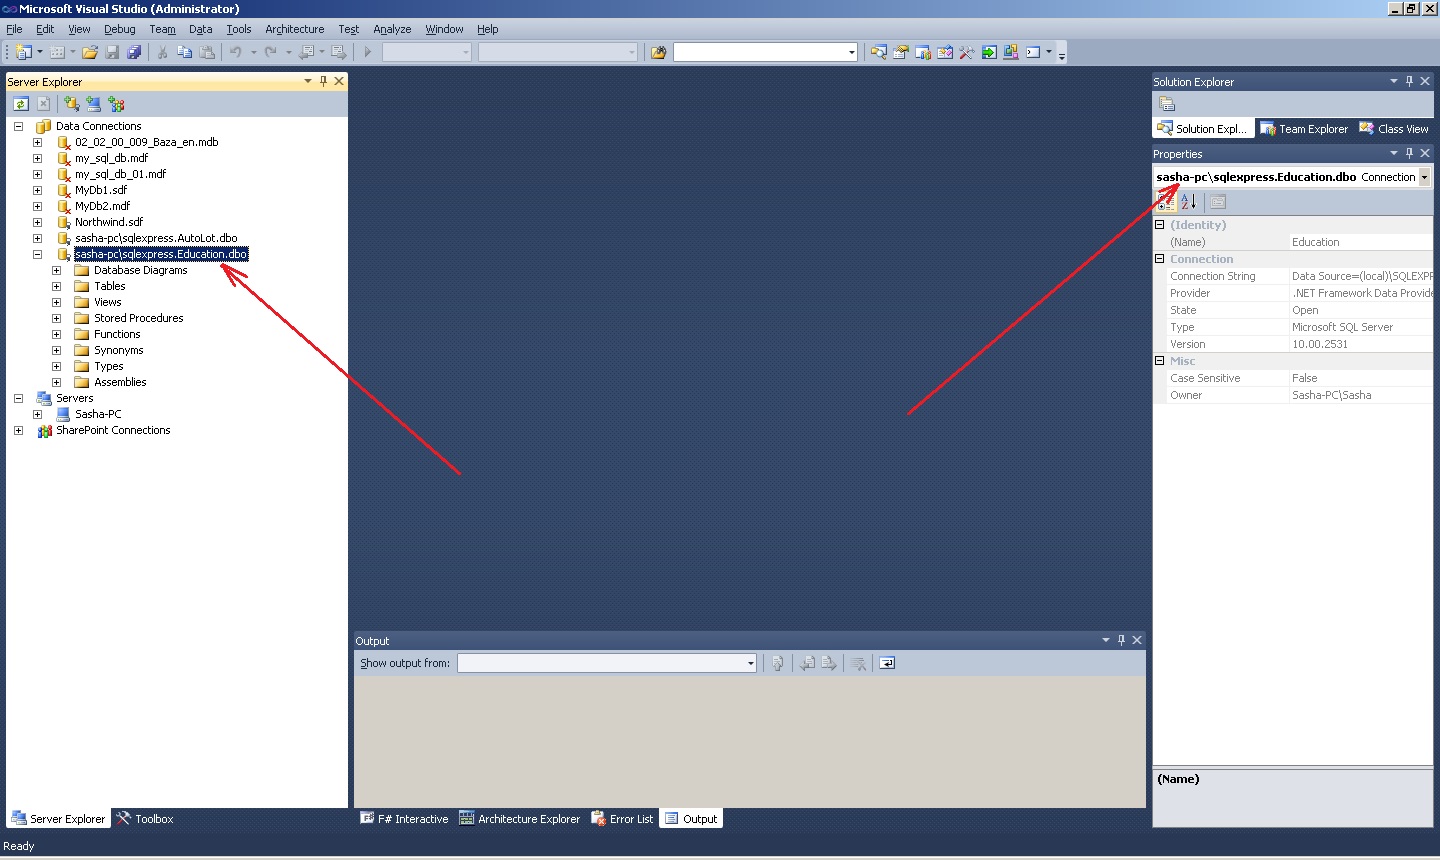
После вызова окно Server Explorer будет иметь приблизительный вид, как показано на рисунке 2.
![База данных окно Server Explorer]()
Рис. 2. Окно Server Explorer
3. Создание базы данных “Education”.
Чтобы создать новую базу данных, базирующуюся на поставщике данных Microsoft SQL Server , нужно кликнуть на узле Data Connections, а потом выбрать “ Create New SQL Server Database … ” (рис. 3).
![база данных SQL Server команда]()
Рис. 3. Вызов команды создания базы данных SQL Server
В результате откроется окно « Create New SQL Server Database » (рис. 4).
В окне (в поле «Server Name») указывается имя локального сервера, установленного на вашем компьютере. В нашем случае это имя “ SQLEXPRESS ”.
В поле « New database name: » указывается имя создаваемой базы данных. В нашем случае это имя Education.
Опцию Use Windows Autentification нужно оставить без изменений и нажать кнопку OK .
![SQL Server 2008 Express команда создание]()
Рис. 4. Создание новой базы данных SQL Server 2008 Express с помощью MS Visual Studio 2010
После выполненных действий, окно Server Explorer примет вид, как показано на рисунке 5. Как видно из рисунка 5, в список имеющихся баз данных добавлена база данных Education с именем
![Server Explorer база данных рисунок]()
Рис. 5. Окно Server Explorer после добавления базы данных Education
4. Объекты базы данных Education.
Если развернуть базу данных Education (знак « + »), то можно увидеть список из следующих основных объектов:
- Database Diagrams – диаграммы базы данных. Диаграммы показывают связи между таблицами базы данных, отношения между полями разных таблиц и т.п.;
- Tables – таблицы, в которых помещаются данные базы данных;
- Views – представления. Отличие между представлениями и таблицами состоит в том, что таблицы баз данных содержат данные, а представления данных не содержат их, а содержимое выбирается из других таблиц или представлений;
- Stored procedures – хранимые процедуры. Они представляют собою группу связанных операторов на языке SQL, что обеспечивает дополнительную гибкость при работе с базой данных.
5. Создание таблицы Student.
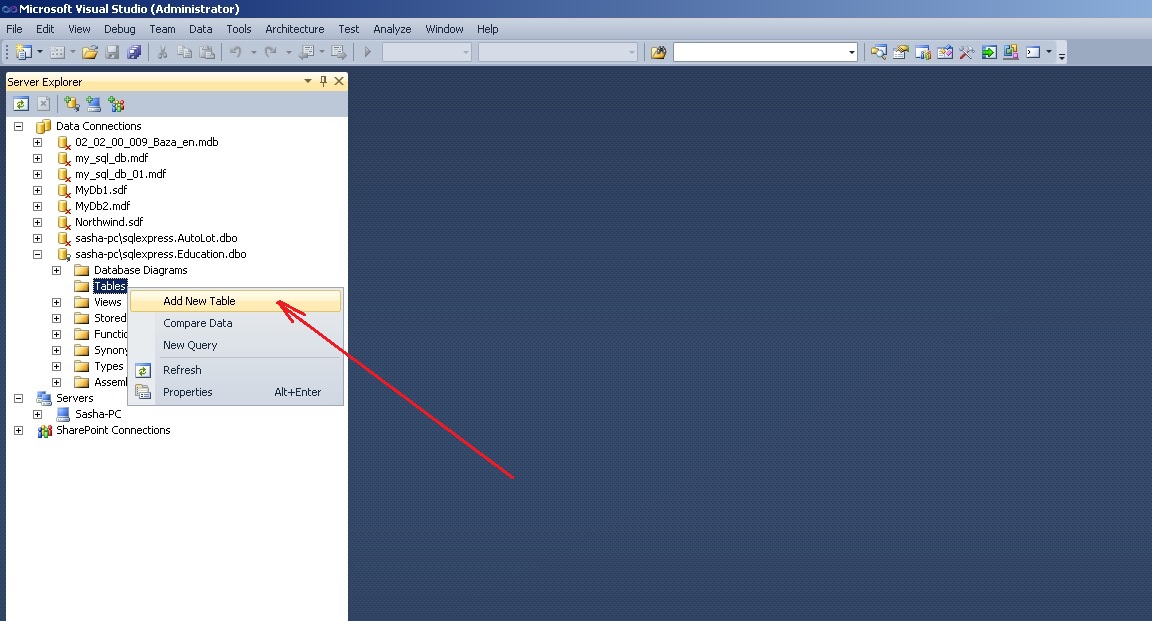
На данный момент база данных Education абсолютно пустая и не содержит никаких объектов (таблиц, сохраненных процедур, представлений и т.д.).
Чтобы создать таблицу, нужно вызвать контекстное меню (клик правой кнопкой мышки) и выбрать команду “ Add New Table ” (рисунок 6).
![база данных таблица создать]()
Рис. 6. Команда добавления новой таблицы
Существует и другой вариант добавления таблицы базы данных с помощью команд меню Data:
![таблица создание рисунок]()
Рис. 7. Альтернативный вариант добавления новой таблицы
В результате откроется окно добавления таблицы, которое содержит три столбца (рисунок 8). В первом столбце “Column Name” нужно ввести название соответствующего поля таблицы базы данных. Во втором столбце “Data Type” нужно ввести тип данных этого поля. В третьем столбце “ Allow Nulls ”указывается опция о возможности отсутствия данных в поле.
![SQL Server таблица создание]()
Рис. 8. Окно создания новой таблицы
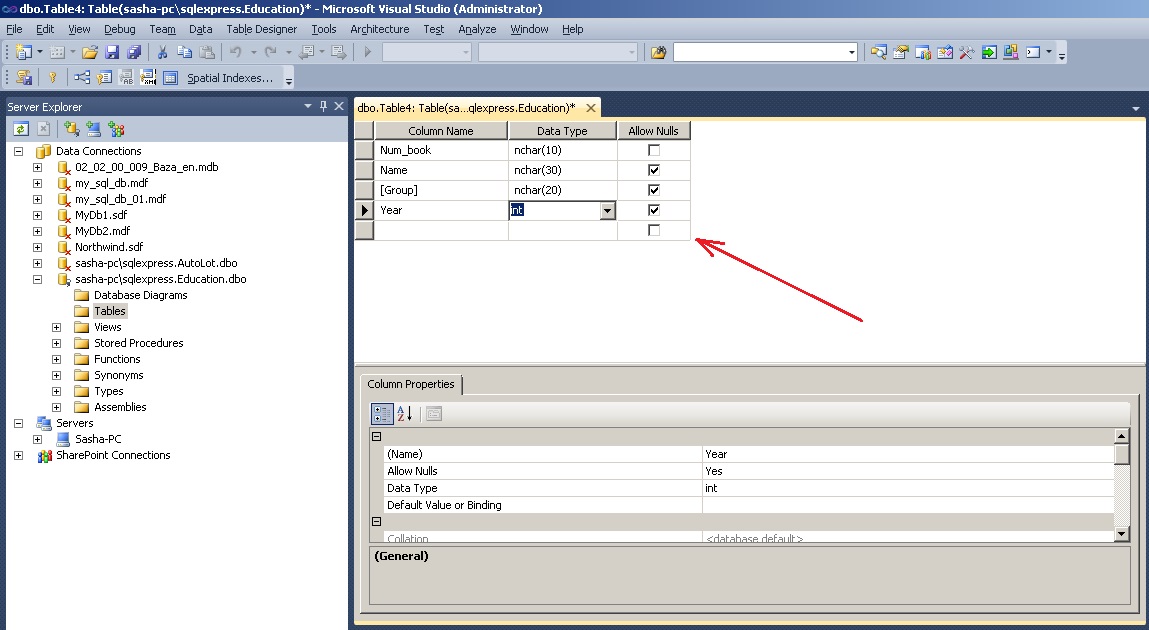
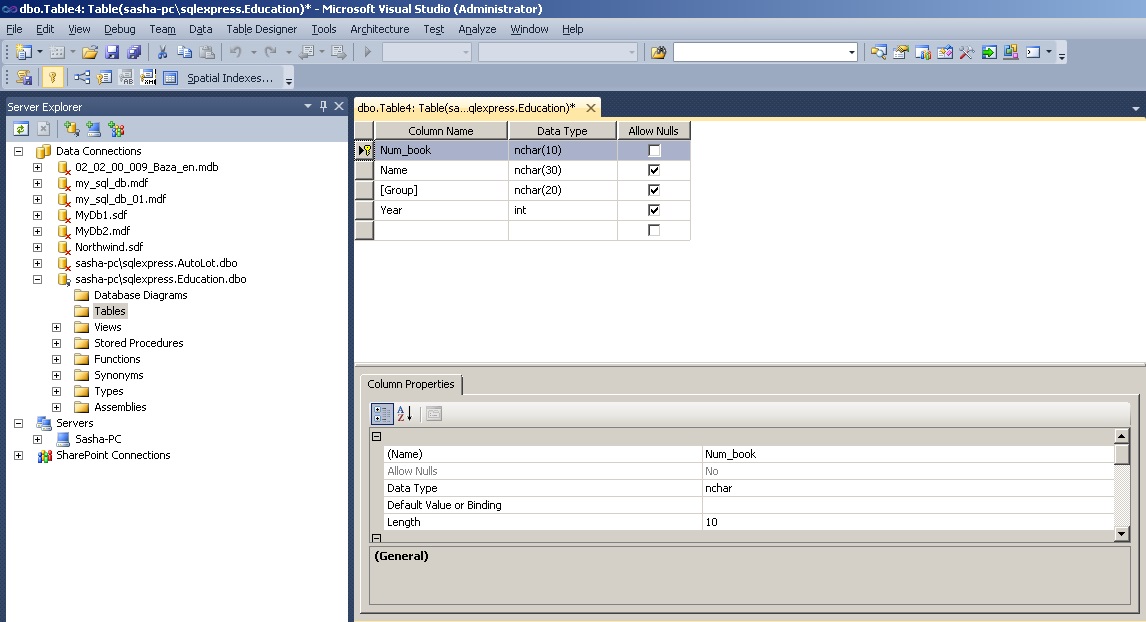
С помощью редактора таблиц нужно сформировать таблицу Student как изображено на рисунке 9. Имя таблицы нужно задать при ее закрытии.
В редакторе таблиц можно задавать свойства полей в окне Column Properties. Для того, чтобы задать длину строки (nvchar) в символах, в окне Column Properties есть свойство Length. По умолчанию значения этого свойства равно 10.
![SQL Server таблица проектирование рисунок]()
Рис. 9. Таблица Student
Следующим шагом нужно задать ключевое поле. Это осуществляется вызовом команды “ Set Primary Key ” из контекстного меню поля Num_book. С помощью ключевого поля будут установлены связи между таблицами. В нашем случае ключевым полем есть номер зачетной книжки.
![таблица SQL Server ключевое поле]()
Рис. 10. Задание ключевого поля
После установки первичного ключа окно таблицы будет иметь вид как изображено на рисунке 11.
![SQL Server таблица формирование]()
Рис. 11. Таблица Student после окончательного формирования
Теперь можно закрыть таблицу. В окне сохранения таблицы нужно задать ее имя – Student (рис. 12).
![таблица имя SQL Server ввод]()
Рис. 12. Ввод имени таблицы Student
6. Создание таблицы Session.
По образцу создания таблицы Student создается таблица Session.
На рисунке 13 изображен вид таблицы Session после окончательного формирования. Первичный ключ ( Primary Key ) устанавливается в поле Num_book. Имя таблицы задается Session.
![таблица формирование SQL Server]()
Рис. 13. Таблица Session
После выполненных действий, в окне Server Explorer будут отображаться две таблицы Student и Session.
Таким образом, в базу данных можно добавлять любое количество таблиц.
⇑
7. Редактирование структуры таблиц.
Бывают случаи, когда нужно изменить структуру таблицы базы данных.
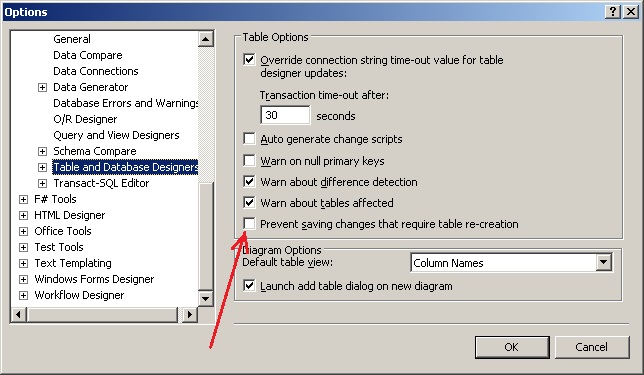
Для того, чтобы вносить изменения в таблицы базы данных в MS Visual Studio, сначала нужно снять опцию “Prevent Saving changes that require table re-creation ” как показано на рисунке 14. Иначе, MS Visual Studio будет блокировать внесения изменений в ранее созданную таблицу. Окно Options, показанное на рисунке 14 вызывается из меню Tools в такой последовательности:
![SQL Server изменения опция]()
Рис. 14. Опция “ Prevent Saving changes that require table re-creation ”
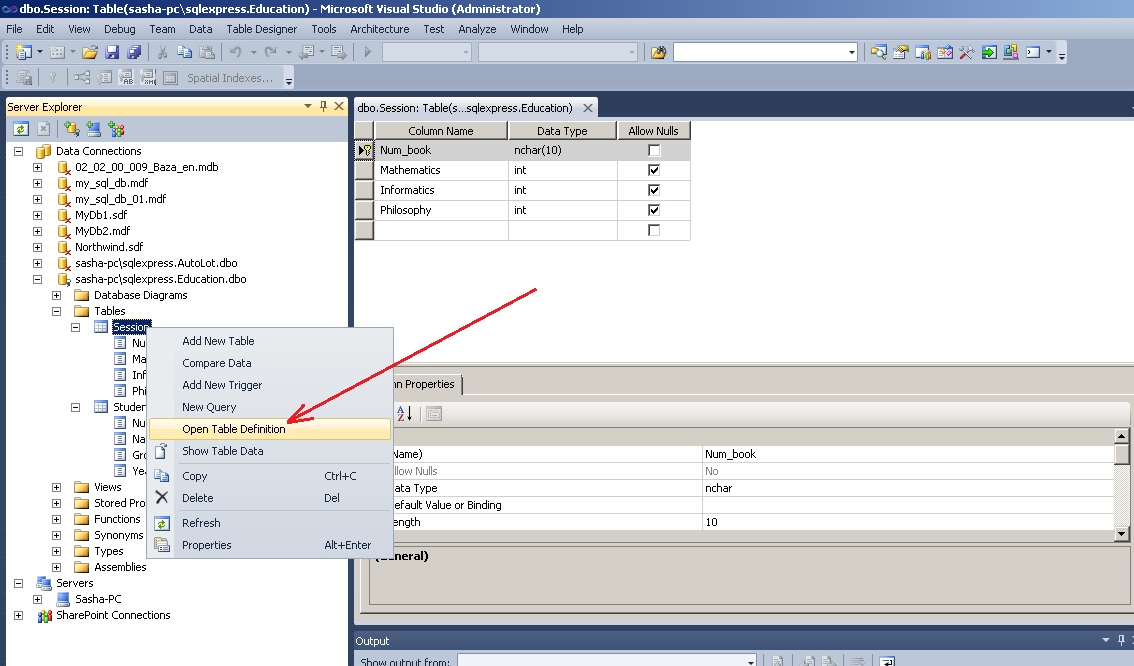
После настройки можно изменять структуру таблицы. Для этого используется команда “ Open Table Definition ” (рисунок 15) из контекстного меню, которая вызывается для выбранной таблицы (правый клик мышкой).
![SQL Server команда рисунок]()
Рис. 15. Вызов команды “ Open Table Definition ”
Также эта команда размещается в меню Data:
Предварительно таблицу нужно выделить.
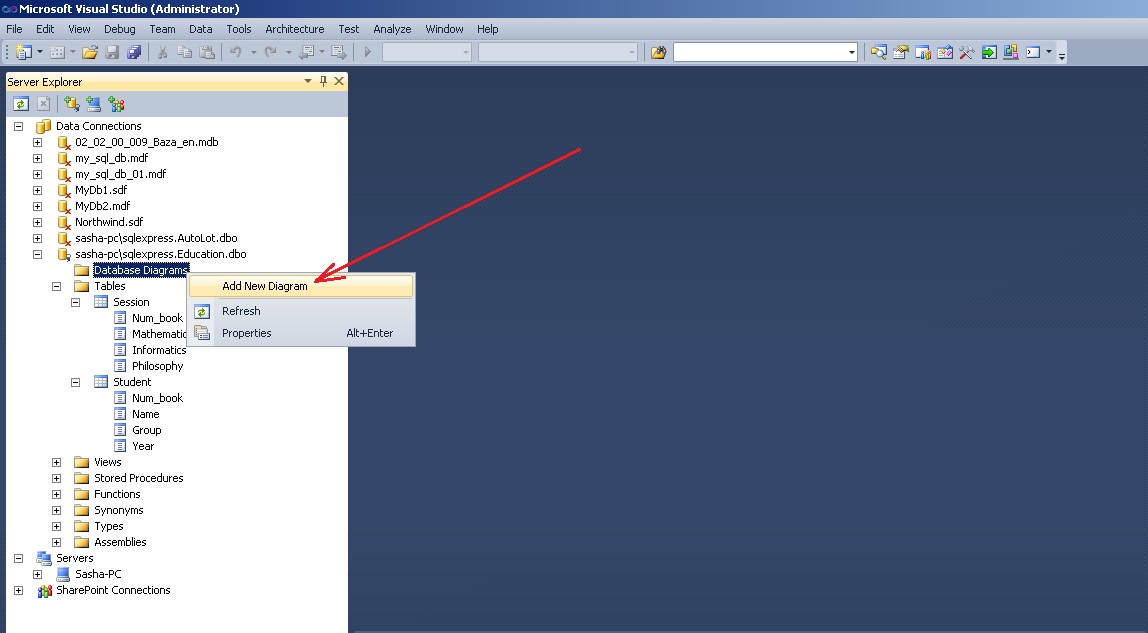
8. Установление связей между таблицами.
В соответствии с условием задачи, таблицы связаны между собою по полю Num_book.
Чтобы создать связь между таблицами, сначала нужно (рисунок 16):
- выделить объект Database Diagram;
- выбрать команду Add New Diagram из контекстного меню (или из меню Data).
![SQL Server диаграмма добавить]()
Рис. 16. Вызов команды добавления новой диаграммы
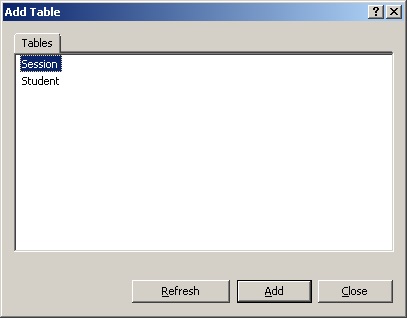
В результате откроется окно добавления новой диаграммы Add Table (рисунок 17). В этом окне нужно выбрать последовательно две таблицы Session и Student и нажать кнопку Add.
![таблица диаграмма добавление окно]()
Рис. 17. Окно добавления таблиц к диаграмме
![таблица диаграмма добавление рисунок]()
Рис. 18. Таблицы Student и Session после добавления их к диаграмме
Чтобы начать устанавливать отношение между таблицами, надо сделать клик на поле Num_book таблицы Student, а потом (не отпуская кнопку мышки) перетянуть его на поле Num_book таблицы Session.
В результате последовательно откроются два окна: Tables and Columns (рис. 19) и Foreign Key Relationship (рис. 20), в которых нужно оставить все как есть и подтвердить свой выбор на OK.
В окне Tables and Columns задается название отношения ( FK_Session_Student ) и названия родительской (Student) и дочерней таблиц.
![связь база данных SQL Server]()
Рис. 19. Окно Tables and Columns
![SQL Server свойство отношение]()
Рис. 20. Окно настройки свойств отношения
После выполненных действий будет установлено отношение между таблицами (рисунок 21).
![SQL Server таблица отношение рисунок]()
Рис. 21. Отношение между таблицами Student и Session
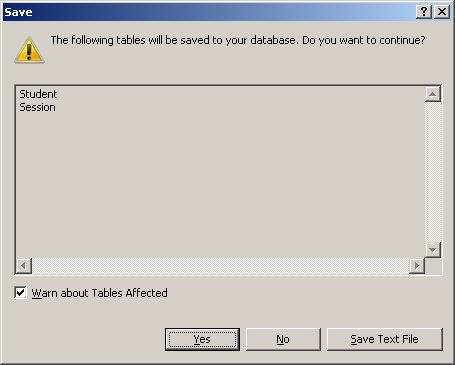
Сохранение диаграммы осуществляется точно также как и сохранение таблицы. Имя диаграммы нужно выбрать на свое усмотрение (например Diagram1).
После задания имени диаграммы откроется окно Save, в котором нужно подтвердить свой выбор (рисунок 22).
![SQL Server изменение таблица]()
Рис. 22. Подтверждение сохранения изменений в таблицах
9. Ввод данных в таблицы.
Система Microsoft Visual Studio разрешает непосредственно вносить данные в таблицы базы данных.
Чтобы вызвать режим ввода данных в таблицу Student, нужно вызвать команду Show Table Data из контекстного меню (клик правой кнопкой мышки) или с меню Data (рис. 23).
![SQL Server данные таблица]()
Рис. 23. Команда Show Table Data
Откроется окно, в котором нужно ввести входные данные (рис. 24).
![SQL Server ввод данные таблица]()
Рис. 24. Ввод данных в таблице Student
После внесения данных в таблицу Student нужно внести данные в таблицу Session.
При внесении данных в поле Num_book таблицы Session нужно вводить точно такие же значения, которые введены в поле Num_book таблицы Student (поскольку эти поля связаны между собой).
Например, если в поле Num_book таблицы Student введены значения “101”, “102”, “103” (см. рис. 24), то следует вводить именно эти значения в поле Num_book таблицы Session. Если попробовать ввести другое значение, система выдаст приблизительно следующее окно (рис. 25).
Таблица Session с введенными данными изображена на рисунке 26.
![таблица данные ввод SQL Server]()
Рис. 26. Таблица Session с введенными данными
Итак, база данных создана. Ввод и обработку данных в таблицах можно реализовать программным путем.
When you develop web projects in Visual Studio, you need a web server to test or run them. Visual Studio lets you test with different web servers, including IIS Express, Internet Information Services (IIS), or the built-in Visual Studio Development Server. You can use any of these servers with a file-based web application project. For a file-based web site project, you can use IIS Express or the built-in Visual Studio Development Server. This topic describes each of the web servers and how to select the server to test with.
The following table provides summary guidance for choosing a web server in Visual web Developer.
IIS Express is the default web server for web application projects in Visual Studio 2012 and is recommended for both web application projects and web site projects.
Visual Studio Development Server
Also known as Cassini, the Visual Studio Development Server is the legacy development web server. Cassini is the default web server when you open a file system folder as a web site project, but you can use IIS Express by choosing Use IIS Express from the Website menu.
Use IIS when you want to test your web application using the server environment that is closest to what the live site will run under, and it is practical for you to install and work with IIS on your development computer. For more information, see Disadvantages of Using IIS as a Development Server with Visual Studio later in this topic.
You can use IIS with web application projects, but not with web site projects.
IIS Express and the Visual Studio Development Server are designed to emulate IIS, but they are configured differently and may fail to reveal errors that can occur when you deploy to a production version of IIS. For more information, see Disadvantages of Using IIS Express or the Visual Studio Development Server later in this topic. If you use IIS Express or the Visual Studio Development Server, it is recommended that you test your application on a staging server that uses the target version of IIS before deploying it to a live site.
Specifying the Web Server for a Visual Studio Web Project
By default, Visual Studio 2012 uses IIS Express. For information about how to specify one of the alternative web servers, see How to: Specify the Web Server for Web Projects in Visual Studio.
Using IIS Express
IIS Express includes many of the features of IIS 7 web server without requiring you to install and manage IIS 7 on your computer. Because IIS Express is similar to IIS 7, it lets you transition web sites to IIS more smoothly than the built-in Visual Studio Development Server does.
IIS Express offers the following features:
It supports and enables the same extensibility model and Web.config file settings as IIS 7.
It does not require changes in your web application code.
It can be installed side-by-side with the full IIS web server as well as with the Visual Studio Development Server. You can choose a different web server for each project.
In corporate environments, IIS Express offers the following features:
It does not require an administrator account in order to run or debug applications.
It does not serve requests to a browser on another computer, making its approval easier in corporate environments.
It supports multiple developers on the same computer. Configuration files, settings, and web content are maintained on a per-user basis under the %systemdrive%\users\%username%\Documents folder.
It can be installed on versions of Windows that do not support IIS 7.
Although IIS Express is derived from IIS and supports the core features of IIS, there are some differences between these servers. For more information, see IIS Express Overview, and Disadvantages of Using IIS Express or the Visual Studio Development Server later in this topic.
Installing IIS Express
IIS Express is installed automatically when you install Visual Studio 2012. If you want to install it in Visual Studio 2010 (SP1 is required), you can use the Microsoft Web Platform Installer.
To install IIS Express
Download the installer and then follow the steps to finish the installation.
Using the IIS Express System Tray Application
IIS Express starts automatically when you run a project in Visual Studio, and it stops when you close the web site project or web application project in Visual Studio. When IIS Express is running, it displays an icon in the system tray, as shown in the following illustration.
![IIS Express System Tray icon]()
The following table lists typical tasks for IIS Express and how to perform them.
Display a list of all sites that are running on IIS Express
Right-click the IIS Express icon in the system tray, and then click Show All Applications.
Select the web site in the IIS Express window. The information will appear beneath the list of web sites.
Stop IIS Express
Right-click the tray icon and select Exit.
In most cases, you do not have to shut down IIS Express manually. However, if you are using SQL Server Express, you might have to stop IIS Express manually before you can access a SQL Server Express .mdf file (for example, from SQL Server Management Studio).
The Visual Studio Development Server
The Visual Studio Development Server does not include all of the extra facilities of IIS. For example, like IIS Express, the Visual Studio Development Server does not support SMTP or FTP. If your web project involves sending email messages, you must have access to an IIS SMTP virtual server to test email.
Your options for configuring the Visual Studio Development Server are more limited compared to IIS Express. You can modify almost any IIS Express setting by editing configuration files, but you can only modify the settings for the Visual Studio Development Server that are available in the Visual Studio UI.
File Authorization on the Visual Studio Development Server
Changing the Port for IIS Express or the Visual Studio Development Server
When you create a new file-based web site or web application project, a random port is selected for the project. For example, if you are testing a page called ExamplePage.aspx, when you run it on IIS Express or the Visual Studio Development Server, the URL of the page might be:
If you want to run IIS Express or the Visual Studio Development Server on a specific port, you can configure the server to do so. You might do this in these scenarios:
You have copied a web application project or web site project and you want to debug and work on both simultaneously. In that case you will have a port collision and will need to change the port number for one of the projects.
Your project includes a reference to a client project or web service that is bound to a specific port.
The code in your project listens to a specific port and you want to be able to test the application using IIS Express or the Visual Studio Development Server.
Disadvantages of Using IIS Express or the Visual Studio Development Server
Resolving References to Root-Level Resources
If your code references root-level resources such as CSS and JavaScript files without specifying that they are at the project root level, the application might work correctly when you test in Visual Studio but fail when you deploy it to IIS in production. Depending on how IIS is configured, a failure could happen in production because IIS may look for root level resources in the root of the IIS web site. For example, if you create a new MVC project in Visual Studio, you’ll find this line of code in the Views\Shared\_Layout.cshtml file:
The tilde (~) specifies that this resource is at the root level of the application. If you remove the tilde and run the application in Visual Studio with IIS Express or the Visual Studio Development Server, you see no change in the application appearance:
![Normal MVC project template home page]()
But when you deploy to IIS (or select IIS as the development web server in Visual Studio), you see that CSS styling is lost because IIS can’t find the resource:
![MVC project template home page with CSS missing]()
Security Context for IIS Express and the Visual Studio Development Server
Code access security If your page runs in medium trust (as most web hosting providers require), the page might run differently under the server in Visual Studio than it does in IIS.
Access to other resources that the page requires This can include reading and writing files other than web pages, reading and writing the Windows registry, and so on.
Using IIS with Visual Studio
The production web server for Microsoft operating systems is IIS, which can include a web server, File Transfer Protocol (FTP) server, Simple Mail Transfer Protocol (SMTP) virtual email server, and other facilities. In order to run IIS, you must be working with one of the versions of Windows that is listed in the following table.
Windows Server 2012
Windows 8, Windows 8 Pro
Windows Server 2008 R2
Windows 7 (Home Premium, Professional, Enterprise, and Ultimate editions)
Windows Server 2008
Windows Vista (Home Premium, Business, Enterprise, and Ultimate editions)
Windows Server 2003
Windows XP Professional x64
Windows XP Professional x32
IIS 5.1 (not recommended; use IIS Express instead. For more information, see Using IIS Express earlier in this topic.)
Advantages of Using IIS as a Development Server with Visual Studio
Working directly with IIS as your development web server lets you work in an environment closer to that of an IIS production web server. This can help you solve configuration problems before your project goes live. If you use IIS Express or the built-in Visual Studio Development Server, the transition to an IIS production web server might require you to perform extra configuration tasks because of the different security contexts between test and production servers.
Disadvantages of Using IIS as a Development Web Server
Using IIS as a development server can require more setup and configuration tasks in order to work with Visual Studio than using IIS Express or the Visual Studio Development Server, including the following:
You must run Visual Studio as an administrator in order to work with IIS.
In addition, it might be impractical for you to work with IIS if any of the following apply:
Your corporate workplace policy does not allow server roles like IIS to be enabled on developer computers.
Your corporate workplace policy does not allow developers to have administrator accounts on IIS.
You do not want to host a web server on your computer (for example, on your home network) for security reasons.
Your web project uses a SQL Server Express LocalDB database. For more information, see Using LocalDB with Full IIS on the SQL Server Express blog.
In these cases you can use either IIS Express or the Visual Studio Development Server.
Installing and Configuring IIS to Work with Visual Studio
In Windows XP, Windows Server 2003, and later versions of Windows, IIS is not installed by default.
When you develop web projects in Visual Studio, you need a web server to test or run them. Visual Studio lets you test with different web servers, including IIS Express, Internet Information Services (IIS), External Hosts, or Custom Web Servers. You can use any of these web servers with a file-based web application project. For a file-based web site project, you can use IIS Express. This topic describes each of the web servers and how to select a web server for testing.
The following table provides summary guidance for choosing a web server in Visual web Developer.
IIS Express
IIS Express is the default web server for web application projects in Visual Studio 2012 and Visual Studio 2013, and it is recommended for both web application projects and web site projects.
Local IIS
Use IIS when you want to test your web application using the server environment that is closest to what the live site will run under, and it is practical for you to install and work with IIS on your development computer. For more information, see Disadvantages of Using IIS as a Development Server with Visual Studio later in this topic.
You can use IIS with web application projects, but not with web site projects.
External Host
You can specify the URL of an external host that you will use for testing. For more information, see Advantages of using an External Host as a Development Server with Visual Studio later in this topic.
Custom Web Server
Visual Studio 2013 adds support for specifying custom Web servers in your projects; this functionality enables developers to define the environment for testing their Web applications.
IIS Express is designed to emulate IIS, but minor differences between IIS Express and the full version of IIS may result in errors that occur only after you have deployed your website to a production version of IIS. For more information, see Disadvantages of Using IIS Express later in this topic. If you use IIS Express, it is recommended that you test your application on a staging server that uses the target version of IIS before deploying it to a live site.
Specifying the Web Server for a Visual Studio Web Project
By default, Visual Studio 2012 and Visual Studio 2013 use IIS Express. For more information about about how to specify one of the alternative web servers, see How to: Specify the Web Server for Web Projects in Visual Studio.
Using IIS Express with Visual Studio
IIS Express includes many of the features of IIS 7 and IIS 8 web servers without requiring you to install and manage IIS on your computer. Because IIS Express is similar to IIS 7 and IIS 8, it lets you transition web sites to IIS more smoothly than using other Web servers.
IIS Express offers the following features:
It supports and enables the same extensibility model and Web.config file settings as IIS 7 and IIS 8.
It does not require changes in your web application code.
It can be installed side-by-side with the full version of IIS and other web servers. You can choose a different web server for each project.
In corporate environments, IIS Express offers the following features:
It does not require an administrator account in order to run or debug applications.
It does not serve requests to a browser on another computer, making its approval easier in corporate environments.
It can be installed on versions of Windows that do not support IIS 7 or IIS 8.
Although IIS Express is derived from IIS and supports the core features of IIS, there are some differences between these servers. For more information, see IIS Express Overview, and Disadvantages of Using IIS Express later in this topic.
Installing IIS Express
IIS Express is installed automatically when you install Visual Studio 2012 and Visual Studio 2013. If you want to install IIS Express in Visual Studio 2010 (SP1 is required), you can use the Microsoft Web Platform Installer.
To install IIS Express
Download the installer and then follow the steps to finish the installation.
Using the IIS Express System Tray Application
IIS Express starts automatically when you run a project in Visual Studio, and it stops when you close the web site project or web application project in Visual Studio. When IIS Express is running, it displays an icon in the system tray, as shown in the following illustration.
![IIS Express System Tray icon]()
The following table lists typical tasks for IIS Express and how to perform them.
Display a list of all sites that are running on IIS Express
Right-click the IIS Express icon in the system tray, and then click Show All Applications.
Select the web site in the IIS Express window. The information will appear beneath the list of web sites.
Stop IIS Express
Right-click the tray icon and select Exit.
In most cases, you do not have to shut down IIS Express manually. However, if you are using SQL Server Express, you might have to stop IIS Express manually before you can access a SQL Server Express .mdf file (for example, from SQL Server Management Studio).
Changing the Port for IIS Express
When you create a new file-based web site or web application project, a random port is selected for the project. For example, if you are testing a page called ExamplePage.aspx, when you run it on IIS Express, the URL of the page might be:
If you want to run IIS Express on a specific port, you can configure the server to do so. You might do this in these scenarios:
You have copied a web application project or web site project and you want to debug and work on both simultaneously. In that case you will have a port collision and will need to change the port number for one of the projects.
Your project includes a reference to a client project or web service that is bound to a specific port.
The code in your project listens to a specific port and you want to be able to test the application using IIS Express.
Disadvantages of Using IIS Express
Resolving References to Root-Level Resources when Deploying to Production
If your code references root-level resources such as CSS and JavaScript files without specifying that they are at the project root level, the application might work correctly when you test in Visual Studio but fail when you deploy it to IIS in production. Depending on how IIS is configured, a failure could happen in production because IIS may look for root level resources in the root of the IIS web site. For example, if you create a new MVC project in Visual Studio, you’ll find this line of code in the Views\Shared\_Layout.cshtml file:
The tilde (~) specifies that this resource is at the root level of the application. If you remove the tilde and run the application in Visual Studio with IIS Express, you see no change in the application appearance:
![Normal MVC project template home page]()
But when you deploy to IIS (or select IIS as the development web server in Visual Studio), you may see that CSS styling is lost because IIS can’t find the resource:
![MVC project template home page with CSS missing]()
Security Context for IIS Express
Code access security If your page runs in medium trust (as most web hosting providers require), the page might run differently under the server in Visual Studio than it does in IIS.
Access to other resources that the page requires This can include reading and writing files other than web pages, reading and writing the Windows registry, and so on.
Using an External Host with Visual Studio
Visual Studio 2013 allows you to configure an external web server for testing, and this feature was called a Custom Web Server in Visual Studio 2012 and earlier versions of Visual Studio. There are several advantages that are available to developers when they configure their Web applications to use an external host for testing, and these will be discussed in the following sections.
Advantages of using an External Host as a Development Server with Visual Studio
For example, if the files for your Web application are stored in a network share that is also the content folder for a website that is hosted by IIS on a development or staging Web Server, you could enter the URL for that website as the external host. This scenario allows for additional clients to test the application, which would not be possible with IIS Express because it is designed for testing on your local computer.
Because an external host server is typically on a remote server, your application is not rebuilt every time that you press F5 to start debugging. This allows you to ignore build errors in source files that are still in development while still being able to test the parts of your application that have been completed.
In addition, because your remote Web server may be running as a service, your application testing may appear to have more immediate reaction time because the website will already be running. In contrast, IIS Express might need to be restarted each time that you press F5 to debug your application.
Disadvantages of using an External Host
Because the web server is remote, you may have difficulty configuring your debugging experience in a way that emulates a local web server. For example, your remote web server may have authentication settings that prevent Visual Studio from connecting to your Web application as a debugger, so if you were to add Debugger.Break() statement to your code, you would receive an HTTP 401 "Access Denied" message when that statement was reached.
Using a Custom Web Server with Visual Studio
Using IIS with Visual Studio
The production web server for Microsoft operating systems is IIS, which can include a web server, File Transfer Protocol (FTP) server, Simple Mail Transfer Protocol (SMTP) virtual email server, and other facilities. In order to run IIS, you must be working with one of the versions of Windows that is listed in the following table.
Пример создания/подключения локальной базы данных Microsoft SQL Server , которая размещается в «*.mdf» -файле
Содержание
Поиск на других ресурсах:
Условие задачи
Используя средства Microsoft Visual Studio создать локальную базу данных, которая размещается в «*.mdf» -файле. Имя базы данных – «MyDataBase.mdf» . База данных должна использоваться в системе управления реляционными базами данных Microsoft SQL Server .
Выполнение
1. Запустить MS Visual Studio . Утилита Server Explorer
Система Microsoft Visual Studio имеет в наличии мощные встроенные средства создания и управления базами данных. К таким средствам относится система управления реляционными базами данных Microsoft Visual Studio .
Для работы с базами данных в системе Microsoft Visual Studio используется утилита Server Explorer (рисунок 1).
Чтобы вызвать окно Server Explorer используется команда
![Visual Studio Server Explorer окно]()
Рис. 1. Окно Server Explorer
2. Создание базы данных
2.1. Команда «Connect to Database»
Существует два способа создания новой базы данных, которая размещается в «*.mdf» -файле:
- вызов команды «Connect to Database» из меню Tools (рисунок 2);
- нажатие кнопки «Connect to Database» из меню Server Explorer (рисунок 3).
![Visual Studio команда]()
Рис. 2. Команда «Connect to Database …»
![Visual Studio команда Server Explorer]()
Рис. 3. Команда «Connect to Database» из панели инструментов Server Explorer
2.2. Окно «Add Connection»
После вызова команды «Connect to Database» откроется окно «Add Connection» (рисунок 4).
![Visual Studio окно]()
Рис. 4. Окно « Add Connection «
В окне «Add Connection» есть возможность выполнять следующие операции:
- задавать источник данных ( Data source );
- создать новый или выбрать уже существующий файл базы данных ( Database file name );
- задавать пароль для входа в базу данных (по желанию);
- проверить соединение с базой данных ( Test Connection );
- устанавливать другие параметры.
Изменяем источник данных нажитием на кнопке «Change…» . В результате откроется окно «Change Data Source» (рисунок 5), в котором нужно выбрать источник данных ( Data Source ) и провайдера ( Data provider ). Предлагаются следующие источники данных:
- база данных Microsoft Access , которая размещается в файле “*.mdb” ;
- база данных, поддерживающая доступ с помощью драйвера ODBC ;
- база данных типа Microsoft SQL Server , в том числе и локальный сервер SQLEXPRESS ;
- база данных “Microsoft SQL Server Compact 3.5” , которая размещается в файлах с расширением “*.sdf”;
- база данных “Microsoft SQL Server Database File” , которая размещается в файлах с расширением “*.mdf” ;
- база данных Oracle .
В нашем случае (в соответствии с условием задачи) нужно выбрать «Microsoft SQL Server Database File» .
![Visual Studio источник данных выбор]()
Рис. 5. Окно изменения источника данных. Выбор Microsoft SQL Server Database File
В поле «Database file name (new of existing)» нужно ввести название новой создаваемой базы данных. В нашем случае вводится имя «MyDataBase.mdf» (рисунок 6). С помощью кнопки «Browse …» можно задать папку, в которой будет размещаться файл базы данных «MyDataBase.mdf» .
На рисунке 6 задано имя новой созданной базы данных, которая размещается по следующему пути:
![MS Visual Studio имя база данных]()
Рис. 6. Выбор имени создаваемой базы данных «MyDataBase.mdf»
После нажатия на OK система выдаст окно (рисунок 7), в котором нужно подтвердить создание новой базы данных.
![Visual Studio создание база данных]()
Рис. 7. Подтверждение создания новой базы данных
После выполненных действий, будет создана новая база данных с именем «MyDataBase.mdf» . Пока что база данных не содержит ни единой таблицы, представления, диаграммы и т.п. (рисунок 8).
В базе данных программист имеет возможность создавать собственные таблицы, диаграммы, представления, хранимые процедуры, функции, типы и сборки.
Теперь базу данных «MyDataBase.mdf» можно использовать в собственных проектах.
![отображение база данных Server Explorer]()
Рис. 8. Отображение базы данных «MyDataBase.mdf» в окне Server Explorer
3. Добавление уже существующей базы данных к перечню баз данных Server Explorer
Окно Add Connection … (рисунок 4) разрешает также добавлять ранее созданную базу данных к перечню баз данных, которые отображаются в окне Server Explorer . В этом случае с помощью кнопки «Browse…» (рисунок 4) нужно выбрать ранее созданный «*.mdf» -файл базы данных.
В результате выбранный файл будет подключен к списку баз данных, которые отображаются в Server Explorer . После этого этот файл можно использовать в проектах на MS Visual Studio .
Дано три стороны треугольника: a , b , c .
Используя формулу Герона, разработать приложение, которое находит площадь треугольника. Приложение реализовать как Web-application .
Формула Герона имеет вид:
![Формула Герона]()
где p – полупериметр:
a, b, c – длина сторон треугольника.
⇑
Выполнение
1. Запустить MS Visual Studio
Пример создания приложения в MS Visual Studio по шаблону Windows Forms Application подробно описывается в теме:
⇑
2. Создание Web-приложения
Приложения типа Web могут вызываться из любого компьютера, подключенного к сети Internet. Для открытия такого приложения используется Web -браузер (например Opera , Google Chrome , Internet Explorer и другие).
Ниже указаны два способа создания Web -приложения в MS Visual Studio .
⇑
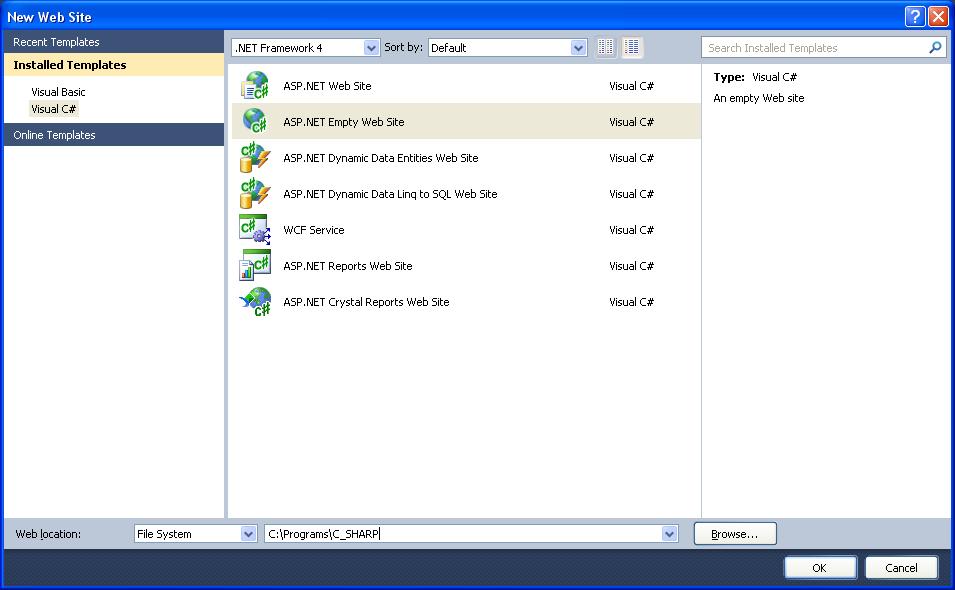
2.1. Создание Web-приложения (способ № 1)
Для этого способа, чтобы создать Web -приложение, нужно сначала вызвать команду (рис. 1):
Рис. 1. Команда создания нового веб-сайта
Например, в нашем случае, файлы будут сохраняться в папке
Место расположения файлов указывается в поле « Web-location» . Доступны три способа размещения файлов:
Выбираем « File system «. В этом случае файлы приложения будут размещаться на локальном сервере ( localhost ), который создается системой. Это означает, что программа-клиент (наше приложение) и программа-сервер (условно отдаленный компьютер в сети) размещены на одном и том же (домашнем) компьютере. Фактически localhost – это IP -адрес, с помощью которого компьютер может обратиться в сети к самому себе, независимо от наличия или вида компьютерной сети.
![MS Visual Studio команда создания Web-сайта]()
Рис. 2. Создание Web-сайта
⇑
2.2. Создание Web-приложения (способ № 2)
Существует также и другой способ создания Web -приложения с помощью команды (рис. 3)
![Visual Studio Команда ASP .NET Empty Web Site]()
Рис. 3. Команда создания нового проекта
Рис. 4. Команда создания Web-приложения
⇑
3. Создание приложения как веб-сайта
Для решения задачи выбираем первый способ.
После выполненных операций создается решение ( Solution ), в котором есть один проект типа веб-сайт (рис. 5).
![Окно]()
Рис. 5. Окно « Solution Explorer » после создания веб-сайта
Если запустить на выполнение данный проект, то внизу в правой части экрана ( SySTray ) отобразится окно загруженного локального сервера (рис. 6).
![Visual Studio локальный сервер выполнение приложения]()
Рис. 6. Загрузка локального сервера для выполнения приложения
Следующим отобразится окно, изображенное на рисунке 7. В этом окне нужно подтвердить на кнопке « ОК «, чтобы модифицировать файл « Web.config » таким образом, чтобы можно было выполнять наше приложение.
Рис. 7. Запрос к модификации файла « Web.config «
В результате запуска, в активном веб-браузере откроется страница с приблизительно таким текстом (рис. 8):
Рис. 8. Текст, который выводится в веб-браузере
Для завершения работы приложения, нужно в MS Visual Studio вызвать команду « Stop Debugging » из меню « Debug «.
⇑
4. Добавление формы к приложению
Добавим новую форму к Web -приложению.
Для этого нужно выделить название приложения в Solution Explorer , сделать клик правой кнопкой «мыши» и в контекстном меню выбрать команду « Add New Item… » (рис. 9).
Рис. 9. Команда « Add New Item… «
Существует и другой способ добавления формы – вызов команды « Add New Item… » из меню « Website «.
Рис. 10. Добавление новой формы
После добавления, в Solution Explorer можно увидеть дополнительные два файла (рис. 11):
С помощью этих двух файлов можно изменять внешний вид формы и организовывать работу в ней.
![Visual Studio Файлы формы]()
Рис. 11. Файлы формы « Default.aspx » и « Default.aspx.cs «
С помощью кнопок Design и Source можно переключаться между режимом проектирования и режимом кода страницы Default.aspx (рис. 12).
Рис. 12. Режимы проектирования ( Design ) и кода ( Source )
⇑
5. Конструирование формы
Согласно с условием задачи, форма должна содержать следующие элементы управления:
⇑
5.1. Изменение размеров формы
Переходим в режим проектирования с помощью кнопки « Design » (рис. 12).
С помощью «мышки» увеличиваем размер формы, как показано на рисунке 13 (необязательно).
Рис. 13. Изменение размеров формы в режиме проектирования
⇑
С помощью «мышки» можно выносить на форму различные элементы управления. Работа с Web -формой есть точно такая же как и с формой типа Windows Forms . Текст на форме можно вносить непосредственно.
Для нашей задачи нужно вынести на форму следующие элементы управления:
- три элемента управления типа Label для обозначения « а = «, « b = «, « c = «;
- один элемент управления типа Button ;
- три элемента управления типа TextBox ;
- один элемент управления типа Label для вывода результата.
При вынесении элемента управления в правой нижней части экрана (окно Properties ) можно изменять свойства элементов управления (рис. 14).
Рис. 14. Изменение свойств элементов управления Web -формы
В целом, после построения, форма приложения должна иметь вид как показано на рисунке 15.
Рис. 15. Форма приложения в режиме проектирования
⇑
6. Программирование события клика на кнопке « Calculate «
Последним шагом есть программирование события, которое будет генерироваться при клике на кнопке « Calculate «. Для Web -приложений это осуществляется стандартным для MS Visual Studio способом. Программный код обработки события будет сформирован в файле « Default.aspx.cs «.
Таким образом, выделяем элемент управления Button1 . В списке свойств Properties переходим к вкладке Events . В вкладке Events делаем двойной клик «мышкой» напротив названия события « OnClick «. Система откроет файл « Default.aspx.cs » со следующим кодом:
В обработчик события Button1_Click(…) вводим код расчета площади треугольника по трем сторонам. В целом текст модуля « Default.aspx.cs » будет иметь вид.
using System; using System.Collections.Generic; using System.Linq; using System.Web; using System.Web.UI; using System.Web.UI.WebControls; public partial class _Default : System.Web.UI.Page < protected void Page_Load( object sender, EventArgs e) < >protected void Button1_Click( object sender, EventArgs e) < double a, b, c, p, s; a = Double .Parse(TextBox1.Text); b = Double .Parse(TextBox2.Text); c = Double .Parse(TextBox3.Text); p = (a + b + c) / 2; s = Math .Sqrt(p * (p - a) * (p - b) * (p - c)); Label4.Text = "S text-align: justify;">После запуска приложения на выполнение можно проконтролировать его работу в Web -браузере (рис. 16).
Рис. 16. Выполнение Web -приложения в браузере Opera
После этого можно выносить приложение на Web-сервер. Но это уже другая тема.
Читайте также:


.jpg)
.jpg)
.jpg)
.jpg)