
Создание дискорд бота на java
Discord4J - это библиотека написанная на Java 8, выполняющая роль интерфейса к Discod API. С помощью нее как раз можно сделать чат-бот для вашего Discord-сервера.
Для реализации эхо-бота в рамках данной статьи, нам понадобится:
- Java 8 (JDK 8)
- Eclipse IDE с поддержкой Maven проектов (с 2016 года интеграция Maven в Eclipse идет "в коробе", начиная с Eclipse Neon)
- Discord4J (на момент написания статьи, использовалась версия v2.7.0)
1. Создание проекта в Eclipse с использованием Maven
Для начала создаем Maven проект в Eclipse. File -> New -> Project . или Alt + Shif + N -> Project . . В списке находим категорию Maven и в ней выбираем Maven Project. Жмем далее.

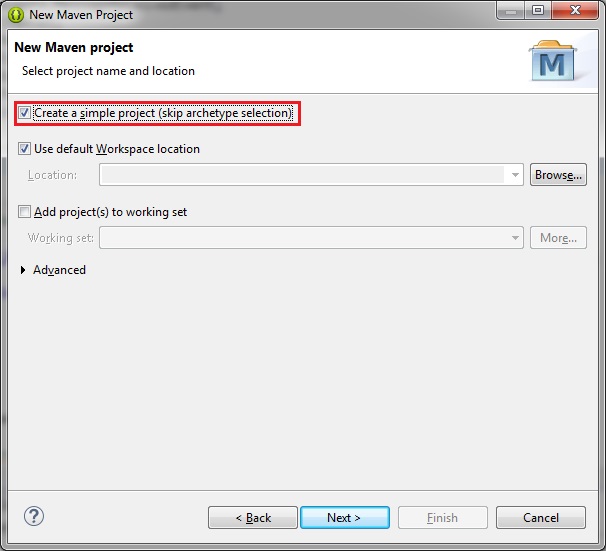
В следующем окне обязательно ставим галочку "Create a simple project". Жмем далее.
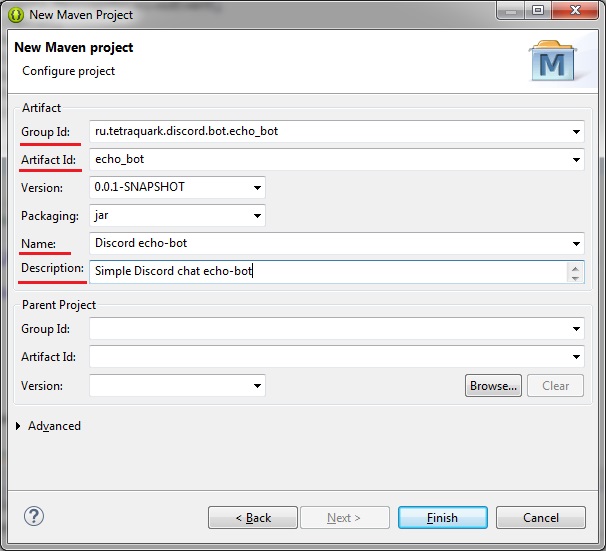
В следующем окне заполняем поля Group ID, Artifact ID, Name, Description на свой вкус. Жмем финиш.
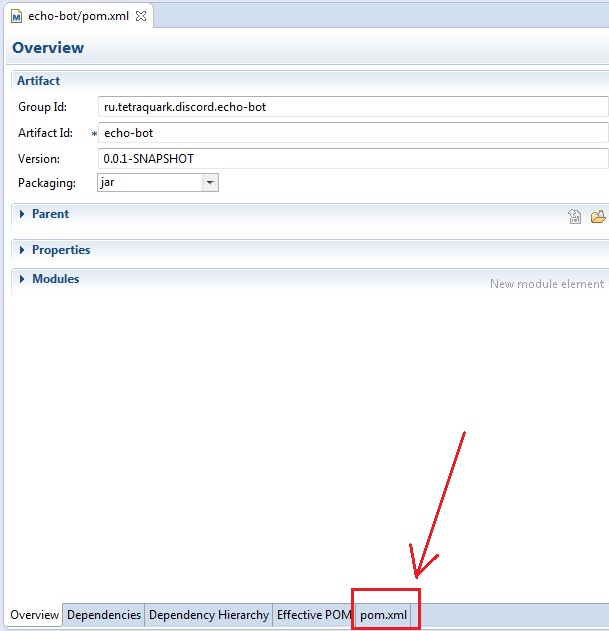
Таким образом мы создали пустой Maven проект для нашего будущего бота, содержание которого примерно следующее:

Открываем в текстовом редакторе файл проекта: pom.xml.
В блок (где-то между
Сохраняем файл и обновляем проект следующим образом: правой кнопкой мыши по проекту в Package Explorer, в всплывающем меню выбираем: Maven -> Update Project.
После проделанной процедуры Maven автоматически загрузит с указанных репозиториев в pom.xml зависимые библиотеки, в нашем случае это Discord4j, и встроит их в проект.
Если ничего плохого не произошло, то проект готов и переходим к написанию кода.
2. Пишем код
Создаем новый package в src/main/java, в нем создаем новый класс для своего бота.
Я приведу пример того, что получилось у меня. Подробно описывать этот код я не буду, потому что эти 100 строк крайне просты. Я добавил комментарии к коду, чего для понимая должно хватить.
Ниже привожу полный код эхо чат-бота (ниже есть ссылка на Github проекта):

We’ll build a really basic bot with the JDA discord API wrapper.
In this tutorial, we’ll use the IntelliJ IDEA IDE, created by Jetbrains.
This tutorial assumes you have a JDK 8+ installed and the JAVA_HOME environment variable is set to it.
Download and install IDEA (The community edition is enough)
Once you open IDEA, you’ll see this screen

Click on Create New Project , then select Gradle and mark just Java , like this


You don’t need to change any gradle settings, but personally I like to enable auto import.

After that, choose a project name and where to save it and then click on Finish .

Wait for gradle to finish configuring your project, and you should see a screen like this

Open build.gradle and let’s add JDA as a dependency (check the latest version here)

If you get a dialog like this showing up, click Import Changes (it won't show up if you enabled auto import)

Now, we’ll create our main class. Open in the file viewer src/main and right click on java , then go to New -> Java Class

Give your main class a name and click on OK

Now, we’ll create a main method (hint: type psvm until a popup shows and then hit enter)

Now, we’ll create our JDA instance, using the JDABuilder class

To continue, you need a discord bot token, which you can get on the applications page
Add the token to your JDABuilder using the setToken(String) method


You’re probably wondering why that line is red. If we hover the mouse above it, we’ll see a message explaining what’s wrong
An exception, huh? For now, we’ll just declare the main method as throws LoginException

Now, click the green play button to the left of our class name and select Run

You’ll see something like this being printed to your console

The first 6 lines are because we don’t have any slf4j implementations on our project, but we can ignore those for now.
The next 3 lines tell us that JDA has successfully logged in to discord, and is ready to receive messages. But our bot doesn’t do anything right now.
To have our bot do something, we need to add a listener to our JDA instance. For now, let’s have our main class extend ListenerAdapter and override the onMessageReceived method

Now, let’s make it reply with Pong! if the message is !ping

To finalize, we register a new instance of our main class in the JDABuilder

Now, when we re-run out bot, it’ll respong with Pong when we run !ping

Now that you know how to build a basic bot, we need to export it into a runnable jar file. To do so, we’ll use the gradle shadow plugin. Here’s how our build.gradle looks now
To export our project, open the gradle tab on the right and double click on Tasks->shadow->shadowJar

The file will be in PROJECT_ROOT/build/libs, and can be ran with the java command: java -jar ourjar.jar
If you don’t want to risk your bot entering into infinite message loops, add this to your listener

In this tutorial, we’ll be using JDA-Utilities to handle our commands, so be sure to add it as a depencency as well. Check the latest version here.
Our build.gradle now looks like this:
Now, we’ll use JDA-Utilities’ CommandClient to handle our command processing.
This is what a basic command looks like:
All mod actions in JDA (such as banning, kicking, adding or removing roles, server muting, server deafening, etc) are done through the GuildController class.
To get the GuildController for a Guild, call it’s getController() method.
All JDA methods that interact with discord’s REST API return an instance of the RestAction class.
A RestAction represents a request that will be done. However, the request will be executed only when you call queue() , complete() , or submit() on the RestAction object. If you don't call one of those methods, the action will never be executed and your bot will not work.
Whenever possible, try using the queue() method and it's overloads, as they do not block) the current thread), so other operations aren't slowed down.
This is what our kick command looks like:
You might be wondering what the x-><> syntax is. If you don't know, they're lambda expressions, which are similar to javascript's closures or python's lambdas.
The implementation of this command is left as an exercise for you.
A softban is basically a ban and unban, to kick and delete an user’s messages. Let’s implement one now by modifying the ban command:
To mute, we’ll need a Mute role. For now, we’ll just give the person the first role named Muted we find:
This example uses the java stream and optional APIs
Again, the actual command implementation is left as an exercise for the reader.
We’ll mute someone for 1 hour, then unmute. Let’s change our mute command:
To create our filter, we’ll need to add a new listener to our JDA object. Let’s create a new class and extend ListenerAdapter :
Now, let’s override the onGuildMessageReceived(GuildMessageReceivedEvent) method:
Let’s also add a curse word list:
Now, let’s see if there’s a curse word and delete the message if it has one:
If we run our bot now, we’ll notice it completely ignores curse words. That’s because we didn’t register the listener. Now let’s go back to our main class and change .addEventListener(commandClientBuilder.build()) to .addEventListener(commandClientBuilder.build(), new CurseWorldFilter()) so our listener is registered.
Run the bot again and you’ll notice it’s now detecting curse words and deleting them.

Hello there, and welcome to the tutorial on connecting/disconnecting bots to and from voice channels! Whilst it does not sound very exciting or adventerous, it is an important step in creating music bots. You have to learn to crawl before you can learn to run.
There are a couple of requirements you must meet before being able to jump straight into the tutorial. This tutorial will not guide you through obtaining them, but it will link you to a few resources you will most likely find useful.
This requirement may be quite obvious, but before you can code a bot in Java you will need to have Java installed. Java essentially comes in two components: the Java Runtime Environment and the Java Development Kit. The Java Runtime Environment, also abbreviated as the JRE is what you most likely have installed on your computer, if at all. The JRE allows Java programs to run on your computer. The Java Development Kit, abbreviated as JDK, contains the tools required to code Java. Installing the JDK will install the JRE, but not vice versa. It is important that you have the JDK installed. If not, please check Oracle’s installation guide.
IntelliJ is the IDE that will be used throughout this tutorial. IDE stands for Integrated Development Environment, and they are essentially fancy text editors with built-in tools to help you produce quality code. IDEs will make your life a lot easier, especially with dependency management softwares, such as Gradle. JetBrains, the developers of IntelliJ, have a detailed installation guide.
Gradle is the dependency management tool that will be used throughout this tutorial. It will ensure that your bot can access JDA files, and that everything will run smoothly throughout deployment. Please refer to the official installation guide.
In order to write the code for a Discord bot, you will need to actually create a Discord bot. Luckily, this process is easy peasy!
Make sure you are logged in on the Discord website.
Click on this link in order to be redirected to Discord’s application page. You should now see something like this (minus the censor):

Click on “New App”. The following should appear on your screen.

Fill in the application name, and optionally add a description + avatar. I named mine Cyborg. Once you’re done, click on “Create App”.
Your new application should say hello by greeting you with the following page:

Don’t mess around with any of the spooky settings, you want to scroll right down until you see the following:

Hit that “Create a Bot User” button, and acknowledge the fact that this action is irreversible. You should then be prompted with the following (obviously your name and/or discriminator will be different):

Don’t check any of the buttons!
Now it’s time to invite the bot to your server. Create a brand new server, if you haven’t already. This will be your super secret (or public — your choice) testing laboratory! Inviting your bot may seem difficult at first, but it’s actually quite simple.
On your application page, there will be a button called “Generate OAuth2 URL”. Click that. You will be prompted with the following (ID will vary):

Make sure to only check the “bot” button for the scopes, and check any permissions you want it to have. Then, click on the “copy” button, and paste the contents into your browser URL bar. Wait until the page loads, select your testing guild, and select “Authorize”.
Congratulations, you’re done! Make sure to click on “Save changes” at the bottom if you haven’t already, and close the tab/window. In order to go to the applications page again, click here, and then click on the application name.
Now comes the exciting part! Writing the actual code. Creating a bot that can join and leave channels is surprisingly simple. A large of the code is actually just checking whether certain conditions are met. Don’t get me wrong — this is equally as important as the connection part.
Firstly, it’s time to create a project. Open up IntelliJ, and you should see the following screen:

If you see a project open instead, you can get to this screen by clickin on File -> Close Project.
Now, click on “Create New Project”. You should be prompted with the following:

If you do not see this, make sure to click on the gradle tab/window on the left. For the additional libraries just check Java, nothing else, and click Next.

We will be following Java package naming conventions throughout this tutorial, so please read up on those. For the group ID, enter your package name without the project name. Mine is de.arraying . For the artifact ID, enter your project name. My bot is called "Cyborg", hence my project name will be cyborg . For the version, you can put whatever version you like. Click on Next.

Make sure you check “Use auto-import”! Other than that, you don’t need to change anything, although you can use the local gradle distribution if you like. Click on Next.

You can leave everything like it is, and click on Finish.
You should now be given a window that looks like this:

Note: If you look closely, you can see that my project is actually called CyborgExample. This is because I already have a project called Cyborg, it is the project from which I am copying the code, step by step.
It may take several seconds, up to a minute, for the src content directories to be created. Be patient.
Open up the build.gradle file. Copy and paste the following content into the file:

It is very important that you change the mainClassName! This should be set to the following: <group>.<artifact>.Bot In this case, <group> is your group ID and <artifact> is your artifact ID.
Note: This tutorial uses the latest version of JDA, currently at 3.5.0_331. In the future, this may be very outdated!
You may close the build.gradle tab.
Now, right-click src/java , and press New -> Package.

For the package name, enter <group>.<artifact> , just like in the previous step, just without the .Bot .
Right-click the newly created package, and press New -> Java Class.

For the name, enter Bot , and click OK.
IntelliJ will open up a new tab for you, looking something like this (you may have a comment above the class):
Now’s it’s time to implement the main function! This is the entry point for your bot. This tutorial will use runtime parameters to pass in your Discord bot’s token. Why? Because hard-coding a token is very bad practice, and creating a configuration file handler would be too much for this tutorial.
Add the following code to your bot:
Now it’s time to add JDA, and make the bot connect to Discord.
With that done, there’s nothing stopping you from doing a test run! Click on Run -> Run.

Select “Bot” from the menu.

And everything should run. But wait — there’s an error! The program doesn’t know what your token is, because you never specified it.
Specifying a runtime parameter is really easy. Click on Run -> Edit Configurations.

Select the “Bot” tab if it hasn’t selected by default. Now you need to get your token. Open the applications page provided by Discord (mentioned earlier). Scroll down, to the “Bot” section. Then, click “click to reveal”, and copy the token. Now, paste the token under “Environment variables”, like this:

Click on OK. Click on Run -> Run ‘Bot’. You should get a console output like this (username and discriminator may vary):
For now, we can ignore the SLF4J warnings. If you hop over to your testing server, you will notice that your bot has come online! Witchcraft!
You have a working bot that can come online on Discord, but it doesn’t connect to voice channels — yet! That’s where this last step comes in.
Right-click your package, and click on New -> Java Class.

Enter “Handler” as the name, and hit OK.
Make the class extend “ListenerAdapter”:
Go back to Bot.java , and modify your JDA code to the following:
This will register your event handler. Go back to Handler.java and add the following method:
You have an event handler that handles the event, and you have a method that handles messages. Now it’s time to add an insanely basic command handler. The command handler will presume that your prefix is ! . Quality bots have a command executor, with command objects, something left out in this tutorial. Update your method to the following:
Add the code (with the checks!) that connects to the user’s voice channel. Edit the if statement to be the following (you may need to import, click on the red name and hit ALT + ENTER to import):
Add the code (again, with the checks!) that disconnects from any voice channel to the else if statement:
If your code is not yet terminated, you need to do so by clicking the red stop button in the top right corner:

Run the code (Run -> Run ‘Bot’), and test the functionality!
В этой статье я подробно расскажу о том, как работать с библиотекой discord.js, создать своего Discord-бота, а также покажу несколько интересных и полезных команд.
Сразу хочу отметить, что я планирую сделать ряд подобных статей, начиная с простых команд, заканчивая музыкой, системой экономики и распознаванием голоса ботом.
Начало работы
Если вы уже знакомы с приведёнными ниже материалами, — смело можете пролистать этот раздел.
Для начала работы с кодом нам нужно установить среду разработки, это может быть:
Среда разработки выбирается по удобству использования и практичности, она у вас может быть любая, но мы рассмотрим её на примере Visual Studio Code, так как она является одной из самых приемлемых для новичков, а также для опытных программистов.
Для установки переходим по этой ссылке.

Выбираем свою операционную систему и запускаем скачивание.
Для создания бота мы используем среду выполнения node.js. Для её установки нам необходимо перейти на этот сайт.

На данный момент нас интересует версия долгосрочной поддержки (LTS), скачиваем её.
В Visual Studio Code присутствует возможность устанавливать расширения.
Для этого, кликните по отмеченной ниже иконке.

В открывшемся окне вписываем название название/идентификатор нужного нам расширения, после чего устанавливаем его.

Из полезных расширений могу отметить:
-
Discord Presence — расширение, позволяющее отображать рабочую область и файл, в котором вы работаете в вашей игровой активности (функция работает только при использовании приложения Discord).
Создание бота
Теперь, когда вы установили все нужные компоненты, мы можем приступить к созданию самого бота.
Здесь всё просто. Переходим на портал разработчиков и нажимаем на кнопку с надписью «New Application» — она находится в правом верхнем углу.
В открывшемся окне вписываем имя бота, после чего, нажимаем на кнопку с надписью «Create».

На этой странице мы можем изменить имя бота, загрузить для него иконку, заполнить описание.
Теперь наша задача — воплотить бота в жизнь. Для этого переходим во вкладку «Bot».

Нажимаем на кнопку с надписью «Add Bot» и воплощаем бота в жизнь.
Поздравляю! Вы создали аккаунт для вашего бота. Теперь у него есть тег, токен, ник и иконка.
Подготовка к написанию кода
После создания аккаунта для бота, мы должны установить нужные пакеты и модули, чтобы в дальнейшем он корректно работал.
Первым делом создаём папку, после чего открываем её в VS Code (Файл > Открыть папку) / (Ctrl + K Ctrl + O)
Далее нам нужно открыть терминал (Терминал > Создать терминал) / (Ctrl + Shift + `)

Теперь мы должны создать файл с неким «описанием» нашего бота, сделаем это через терминал.
Вписываем данную строку в терминал и нажимаем Enter:
После каждой появившейся строки нажимаем Enter или вписываем свои значения.
Значения в этом файле можно будет изменить в любой момент.
Далее, мы должны поочерёдно вводить в терминал эти строки:
«Install» также можно сокращать в «I», но необязательно.
Итого, если вы следовали инструкциям и всё сделали правильно, в вашей папке должны были появиться 3 объекта:

Написание кода
Для того, чтобы наш бот появился в сети и мог реагировать на команды, нам нужно написать для него код.
Существует множество вариантов для его написания: используя один файл, два, несколько, и т.д
Мы рассмотрим вариант с двумя файлами, так как его использовать очень легко и удобно, но у каждого варианта есть свои недостатки — например, у этого недостатком является сложность в написании начального кода.
Но не волнуйтесь, весь код вам писать не придётся.
Для начала, нам нужно где-то хранить основные параметры и информацию о боте.
Мы можем сделать это двумя способами:
- Создать отдельный файл
- Записать всё в константы
Разберём хранение параметров в отдельном файле.
Итак, создаем файл config.json
Вставляем в него следующий код:
* Для получения токена зайдите на портал разработчиков, перейдите во вкладку «Bot» и скопируйте его.

* Самым распространённым среди разработчиков префиксом является !
Далее нам нужно создать файл bot.js и вставить в него данный код:
Теперь создаём файл comms.js, в нём будут сами команды.
В нём должен быть следующий код:
Чтобы добавить больше команд — просто объявляйте больше функций и добавляйте их в список, например:
И вот, мы вышли на финишную прямую!
Осталось всего ничего — запустить бота.
Для этого открываем терминал и вставляем в него следующую строку:

Готово! Бот запущен и вы можете им пользоваться, ура!
Чтобы пригласить бота на свой сервер, воспользуемся нам уже известным порталом разработчиков.
Перейдём во вкладку OAuth2, пролистаем чуть ниже, выберем «Bot» и отметим нужные боту привилегии.

Существует два способа:
-
Заранее отметить нужные привилегии.
Итоговый код должен быть таким:
Чтобы указать несколько привилегий, мы должны перечислить их в квадратных скобках, через запятую:
* Все привилегии указываются заглавными буквами
Список доступных привилегий:
ADMINISTRATOR
CREATE_INSTANT_INVITE
KICK_MEMBERS
BAN_MEMBERS
MANAGE_CHANNELS
MANAGE_GUILD
ADD_REACTIONS
VIEW_AUDIT_LOG
PRIORITY_SPEAKER
STREAM
VIEW_CHANNEL
SEND_MESSAGES
SEND_TTS_MESSAGES
MANAGE_MESSAGES
EMBED_LINKS
ATTACH_FILES
READ_MESSAGE_HISTORY
MENTION_EVERYONE
USE_EXTERNAL_EMOJIS
VIEW_GUILD_INSIGHTS
CONNECT
SPEAK
MUTE_MEMBERS
DEAFEN_MEMBERS
MOVE_MEMBERS
USE_VAD
CHANGE_NICKNAME
MANAGE_NICKNAMES
MANAGE_ROLES
MANAGE_WEBHOOKS
MANAGE_EMOJIS
Полезные и интересные команды
В предыдущем разделе я показал вам, как запустить бота и как писать для него команды.
Теперь я хочу поделиться с вами несколькими своими командами.
Не стоит пугаться большого кода, здесь всё предельно просто.
Заключение
Вот и подошла к концу первая часть обучения, как вы могли заметить, создать бота, используя библиотеку discord.js очень просто.
Читайте также:
- Ворд элементы управления не активны
- Где производятся настройки оплаты за время командировки в 1с
- Компьютерная программа используемая для дактилоскопической регистрации
- Как узнать с кем переписывается человек в whatsapp без доступа к телефону бесплатная программа
- 1с в данной транзакции уже происходили ошибки