
Расширение для visual studio code для выбора цвета
Представляем вашему вниманию подборку 15 расширений для Visual Studio Code (VSCode), которые пригодятся программисту любого уровня.
Для тех, кто не в курсе, Visual Studio Code – это бесплатный и кроссплатформенный текстовый редактор, созданный компанией Microsoft. Он достаточно быстро стал «народным любимцем», ввиду его высокой производительности и обильного функционала.
Как и большинство современных IDE, VSCode имеет перманентно развивающийся рынок устанавливаемых дополнений, расширяющих исходные возможности редактора. Для того, чтобы разобраться, на какие именно плагины стоит обратить внимания, ресурс «Библиотека программиста» представляет вашему вниманию подборку 15 плагинов для Visual Studio Code, которые будут полезны любому программисту.
По умолчанию, Visual Studio Code не предусматривает возможности открывать файл в любом выбранном браузере. Данное расширение не только добавляет функцию Открыть в браузере по умолчанию, но также позволяет открывать файлы в любом имеющемся у вас браузере (Firefox, Chrome, IE).
[video width="768" height="372" mp4="https://media.proglib.io/wp-uploads/2017/07/open-in-browser.mp4"][/video]
Quokka – это утилита, дающая вам возможность предварительного просмотра результата выполнения того или иного куска кода. Она выдает вам результаты выполнения функций и посчитанные значения переменных. Расширение легко настроить, и оно запускается из того же ящика, что и JSX или Typescript проекты.
[video width="768" height="348" mp4="https://media.proglib.io/wp-uploads/2017/07/quokka.mp4"][/video]
Быстро вставляйте случайные данные при помощи знаменитой библиотеки Javascript Faker. Вы можете вставлять произвольные имена, адреса, изображения, телефонные номера и даже отрывки известных литературных произведений. Каждая категория имеет свои подкатегории, что позволяет вам выбрать наиболее подходящий вариант.
[video width="768" height="388" mp4="https://media.proglib.io/wp-uploads/2017/07/faker.mp4"][/video]
С этим плагином вы можете отслеживать определения CSS классов и id таблиц стилей. Для этого просто достаточно кликнуть правой кнопкой мыши на селектор в вашем HTML файле и воспользоваться функцией Перейти к определению или Подсмотреть определение.
[video width="768" height="322" mp4="https://media.proglib.io/wp-uploads/2017/07/css-peek.mp4"][/video]
Это расширение упрощает работу с HTML файлами, избавляя вас от необходимости прописывать теги head и body вручную. Просто наберите в пустом файле html, нажмите на Tab, и VS Code сам сгенерирует шаблон вашего документа.
[video width="768" height="422" mp4="https://media.proglib.io/wp-uploads/2017/07/html-boilerplate.mp4"][/video]
На сегодняшний день, Prettier – самый популярный редактор кода в мире веб-разработки. Он позволяет приводить код, написанный несколькими людьми, к единообразному виду. В настройках Prettier можно установить автоматический запуск, что позволяет моментально форматировать JS и CSS документы.
[video width="1300" height="796" mp4="https://media.proglib.io/wp-uploads/2017/07/prettier.mp4"][/video]
Небольшой плагин, который даёт вам возможность получать краткую справку об используемых в CSS цветах. Наведя курсор на название цвета, вы можете увидеть, как этот цвет выглядит, а также получить всю информацию о трансляции данного цвета в разные форматы (hex, rgb, hsl и cmyk).
[video width="768" height="366" mp4="https://media.proglib.io/wp-uploads/2017/07/color-info.mp4"][/video]
Это расширение привносит в VS Code возможность работать с SVG файлами. С помощью SVG Viewer, вы можете редактировать SVG файлы, конвертировать их в PNG и создавать data URL схемы.
[video width="768" height="390" mp4="https://media.proglib.io/wp-uploads/2017/07/svgviewer.mp4"][/video]
[video width="768" height="378" mp4="https://media.proglib.io/wp-uploads/2017/07/todo-highlight.mp4"][/video]
Небольшое дополнение, добавляющее в VS Code поддержку около 20 популярных шрифтов, в частности, Font Awesome, Ionicons, Glyphicons, and Material Design.
[video width="768" height="348" mp4="https://media.proglib.io/wp-uploads/2017/07/icon-fonts.mp4"][/video]
Minify является утилитой, предлагающей массу возможностей по оптимизации и сжатию размеров кода. Minify работает с HTML, JS и CSS файлами и также отлично сочетается с такими плагинами, как uglify-js, clean-css и html-minifier.
[video width="768" height="370" mp4="https://media.proglib.io/wp-uploads/2017/07/minify.mp4"][/video]
Так, пришло время немного расслабиться. Если все рассматриваемые до этого расширения были ориентированы на какое-то практическое применение, то эта утилита позволяет немного побаловаться с регистрами. По умолчанию, VS Code имеет только функции приведения к верхнему и нижнему регистру, но, установив себе Change Case, вы получите доступ к довольно обширному количеству регистров, к примеру, змеиный регистр, верблюжий регистр и прочее.
[video width="768" height="328" mp4="https://media.proglib.io/wp-uploads/2017/07/change-case.mp4"][/video]
Очень полезный инструмент, который позволяет вам работать с регулярными выражениями прямо в текстовом редакторе. Он принимает на вход два регулярных выражения и выдаёт результаты сравнения. Принцип работы чем-то похож на RegExr.
[video width="768" height="364" mp4="https://media.proglib.io/wp-uploads/2017/07/regex-previewer.mp4"][/video]

VS Code поддерживает большое количество языков и Фреймворков, но далеко не все. Если по каким-то причинам, используемая вами технология не попала в этот список, то вы всегда можете скачать нужное вам расширение с поддержкой таких приятных фич, как автозаполнение, правильные отступы и тому подобное.

Вот и дошли до самого вкусного. Ведь вы собираетесь много работать в VS Code, так почему бы для начала не сделать его красивым? Есть тонны отличных тем, но мы отобрали 4 фаворита:
Helper with GUI to generate color codes such as CSS color notations.
And, a command Convert Color to change the color notation.
A dialog box is shown by pressing Alt + C P keys or command Pick Color . If a cursor is positioned on a string that is color notation at that time, that string is selected as target for editing.
- Supported color spaces to edit the color: HSB (HSV), RGB, Lab, and CMYK. With alpha channel.
- Supported color notations to output the color: hsb() / hsba() , hsl() / hsla() , hwb() , rgb() / rgba() , RGB-Hex 3/4/6/8 digits, CSS Named Color, device-cmyk() and gray() .
- Custom color palettes supported. command to change the color notation supported.
- Multiple cursors supported.
Install
You need Node.js (including NPM) installed and available in your $PATH .
Note: If you use a Node Version Manager (e.g. nvm), the Node.js might not be available in a process VS Code will run, until you make it. (Especially in Windows 10 / Vista, the NPM might not be available.)
Then, launch the Command Pallete ( Ctrl + Shift + P or Cmd + Shift + P ) and type ext install , and then look for "Color Picker".
Note: If a few NPM modules that the extension uses are not found in your computer, those will be installed automatically. Then, only when first launching, it may take some little time for setting up. (Please wait for the finish without closing VS Code.)
Note: For alternative NPM (e.g. you are in China and you are using CNPM), see Manual installation NPM modules.
Usage
A dialog box is shown by pressing Alt + C P keys (press P after release Alt and C) or command Pick Color .
If a cursor is positioned on a string that is color notation at that time, that string is selected as target for editing. The color notation is recognized even if it includes line-breaks and comments.
For example:
Multiple cursors also supported.
You can see tooltip information for some controls in the dialog box by hovering a mouse on those.
Convert Color
When a cursor or multiple cursors are positioned on strings that are color notation, press Alt + C C (press C after release Alt and C) keys or run a command Convert Color .
Then a list of color notations is shown. The target strings are converted to each color with the notation you chose.

Color palettes
You can create custom color palettes. Also, you can specify color palettes that are loaded always, or color palettes that are loaded for only a project.
For example, a color palette as a design theme (or template) for your website is loaded only when that website project is being opened by VS Code.
See colorHelper.storeDir option.
Options
You can specify following options by User Settings or Workspace Settings.
colorHelper.pickerForm


colorHelper.storeDir
A path to directory that contains your color palettes.
For information about color palettes, see README.md that is found in that directory.
colorHelper.resident
Stands by for a quick response.
After the dialog box is opened, it stays in memory even after it is closed until VS Code is exited (or VS Code might unload it).
colorHelper.formatsOrder
An array that indicates the order of formats in UI (e.g. drop-down list).
Allowed items are "hsb" , "hsl" , "hwb" , "rgb" , "hex" , "named" , "cmyk" or "gray" .
This array doesn't have to contain all formats. The formats that are not contained in the array are moved to the top of the list in UI automatically when it was used. If you want to make the list static, specify all formats in the order you desire, e.g. ["hsb", "hsl", "hwb", "rgb", "hex", "named", "cmyk", "gray"] .
Rendering trouble
If your GPU driver has a problem, the dialog box might not be shown correctly. The following options try to avoid the problem.
Note: You should not use these if there is no problem. Also, it is not a solution to the root of the problem, and it might not solve the problem.
Steps:
- If the dialog box is not shown correctly, set colorHelper.disableGpu to 1 .
- If that wasn't solved yet, set colorHelper.disableShadow to true .
- If that wasn't solved yet, set colorHelper.disableTransparent to true .
- If that wasn't solved yet, please visit support page.
colorHelper.disableGpu
If 1 is specified, disable GPU rendering on Windows. By default ( -1 ), it is switched automatically dependent on current platform.
colorHelper.disableShadow
If true is specified, disable drop shadow effect of the dialog box.
colorHelper.disableTransparent
If true is specified, disable transparent window as the dialog box.
Manual installation NPM modules
You might be using your favorite alternative NPM. Also, if you're in China, maybe you are using CNPM instead of NPM.
The following steps install NPM modules manually:
Colors visible in the Visual Studio Code user interface fall in two categories:
- Workbench colors used in views and editors, from the Activity Bar to the Status Bar. A complete list of all these colors can be found in the theme color reference.
- Syntax colors and styles used for source code in the editor. The theming of these colors is different as syntax colorization is based on TextMate grammars and TextMate themes as well as semantic tokens.
This guide will cover the different ways in which you can create themes.
Workbench colors
The easiest way to create a new workbench color theme is to start with an existing color theme and customize it. First switch to the color theme that you want to modify, then open your settings and make changes to the workbench.colorCustomizations setting. Changes are applied live to your VS Code instance.
The following, for example, would change the color of the title bar:
A complete list of all themable colors can be found in the color reference.
Syntax colors
For syntax highlighting colors, there are two approaches. You can reference an existing TextMate theme ( .tmTheme file) from the community, or you can create your own theming rules. The easiest way is to start with an existing theme and customize it, much like in the workbench colors section above.
First switch to the color theme to customize and use the editor.tokenColorCustomizations settings. Changes are applied live to your VS Code instance and no refreshing or reloading is necessary.
For example, the following would change the color of comments within the editor:
The setting supports a simple model with a set of common token types such as 'comments', 'strings' and 'numbers' available. If you want to color more than that, you need to use TextMate theme rules directly, which are explained in detail in the Syntax Highlighting Guide.
Semantic colors
Semantic highlighting is available for TypeScript and JavaScript in VS Code release 1.43. We expect it to be adopted by other languages soon.
Semantic highlighting enriches syntax coloring based on symbol information from the language service, which has more complete understanding of the project. The coloring changes appear once the language server is running and has computed the semantic tokens.
Each theme controls whether to enable semantic highlighting with a specific setting that is part of the theme definition. The style of each semantic token is defined by the theme's styling rules.
Users can override the semantic highlighting feature and colorization rules using the editor.tokenColorCustomizations setting:
Enable semantic highlighting for a specific theme:
Themes can define theming rules for semantic tokens as described in the Syntax Highlighting Guide.
Create a new Color Theme
Once you have tweaked your theme colors using workbench.colorCustomizations and editor.tokenColorCustomizations , it's time to create the actual theme.
Generate a theme file using the Developer: Generate Color Theme from Current Settings command from the Command Palette
Use VS Code's Yeoman extension generator to generate a new theme extension:
If you customized a theme as described above, select 'Start fresh'.

Copy the theme file generated from your settings to the new extension.
You can also use an existing TextMate theme by telling the extension generator to import a TextMate theme file (.tmTheme) and package it for use in VS Code. Alternatively, if you have already downloaded the theme, replace the tokenColors section with a link to the .tmTheme file to use.
Tip: Give your color definition file the -color-theme.json suffix and you will get hovers, code completion, color decorators, and color pickers when editing.
Tip: ColorSublime has hundreds of existing TextMate themes to choose from. Pick a theme you like and copy the Download link to use in the Yeoman generator or into your extension. It will be in a format like "https://raw.githubusercontent.com/Colorsublime/Colorsublime-Themes/master/themes/(name).tmTheme"
Test a new Color Theme
To try out the new theme, press F5 to launch an Extension Development Host window.
There, open the Color Theme picker with File > Preferences > Color Theme and you can see your theme in the dropdown list. Arrow up and down to see a live preview of your theme.

Changes to the theme file are applied live in the Extension Development Host window.
Publishing a Theme to the Extension Marketplace
If you'd like to share your new theme with the community, you can publish it to the Extension Marketplace. Use the vsce publishing tool to package your theme and publish it to the VS Code Marketplace.
Tip: To make it easy for users to find your theme, include the word "theme" in the extension description and set the Category to Themes in your package.json .
We also have recommendations on how to make your extension look great on the VS Code Marketplace, see Marketplace Presentation Tips.
Adding a new Color ID
Color IDs can also be contributed by extensions through the color contribution point. These colors also appear when using code complete in the workbench.colorCustomizations settings and the color theme definition file. Users can see what colors an extension defines in the extension contributions tab.
Color themes let you modify the colors in Visual Studio Code's user interface to suit your preferences and work environment.
Selecting the Color Theme
- In VS Code, open the Color Theme picker with File >Preferences >Color Theme. (Code >Preferences >Color Theme on macOS).
- You can also use the keyboard shortcut ⌘K ⌘T (Windows, Linux Ctrl+K Ctrl+T ) to display the picker.
- Use the cursor keys to preview the colors of the theme.
- Select the theme you want and press Enter .

The active color theme is stored in your user settings (keyboard shortcut ⌘, (Windows, Linux Ctrl+, ) ).
Tip: By default, the theme is stored in your user settings and applies globally to all workspaces. You can also configure a workspace specific theme. To do so, set a theme in the Workspace settings.
Color Themes from the Marketplace
There are several out-of-the-box color themes in VS Code for you to try.
Many more themes have been uploaded to the VS Code Extension Marketplace by the community. If you find one you want to use, install it and restart VS Code and the new theme will be available.
You can search for themes in the Extensions view ( ⇧⌘X (Windows, Linux Ctrl+Shift+X ) ) search box using the @category:"themes" filter.

Auto switch based on OS color scheme
Windows and macOS support light and dark color schemes. There is a setting, window.autoDetectColorScheme , that instructs VS Code to listen to changes to the OS's color scheme and switch to a matching theme accordingly.
To customize the themes that are used when a color scheme changes, you can set the preferred light, dark, and high contrast themes with the settings:
- workbench.preferredLightColorTheme - defaults to "Default Light+"
- workbench.preferredDarkColorTheme - defaults to "Default Dark+"
- workbench.preferredHighContrastColorTheme - defaults to "Default High Contrast"
- workbench.preferredHighContrastLightColorTheme - defaults to "Default High Contrast Light"
Customizing a Color Theme
Workbench colors
You can customize your active color theme with the workbench.colorCustomizations and editor.tokenColorCustomizations user settings.
To set the colors of VS Code UI elements such as list & trees (File Explorer, suggestions widget), diff editor, Activity Bar, notifications, scroll bar, split view, buttons, and more, use workbench.colorCustomizations .
You can use IntelliSense while setting workbench.colorCustomizations values or, for a list of all customizable colors, see the Theme Color Reference.
To customize a specific theme only, use the following syntax:
If a customization applies to more than one themes, you can name multiple themes or use * as wildcard at the beginning and the end of the name:
Editor syntax highlighting
To tune the editor's syntax highlighting colors, use editor.tokenColorCustomizations in your user settings settings.json file:

A pre-configured set of syntax tokens ('comments', 'strings', . ) is available for the most common constructs. If you want more, you can do so by directly specifying TextMate theme color rules:

Note: Directly configuring TextMate rules is an advanced skill as you need to understand on how TextMate grammars work. Go to the Color Theme guide for more information.
Again, to customize specific themes, you can do this in one of the following ways:
Editor semantic highlighting
Some languages (currently: TypeScript, JavaScript, Java) provide semantic tokens. Semantic tokens are based on the language service's symbol understanding and are more accurate than the syntax tokens coming from the TextMate grammars that are driven by regular expressions. The semantic highlighting that is computed from the semantic tokens goes on top of syntax highlighting and can correct and enrich the highlighting as seen in the following example:
The "Tomorrow Night Blue" color theme without semantic highlighting:

The "Tomorrow Night Blue" color theme with semantic highlighting:

Notice the color differences based on language service symbol understanding:
- line 10: languageModes is colored as a parameter.
- line 11: Range and Position are colored as classes and document as a parameter.
- line 13: getFoldingRanges is colored as a function.
The settings editor.semanticHighlighting.enabled serves as the main control on whether semantic highlighting is applied. It can have values true , false , and configuredByTheme .
- true and false turn semantic highlighting on or off for all themes.
- configuredByTheme is the default and lets each theme control whether semantic highlighting is enabled or not. All the themes that ship with VS Code (for example, the "Dark+" default) have semantic highlighting enabled by default.
Users can override the theme setting by:
When semantic highlighting is enabled and available for a language, it is up to the theme to configure whether and how semantic tokens are colored. Some semantic tokens are standardized and map to well-established TextMate scopes. If the theme has a coloring rule for these TextMate scopes, the semantic token will be rendered with that color, without the need for any additional coloring rules.
Additional styling rules can be configured by the user in editor.semanticTokenColorCustomizations" :
To see what semantic tokens are computed and how they are styled, users can use the scope inspector (Developer: Inspect Editor Tokens and Scopes), which displays information for the text at the current cursor position.

If semantic tokens are available for the language at the given position and enabled by theme, the inspect tool shows a section semantic token type . The section shows the semantic token information (type and any number of modifiers) as well as the styling rules that apply.
More information on semantic tokens and styling rule syntax can be found in the Semantic Highlighting Guide.
Creating your own Color Theme
Creating and publishing a theme extension is easy. Customize your colors in your user settings then generate a theme definition file with the Developer: Generate Color Theme From Current Settings command.
VS Code's Yeoman extension generator will help you generate the rest of the extension.
See the Create a new Color Theme topic in our Extension API section to learn more.
Remove default Color Themes
If you'd like to remove some of the default themes shipped with VS Code from the Color Theme picker, you can disable them from the Extensions view ( ⇧⌘X (Windows, Linux Ctrl+Shift+X ) ). Open the . More Actions dropdown menu from the top of the Extensions view, select Show Built-in Extensions, and you'll see a THEMES section listing the default themes.

You can disable a built-in theme extension as you would any other VS Code extension with the Disable command on the gear context menu.

File Icon Themes
File icon themes can be contributed by extensions and selected by users as their favorite set of file icons. File icons are shown in the File Explorer and tabbed headings.
Selecting the File Icon Theme
- In VS Code, open the File Icon Theme picker with File >Preferences >File Icon Theme. (Code >Preferences >File Icon Theme on macOS).
- You can also use the Preferences: File Icon Theme command from the Command Palette ( ⇧⌘P (Windows, Linux Ctrl+Shift+P ) ).
- Use the cursor keys to preview the icons of the theme.
- Select the theme you want and hit Enter .
By default, the Seti file icon set is used and those are the icons you see in the File Explorer. Once a file icon theme is selected, the selected theme will be remembered and appear again whenever VS Code is restarted. You can disable file icons by selecting None.
VS code ships with two file icon themes; Minimal and Seti. To install more file icon themes, select the Install Additional File Icon Themes item in the file icon theme picker and you'll see a query for file icon themes (tag:icon-theme) in the Extensions view.
You can also browse the VS Code Marketplace site directly to find available themes.
The active File Icon theme is persisted in your user settings (keyboard shortcut ⌘, (Windows, Linux Ctrl+, ) ).
Creating your own File Icon Theme
You can create your own File Icon Theme from icons (preferably SVG), see the File Icon Theme topic in our Extension API section for details.
Next steps
Themes are just one way to customize VS Code. If you'd like to learn more about VS Code customization and extensibility, try these topics:
Все, что вам нужно для быстрой работы – от интеграции Docker и Git до поддержки Markdown и XML. Что еще умеет Visual Studio Code?

VS Code – это не просто текстовый редактор. Благодаря встроенным возможностям и огромному количеству расширений он превратился в полноценную IDE для проектов различной сложности. Сохраняя гибкость и легкость, он позволяет настраивать все, что вам необходимо.
Поддержкой множества языков уже давно никого не удивишь – любой редактор это умеет. Самые ценные возможности инструмента не связаны непосредственно с любимым вами языком программирования. Это работа с репозиториями, различными форматами документов и данных, комфортный процесс разработки.
Среди бесчисленных плагинов для Visual Studio Code мы выбрали очередной ТОП-10. Возможно, вы еще не используете их.
Для визуализации разметки
HTML Preview
Иногда для комфортный работы требуются очень простые вещи. Например, плагин HTML Preview, который умеет показывать, как будет выглядеть HTML, который вы пишете.
Инструмент больше подходит для фрагментов кода, а не для целых страниц с подключенными таблицами стилей. Впрочем и с этой задачей он справится, если все внешние ресурсы доступны.
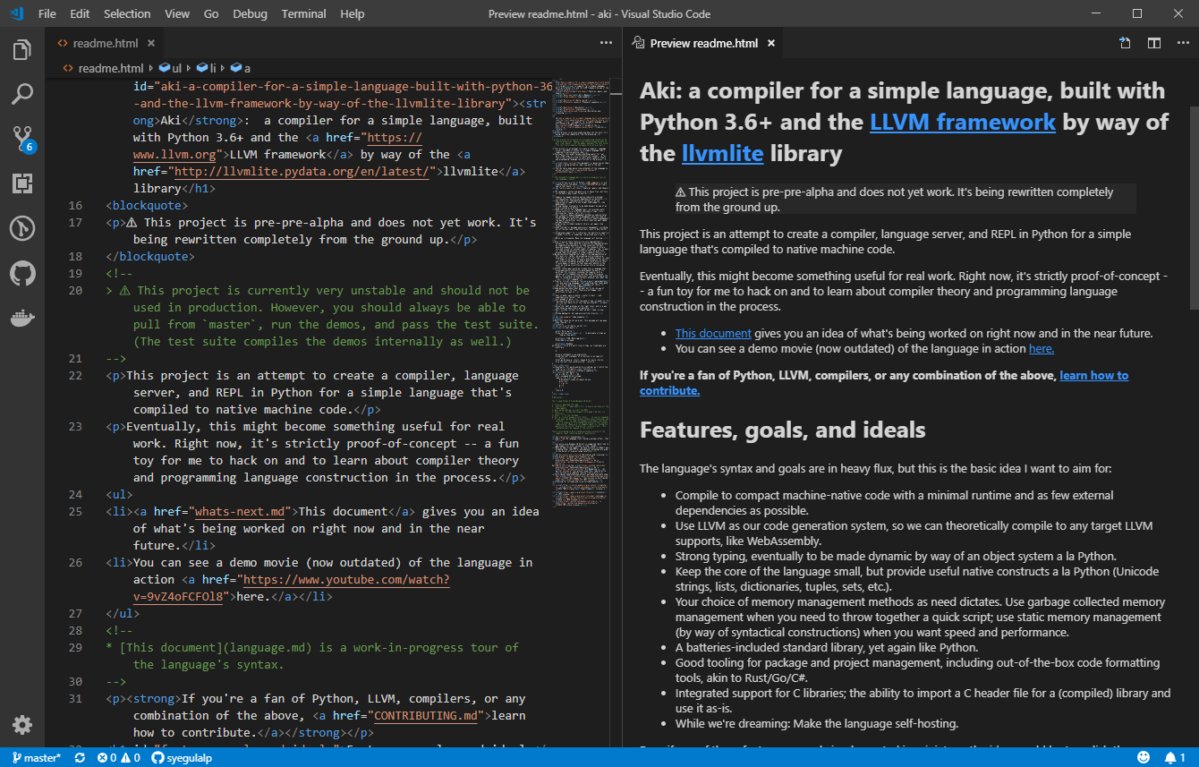
Предварительный просмотр веб-страницы при редактировании HTML-кода с плагином HTML Preview.
AsciiDoc
90% разработчиков терпеть не могут писать документацию к своим проектам. Чтобы сделать это важное занятие немного более приятным, используйте профессиональные инструменты, например, плагин AsciiDoc. Вы пишете и сразу видите результат в режиме реального времени с подсветкой синтаксиса, кучей сниппетов и поддержкой символов.
Все работает на JavaScript, но при желании можно перейти на Ruby-движок.
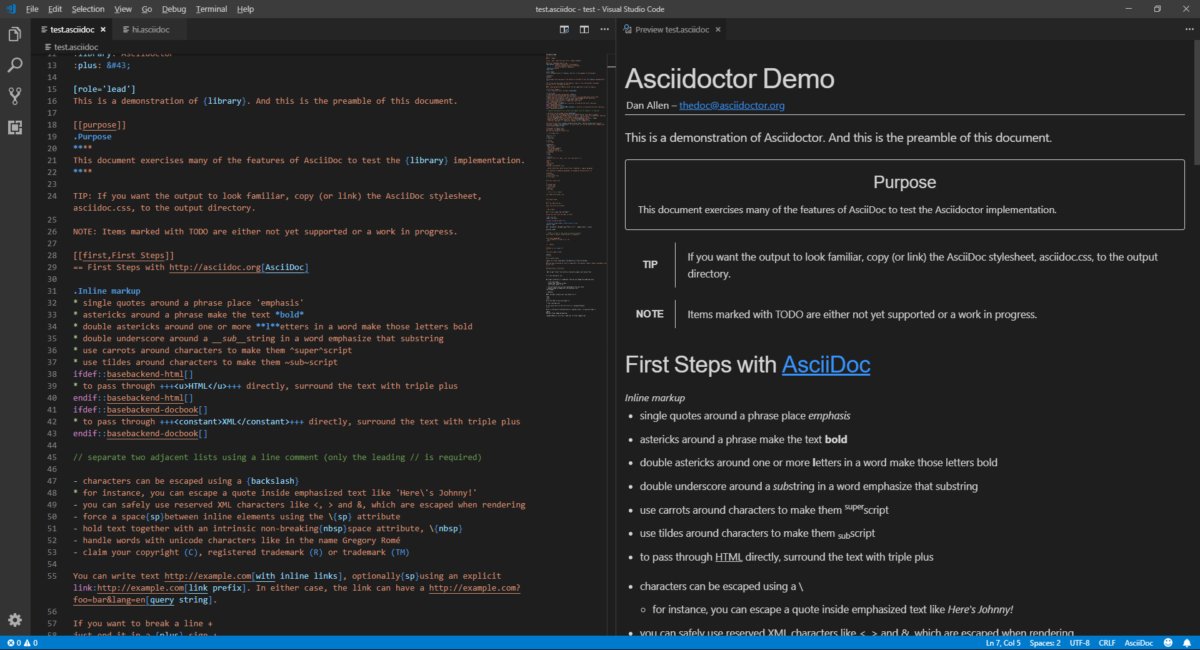
Редактирование файлов AsciiDoc с подсветкой синтаксиса и просмотр в режиме реального времени.
Markdown All in One
Markdown – это, пожалуй, лучший выбор для README-файлов и простой документации. Visual Studio Code поставляется с базовой поддержкой этого формата, но плагин Markdown All in One здорово расширяет его возможности:
- горячие клавиши для инлайновых стилей (полужирный шрифт, курсив, подчеркивание);
- автоматическое создание оглавления из заголовков;
- форматирование математических формул;
- автодополнение;
- поддержка улучшенного варианта разметки Github Flavoured Markdown.
Лучшая фича плагина – компиляция Markdown в достаточно чистый HTML-код.
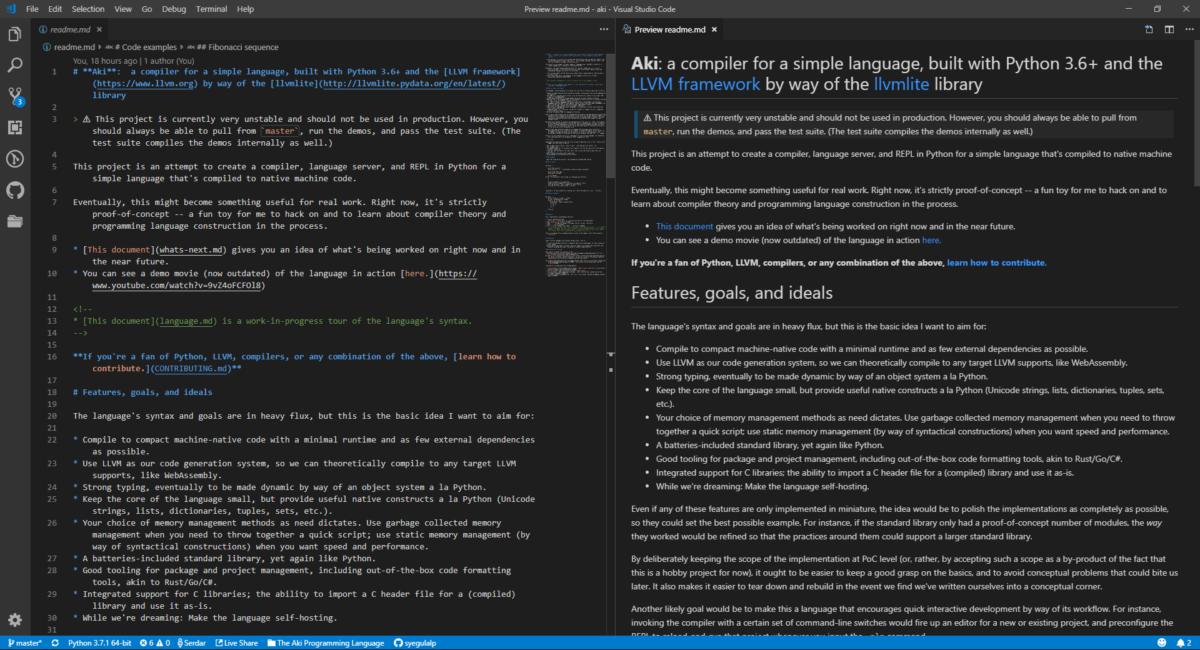
Редактирование и предварительный просмотр формата Markdown с плагином Markdown All in One.
reStructuredText
Несмотря на то, что формат документации reStructuredText по существу является простым текстом с некоторыми стилистическими украшениями, было бы неплохо иметь интерактивный инструмент для работы с ним. Расширение reStructuredText от LeXtudio предоставляет сниппеты и подсветку синтаксиса для документов в этом формате, а также предварительный просмотр и линтинг.
Возможно потребуется установить другие пакеты Python, чтобы получить доступ к полному спектру функций.
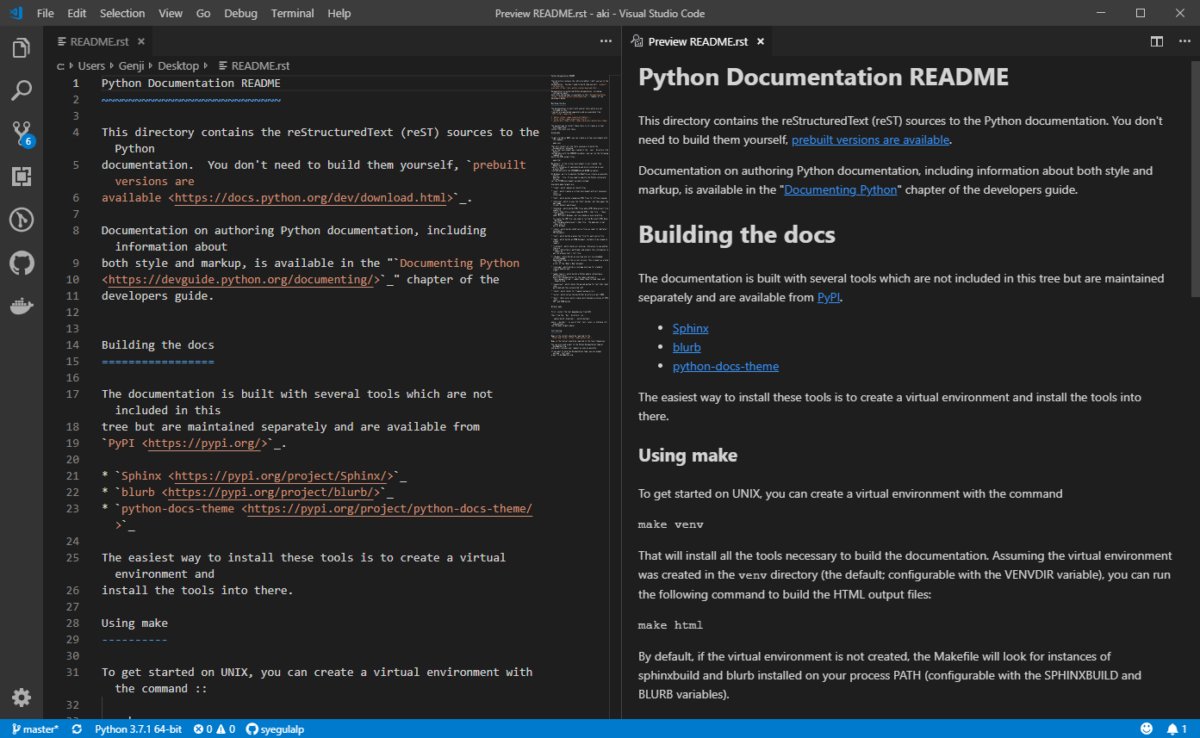
Расширение reStructuredText обеспечивает подсветку синтаксиса и предварительный просмотр для популярного формата документации.
XML Tools
XML можно любить или ненавидеть (что более вероятно), но как формат данных он все еще живет и процветает. Расширение XML Tools делает работу с XML немного менее печальной и мучительной. Вы можете очистить или минимизировать уродливое форматирование, изучить отдельное древовидное представление документа, запустить запросы XPath и линтинг XQuery и выполнить код прямо в редакторе.
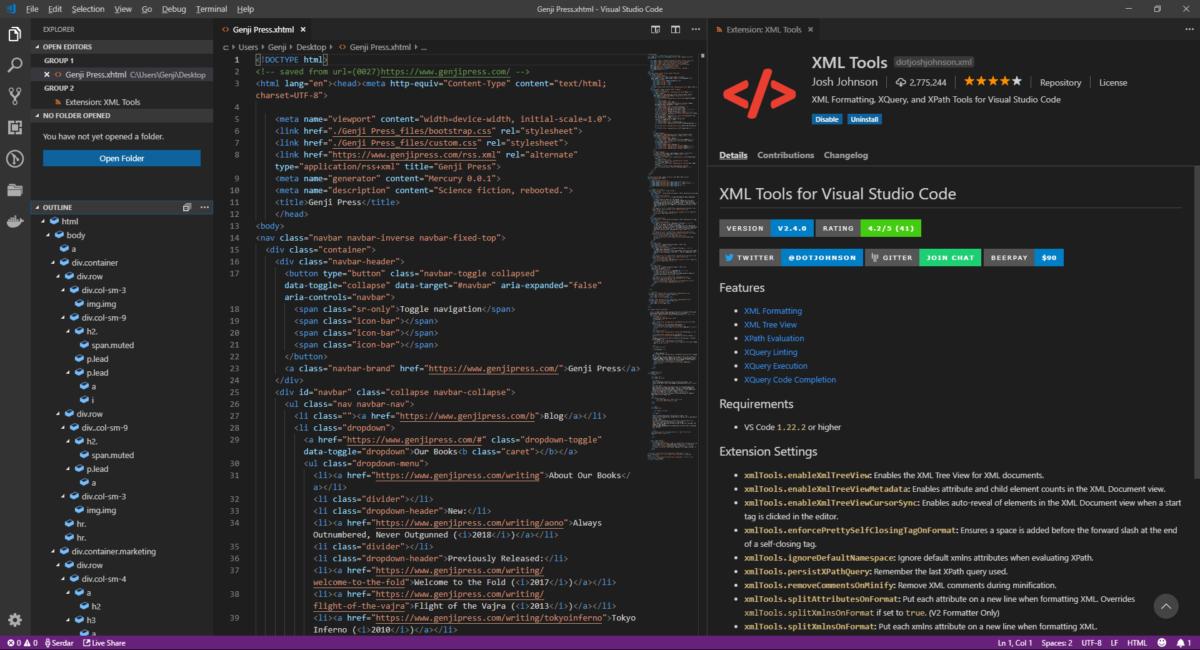
Расширение XML Tools обеспечивает иерархический просмотр дерева XML-документов и предоставляет множество инструментов для работы с этим форматом.
Для распределенных команд
GitLens
Сегодня сложно представить более-менее крупный проект, не использующий систему контроля версий. Чаще всего это Git, и в Visual Studio Code есть его минимальная поддержка прямо из коробки.
Если вы хотите большего, GitLens вам поможет. Плагин добавляет в редактор массу дополнительных возможностей:
- список репозиториев;
- история изменений активного файла;
- история изменений выделенной строки;
- сравнение веток, тегов и ссылок;
- поиск по коммитам.
Самая удобная фича GitLens доступна непосредственно в поле редактирования. Кликните на любую строчку – вы увидите, кто и когда изменял ее последним.
После недели использования этого плагина вы никогда не захотите расставаться с ним.

Функция line blame в GitLens показывает, кто и когда внес изменения в указанную строчку.
Microsoft Visual Studio Live Share
Для больших распределенных команд разработчиков очень важно правильно организовать совместную работу с кодом в реальном времени. Расширение Microsoft Visual Studio Live Share связывает ваш Visual Studio Code с редакторами ваших коллег. Таким образом в режиме реального времени каждый сотрудник может видеть, над чем работают другие члены команды. Live Share разделяет не только экраны, но и вывод запущенного кода.
К соединению можно подключить также терминалы или локальные веб-приложения.
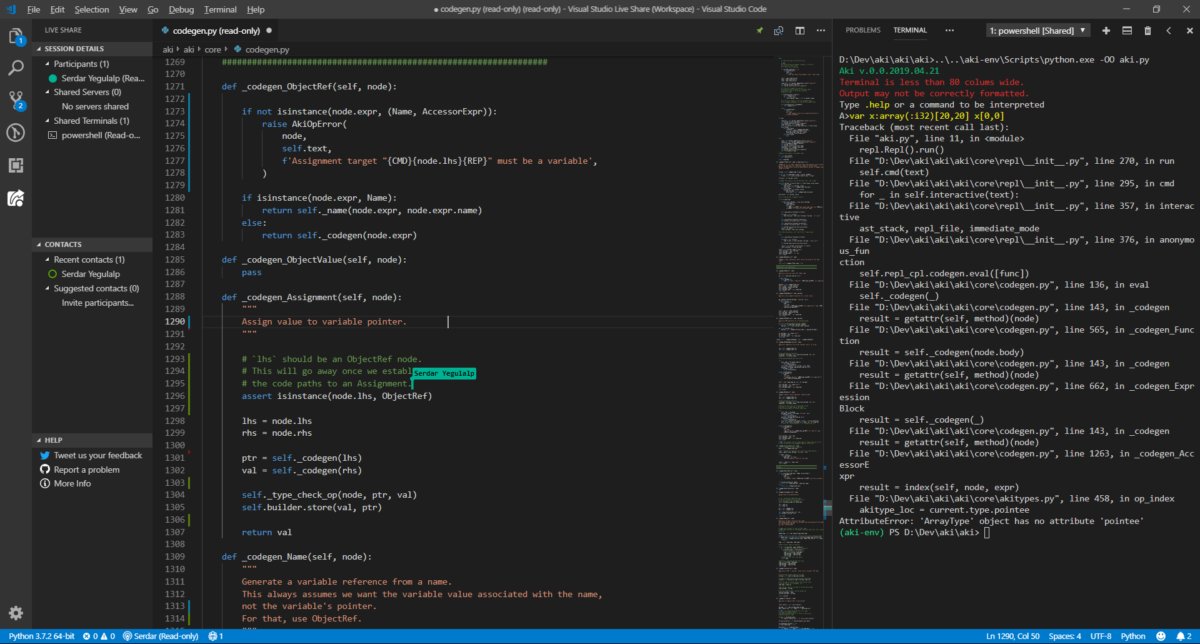
Редактирование кода с другими членами команды в режиме реального времени с помощью расширения Microsoft Visual Studio Live Share. Обратите внимание на флаг курсора с именем сотрудника.
Для управления проектами
Docker
Docker упростил создание, управление, публикацию и обслуживание программного обеспечения как в облаке, так и on-premise. Расширение Docker для Visual Studio Code от Microsoft делает управление докеризованными проектами немного легче. Вы можете автоматически генерировать Dockerfile для проектов, запускать образы, управлять запущенными контейнерами, подключаться к реестрам и развертывать образы непосредственно в Службе приложений Azure.
Быстрый доступ к образам, реестрам, запущенным контейнерам и консоли в плагине Docker.
Project Manager
Visual Studio Code рассматривает открытую в нем папку как отдельный проект. Чтобы работать с несколькими такими проектами и переключаться между ними обычно нужно создавать несколько экземпляров редактора. Если для вас это неудобно, просто установите расширение Project Manager.
Плагин позволяет переключаться между разными проектами внутри одного экземпляра VS Code. Просто откройте боковую панель и выберите нужный.
Расширение Project Manager позволяет свободно переключаться между проектами в одном экземпляре редактора VS Code.
Для тех, кому мало Visual Studio Code
VSCodeVim
Vim – легендарный хардкорный редактор с огромными возможностями настройки и редактирования текстов. Преданные фанаты вряд ли променяют его на что-то другое, а вот новички, возможно, захотят попробовать Vim на вкус, избежав чрезмерных трудностей.
Расширение VSCodeVim эмулирует основные возможности – настройки и горячие клавиши – редактора Vim внутри Visual Studio Code.
Плагин не поддерживает Vimscript, поэтому любые дополнения, созданные с его помощью придется воссоздавать вручную.
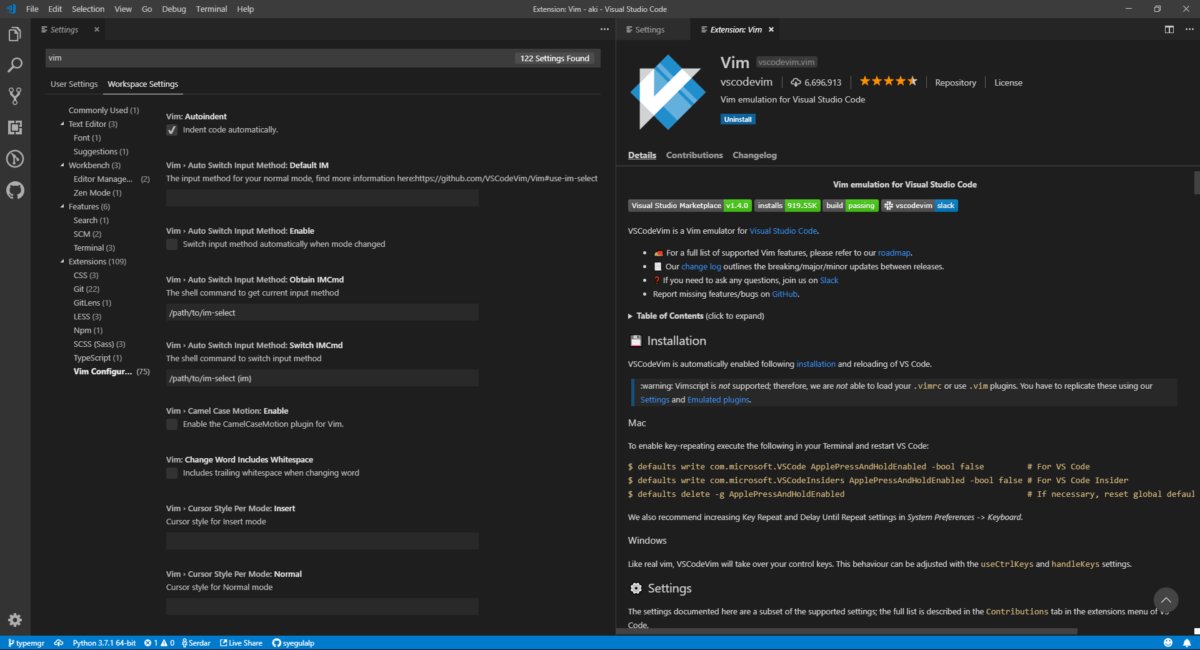
Эмуляция Vim внутри VS Code с помощью плагина VSCodeVim.
Читайте также: