Rad studio сделать android браузер
This page describes how to develop multi-device applications that target the Android platform. See Android Mobile Application Development for topics that are not specific to the development phase, such as configuring your PC and Android devices to work with RAD Studio.
To create a multi-device app that supports Android:
Then select a multi-device application type in the Multi-Device Application wizard.
Component Restrictions for FireMonkey Android Apps
While you are designing your Android app in RAD Studio, you can only use components that are supported on Android devices. When Android is the active target platform of your project, unsupported components are grayed out on the Tool Palette.
Style Selector
At the top of the multi-device Form Designer is the style selector:
The style selector's drop-down menu lists all the styles that you can apply to the Master view.
Select the Android style from the style selector to see all the properties on the components according to the target platform.
View Selector
![]()
At the top of the multi-device Form Designer is the view selector:
The view selector's drop-down menu lists all the available views, which show the different platforms, such as iOS, Android, Windows and macOS.
- Android 3.5" Phone
- Android 4" Phone
- Android 5" Phone
- Android 7" Tablet
- Android 10" Tablet
- Google Glass
Note: Select the Android target platform to see all the available components for Android, otherwise they appear grayed out.
Add new views to your project in order to customize your application for a specific Android device type. All the views inherit the components and properties from the Master form. For more information see Form Designer.
If you want to customize some aspects of your application for all Android devices you can do it using the Master form, provided you do not want to propagate to the rest of platforms. Otherwise use the Code Editor, for example:
For more information:
-
(shows how to use the Master form for different form factors (such as phone or tablet), without using different views for each form factor)
Using Frameworks in Android Apps
FireMonkey
The FireMonkey framework is ideal for the Android target platform, and it supports other target platforms as well.
VCL (not available for Android)
The Visual Component Library (VCL) is available only on Windows (32-bit or 64-bit).
Some run-time library (RTL) units that provide basic functionality are common for every supported target platform (including Android), such as System.pas or System.SysUtils.pas.
A number of RTL units are Android-only (see Android API and Java Libraries). These units are prefixed with the Androidapi unit scope.
Android API and Java Libraries
The RTL contains a number of units that provide Delphi and C++ interfaces to the Android native API. These units are scoped with Androidapi and are typically located in the source\rtl\android\ directory of your RAD Studio installation. The FireMonkey framework relies on some of these units. You may also use them directly if you want.
You can also use parts of the Android API that are not mapped by the RTL, or use your own Java libraries in your project:
Android Core Lib Names Cannot Be Used as App Names
You cannot assign a name to your project if the name conflicts with the name of a core library shared object file, such as .so.
For example, you cannot use any of the following as project names:
- c (conflicts with libc.so)
- m (conflicts with libm.so)
- z (conflicts with libz.so)
- ssl (conflicts with libssl.so)
- ui (conflicts with libui.so)
- gui (conflicts with libgui.so)
- camera_client (conflicts with camera_client.so)
Alignment Recommendations for Mobile Toolbars and Other FireMonkey Components
To ensure that the toolbar in your app behaves and looks the same on the iOS and Android platforms, you should set specific alignment properties in the Object Inspector, as follows:
- Set the Align property for all controls that are children of a TToolbar. For example, the following are Align property values: (Left, Right, Center, Contents)
- To maintain space between controls, or to maintain space between the left and right borders of toolbars, set the following properties:
-
: (left, right) : (left, right)
- On the TToolbar, set:
- Align = Top
- On the child TLabel, set:
- Align = Contents
- Send the TLabel to the back using the context menu.
- On the two child TSpeedButtons, set:
- Align = Left, Right, Center, Contents, VertCenter For descriptions of these properties, see FMX.Types.TAlignLayout.
- Margins Left = 5
- To format a segmented control (styled TSpeedButtons with a shared group name) so that it is centered on the toolbar:
- Add a TLayout control to the TToolBar.
- Set TLayout.Align to Center.
- Add buttons to the TLayout and set alignment properties and margins for each button (that is, Align = Left, Margins = Left, Margins = Right, and so forth).
- For an example, see Mobile Tutorial: Using a Button Component with Different Styles (iOS and Android).
- To center the label on a toolbar that already has buttons, you must set TLabel.Align = Contents and select Send to Back on the context menu.
Similar alignment rules pertain to other controls. For example, assume you have added a TSwitch to a ListBox item; to have the switch aligned to the right and centered vertically, set the following properties for TSwitch:
Using Custom Fonts in Android Apps
You can use custom fonts in your Android apps. One use for custom fonts is as icons in your mobile applications. True-type fonts have advantages over raster image files in that fonts are light-weight and vector-based, so they scale well to high resolutions. You can install your own custom fonts into your system font library on your development system. Then the custom fonts should be available in the IDE for you to select at design time.
However, if you deploy the app at this point to a target device, the fonts in the app are rendered using only the installed fonts available on the device. You need to add the font to your project using the Deployment Manager to ensure that the fonts you see at design time in the IDE are copied over to the device.
Here are the basic steps for incorporating a custom font in your Android app::
- Install the custom font on your Windows system.
- See the Windows Help and Support on your system for instructions.
- For example, right-click the font file, and click Install.
- Add the font file to the root directory of your project.
- In the Object Inspector, assign the font to the Text Settings/Font property for the controls that use the font.
- Add the font file to your project in the Deployment Manager.
To know whether a font might be available at run time on a specific mobile device, you need to check whether the font you are using at design time is supported on your target devices:
Setting the Required Uses Permissions for Your Android Apps
Some basic Android permissions are pre-set for all FireMonkey Android apps. You should verify that specific access permissions are enabled for your Android device on the Uses Permissions page in Project Options.
- To use the Android device's camera, ensure that the following permissions are enabled:
- Camera
- Read/Write external storage
- Access coarse location
- Access fine location
- Access location extra commands
- Record audio
Using the Android Device's Back Button
To make your application handle when users press the Back button on their Android device, add an event handler to your form for OnKeyUp, and use the following code within your event handler:
FireMonkey wraps the Web Browser component as the TWebBrowser component. You can use TWebBrowser in desktop apps as well as mobile apps, but this topic describes how to create a simple FireMonkey Web Browser application for iOS and Android platforms.![TWebBrowserDemo.jpg]()
Contents
Design the User Interface
![SelectToolBar 2.jpg]()
- Select either:
- File > New > Multi-Device Application - Delphi >Blank Application
- File > New > Multi-Device Application - C++Builder >Blank Application
- Select the TToolBar component in the Tool Palette, and drop it on the Form Designer. To find TToolBar, enter a few characters (such as "tool") in the Search box of the Tool Palette:
- The priortoolbutton StyleLookup value for TButton adds a Back button label. On iOS devices, the label is similar to the following image:
- For more detail about selecting a style in multi-device applications, see Mobile Tutorial: Using a Button Component with Different Styles (iOS and Android).
Write an Event Handler to Open a Web Page when the User Changes the URL in the Edit Control
Unlike desktop platforms, mobile platforms use the Virtual Keyboard to enter text as in the following images. The user can complete the action by clicking "Done".
![VirtualKeyBoard Android.jpg]()
Android (LG - E612
FireMonkey provides many types of event handlers to cover most actions taken by users. After the "Done" button is selected, the FireMonkey framework sends an OnChange event to the TEdit control. On the other hand, there is no specific event for the "Back" button. In this section, you implement event handlers to support both scenarios.Implement a Common Method to Open a Web Page
Before implementing event handlers, first implement a common method to open a Web page based on the Text property of the Edit control.
-
In the private section of the TForm1 class, declare the OpenURL method:
Implement an Event Handler for the OnChange Event
![Edit1ChangeAtObjectInspector.jpg]()
- Create the event handler by selecting the Edit component (in the Form Designer), and then double-clicking the white space next to the OnChange event (in the Object Inspector's Events tab). The Object Inspector creates a new event handler called Edit1Change:
Implement an Event Handler for the Back Button
To implement the Back button for your Web Browser, you can simply call the GoBack method on the Web Browser component:
The basic behavior is now implemented for this Web Browser application. Try running your application on your Android device, the iOS Simulator, or your iOS device.
Selecting the Proper Virtual Keyboard for the Web Browser Application
After you run your first Web Browser application, you might realize that the Virtual Keyboard is not optimized.
iOS provides several virtual keyboards as follows:
Alphabet: Default: EmailAddress: NamePhonePad: NumberPad: NumbersAndPunctuation: PhonePad: URL: Android provides several virtual keyboards as follows:
Alphabet: Default: EmailAddress: NamePhonePad: NumberPad: NumbersAndPunctuation: PhonePad: URL: The most appropriate Virtual Keyboard type for Web Browser components is URL. As we have already discussed in Design the User Interface, the following steps set the URL as the Virtual Keyboard type for the Web Browser component in this example. Select the Edit box on the Form Designer, and then in the Object Inspector, set the KeyboardType property to URL .
![TEdit Properties.jpg]()
WebBrowser Mobile Code Snippet
The WebBrowser project in Mobile Code Snippets demonstrates the functionality described in this tutorial.
This page describes how to develop multi-device applications that target the Android platform. See Android Mobile Application Development for topics that are not specific to the development phase, such as configuring your PC and Android devices to work with RAD Studio.
To create a multi-device app that supports Android:
Then select a multi-device application type in the Multi-Device Application wizard.
Component Restrictions for FireMonkey Android Apps
While you are designing your Android app in RAD Studio, you can only use components that are supported on Android devices. When Android is the active target platform of your project, unsupported components are grayed out on the Tool Palette.
Style Selector
At the top of the multi-device Form Designer is the style selector:
The style selector's drop-down menu lists all the styles that you can apply to the Master view.
Select the Android style from the style selector to see all the properties on the components according to the target platform.
View Selector
![ViewsFormDes.jpg]()
At the top of the multi-device Form Designer is the view selector:
The view selector's drop-down menu lists all the available views, which show the different platforms, such as iOS, Android, Windows and macOS.
- Android 3.5" Phone
- Android 4" Phone
- Android 5" Phone
- Android 7" Tablet
- Android 10" Tablet
- Google Glass
Note: Select the Android target platform to see all the available components for Android, otherwise they appear grayed out.
Add new views to your project in order to customize your application for a specific Android device type. All the views inherit the components and properties from the Master form. For more information see Form Designer.
If you want to customize some aspects of your application for all Android devices you can do it using the Master form, provided you do not want to propagate to the rest of platforms. Otherwise use the Code Editor, for example:
For more information:
-
(shows how to use the Master form for different form factors (such as phone or tablet), without using different views for each form factor)
Using Frameworks in Android Apps
FireMonkey
The FireMonkey framework is ideal for the Android target platform, and it supports other target platforms as well.
VCL (not available for Android)
The Visual Component Library (VCL) is available only on Windows (32-bit or 64-bit).
Some run-time library (RTL) units that provide basic functionality are common for every supported target platform (including Android), such as System.pas or System.SysUtils.pas.
A number of RTL units are Android-only (see Android API and Java Libraries). These units are prefixed with the Androidapi unit scope.
Android API and Java Libraries
The RTL contains a number of units that provide Delphi and C++ interfaces to the Android native API. These units are scoped with Androidapi and are typically located in the source\rtl\android\ directory of your RAD Studio installation. The FireMonkey framework relies on some of these units. You may also use them directly if you want.
You can also use parts of the Android API that are not mapped by the RTL, or use your own Java libraries in your project:
Android Core Lib Names Cannot Be Used as App Names
You cannot assign a name to your project if the name conflicts with the name of a core library shared object file, such as .so.
For example, you cannot use any of the following as project names:
- c (conflicts with libc.so)
- m (conflicts with libm.so)
- z (conflicts with libz.so)
- ssl (conflicts with libssl.so)
- ui (conflicts with libui.so)
- gui (conflicts with libgui.so)
- camera_client (conflicts with camera_client.so)
Alignment Recommendations for Mobile Toolbars and Other FireMonkey Components
To ensure that the toolbar in your app behaves and looks the same on the iOS and Android platforms, you should set specific alignment properties in the Object Inspector, as follows:
- Set the Align property for all controls that are children of a TToolbar. For example, the following are Align property values: (Left, Right, Center, Contents)
- To maintain space between controls, or to maintain space between the left and right borders of toolbars, set the following properties:
-
: (left, right) : (left, right)
- On the TToolbar, set:
- Align = Top
- On the child TLabel, set:
- Align = Contents
- Send the TLabel to the back using the context menu.
- On the two child TSpeedButtons, set:
- Align = Left, Right, Center, Contents, VertCenter For descriptions of these properties, see FMX.Types.TAlignLayout.
- Margins Left = 5
- To format a segmented control (styled TSpeedButtons with a shared group name) so that it is centered on the toolbar:
- Add a TLayout control to the TToolBar.
- Set TLayout.Align to Center.
- Add buttons to the TLayout and set alignment properties and margins for each button (that is, Align = Left, Margins = Left, Margins = Right, and so forth).
- For an example, see Mobile Tutorial: Using a Button Component with Different Styles (iOS and Android).
- To center the label on a toolbar that already has buttons, you must set TLabel.Align = Contents and select Send to Back on the context menu.
Similar alignment rules pertain to other controls. For example, assume you have added a TSwitch to a ListBox item; to have the switch aligned to the right and centered vertically, set the following properties for TSwitch:
Using Custom Fonts in Android Apps
You can use custom fonts in your Android apps. One use for custom fonts is as icons in your mobile applications. True-type fonts have advantages over raster image files in that fonts are light-weight and vector-based, so they scale well to high resolutions. You can install your own custom fonts into your system font library on your development system. Then the custom fonts should be available in the IDE for you to select at design time.
However, if you deploy the app at this point to a target device, the fonts in the app are rendered using only the installed fonts available on the device. You need to add the font to your project using the Deployment Manager to ensure that the fonts you see at design time in the IDE are copied over to the device.
Here are the basic steps for incorporating a custom font in your Android app::
- Install the custom font on your Windows system.
- See the Windows Help and Support on your system for instructions.
- For example, right-click the font file, and click Install.
- Add the font file to the root directory of your project.
- In the Object Inspector, assign the font to the Text Settings/Font property for the controls that use the font.
- Add the font file to your project in the Deployment Manager.
To know whether a font might be available at run time on a specific mobile device, you need to check whether the font you are using at design time is supported on your target devices:
Setting the Required Uses Permissions for Your Android Apps
Some basic Android permissions are pre-set for all FireMonkey Android apps. You should verify that specific access permissions are enabled for your Android device on the Uses Permissions page in Project Options.
- To use the Android device's camera, ensure that the following permissions are enabled:
- Camera
- Read/Write external storage
- Access coarse location
- Access fine location
- Access location extra commands
- Record audio
Using the Android Device's Back Button
To make your application handle when users press the Back button on their Android device, add an event handler to your form for OnKeyUp, and use the following code within your event handler:
Поговорим о том, как «подружить» или настроить Android и RAD Studio XE7 (или Delphi, или C++Builder, или AppMethod).
На самом деле вопрос не очень сложный, но часто поступающие на эту тему вопросы побудили меня написать этот пост.План действий:
— настройка RAD Studio XE7 (SDK + NDK);
— настройка Android-устройства;
— запуск своего приложения на Android-устройстве.
Итак начнём!![]()
— RAD Studio XE7 (самая последняя версия на момент написания статьи);
![]()
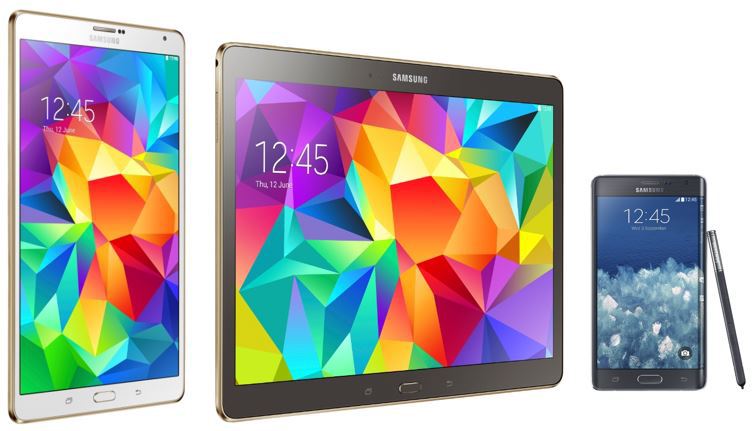
— Три замечательных девайса:
Samsung Galaxy Tab S 8.4 (SM-T700);
Samsung Galaxy Tab S 10.5 (SM-T800);
Samsung Galaxy Note Edge (SM-N915F).![]()
— Ещё понадобятся обычные USB-кабели. Можно использовать один и подключать девайсы поочередно, или использовать три USB-кабеля, но это по желанию.
![]()
Буду использовать свой ноутбук с Windows 8 64x.
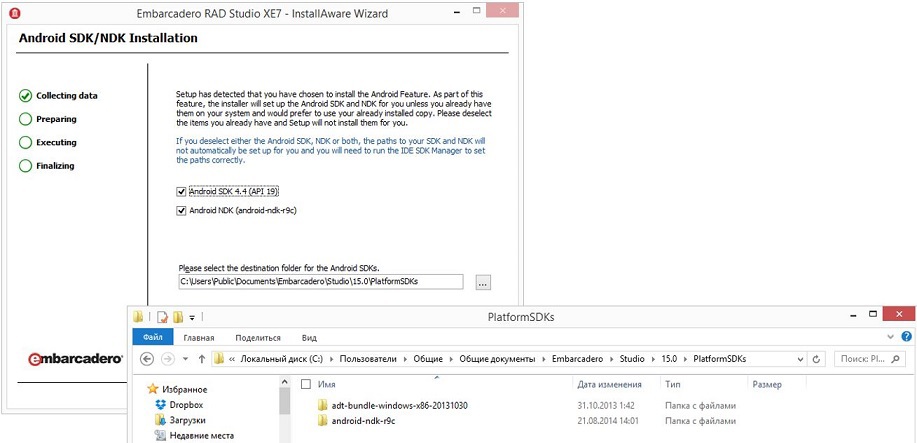
В процессе установки RAD Studio XE7 я не трогаю галочки Android SDK и Android NDK. По умолчанию галочки стоят, после установки эти две библиотеки будут установлены и настроены автоматически.![]()
1.1. Настройка путей к SDK и NDK (этот пункт не обязательный).
Если по каким-то причинам вы не устанавливали SDK и NDK в процессе установки RAD Studio, то выполняем их настройку самостоятельно.
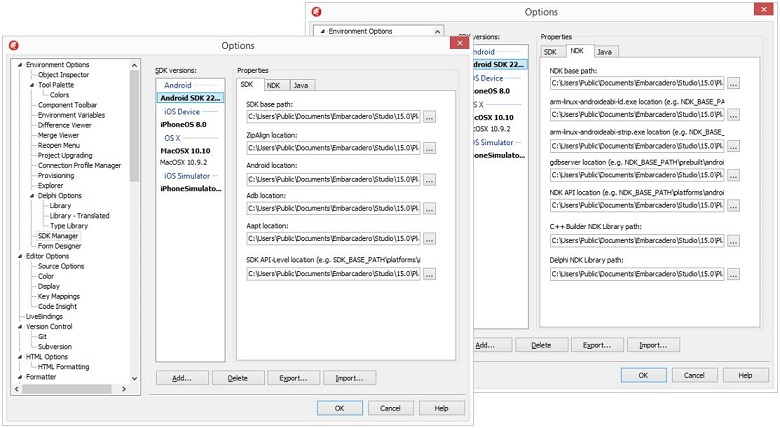
В RAD Studio заходим в меню Tools --> Options, там находим закладку «SDK Manager», далее самостоятельно проверяем и настраиваем пути к библиотекам.![]()
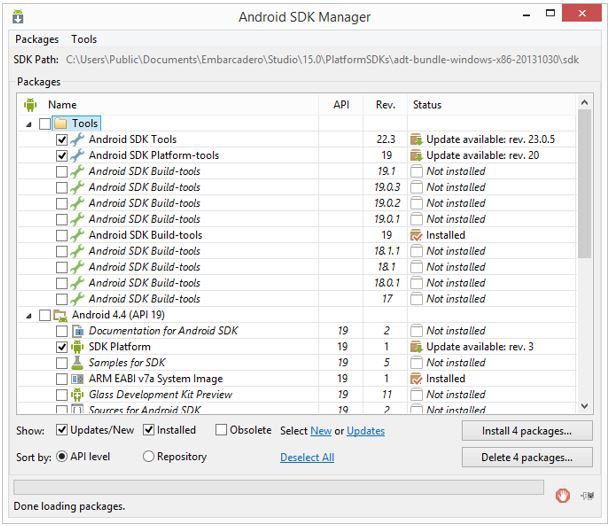
1.2. Обновление библиотеки SDK (не обязательно).
В редких случаях может понадобится обновление библиотеки SDK. Для этого запускаем «Android SDK Manager» и нажимаем на кнопку «Install N packages. ». Далее из интернета скачаются и установятся
последние обновления.![]()
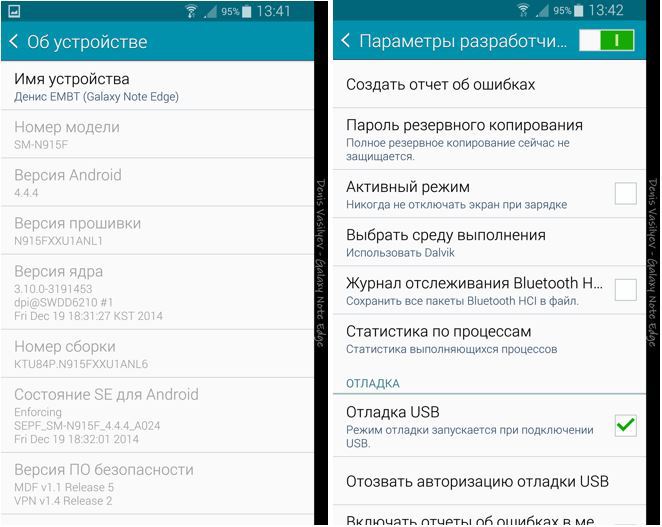
Беру планшет в руки и захожу в его настройки, там нахожу пункт «Об устройстве».
Далее нахожу «номер сборки» и нажимаю на него 7 раз подряд. После этого активизируется скрытый пункт «Параметры разработчика», захожу в него и ставлю флажок напротив пункта «Отладка USB».
То же самое я повторяю для остальных своих девайсов.![]()
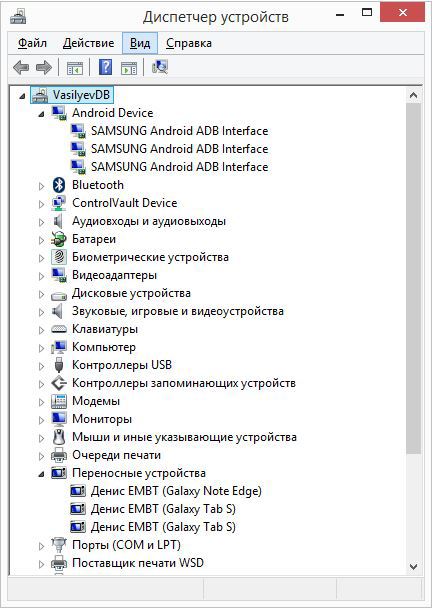
Для этого я поочерёдно подключаю каждый планшет через USB-кабель к моему ноутбуку.
Далее захожу в «Диспетчер устройств» и убеждаюсь, что все драйверы установлены. В моём случае они установились автоматически. Если драйверы не установились автоматически, то необходимо зайти на сайт производителя вашего планшета, скачать и установить их самостоятельно. Убедитесь в том, чтобы в «Диспетчере устройств» все девайсы были определены.
То же самое я повторяю для остальных своих устройств.![]()
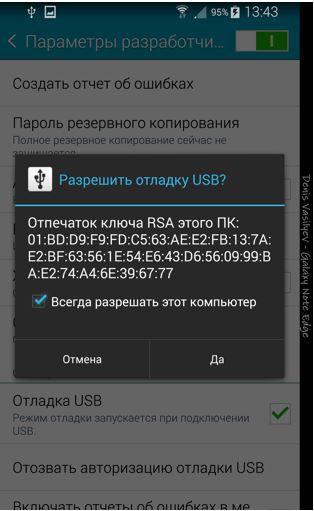
После установки драйверов необходимо полностью отключить Android-девайс от ПК, вытащив из него USB-кабель и подключив его повторно. Дождитесь, когда на самом Android-девайсе появится приглашение «Разрешить отладку USB», ниже поставьте галочку «Всегда разрешать этот компьютер» и нажмите «Да».
![]()
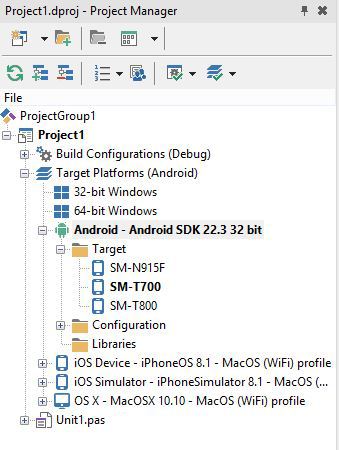
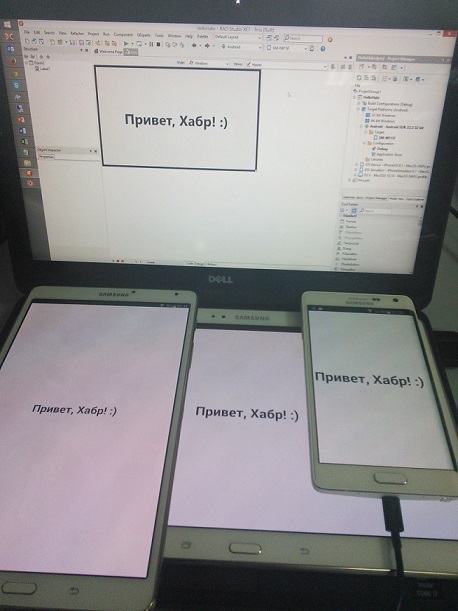
Только на этом этапе я запускаю RAD Studio.
Создаю новый проект Multi-Device Application и в «Project Manager» двойным кликом активизирую платформу Android (она выделяется жирным шрифтом). Далее открываю плюсом список Target, если девайс не появится, то необходимо нажать правой кнопкой на Target и из выпадающего списка — на Refresh. Все три девайса у меня определились с первого раза.![]()
Запускаю своё приложение на Android-устройстве. Вот так всё просто :)
Необходимо помнить, что совсем не обязательно каждый запуск своего приложения отлаживать на устройстве. Delphi позволяет сделать это быстро и комфортно. Всю логику можно отладить в среде Windows, а потом уже проверить, как приложение запустится на самом устройстве.
Важно помнить, что мы создаём сразу кросс-платформенное приложение, поэтому все платформозависимые классы или конструкции следует выносить отдельно от основного кода.
![Delphi for Android]()
В предыдущей части цикла мы сделали обзор основных возможностей новой RAD Studio XE5. Сегодня же перейдем к практике. Прежде всего, давайте определимся с задачей.
Постановка задачи
Не смотря на некоторую академичность задачи, в качестве примера мы выбрали кулинарную книгу. А для придания оригинальности разрабатываемому приложению, попытаемся расширить обычный для подобных программ функционал несколькими дополнительными функциями:
Пересчет количества требуемых продуктов.
Обычно в рецептах указывается точное количество используемых продуктов. Но если требуется изменить количество порций, то соответственно, необходимо пересчитывать и количество продуктов. В процессе приготовления блюда это не всегда удобно.
Таймер.
Если вы новичок в кулинарии, то, вам следует использовать рецепты, в которых четко указано время той или иной операции. И таймер на планшете, телефоне или нетбуке вполне может стать удобной заменой кухонному таймеру.
Часто бывает, что несколько операций выполняются параллельно. Каждая операция может иметь свой «таймер».
При этом нас интересует, как «настольная», так и мобильная реализация приложения. Мобильное приложение будет использоваться в качестве пособия для визуализации рецепта и сопровождения процесса подготовки. Настольная версия может быть использована в более расширенном функционале для, например, формирования новых рецептов.Здесь следует оговориться, что в принципе, поваренные книги, как и книги по программированию, могут быть рассчитаны на разный уровень подготовленности читателей. В нашем случае речь идет о «рецептах для чайников», т. е. тех, в которых указывается точное количество продуктов и точное время того или иного действия.
Данное приложение мы реализуем для Windows и для Android. Затем на основе единой базы исходных кодов мы сможем выполнить портирование приложения на MacOS и iOS.
Выбор средств разработки
Прежде чем приступить непосредственно к разработке, давайте определимся с инструментарием. Разумеется, что данные, которые будут использоваться в приложении, целесообразнее всего хранить в базе данных.
Для чистоты эксперимента в качестве СУБД используем SQLite. Эта СУБД обладает рядом преимуществ, среди которых скорость работы, простота использования, экономичность в отношении ресурсов. Она идеально подходит для решения несложных задач, а кроме того, Android имеет встроенную поддержку SQLite.
В дальнейшем мы рассмотрим, каким образом можно перевести приложение на использования СУБД InterBase и покажем все преимущества «родного» решения от Embarcadero.
Вместе с приложением мы будем распространять уже готовую СУБД, созданную отдельно. Такой подход обусловлен спецификой задачи.
Конечно же, нам понадобиться Delphi XE5. Для создания Windows приложения в принципе мы могли бы ограничиться Professional редакциях. Но для т.н. мобильной разработки нам понадобиться как минимум Enterprise редакция продукта. В качестве альтернативы можно воспользоваться пакетом Mobile Add-On Pack for Delphi XE5 Professional.
Для работы с SQLite в Windows нам понадобится скачать с официального сайта библиотеку sqlite-dll-win32-x86-3080100.zip. Проще всего поместить данную библиотеку в одну из системных папок (например, Windows/SYSTEM32).
В настоящий момент существует довольно большое количество бесплатных средств администрирования баз данных SQLite. Вы вполне можете воспользоваться одним из них.Доступ к базе данных из приложения мы будем осуществлять с помощью библиотеки FireDAC.
FireDAC — это универсальная библиотека доступа к данным, предназначенная для разработки приложений, подключаемых к различным базам данных. С помощью FireDAC можно разрабатывать, как VCL, так и FireMonkey приложения. Библиотека поддерживает следующие СУБД: InterBase, SQLite, MySQL, SQL Server, Oracle, PostgreSQL, DB2, SQL Anywhere, Advantage DB, Firebird, Access, Informix. Однако, на данном этапе, в мобильных приложениях «напрямую» (без использования технологии DataSnap) с помощью FireDAC можно подключиться только к SQLite и InterBase.
Создание базы данных
![Логическая модель БД, созданная с помощью Embarcadero ER/Studio]()
Процесс разработки мы начнем с создания структуры базы данных. Логическая модель ее приведена на диаграмме.
Данная диаграмма получена с помощью еще одного инструмента от компании Embarcadero Technologies — ER/Studio. Developer редакция этого продукта доступна пользователям RAD Studio Architect. В рамках настоящей публикации мы не станем детально останавливаться на описании ER/Studio. Этот мощный инструмент вполне заслуживает того, что бы посвятить ему отдельный материал.
При создании структуры базы данных каждой сущности логической модели будет соответствовать физическая таблица. Вкратце рассмотрим назначение полученных таблиц.
В таблице tblFoodstuff мы будем хранить список всех возможных продуктов. В таблице tblUnit – список единиц измерения (грамм, ложка, стакан и т.д.). Таблица tblRecipe содержит список рецептов. В таблицах tblIngredientes и tblAction содержатся перечень ингредиентов (с указанием количества в поле qty) и действий (с указанием времени и описаниями), соответственно.
Для создания SQLite базы вы можете просто воспользоваться приведенным ниже скриптом.
Создание Windows приложения
Непосредственно процесс разработки приложения мы организуем следующим образом. Начнем с создания базовой версии приложения для Windows, затем портируем его на платформу Android. Далее будем расширять функционал обоих приложений параллельно. MacOS и iOS версии приложения станут заключительным этапом. К их созданию мы приступим после того, как будем иметь готовую Windows и Android версию.
IDE Delphi предоставляет несколько шаблонов новых приложений. В данном случае нас интересует FireMonkey Desktop Application.
![Создание нового FM приложения в Delphi]()
После выбора соответствующего пункта меню на экран будет выведен дополнительный диалог, в котором будет предложено выбрать тип нового FireMonkey приложения – HD (High Definition) или 3D.
![image]()
Переименуем главную форму приложения (в инспекторе объектов меняем свойство Name) и сохраним вновь созданный проект. Добавим в проект новый Data Module (меню File| Other ветка Delphi Files), переименуем и сохраним его.
![Создание нового модуля данных в Delphi]()
Таким образом, мы создали новый проект и подготовились непосредственно к разработке.
Настройка FireDAC соединения
Двойной щелчок по компоненту на форме вызовет диалог настройки подключения.
![FireDAC. Настройка соединения]()
В качестве Driver ID в нашем случае следует указать SQLite, а также в качестве значения параметра Database указать путь к файлу базы данных. Проверить правильность настроек можно с помощью кнопки Test.
Сразу же создадим функцию, отвечающую за подключение к БД в Run Time.
Для того, что бы данную функцию можно было вызвать из главного модуля, вынесем ее заголовок в секцию public.
Главная форма приложения
![Главная форма приложения]()
На главную форму приложения последовательно поместим компоненты TGroupBox, TTabControl и TSplitter. Настроим для каждого из них свойство Align (alLeft, alLeft и alClient, соответственно). На левую панель помещаем два компонента – TListBox и TBindNavigator. Размещаем их как показано на рисунке. Двойным щелчком мыши вызовем дизайнер пунктов компонента TTabControl, и создадим два пункта.
В левом части нашего приложения будет отображаться список рецептов. На вкладках в правой части – список ингредиентов блюда (с указанием количества) и, непосредственно, сам рецепт, состоящий из определенного списка действий.Подключение данных
![Настройка набора данных]()
Как мы уже говорили, в FireMonkey нет специальных компонентов отображения данных. Вместо этого используется механизм связывания LiveBinding. Давайте посмотрим, как он работает. Подключим список рецептов к компоненту TListBox на главной форме. Прежде всего, нужно создать набор данных для работы со списком рецептов. В модуле данных используем компонент TFDTable. Настроим его свойства следующим образом:
В код нашей функции ConnectToDB добавим вызов метода открытия набора данных.
Для того, что бы установить соединение с базой в режиме Run Time следует добавить вызов функции ConnectToDB. Можно привязать его к событию OnCreate модуля данных.
На начальном этапе разработки приложения мы не будем обрабатывать исключения, которые могут возникнуть при подключении, хотя в дальнейшем это необходимо будет сделать.
Организуем вывод данных из таблицы TRecipe в список на главной форме. Для этого, прежде всего, добавим модуль данных в секцию Uses модуля главной формы программы.
В редакторе формы вызовем контекстное меню и выберем пункт Bind Visually. В нижней части экрана откроется LiveBinding Designer. В нем в виде элементов диаграммы представлены объекты и их основные свойства. Простым перетаскиванием свяжем свойства трех объектов так, как это показано на рисунке.![Visual Binding]()
Собственно, это все, что нужно для отображения данных из таблицы рецептов (т.е. списка названий рецептов). Если мы сейчас запустим программу, она покажет список, но он будет пустым, и нам следует позаботиться о том, как добавлять рецепты.
Создадим новую FireMonkey HD форму. Настроим ее свойства следующим образом:
Name = fAddRecipe
BorderStyle = bsToolWindow
Position = poMainFormCenterПодключим модуль данных и поместим на форме компонент TEdit и две кнопки. В LiveBinding Designer свяжем свойство Text компонента TEdit с полем Title набора данных.
![Форма редактирования рецепта]()
Сохраним новую форум и удалим ее из списка автоматически создаваемых форм (меню Project|Options вкладка Forms).
Для главной формы приложения создадим метод:
При запуске программы определим событие AfterInsert для набора данных с рецептами.Теперь, запустив приложение, мы получим список рецептов, который можно модифицировать с помощью навигатора. При добавлении нового рецепта на экране появляется форма с полем ввода.
В этой части цикла мы создали простейшее FireMonkey приложение для Windows. Научились устанавливать соединение с базой данных при помощи пакета FireDAC и рассмотрели простейший пример использования LiveBinding.
В следующей, возможно самой интересной, части цикла мы создадим первое Android приложение.
Читайте также: