
Программа для программирования для мотора bafang bbs02
Reprogramming your Bafang mid-drive system can improve the usability and performance of your ebike. The stock settings out of the factory are often not the best settings. You will find that for example, the first pedal-assist setting is way too powerful, or that the speed limits are just annoying. With the help of this guide, you can reprogram your system to better settings with my custom .el file. You can also learn about all the settings and reprogram the system to your likings.
Disclaimer: Reprogramming your Bafang system is not without risk. If you change the wrong settings and you don’t exactly know what you are doing, damage can be done to the controller. You can even destroy the controller in certain cases. So only customize your own settings if you understand what they mean and what the risks are. I am not responsible for any damage that might occur.
Necessary hardware and software
In order to start reprogramming your Bafang BBSxx mid-drive system, you will need a programming cable . You can purchase this cable with this order link:
You will also need to install a driver and the Bafang configuration tool:
Bafang configuration tool:
USB Drivers:
NOTE: Not all cables necessarily use the CP210x driver. Some cables may require the CH341, or another driver.
Bafang configuration tool instructions
If you have purchased the cable, installed the driver, and installed the configuration tool you are ready to go. Now follow the following steps in order:
- Unplug the battery of your e-bike
- Unplug the Display cable
- Connect the programming cable to the display cable
- Plug in the battery of your e-bike (and turn it on)
- Plug in the USB cable of the programming cable to your desktop/notebook
You are now ready to start using the configuration tool. If you don’t want to know about all the settings, but just want a better configuration, you can use my configuration. First, you need to download the right configuration for your model. Download the correct file according to your Bafang motor version. If you have another Bafang version you cannot use these files. You will have to follow the rest of the post and change the settings yourself.
To use these configurations you need to follow the following steps:
You first need to back up your default settings. If something goes wrong you can always return to the default settings. You do this as follows:
- Select the COM port that your USB programming cable is connected to. Hitting the magnifying glass will automatically select the correct port.
- Now click ”Connect”
- Now click “Read flash” in the right bottom corner of the program.
- You should now see all your settings.
- Click ”File” in the left top corner of the program.
- Click ”save as” and save your file at a location that you can access later if necessary.
- You now have created a back-up you can use later if problems occur.
Instructions to insert my custom configuration
- Select the COM port that your USB programming cable is connected to. Hitting the magnifying glass will automatically select the correct port.
- Now click ”Connect”
- Now click “Read flash” in the right bottom corner of the program.
- You should now see all your settings.
- Now click ”File” in the left top corner of the program.
- Click ”load” and select the file you downloaded, make sure that you downloaded the right version for your motor (BBS02 750 Watt or BBSHD 1000 Watt).
- Only change the setting ”Wheel Diameter[inch]” to your wheel diameter, leave the other settings unchanged.
- Now click ”Write flash” in the right bottom corner of the program.
- You now have successfully reprogrammed your Bafang system with custom settings.
- Close the program, unplug the battery, unplug the programming cable, plug in the display cable and connect the battery again.
- You are now ready to test your new configuration.
If you don’t like these settings and you want to tweak certain settings, you can read the rest of this post and adjust certain settings.
Explanation of all the settings/my recommended settings
All these settings that are recommended here are the same as in the configuration files above. So if you want these settings, follow the steps above.
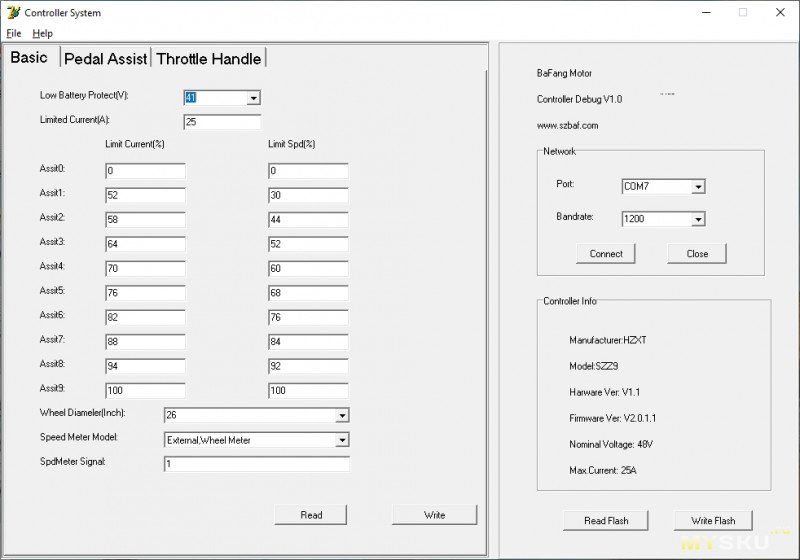
Settings in the first tab (Basic)

Low Battery Protection [V]: 41
This setting will prevent damage to your battery. If your battery voltage drops lower than the number assigned in this setting, the motor will stop working. This way the battery can’t be discharged further. If you have a 48V battery, I don’t recommend lowering this value since it can cause serious damage to your battery. If you have a 52V battery, you need to set this value to 44.
Current Limit [A]: 18 for BBS02 750 Watt, 30 for BBSHD 1000 Watt
This setting will set the maximum current that the controller will draw. In theory, the BBS02 750 Watt version can handle 25A, because it has a 25A controller. I, however, do not recommend setting this to 25. The MOSFETs and the cooling systems of the BBS02 are not really designed for 25A and therefore will reduce the life expectancy of your motor. 18A still gives great performance with plenty of power for most people. If you want insane power, get the BBSHD, this motor has a 30A controller. The controller and cooling of the BBSHD are better than the BBS02. That’s why the setting should/can be set to 30 if you have the BBSHD.
Assist levels:
Now the settings for the assist levels. I recommend setting all the ”Speed Limit [%]” to 100%, this way the motor will only stop assisting when you hit the max speed that you set on your display. I found it really annoying that the motor would stop assisting at different speeds, at different assist levels. The better way of doing it is just to change the power level for the different assist levels. The max speed you will hit in that assist level will then be dependent on the amount of power. This way the bike will just keep assisting with a specified amount of power for that assist level. I also recommend increasing the ”Current Limit [%]” 10% at a time. This way you have amazing control over the amount of power. The ”Current Limit [%]” setting specifies the percentage of the ”current limit[A]” the motor can use at that level. So if the ”Current Limit [%]” is set to 50 in assist level 5, it will use (0,5 * 18 = 9A) max in assist level 5. I recommend the following settings:
Assist Level/Current Limit [%]/Speed Limit [%]:
0/0/100
1/10/100
2/20/100
3/30/100
4/40/100
5/50/100
6/60/100
7/70/100
8/80/100
9/100/100
Speed Meter Type: External, Wheel Meter
This is the only speed sensor that works with the Bafang BBSxx, this setting is the default. So don’t change it to something different.
Speed Meter Signal: 1
The only setting that works is 1, again default. Don’t change it to anything different.
Wheel Diameter [Inch]: custom
Set this setting to your wheel diameter, if your wheel diameter isn’t in the list, then select the one that is closest to your wheel diameter.
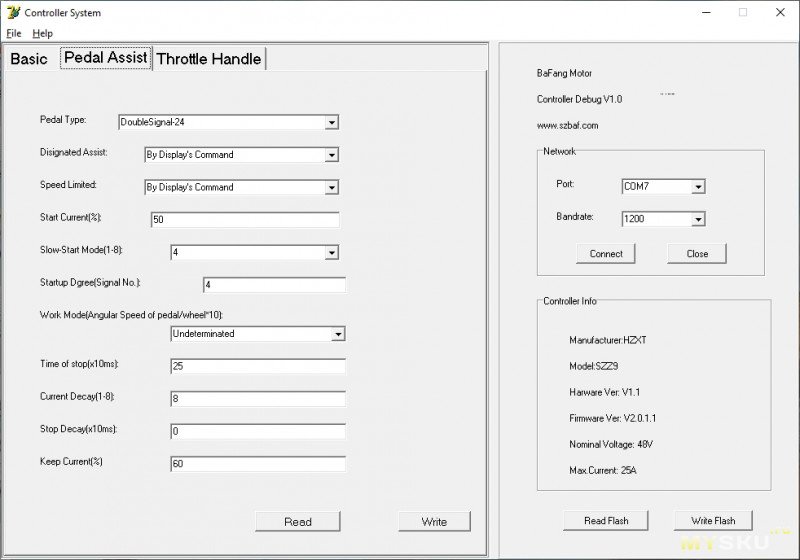
Settings in the second tab (Pedal Assist)

Pedal Sensor Type: DoubleSignal-24
This is the only setting that works correctly, again the default setting, don’t change.
Designated Assist Level: By Display’s Command
In order to change the number of assist levels with your display set this to ”By Display’s Command”. This is the only setting that makes sense because it’s convenient to be able to change this in the display settings.
Speed Limit: By Display’s Command
In order to change the speed limit with the help of the display you have to set this to ”By Display’s Command”. If you want the e-bike to be limited to a certain speed that can’t be changed on the display, you have to assign a certain speed to this setting. If you want the e-bike to limited to 25km/u, select 25km/u. You then can’t change the speed limit on the display of the e-bike. So this setting can be handy for legal reasons.
Start Current[%]: 10
This setting will decide how much current the motor will draw on startup. It, in turn, will decide how fast the e-bike will accelerate. I recommend 10, because then your drive train won’t be under a lot of strain as you accelerate. If you want higher acceleration you can set this value to 20 or 30. I don’t recommend setting this higher than 20 or 30, then most drivetrains will have a hard time and you can potentially break your controller if you are in too high of a gear.
Slow-start Mode(1-8): 4
This setting will decide how fast the current will increase when accelerating. I recommend 4, because this is a nice sweet spot. If you increase slow start, your start will be really slow and jerky. If you decrease slow start, you will accelerate faster. But you also risk damaging or breaking your controller. So I recommend just leaving it to 4.
Start Degree (Signal No.): 4
This setting will decide after what number of steps the motor will start assisting. I recommend 4 because this results in a responsive system. It also is not too responsive, which is good. If you want the pedal-assist to start the fastest when you just pedal a small bit, change it to 2. Changing it to 0 or 1 won’t work, so don’t do that. The maximum will be 20 (24 is a full rotation). But I don’t recommend setting it higher than 4.
Work Mode (Angular Pedal Speed/wheel*10): Undeterminated
Changing this setting doesn’t do anything noticeable. So leave it to default which is undeterminated.
Stop Delay [x10ms]: 25
This setting will decide how fast the motor will stop assisting when you stop pedaling. If you have e-brakes installed I recommend 25, because it is nice that it won’t stop immediately. And if you want the motor to stop straight away, you just hit the brakes. If you don’t have e-brakes however, set this to 10. 10 is the lowest value that will work properly. If you decrease it even more, the pedal-assist won’t work at all anymore for some reason.
Current Decay (1-8): 8
The lower this setting, the faster the drive unit will decrease power as you pedal faster. You don’t want the power to cut down a lot if you pedal faster, so leave this to 8. This also is the default setting.
Stop Decay [x10ms]: 0
This setting determines the amount of time the system takes to reduce the power when you stop pedaling. I think it’s best that the power goes to 0 when you stop pedaling instantly. This is what you would expect. 0 is again default, so I don’t see a reason to change this.
Keep Current[%]: 80
This is a sneaky but important setting. Keep current will decide to which current your motor will drop. It only does this when you are pedaling at a high rate (so if you have reached a constant speed). Then it will drop to for example 80 percent of the current that is assigned in the selected assist level. So if you set this setting really low, then the motor will assist less when you have reached a constant speed. If you set this setting higher, it will assist more when you have reached a constant speed. I recommend 80% because this gives plenty of power when a constant speed is reached. It nicely compensates for your pedaling power. If you want to pedal more yourself and save more battery at a constant speed, set it to 60%. Anything other than 60 or 80 is not recommended.
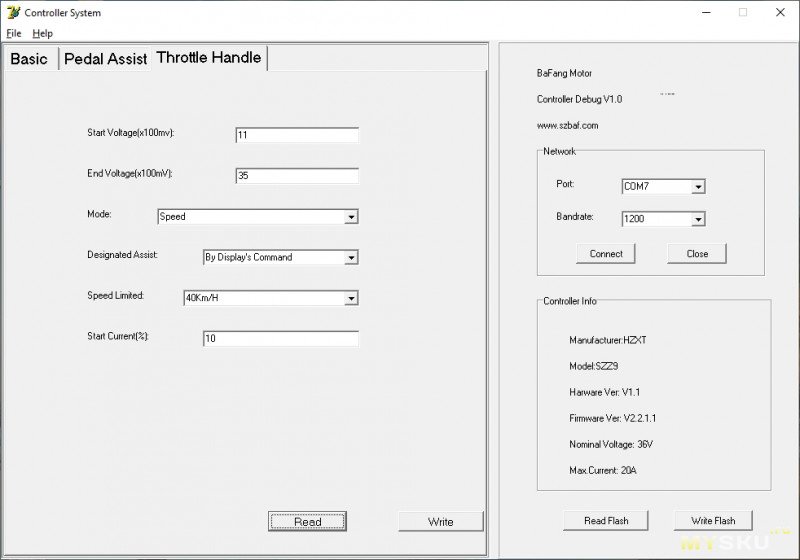
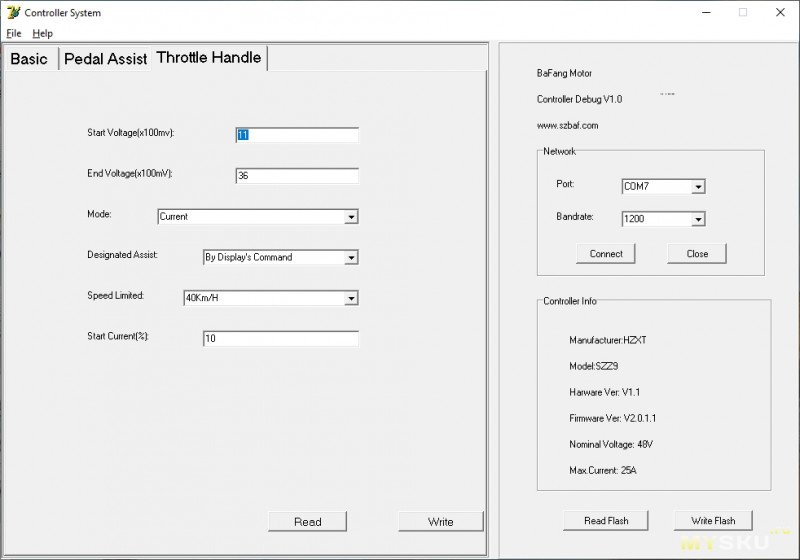
Settings in the third tab (Throttle Handle)

Start Voltage [x100mV]: 11
This setting will decide after how much throttle movement, the throttle will respond. Leave this setting to 11, changing it can give problems to the response of your throttle.
End Voltage [x100mV]: 36
This setting decides at which level the throttle will stop. If you want a wider range of control with your throttle you can set this to a maximum of 42. I recommend 36, since this is the default and in my opinion, works perfectly.
Mode: Current
This setting decides whether the throttle acts as a current throttle or as a speed throttle. I recommend “current” since this is easier to calculate by your controller. If your throttle responds jerky, you can try setting this to speed.
Designated Assist Level: By Display’s Command
This will decide how many levels of throttle power you will have. I recommend this setting to be the same as the amount of pedal-assist levels. Therefore leave it at ”By Display’s Command”, then it will be the same as what is set on the display’s settings. The setting on the display will set this setting and the pedal-assist setting at the same time. So they always will be equal. Take care not to hit the throttle in too high of a gear in level 9, this can burn out your controller.
Speed Limit: 40km/h
This setting doesn’t imply that the maximum speed with the throttle is 40km/u. The speed limit is overwritten by the throttle, so you will go as fast as you want. This setting works as a sort of cruise control, If you pedal and use the throttle at the same time, the motor will cut off above 40km/u. So you can maintain that speed. So set this setting to the desired ”cruise control” speed.
Start Current [%]: 10
This setting will decide how much current the motor will immediately draw when the throttle is engaged. I do not recommend settings this higher than 10, otherwise, you can wheelie of the bike because of the insane power. You also risk burning out your controller if set too high. If you have a weak drive train or IGH decrease this number even more.
If you have read this entire post, you should have a good understanding of all the settings there are. Still, you should be very careful with all the settings, always double-check before writing. If you take good care, nothing bad should happen and you can really customize everything to your liking. Good luck reprogramming your Bafang system!
If you have any questions, want to start a discussion, or need some support, please use the comment section below. I will respond to you within 24 hours.
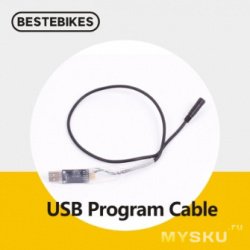
Сегодня расскажу про кабель для программирования кареточных моторов фирмы Bafang. Подходит для моделей bbs01, bbs02, bbs03 и bbshd. Будет краткий гайд по перепрошивке параметров контроллера центрального мотора электровелосипеда.
В обзоре своего электровелосипеда 750 Вт я писал, что неплохо бы настроить параметры мотора под свой стиль катания. Для этого нужно купить или сделать самому специальный кабель. И вот пришло время об этом рассказать.
Начнем.
Упаковка кабеля незатейливая:
Длина 50 см.
В комплекте карточка с QR кодами:
По QR кодам можно скачать софт и инструкцию на английском языке:
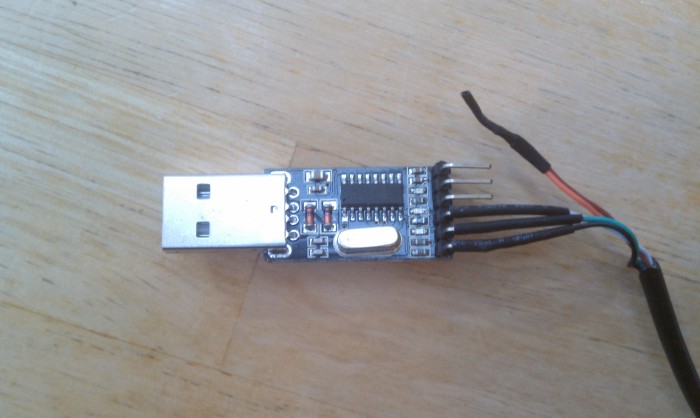
USB часть кабеля (там по сути USB-TTL адаптер):
Микросхема CH340G.
С обратной стороны:
Разъем для соединения с кабелем: EB-bus на место экрана контроллера:

Конечно, можно спаять такой кабель самому, для этого нужно купить USB-TTL адаптер и кабель для экрана контроллера (зеленый разъем пять контактов) и соединить их. Распайка:
Внимание: контакты P + и PL будут подключены непосредственно к вашей батарее, а ее напряжение составляет 36 В или 48 В, что может повредить ПК при неосторожном монтаже.
Но предприимчивые китайцы для ламеров (для меня) сделали готовый кабель.
Схема подключения кабеля простая. Он подключается на кабель EB-bus вместо экрана контроллера:
Мотор должен быть подключен к заряженной батарее.
Вот так это выглядит на мини компьютере с Windows10:
Софт скачиваем здесь
Это программа Controllerstsudu версии:
Драйвер версии 3.5.2019.1 для китайских аналогов Arduino — программаторов на микросхемах серии CH340 и
CH341 от WinChipHead. Предназначен для установки на Windows XP, Windows Vista, Windows 7, Windows 8,
Windows 8.1 и Windows 10.
Для автоматической установки на 32-ух битную Windows распакуйте архив и запустите файл — SETUP.EXE, для
64-х битной — DRVSETUP64.exe.
Поддержка устройств на микросхемах: CH340G, CH340T, CH340C, CH340N, CH340K, CH340E, CH340B, CH341A,
CH341F, CH341T, CH341B, CH341C, CH341U.
Устанавливаем драйвер и запускаем программу Controllerstsudu для работы с мотором от имени администратора.
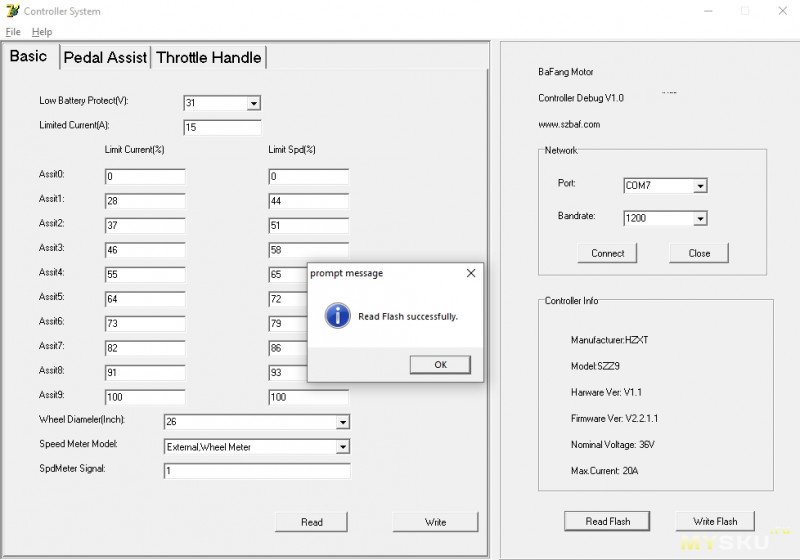
Когда программа запустилась, слева надо выбрать com порт и нажать кнопку соединения «Connect». Если драйвера установлены успешно и выбран рабочий порт, программа считает данные с мотора.
Для мотора BBS01B 250 Вт мы видим:
Для начала работы нужно загрузить параметры из контроллера, нажав «Read Flash».
Имеющиеся данные контроллера по умолчанию лучше сохранить, что бы была возможность откатится к заводским настройкам, программа это позволяет:
Теперь можно безопасно работать с мотором.
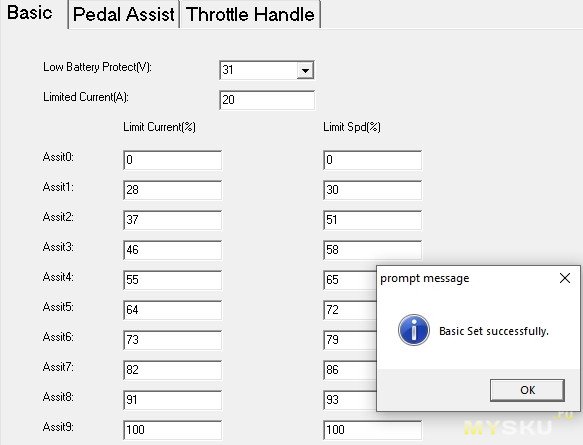
У программы есть три вкладки параметров. Начнем с первой. Basic (Базовые настройки).
Параметры:
Low Battery Protection [V] (Нижний порог защиты батареи [Вольт]) — это напряжение, при котором контроллер останавливает двигатель, чтобы обеспечить защиту батареи от чрезмерного разряда. Это позволит продлить жизнь аккумуляторам. Для 13S аккумуляторных блоков по умолчанию используется 41 В. Для 10S, соответственно, 31 В.
Current Limit [A] (Предел тока [Aмпер]) — это максимальный ток через двигатель. Если ваш мотор на 25A, например, вы можете установить его на 20A, чтобы он был менее мощным.
Assist 0 ÷ Assist 9 (Ассистент 0 ÷ Ассистент 9) — Все это возможные вспомогательные настройки (как для педального ассистента, так и для рукоятки дроссельной заслонки с использованием одного из уровней). Важно упомянуть, что значение «Ток 0» и ограничение скорости должны быть установлены на 1, если вы хотите использовать ручку дроссельной заслонки с PAS0, выбранным на вашем ЖК-дисплее. Обычно Assist 0 установлен на 0, поэтому вы можете использовать свой велосипед без помощи мотора, если хотите. Будьте осторожны, устанавливая эти уровни. Если вы установите слишком низкий ток, двигатель не сможет сдвинуть велосипед. Если вы установите слишком высокий уровень первого вспомогательного уровня, то ускорение при старте будет значительным. Это может повредить внутренние механизмы. Ограничение скорости устанавливает, на какой скорости (% от максимальной скорости, установленной на вашем ЖК-дисплее) двигатель уменьшит мощность и просто сохранит эту скорость.
Speed Meter Type (Тип счетчика скорости) — этот параметр выбирает счетчик скорости, используемый на вашем велосипеде. Для наборов BBS это внешний датчик. Этот параметр задается производителем.
Speed Meter Signals (Сигналы счетчика скорости) — здесь вы можете установить, сколько сигнала за оборот генерирует ваш датчик. Если вы используете внешний датчик с магнитом, он генерирует один сигнал на оборот колеса. Этот параметр задается производителем.
Wheel Diameter [inch] (Диаметр колеса [дюйм]) — Диаметр колеса должен соответствовать размеру вашего ведущего колеса (следовательно, ваш велосипед может иметь два колеса различного размера). Установка диаметра на меньший размер, чем на самом деле, приведет к увеличению скорости, но также может привести к повреждению двигателя.
Если что-то меняем, сохраняем настройки:
Когда вы закончите настройку основных настроек, вы можете использовать кнопку «WRITE» (Записать) на этой вкладке программы, чтобы записать их на ваш контроллер. Вы также можете в любое время использовать кнопку «READ» (Считать), чтобы прочитать их (это заменит все значения на вкладке «Basic»). Это не будет перезаписывать другие настройки. Если вы используете кнопки справа — «Read Flash» и «Write Flash», то все считаете и запишите полный список настроек (Basic, Pedal Assist and Throttle Handle), поэтому будьте осторожны.
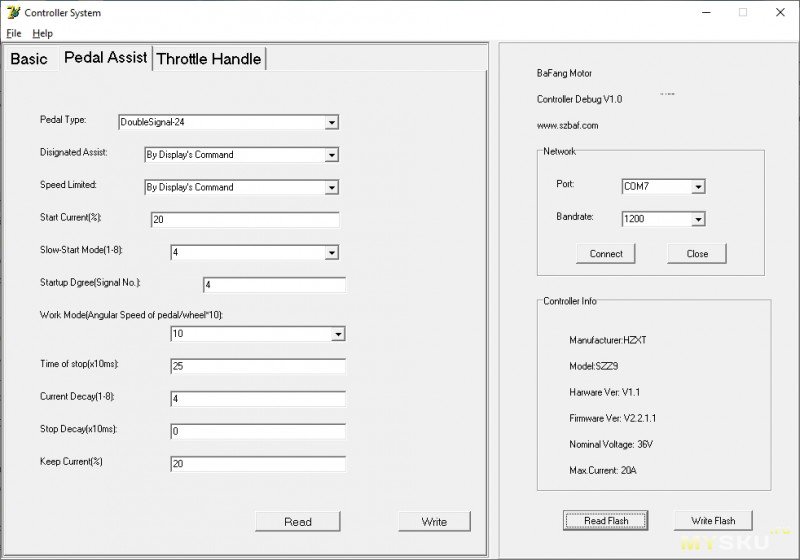
Далее вкладка — Pedal Assist (Настройка помощника педалирования):
Pedal Sensor Type (Тип датчика педалей) — этот параметр выбирает тип датчика вращения педали. Он устанавливается производителем и не должен меняться.
Designated Assist Level (Назначенный уровень помощи.) — Есть два типа операций, выбранных с помощью этого параметра. Сначала «По команде дисплея». Это означает, что на ЖК-дисплее будет выбран вспомогательный уровень (тот, который находится на вкладке «Основные настройки»). Второй вариант — выбрать определенный уровень помощи, который будет исправлен, и вы не сможете изменить его с ЖК-дисплея. Для этого вы можете выбрать любой уровень помощи от 0 до 9.
Speed Limit (Ограничение скорости) — это максимальная скорость, с которой двигатель будет обеспечивать дополнительное ускорение. Когда скорость будет достигнута, она сохранит ее, но больше не ускорится. Если вы установите этот параметр в «По команде дисплея», вы сможете установить скорость с вашего ЖК-дисплея. Имейте в виду, что некоторые ЖК-дисплеи позволяют установить скорость 99 км / ч, что невозможно, по крайней мере, с помощью существующих комплектов BBS. Этот параметр используется для всех вспомогательных уровней, которые вы видите на вкладке «Основные». Если вы установите значение 40 км / ч (в этой программе или на вашем ЖК-дисплее), а уровень Assist 5 установлен на 50%, то вы сможете достичь 20 км / ч на этом вспомогательном уровне.
Start Current [%] (Стартовый ток [%]) — это ток запуска при повороте педалей. Хорошо установить это, по крайней мере, на 10%, чтобы убедиться, что велосипед начнет двигаться, и двигатель не остановится. Установка этого очень высокого значения заставит велосипед ускоряться очень быстро при запуске, который может повредить его внутренние механизмы, а также двигатель. Рекомендуемое значение — от 10% до 30%. Вы также должны убедиться, что вы не начнете педалирование на слишком высокой передаче, которая слишком сильно загрузит двигатель.
Slow-start Mode (1-8) (Режим медленного запуска (1-8)) — Этот параметр определяет, как быстро достигается начальный ток. Вы можете заставить ваш велосипед ускориться плавно и заставить его быстро реагировать. Значение около 4 обычно хорошо работает для нормального велоспорта. Если вы горный байкер, тогда установка на низкое значение ускорит ускорение, что может быть полезно, но вы должны быть осторожны, чтобы не «насиловать» ваш контроллер и двигатель.
Start Degree (Signal No.) (Стартовый угол (количество сигналов)) — этот параметр устанавливает, сколько импульсов от датчика педали требуется до запуска двигателя. Полный оборот педали на наборах BBS генерирует 24 импульса. Установка этого параметра на 0 или 1 не будет работать. Значение около 4 работает хорошо, так как оно не начинается с небольшого перемещения, а также не требует слишком большого вращения.
Work Mode (Angular Pedal Speed / Wheel * 10) (Рабочий режим (угловая скорость педали / колесо * 10)) — Цель этого параметра не очень ясна. Он должен контролировать мощность в зависимости от скорости вращения педали. Значение, установленное производителем, кажется, работает очень хорошо, поэтому вам не нужно его менять.
Stop Delay [x10ms] — это задержка после остановки педали до остановки двигателя. Имейте в виду x10мс. Если вы установите значение 100, это приведет к задержке в 1 секунду. Значение 25 (250 мс) хорошо работает.
Current Decay (1-8) — Этот параметр устанавливает, насколько быстро происходит падение тока при педалировании на скорости и достигает максимальной скорости на выбранном вспомогательном уровне. Нижнее значение означает, что ток начнет падать с меньшей скоростью.
Stop Decay [x10ms] — Время, в течение которого двигатель останавливается.
Keep Current [%] – — эта настройка управляет процентом максимального тока на выбранном вспомогательном уровне, который будет протекать через двигатель, когда вы достигнете максимальной скорости и продолжите педалирование. Поэтому, если ваш максимальный ток равен 25 А, и вы используете PAS5, установленный на 50%, тогда у вас будет максимальный ток 12,5 А для этого вспомогательного уровня. Затем, если Keep Current установлен на 50%, когда достигается максимальная скорость, и вы продолжаете педалирование, ток будет сохранен на уровне 6.25A. Это обеспечивает плавный переход на вспомогательную мощность, когда вы уменьшаете скорость педалирования, а скорость движения падает ниже максимума.
Последняя вкладка — Throttle Handle (Настройка ручки газа):
Start Voltage [x100mV] — это выходное напряжение ручки дроссельной заслонки, при котором двигатель запускается. Минимум, на который реагирует контроллер, составляет 1,1 В, поэтому вы должны установить этот параметр равным 11 (11x100 мВ = 1,1 В).
End Voltage [x100mV] — это выходное напряжение ручки дроссельной заслонки, при котором двигатель достигнет максимальной мощности (ограничен другой настройкой). Максимально допустимый из контроллера 4,2 В (42 х 100 мВ = 4,2 В). Вам нужно немного поиграть с этим параметром, поскольку максимум ручки дроссельной заслонки может отличаться в зависимости от модели. Если вы установите этот параметр слишком низко, вы почти не получите ответа от ручки дроссельной заслонки. Когда вы установите максимальное значение, которое может произвести ручка, вы получите максимально широкий диапазон управления мощностью двигателя.
Mode — это режим работы ручки дроссельной заслонки. У вас есть два варианта: (speed) скорость и current (ток). Когда он установлен на скорость, контроллер использует скорость движения, чтобы установить мощность двигателя в соответствии с положением ручки дроссельной заслонки. К сожалению, существует значительная задержка из-за того, как измеряется скорость, и реакция в этом режиме довольно плохая. При установке на ток ручка управляет током двигателя в соответствии с его положением. Этот режим работает лучше и похож на работу автомобиля.
Designated Assist Level (Обозначенный уровень помощи) — Вы можете установить это значение «По команде дисплея» или выбрать фиксированный уровень. Первый параметр использует настройку PAS на вашем ЖК-дисплее. Это означает, что максимальная выходная мощность и скорость зависят от выбранного уровня PAS и положения ручки дроссельной заслонки. Поэтому, если выбран низкий PAS, максимальный ток и скорость будут слишком низкими, даже если вы нажимаете дроссель на максимум. Если для этого параметра выбран фиксированный вспомогательный уровень, ручка дроссельной заслонки будет использовать максимальный ток и скорость. Будьте осторожны, если вы установите этот уровень на 9-й уровень, чтобы не нажимать дроссель на макс, когда он остановлен, потому что высокий ток и мощность могут повредить ваш контроллер и двигатель.
Speed Limit — с помощью этого параметра вы можете ограничить максимальную скорость при использовании ручки дроссельной заслонки. Это перезаписывает заданную максимальную скорость вспомогательного уровня, если она выше.
Start Current [%] (Стартовый ток [%]) — это процент максимального тока, применяемого к двигателю, когда рукоятка дроссельной заслонки генерирует минимальное допустимое напряжение. Обычно ценность 10% или 20% работает хорошо. Если ваш максимальный ток на вкладке «Основные» установлен на 25 А, а «Пусковой ток» установлен на 10%, вы получите 2,5 А пусковой ток. Это приведет к плавному запуску и не будет слишком сильно нагружать внутренние механизмы. Если вы установите этот параметр на очень высокое значение, вы можете повредить внутренние шестерни и двигатель.
Как видим, перечень параметров очень широк и кареточный мотор можно тонко настроить для своей манеры езды.
Большая тема по программированию моторов Bafang на форуме электротранспорт там подробнее.
For information on the programming parameters and what they do you should check out The Hackers Guide to Programming the BBS02 located here.
UPDATE: The BBSHD is programmed in the exact same way with the same software as the BBS02. Just make sure you set the Limited Current (Amps) to 30 not 25 which is the most the BBS02 can handle.

Looks pretty Ghetto and is oh-so-short but it works every time with Windows OS and only $20-25, What a deal! Hey, it’s not the size that matters… (that’s what my wife keeps telling me)
An important note, programming your controller will immediately void any warranty from Bafang. Don’t expect to make ANY changes to your programming and expect ANY dealer to refund or replace your blown controller, EVER. It’s just not fair to them.
Manufacturers of ebike motors walk a delicate line between making their drive motors configurable (even at risk to bad variables being entered) and completely locking down the system. Bosch has chosen to go the latter route and does not allow anyone other than Magura in the US to change anything on the units other than tiny changes like increasing or decreasing the wheel size slightly to account for different sized tires on the same sized rim. Bosch will never get a dime of my money, you can find out why halfway down this post.

There are 2 schools of thought on programming the BBS02. One school is represented by Paul (cellman) from em3ev who believes that you should make only minor changes to the software such as
- Allow higher powered throttle at any PAS level
- Allow throttle at PAS level 0 so you don’t have to disconnect the PAS entirely to use throttle only
- Low voltage cutoff
- Amps to the unit
Quotes from Paul about the much contested PAS system
“The PAS level should be used to set the pedal cadence. Just because it’s set to 9, does not mean it will pull more power (although it likely will of course), but if you pedal fast enough and hard enough to do much of the work, the kit will not provide much power. PAS works like a switch on the BBS02. It does not adjust as you pedal faster or slower. When you set the PAS level it fixes the speed and it does not want to rotate at a speed much lower than that, or even accelerate smoothly to that speed.”
The other school of thought held by many members of Endless-Sphere is that you should be able to change most any feature or variable you want to although we are literally wandering around in the dark since it’s not even clear what many of the variables even do. It is quite common for people to set the Limit Speed % on every PAS level to 100%. This seems to be a good way to destroy your controller and really drives Paul crazy. There is no programming manual and while Bafang does not prevent you from programming the unit, they certainly don’t seem to be encouraging it either. It seems clear that they never intended for the end users to be programming their own controllers, only ebike ‘dealers’.

Many people dislike the way the PAS system works, as the PAS level is basically a switch to set the pedal cadence and assists MORE the LESS you pedal and assists LESS the MORE you pedal. This seems to be counter intuitive to many who want the unit to offer more power the more you pedal. This means if you want the drive unit to provide more power on a hill you actually have to shift UP not DOWN to select a higher speed and a lower pedal cadence (or lower the PAS system to select a lower cadence as well as a lower power setting). This is not only counter intuitive, but also risks controller overheating as the biggest problem that I’ve found with the BBS02 is that they tend to overheat and fry mosfets when the pedaling cadence is too slow and the hill is too steep. The best way to keep your controller from overheating is to fit the right size chainwheel on it for the hills you plan to climb and consider upgrading the crappy mosfets the controller comes with.
Wow I really can’t help myself, can I? Neat little leds that show power and send/receive covered up by that pesky heat shrink tubing.
I follow Paul’s school of thought, mostly because I buy from him and I trust his judgement. He has spent thousands of dollars replacing customers who reprogrammed their controllers, then fried them and expected free replacements. I just don’t karmically want to be one of those people.
To program the unit you’ll have to plug-in the USB cable (but don’t hook it up to the bike yet) and wait a few minutes. Then browse to the device manager in CONTROL PANEL->SYSTEM->DEVICE MANAGER and look for the com port under PORTS (COM & LPT) as shown below. If you can’t find it just flail around awhile, it will magically appear or maybe you’ll just end up destroying your computer.

Once you figure out the com port you will need to download this file, then rename it to .zip and then extract it somewhere convenient. If renaming it isn’t working right it might be because your windows OS is hiding the file extension. To turn that off go to control panel -> folder options -> View and turn off ‘hide file extensions for known types’. You’re looking for the file controllerst.exe . Make a shortcut to your desktop, that will make it easy to find when you need it. Load that program and then TYPE in the com port that you discovered in the device manager. For this example it would be COM4.
UPDATE: A Bulgarian hacker living in Norway named Penoff used the source code and completely rewrote the Bafang programming software. All the settings are the same but the software that Penoff has written fixes a lot of the annoying bugs (like the com ports not showing up properly) and works the way the original Bafang software SHOULD have worked. I’ve tested it pretty extensively and emailed back and forth with Penoff who seems to be a stand up guy. If you want to download his application you can do it through his website here. You won’t be disappointed.

Looks like a drop down box right? But it is not. You will have to type in your com port you discovered in the device manager.
The controller Info should fill in under the com port but the settings on the left won’t come up till you hit the READ button (not the READ FLASH button).
Now hook up the bike and the battery to the BBS02. Plug the USB wire into the green display port adapter, make sure your arrows line up, the connector is keyed.
Once you hit the READ button the setting for your controller should fill in the current page, You must click read on each of the three seperate pages to load the settings for that page (BASIC \ PEDAL ASSIST \ THROTTLE HANDLE)
There is a lot of different settings you can mess with as shown in the thread on ES about programming the controller. Here are the settings that my most recent BBS02 come from Paul pre-programmed with. To save the settings you must also click WRITE on each page as you change the settings, it won’t write the settings for the page you are not on.

Em3ev settings. I change the wheel diameter to 18 so that the kph reads as mph, change anything other than the Low Battery Protect and Limited Current at your own risk.


Em3ev settings. You can ignore the speed limited command here as the throttle ignores it anyway. I set the “Designated Assist” throttle power to display command so that I can set different throttle power levels by setting a higher PAS level with the PAS disabled. If you want max power on the thumb throttle just set the Designated Assist to 9.
I have lots of hours on these controllers with no failures, so these are the settings I would use. The only settings I would change are the Low Battery Protect (v) which is useful if you are using a pack without BMS and limit current which will limit the current to the controller in Amps. You should match the limit current to the Continuous Amps rating on your BMS. Be aware that often times Chinese battery companies tend to exaggerate their continuous Amps ratings, so when in doubt, use a lower number and slowly work your way up.
For anyone who cares here is a more technical description of the battle going on inside the controller by someone who is a lot smarter than I am on ES (probably better looking too).
Without phase current limiting there is no way to guarantee a motor will not overheat. You rely on the operator keeping the motor at a reasonably high rpm or minimising voltage applied to the motor at low motor speeds. The best a seller can do to avoid overheating is to keep the Limitspd% low so that little current is applied at low cadences but for an operator who avoids low cadence for more than a few seconds this is bad because the motor will provide no power at normal cycling cadences. An operator that keeps pedaling cadence in normal ranges, above about 60 rpm, with the BBS01 will never overheat the motor but an operator that lets motor speed drop below this risks overheating the motor with a wide range of controller settings. This would go away with phase current limiting but the BS0X doesn’t have that feature. The seller suffers potential warranty claims if the Limitspd% is set high but the operator suffers poor performance if the Limitspd% is set low. The current to the motor is also affected by “Keep Current(%)” and Current Decay (1-8)”.
Basically it means if you are climbing a hill you need to have a high cadence level if you want more power and your controller to not fry. I suggest using the thumb throttle on hills (not just the PAS) and shift into a low enough gear that is either too fast (or almost too fast) to keep up with pedaling. As long as the motor is spinning pretty fast the controller should never burn out regardless of how steep the hill is. If you can’t set the gearing on a hill so that you are pedalling fast to keep up then you need to install a smaller chainring for that bike (and lose a little of your top speed).

Here is another trick to bypass the speed limiting on the BBS02 from the thread on ES
For effective unlimited speed, change your wheel size to make mp/h show as km/h.
I.e. if you have a 26 inch wheel, set it as 16 inch wheel in the display (i.e. 26/1.61 = 16 – 1.61 is also roughly the same ratio as km to miles, as in 26km is 16miles). After making this change, then 25km/h on the display will in actual fact be 25mph in reality. No BBS unit is capable of 50mph, so it’s effectively now unlimited (or more accurately, speed limited by max current).
For most fatbike tires you would want to set the tire diameter to 18 (the 26″ tire is closer to 29″ because of all that extra rubber. 29/1.61 = 18)
A lot of variables like tire size and the number of PAS levels that are displayed can also be programmed through the display without the use of a programming cable. To set these parameters you need to look at the user manual for the particular display you have. These can be found here.
Thanks to everyone who spent countless precious hours of their life trying to figure out how to do this and leaving behind a heart-breaking 37 page thread. Our knowledge is built on your blood, sweat, and tears … and your piles of dead controllers.
Update: Had some intermittent problems with the cable after a bunch of uses and re-soldered the connections and the problems went away. Matt seemed happy enough to send me another one but I like fixing (and breaking) stuff. I also soldered the ground connector on the other side of the USB connector that was not soldered to reinforce the circuit board. I also built a 9 pin serial cable out of an old BBS02 display extension cable and a serial extension cable I had laying around. A bunch of BBS02’s I bought from BMS battery were set to 18 amps even though I specifically requested 25 amps. I only recommend buying Chinese motors from Paul at em3ev, everyone else in that country is just impossible to deal with.
Warning: Using This Software Can Void Your Warranty! ONLY CONTINUE IF YOU ACCEPT THE CONSEQUENCES OF YOUR ACTIONS!
If you own a Bafang mid-drive motor you may want to change a thing or two in the controller programming. There are a couple of things you need first to program your Bafang Controller:
1. Bafang programing cable - Available here on Amazon or here on eBay.
2. Programming software - Available by signing up/logging in and then clicking on the Download button above.
3. Windows Laptop / PC - Required to install and run the programming software.
Once you have your cable, software, and a Windows PC, unzip the compressed download file containing the software files.
The files will unzip to create 2 folders and two files, a "Bin" folder to run the program, a "Profiles" folder to hold the preset profiles created by others for your use, a file named "Bafang_Programmer.exe" used to start the program, and a file named "KarlsGuide.pdf" to help you understand and use the program. To run the program, we recommend adding a shortcut to your desktop for ease of use. You can do that by Right-clicking on the "Bafang_Programmer.exe" file, and selecting "Send to/desktop as a shortcut.
Since this is an introductory guide to using the programming cable and the Bafang Config Tool to change the options of the controller for your Bafang mid-drive motor, so we won't be going in-depth about any other tab but the Basic tab.
The Bafang Config Tool has been designed to work on a Windows system, but that doesn't mean it won't work on anything else. It will work fine on Windows 7 systems and newer, but there are drivers available for older systems. Some Windows 10 systems might need a driver as well, depending on the cable.
Where do I plug in the Programming cable?
The Programming cable plugs IN PLACE OF the display. So first, connect the battery to the motor, and, if the battery has an On/Off switch, turn it on. Since batteries and connectors are all different this could be done in several ways. Then, trace the cable from the display to the wiring harness and unplug the display from the wiring harness. These connectors are designed to be waterproof, and stay firmly connected, so unplugging this can be difficult.
Once your display is disconnected, your battery attached and if necessary, turned on, then line the notch on the cable connector with the key on the other connector, plug the programming cable into the connector that the display was plugged into. Be careful now. Since the motor is turned on when the cable is plugged in, if you bump the pedals, or the throttle, the motor will spin the back wheel. This is one good reason to do your tuning with the back wheel in the air, and nothing loose near the chain or sprockets that could be caught in them. Alternately you can remove the chain from the chain ring.
Now, on your laptop, close any open programs, including the Bafang Config Tool. Make sure the Bafang Config Tool is not running by checking for any icons in the task bar. Then plug the other end of the Programming cable into an available USB port on the laptop. Slowly count to 5 before you do anything else. This gives your laptop time to detect the cable, connect to it, and automatically install the drivers for it. Now start the Bafang Config Tool by either double-clicking on the file named Bafang_Programmer.exe in the LunaBafangConfigTool folder, or double-clicking on the shortcut you made to it. If you see a security warning, don't worry, just click on "Run". Now you should see the program, showing three tabs, "Basic", "Pedal Assist", and "Throttle".
Once connected, the first thing you should do is save your existing controller settings. Do this by clicking on the "Read Flash" button.
The settings on the tabs should change to whatever the settings are on your controller now. The Bafang Config Tool software stores the setting configuration files as "Profiles", in the Profiles folder of the software. In order to save these settings, click on "File", then "Save As", and type in a name in the file name box, something like Original, or OEM, or MyStock so that you can save the original settings.
Now to make those changes that improve your riding experience with your Bafang motor. I like to start with a known-good profile, like one of the "Limitless" profiles. They all have closely spaced current levels in the pedal assistance settings, so they can be used to hold a consistent speed with consistent pedaling effort. If you find yourself using pedal assistance at the top or bottom of the range, you might want to change all of the current % settings stronger or weaker, so you are using more of the middle settings.
If you want a smooth pedal assist, with no annoying speed or power cuts, you will only find that with the "Limitless" series of profiles. They are called Limitless because they aren't limited by Bafang's interpretation of Cadence Speed Control. Rather than applying more power as cadence speed increases, Bafang chose to reduce power, right when it is needed the most. For instance, with Bafang's cadence limiting in use, if you downshift to get more power from a higher pedaling cadence, you would actually get less power from the motor. It feels like punishment when the motor power is reduced, and simply because the pedals were being spun faster than an arbitrary cadence limit.. So, all the Limitless profiles have 100% in the cadence speed limit boxes, essentially turning off Bafang's cadence limiting. The Limitless profiles also save a lot more electricity, by allowing constant pedaling, and only using the minimum power necessary to maintain an adequate speed.
Just click on "File", then "Load", and select a profile from the list. Not all of these profiles are suitable for all motor controllers, so it's best to research the profile, or choose from what you know first. For instance, for BBS02 motor controllers, choose from BBS02 labeled profiles, in 48 or 52 volts. For BBSHD motor controllers, choose BBSHD labeled profiles, in 48 or 52 volts. For the high-power Ludicrous controllers, the name has been shortened to keep it small, so look for LmtlsLdcrs profiles, in 48 or 52 volts.
Now for the part you've all been waiting for, actually making changes to your motor's settings. I strongly recommend using a known-good profile to start with, and then making changes to it, always saving the changes with a new name. I usually just add a number to the end, so I know which revision I'm working on. To start with, just make changes to the "Basic" tab in the Bafang Config Tool, but don't change the "Speed Meter Type", or the "Speed Meter Signals" fields.
Here are the definitions for the settings on the Basic tab, so you know what it is that you are changing.
Low Battery Cutoff [Volts] = Voltage at which the controller will stop the motor to keep your battery safe from over-discharge.It should be set at 43 volts for a 52 volt battery, and 40 volts for a 48 volt battery.
Current Limit [Amps] = The maximum current allowed to flow through the motor. If your motor is 25A for example you can set it to 20A to keep it safe. The controller firmware has a built-in limit and will not allow you to set it higher. Changing this setting can affect both the Pedal Assist and Throttle Tab settings as well.
Assist levels 0 - 9 – Both Pedal Assist and Throttle use these settings. If you want to use your Throttle without Pedal Assistance on assist level 0, then it is important to set both current and speed limits to 1. The current limit [%] is a percentage of the number in the current limit [Amps] box above. The speed limit [%] sets the maximum speed percentage for the motor reducing the power to maintain a set pedaling cadence and/or wheel speed. This is the part of pedal assistance I don't agree with. Speed limits are an artificial imposition on the natural process of riding a bike.
Speed Meter Type – This set for the type of sensor, for BBSxx kits this is set to “External, Wheel Sensor”.
Speed Meter Signals – This set for the type of speed sensor, for BBSxx kits this is set to “1”.
Wheel Diameter [inch] – The wheel diameter should match the size of the wheel you installed. for the best speedometer reading. Setting the diameter to a smaller size than it is increases the speedometer's perceived speed. Setting the wheel size extra small can bypass the 40kph speed limit imposed by some displays.
Pedal assistance is designed to be used on roads, paved, or unpaved, where your bike can be pedaled consistently without stopping to dodge roots and rocks like you would on a single-track trail. Pedal assistance is a cooperative effort, part motor, and part human effort. It is important to get the power levels set low enough to require effort, but not so low that you have to stand up to pedal. It is also important to get the steps between settings low enough that you aren't stuck between too much power and too little.
We recommend enabling all 9 levels of pedal assistance in the display settings of your display if your display supports it (this is doable with all color displays). For help with this, search this forum for your display name, 750C, DPC14, DPC18 and etc. You can also change the effect of all the pedal assistance settings at once by simply changing the "Current Limit" level. This affects all the pedal assistance power percentages, as well as the max power.
Once you have your settings ready, click on "File" and "Save As" to save your settings as a new profile with a name you can remember. Then, to change the settings on the motor, click on "Write Flash". In a moment a message will pop up indicating a successful uploading of the profile to the controller. I usually do it twice to make sure the change is copied completely. Then click on "Disconnect". The controller information should be empty. Click on the upper-right-hand corner "X" to close the Bafang Config Tool.
Removal is the reverse of the connection. Start by making sure the Bafang Config Tool program on your laptop is closed, then unplug the cable from your laptop's USB port. Then unplug the cable from the wiring harness, and connect the display cable connector. Use the arrows on the connectors and make sure to align the connector's key with the key way on the other connector, then press them firmly together.
Now the fun part. Trying it out. At this point you can power up the E-Bike and take it for a ride, making sure to power it up while the bike is standing still, It's all right to have the brakes on while powering up, in fact I suggest it. Then take it for a spin. Test out all the PAS levels, at least briefly, to ensure all of the settings are working as they should.
Author Anton Downloads 664 Views 27,485 First release Aug 9, 2020 Last update Aug 9, 2020 Rating 3.75 star(s) 4 ratings
Сегодня расскажу про кабель для программирования кареточных моторов фирмы Bafang. Подходит для моделей bbs01, bbs02, bbs03 и bbshd. Будет краткий гайд по перепрошивке параметров контроллера центрального мотора электровелосипеда.
В обзоре своего электровелосипеда 750 Вт я писал, что неплохо бы настроить параметры мотора под свой стиль катания. Для этого нужно купить или сделать самому специальный кабель. И вот пришло время об этом рассказать.
Упаковка
Упаковка кабеля незатейливая:
Длина 50 см.
В комплекте карточка с QR кодами:
По QR кодам можно скачать софт и инструкцию на английском языке:
USB часть кабеля (там по сути USB-TTL адаптер):
Микросхема CH340G.
С обратной стороны:
Разъем для соединения с кабелем: EB-bus на место экрана контроллера:
Распайка
Конечно, можно спаять такой кабель самому, для этого нужно купить USB-TTL адаптер и кабель для экрана контроллера (зеленый разъем пять контактов) и соединить их. Распайка:
Внимание: контакты P + и PL будут подключены непосредственно к вашей батарее, а ее напряжение составляет 36 В или 48 В, что может повредить ПК при неосторожном монтаже.
Но предприимчивые китайцы для ламеров (для меня) сделали готовый кабель.
Схема подключения кабеля
Схема подключения кабеля простая. Он подключается на кабель EB-bus вместо экрана контроллера:
Мотор должен быть подключен к заряженной батарее.
Вот так это выглядит на мини компьютере с Windows10:
Софт скачиваем здесь.
Это программа Controllerstsudu версии:
Драйвер версии 3.5.2019.1 для китайских аналогов Arduino — программаторов на микросхемах серии CH340 и CH341 от WinChipHead. Предназначен для установки на Windows XP, Windows Vista, Windows 7, Windows 8,
Windows 8.1 и Windows 10.
Для автоматической установки на 32-ух битную Windows распакуйте архив и запустите файл — SETUP.EXE,
Для 64-х битной — DRVSETUP64.exe.
Поддержка устройств на микросхемах: CH340G, CH340T, CH340C, CH340N, CH340K, CH340E, CH340B, CH341A, CH341F, CH341T, CH341B, CH341C, CH341U.
Программирование контроллера
Устанавливаем драйвер и запускаем программу Controllerstsudu для работы с мотором от имени администратора.
Когда программа запустилась, слева надо выбрать com порт и нажать кнопку соединения «Connect». Если драйвера установлены успешно и выбран рабочий порт, программа считает данные с мотора.
Для мотора BBS01B 250 Вт мы видим:
Для начала работы нужно загрузить параметры из контроллера, нажав «Read Flash».
Имеющиеся данные контроллера по умолчанию лучше сохранить, что бы была возможность откатится к заводским настройкам, программа это позволяет:
Теперь можно безопасно работать с мотором.
У программы есть три вкладки параметров. Начнем с первой. Basic (Базовые настройки).
Параметры:
Low Battery Protection [V] (Нижний порог защиты батареи [Вольт]) — это напряжение, при котором контроллер останавливает двигатель, чтобы обеспечить защиту батареи от чрезмерного разряда. Это позволит продлить жизнь аккумуляторам. Для 13S аккумуляторных блоков по умолчанию используется 41 В. Для 10S, соответственно, 31 В.
Current Limit [A] (Предел тока [Aмпер]) — это максимальный ток через двигатель. Если ваш мотор на 25A, например, вы можете установить его на 20A, чтобы он был менее мощным.
Assist 0 ÷ Assist 9 (Ассистент 0 ÷ Ассистент 9) — Все это возможные вспомогательные настройки (как для педального ассистента, так и для рукоятки дроссельной заслонки с использованием одного из уровней). Важно упомянуть, что значение «Ток 0» и ограничение скорости должны быть установлены на 1, если вы хотите использовать ручку дроссельной заслонки с PAS0, выбранным на вашем ЖК-дисплее. Обычно Assist 0 установлен на 0, поэтому вы можете использовать свой велосипед без помощи мотора, если хотите. Будьте осторожны, устанавливая эти уровни. Если вы установите слишком низкий ток, двигатель не сможет сдвинуть велосипед. Если вы установите слишком высокий уровень первого вспомогательного уровня, то ускорение при старте будет значительным. Это может повредить внутренние механизмы. Ограничение скорости устанавливает, на какой скорости (% от максимальной скорости, установленной на вашем ЖК-дисплее) двигатель уменьшит мощность и просто сохранит эту скорость.
Speed Meter Type (Тип счетчика скорости) — этот параметр выбирает счетчик скорости, используемый на вашем велосипеде. Для наборов BBS это внешний датчик. Этот параметр задается производителем.
Speed Meter Signals (Сигналы счетчика скорости) — здесь вы можете установить, сколько сигнала за оборот генерирует ваш датчик. Если вы используете внешний датчик с магнитом, он генерирует один сигнал на оборот колеса. Этот параметр задается производителем.
Wheel Diameter [inch] (Диаметр колеса [дюйм]) — Диаметр колеса должен соответствовать размеру вашего ведущего колеса (следовательно, ваш велосипед может иметь два колеса различного размера). Установка диаметра на меньший размер, чем на самом деле, приведет к увеличению скорости, но также может привести к повреждению двигателя.
Если что-то меняем, сохраняем настройки:
Когда вы закончите настройку основных настроек, вы можете использовать кнопку «WRITE» (Записать) на этой вкладке программы, чтобы записать их на ваш контроллер. Вы также можете в любое время использовать кнопку «READ» (Считать), чтобы прочитать их (это заменит все значения на вкладке «Basic»). Это не будет перезаписывать другие настройки. Если вы используете кнопки справа — «Read Flash» и «Write Flash», то все считаете и запишите полный список настроек (Basic, Pedal Assist and Throttle Handle), поэтому будьте осторожны.
Далее вкладка — Pedal Assist (Настройка помощника педалирования):
Pedal Sensor Type (Тип датчика педалей) — этот параметр выбирает тип датчика вращения педали. Он устанавливается производителем и не должен меняться.
Designated Assist Level (Назначенный уровень помощи.) — Есть два типа операций, выбранных с помощью этого параметра. Сначала «По команде дисплея». Это означает, что на ЖК-дисплее будет выбран вспомогательный уровень (тот, который находится на вкладке «Основные настройки»). Второй вариант — выбрать определенный уровень помощи, который будет исправлен, и вы не сможете изменить его с ЖК-дисплея. Для этого вы можете выбрать любой уровень помощи от 0 до 9.
Speed Limit (Ограничение скорости) — это максимальная скорость, с которой двигатель будет обеспечивать дополнительное ускорение. Когда скорость будет достигнута, она сохранит ее, но больше не ускорится. Если вы установите этот параметр в «По команде дисплея», вы сможете установить скорость с вашего ЖК-дисплея. Имейте в виду, что некоторые ЖК-дисплеи позволяют установить скорость 99 км / ч, что невозможно, по крайней мере, с помощью существующих комплектов BBS. Этот параметр используется для всех вспомогательных уровней, которые вы видите на вкладке «Основные». Если вы установите значение 40 км / ч (в этой программе или на вашем ЖК-дисплее), а уровень Assist 5 установлен на 50%, то вы сможете достичь 20 км / ч на этом вспомогательном уровне.
Start Current [%] (Стартовый ток [%]) — это ток запуска при повороте педалей. Хорошо установить это, по крайней мере, на 10%, чтобы убедиться, что велосипед начнет двигаться, и двигатель не остановится. Установка этого очень высокого значения заставит велосипед ускоряться очень быстро при запуске, который может повредить его внутренние механизмы, а также двигатель. Рекомендуемое значение — от 10% до 30%. Вы также должны убедиться, что вы не начнете педалирование на слишком высокой передаче, которая слишком сильно загрузит двигатель.
Slow-start Mode (1-8) (Режим медленного запуска (1-8)) — Этот параметр определяет, как быстро достигается начальный ток. Вы можете заставить ваш велосипед ускориться плавно и заставить его быстро реагировать. Значение около 4 обычно хорошо работает для нормального велоспорта. Если вы горный байкер, тогда установка на низкое значение ускорит ускорение, что может быть полезно, но вы должны быть осторожны, чтобы не «насиловать» ваш контроллер и двигатель.
Start Degree (Signal No.) (Стартовый угол (количество сигналов)) — этот параметр устанавливает, сколько импульсов от датчика педали требуется до запуска двигателя. Полный оборот педали на наборах BBS генерирует 24 импульса. Установка этого параметра на 0 или 1 не будет работать. Значение около 4 работает хорошо, так как оно не начинается с небольшого перемещения, а также не требует слишком большого вращения.
Work Mode (Angular Pedal Speed / Wheel * 10) (Рабочий режим (угловая скорость педали / колесо * 10)) — Цель этого параметра не очень ясна. Он должен контролировать мощность в зависимости от скорости вращения педали. Значение, установленное производителем, кажется, работает очень хорошо, поэтому вам не нужно его менять.
Stop Delay [x10ms] — это задержка после остановки педали до остановки двигателя. Имейте в виду x10мс. Если вы установите значение 100, это приведет к задержке в 1 секунду. Значение 25 (250 мс) хорошо работает.
Current Decay (1-8) — Этот параметр устанавливает, насколько быстро происходит падение тока при педалировании на скорости и достигает максимальной скорости на выбранном вспомогательном уровне. Нижнее значение означает, что ток начнет падать с меньшей скоростью.
Stop Decay [x10ms] — Время, в течение которого двигатель останавливается.
Keep Current [%] – — эта настройка управляет процентом максимального тока на выбранном вспомогательном уровне, который будет протекать через двигатель, когда вы достигнете максимальной скорости и продолжите педалирование. Поэтому, если ваш максимальный ток равен 25 А, и вы используете PAS5, установленный на 50%, тогда у вас будет максимальный ток 12,5 А для этого вспомогательного уровня. Затем, если Keep Current установлен на 50%, когда достигается максимальная скорость, и вы продолжаете педалирование, ток будет сохранен на уровне 6.25A. Это обеспечивает плавный переход на вспомогательную мощность, когда вы уменьшаете скорость педалирования, а скорость движения падает ниже максимума.
Последняя вкладка — Throttle Handle (Настройка ручки газа):
Start Voltage [x100mV] — это выходное напряжение ручки дроссельной заслонки, при котором двигатель запускается. Минимум, на который реагирует контроллер, составляет 1,1 В, поэтому вы должны установить этот параметр равным 11 (11×100 мВ = 1,1 В).
End Voltage [x100mV] — это выходное напряжение ручки дроссельной заслонки, при котором двигатель достигнет максимальной мощности (ограничен другой настройкой). Максимально допустимый из контроллера 4,2 В (42 х 100 мВ = 4,2 В). Вам нужно немного поиграть с этим параметром, поскольку максимум ручки дроссельной заслонки может отличаться в зависимости от модели. Если вы установите этот параметр слишком низко, вы почти не получите ответа от ручки дроссельной заслонки. Когда вы установите максимальное значение, которое может произвести ручка, вы получите максимально широкий диапазон управления мощностью двигателя.
Mode — это режим работы ручки дроссельной заслонки. У вас есть два варианта: (speed) скорость и current (ток). Когда он установлен на скорость, контроллер использует скорость движения, чтобы установить мощность двигателя в соответствии с положением ручки дроссельной заслонки. К сожалению, существует значительная задержка из-за того, как измеряется скорость, и реакция в этом режиме довольно плохая. При установке на ток ручка управляет током двигателя в соответствии с его положением. Этот режим работает лучше и похож на работу автомобиля.
Designated Assist Level (Обозначенный уровень помощи) — Вы можете установить это значение «По команде дисплея» или выбрать фиксированный уровень. Первый параметр использует настройку PAS на вашем ЖК-дисплее. Это означает, что максимальная выходная мощность и скорость зависят от выбранного уровня PAS и положения ручки дроссельной заслонки. Поэтому, если выбран низкий PAS, максимальный ток и скорость будут слишком низкими, даже если вы нажимаете дроссель на максимум. Если для этого параметра выбран фиксированный вспомогательный уровень, ручка дроссельной заслонки будет использовать максимальный ток и скорость. Будьте осторожны, если вы установите этот уровень на 9-й уровень, чтобы не нажимать дроссель на макс, когда он остановлен, потому что высокий ток и мощность могут повредить ваш контроллер и двигатель.
Speed Limit — с помощью этого параметра вы можете ограничить максимальную скорость при использовании ручки дроссельной заслонки. Это перезаписывает заданную максимальную скорость вспомогательного уровня, если она выше.
Start Current [%] (Стартовый ток [%]) — это процент максимального тока, применяемого к двигателю, когда рукоятка дроссельной заслонки генерирует минимальное допустимое напряжение. Обычно ценность 10% или 20% работает хорошо. Если ваш максимальный ток на вкладке «Основные» установлен на 25 А, а «Пусковой ток» установлен на 10%, вы получите 2,5 А пусковой ток. Это приведет к плавному запуску и не будет слишком сильно нагружать внутренние механизмы. Если вы установите этот параметр на очень высокое значение, вы можете повредить внутренние шестерни и двигатель.
Пример данных на моем моторе 750 Вт BBS02B
Как видим, перечень параметров очень широк и кареточный мотор можно тонко настроить для своей манеры езды.
Большая тема по программированию моторов Bafang на форуме электротранспорт там подробнее.
Читайте также: