
Настройка visual studio ue4
Unreal Engine предназначен для плавной интеграции с Visual Studio, что позволяет вам быстро и легко вносить изменения в свои проекты, чтобы сразу увидеть результаты после компиляции. Настройка Visual Studio для работы с Unreal Engine может помочь повысить эффективность и общее взаимодействие с пользователем для разработчиков, использующих Unreal Engine.
В этом документе мы также рассмотрим основные настройки рабочего процесса Unreal Engine>Visual Studio.
Перед настройкой рабочего процесса Unreal Engine>Visual Studio
В Visual Studio 2017 (VS2017) поддержка C ++ теперь является частью дополнительных рабочих нагрузок, которые не установлены по умолчанию. Подробные инструкции по добавлению инструментов C++ в существующую установку Visual Studio см. В разделе Установка поддержки C ++ в Visual Studio на странице поддержки Microsoft. Если вы еще не установили Visual Studio или Unreal Engine, см. Раздел « Параметры новой установки Visual Studio » на этой странице.
В следующей таблице указано, какие версии Visual Studio интегрированы с соответствующими версиями Unreal Engine 4.
Начиная с версии 4.22, Unreal Engine не поддерживает VS 2015. Unreal Engine по-прежнему использует VS 2017 по умолчанию, но также поддерживает VS 2019.
Начиная с версии 4.20, Unreal Engine по умолчанию использует VS 2017. Тем не менее, VS2015 по-прежнему поддерживается. Если у вас установлена VS 2015, но нет VS 2017, Unreal Engine 4.20 все равно будет работать. Однако если у вас установлены как VS 2015, так и VS 2017, Unreal Engine 4.20 по умолчанию будет использовать IDE и компилятор VS 2017, а также генерировать файлы проекта VS 2017.
Чтобы настроить Unreal Engine 4.20 для создания решения и файлов проекта VS 2015, вы можете выполнить одно из следующих действий:
Выберите версию Visual Studio, которую вы хотите использовать в качестве предпочтительной IDE исходного кода в редакторе (из окна настроек редактора)
Версии Unreal Engine с открытым исходным кодом (доступны через GitHub и Perforce) интегрированы с VS 2013. Кроме того, более ранние версии Unreal Engine, интегрированные с более старыми версиями Visual Studio, не рассматриваются в этом документе.
Запустите установщик предварительной установки Unreal Engine
Когда вы устанавливаете Unreal Engine из Epic Launcher или клонируете его из GitHub, обязательный установщик Unreal Engine запускается автоматически. Однако, если вы устанавливаете или синхронизируете Unreal Engine из Perforce, вам нужно будет вручную запустить обязательный установщик. Это необходимо сделать до запуска любых инструментов Unreal Engine, которые вы создали локально.
Параметры для новой установки Visual Studio
Если вы устанавливаете Visual Studio в первый раз, вам нужно убедиться, что у вас включены следующие параметры.
Инструменты C ++
Чтобы добавить инструменты C ++ в установку Visual Studio, выберите « Разработка игр с C++» в разделе « Рабочие нагрузки» .

Включите Unreal Engine Installer
Чтобы включить UE Installer при установке Visual Studio, найдите боковую панель « Summary» справа, разверните « Game development with C++» и в разделе « Optional» установите флажок для Unreal Engine installer .

Рекомендуемые настройки
Ниже приведены рекомендуемые настройки для разработчиков, использующих Visual Studio вместе с Unreal Engine 4.
Увеличьте ширину выпадающего меню конфигураций решения

Щелкните правой кнопкой мыши на панели инструментов и выберите « Настроить» в нижней части появившегося меню.

Нажмите на вкладку Команды .

Выберите переключатель на панели инструментов .

В раскрывающемся списке рядом с панелью инструментов выберите « Стандартный» .

В списке предварительного просмотра выберите элемент управления « Конфигурации решения» .

Нажмите Изменить выделение справа.

Установите ширину до 200 . Затем нажмите ОК .

Нажмите Закрыть . Ваша панель инструментов должна обновиться немедленно.
Добавьте раскрывающийся список платформ решений

Найдите самую правую кнопку на стандартной панели инструментов (если навести на нее курсор мыши, она будет помечена как « Стандартные параметры панели инструментов» ).

Отключить окно списка ошибок
Как правило, окно списка ошибок появляется автоматически, когда в вашем коде есть ошибка. Однако при работе с Unreal Engine в окне Список ошибок может отображаться информация о ложных ошибках. Лучше всего отключить окно Error List и использовать окно Output, чтобы увидеть реальные ошибки кода при работе с Unreal Engine. Следующие шаги показывают, как отключить окно списка ошибок .

В меню « Инструменты» откройте диалоговое окно « Параметры ».

Выберите « Проекты и решения» и снимите флажок « Всегда показывать список ошибок», если сборка завершается с ошибкой .
Отключите Показать неактивные блоки . Если вы этого не сделаете, многие фрагменты кода могут отображаться серым цветом в текстовом редакторе. Выберите Сервис> Параметры> Текстовый редактор> C / C ++> Вид, чтобы отключить этот параметр.
Установите для параметра « Отключить внешние папки зависимостей» значение «Истина», чтобы скрыть ненужные папки в обозревателе решений . Найдите папку «Отключить внешние зависимости» в разделе «Инструменты»> «Параметры»> «Текстовый редактор»> «C / C ++»> «Дополнительно» .
Отключите функции « Редактировать и продолжить» , они вам не нужны. Перейдите в Инструменты> Параметры> Отладка> Изменить и продолжить .
Пользователи Visual Assist X
Отключить формат после вставки. Перейдите в VAssistX> Параметры Visual Assist X> Дополнительно> Исправления, чтобы изменить этот параметр.
Если вы не отключите эту опцию, Visual Assist X автоматически отформатирует ваш исходный код. Это может привести к плохо отформатированным документам.
Intellisense, ошибки в реальном времени и Squiggles
Проекты UE4 теперь имеют надлежащую поддержку IntelliSense, в том числе живой список ошибок и кривые. Смотрите ниже, как включить его.
IntelliSense перекомпилирует C ++ при вводе. Это намного мощнее, чем проверка синтаксиса VAX, поскольку он использует полный компилятор C ++, который проверяет каждую строку кода. Это значительно ускорит ваш рабочий процесс.

Наряду с загогулами, вы также увидите ошибки IntelliSense в списке ошибок для любого файла, который вы просматриваете. Вы можете включить или выключить это в контекстном меню в Списке ошибок.

Возможно, вы уже отключили загогулины, потому что они не работали с проектами UE4. Обязательно нажмите C / C ++> Advanced и используйте настройки, аналогичные приведенным ниже.


Детали реализации
Иногда при редактировании кода появляются загогулины в течение нескольких секунд. Это потому, что у нас много включаемых файлов, и IntelliSense в настоящее время не использует PCH.
Squiggles в заголовочных файлах работают путем компиляции заголовка с известным .cpp включающим его. Иногда IntelliSense запутывает это, и вы увидите загогулины в заголовках.
Существует параметр Max Cached Translation Units, который вы можете увеличить, если хотите повысить скорость отклика. Однако он использует больше памяти.
Эту опцию необходимо перезапускать только при добавлении новых модулей или изменении включений проекта.
Расширение UnrealVS
Расширение UnrealVS для Visual Studio обеспечивает легкий доступ к общим действиям при разработке с Unreal Engine 4. В этом документе объясняется, как установить расширение, а также как использовать его в вашем проекте.
Расширение UnrealVS не работает с выпусками Visual Studio Express. Он совместим только с выпусками Visual Studio Community и Professional.
отладка
Visual Studio поддерживает расширение отладчика с помощью визуализаторов, которые позволяют легко проверять распространенные типы Unreal, такие как FNames и динамические массивы.
Установка визуализатора UE4 для Visual Studio 2013
Для копирования файла в установочный каталог Visual Studio могут потребоваться разрешения администратора.
Compiling individual game projects using Visual Studio on Windows, or Xcode on Mac.
Unreal Engine 4 (UE4) uses a custom building method via the UnrealBuildTool which handles all the complex aspects of compiling the project and linking it with the engine. This process occurs transparently allowing you to simply build the project through the standard Visual Studio build workflow.
UnrealBuildTool uses the .Build.cs and .Target.cs files to build the game project. These are automatically generated when a project is created using a C++ template, or when the CPP Class Wizard is used to add code to a project created from a Blueprints Only template.
Build Configuration
Unreal projects have multiple targets (Editor, Client, Game, and Server) described by *.target.cs files, each of which can be built to different configurations. In Visual Studio, this manifests as a Visual Studio *.vcxproj file with different configurations for each target. The solution configurations are named as [Configuration][Target Type] (for example, "DevelopmentEditor" for the default editor target, and "Development" for the default standalone game target). The configuration you use will be determined by the purposes of the build you want to create.
Every build configuration contains two keywords, and the first keyword indicates the state of the engine and your game project. For instance, if you compile using a Debug configuration, you will be able to debug your game's code. The second keyword indicates the target you are building for. For example, if you want to open a project in Unreal, you need to build with the Editor target keyword.
Build Configuration - State
Debug
This configuration contains symbols for debugging. This configuration builds both engine and game code in debug configuration. If you compile your project using the Debug configuration and want to open the project with the Unreal Editor, you must use the "-debug" flag in order to see your code changes reflected in your project.
DebugGame
This configuration builds the engine as optimized, but leaves the game code debuggable. This configuration is ideal for debugging only game modules.
Development
This configuration enables all but the most time-consuming engine and game code optimizations, which makes it ideal for development and performance reasons. Unreal Editor uses the Development configuration by default. Compiling your project using the Development configuration enables you to see code changes made to your project reflected in the editor.
Shipping
This is the configuration for optimal performance and shipping your game. This configuration strips out console commands, stats, and profiling tools.
Test
This configuration is the Shipping configuration, but with some console commands, stats, and profiling tools enabled.
Build Configuration - Target
[empty]
This configuration builds a stand-alone executable version of your project, but requires cooked content specific to the platform. Please refer to our Packaging Projects Reference page to learn more about cooked content.
Editor
To be able to open a project in Unreal Editor and see all code changes reflected, the project must be built in an Editor configuration.
Client
If you're working on a multiplayer project using UE4 networking features, this target designates the specified project as being a Client in UE4's client-server model for multiplayer games. If there is a Client.Target.cs file, the Client build configurations will be valid.
Server
If you're working on a multiplayer project using UE4 networking features, this target designates the specified project as being a Server in UE4's client-server model for multiplayer games. If there is a Server.Target.cs file, the Server build configurations will be valid.
Building with Visual Studio
Setting the Build Configuration
The build configuration can be set in the Visual Studio toolbar.
Project - Configuration Menu

Setting the Solution Platform
The solution platform can be set in the Visual Studio toolbar.
UE4 currently supports the following platforms:
Windows 32-bit
Windows 64-bit
When working with Unreal Engine 4, you will typically use the Win64 platform. This is the only one included by default when generating project files; the Project Files for IDEs page has instructions for generating project files for additional platforms.
Building the Project
Make sure you are running Visual Studio 2015 or higher for Windows Desktop installed before proceeding. If you are using Mac, make sure to have Xcode 9.0 or higher installed.
Set the Solution Configuration to the configuration you want to build. In this example, it is set to Development Editor. Refer to the Build Configuration section for descriptions of each available configuration.

Right-click your game project and choose Rebuild to recompile.

You can now run the engine with your compiled project.
When running the engine, it is important to use the Unreal Engine executable that matches the build configuration you rebuilt your project in. For example, if you compiled your project in the DebugGame Uncooked build configuration, you would run the UE4-Win64-DebugGame.exe executable with your game information as an argument. More information on the binary naming convention can be found on the Building Unreal Engine page.
When running Unreal, it is important to add the -game flag if you rebuilt your project in any Uncooked configuration, and the -debug flag if you rebuilt your project in any Debug configuration.
Visual Studio Known Issues
"Project is out of date" message always appears
Visual Studio thinks the project is out of date when it really is up to date. You can safely suppress this message by checking the Do not show this dialog again box and pressing No.
No Debugging Information window appears when using the Debug configuration
The reason for this is that the UE4editor.exe was compiled using the Development configuration. Your game project will still be debuggable when compiled using the Debug configuration despite this warning. You can safely suppress this message by checking the Do not show this dialog again box and pressing Yes.
Building with Xcode
When building in Xcode, you are only compiling the game project, not the Editor.
To compile the project:
The Unreal Engine Xcode project is configured to build Debug configuration when you use Xcode's Product > Build option and Development configuration when you use Product > Build For > Profiling. You can edit this behavior by editing the target schemes.
You can now run the engine with your compiled project.
When running the binary Editor, it is important to add the -game flag if you rebuilt your project in any Uncooked configuration, and the -debug flag if you rebuilt your project in any Debug configuration.
Xcode Known Issues
Xcode does not stop at breakpoints
Xcode's LLDB debugger needs to be configured to correctly handle breakpoints in Unreal Engine projects. You need to create (or edit, if you already have it) a .lldbinit file in your home folder and add the following line to it:
Tips, tricks, and techniques for setting up Visual Studio to work with Unreal Engine
Unreal Engine (UE) is designed to integrate smoothly with Visual Studio (VS), allowing you to make code changes in your projects quickly and easily, and immediately see results upon compilation. Setting up VS to work with UE can help improve efficiency and the overall user experience for developers using UE.
This document covers the basics for setting up your Unreal Engine-to-Visual Studio workflow. While this document focuses on using the most recent versions of UE and VS, you can look at our Visual Studio Legacy Reference Page for help using older versions of UE and VS.
Before Setting Up Your Unreal Engine-to-Visual Studio Workflow
The following table lists which versions of VS are integrated with the binary version of UE.
Unreal Engine Version
Visual Studio Version
4.25 or Later
VS 2019 (Default)
4.22 or Later
VS 2017 / VS 2019
4.15 or Later
4.10 to 4.14
4.2 to 4.9
Run the Unreal Engine Prerequisite Installer
When installing UE from the Epic Launcher—or if you clone it from GitHub—the UE prerequisite installer runs automatically. However, if you install or sync UE from Perforce, you will need to manually run the prerequisite installer before running any UE tools you have built locally. This installer is located at [UERootLocation]\Engine\Extras\Redist\en-us] in the code base.
Options for a New Visual Studio Installation
If you are installing VS for the first time, you will want to make sure that you have the following options enabled.
C++ Tools
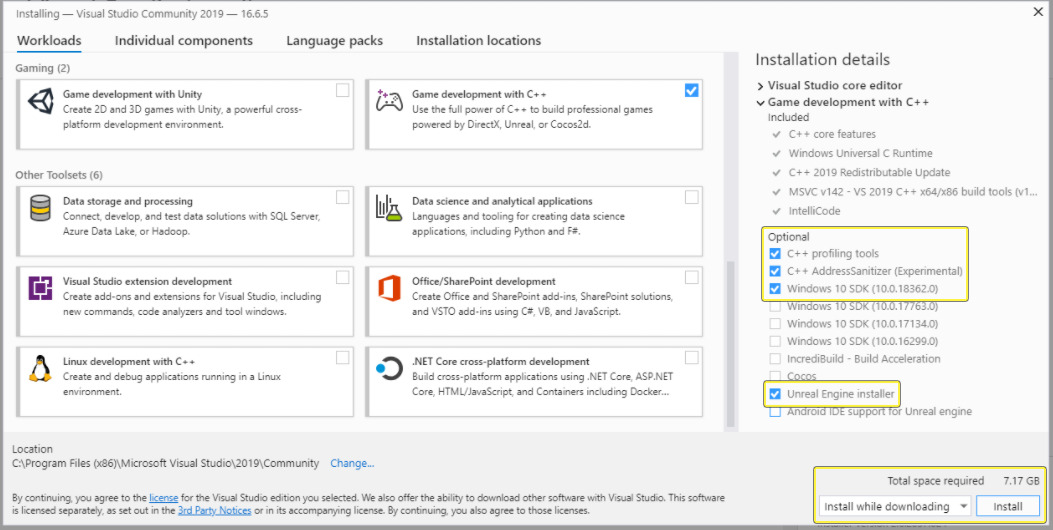
To add C++ tools to your VS installation, make sure you select Game development with C++ under Workloads, as well as these additional options.
C++ profiling tools
C++ AddressSanitizer (optional)
Windows 10 SDK (10.0.18362 or Newer)
Include the UE Installer
To include the UE installer when installing VS, locate the Summary sidebar on the right, expand Game Development with C++, and under Optional, make sure the checkbox for Unreal Engine installer is checked to enable it.
Recommended Settings
The following settings are recommended for developers using VS with UE.
If the version of VS below looks a little different, it's because the theme was changed to Dark. You can do this by going to Tools > Options > Environment > General > Color theme.
Increase the Width of Solution Configurations Dropdown Menu
Right-click the toolbar and select Customize at the bottom of the menu that appears.

Click the Commands tab and select the Toolbar radio button.
In the dropdown next to the Toolbar, choose Standard.
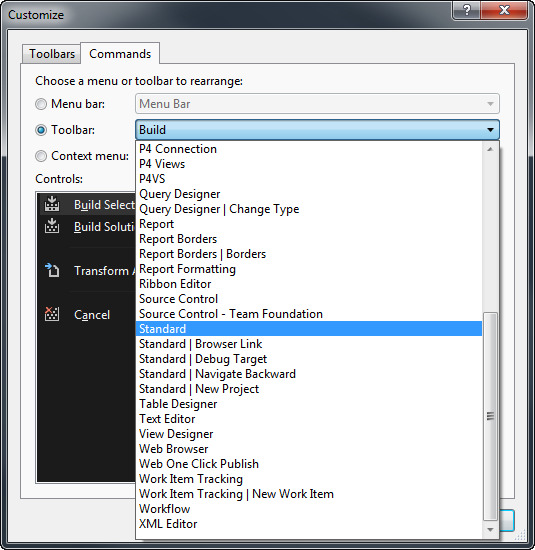
In the Preview list, select the Solution Configurations control (you may need to scroll down), then click Modify Selection.

Set the Width to 200, then click OK.

Click Close on the Customization . Your toolbar should update immediately.
Add the Solution Platforms Dropdown
Locate the far right button on the Standard toolbar (if you hover the mouse over it, it's labeled Standard Toolbar Options).

Click the dropdown button, choose Add or Remove Buttons, then click on Solution Platforms to add the menu to the toolbar (this may be enabled by default).

Turn Off the Error List Window
Typically, the Error List window pops up automatically when you have an error in your code. However, when working with UE, the Error List window can display false error information. It's best to disable the Error List window and use the Output window to see real code errors when working with UE. The following steps show how to turn off the Error List window.
Close the Error List window if it is open.
From the Tools menu, open the Options dialog.
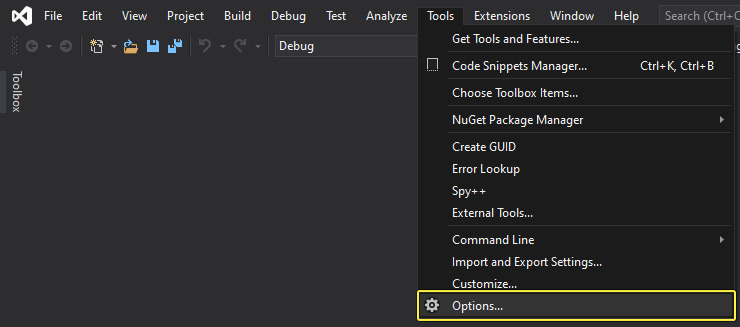
Select Projects and Solutions and disable Always show Error List if build finishes with error.
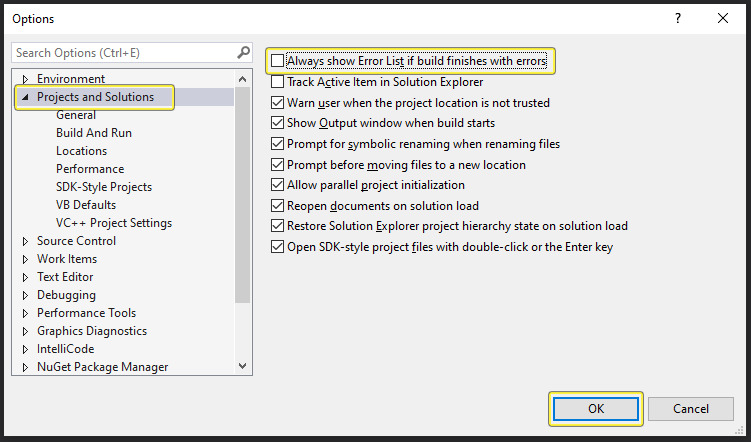
Click OK.
Here are some other configuration settings you might find useful:
Turn off Show Inactive Blocks. If you do not, chunks of code may appear grayed out in the text editor. Go to Tools > Options > Text Editor > C/C++ > View to turn off this setting.
Set Disable External Dependencies Folders to True to hide unneeded folders in the Solution Explorer. Find Disable External Dependencies Folder in Tools > Options > Text Editor > C/C++ > Advanced.
Turn off Edit & Continue features; you do not need them. Go to Tools > Options > Debugging > Edit and Continue.
Turn on IntelliSense.
Debugging
For more information about Debug Support, check out the debugging section of our Visual Studio Legacy Page.
Create your first code project and add a new C++ class.
Choose your operating system:


In order to understand and use the content on this page, make sure you are familiar with the following topics:

In this Quick Start Guide, you will learn how to setup a C++ project in the Unreal Engine and program your first C++ gameplay class in Visual Studio. By the time you've completed this tutorial, you will know how to do the following:
Create a new C++ Project
Create a new Actor class in C++
Edit that C++ class in your development environment, adding visual representation and functionality
Compile your project
Test your new Actor in the Unreal Editor
This guide assumes that you have already set up Visual Studio as your programming environment. If not, please refer to Setting Up Visual Studio for the Unreal Engine for instructions on how to install it and get it set up for programming with the Unreal Engine. We also assume that you have some familiarity with using the Unreal Editor before starting this guide, but for your convenience we will walk through all the steps necessary to create and manage C++ classes from the editor. The end product of this guide will be a cube that floats softly in mid-air and continually rotates, giving you a simple object to test as you learn to use the development environment for programming.
This guide assumes that you have already set up XCode as your programming environment. We also assume that you have some familiarity with using the Unreal Editor before starting this guide, but for your convenience we will walk through all the steps necessary to create and manage C++ classes from the editor. The end product of this guide will be a cube that floats softly in mid-air and continually rotates, giving you a simple object to test as you learn to use the development environment for programming.
1. Required Setup
Launch the Unreal Editor. When the Project Browser comes up, click Games Project category and select a Blank template. Make sure that you have C++ and Starter Content enabled, choose your preferred Save Location and Name for this project, and then click Create Project. In our instance, we're naming our project QuickStart.
This will automatically create a simple, blank project with only essential C++ code in the solution, and it will automatically open inside both the Unreal Editor and Visual Studio. For more information on managing and creating Projects, please refer to the Project Browser page.
This will automatically create a simple, blank project with only essential C++ code in the solution, and it will automatically open inside both the Unreal Editor and XCode. For more information on managing and creating Projects, please refer to the Project Browser page.
Any Blueprint project can be converted to a C++ project. If you have a Blueprint project that you want to add C++ to, create a new C++ class per the next section, and the editor will set up your code environment for you. Also note that using a C++ project does not prevent you from using Blueprint. C++ projects simply set up the base classes for your project in C++ instead of Blueprint.
2. Create a New C++ Class
In the Unreal Editor, click the File drop-down menu, then select the New C++ Class. command.
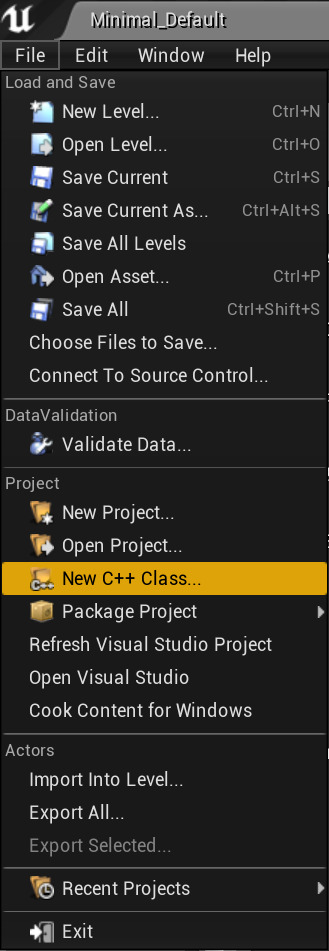
Click image for full size.
The Choose Parent Class menu will display. You can choose an existing class to extend, adding its functionality to your own. Choose Actor, as it is the most basic type of object that can be placed in the world, then click Next.
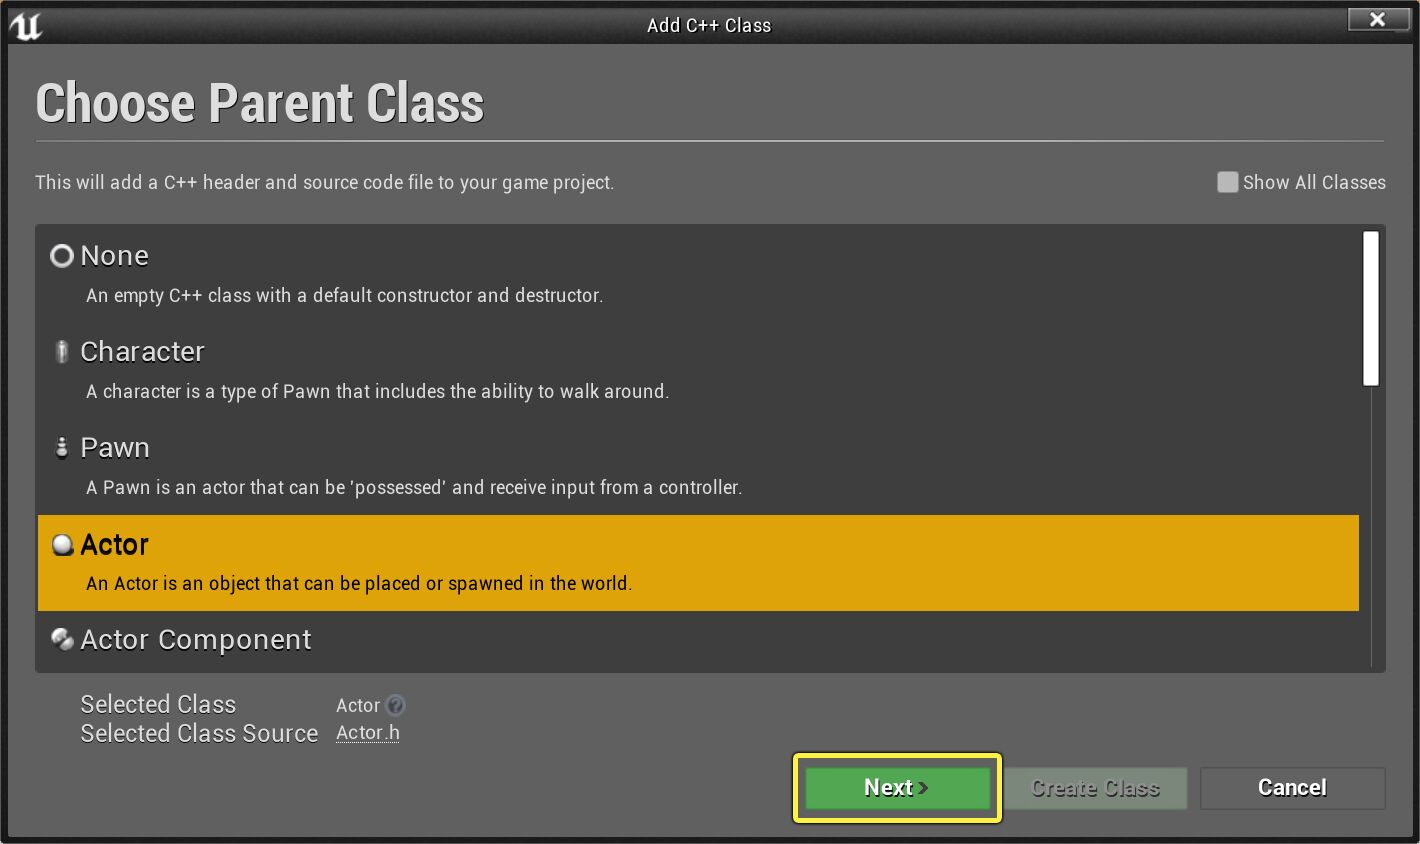
Click image for full size.
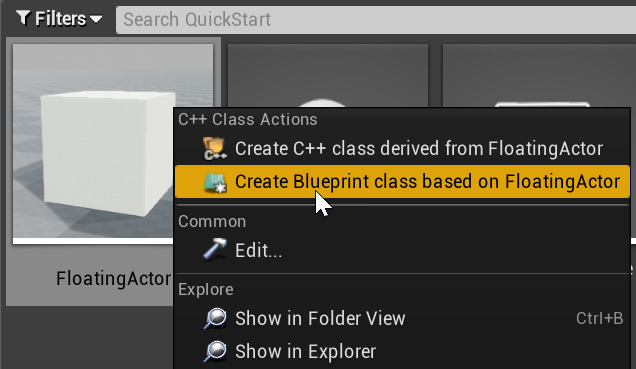
In the Name Your New Actor menu, name your Actor FloatingActor and click Create Class.
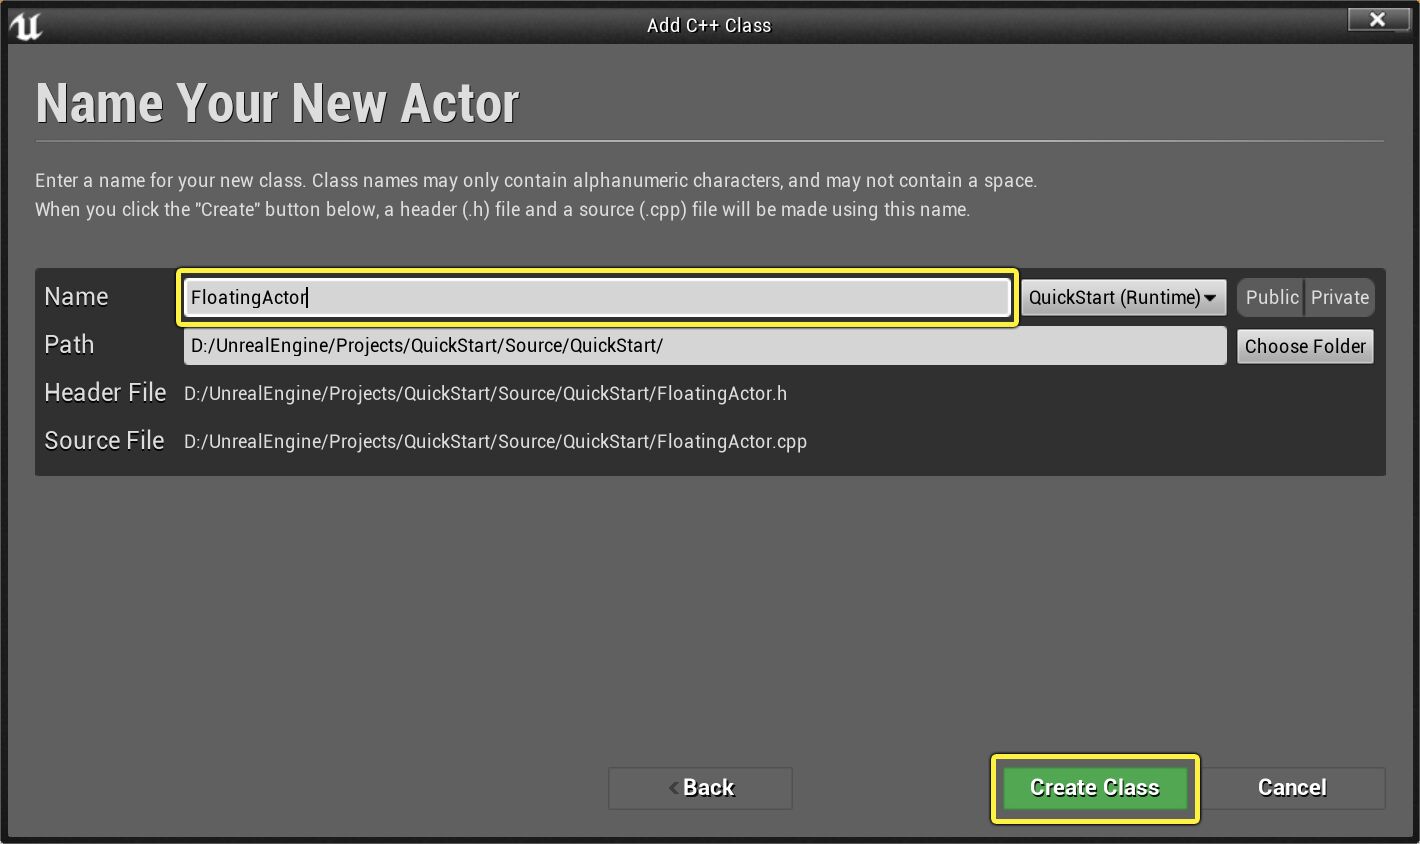
Click image for full size.
The Unreal Engine will automatically compile and reload with our new class selected in the Content Browser, and your programming environment will automatically open with FloatingActor.cpp .
3. Edit Your C++ Class
Now that we have created our C++ Class, we're going to switch over to Visual Studio and edit our code.
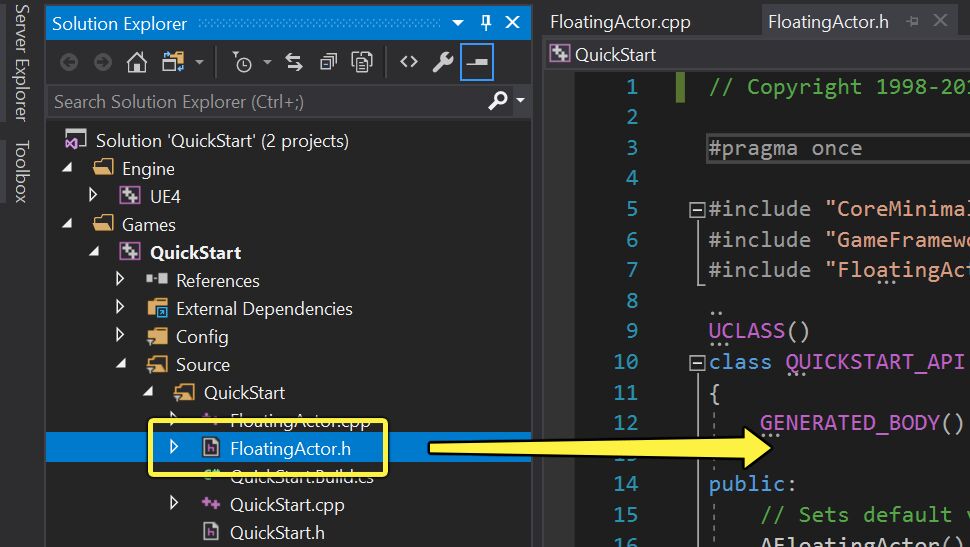
In Visual Studio, locate the Solution Explorer, which by default is on the left side of the window, then use it to locate FloatingActor.h . In our project, it will be located under Games > QuickStart > Source > QuickStart.
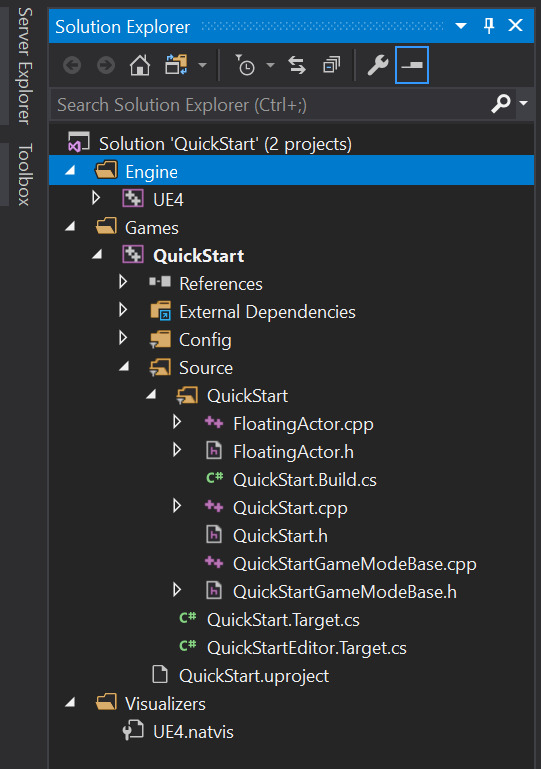
Double-click FloatingActor.h to open it and bring it into focus in the text editor.
This is a header file. You can think of it as being sort of like a table of contents for a C++ class. Before we can start building any new functionality, we must declare any new Variables or Functions that we're using in this file.
Add the following code underneath the declaration for AFloatingActor():
Here we're declaring a StaticMeshComponent, which will act as our visual representation for our object. Note that it uses a UProperty macro, which makes it visible inside the Unreal Editor. For more information on UProperty and its specifiers, see the page on Properties .
Now open FloatingActor.cpp and add the following code inside of AFloatingActor::AFloatingActor(), just before the closing bracket:
This function is the constructor, and it tells the class how to initialize itself when it is first created. The code we have added will fill our VisualMesh reference in with a new StaticMeshComponent, attach it to our Actor, and set it to the cube mesh from the Starter Content assets. For more information about attaching components in code, refer to our guide for Creating and Attaching Components .
Add the following code inside of AFloatingActor::Tick(float DeltaTime), just before the closing bracket:
The Tick function is where we add code that we want to execute in real-time. In this case, it will make our cube simultaneously rotate while also floating up and down. For more information about Ticking actors, see Actor Ticking .
Now that we have created our C++ Class, we're going to switch over to XCode and edit our code.
In XCode, locate the Project Navigator, which by default is on the left side of the window, then use it to locate FloatingActor.h . In our project, it will be located under Games > QuickStart > Source > QuickStart.

Double-click FloatingActor.h to open it and bring it into focus in the text editor. This is a header file. You can think of it as a table of contents for a C++ class. Before we can start building any new functionality, we must declare any new Variables or Functions that we're using in this file.
Add the following code underneath the declaration for AFloatingActor():
Here we're declaring a StaticMeshComponent, which will act as our visual representation for our object. Note that it uses a UProperty macro, which makes it visible inside the Unreal Editor. For more information on UProperty and its specifiers, see the page on Properties .
Now open FloatingActor.cpp and add the following code inside of AFloatingActor::AFloatingActor(), just before the closing bracket:
This function is the constructor, and it tells the class how to initialize itself when it is first created. The code we have added will fill our VisualMesh reference in with a new StaticMeshComponent, attach it to our Actor, and set it to the cube mesh from the Starter Content assets. For more information about attaching components in code, refer to our guide for Creating and Attaching Components .
Add the following code inside of AFloatingActor::Tick(float DeltaTime), just before the closing bracket:
The Tick function is where we add code that we want to execute in real-time. In this case, it will make our cube simultaneously rotate while also floating up and down. For more information about Ticking actors, see Actor Ticking .
4. Compile and Test Your C++ Code
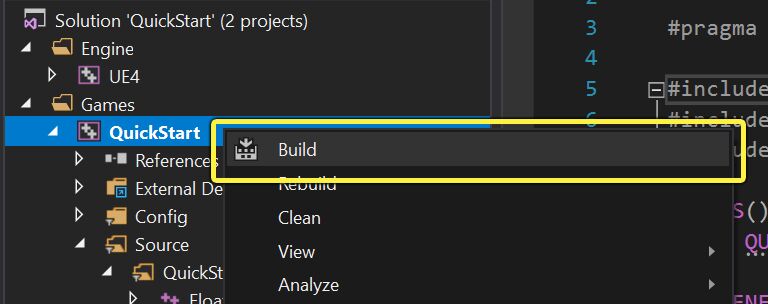
Save your work in both FloatingActor.h and FloatingActor.cpp . Then, in the Solution Explorer, right-click the project, click the Build command in the context menu, and wait for the project to finish compiling.
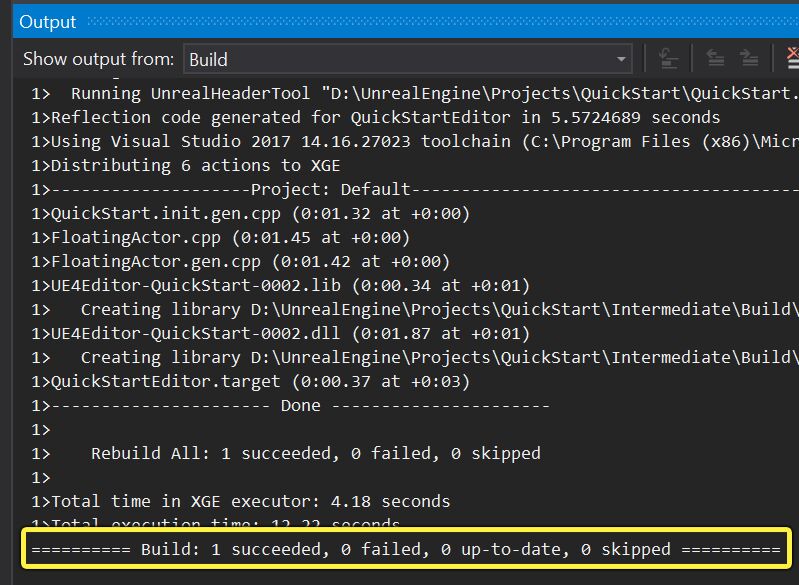
You should see a message that says "Succeeded" in the Output log at the bottom of the window.
Alternatively, you can go back to the Unreal Editor and click the Compile button in the toolbar at the top of the screen.

You should always save your work before attempting to compile, otherwise the changes you make in your code will not take effect.
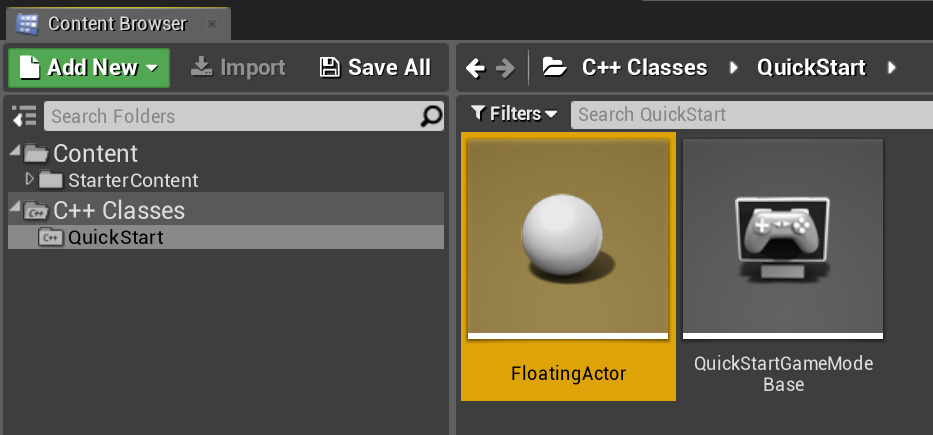
In the Unreal Editor, go back to the Content Browser, unfold C++ Classes, and then locate FloatingActor. It will be located in the folder that has the same name as your project, in our case, QuickStart.
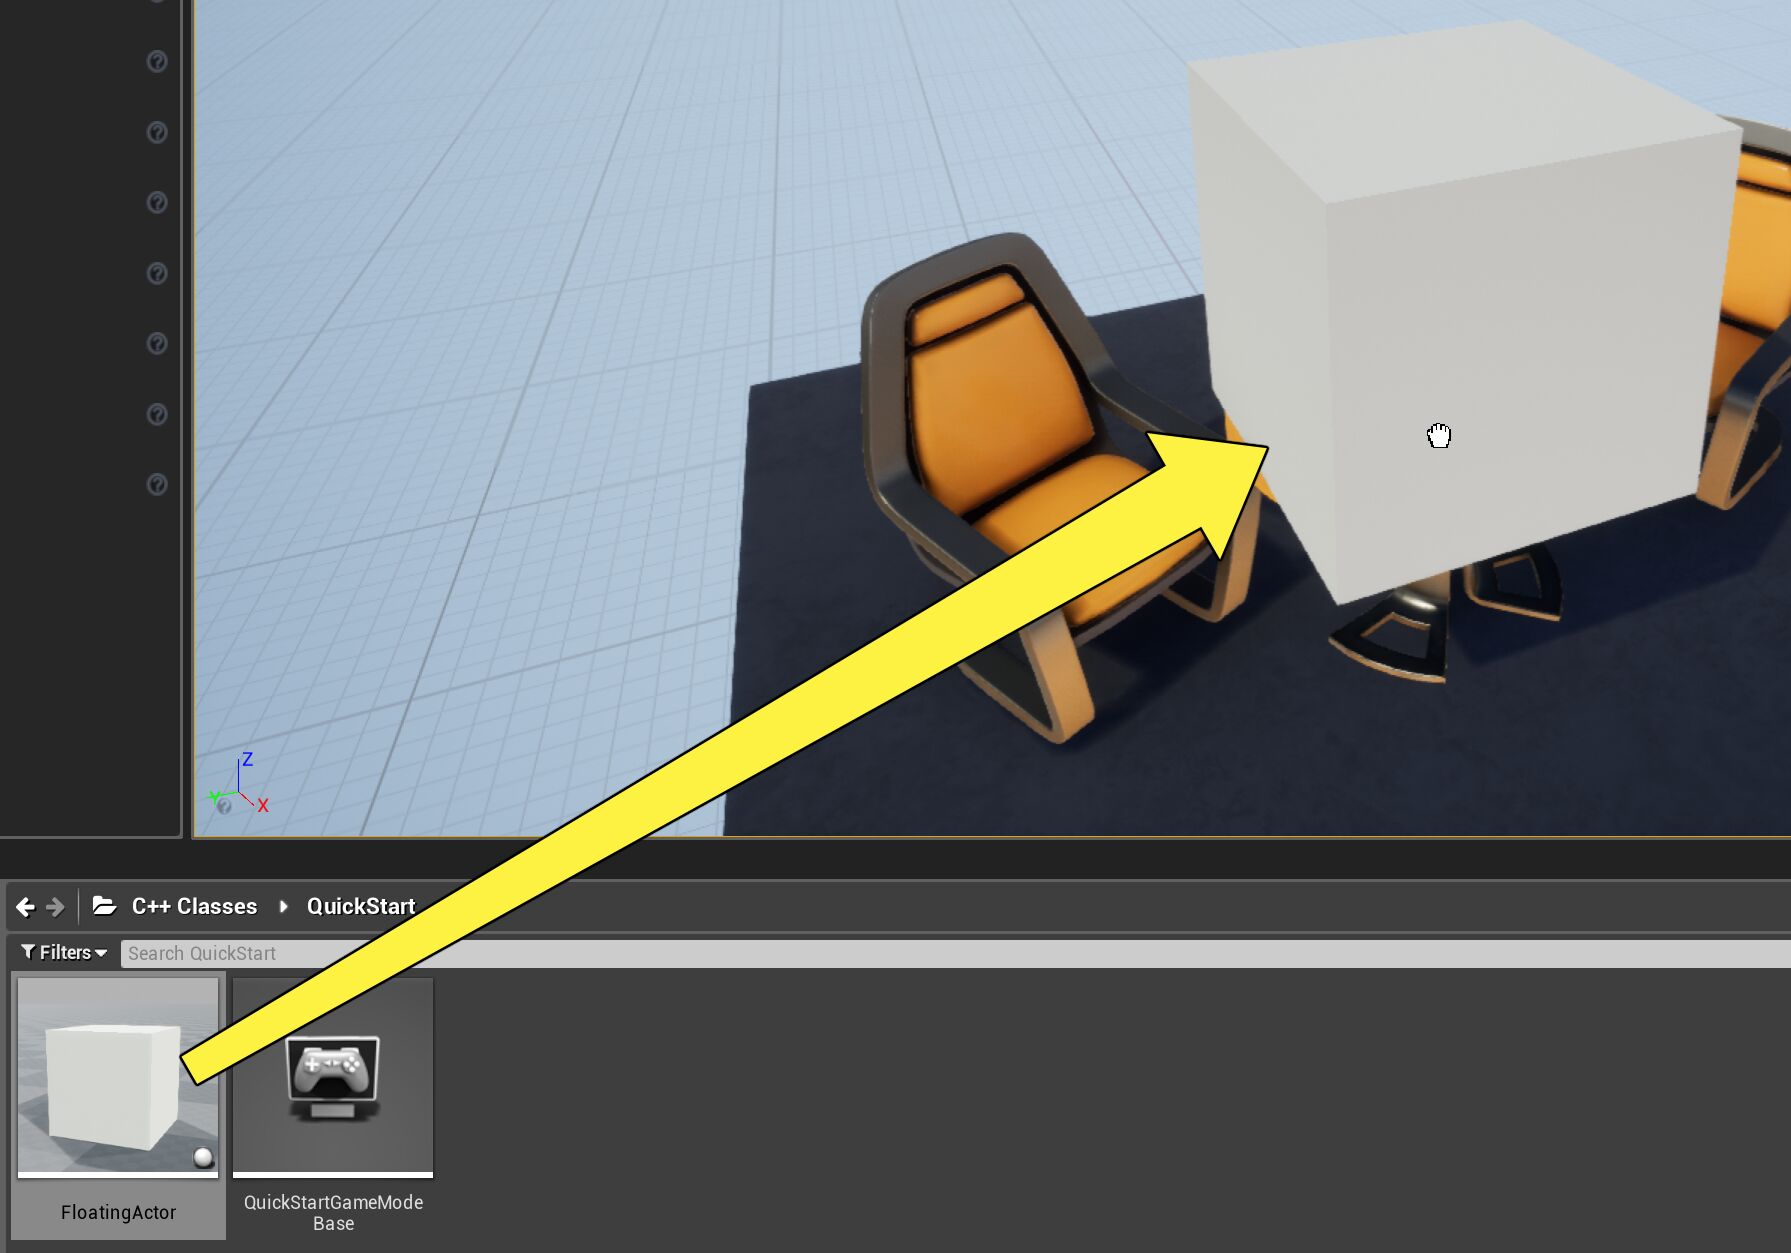
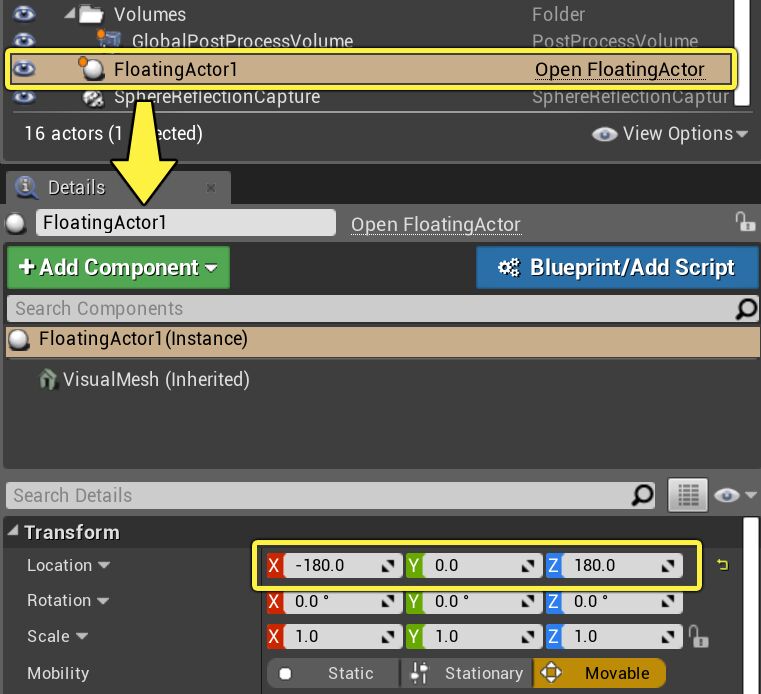
Click and drag FloatingActor into the Perspective Viewport to create an instance of FloatingActor. It will be selected in the World Outliner as "FloatingActor1" and its properties will be visible in the Details Panel.
For more information about navigating the Viewport and placing Actors in the World, refer to the Level Designer Quick Start .
In the Details Panel for FloatingActor1, set your Actor's Location to (-180, 0, 180). This will place it directly over the table in the default scene.
Alternatively, you can use the Move gizmo to move it there manually.

Press the Play In Editor button at the top of the screen.

Save your work in both FloatingActor.h and FloatingActor.cpp . Then, click the Product drop-down menu at the top of the screen, select the Build command, and wait for the project to finish building.

You should see a message that says "Succeeded" in the Output log at the bottom of the window. Alternatively, you can go back to the Unreal Editor and click the Compile button in the toolbar at the top of the screen.
You should always save your work before attempting to compile, otherwise the changes you make in your code will not take effect.
In the Unreal Editor, go back to the Content Browser, unfold C++ Classes, and then locate FloatingActor. It will be located in the folder that has the same name as your project, in our case, QuickStart.
Click and drag FloatingActor into the Perspective Viewport to create an instance of FloatingActor. It will be selected in the World Outliner as "FloatingActor1" and its properties will be visible in the Details Panel.
For more information about navigating the Viewport and placing Actors in the World, refer to the Level Designer Quick Start .
In the Details Panel for FloatingActor1, set your Actor's Location to (-180, 0, 180). This will place it directly over the table in the default scene.
Alternatively, you can use the Move gizmo to move it there manually.
Press the Play In Editor button at the top of the screen.
5. End Result
You should now see your cube gently floating up and down over the table while it slowly rotates.
Congratulations! You've created your first Actor class entirely with C++! While this represents a very simple object and only scratches the surface of what you can do with C++ source code, you have at this point touched on all the essentials of creating, editing, and compiling C++ code for your game. You are now ready for more complex gameplay programming challenges, and we suggest a few below.
6. On Your Own!
Now that you know how to build a simple C++ Actor, try making it more configurable. For instance, you can add variables to control its behavior:
In FloatingActor.h:
In FloatingActor.cpp:
By adding these variables in the header and replacing the float values we were using to scale DeltaHeight and DeltaRotation in the .cpp, we can now edit the float and rotation speed in the Details Panel when we select our Actor.

You can experiment by adding other kinds of behavior to the Tick function using Location, Rotation, and Scale.
You can also try attaching other kinds of components in C++ to create a more complex object. Refer to the Creating and Attaching Components guide for examples of different types of components you have available, and try adding a Particle System Component to add a bit of flare to your floating object.

Finally, if you right-click your own Actor class in the Content Browser, you will find the option to extend it, either in C++ or in Blueprint, enabling you to create new variations of it.
You can have a whole library of FloatingActors, each substituting different Meshes or parameters as you so choose.
Unreal Engine 4 (UE4) предназначен для легкой интеграции с Visual Studio, он может быстро и легко изменять код проекта и сразу же получать отзывы о компиляции. Правильная настройка Visual Studio на основе UE4 может повысить производительность и улучшить работу.
В этом документе будут рассмотрены некоторые основные методы UE4 на VS2013.
Перед настройкой
Прежде всего, обратите внимание, что Visual Studio 2015 (VS2015) не включает инструменты C ++ при установке по умолчанию. При установке VS2015 необходимо выбратьизготовленный на заказУстановите и проверьте компоненты C ++, которые необходимы для дальнейшей работы. Если у вас установлена Visual Studio 2015, вы можете выбратьFile > New > Project > C++Установите C ++.
В следующей таблице показано соответствие между версиями UE4 и предварительно интегрированными версиями Visual Studio.
4.15 or Later
4.10 to 4.14
4.2 to 4.9
Версия Unreal 4 с открытым исходным кодом (загруженная с GitHub или P4) была интегрирована с VS2013. Более старые версии UE4 и более ранняя Visual Studio здесь не описаны.
Рекомендуемые настройки
Ниже приведены рекомендуемые настройки для разработчиков, использующих Visual Studio с Unreal Engine 4.
Выполните следующие действия, чтобы увеличить ширину раскрывающегося списка конфигураций решения:
Щелкните правой кнопкой мыши на панели инструментов и выберитеCustomize。

Нажмите наCommandsРазбивка.

выбратьToolbarПараметры.

вToolbarВ раскрывающемся списке рядом с ним выберитеStandard,

вControlsВ нижней части списка выберитеSolution Configurations。

Нажмите справаModify Selection。

волиWidthУстановите на «200».

Нажмите наCloseПанель инструментов обновится автоматически.

Выполните следующие действия, чтобы добавить раскрывающийся список Solution Platforms.
Найдите крайнюю правую кнопку на стандартной панели инструментов.После нажатия появляется раскрывающееся меню для добавления или удаления кнопок на панели инструментов.


еслиError ListЕсли окно открыто, сначала закройте его.
отToolsВ меню откройтеOptionsДиалоговое окно

выбратьProjects and SolutionsИ снимите этоAlways show Error List if build finishes with error。

Нажмите наOK。
Другие параметры конфигурации, которые могут быть полезны:
близкоПоказать неактивные блоки, Если вы не отключите это, многие блоки кода будут недоступны в текстовом редакторе. (Параметры> Текстовый редактор> C / C ++> Форматирование) 。
Включите IntelliSense и «загогулины», чтобы заставить их работать. (Пожалуйста, обратитесь кИнтеллисенс, Живые Ошибки и СквигглыСекция)
Если не нужноРедактировать и продолжитьОсобенности, пожалуйста, отключите их. (Параметры> Отладка> Изменить и продолжить)
Visual Assist X рекомендуемые пользователем настройки
Закрыть в Visual Assist X (VAX)Формат после вставкиФункция. Эта функция иногда может привести к путанице в формате. (Параметры VAX> Дополнительно> Исправления)
Отключить в браузере решенийВнешний (внешний)Папки, они нарушают вид. (ВПараметры> Текстовый редактор> C / C ++> ДополнительновОтключить папку внешних зависимостей )
Visual Studio 2017 Users
Если вы устанавливаете Visual Studio впервые, вам необходимо убедиться, что включены следующие параметры. [Галочка в правом нижнем углу (установщик Unreal Engine)]
Следующие параметры загрузят установщик UE4 как часть установки Visual Studio 2017.

Не включает установщик UE4
Следующие параметры не загружают установщик UE4 как часть установки Visual Studio 2017. [Unreal Engine установщик не отмечен]

Интеллект, живые ошибки и сквигглы
Проекты Unreal Engine 4 теперь поддерживают функциональные возможности IntelliSense, в том числе список ошибок в реальном времени и Squiggles. (Пожалуйста, обратитесь к следующему введению для получения информации о том, как включить его.)
Функция IntelliSense в VC10 перекомпилирует C ++ при написании кода. Это гораздо мощнее, чем просто проверка синтаксиса VAX: VC10 использует полноценный компилятор C ++ и может проверять каждую строку кода. Эта функция очень мощная и ускорит ваш рабочий процесс!

При использовании вместе с функцией напоминания тильды, если в просматриваемом файле есть ошибки IntelliSense, его можно увидеть в списке ошибок. Вы можете включить или отключить эту функцию из контекстного меню списка ошибок.

Поскольку функция Squiggles не работает с проектами Unreal Engine 4, возможно, вы отключили их. Обязательно перейдите на вкладку C / C ++ Advanced и используйте следующие настройки.

Когда вы открываете файл C ++, вы можете определить, работает ли компилятор IntelliSense, по этой иконке:

Детали реализации
Иногда может потребоваться несколько секунд для отображения волнистых подсказок при написании кода.
Это потому, что у нас много включаемых файлов, и IntelliSense в настоящее время не использует предварительно скомпилированные заголовочные файлы.
Иногда вы видите «ложноположительные» ошибки IntelliSense. Вот несколько возможных причин.
Компилятор IntelliSense (EDG) более строг, чем компилятор MSVC.
Компилированный IntelliSense C ++ всегда рассматривается как 32-битный.
Неправильное выражение IntelliSense немного отличается от неправильного выражения компилятора VC ++. Они просто выражают по-разному.
Функция Squiggles в заголовочном файле компилирует известные .cpp Соответствующие заголовочные файлы для работы.
Иногда IntelliSense портит эту функцию, заставляя вас видеть волнистые подсказки в заголовочных файлах.
При необходимости вы можете увеличитьМакс Кэшированные переводческие единицыНастройки.
Он будет использовать больше памяти, но может немного улучшить скорость отклика.
Несколько файлов C ++ еще не совместимы с IntelliSense.
Unreal Build Tool имеет новый -IntelliSense Параметры.
Это создаст листы свойств IntelliSense для всех файлов нашего проекта.
Когда вы добавляете новый модуль или проект содержит изменения, просто перезапустите его.
Плагин UnrealVS
Расширение Visual Studio UnrealVS обеспечивает легкий доступ к общим операциям при разработке с Unreal Engine.

Особенности включают в себя:
Установите запуск проекта.
Скомпилируйте привязываемые команды для запуска проекта.
Установите параметры командной строки.
Скомпилируйте проект партиями.
Быстро скомпилируйте меню проекта.
Расширение UnrealVSнеспособныйиVisual Studio ExpressВерсии работают вместе. Он совместим только с Visual Studio Professional.
Плагин UnrealVS не работает с Visual Studio 2012 Lite. Он совместим только с Visual Studio 2012 Professional.
Пожалуйста, обратитесь кРасширение UnrealVSЭта страница содержит информацию о настройке и использовании плагина.
Отладка
Visual Studio поддерживает расширение отладчика с помощью «визуального средства просмотра» для простого просмотра распространенных нереальных типов данных, таких как объекты FNames и динамические массивы.
Настройки визуального просмотра для Visual Studio 2013
Вы заметите, что ваш установочный файл содержит файлы с логикой визуального просмотра:
Скопируйте файл в следующую папку:
Копирование этого файла в каталог установки Visual Studio может потребовать прав администратора.
Читайте также: