Moodle формат файла для загрузки пользователей
Поскажите, как можно загрузить пользователей через импорт на сайт?
Я так понимаю, что создаётся файл csv, а вот какие и в каком порядке там должны быть поля?
Спасибо за ответ!
Можно сделать выгрузку пользователей в csv, а там уже узнать порядок полей.
Каким образом сделать выгрузку? Я такой опции не вижу в упор. Подскажите, пожалуйста, в каком разделе её искать.
Добрый день, Сергей.
csv-файл, который может содержать следующие поля:
обязательные: username, password, firstname, lastname, email
опциональные: institution, department, city, country, lang, auth, ajax, timezone, idnumber, icq, phone1, phone2, address, url, description, mailformat, maildisplay, htmleditor, autosubscribe, emailstop, course1, type1, role1, group1, enrolperiod1, course2, type2, role2, group2, enrolperiod2 etc. (из опциональных мы используем город - city, чтобы разделять своих студентов и филиалы, а также course1 - дисциплина, group1 - группа, type1 - роль пользователя, если необходимо не просто загрузить пользователей, но и записать их на какой-нибудь курс, в определенную группу и сразу назначить роль).
Файл будет иметь следующий формат: первой строкой через определенный разделитель (например, ;) идет список полей, которые вы будете использовать. Сначала обязательные, потом опциональные.
Затем идет список пользователей, которых вы хотите загрузить. На каждого пользователя - новая строка, содержащая значения всех полей и в той последовательности, как вы указали в первой строке. Вот небольшой примерчик:
Курсор оставляем в конце последней строки. Файл необходимо сохранить в кодировке UTF-8.
Мы для себя сделали шаблон MS Office Excel и работаем с ним. Кроме того, знаю, что есть скрипт, который генерирует csv-файл.
P.S.: А версию Moodle советую обновить до 1.9.
Хм. А у меня что то не получается вот что. Хотел сразу щаписать студента на курс и в группу. Но есть ньюанс. Курс, например, "микроэкономика" находится в категории курса "Экономика", как ее прописывать? И когда указал для group1 группу 333 он ругнуться не ругнулся, но и группу я нигде не увидел эту.
Вообще сколько ни колупаю ,не нашел как студентов принудительно на курс записать. Пока она сами заходят под своими логинами-паролями, на вопрос "вы хотите стать участником. " отвечают ДА и только после этого я могу из в группы объединить. Неудобно, а как по другому и попроще не в курсе, не нашел. модуль дополнительный на локальной машине пробовал ставить, в группы объединяет, но я так понял ,вручную все заносить нужно, из общей базы уже существующих как брать ,не разобрался, если это вообще возможно
Не знаю как в 2.х, но в 1.9 имя группы состоящий только из цифр воспринимается как ID группы, а не имя! Внимательно прочитайте хелп от загрузки пользователей, там все это написано.
Так что либо имена групп должны содержать буквы, либо всегда указывать ID группы, либо патчить.
Выгрузка (без паролей) в Пользователи/массовые действия на пользователями -> скачать
Неплохой короткий видео урок доступен на эту тему.
Для облегчения жизни написал простой скрипт, который из текстового файла с фамилиями и именами создает csv с минимальным набором полей username; password; firstname; lastname; email. Раньше эту задачу решал с помощью excel + макросы, но потом написал скрипт на PHP. Может кому-то будет полезем.
Статья о скрипте здесь, но написана в очень свободном стиле, уж простите.
Да, если загружать в существующую глобальную группу - метка к фамилии и не нужна, вы правы.
Насчет однофамильцев - вы не поверите, на первом курсе 7 Смирновых + одна Смирнова. Частенько попадаются в одной группе такие: Родионов Владислав Владимирович и Родионов Владислав Васильевич - это в прошлом году, а в этом, в одной группе Веселовская Виктория Николаевна и Веселовская Виктория Сергеевна. Эти люди не родственники, как вы поняли. Как-то так)
За поля спасибо, перепутал уже в скрипте - поправлю! Скрипт еще не опробован, вот, собираю мнения, как сделать лучше. Спасибо за советы!
Добрый день, в какую строку писать имя глобальной группы при загрузке пользователей? Пишу в cohort1 имя глобальной группы не получается.
Сегодня нет образовательной организации, которая бы не использовала среду для дистанционного обучения Moodle. Однако одним из камней преткновения в использовании данной среды является регистрация новых пользователей. Обычно это класс или несколько классов сразу, в которых численность может доходить до 35-36 человек. «Вбивать руками» — каждого пользователя занятие долгое и утомительное. Рассмотрим прием, который заложен разработчиками Moodle, который позволяет загружать пользователей массово из файла.
Файл с пользователями сформировать гораздо проще и быстрее, чем вносить пользователей по одному в базу. Конечно есть вариант интеграции Moodle с LDAP, но это уже материал для отдельной статьи.
1. Создаем таблицу с данными будущих пользователей. Как показывает практика, для этого лучше всего походит LibreOffice Calc. Необходимые поля:
- username
- password
- firstname
- lastname

2. Сохраняем файл формате csv с указанием кодировки и разделителя (эти параметры необходимо запомнить, они понадобятся нам при загрузке файла). Для этого выполняем — Файл — Сохранить как и выбираем формат сохранения csv:

Указываем кодировку файла и разделитель:

3. Переходим в Moodle — раздел Администрирование — Пользователи — Учетные записи — Загрузить пользователей и попадаем на страницу загрузки файла с данными пользователей:

4. Выбираем файл или перетаскиваем его на поле для загрузки файла:

5. Выбираем параметры файла, которые мы указывали при сохранении и нажимаем кнопку «Загрузить пользователей»:
6. Система проверит наш файл на наличие ошибок и сверит вновь добавляемых пользователей с базой пользователей. Если конфликтов не будет выявлено, то смело можем добавлять пользователей из файла:
An administrator can upload multiple user accounts via text file in Settings > Site administration > Users > Accounts > Upload users.
There are many robust options for uploading information (fields associated with a user) with this method: from enrolling users in multiple courses with course specific roles to updating user information in the User profile to deleting users from the site.
Tip: It is usually not necessary to upload users in bulk with Upload users. To keep maintenance work down you should first explore forms of authentication that do not require manual maintenance, such as connecting to existing external databases or letting the users create their own accounts (Self enrolment). See Authentication for more information.

Contents
Upload user process
Here is an outline of the process:
- Create file for uploading
- Go to Settings > Site administration > Users > Accounts > Upload users
- Add file to upload
- Upload users preview - check settings and default user profile settings
- Upload users preview - click "Upload users"
- Upload users results - shows list of users, exceptions made in upload and summary of number of users
- Upload users results - click "Continue"
- Returns to Upload users screen
Updating users preview
There are settings for the kind of Upload user function you want to perform on the "Upload users preview" page.

Updating existing accounts
By default Moodle adds new user accounts and skips existing users lines where the username matches an existing account. Set "Upload Type" to Add new and update existing users, and existing user account will be updated.
- Add all, append number to usernames if needed
- Add new and update existing users
- Update existing users only
There are also fields settings to force password change, allow renames, allow deletes, prevent email address duplicates, standardise usernames and select for bulk operations(new users. updated users, all users).
Warning: errors updating existing accounts can affect your users badly. Be careful when using the options to update.
Set default user values
You may be able to set default user field values, if the fields were not included in the uploaded file on this page.
Upload user results
After accepting the preview settings by clicking on "Upload users", you should see the the Upload users results screen.

This screen will show you any exceptions or changes that were made to each user in the upload process. For example if you were updating user information, the updated information will be shown. Or if a user was not added that record will be highlighted.
The screen will summarize how many users were uploaded or updated, indicate the number of weak passwords and the number of errors.
File formats for upload users file
The upload files have their fields separated by a comma (or other delimiter). The first line contains the valid field names. The rest of the lines (records) contain information about each user.
:Tip: If you are not an expert, avoid special characters in field information like quotes or other commas. Test a file with only one record before a large upload. Remember there are other ways to authenticate users on you site or enroll users in a course.
:Tip: You can use a spread sheet program to create the file with the required columns and fields. Then save the file as "CSV (comma delimited)". These files can be opened with simple text editors for verification.
Valid upload file for testing
Here is an example of a simple valid upload file:
username,password,firstname,lastname,email,course1,group1,cohort1
jonest,verysecret,Tom,Jones,jonest@someplace.edu,math102,Section 1,year 3
reznort,somesecret,Trent,Reznor,reznort@someplace.edu,math102,Section 3,year 4
Fields that can be included
username, firstname, lastname, email
- Password field: "password" field is optional if "Create password if needed" setting is chosen (default).
- If included, values should meet the requirements for the site's Password policy. To force password change for a particular user, set the password field to changeme .
- If omitted, a password will be generated for each user (during the next Cron job) and welcome e-mails sent out (not working in v2.0.2?).
- Note: the text for the welcome e-mail is in the language settings.
- Optional fields: To provide values other than the default include one or more of these
institution, department, city, country, lang, auth, ajax, timezone, idnumber, icq, phone1, phone2, address, url, description, mailformat, maildisplay, htmleditor, autosubscribe
- Country- use a country TWO LETTER CODE
- Some fields have a maximum number of characters that are allowed (notably institution should be at most 40 characters long). See hints below.
- Maildisplay, htmleditor and autosubscribe can be set from an import screen in Moodle 2.0.
- Custom profile field names: (Optional). xxxxx is the real custom user profile field name (i.e. the unique shortname)
- Special fields: Used for changing of usernames or deleting of users
- Enrolment fields: (Optional):
- course is the "shortname" of the course, if present the user will be enrolled in those courses.
- type refers to the role to be used for associated course enrolment. Value 1 is default course role, 2 is legacy Teacher role and 3 is legacy Non-editing Teacher.
- You can use role field instead to specify roles directly - use either role short name or id (numeric names of roles are not supported).
- Users may be also assigned to groups in course (group1 in course1, group2 in course2, etc.).
- A group is identified by name or id (numeric group names are not supported)
- You can set the enrolment duration, in days, for each course ( enrolperiod1 for course1 , enrolperiod2 for course2 , etc.).
New feature
in Moodle 2.2!For Boolean fields, use 0 for false and 1 for true.
To prevent users from receiving a large number of emails from courses or forced subscription forums use the maildigest. The options for this field are 0 = No digest, 1 = Complete digest and 2 = Digest with just subjects.
Advanced potentials of Upload user
Templates
Note: This section needs checking and updating if necessary for Moodle 2.0. Please do so and remove this note when finished.
The default values are processed as templates in which the following codes are allowed:
- %l - will be replaced by the lastname
- %f - will be replaced by the firstname
- %u - will be replaced by the username
- %% - will be replaced by the %
Between the percent sign (%) and any code letter (l, f or u) the following modifiers are allowed:
- (-) minus sign - the information specified by the code letter will be converted to lowercase
- (+) plus sign - the information specified by the code letter will be converted to UPPERCASE
- (~) tilde sign - the information specified by the code letter will be converted to Title Case
- a decimal number - the information specified by the code letter will be truncated to that many characters
For example, if the firstname is John and the lastname is Doe, the following values will be obtained with the specified templates:
Template processing is done only on default values, and not on the values retrieved from the CSV file.
In order to create correct Moodle usernames, the username is always converted to lowercase. Moreover, if the "Allow extended characters in usernames" option in the Site policies page is off, characters different to letters, digits, dash (-) and dot (.) are removed. For example if the firstname is John Jr. and the lastname is Doe, the username %-f_%-l will produce john jr._doe when Allow extended characters in usernames is on, and johnjr.doe when off.
When the "New username duplicate handling" setting is set to Append counter, an auto-increment counter will be append to duplicate usernames produced by the template. For example, if the CSV file contains the users named John Doe, Jane Doe and Jenny Doe without explicit usernames, the default username is %-1f%-l and New username duplicate handling is set to Append counter, then the usernames produced will be jdoe, jdoe2 and jdoe3.
Deleting accounts
If the deleted field is present, users with value 1 for it will be deleted. In this case, all the fields may be omitted, except for username . After uploading the file, be sure to change the "Upload type" to "Update existing users only" and the "Allow deletes" option to "Yes".
Deleting and uploading accounts could be done with a single CSV file. For example, the following file will add the user Tom Jones and delete the user reznort:
Encoding file format
On the initial Upload user screen, you may select the file encoding format from a pull down list. These include UTF-8 (the default), ASCII, ISO-8859-1 to ISO-8859-11 or any one of over 36 formats.
Hints
Spreadsheet
If you use a spreadsheet program such as Excel to create your .csv file, check the resulting output in a text editor before you upload it. It is possible to get trailing commas on each line from an empty field if you have added and deleted columns of information prior to saving the final file. Also check the character encoding. A csv file is a simple text file (ASCII or Unicode) that can be used to upload user accounts.
Excel translates passwords that begin with - (minus) or + (plus) as zero. Even when saving as .csv and saying "Yes" to "Keep this format, and leave out any incompatible features." Check for this before uploading, as a zero halts the upload process.
If you use a formula in Excel to create fields (for example, the concatenate function to create a user name), then remember to copy the cells with the formula and use special paste with values checked to make them into an acceptable data for a csv file.
The upload will also fail if you have trailing spaces at the end of your data fields. Often, this can not be removed with a simple Find " " and Replace with "". If information has been copied from web sources than it is possible to include non-breaking spaces which will prevent your upload from being completed correctly. To find these invisible spaces, use the Find and Replace function in Excel. In the find field, hold alt and type 0160. Leave the replace field blank.
Country
The country should be written as a two letter code, in capitals. For example, use BE for Belgium or NL for the Netherlands. Using "be" or "nl" as a country code will result in a database error.
Tip: If you are having trouble working out the two-letter code for a country, you can consult this Moodle source code file /moodle/lang/en_utf8/countries.php or click here for a 1.9 STABLE list.
The full list of country names and code elements is also available on the ISO Website.
Field size limits
Some fields have maximum character lengths. Typically the file will import to the preview list screen but not finish the process. Turn on debug to see the fields that are too long. Common fields to cause problems are "Institution" which is limited to 40 characters, and "City", also limited. The error will be "User not added - error".
All fields listed here
firstname, lastname, username, email, city, country, lang, timezone, mailformat, maildisplay, maildigest, htmleditor, ajax, autosubscribe ,institution, department, idnumber, skype , msn, aim, yahoo, icq, phone1, phone2, address, url, description, descriptionformat, password, auth, oldusername , deleted, course1, course2, course3, course4
По умолчанию в Moodle включен только один вид регистрации - ручная. Т.е. администратор системы сам, в ручном режиме, регистрирует пользователей на сайте. Но существуют и другие способы, которые могут облегчить работу администратора и учителя. Самые распространенные - самостоятельная регистрация пользователей и массовая загрузка пользователей из специального файла CSV.
Настройка способов регистрации в Moodle
Блок "Настройки": Администрирование >> Плагины >> Аутентификация >> Настройки аутентификации
![]()
Здесь можно включить или отключить способы регистрации из списка предложенных.
На этой же странице ниже предлагается произвести некоторые настройки регистрации.
Самостоятельная регистрация пользователей по e-mail
Чтобы разрешить самостоятельную регистрацию пользователей по e-mail, включите данный способ как это описано выше и на той же странице разрешите самостоятельную регистрацию:
![]()
Массовая загрузка пользователей
Еще один способ регистрации пользователей с возможностью одновременной записи пользователей на определённый курс - это массовая загрузка пользователей с помощью текстового файла в формате .csv
Этот способ наиболее удобный и не имеет недостатков способов описанных выше:
- это не занимает много времени у администратора для ручной регистрации каждого пользователя и облегчает работу учителя при записи пользователей на курс
- пользователи не смогут самостоятельно создавать учетные записи и, таким образом, один пользователь не сможет иметь более одной учетной записи и будет исключена возможность регистрации посторонних людей с целью использования сайта для спама и т.д.
Более подробно этот способ регистрации будет рассмотрен в разделе "Работа с курсами в Moodle"
![Способы регистрации пользователей в Moodle]()
В данной инструкции описаны алгоритмы регистрации пользователей в системе Moodle. Рассматриваются самые общие способы, используемые на практике.
В данной инструкции используется версия Moodle 3.10.3.
ФИО и данные пользователей, которые используются в примерах, вымышленные.
В конце материала - видеоверсия инструкции.
Рассмотрим 2 способа регистрации пользователей в системе: стандартная регистрация и загрузка списком.
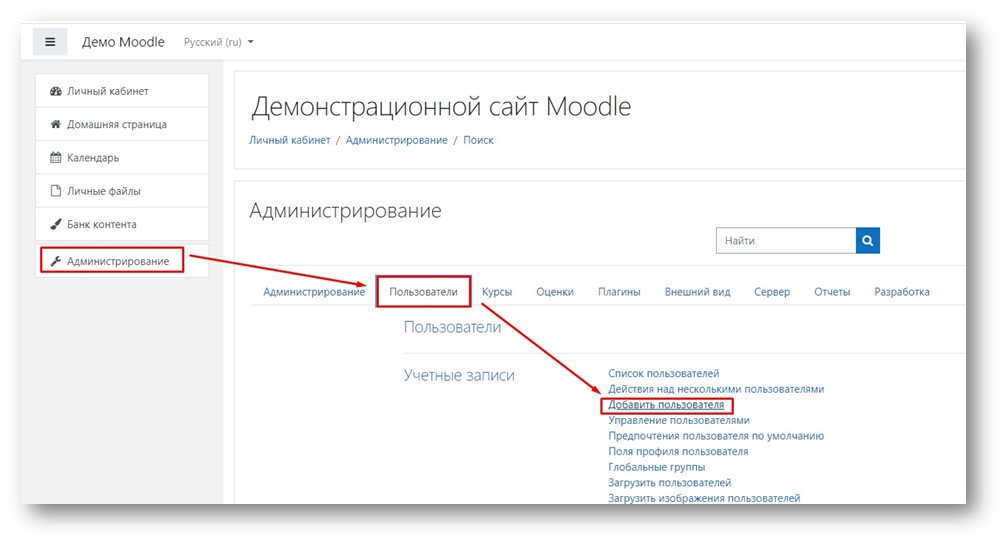
1. Стандартная регистрация пользователей.
Заходим в меню Администрирование - Пользователи – Добавить пользователя:
![moodle - переход в раздел регистрации пользователей]()
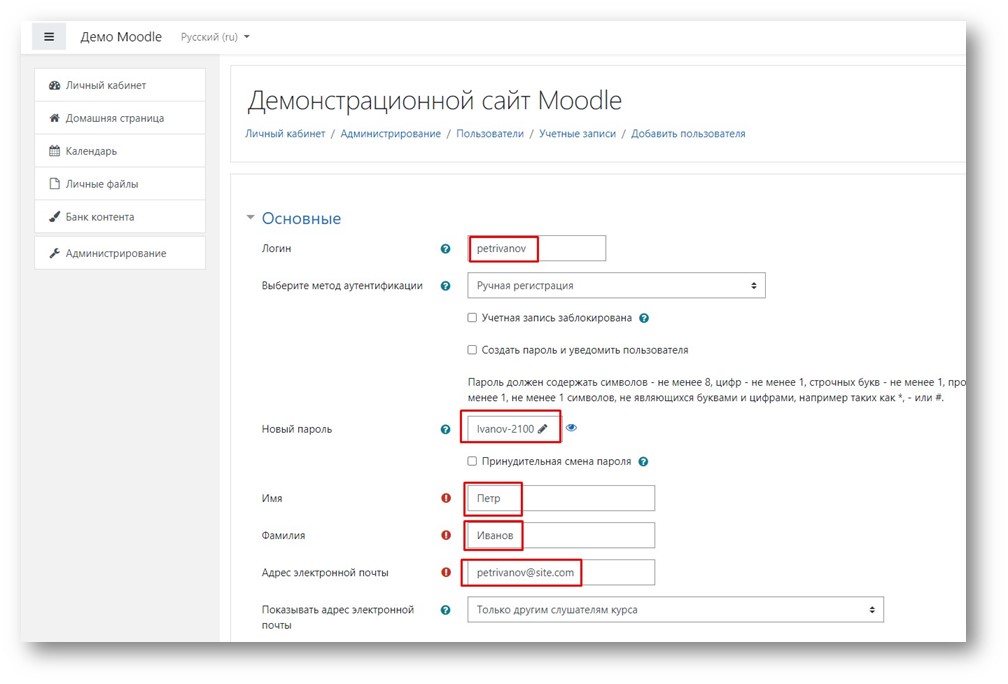
Заполняем минимальный набор полей. При необходимости вносим данные и в дополнительные поля:
![Moodle - поля профиля пользователя]()
При создании пароля в системе со стандартными настройками пароль должен:
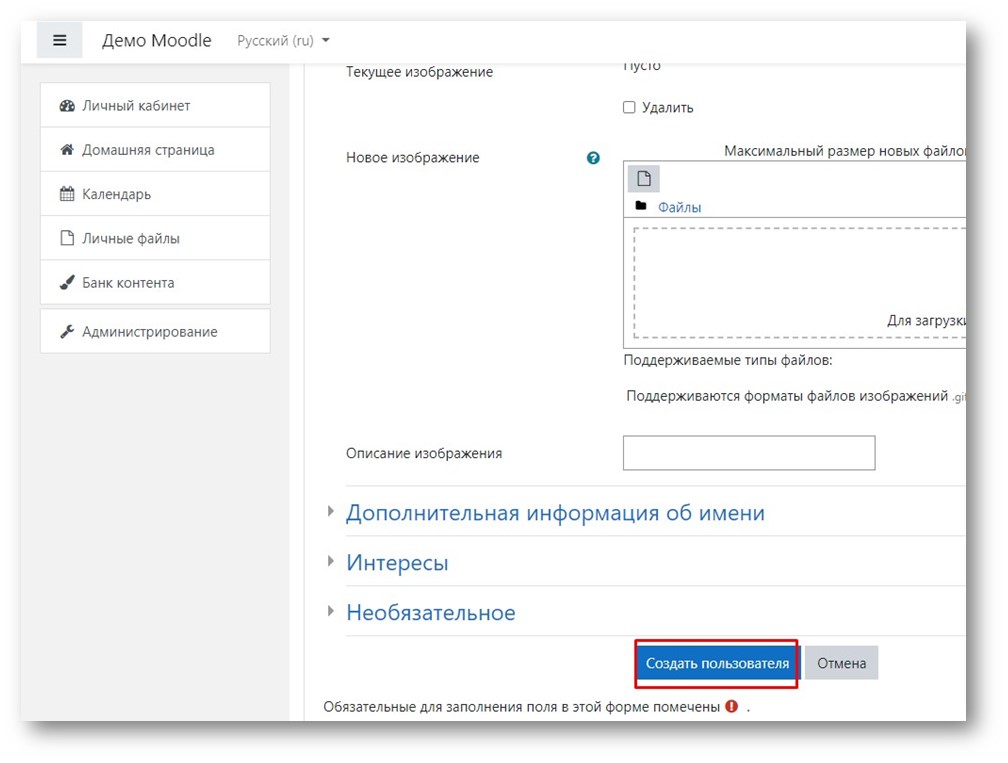
После заполнения нужных полей кликаем Создать пользователя:
![Moodle - кнопка создания пользователя]()
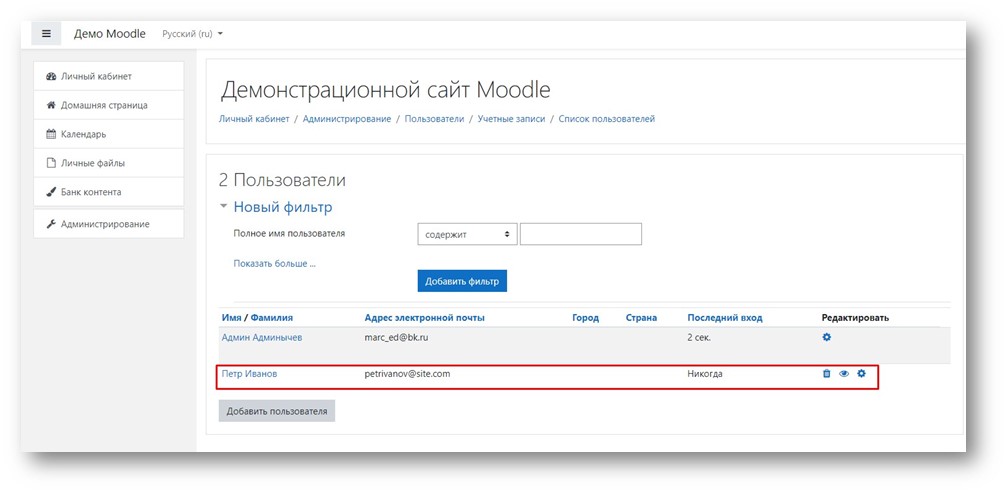
Видим нового пользователя в списке пользователей:
![Moodle - новый пользователь в списке пользователей]()
2. Загрузка пользователей списком.
Загрузка пользователей списком в систему Moodle может быть более удобна, если есть необходимость добавить большое количество пользователей одновременно.
Алгоритм загрузки пользователей списком состоит из двух шагов: подготовка списка пользователей в файле и загрузка файла со списком в систему Moodle.
Подготовка списка пользователей в специальном формате.
Для загрузки пользователей списком создают текстовый файл с расширением csv. Информация в этом файле содержит названия полей и данные пользователей. В нашем примере используются поля:
- lastname - фамилия;
- firstname - имя;
- middlename - отчество;
- username – имя пользователя (логин);
- password – пароль;
- email – адрес электронной почты.
Набор полей может отличаться от представленного в нашем примере. Могут быть использованы поля глобальных групп, страны и т.д.
Вот так выглядит готовый файл в программе Excel:
![Список пользователей для Moodle в файле Excel]()
После подготовки списка файл сохраняется в формате csv c указанием разделителя. В качестве разделителя обычно используется запятая или точка с запятой:
![Сохранение пользователей в формате csv для загрузки в Moodle]()
Загрузка пользователей.
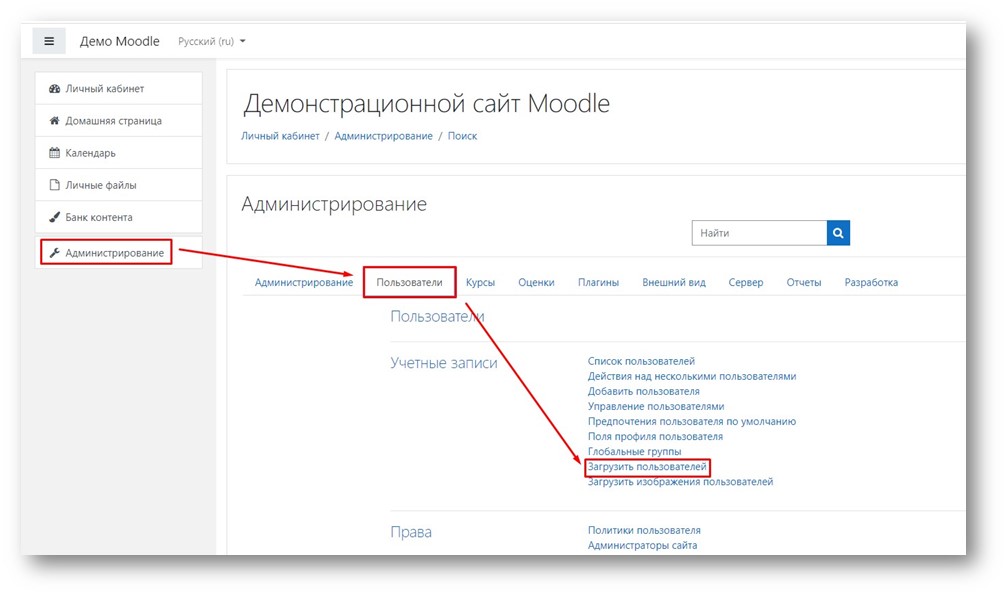
Для загрузки файла с пользователями в систему Moodle переходим в раздел Администрирование – Пользователи – Загрузить пользователей:
![Moodle - переход в раздел загрузки пользователей]()
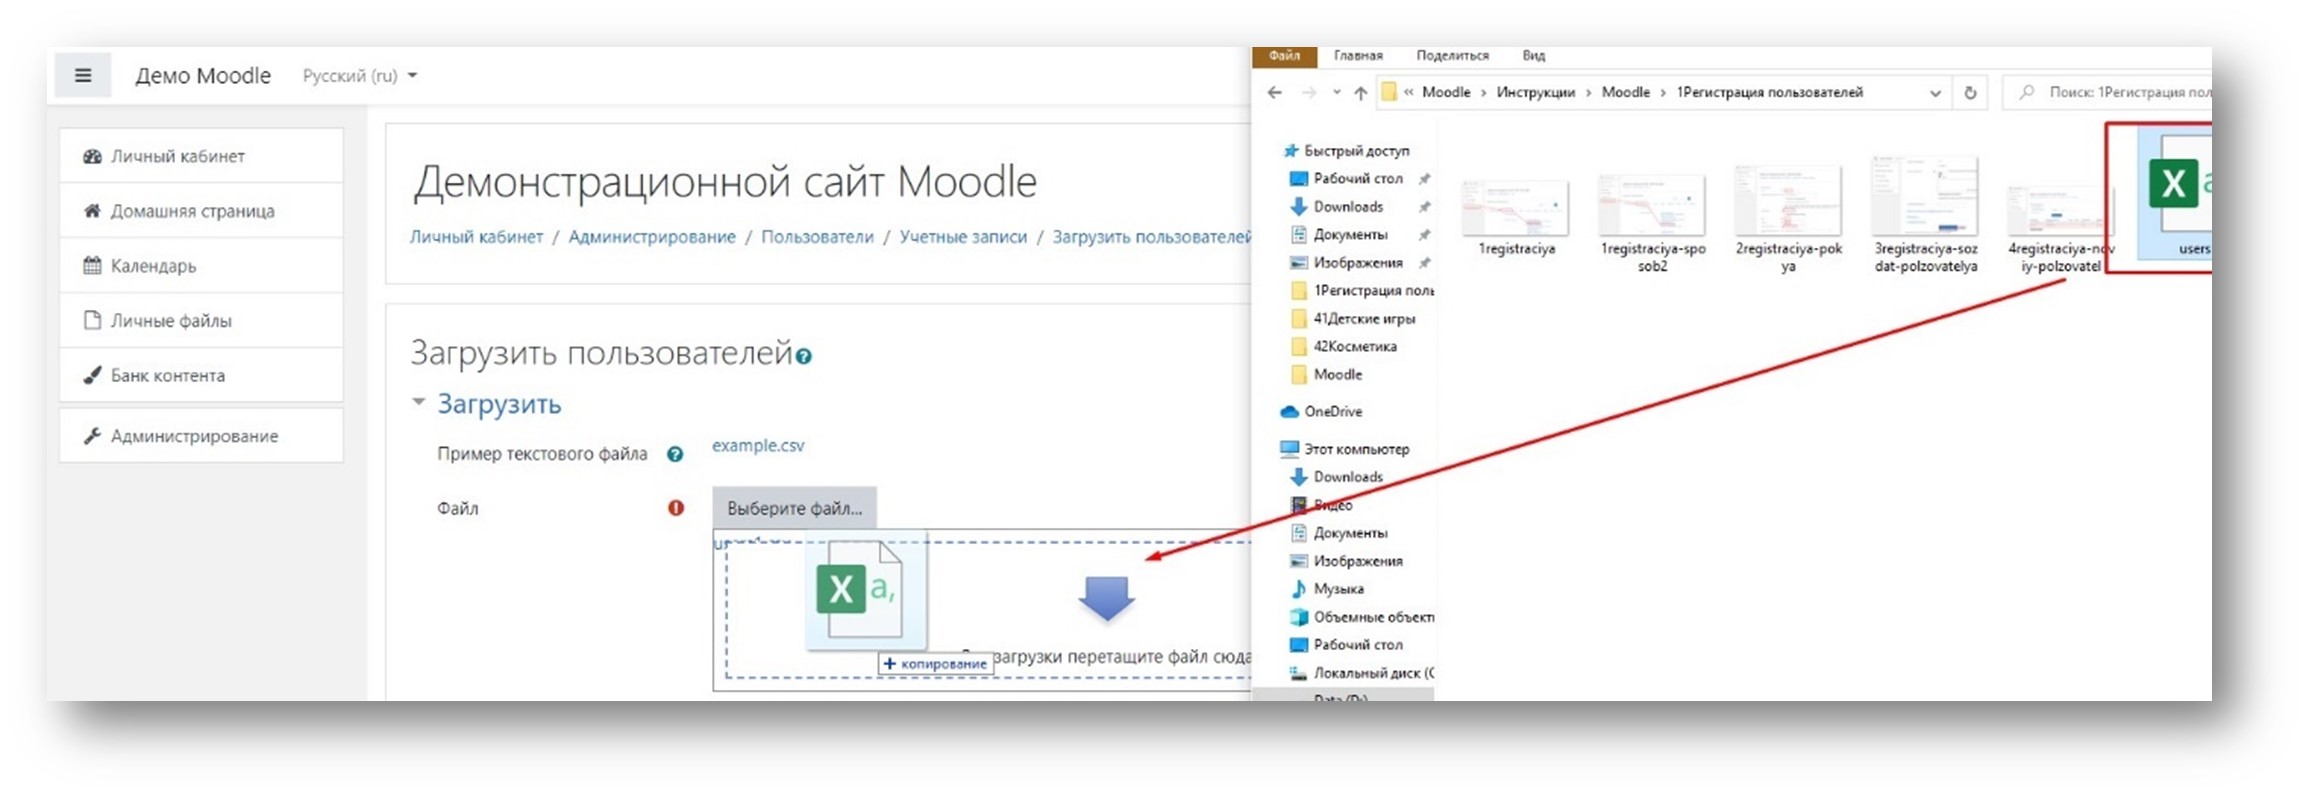
На открывшейся странице выбираем файл с помощью проводника, либо перетаскиваем файл:
![Moodle - загрузка файла со списком пользователей]()
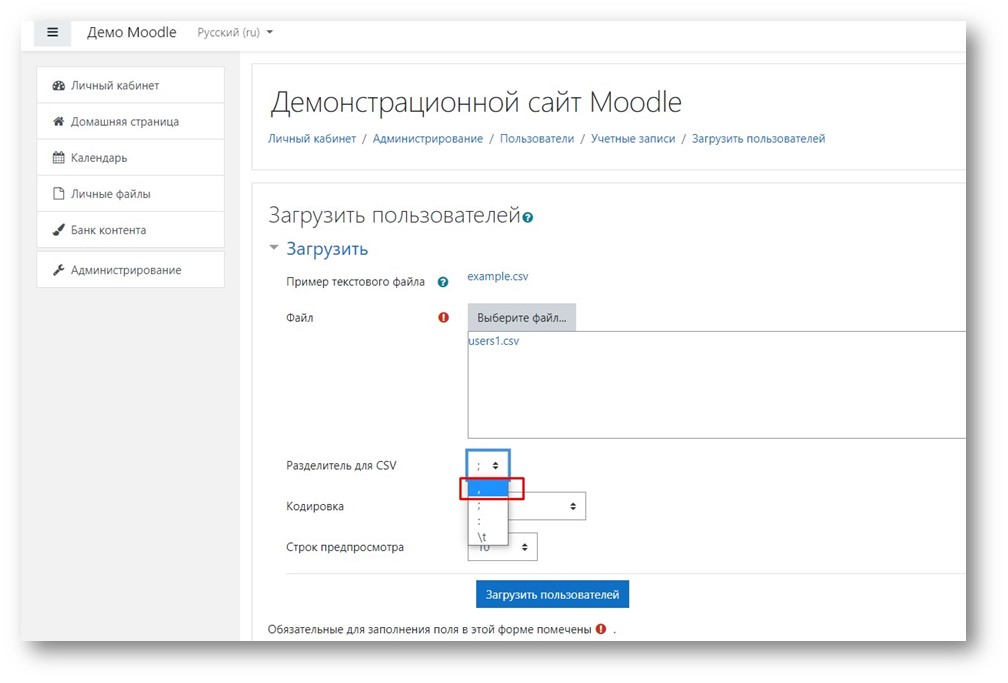
Выбираем нужный разделитель и кликаем Загрузить пользователей:
![Moodle - выбор разделителя и загрузка пользователей]()
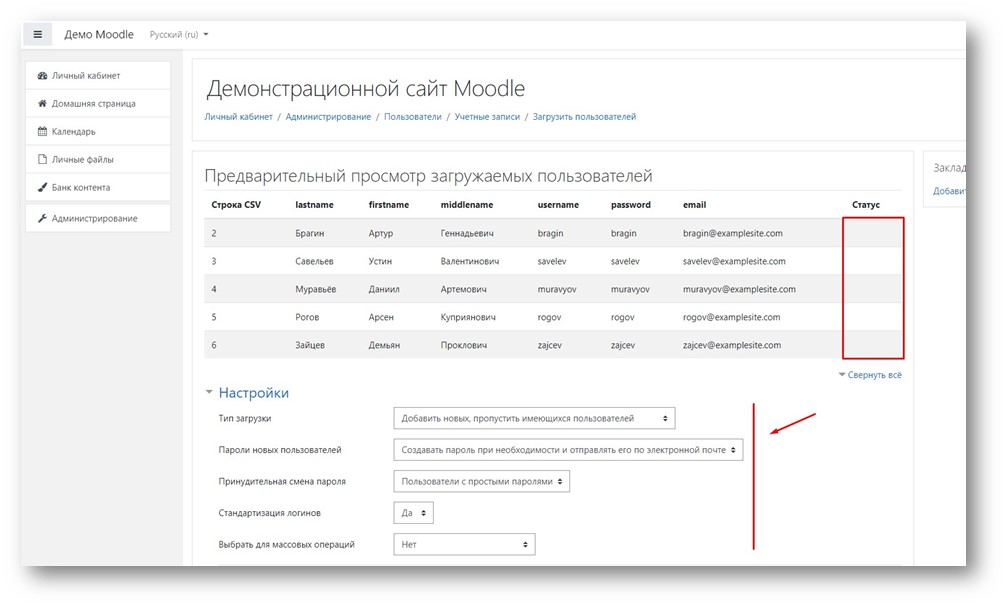
В разделе Настройки можем выбрать дополнительные опции.
![Moodle - предварительный просмотр загружаемых пользователей]()
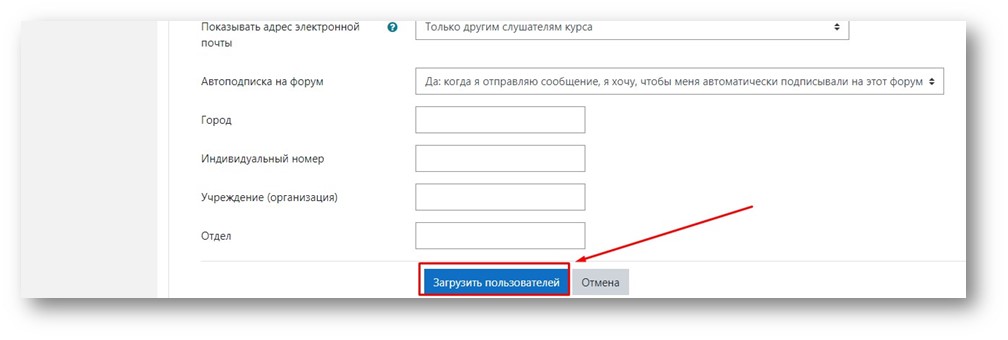
Убедившись в том, что в предварительном просмотре все хорошо и изменив (при необходимости) какие-либо настройки, кликаем Загрузить пользователей:
![Moodle - загружаем пользователей списокм]()
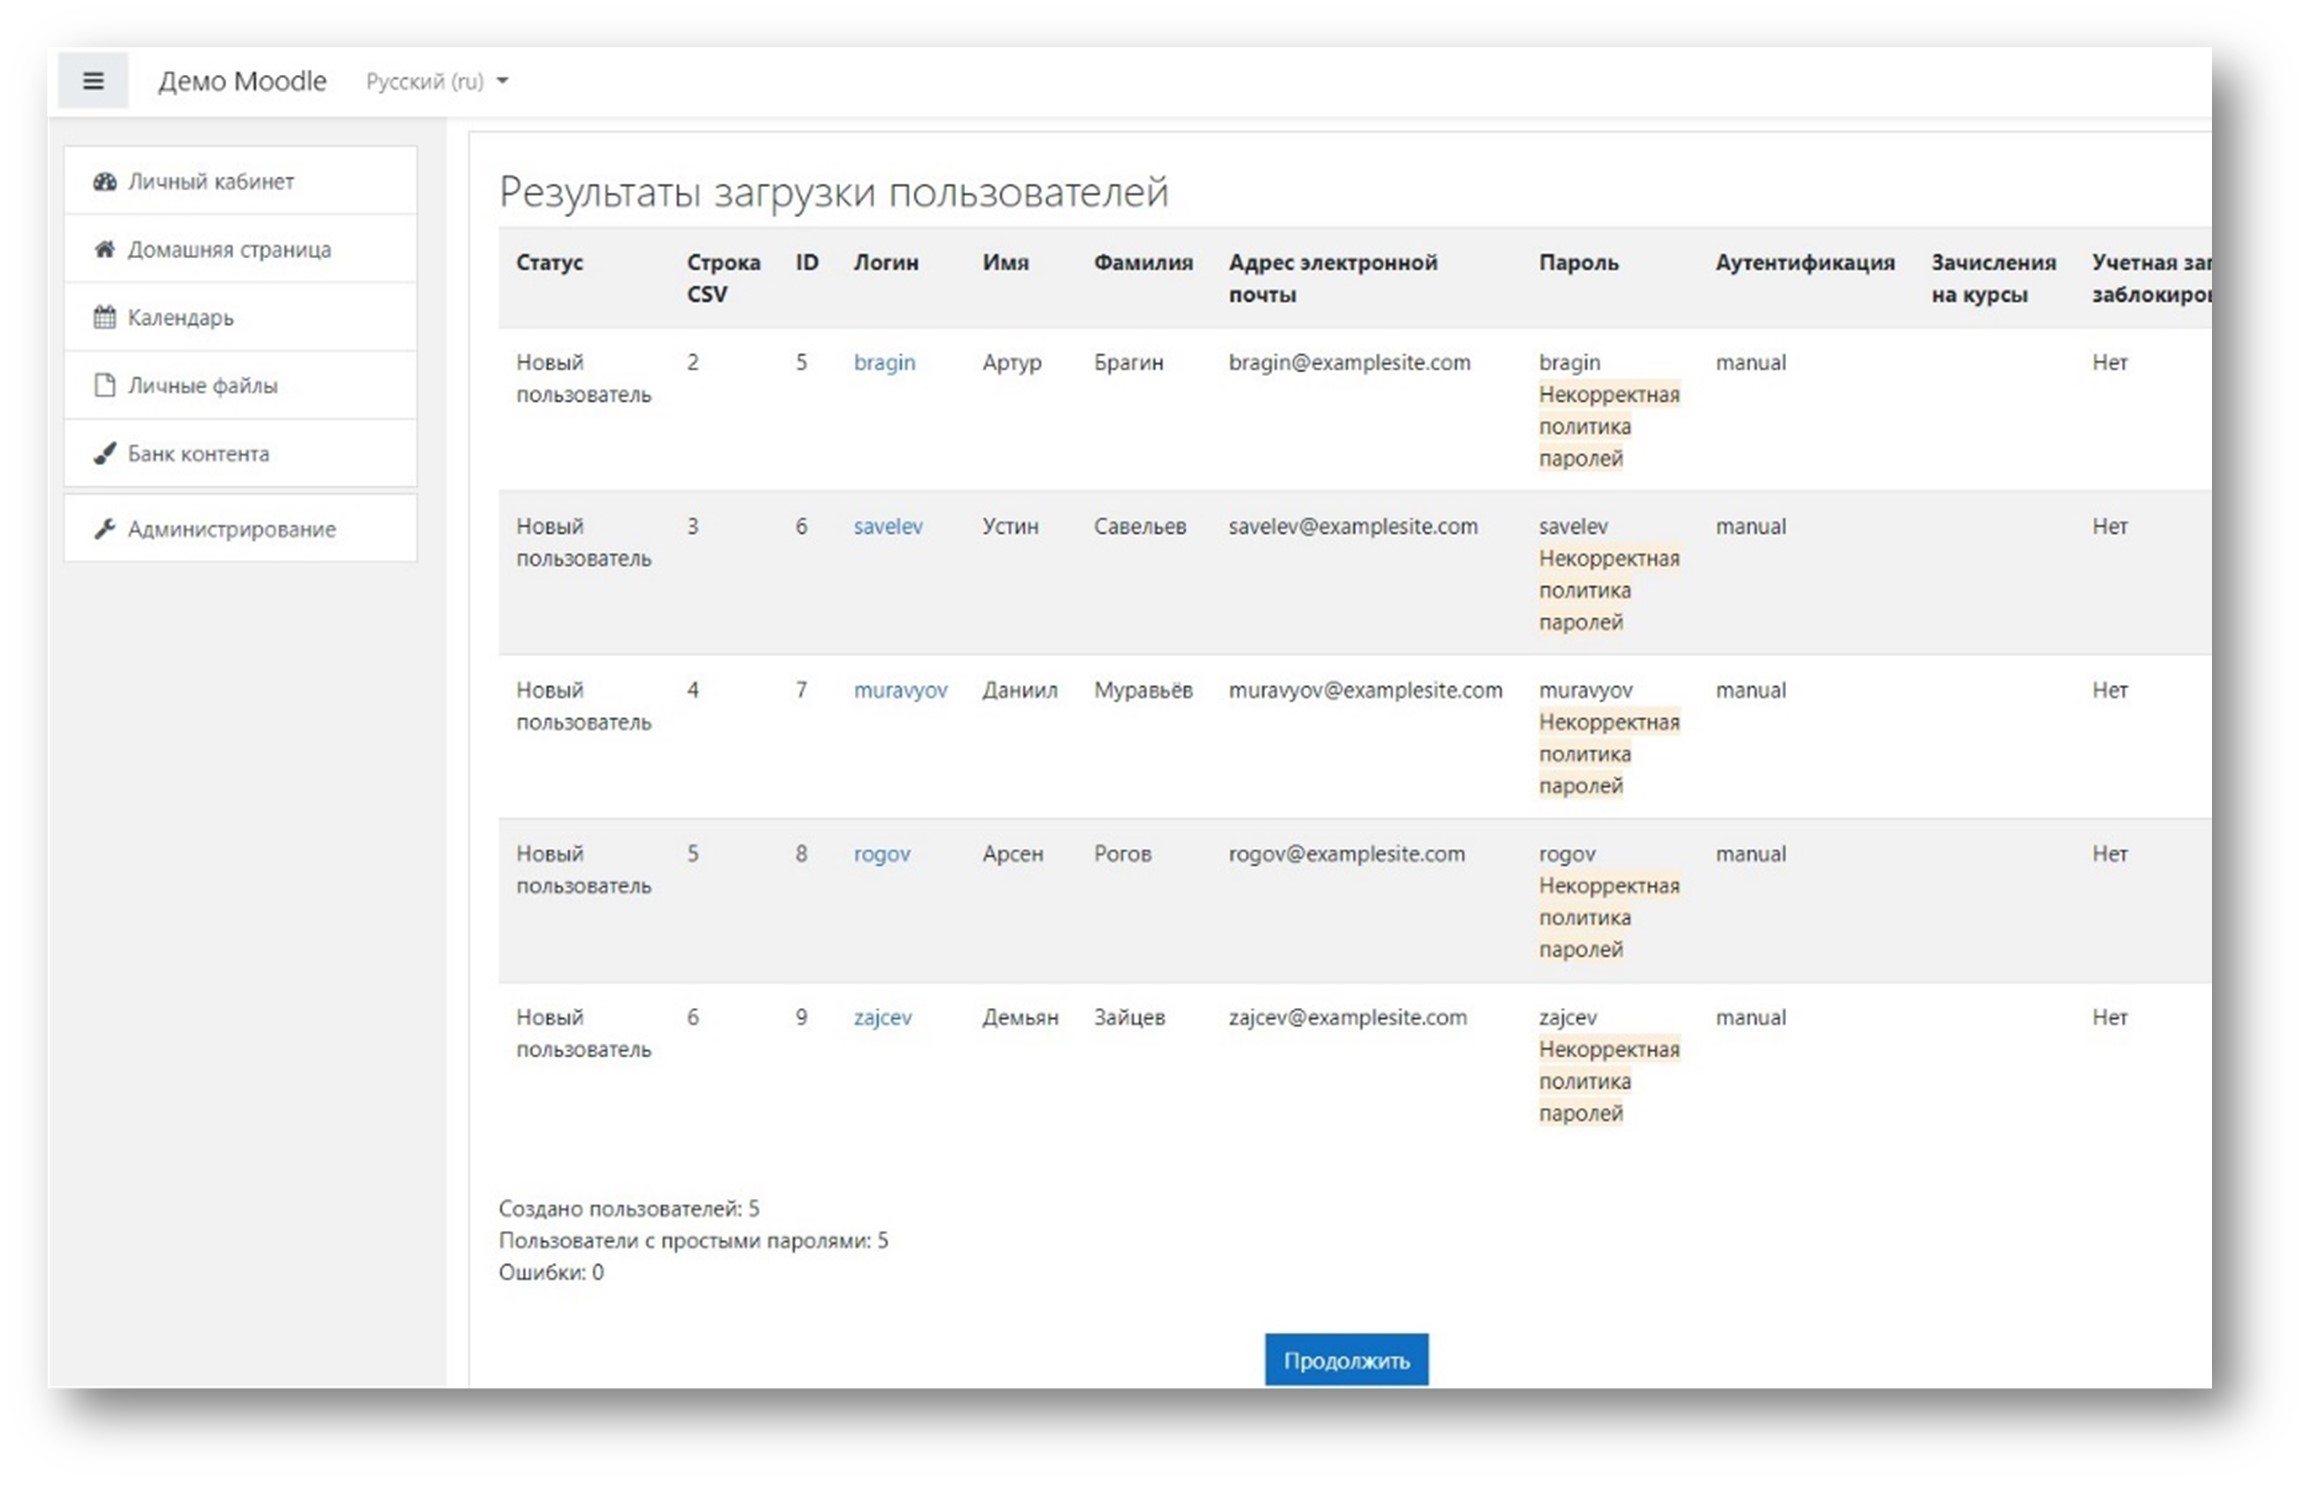
![11polzovateli sozdany]()
Видим, что добавились 5 новых пользователей.
![Moodle - новые пользователи в системе]()
Мы рассмотрели стандартную регистрацию пользователей и загрузку пользователей списком. Заметим, что существует и самостоятельная регистрация пользователей в системе. Но это отдельная большая тема.
Читайте также: