
Macrobutton word что это
The MacroButton field is a field developed in early versions of Word (pre-Windows). The name comes from the ability to trigger a macro. It was early used to insert dummy text for typing and can still serve that function well, without any macros. It continues to work, well, in Word 2019.
MacroButton Fields - Syntax and Behavior
Syntax
MacroButton MacroName DisplayText >
MacroButton - the field command
MacroName - name of macro being called - or "NoMacro"
DisplayText - text that acts as the "button" for the macro and is displayed in your document. Note that there are no quotation marks used in this field. DisplayText can be any text you want but will not wrap to a new line. There are limits on length. Instead of the DisplayText you can insert an inline picture or icon to act as a visual button for your macro. See below, though for images. The text in a MacroButton field prompt cannot be longer than a single line between the left and right indents for the paragraph. You can shrink the font size of the prompt text to fit more words on that single line.
Behavior
Clicking on a MacroButton field will select the field. Double-clicking on one will activate a macro if there is a macro designated. You can change this behavior to make the macro activate on a single click as well.
MacroButton Fields as Prompts
You can use the first behavior (selecting the field) to make simple click-and-type prompts. If you look at many of the templates that come from Microsoft with Word, you will find places that say something like "[Click here and type]." If you click at that spot, the whole prompt is selected and anything you type replaces it. Often, this is exactly what you want for a simple prompt. What you are seeing is a simple implementation of the "MacroButton" field. This use of the macrobutton field is the forerunner of Content Controls.
To insert a MacroButton field like this in your document type it then make it a field.
As is the case with all fields, you cannot simply type the field braces . You either have to use Word's Insert => Field or press Ctrl+F9 and type the field contents. To get: MacroButton NoMacro DisplayText > you could simply type "MacroButton NoMacro DisplayText " and select it. Then press the Ctrl+F9 key combination to make it a field. Pressing F9 will update it to the field display of DisplayText . You must create or edit the field manually to get colors or other formatting in your prompt text that will disappear when the user actually uses it and types.
Inserting a MacroButton field like this in your document using the Field insertion dialog is a bit more involved:
(Word 97-2003) Insert => Field .
(Word 2007-2019) Insert => Quick Parts => Field .
Where it says Field: type "MacroButton NoMacro prompt." The "MacroButton" is the name of the field. "NoMacro" is the name used by the field for the macro to be called - in this special case, none. The "prompt" is whatever prompt text you want. This can be "[Click here and type]" or the text that will usually be just fine but which the user might want to change. "NoMacro" is used as a convention to indicate that there is no macro being used. Note that if there was an available macro with the name "nomacro" that macro would be run by this field. Any name that does not indicate an available macro will give the same result, that is, the entire field will be selected when clicked on (as always happens with a MacroButton) but since no macro can be found, the result is selected text. If you want to format your prompt text, you need to do that by revealing the field code and editing. To me, typing the field and then using Ctrl+F9 to insert the braces is much easier.
As is the case with other fields, the F11 key will take you to the next field, selecting that field. When you use macrobutton fields as prompts, you may want to put an instruction in your documents to use F11 to go to the next field. I do this putting the instruction in blue or red text and a different font in a textbox formatted to float in front of text. The textbox is formatted to have no lines and no fill. The text in the textbox is formatted as hidden so it should not print. I have this textbox as an AutoText entry in my developer's template so that I can insert it easily when I prepare a new template.
Below is an example of how a Macrobutton Prompt appears in a document. (Screenshot) The field code for this prompt is:
MacroButton NoMacro This is a macrobutton prompt ! When you click on it, all is selected. >
The first paragraph shows the prompt as displayed on the page. The second shows the prompt after it has been clicked on before typing; the third shows that the prompt colors do not show up in the text after the user types.
You can download a free Add-In that gives you a dialog box below to add a MacroButton prompt to your document where you want with a choice of colors for the prompt text.
Dialog box from Add-In
MacroButton Fields to Run Macros
Instead of simply being a prompt for typing, this MacroButton field will run a macro if double-clicked. (This can be altered to a single click using VBA.) Instead of NoMacro, simply type the name of the macro. When inserting the field, you can click on the Options button and you will be given a list of available macros (possibly quite a long list) from which to select.
Where it says "Macros defined in active document" a more accurate caption would be "Macros available to active document." This list also includes all of Word's built-in commands, many of which are not found on the menus.
Note that the MacroButton field is selected when it is clicked or double-clicked. You may want to have your macro collapse the selection at some point so that your MacroButton field won't be inadvertently deleted. The language for this is:
Note also that a macro button prompt will print as ordinary text. (It is the field result). To avoid it being printed, you may want to put it in a no-border text box formatted as hidden text (Format => Font). Because of this, it is often easier to use a custom toolbar with a button on that toolbar. The toolbar will not print.
MacroButton Fields can be used in Protected Forms and will be active even in a protected portion of the document. They are often used in such forms as a replacement for hyperlinks (since regular hyperlinks are inactive in the protected portion of a form).
A simple example of macrobuttons can be found in the CheckBox template. This template/tutorial combines the powers of macros, autotext, and the macrobutton field.
MacroButton Fields where the Macro responds to the contents of the field (uses them as an argument or variable for the macro)
It is possible to use one macro that responds to the contents of the field to change what the macro does. Doing this with Private or AddIn fields incorporated in MacroButton fields is discussed in the MacroButtons page on the MVP FAQ site. The same technique can be used with just the display text of the MacroButton field.
The macro is:
Sub TestMacro2()
Dim MyString As String
'Ignore first 24 characters of the macrobutton field -
' the words 'MacroButton TestMacro2', and the spaces
MyString = Mid$(Selection.Fields(1).Code, 24)
MsgBox MyString
End SubThe field is:
MacroButton TestMacro2 [Click Here] >
This can be used to construct a list of templates in the Workgroup Templates folder as macrobuttons. When you double-click (or single-click as shown below) on the macrobutton, the macro creates a new document based on the named template. A single macro decides which template to open based on the template listed in the macrobutton field.
That is, the following fields both call the same macro:
Macrobutton TemplateListLoad Releases\Release - blank> (Displays: Releases\Release-Blank)
Macrobutton TemplateListLoad Log> (Displays: Log)
The macro uses the display information to decide which template to use. The macro is:
Sub TemplateListLoad()
' Based on ideas from http://wordmvp.com/FAQs/TblsFldsFms/UsingMacroButton.htm
' Macro written by Charles Kyle Kenyon
' 24 October 2002
'
Dim sTemplateName As String
Dim sTemplatesPath As String
'
' Get workgroup templates path
'
sTemplatesPath = Options.DefaultFilePath(wdWorkgroupTemplatesPath) & "\"
'
' Parse template name from Macrobutton field.
' (The selection is the entire field.)
On Error GoTo ErrorHandler
sTemplateName = Mid$(Selection.Fields(1).Code, 31) & ".dot"
' Use to create a new document based on the template
Documents.Add Template:=sTemplatesPath & sTemplateName
Selection.Collapse
Exit Sub
'
End Sub
Making MacroButtons respond to a single click
To me, double-clicking on a button is counter-intuitive. To make a macrobutton respond to a single click to run a macro the following VBA code has to be active:
Options.ButtonFieldClicks = 1
This has to be run before the user tries to click on the button. It can be in an AutoOpen or AutoNew macro in the template which contains the macrobutton or in an AutoExec macro in a global template. (Explaining these gets beyond the scope of this article; see Template Basics for more.)
Using MacroButtons to function as hyperlinks in protected forms.
- With your document not protected for forms, record a macro that opens the document to which you want to link. Save the macro in your document (not in Normal.dot) when you record it.
- Use the Macro Editor (Alt+F11) to edit your macro. At the end of the macro (just before "End Sub") add the following line.
Selection.Collapse - Where you want your hyperlink Press Ctrl+F9 to insert your field codes and type "MacroButton MyMacro displaytext." where "MyMacro" is the name of your macro and "displaytext" is what you want the hyperlink to show in your document. (See Syntax above)
- Press F9 to update your field. It should show your displaytext.
- Select your field and press Ctrl+Shift+S to get into the styles drop-down.
- Type "hyperlink" for the style name and press enter.
Example of MacroButton Field Use in Multiple Ways - The Microsoft Fax Transmittal Template from Word 97
![]()
Note the checked box by "For Review." Here is the same template after toggling display of Field Codes (Alt+F9). The prompts for user input are MacroButton fields not associated with any macro. A dummy name of "NoMacro" is inserted but the purpose of the field is to display the prompt. The checkboxes in the form are MacroButton fields, not Form Checkboxes or Content Controls! Both of these use the property of MacroButton fields to select the entire field when clicked on. The display text for the checkbox fields is the unchecked or checked box.
If there were an active macro named NoMacro (or nomacro) these MacroButton fields would call that macro!
The name of the macro called by the (unchecked) Urgent checkbox is "CheckIt." The one called by the (checked) For Review checkbox is "UncheckIt." Look again at the form with the field codes not showing. All you see is the display text - the checked and unchecked boxes.
See Checkbox Add-In for samples.
Different behavior with images for text in .doc vs .docx formatted documents
An image does not work well as a prompt in document (templates) formatted as .docx or .docm (.dotx or .dotm). These are the document and template formats for the Ribbon versions of Word (2007+). See this post on the Microsoft Answers forum. The image is selected, not the field. If the image is deleted by the user and the user types, that typing becomes the prompt for the field. Clicking or double-clicking on the field will not run a macro.
If the same document is saved in .doc or .dot format, the macrobutton field will act as specified. The screenshot below is from a document in .docx format when the MacroButton Field has been clicked on.
Here is a screen shot of the same thing, except the same document has been saved in .doc format:
In the .doc format, clicking on the image selects the field containing the image (and a double-click will run an associated macro). If the user types anything, the image is deleted, the field is deleted, leaving only the typing. When in .docx format, the image is selected in the field. No macro is run. If the image is deleted by the user and the user types, what the user types becomes the new MacroButton field prompt! If there is no image, or if the user clicks on a text prompt included with the image, the field is selected, including the image, and replaced by typing.
Here is another sample using a smaller image, in .docx format:
3. shows the field structure with the button image following the text.
1. shows what it looks like when the image is clicked on. Note the image moves in front of the text even though formatted to be inline with text. If there is a macro, it will not run in this condition.
2. Shows what it looks like when the space after the text is clicked on or the field is entered using the F11 (next field) function key. When this is done, if there is a macro, it will run.
What happens in these instances when text is typed?
In Word 2007 and later when you click on the image, any text typed is added to the MacroButton Field prompt text. If the field itself is selected or you click in the area following the image, the field is replaced by typing. In this second instance, if there is a macro, it is run first.
If the same fields are saved in a .doc (Word 97-2003) format, the field simply acts as a macrobutton field.
See Greg Maxey's page on Toggle objects for some ways to get Word to respond to images in macrobutton fields. One method is with spaces, another is with the IncludePicture field inserting the image. The second suggestion comes from Doug Robbins. An example using the IncludePicture field:
Macrobutton NoMacro INCLUDEPICTURE "https://addbalance.com/word/images/PillcrowFlying.jpg" > >
Using that construction, the image is selected with the macrobutton (and replaced by typing).
MacroButton Field Prompts compared to Content Controls
Both select the entire contents when you click in them. When not selected, they can be indistinguishable to the user.
The color of placeholder text can be edited when you create them and can be something that is very different from the color of the text that will be typed.
Unless formatted to delete the content control when edited, the content control will remain with edited text. The macrobutton field will be replaced by typing.
MacroButton field prompts will work in versions of Word that do not work with Content Controls as well as those that do. This includes Mac versions.
MacroButton Fields and the Table of Contents
If you have a MacroButton Field that is in text that shows up in a Table of Contents, it will be formatted as a Hyperlink in the Table of Contents and the Macrobutton Field will be an active field in the TOC. (This is not true of a hyperlink field.)
MacroButton
Press Control+F9 to insert a set of Field Code Braces. < >.
Do not simply type the braces; you must use Control + F9.
Type the following between the braces:
MACROBUTTON MyMacroName Double-Click To Run Macro
(Use the name of an actual macro, instead of MyMacroName)
You should end up with something like this:
< MACROBUTTON MyMacroName Double-Click To Run Macro >
3
Right-click the area between the braces and select Toggle Field Codes.
If desired, format the macro button to look like a button, using Format Font, Format Paragraph, and Format Borders and Shading
The macrobutton field can be used as a text marker within a template, or, as the name implies, it can be used to run a macro.
Using MacroButton fields as a text marker
You can use a MacroButton field that doesn't actually run a macro but simply displays a prompt and allows the user to click on the prompt and type. To do this, insert a field like:
Change "Click here and type name" to whatever text you require. Press F9 to update the field, which will also display the display text instead of the field code:
See Microsoft's fax templates (which are supplied with Word) for examples of this. Also see:
How to create a template that makes it easy for users to "fill in the blanks", without doing any programming.
Using fields to run a macro
For this, use a field like this:
See: Run a macro when a user double-clicks a button in the document for more details of how to create the field.
Macro button fields can make it very easy to set up fairly sophisticated templates with very little programming effort. For example, see:
Using fields to insert information from the Outlook Address Book into documents such as letters.
But they can be useful for all sorts of things - for some more examples, see:
Using hyperlinks in protected forms
Enable a user to double-click text in a document to change its value
Organizing your macros
Also see the checkboxes in the Microsoft Fax templates which are supplied with Word, where the macros associated with the fields insert AutoText entries, one AutoText entry being a MacroButton field containing a checked checkbox symbol, the other being a MacroButton field containing an unchecked one. If you copy those fields, and the macros and AutoText entries associated with them (using the Organiser) into your own templates, you can use them unmodified.
"Passing arguments" to MacroButton fields
Macros assigned to MacroButton fields cannot take arguments. In fact if you want to be semantic, macros cannot take arguments, ever, because a macro is defined as a public subroutine that takes no arguments, which is why subroutines that do take arguments are not shown in the list when you select Tools + Macro + Macros.
However, depending on your situation, you can get round this in a number of ways, the best two (depending on the circumstances) being.
Your macro can read the value from a Custom Document Property, or a Document Variable.
You can insert a Private field within your MacroButton field. The first thing your macro should do is look for the code of the Private field (which by definition will be the second field of the Selection) and read the value that you want to pass
This method is especially good if you have more than one MacroButton field in a single document which you want to call the same macro, but with the macro operating on a different variable in each case.
For example, you could create a nested field as follows:
< < Private Hello world >Macrobutton TestMacro [Double-click to run macro]>
. which would display:
. and the macro could look like this:
Instead of a Private field, you could use an Addin field within your MacroButton field. An Addin field is very similar to a Private field but even more private - see Using Addin Fields.
Note that the order matters; the following works as one would wish it to:
< Macrobutton TestMacro [Double-click to run macro]< Addin >>
. but the following makes the MacroButton field's display text invisible:
< < Addin >Macrobutton TestMacro [Double-click to run macro]>
The macro could look like this:
Using fields to insert information from the Outlook Address Book into documents such as letters
The macrobutton field can be used as a text marker within a template, or, as the name implies, it can be used to run a macro.
For example, you may wish to include addressee details in a Letter template, without having to resort to either using a custom dialog (UserForm1) or a mail merge.
In this instance, insert the following field in the document template at the position the addressee information is to be placed:
To create the field, either:
Press Ctrl+F9 to position the field boundaries "<>" (don't type them); then type MACROBUTTON followed by the macro's name and the display prompt (you can have spaces within the prompt). Or
Select Insert + Field, and in the dialog, find the MacroButton field. This method is particularly good if you are not used to working with the field in question, because of all the help facilities the dialog gives you (see: Some Tips and "Gotchas" for those who are new to Word). The former method is quicker, though.
Then press F9 to update the field, which will also display the display text instead of the field code:
If the user single-clicks anywhere in the field, then entire field is selected:
(Note that the field shading is an option you can switch on or off under Tools + Options + View).
A single left mouse button click anywhere in the field will select the field, allowing it to be overtyped:
A double left mouse button click will run the macro attached to the field.
The macrobutton field can be used to run any macro e.g. you might wish to extract a name from your Outlook contacts list, for insertion on a template for writing company cheques:
You can use the following macros with the above fields:
Notes
The user may find that the first time they run the macro in each Word session, they might see the "Choose profile" dialog and have to click OK:
And/or, they may find that the "Select Names" dialog displayed by the macro doesn't automatically display their contacts, and they have to select the drop-down and select "Contacts" every time.
If your users experience either of these problems, it is down to an Outlook configuration issue, and you should post the details in the microsoft.public.outlook.contacts newsgroup.
If the document is protected (using Tools + protect Document), and if the MacroButton foeld is in a protected area of the document, you will need to unprotect the document immediately before the line that starts:
and reprotect it immediately after that line - e.g.:
Alternatively, if you did want to use a UserForm in an AutoNew macro, and wanted the UserForm to have a button that allowed your users to pick a name from the Outlook Address Book, you could use almost exactly the same code as provided in this article to do that as well. That is essentially how the Microsoft Letter Wizard works.
Цель работы: Изучение возможностей использования макросов для автоматизации в процессе создания больших документов.
Контрольные вопросы для самоконтроля при изучении темы:
- Чтотакое макрос?
- Когдаимеет смысл создавать макросы?
- Длякаких целей используют макросы?
- Вкаких приложениях MSOffice можно создавать макросы, посредствомавтоматической записи выполняемых пользователем инструкций?
- Какбыстро открыть диалоговое окно «макрос»?
- Какойязык используется при разработке макросов?
- Гдесохраняется последовательность инструкций записанных в виде макроса?
- Какможно запустить на выполнение макрос?
- Какойредактор используется при редактировании/ создании макроса?
- Откройтелюбой текстовый файл, созданный в предыдущих работах.
- Напишитемакрос, позволяющий установить жирное начертание шрифта в 14 пунктов длячасти текстовой строки. Назовите макрос жирн14. При записи макроса назначьтекомбинацию СТRL+ SHIFT+Ж.
- выделитев письме обращение «Уважаемый господин …» и примените к нему созданныймакрос, используя комбинацию клавиш.
- Включитеэтот же макрос в пункт меню Сервис,расположив его под разделительной чертой внизу (СервисНастройка). Просмотрите текст макроса на языке Visual Basic, составленный Word: СервисМакроскнопка Изменитьимя макроса.
- Включитеэтот же макрос в ПИ, причем на основе собственного рисунка. Для этоговоспользуйтесь командой Изменитьв контекстном меню на созданной кнопке.
- Напишитемакрокоманду, которая позволяет копировать абзац текста в начало текущегодокумента (для этого нужно выделить абзац с помощью тройного нажатияклавиши F8). Назначьте для макроса клавиатурную комбинацию, пиктографическийинструмент и внесите в меню по своему усмотрению. Проверьте все варианты назначения.
- Напишитемакрокоманду, которая восстанавливает окно приложений до нормальногоразмера. Обеспечьте выполнение макрокоманды с использованием клавиатурнойкомбинации. Проверьте созданную команду.
- Напишитемакрос для удаления слова (выделив его нажатием 2 раза на F8), без помещения его в буферобмена (клавиша DEL). Свяжите его с пиктограммой. Проверьте и удалитееё. Для этого переместите её (в режиме Настройка)с помощью мыши за пределы ПИ.
- Создайтепару макросов для переключения между синим и белым фоном окна (синий фонснижает нагрузку на зрение, но на нем не всегда хорошо видны некоторыеобъекты). Эта настройка осуществляется командами Сервис Параметры вкладка Общиефлажок Белыйтекст на синем фоне.
- Сохранитерезультаты в файле.
Word позволяет автоматизировать многие задачи путем создания макросов, реализующих последовательность инструкций за одну команду. Инструкции могут состоять из команд, последовательности нажатий клавиш, других действий (но не манипуляции с мышью). Вместо того, чтобы вручную делать отнимающие много времени и повторяющиеся действия, можно создать и запускать один макрос, который будет выполнять эту задачу.
Макросы часто используются для следующих целей:
- для ускорения часто выполняемых операций редактировании или форматирования;
- для объединения нескольких команд, например, для вставки таблицы с указанными размерами и границами и определенным числом строк и столбцов;
- для упрощения доступа к параметрам в диалоговых окнах;
- для автоматизации обработки сложных последовательных действий в задачах.
Макросы имеют имя и равноправны с другими командами Word.
Макрос можно создать двумя способами:
- записать последовательность действий на макрорекодер;
- создать программу на Visual Basic.
Перед записью макроса запланируйте заранее шаги и команды, которые он должен выполнить. Если при записи будет допущена ошибка, то в макросе также запишутся все исправления. Ненужные инструкции можно будет убрать позже путем редактирования макроса.
Если макрос вызывает команду ПравкаНайти/Заменить, нажмите кнопку Больше, а затем выберите параметр Везде в списке Направление. Если макрос выполняет поиск только вперед или назад, то по достижении конца или начала документа Word приостановит выполнение макроса и предложит продолжить поиск в оставшейся части документа.
Перед использованием макроса, записанного в другом документе, убедитесь, что он не зависит от содержимого этого документа.
Если некоторый макрос используется особенно часто, назначьте ему кнопку панели инструментов (ПИ), команду меню или сочетание клавиш. Это позволит быстро вызвать макрос без открытия диалогового окна Макросы.
Средство записи макросов позволяет быстро создавать макросы с минимальными усилиями. При этом макрос записывается в виде последовательности инструкций на языке программирования Visual Basic для приложений. Допускается применение мыши для выбора команд и параметров. Но действия, проделанные в окне документа с помощью мыши, не записываются. Например, с помощью мыши нельзя перемещать курсор, копировать и перемещать объекты, в том числе перетаскиванием. Для записи этих действий используйте клавиатуру. Запись макроса можно временно приостанавливать и затем продолжать с того места, где запись была остановлена.
- Двойной щелчок по индикатору ЗАП в строке состояния;
- СервисМакрос Начать запись. На экране появится диалоговое окно команды.
- В поле «Имя»ввести уникальное имя.
- В списке Макрос доступен для выберите шаблон или документ, в котором будет храниться макрос.
- В поле «Описание» полезно задать описание команды и поясняющие комментарии.
- Если макросу не требуется назначить кнопку панели инструментов, команду меню или сочетание клавиш, нажать кнопку ОК, чтобы начать запись макроса.
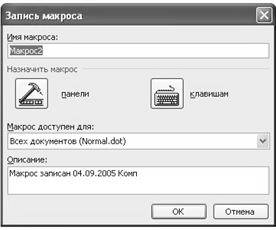
В блоке «Назначить» щелкнуть по одной из кнопок для присвоения макросу (для последующего вызова): кнопки ПИ (Панели), клавиатурную комбинацию (Клавиши). Выберите записываемый макрос в списке Команды и а)перетащите его на ПИ или в меню или б)введите сочетание клавиш в поле Новое сочетание клавиш и нажмите кнопку Назначить.
Макросы хранятся в шаблонах или документах. По умолчанию макросы сохраняются в шаблоне Normal/dot, чтобы они были доступны всем документам Word. Если макрос будет использоваться только в одном документе, сохраните его в документе. Отдельные макросы в документе хранятся в проектах макросов, которые можно копировать из одного документа в другой. для копирования, удаления или переименования проекта макросов: СервисМакросМакросыОрганизатор.
Макрокоманда сохраняется вместе с шаблоном документа, в котором она записана. Для добавления макрокоманды из другого шаблона следует использовать команду Файл Шаблоны кнопка Организатор. Сохранение изменений: ФайлСохранить все.
Если новому макросу будет присвоено имя одного из встроенных макросов Word, то последний будет заменен.
Например, макрос FileClose связан с командой Файл Закрыть. Если назвать новый макрос FileClose, то он будет связан с командой Закрыть, и при выборе команды Закрыть будет выполняться новая последовательность действий. Чтобы просмотреть список встроенных макросов Word, выберите команду СервисМакросМакросы. В списке Макросы из выберите Команд Word.
Воспроизвести макрос можно несколькими способами:
- СервисМакросМакросыимямакроса Выполнить.
- С помощьюклавиатурной комбинации (если она была назначена в процессе записимакроса). Процедура назначенияклавиатурной комбинации (если она была назначена) следующая:
- СервисНастройка вкладка Клавиатура;
- в поле «Категории» выбрать Макросы имя макроса. Если клавиши были назначены, то их сочетание будет показано в поле «Текущие сочетания клавиш». При отсутствии назначения или при желании дать новое в поле «Новое сочетание клавиш» следует ввести новую комбинацию, просто нажав на эти клавиши;
- нажать последовательно кнопки Назначить и Закрыть.
III.С помощью ПИ (если макрос связан с кнопкой ПИ).
Процедура назначения инструмента в виде пиктограммы может быть выполнена командой СервисНастройка. После выбора имени макроса его следует перетащить мышью на предполагаемое место расположения в пиктографическом меню. Существующие инструменты сдвигаются. Вызвав контекстное меню на кнопке макроса, можно придать кнопке нужный вид.
IV.С помощью поля-кнопки Macrobutton. Поле Macrobutton позволяет запустить макрос прямо из документа. Двойной щелчок по этой кнопке запускает макрос, указанный в инструкции этого поля. Инструкция выглядит так:
Вставка поля Macrobutton осуществляется командами ВставкаПоле категория Автоматизация документа поле Macrobutton или сочетание клавиш.
Статьи к прочтению:
Word для начинающих. Урок 25: Создание и использование макросов
Похожие статьи:
Лабораторная работа 15 Тема: Автоматизация приложений пакета Microsoft Office с помощью макросов. Цель: Приобретение практических навыков автоматизации…
Основы работы с Microsoft Office Word 2003 Содержание Теоретическая часть. 3 1. Создание документов. 3 1.1. Ввод текста в документ. 3 1.1.1. Ввод текста…
Имеется в Ворде поле типа MACROBUTTON, оно пользователем выделено, то есть перед тем как пользователь по нему сделает двойной щелчёк мышью для его запуска поле выделится
как узнать текст который оно отображает.
Код_выделенного_поля = ActiveDocument.Fields(Selection.Fields(1).Index).Code.Text
Результат_выделенного_поля = ActiveDocument.Fields(Selection.Fields(1).Index).Result
Текст_выделенного_поля = ActiveDocument.Fields(Selection.Fields(1).Index).
MsgBox Selection.Text не помогает, MsgBox показывает квадрат
Спасибо
2 Ответ от Ципихович Эндрю 12.06.2011 14:08:01
Похожие темы
поле типа MACROBUTTON
Многие применяют для работы с текстом редактор Microsoft Word. Рано или поздно у пользователей этой программы возникают разные вопросы. Наш сайт о Microsoft Office Word даст ответ про: переворачивание страницы в офисе 2003. До недавнего времени информацию в сети было найти затруднительно, так как она разбросана по разным ресурсам и форумам. На портале о Microsoft Office Word вы узнаете про: как в ворде сделать умножение. Но вот наконец появился форум, на котором вся информация по работе с Microsoft Word собрана воедино. На портале о Microsoft Office Word вы узнаете про: редактор формул в word 2007 что это?. Форум Ворд Эксперт предназначен для русскоязычных пользователей, интерфейс интуитивно понятен, а регистрация быстра и легка. Наш сайт о Microsoft Office Word даст ответ про: как сделать наклон текста в word.
На форуме можно задать вопрос о настройках, форматированию и редактированию документов, узнать все о шаблонах, полях и макросах. На портале о Microsoft Office Word вы узнаете про: макросы word генерация документа. И даже найти готовые макросы и инструкции по их созданию своими руками. Если же вы захотите, то можно оставить заявку на написание макроса в соответствующем разделе сайта. На портале о Microsoft Office Word вы узнаете про: как делать красную строку в майкрософт офис.
При любых сложностях в работе с программой, разработке шаблонов, создании таблиц или редактировании текста вы можете задать вопрос на форуме. На портале о Microsoft Office Word вы узнаете про: смарт-теги в word. Обязательно указывайте, какой версией редактора вы пользуетесь. Можно сделать это в подписи. Также на сайте можно найти ссылки с полезной информацией по Microsoft Word и различную литературу, готовые решения и советы по оптимизации работы с редактором. Наш сайт о Microsoft Office Word даст ответ про: как пронумеровать страницы в ворде 2007 счтобы они отображались после печати.
Редактор Word позволяет использовать для тех или иных команд сочетания клавиш, так называемые "горячие клавиши". В некоторых случаях это действительно бывает удобнее, чем действовать мышкой или искать нужные функции в недрах редактора.
Горячие клавиши экономят наше время и, в некоторой степени, повышают производительность труда.
Как правило, сочетание клавиш состоит из функциональной клавиши Ctrl и какой-нибудь иной буквы или цифры на клавиатуре. Безусловно, вместо клавиши Ctrl можно установить и другую клавишу, например, Alt или Shift , а также использовать их совместно.
Ниже я привожу небольшой список часто используемых сочетаний клавиш. В качестве второй клавиши используются буквы латинского алфавита. Но переключаться на другой язык не нужно, система сама определяет нажатую клавишу.
Ctrl + N - Создать новый пустой документ
Ctrl + O - Открыть документ
Ctrl + S - Сохранить текущий документ
Ctrl + P - Печать текущей страницы
Ctrl + Z - Отмена последнего действия
Ctrl + Y - Повтор последнего действия
Ctrl + C - Копировать выделенный фрагмент в буфер обмена
Ctrl + V - Вставка скопированного фрагмента
Ctrl + X - Удаление и копирование выделенного фрагмента в буфер обмена
Ctrl + F - Вывод диалогового окна Найти и Заменить для поиска текста в текущем документе
Shift + F12 - Сохранить текущий документ
F12 - Сохранить текущий документ под другим именем
Вы можете помочь в развитии сайта, сделав пожертвование:
--> Или помочь сайту популярной криптовалютой:
BTC Адрес: 1Pi3a4c6sJPbfF2sSYR2noy61DMBkncSTQ
ETH Адрес: 0x7d046a6eaa1bd712f7a6937b042e9eee4998f634
LTC Адрес: LUyT9HtGjtDyLDyEbLJZ8WZWGYUr537qbZ
USDT (ERC-20) Адрес: 0x7d046a6eaa1bd712f7a6937b042e9eee4998f634
Яндекс Деньги: 410013576807538
А тут весь список наших разных крипто адресов, может какой добрый человек пожертвует немного монет или токенов - получит плюсик в карму от нас :) Благо Дарим, за любую помощь! -->
Читайте также: