
Kingston ssd now 300 v 120gb прошивка
- As a precaution, perform a backup of all your data to ensure no data is lost during the firmware update process
- Do not unplug power at any time during the firmware update
- Use only native SATA ports to perform upgrade. Do NOT use third party controllers
- Intel and AMD users must use the Microsoft AHCI driver for the update procedure to complete successfully
- Notebook users, please use AC power to prevent any power loss during firmware upgrade
Changing the solid-state drive (SSD) firmware version can bring about a wide variety of changes such as stability improvements for different sleep states, power consumption enhancements, increased read/write speeds, optimized compatibility with various systems, and many others.
However, performing this step is very risky because it can damage the SSD’s software in the event of an update failure. Therefore, make sure you consider changing the firmware only when and if the new version includes changes that you can make use of.
As for the installation method, given the huge number of SSD manufacturers and the wide variety of solid-state drives, it’s recommended that you carefully read and understand the update guide, and initiate the upgrade only when you have completely familiarized yourself with the steps.
In addition to that, most SSD manufacturers also require additional software that will help you apply a new firmware using a specific method – so make sure you have everything you need for a complete and successful upgrade.
Another aspect you should keep in mind is that this task must be performed in a steady power environment, such as the one provided by a UPS unit. Don’t forget to reboot the system so that the newly made changes can take effect.
About SSD Toolbox:
The Solid State Drive (SSD) Toolbox is an update utility that properly recognizes the SSD unit(s) installed on your system. It also displays various pieces of information regarding the connected storage devices and searches for a new suitable firmware version.
However, before you consider downloading this version, carefully read the release notes for changes that can apply to your SSD. Once you have updated your drive, reboot to make sure that all modifications take effect.
When it comes to installing this software, the steps are very easy because all you have to do is get the downloadable package (extract it if necessary) and run the available setup. Once the installation is complete, run the Toolbox and follow the instructions for updating the SSD.
That being said, make sure this Toolbox version has a new firmware version available for your solid state drive and, if so, hit the download button, and install the software. Otherwise, check with our website as often as possible so that you don’t miss the release that can improve your SSD.
It is highly recommended to always use the most recent driver version available.
Try to set a system restore point before installing a device driver. This will help if you installed an incorrect or mismatched driver. Problems can arise when your hardware device is too old or not supported any longer.
COMPATIBLE WITH: Windows XP
Windows Vista
Windows XP 64 bit
Windows Vista 64 bit
Windows 7
Windows 7 64 bit
Windows 8
Windows 8 64 bit
Windows 8.1
Windows 8.1 64 bit file size: 13.5 MB filename: V300_603fw_Win.exe
Kingston Technology’s Statement In Support of Ukraine - Learn More
Обновление прошивки твердотельного накопителя
Обновления прошивки твердотельного накопителя Kingston предоставляются через приложение SSD Manager (KSM) компании Kingston. Если обновление прошивки для Вашего продукта применимо или доступно, приложение KSM сообщит об этом, и в его интерфейсе будут отображены примечания к выпуску прошивки, связанные с обновлением.
Чтобы проверить наличие обновлений прошивки для Вашего продукта, загрузите и установите приложение SSD Manager (KSM) компании Kingston по ссылке ниже. Чтобы выполнить обновление прошивки, выберите целевой твердотельный накопитель в приложении и нажмите кнопку обновления прошивки. Обратите внимание, что приложение должно быть запущено в ОС Windows с правами Администратора. Перед обновлением прошивки необходимо всегда выполнять резервное копирование данных.
Если Вам не удается выполнить обновление в среде ОС Windows или Вам нужна копия примечаний к выпуску прошивки, обратитесь в службу технической поддержки за помощью.
ПРОШИВКИ И ОБНОВЛЕНИЯ ПРОШИВОК ПРЕДОСТАВЛЯЮТСЯ ПО УСМОТРЕНИЮ КОМПАНИИ KINGSTON ДЛЯ ОПРЕДЕЛЕННЫХ ПРОДУКТОВ КОМПАНИИ KINGSTON. ПРОШИВКИ И ОБНОВЛЕНИЯ ПРОШИВОК ПРЕДОСТАВЛЯЮТСЯ НА УСЛОВИЯХ «КАК ЕСТЬ» И ИСПОЛЬЗУЮТСЯ НА ВАШ СОБСТВЕННЫЙ РИСК БЕЗ КАКИХ-ЛИБО ГАРАНТИЙ, ЗАЯВЛЕНИЙ ИЛИ ЗАВЕРЕНИЙ СО СТОРОНЫ КОМПАНИИ KINGSTON.
КОМПАНИЯ KINGSTON ПРЯМО ОТКАЗЫВАЕТСЯ ОТ ВСЕХ ТАКИХ ГАРАНТИЙ ЛЮБОГО ВИДА, БУДЬ ТО ВЫРАЖЕННЫХ В ПРЯМОЙ ФОРМЕ, ПОДРАЗУМЕВАЕМЫХ ИЛИ ПРЕДУСМОТРЕННЫХ ЗАКОНОМ, В ОТНОШЕНИИ ПРОШИВОК И ОБНОВЛЕНИЙ ПРОШИВОК, ВКЛЮЧАЯ, БЕЗ ОГРАНИЧЕНИЙ, ГАРАНТИИ ИЛИ УСЛОВИЯ КАЧЕСТВА, РАБОТОСПОСОБНОСТИ, ОТСУТСТВИЯ НАРУШЕНИЙ ЧЬИХ-ЛИБО ПРАВ, ПРИГОДНОСТЬ ДЛЯ ПРОДАЖИ ИЛИ ПРИГОДНОСТЬ ДЛЯ ИСПОЛЬЗОВАНИЯ С ТОЙ ИЛИ ИНОЙ ЦЕЛЬЮ.
КОМПАНИЯ KINGSTON НЕ ЗАВЕРЯЕТ И НЕ ГАРАНТИРУЕТ, ЧТО ПРОШИВКИ ИЛИ ОБНОВЛЕНИЯ ПРОШИВОК ВСЕГДА БУДУТ В НАЛИЧИИ И ДОСТУПНЫ БЕСПЕРЕБОЙНО, СВОЕВРЕМЕННЫ, БЕЗОПАСНЫ, ТОЧНЫ, ПОЛНЫ И НЕ БУДУТ ИМЕТЬ СБОЕВ, ВКЛЮЧАЯ, ПОМИМО ПРОЧЕГО, ТОЧНОСТЬ ИЛИ ПОЛНОТУ ЛЮБОЙ ИНФОРМАЦИИ, ТЕКСТА, ГРАФИКИ, ИНТЕРНЕТ-ССЫЛОК ИЛИ ДРУГИХ КОМПОНЕНТОВ, СОДЕРЖАЩИХСЯ В ПРОШИВКАХ.
РАЗРЕШЕНИЕ НА ЗАГРУЗКУ ЛЮБОЙ ПРОШИВКИ И/ИЛИ ОБНОВЛЕНИЯ ПРОШИВКИ НЕ ПРЕДОСТАВЛЯЕТ КАКОЙ-ЛИБО ЛИЦЕНЗИИ, ВЫРАЖЕННОЙ В ПОЛОЖИТЕЛЬНОЙ ФОРМЕ ИЛИ ПОДРАЗУМЕВАЕМОЙ, ПУТЕМ ЛИШЕНИЯ ПРАВА ВОЗРАЖЕНИЯ ИЛИ ИНОЙ, НА ЛЮБЫЕ ПРАВА ИНТЕЛЛЕКТУАЛЬНОЙ СОБСТВЕННОСТИ, КРОМЕ СЛУЧАЕВ, ПРЕДУСМОТРЕННЫХ НАСТОЯЩИМ ДОКУМЕНТОМ.
ЗАГРУЖАЯ НАСТОЯЩЕЕ ПРОГРАММНОЕ ОБЕСПЕЧЕНИЕ, ВЫ СОГЛАШАЕТЕСЬ НА ВЫШЕИЗЛОЖЕННЫЕ УСЛОВИЯ.

Will the SSD experience a performance decrease? If so, is there a way to reset the drive to a factory default?
Performance decreases have been reported on some SSDNow drives. If you have an older SSD drive that does not have effective Garbage Collection, SSD drive performance will decrease over time. This is due to the way the system overwrites data that has been flagged for deletion.
Try using the Secure Erasetool like HDDErase to wipe the drive and restore it to its original condition.
Encrypted solid state drives utilise the hard drive security command available on most business-class computers and motherboards.It is accessed through the BIOS. This will allow you to create a password for multiple HDDs and SSDs and securely erase the drives if needed. Some computers will not have this feature. If this is the case, the drive can still be used, just without these security features. Be sure not to confuse the BIOS password with the hard drive security password.
SSDs do not require defragmentation. Since they do not contain a physical disk, there is no need to organise the data in order to reduce seek time. Therefore defragmenting an SSD is not effective. Also, defragmenting an SSD can put undue wear on specific areas of the drive. SSDs are designed to write data as evenly as possible over the entire drive to reduce undue wear to any one location. Defragmenting your SSD drive a couple of times will not harm it. However, if it is done continuously over a long period, it may reduce the life of the drive.
Any of our SSDs can be used in RAID. However, due to endurance specifications, only certain part numbers should be used in RAID. For servers, please contact Kingston to determine the best Kingston SSD to use for your workload.
Self-Monitoring Analysis and Reporting Technology (SMART) is a built-in monitoring capability in hard drives and SSDs. It can allow users to monitor the health of a device. It does this through monitoring software designed specifically for the SMART feature. All of our SSDNow drives support SMART.
Trim and garbage collection are technologies that modern SSDs incorporate to improve both their performance and endurance. When your SSD is fresh out of the box, all of the NAND blocks are empty so the SSD can write new data to the empty blocks in a single operation. Over time, most of the empty blocks will become used blocks that contain user data. In order to write new data to used blocks, the SSD is forced to perform a read-modify-write cycle. The read-modify-write cycle hurts the SSD's overall performance because it must now do three operations instead of a single operation. The read-modify-write cycle also causes write amplification, which hurts the SSD's overall endurance.
Trim and garbage collection can work together to improve SSD performance and endurance by freeing up used blocks. Garbage collection is a function built into the SSD controller that consolidates data stored in used blocks in order to free up more empty blocks. This process happens in the background and is completely handled by the SSD itself. However, the SSD may not know which blocks contain user data and which blocks contain stale data that the user has already deleted. This is where the trim function comes in. Trim allows the operating system to inform the SSD that data has been deleted so that the SSD can free up those previously used blocks. For trim to work, both the operating system and the SSD must support it. Most modern operating systems and SSDs support trim, although most RAID configurations do not.
Kingston SSDs take advantage of both garbage collection and trim technologies in order to maintain the highest possible performance and endurance over their lifetime.
Why didn't my primary HDD transfer rate score in the Windows Experience Index (WEI) go up after installing the new SSDNow drive?
The Windows Experience Index (WEI) merely measures the relative capability of components. The WEI only runs for a short time and does not measure the interactions of components under a software load, but rather characteristics or your hardware.
In Vista, the WEI scores ranged from 1.0 to 5.9. In Windows 7, the range has been extended upward to 7.9.
First, open an Elevated Command Prompt window.
To open an Elevated Command Prompt window: Click on Start Orb > Type "CMD.exe" in Search box > Right click on "CMD" and select "Run as Administrator" (If you receive a prompt confirmation, click YES)
To verify that the TRIM command is enabled, type the following and press enter in the Elevated command:
fsutil behavior query disabledeletenotify
The results will be as follows: DisableDeleteNotify = 1 (Windows TRIM commands are disabled) DisableDeleteNotify = 0 (Windows TRIM commands are enabled)
To enable the TRIM command,type the following and press enter in the Elevated command:
fsutil behavior set disabledeletenotify 0
To disable the TRIM command,type the following and press enter in the Elevated command:
fsutil behavior set disabledeletenotify 1
Kingston realises the importance of keeping our customers' personal data and information confidential and secure. Kingston takes measures to ensure the security of all of our customers' personal information when a Solid State Drive (SSD) is returned to our RMA facility for warranty replacement or repair. When an SSD reaches our repair centre, it will undergo a thorough testing process. During the first phase of testing, an ATA Secure Erase is performed on the SSD, which erases all data and information. ATA Secure Erase is federally approved by the National Institute of Standards and Technology (NIST 800-88) for legal sanitisation of confidential user data. If the SSD is not in a functional state and not capable of undergoing an ATA Secure Erase, the SSD is dismantled and the NAND Flash Memory is destroyed.
If I enable security for my encrypted solid state drive, can I use it on another computer that is compatible with hard drive security mode?
You can, but you must first disable the security for the drive in the original computer. Then you can enable it again in the new computer.
If I enable the ATA security on my SSDNow drive and forget my password, can I reset the drive in order to use it again?
No. If you forget the password for this drive, it cannot be accessed. Be aware that forgetting your password is not covered under Kingston’s warranty.
The only exception to this is using a master or administrative password for the drive in addition to the user password. The BIOS would have to support this and it would have to be enabled at the time you initiated the ATA security for this drive. Using a master password would allow an administrator to reset the drive.
The toolbox will not see my drive. It states "No SandForce drives found" or "No Kingston drives found". How do I resolve this?
If your computer has an Intel-based system, you may need to disable the Intel RST driver and revert to the Microsoft default AHCI driver then run the toolbox. On an AMD-based system, the AMD AHCI driver may be blocking the toolbox.
The Windows AHCI driver must be loaded. To to this, right click on Computer and choose manage. Go to IDE ATA/ATAPI Controllers>AMD SATA Controller or Intel SATA Controller. Right-click on this and choose Update Driver Software. Select Browse>Let me pick. Choose "Standard AHCI" from the list. Then reboot the computer. You should now be able to run the toolbox.
When I connect my SSD as a secondary drive, it is seen as new hardware but I cannot see it as a usable drive. How can I resolve this?
Open the Control Panel, open Administrative Tools and then open Computer Management. Click on Disk Management and see if the SSD drive is shown in the right window pane. If it is, right-click on where it is labelled as disk 1, disk 2, etc. and select "Initialize disk" (this may come up automatically when you go into Disk Management).
In XP, right click on the area to the right of that and choose "New Partition". Then choose "Primary Partition" in the partition wizard. Continue with the wizard by choosing the size, drive letter and formatting of the partition.
In Windows Vista and 7, right click on the area to the right of the disk label and choose "New Simple Volume". Continue with the wizard by choosing the size, drive letter and formatting of the partition.
In MacOS, a "disk insertion" window will appear. Click on the "Initialize" button. This will take you to the disk utility. Select the Kingston drive from the list of drives on the left side of the window. From the actions available, choose Partition. For the "Volume Scheme", choose "1 partition". For the format, choose MacOS extended for a permanent drive. Choose ExFAT for an external drive (available on MacOS 10.6.6 and above). Click Apply. A warning window will appear stating that you will erase all data from the drive. Click on the partition button at the bottom.
There is a compatibility problem between older Macbook and Macbook pros with SATA II ports and LSI (Sandforce) based SSDs. There is no update a user can download to resolve this at this time.
The V300 is our entry-level SSD targeting the mainstream user.In order to achieve a balance of price and performance, Kingston will source NAND Flash components from various Tier 1 NAND manufacturers.Our V300 SSDs are built with either synchronous or asynchronous NAND Flash components.Kingston specs the V300 SSD using ATTO 2.41 to achieve a minimum of 450MB/s read/write.Your results may differ should you benchmark your drive with something other than ATTO 2.41.We have provided the following document for a more detailed explanation of SSD benchmarking and performance.
My new SSD is not being seen by the BIOS in my 2008 or older computer. My older SATA drive is seen in the same port. Why?
Our SATA III (6Gbit/s) SSDs are tested to be backwards compatible to SATA II (3Gbit/s). They are not designed or tested to be backwards compatible with SATA I ports (1.5Gbit/s). Most systems made before 2008 used SATA I ports. Our SSDs will likely not work in these systems.
When I try to install Windows 7 from my installation disk, it will not detect the new SSD. However, the drive is seen in the BIOS. How do I resolve this?
When the SSD is recognised in the BIOS, but the Windows 7 installation does not detect the drive:
Follow these steps:
Disconnect any other hard drives or SSDs. Boot the Windows 7 installation disk. Choose repair, then advanced, then command prompt. Type: "diskpart" without quotes and press Enter. You will see a prompt labeled "diskpart". Type the following commands and press Enter after each one.
Diskpart > Select Disk 0
Diskpart > Clean
Diskpart > Create Partition Primary Align=1024
Diskpart > Format Quick FS=NTFS
Diskpart > List Partition
Diskpart > Active
Diskpart > Exit
Then, reboot the computer to the Windows 7 installation disk.
Why is the firmware version on my SSD higher than what is available for download on the Kingston support page?
The firmware versions available on our website have been tested for all revisions of that product line. Any subsequent firmware versions are updates to support newer hardware. Once a firmware version becomes available that fixes a problem, changes specification of the drive model, and has been tested for all available revisions, it will be posted. FAQ: KSD-021715-LSI-03
ElectroStatic Discharge, ESD is simply the discharge of built-up static electricity. ESD should not be taken lightly as this is one of the few things that an individual can do to damage or destroy their computer or hardware components. It is like when you rub your feet on the carpet and you touch something metal. ESD can occur without the user feeling a shock and will occur when only working on the inside of the computer or handling hardware.
How to help prevent ESD
The best method of preventing ESD is to use an ESD wrist strap or an earthing mat or table. However, because most users do not have access to these items, we have included the below steps to help reduce the chance of ESD as much as possible.
- Standing – We recommend that you are standing at all times when working on the computer. Sitting on a chair can generate more electrostatic.
- Cables – Make sure that everything is removed from the back of the computer (power cable, mouse, keyboard, etc).
- Clothes – Do not wear any clothing that conducts a lot of Electrical Charge, such as a wool jumper.
- Accessories – To help reduce ESD and prevent other problems, it is also a good idea to remove all jewellery.
- Weather – Electrical storms can increase the ESD risk; unless absolutely necessary, try not to work on a computer during an electrical storm. In very dry areas, the air itself becomes a part of the electrostatic build-up mechanism every time there is an air flow (wind, air conditioning, blower) passing over an insulated surface. Do not let high humidity levels build false confidence, and beware of corrosion problems with interconnects and other electrical interfaces.
To learn more about ESD and how to protect your electronics, please refer to the below site.
When performing a fresh installation or MacOS High Sierra on my new SSD, it states that the drive is not detected. It works fine if it is an upgrade installation. How do I resolve this?
During the OS installation, go to UTILITIES / TERMINAL
In terminal type:
diskutil list
Then press RETURN. Scroll up to top and verify the Kingston SSD disk (i.e. disk0, disk1, etc).
diskutil mountDISK disk0 (or whichever ddisk is the Kingston SSD).
Then press RETURN. It should show "mounted successfully".
diskutil eraseDISK apfs YOURDRIVENAME disk0 (or whichever disk is the Kingston SSD)
Warning – This step (eraseDISK command) will delete all data on the target drive. Confirm that you have selected the drive you wish to delete and then continue.
Then press RETURN. It should show "successful". Then exit terminal and proceed with the normal installation of the OS. FAQ: KSD-092917-GEN-21
Secure Erase User Guide for Linux
This guide will walk you through securely erasing your Kingston SSD using Linux tools
SATA Secure Erase Procedure
Warning
Please make sure to have a full backup of any important data before you proceed!
Prerequisites
• You must have root privileges.
• You must have your SSD connected to the system as a secondary (non-OS) drive.
• You must have lsscsi and hdparm installed. You may need to install them with your distribution’s package manager.
• Your drive must not be in a security freeze.
• Your drive must not be password protected.
If the output shows "frozen" (instead of "not frozen") then you cannot continue to the next step. You must try to remove the security freeze by trying one of the following methods:
Now issue the hdparm command again. If it worked the output will show “not frozen” (instead of “frozen”).
Method 2: Hot plug the drive. This is done by physically unplugging the SATA power cable from the drive and plugging it back in while the system is powered on. You may need to enable hot plug in BIOS. Not all systems support hot plug.
Now issue the hdparm command again. If it worked the output will show “not frozen” (instead of “frozen”).
NVMe Secure Erase Procedure
Warning
Please make sure to have a full backup of any important data before you proceed!
Prerequisites
• You must have root privileges.
• You must have your SSD connected to the system as a secondary (non-OS) drive.
• You must have nvme-cli installed. You may need to install it with your distribution’s package manager.
• Your drive must not be password protected.
This command may take a few minutes to complete.
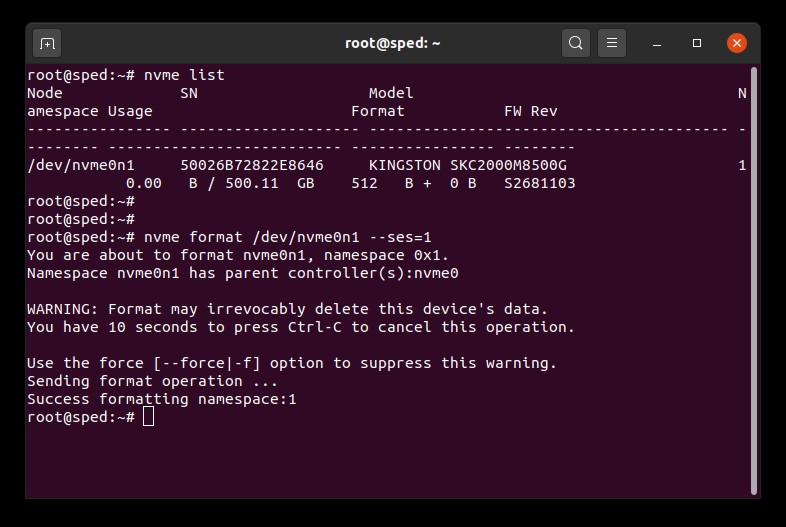
NVMe Secure Erase Example
FAQ: KSM-SE-LIX

Kingston Toolbox – ещё один из инструментов для обновления прошивок у SSD-накопителей, базирующихся на контроллерах от SandForce.
До их выхода на сайте производителя были доступны для загрузки, немного иные инструменты для прошивки дисков, например, KINGSTON SSDNow \ HyperX Updater.
На данный момент, и Kingston Toolbox перестал обновляться, ещё этак в 2015 году. Его заменил Kingston SSD Manager, который впрочем умеет прошивать не только чипы от SandForce.
В разделе с документацией выложены только те файлы, которые непосредственно отсутствуют в архивах прошивальщиков.
Kingston Toolbox v2.0.7A ; SSD_Toolbox_20.rar; size: 955 751 bytes.
; SE100S37/100G, SE100S37/200G, SE100S37/400G:
Kingston E100 Toolbox v2.0.85 FW Rev.519ABBF0 (07/19/14) ; E100_519_Win.rar; size: 2 979 213 bytes.
; SKC300S37A/60G, SKC300S37A/120G, SKC300S37A/180G, SKC300S37A/240G, SKC300S37A/480G:
Kingston KC300 Toolbox v2.0.3 FW Rev.507KC4 (05/21/13) ; KC300_507KC4fw_win.rar; size: 2 862 203 bytes.
; SKC300S37A/60G, SKC300S37A/120G, SKC300S37A/180G, SKC300S37A/240G, SKC300S37A/480G:
Kingston KC300 Toolbox v2.0.85 FW Rev.526ABBF0 (04/09/14) ; KC300_526_Win.rar; size: 3 026 870 bytes.
; SKC300S37A/60G, SKC300S37A/120G, SKC300S37A/180G, SKC300S37A/240G, SKC300S37A/480G:
Kingston KC300 Security Toolbox v7.0.7.5b FW Rev.600ABBF0 (01/21/15) ; Kingston_KC300_Security_Toolbox.rar; size: 1 530 865 bytes.
; SMS200S3/30G, SMS200S3/60G, SMS200S3/120G, SMS200S3/240G:
Kingston MS200 Toolbox v2.0.96 FW Rev.608ABBF0 (12/16/15) ; MS200_608fw_Win.rar; size: 4 927 296 bytes.
; SE50S37/100G, SE50S37/240G, SE50S37/480G:
Kingston SE50 Toolbox v2.0.85 FW Rev.519ABBF0 (09/02/14) ; SE50_519_win.rar; size: 2 040 171 bytes.
; SH100S3x/xxx:
Kingston SSD SH100 Toolbox v1.0 ; SH100S3Toolboxv1.rar; size: 530 083 bytes.
; SH103S3/90G, SH103S3/120G, SH103S3/240G, SH103S3/480G:
Kingston SH103 Toolbox v2.0.85 FW Rev.526ABBF0 (04/09/14) ; SH103S3_526_Win.rar; size: 10 076 682 bytes.
; SH103S3x/xxx:
Kingston SSD SH103 Toolbox v1.0 ; SH103S3Toolboxv1.rar; size: 605 139 bytes.
; SHFS37A/120G, SHFS37A/240G:
Kingston SHF Toolbox v2.0.85 FW Rev.580ABBF0 (07/02/14) ; SHF_580_Win.rar; size: 1 851 916 bytes.
; SKC100S3x/xxx:
Kingston SSD KC100 Toolbox v1.0 ; SKC100S3Toolboxv1.rar; size: 555 881 bytes.
; SMS200S3/30G, SMS200S3/60G, SMS200S3/120G, SMS200S3/240G, SMS200S3/480G:
Kingston SMS200 Toolbox v2.0.96 FW Rev.519ABBF0 (08/19/15) ; SMS200_603fw_Win.rar; size: 5 657 952 bytes.
; SV300S37A/60G, SV300S37A/120G, SV300S37A/240G, SV300S37A/480G:
Kingston SV300/SMS200 Toolbox v2.0.96 FW Rev.608ABBF0 (12/16/15) ; SV300_608fw_Win.rar; size: 4 928 343 bytes.
; SV300S3x/xxx:
Kingston SSD SV300 Toolbox v1.0 ; SV300S3Toolboxv1.rar; size: 610 253 bytes.
; SVP200S3x/xxx:
Kingston SSD SVP200 Toolbox v1.0 ; SVP200S3Toolboxv1.rar; size: 533 104 bytes.
; SV300S37A/60G, SV300S37A/120G, SV300S37A/240G, SV300S37A/480G:
Kingston V300 Toolbox v2.0.84 FW Rev.525ABBF0 (1/30/14) ; V300_525fw_Win.rar; size: 8 816 805 bytes.
; SV300S37A/60G, SV300S37A/120G, SV300S37A/240G, SV300S37A/480G:
Kingston SH103S3 Toolbox v2.0.93 FW Rev.603ABBF0 (05/20/15) ; V300_603fw_Win.rar; size: 12 059 058 bytes.
; SVP200S37A/60G, SVP200S37A/90G, SVP200S37A/120G, SVP200S37A/240G, SVP200S37A/480G, SVP200S3/60G, SVP200S3/90G, SVP200S3/120G, SVP200S3/240G, SVP200S3/480G:
Kingston SH103S3 Toolbox v2.0.7A FW Rev.507KC4 (09/25/13) ; VP200_507KC4_win.rar; size: 17 942 027 bytes.
Kingston SH103S3 Toolbox 2.0 Firmware Update Procedure Rev.526ABBF0 (04/09/14) [526_UpdateProcedure_040914.pdf] ; download; size: 324 916 bytes.
Kingston SHFS37A Toolbox 2.0 Firmware Update Procedure Rev.580ABBF0 (07/02/14) [580ABBF0_Update_Procedure_Fury070214.pdf] ; download; size: 322 060 bytes.
Kingston SV300S3 Toolbox 2.0 Firmware Update Procedure (05/19/15) [603ABBFO_Update_Procedure_051915.pdf] ; download; size: 384 071 bytes.
Kingston SV300S3 Toolbox 2.0 Firmware Update Procedure Rev.525ABBF0 (1/30/14) [SV300S3_525_FWUpdateProcedure_013014.pdf] ; download; size: 324 295 bytes.
Kingston SVP200S3 Release Notes Rev.507KC4 (09/25/13) [SVP200S3_507KC4_releasenotes.pdf] ; download; size: 61 273 bytes.
Kingston SVP200S3 Toolbox 2.0 Firmware Update Procedure Rev.507KC4 (07/01/13) [SVP200S37A_UpdateProcedure_win.pdf] ; download; size: 314 635 bytes.
Kingston SVP200S3 Toolbox 2.0 Firmware Update Procedure Rev.507KC4 (09/25/13) [SVP200S3_UpdateProcedure_ALL.pdf] ; download; size: 323 272 bytes.
Leave a Reply Cancel reply
This site uses Akismet to reduce spam. Learn how your comment data is processed.

KINGSTON SSDNow \ HyperX Updater – размещаю здесь все имеющиеся у меня в наличие прошивальщики класса SandForce Updater, скаченные в своё время с официального сайта компании Kingston.
Для правильной работы прошивальщика рекомендуется использовать операционную систему Windows 7 и переключить режим работы SATA-контроллера на AHCI.
Перечень совместимых моделей SSD-накопителей, к которым должны подходить имеющиеся здесь прошивки.
– SE100S37/100G, SE100S37/200G, SE100S37/400G
– SE100S37/100GBK, SE100S37/200GBK, SE100S37/400GBK
– SKC100S3/120G, SKC100S3/240G, SKC100S3/480G
– SKC100S3/120GBK, SKC100S3/240GBK, SKC100S3/480GBK
– SKC100S3B/120G, SKC100S3B/240G, SKC100S3B/480G
– SKC300S37A/60G, SKC300S37A/120G, SKC300S37A/180G, SKC300S37A/240G, SKC300S37A/480G
– SH100S3/120G, SH100S3/240G, SH100S3/480G
– SH100S3/120GBK, SH100S3/240GBK, SH100S3/480GBK
– SH100S3B/120G, SH100S3B/240G, SH100S3B/480G
– SVP200S3/60G, SVP200S3/90G, SVP200S3/120G, SVP200S3/240G, SVP200S3/480G
– SVP200S3/60GBK, SVP200S3/90GBK, SVP200S3/120GBK, SVP200S3/240GBK, SVP200S3/480GBK
– SVP200S3B/60G, SVP200S3B/90G, SVP200S3B/120G, SVP200S3B/240G, SVP200S3B/480G
– SVP200S37A/60G, SVP200S37A/90G, SVP200S37A/120G, SVP200S37A/240G, SVP200S37A/480G
– SVP200S37A/60GBK, SVP200S37A/90GBK, SVP200S37A/120GBK, SVP200S37A/240GBK, SVP200S37A/480GBK
– SVP200S3B7A/60G, SVP200S3B7A/90G, SVP200S3B7A/120G, SVP200S3B7A/240G, SVP200S3B7A/480G
– SH103S3/90G, SH103S3/120G, SH103S3/240G, SH103S3/480G
– SH103S3/90GBK, SH103S3/120GBK, SH103S3/240GBK, SH103S3/480GBK
– SH103S3B/90G, SH103S3B/120G, SH103S3B/240G, SH103S3B/480G
Подбирайте по названию архива, в котором заключена основная часть модели диска.
KINGSTON SSDNow SKC100S3 SF Updater FW502 for Windows ; KC100_502fw_win.rar; size: 4 281 118 bytes.
KINGSTON SSDNow SKC100S3 SF Updater FW503 for Linux ; KC100_503fw_Lnx.rar; size: 10 907 771 bytes.
KINGSTON SSDNow SKC100S3 SF Updater FW503 for Windows ; KC100_503fw_win.rar; size: 4 517 172 bytes.
KINGSTON SSDNow SH100S3 SF Updater FW503 for Linux ; SH100_503FW_Lnx.rar; size: 10 923 705 bytes.
KINGSTON SSDNow SH100S3 SF Updater FW503 for Windows ; SH100_503fw_win.rar; size: 4 532 989 bytes.
KINGSTON SSDNow SE100S3 SF Updater FW515 for Linux ; SE100_515fw_Lnx.rar; size: 10 765 571 bytes.
KINGSTON SSDNow SE100S3 SF Updater FW515 for Windows ; SE100_515fw_win.rar; size: 4 413 547 bytes.
KINGSTON HyperX SSD SH100S3/120GB Field Updater FW332 ; SH100S3120G_332.rar; size: 4 357 790 bytes.
KINGSTON HyperX SSD SH100S3/240GB Field Updater FW332 ; SH100S3240G_332.rar; size: 4 156 677 bytes.
KINGSTON SSDNow SH100S3 SF Updater FW501 for Linux ; SH100S3All_501fw_Lnx.rar; size: 10 837 808 bytes.
KINGSTON SSDNow SH100S3 SF Updater FW501 for Windows ; SH100S3All_501fw_win.rar; size: 4 618 906 bytes.
KINGSTON SSDNow SH103S SF Updater FW503 for Linux ; SH103_503FW_Lnx.rar; size: 11 276 697 bytes.
KINGSTON SSDNow SH103S SF Updater FW503 for Windows ; SH103_503fw_win.rar; size: 4 886 492 bytes.
KINGSTON SSDNow SKC100S3 SF Updater FW501 for Linux ; SKC100S3All_501fw_lnx.rar; size: 10 859 142 bytes.
KINGSTON SSDNow SKC100S3 SF Updater FW501 for Windows ; SKC100S3All_501fw_win.rar; size: 4 640 223 bytes.
KINGSTON SSDNow SKC100S3 Field Updater FW332 ; SKC100S3ALL-332.rar; size: 4 457 440 bytes.
KINGSTON SSDNow SKC300S3 SF Updater FW507 for Linux ; KC300_507KC4fw_Lnx.rar; size: 11 769 322 bytes.
KINGSTON SSDNow SVP200S3 SF Updater FW503 for Linux ; SVP200_503fw_Lnx.rar; size: 15 442 567 bytes.
KINGSTON SSDNow SVP200S3 SF Updater FW503 for Windows ; SVP200_503fw_win.rar; size: 9 052 080 bytes.
KINGSTON SSDNow SVP200S3 SF Updater FW501 for Windows ; SVP200S3_All_501fw_win.rar; size: 5 442 309 bytes.
Документацию, сюда помещу только ту, что отсутствует в дистрибутивах с прошивальщиками, данными выше.
Release Notes :
SE100S37 Firmware Release Notes (519ABBF0 – July 18, 2014) [E100_519ABBF0_071914.pdf] ; download; size: 89 607 bytes.
Update Procedure :
SKC100S3/240G Firmware Update Procedure [SKC100S3_240GB_Procedure.pdf] ; download; size: 558 826 bytes.
SKC100S3/480G Firmware Update Procedure [SKC100S3_480GB_Procedure.pdf] ; download; size: 414 232 bytes.
SKC300S37A Firmware Update Procedure for Linux (507KC4 05/21/13) [SSDNow_SF_Updater_lnx_052113.pdf] ; download; size: 420 510 bytes.
SKC100S3, SH100S3 and SVP200S3 Firmware Update Procedure for Linux (FW502 06/05/12) [SSDNow_SF_Updater_lnx_072512.pdf] ; download; size: 462 750 bytes.
Leave a Reply Cancel reply
This site uses Akismet to reduce spam. Learn how your comment data is processed.
Читайте также: