
Как удалить oracle database 19c
To uninstall Oracle database on Windows, we have to delete the all the related Ora* registry keys, files and folders manually.
P.S Tested with Oracle database 19c on Windows 10
1. Stop Oracle* services
Press Windows key , type services , stop all Oracle related services.

2. Delete Oracle* registry keys
Press Windows key , type regedit , delete the following Windows registry keys if it exists. :

2.2 HKEY_LOCAL_MACHINE/SOFTWARE/Wow6432Node/Oracle* (64-bits Windows)


3. Delete Oracle* folders.
Delete the following Oracle* folders and files if it exists.
- C:\Oracle or ORACLE_BASE
- C:\Program Files\Oracle
- C:\Program Files (x86)\Oracle
- C:\ProgramData\Microsoft\Windows\Start Menu\Programs\ Oracle-related folders.
- C:\Users Oracle-related folders.
Empty C:\temp and recycle bin.
Done. The Oracle database is uninstalled from the Windows completely.
References
mkyong
Comments
Thank you for this post. Oracle Database is a big SHIT and absolutely NOT user friendly.
Try MS Access, that should work better for you.
jajajaja bro me dio mucha risa lo siento XD
Thanks for the post it really helped me after several days of trying to uninstall. Can you please suggest any database that is better and user friendly than oracle?
This is a very useful guide, thanks for sharing this.
Just one concern though : I don’t think it’s a good idea to just delete every Ora* file, especially if you have more oracle products installed, like e.g. a standalone db client. In any case, it might be better to highlight the need to backup the registry before deleting all these files. It might be a non-brainer standard practice for most users, but I am sure some less experienced devs will use this guide and end up editing their registry without knowing there is no warning, no ‘undo’ option, no automatic backups.

In this tutorial you will learn how to properly uninstall Oracle Database 19c from Windows operating system. For the demonstration I will be using Windows 10. However you can follow these steps to uninstall 19c from any Windows OS as the process is the same.
A Quick Warning
Uninstallation of Oracle 19c from Windows 10 or any other windows OS requires you to delete or modify windows registries and other components like Oracle Home directories and Windows services. This could result in a catastrophic event like crashing your system or application. So, follow this tutorial at your own risk and be cautious. If you mess up I won’t be responsible for that.
Process of Uninstalling Oracle Database 19c
It’s a 5 step process to uninstall Oracle database 19c from Windows 10. These 5 steps are –
- Delete the Environment Variable
- Delete the Registries
- Restart the Machine
- Delete Oracle Home Users and Groups
- Delete Oracle 19c
Now let’s start with the steps one by one.
Step 1: Delete the Environment Variable
If you want to uninstall Oracle Database 19c for the purpose of re installing it or planning to install any other version of Oracle Database, then deleting Environment Variable is not only important but also recommended. Not doing so will cause “Environment Variable Path Is Too Long” Error.
How to Delete The Environment Variable?
To delete the Oracle database 19c’s environment variable first launch the Windows 10’s search utility by pressing Windows Key + Q. After that simply search “Environment Variable”. This search will show you “Edit the System Environment Variables” app.
Click on the app and open it – After that you will be on the “Advance Tab of System Properties”. Here Click on The Button named “Environment Variables”. This button will be at the bottom of the windows.
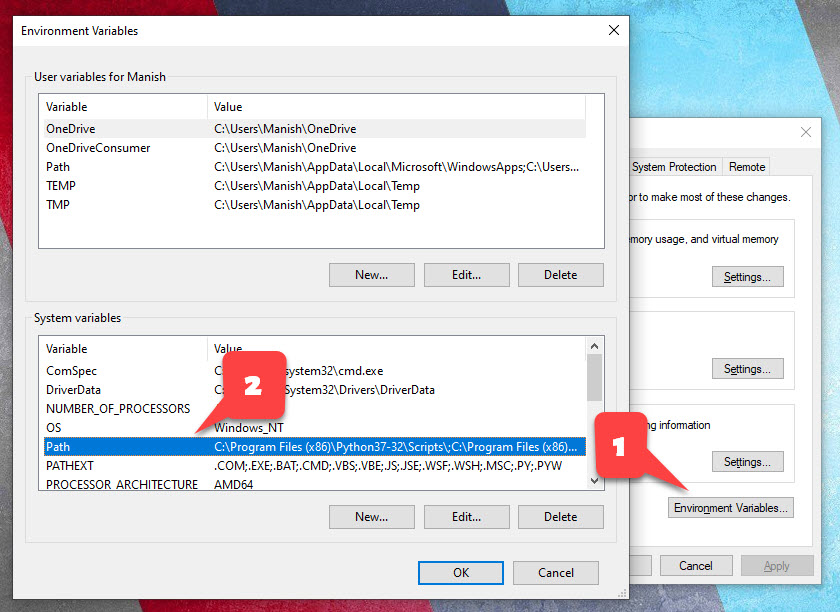
Next, come to this “System Variables” section and search variable name Paths. Just double click and open it.
Here you will see a list of all the environment variables. Don’t delete anything here except the location of your Oracle Home.
In my case this location looks something like this.
This could be different in your case. So be careful and delete accordingly.
Step 2: Delete the Registries of Oracle 19c
This is a very crucial step of the entire process. While performing this step you need to be extra careful.
Before performing this step, you need to take care of two things. These are –
- Only delete the registries that are listed below and nothing else.
- If you have any other software from Oracle Installed on your system, then consult your admin before deleting anything.
In any case it’s always best to take the backup of your registries first. In this quick video that I published on my Facebook Page I have shown how to take the back up of the registries. Do check that out.
Names of Oracle Database 19c registries –
There are total 6 registries that are related to Oracle 19c. These are –
- OracleJobSchedulerORCL
- OracleOraDB19Home1MTSRecoveryService
- OracleOraDB19Home1TNSListener
- OracleRemExecServiceV2
- OracleServiceORCL
- OracleVssWriterORCL
ORCL is the SID that I have assigned to my Oracle Database. This could be different for you.
Location of Oracle Database 19c registries –
You can locate all these registries inside the “Registry Editor” of your Windows operating system. To open the Registry Editor, you first need to launch the “Run Dialog Box”.
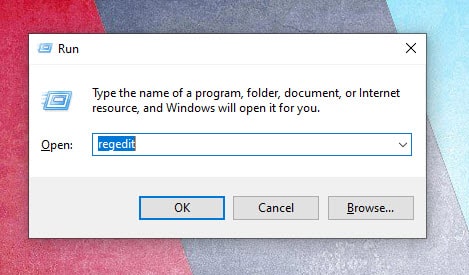
Press Windows Key + R that will open your Run Dialog Box.
Inside the Run box simply write “Regedit” and press enter. That will open your Registry Editor.
Next step is to locate the above-mentioned registries.
You can find all the above-mentioned registries at this location-
HKEY_LOCAL_MACHINE\SYSTEM\CurrentControlSet\Services\
Just traverse to this location and delete all the registries that are listed above. Just be careful.
One More Registry
Along with these 6 registries there is one more that we have to delete. The name of this registry is “Oracle”. And you can find it at this location –
\HKEY_LOCAL_MACHINE\SOFTWARE
This registry contains important information of Oracle Database 19c like DB_Home, SQLPATH, location for your control file and archive file, your SID etc.
Once again, before deleting this registry make sure only oracle database 19c software is installed on your system. In addition to that if you have other software from oracle installed then take a good look at the contents of this folder and delete only those associated with Oracle Database 19c.
Step 3: Restart the Machine
So far, we have done major modifications to our Windows 10 operating system. Moreover, to make these changes settle down and come to effect, we must restart our system.
Restarting the system is important for up coming steps. So, just do it.
Step 4: Delete Oracle Home Users and Groups
In order to manage the working of Oracle Database 19c Database Management system, Oracle Universal Installer (OUI) creates 14 windows groups. Furthermore, the OUI manages those user groups using a dedicated windows user, that you have created during the installation.
Name of Oracle 19c User Groups –
There are total 14 user groups, the name of these groups are as follow –
- ORA_ASMADMIN
- ORA_ASMDBA
- ORA_ASMOPER
- ORA_CLIENT_LISTENERS
- ORA_DBA
- ORA_DBSVCACCTS
- ORA_GRID_LISTENERS
- ORA_INSTALL
- ORA_OPER
- ORA_OraDB19Home1_DBA
- ORA_OraDB19Home1_OPER
- ORA_OraDB19Home1_SYSBACKUP
- ORA_OraDB19Home1_SYSDG
- ORA_OraDB19Home1_SYSKM
Where To Find Oracle 19c Windows Groups and Users –
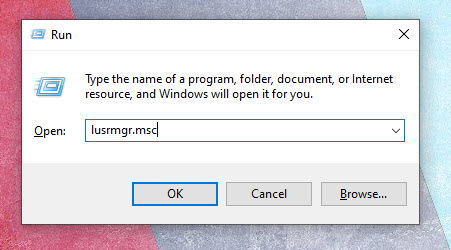
In windows OS all the Users and Groups are organized under “Local Users and Groups Windows”. You can open this window using “lusrmgr.msc” command. You simply have to write this command in your Run Dialog Box and hit enter.
Inside “Local Users and Groups window” you will find two directories “Users” and “Groups”.
All the Oracle Database 19c’s users and groups are placed inside these two directories.
Delete the Oracle 19c’s Windows User –
First get inside the “Users” directory and locate the Window user which you created during the installation of your Oracle Database 19c and delete it.
Delete the Oracle User Groups –
After deleting the windows user next you have to delete the User Groups that I listed above. Additionally, you can find all the above-mentioned Oracle Database 19c groups under the “Groups” directory.
So, just get inside that directory and delete all the groups one by one.
Also, make sure to delete only those Groups that I mentioned above in this blog and nothing else.
Step 5: Delete the Oracle Database 19c
Now that we have deleted all the registries, users and groups we are free to delete the Oracle 19c’s files and directories from our Operating system. Furthermore, the two main directories where Oracle Universal Installer has saved all the Oracle Database 19c related files and folders are –
What is Oracle Home?
Oracle Home is the directory where oracle database software is installed in your operating system’s file structure.
Now find your Oracle Base and Oracle Home and simply delete those folders.
Not Able to Delete the Directories –
Meanwhile, last time many viewers complained that they were not able to delete the files and directories. In this case chances are there that your system could have a pending restart so first restart your system and try again. However, if this still doesn’t solve your problem, then reboot your windows 10 in safe mode and then delete that file or folder.
Just One More Oracle 19c Directory –
After deleting your Oracle Base and Home next you have to delete the directory that Oracle Universal Installer (OUI) has created inside the Program File folder.
Additionally, you can find “Program File” folder inside your main drive where your OS is installed. Just get inside and find the directory with the name “Oracle” and delete it.
With this our uninstallation is done. So, that’s how we wipe out Oracle Database 19c from our Windows 10.
In case if you still have any doubts then I suggest you to watch this video on how to uninstall oracle database 19c.
You can also reach me out on my Facebook or Instagram.
Thanks and have a great day!

Oracle Database 19c – the latest offering of Oracle corp. is now available for windows 10 operating system. Oracle has finally released the on-premises version of Oracle Database 19c for Windows operating system. Meaning now you can download and install it on your windows systems. That is exactly what we are going to learn today.
In this blog I will show you how to properly install Oracle Database 19c on Windows 10. Just to make the installation less complex and easy to understand I have divided this blog into three simple sections. These are –
- Prerequisite for Oracle 19c installation
- Download of the Oracle 19c software, and
- Installation of Oracle DB 19c on Windows 10.
Also, we will see at the end of this blog, what is the default URL of the Oracle Database 19c Enterprise Manager? Thus, I suggest you to read on till the end.
Prerequisite for Oracle 19c installation
The most important part is knowing a software before you deploy it on any machine. It could save you from various errors. Also solving them would be a time-consuming activity. Furthermore, if you are preparing for an interview then this could help you in nailing it.
Here I have explained all the important things related to Oracle DB 19c in Question Answer format. Check it out –
Is Oracle Database 19c available for all the Windows operating systems?
No, it is not. Oracle Database 19c is only available for –
- Windows 8.1 x64 – Pro and Enterprise editions
- Windows 10 x64 – Pro, Enterprise, and Education editions
- Windows Server 2012 R2 x64 – Standard, Datacenter, Essentials, and Foundation editions
- Windows Server 2016 x64 – Standard, Datacenter, and Essentials editions
- Windows Server 2019 x64 – Standard, Datacenter, and Essentials editions
Can we install Oracle DB 19c on x32 bit Windows operating system?
No, we cannot install Oracle Database 19c on x32bit Windows operating system. Oracle 19c is only compatible with x64bit Windows OS. Those who have x32bit Windows OS installed. I am sorry. You either need to upgrade your system to x64bit (But first make sure your CPU has x64 bit architecture. You cannot install x64bit OS on a x32 bit CPU) or configure a virtual box.
What are hardware requirements for Oracle 19c?
The minimum hardware requirement for installing Oracle Database 19c on Windows 10 are as follow—
- Minimum 2GB free RAM.
- 10GB of empty space on Hard Disk Drive
- A processor based on either Intel EM64T or AMD64 architecture.
- Display card with minimum resolution of 1024×768 pixels.
- 16 GB SWAP (virtual memory) space if RAM is more than 16 GB. If RAM is in between 2 GB and 16 GB, then 1 time the size of the RAM
Also make sure that your system is connected to the internet.
Free RAM for Oracle 19c.
Somebody commented on my 18c installation video and said that he has 3 or may 4 GB RAM installed but the Oracle Universal Installer (OUI) is still giving the minimum hardware compatibility error.
Therefore, let me clear the confusion here – No matter what size of RAM you have installed in your system, installation will not proceed unless 2GB of free space of RAM is available.
Consequently, 2GB of RAM must be free for Oracle 19c of whatever the size of RAM you have installed in your system.
Storage for Oracle 19c
As mentioned earlier that the installation of Oracle Database 19c requires at least 10GB of Free storage space. Thus, 10GB empty space on your hard disk drive is a sweet spot. Empty storage space depends on, which edition of Oracle Database 19c you are installing. For example –
- Oracle Database 19c Enterprise Edition requires at least 6.0 GB free storage space
- Oracle DB 19c Standard Edition 2 requires at least 5.5 GB free storage space
Furthermore you should also, at least have 7.0 GB for restart installation.
Oracle recommends that you allocate approximately 100 GB to allow additional space for applying any future patches on top of the existing Oracle home.
How many Edition of Oracle 19c are available?
So far, Oracle Database 19c is only available in 2 editions. These are –
- (EE) Oracle Database 19c Enterprise Edition, and
- (SE2) Oracle Database 19c Standard Edition 2
Now that I have given you all the basic information about the installation of Oracle Database 19c. It’s time to start the installation.
In order to install the Oracle Database 19c we first need to download its copy on our system. Similar to every other Oracle Database software, Oracle 19c is also available for Free to us.
Let’s see how you can do that –
How to download Oracle Database 19c?
The download of Oracle Database 19c is going to be about 3 GB in size. Therefore make sure you have sufficient hard disk space to store it along with a high-speed internet.
Currently Oracle Database 19c is only available for Microsoft OS, Linux x86 – 64, Oracle Solaris, IBM AIX, HP-UX and Linux on System Z. And you can download your copy of Oracle 19c from here.
Since the launch of Oracle DB 18c, Oracle has introduced a new installation process called image-based installation. And thanks to this new process we only have to download 1 ZIP file, which is unlike Oracle 12c and previous versions.
Currently there are only two editions of Oracle Database 19c that are available –
- Oracle Database 19c Enterprise Edition
- And, Oracle Database 19c Standard Edition 2
Both these editions are bundled within the single file that I mentioned earlier. But you don’t need to download them separately.
I have explained the download process of Oracle Database 19c in my Video tutorial. Thus, if you are still confused, then check out the video.
Extract Oracle 19c.
You must be wondering, what’s so special about extracting the files of Oracle 19c?
Perhaps you are right. But, I guess you will agree with me when I ask you this. Will you install your Oracle Database Server into your Download folder. I would never do that, would you?
Since the launch of image-based installation with Oracle 18c, the Oracle Universal installer (OUI) has become slightly strict with the Oracle Home location.
In image-based location the OUI takes the path of the directory where we have extracted the Oracle Database and assigns it as Oracle Home. Therefore, it becomes necessary for us to decide the location of our DB Home/Oracle Home beforehand and extract all the files from the ZIP folder onto that location.
What would I suggest you do?
First of all decide a location. Additionally, it’s recommended to locate your Oracle Home in any partition of your hard disk, except the one which contains your Operating system.
For example. I will create a folder in my D: Drive and name it ‘db_home’.
Once you’ve done that – copy the zip file which we downloaded earlier into that folder and extract its content there.
That’s all you have to do.
Now we are all set to start the installation process of Oracle Database 19c.
Launch the OUI
Once you have successfully extracted your Oracle 19c files and folders then you’re all set to launch the Oracle Universal Installer (OUI).
But before you do that, make sure you are logged on to your windows with an administrative user account. You have to follow this clause because it is mandatory. Consequently, failing to do so may cause mid installation error and crash the entire installation process.
Now that you have logged on to your windows with an administrative user, locate the directory where you have extracted your Oracle Database 19c. Thereafter you have to search the file with the name “setup.exe”.
Once you find the file right click on it and choose “Run as Administrator”.
That’s all you need to do to start the Oracle Universal Installer (OUI).
Screen 1: Configuration Option

Here we are presented with two configuration options.
- Create and configure a single instance database.
- Setup software only
If you select the first option, the oracle universal installer will not only install and configure the Oracle server on your system. But it will also create a starter database for you. This option is good for learning and practice purposes.
But if you go with the second option which is “setup software only”. It will do exactly what its name suggests. It will install and configure the Oracle Database server on your system. However OUI, the oracle universal installer will not create or configure any database for you.
Additionally, this option is best suitable when you are configuring a RAC or planning to perform an upgradation.
Action: Select The First Option – Create and Configure A Single Instance Database.
Screen 2: Select System Class.

In this step we need to select what type of installation of Oracle 19c we want to perform. OUI gives us two options.
First one is “Desktop Class” – You choose this option when you are installing Oracle Database 19c on your desktop or laptop. Because this option will perform the basic installation of Oracle 19c on your system.
Second option is “Server Class” – This is advanced installation. As it is generally used when you are installing Oracle Database 19c or any other version on Server grade machine.
Action: Select The First Option “Desktop Class”
Screen 3: Specify Oracle Home User.

There are so many things which Oracle Database server does in the background to keep your system running. And to do those tasks it creates 14 windows groups. Furthermore to handle those groups Oracle server needs a dedicated windows user.
In this step OUI gives us four options for creating or configuring Windows 10 user. These four options are –
- Use Virtual Account
- Or, Use Existing Windows User
- Create New Windows User
- Use Windows Built-In Account
Use Virtual Account
Select this option if you neither want to create a new user nor want to use any built-in or existing user.
Use Existing Windows User
Choose this if you want to use an existing standard or administrative windows user which is already created.
Create New Windows User
Oracle universal installer gives you an option for creating a dedicated user for your Oracle Database 19c. Using this you can create a Standard Windows User which is completely dedicated to your Oracle requirements. However this user will not be allotted with logon privileges. Therefore logging in to your system with this user won’t be possible. But you can modify it like any other standard windows user.
Use Windows Built-in Account
Choose this if you want to use one of those user accounts which Windows 10 has created for you during its installation.
For enhanced security Oracle recommends either using Virtual Account or Standard Windows user instead of windows built-in account. Also, you cannot change this Oracle Home user once the installation is done thus be careful while creating it.
Action: I will suggest creating a new and completely dedicated Oracle Database 19c user. To do that you have to select the third option which is “Create Windows User”.
Screen 4: Typical Installation.

Perhaps this is the most important step in this entire installation process of Oracle Database 19c. Here I suggest you bring out your pen and paper and get ready to note down some information.
Oracle Base
This is an editable drop-down input field. Therefore you have the freedom to either choose from the option given in the drop-down list or enter your desired directory location.
Oracle Base is a base directory for all your Oracle Products. Consequently this will be the location where all the necessary files like Oracle Home of Oracle Database 19c will be stored.
Here you will get a drop-down input field with one or two options already filled. Choose from any of these if you want to. But, if you want to assign a location of your choice then hit the “Browse” button and select the desirable location.
Action: Specify a directory location which is secure and stable.
Software Location.
Software location is famously known as Oracle Home or DB Home. This directory will be placed inside the Oracle Base. Also, it will be the directory where all the files and folders of Oracle Database 19c are placed.
Since Oracle introduced image-based installation in Oracle 18c we were not allowed to change or modify this location. But prior to that we were free to set this location according to our preference. Now, the Oracle Universal installer (OUI) takes the location of the setup files and assigns it as the Oracle Home or software location.
That’s why I asked you guys to move your Oracle Database 19c files from download folder to another location, which is more secure and stable.
Anyways, you can read more about Oracle Home here
Database File Location
Important files of Oracle Database 19c like Data files, redo log files, control files, server parameter files and the password files will be saved onto this directory. Furthermore it will be placed inside the software location of your Oracle 19c.
These files are most important and required for the proper functioning of the Oracle 19c database. Therefore make sure not to delete the content of this directory.
Action: Let it be set on default
Database Edition.
This is another drop-down list. Here you will find all the editions of Oracle 19c which you have downloaded. Fortunately Oracle Database 19c is only available in two editions and both of them come within the bundle which you have downloaded.
These editions of Oracle 19c are –
- Oracle Enterprise Edition
- And, Oracle Standard Edition 2
Action: Select Enterprise Edition
Character Set
As the name suggests, using this field you set the character set for your Database.
Action: Let it be set on default.
Global Database Name (S.I.D.)
The Global Database Name will be the name of your database and will serve as your database SID. You will need it while making a connection with your database using tools such as SQL Developer. By default, it is set as ORCL. If you want, you can change it to any other name, but make sure to remember it. I suggest you write it down somewhere as your Database SID.
Password
This will be the password for your Administrative user. Administrative users are special user. Using them you can alter the core of your Database. So, it’s always advisable to set a strong password for them.
Now you asked what are the names(username) of those Administrative users?
Oracle 19c has four Administrative users just like every other variant of Oracle Database. These are –
You can use the name of either of these users as username and the password which you have specified in the field to log on to your database.
As I said earlier, these can modify the core of your database thus be careful with them.
Create as Container Database
In most of the cases this checkbox is already checked, but if for some weird reason it isn’t, then check it. If OUI finds this checkbox enabled then it will create a root container database for you.
Pluggable Database Name
In this field you will specify a unique name for your pluggable database. By default, it is set on ‘orclpdb’. This Pluggable Database (PDB) will work as a template for those PDBs which you will create in future.
Action: Let it be set on its default value. If you decide to change it, then note it down somewhere.
Screen 5: Prerequisite Checks

In this step the OUI will check the prerequisites. We will be good to install it if everything goes well. If there is any error, then the OUI will show you here.
Screen 6: Summary

On this screen, the OUI will show the summary of the configuration which you just did for your Oracle Database 19c installation. Here go ahead and press the Install button.
If possible save this information somewhere for future use. It’s always better to be safe than sorry!
Unlike 11g and 12c in Oracle 19c you will not get a DBCA separately for your database configuration. Because this new Oracle 19c Universal Installer has simplified the process.
Once the installation is done the installer will show you the URL for your Oracle Database 19c Enterprise Manager. Enterprise manager is a web-based tool for managing Oracle Database 19c. Copy and save that link. I suggest you bookmark that link.

That’s how we install Oracle Database 19c on Windows 10. This was a detailed tutorial on installation of Oracle 19c. I have crafted this tutorial by taking the perspective of interview and certification in my mind.
Though the tutorial is very detailed but if you still have any doubts then feel free to leave me a message on my Facebook.

If you have ever tried to get rid of Oracle Database from your machine then I think you will agree with me, when I say that uninstalling Oracle Database is not as easy as any other software from your system. In this tutorial you will learn the manual process of uninstalling Oracle Database 18c from your Windows 10.
Info
The process of uninstalling Oracle Database 18c will remain the same for both Microsoft Windows 10 x64bit as well as Windows 10×32 bit. Thus you can follow the steps and enjoy the tutorial.
- Delete the Environment Variable
- Delete the Oracle Database 18c Windows registries
- Restart Your System
- Delete the Oracle Home User and Groups
- Delete The Oracle Database 18c
Let’s look at each of these steps in detail and learn how to uninstall Oracle Database 18c from Windows 10 operating system.
Step 1: Delete the Environment Variable.
Deleting Environment Variable is not only important but also recommended. Especially if you are planning to reinstall any version of Oracle Database on your machine and don’t want to face the error which says “Environment variable path is too long”.
What is an Environment Variable for Oracle Database?
Environment variable is the path to the bin directory which is located in oracle home (also known as DB_Home). This bin directory consists of all the necessary executable files for your oracle 11g server.
How to find out the Environment Variable for your Oracle 18c?
I have done a quick video on how to find out the DB Home and SID of your Oracle 18c, which you can check here.
How to Delete Environment Variable for Oracle 11g
Right Click on “This PC” icon and Select “Properties”. Then from the left hand side panel of the system properties windows select “Advance System Settings”. This will open up “System Properties” Windows. Inside this go to “Advance” Tab and select “Environment Variable”
This PC’s Properties – Advance System Settings – System properties (go to the Advance Tab) – Environment Variable
For the proper working of Oracle Database there are various windows services which runs in the background. These services are backed up by windows registries. In order to completely delete the Oracle Database 18c we need to delete all the major windows registries associated with it.
Before you start doing anything let me tell you that this is a very crucial step. You have got to be very careful while deleting any registries. I would suggest you to take a backup before deleting them.
Precaution:
Before deleting this registry make sure only oracle database 18c software is installed on your system. In case you have other software from oracle installed then take a good look at the contents of this folder and delete only those associated with Oracle Database 18c.
How to take a backup of your registries?
For precautionary purposes taking a backup of your registries is highly recommended.
- To backup “Oracle Software” Registry go to HKEY_LOCAL_MACHINE inside the registry editor and then select SOFTWARE. Right click on it and then select EXPORT. After that select a location and give it a name then click – Save.
- To backup Oracle Database Services registries go to HKEY_LOCAL_MACHINE inside the registry editor and after that go to sub directory “Systems” then to “CurrentControlSet”. Right click CurrentControlSet and select export. Then choose a destination and give it a name.
That’s all you have to do to take a backup. I recommend you to take the backup on an external storage device like a thumb drive.
How to Delete Oracle Database 18c Registries?
There are 2 sets of registries that we have to delete here. First one is for Oracle Database 18c software and another is for all those services which run in the background and are responsible for proper working of your oracle database.
Launch The Registry Editor.
As in windows operating systems all the windows registries are organized into “Registry Editor”, thus to access them you first need to go to the “Registry Editor”. The easiest way to access the “Windows Registry Editor” is through “Run Command” box.
Open up your Run command box by pressing “Windows Key” and “R” key simultaneously. In order to open up the Registry editor in your windows you have to write REGEDIT in your run dialogue box.

Delete the registries for oracle database background services.
- OracleJobSchedulerORCL
- OracleOraDB18Home1MTSRecoveryService
- OracleOraDB18Home1TNSListener
- OracleRemExecServiceV2
- OracleServiceORCL
- OracleVssWriterORCL
The postfix ORCL is default SID for the Oracle database 18c Enterprise Edition (which is installed on my system) it could be different in your case. Make sure you delete only the registries shown in the above list.
In order to stop all the background services of Oracle 18c we need to delete these registries from the operating system. To delete them you first need to locate them. The location path for these registries are as follows:
HKEY_LOCAL_MACHINE >>SYSTEM >>CurrentControlSet >>Services

Under the “services” directory you will have to find all the registries that I have listed above and delete them.
Delete the registries for oracle database Software.
Next you have to delete the windows registry for Oracle Database 18c software. It contains information like your DB_Home, SQLPATH, location for your control file and archive file, your SID etc. The name of this registry is “Oracle” and its location is:
HKEY_LOCAL_MACHINE\SOFTWARE

Under the “software” – search for directory “Oracle”. Once you have reached this directory, right click and Delete it.
Step 3: Restart your System
As we have deleted all the major windows registries associated with our Oracle Database 18c thus in order to bring these changes to effect, you must restart your system.
Step 4: Delete the Oracle Home User and Groups
Since the launch of Multi-tenant architecture Oracle added an extra step to the installation of Oracle Database software where we need to create a dedicated windows User which Oracle Server utilizes for handling all the Oracle User Groups. To uninstall the Oracle Database 18c we need to delete that Oracle Home user as well as all the Oracle User Groups from our Windows 10.
Launch the “Local Users and Group Window”.
Similar to the registry editor, in windows operating system, all the Windows Users and Groups are organized under “Local User and Group” Windows. And similar to windows registry the fastest way to launch the “Local Users and Group windows” is once again through “Run command” box.
Thus to open the “Local User and Group” Window open up your “Run Command” box and write the command “lusrmgr.msc”. This will launch the desired window for you.

In “Local Users and Groups” windows first you need to go to the “Users” directory. Here locate the Window user which you created during the installation for your Oracle Database 18c and delete it.

Once you are done deleting the user, next you have to delete all the Windows Groups which Oracle universal Installer (OUI) created during the installation.
Delete Oracle User Groups.
- ORA_ASMADMIN
- ORA_ASMDBA
- ORA_ASMOPER
- ORA_CLIENT_LISTENERS
- ORA_DBA
- ORA_DBSVCACCTS
- ORA_GRID_LISTENERS
- ORA_INSTALL
- ORA_OPER
- ORA_OraDB18Home1_DBA
- ORA_OraDB18Home1_OPER
- ORA_OraDB18Home1_SYSBACKUP
- ORA_OraDB18Home1_SYSDG
- ORA_OraDB18Home1_SYSKM
Once again, if along with Oracle 18c there are other software from Oracle installed on your system then be careful to delete only those that are listed above.

You can find all the above listed groups in the “Groups” directory which you can access from the right hand side panel of the “Local Users and Groups” windows.

Once you have successfully located all the desired user groups, delete them all. That’s all you have to do in this step.
Step 5: Delete the Oracle Home and Oracle base.
Now that you have deleted all the registries and groups associated with your Oracle Database 18c & restarted your PC then you are all set to delete your Oracle Home and Oracle Base. The two main directories where Oracle Universal Installer has saved all the Oracle Database 18c related files and folders.
What is Oracle Home?
Oracle Home is the directory where oracle database software is installed in your operating system’s file structure.
Locate your Oracle Home and Base and delete them. In case you are not able to delete them, then first make sure you are logged on to your windows using an administrative account. Second, chances are there, that your system may have a pending restart, so restart your machine and try again.
Clean The Program File.
Next go to your Program File folder which is placed in your main drive where OS is installed. Here locate a folder with the name “Oracle” and delete it.
That’s all you have to do. This is the proper manual uninstallation of Oracle Database 18c. After this you will be free to install any Oracle Database version on your windows without formatting it.
O racle 19c is not compatible with all versions of the Windows operating system. Therefore, before you continue with the installation, you may consider checking the version and type of your operating system. To do this, click on the Windows button and search for settings.

Clicking on Settings
On the pop windows that appear, type in ‘about’ and select About your PC.

Searching About your PC
Check on the type of your Windows operating system under Windows Specifications.

Viewing Windows Specifications
If your operating system is among the ones listed below, we can continue to the next stage. Otherwise, you may need to upgrade to the supported Windows versions.
- Windows 8.1 x64 – Pro and Enterprise editions
- Windows 10 x64 – Pro, Enterprise, and Education editions
- Windows Server 2012 R2 x64 – Standard, Datacenter, Essentials, and Foundation editions
- Windows Server 2016 x64 – Standard, Datacenter, and Essentials editions
- Windows Server 2019 x64 – Standard, Datacenter, and Essentials editions
Hardware requirements
For smooth installation and running, please ensure your PC meets the below requirements. You can check this by looking into your device specifications. Click on the Windows button and search “Settings”. On the pop window, search ‘about’ and click on About this PC”. Check the specifications under Device specifications.

- Minimum 2GB free RAM (The free RAM means at least 2GB of the installed RAM is available for Oracle 19c).
- A processor-based on either Intel or AMD64 architecture.
- Display card with a minimum resolution of 1024×768 pixels.
- 16 GB SWAP (virtual memory) space if RAM is more than 16 GB.
- 13GB free storage space on your hard drive.
Downloading Oracle Database 19c for Windows
Visit Oracle Database downloads official page. On this page, you will find various packages. However, we will focus on Oracle Database 19c(19.3) for Microsoft Windows x64 (64-bit).

Downloading this software is free, but it will also require an Oracle account. Input your login credentials if you already have one or signup for one.

Once your account is verified, the download will start automatically.
Installing Oracle 19c on Windows
File extraction and Location
The installation of Oracle 19c is different from the earlier versions. Oracle has introduced a new method called image-based installation. Once the download is complete, unzip the package using WinRAR and copy it in your root directory. Then, create a new folder and give it a name such as ‘db_home’.

Right-click on the setup.exe and click on ‘Run as administrator. This will launch the installation process.

Running the setup
Configuration option
In this stage, it will give you an option to choose your installation configuration. This step is very core. (Create and configure a single instance database), this option allows you to install the Oracle software and create a database at the same time. Our main target is to install Oracle 19c; hence we will select the second option (Setup the software only). This option will enable us to install all essential components for administering a database. By selecting this version, it will allow you to upgrade.

Database installation option
Database installation option
Next will be for you to choose the database installation you want to perform. Single instance database installation will allow you to install a single instance database on your server. However, Oracle Real Application will allow multiple instances to run on different servers. This means that you can have different servers sharing the same storage in the same physical database. In our case, select the first option and click next.

Select database installation option
Database edition
This stage will allow you to choose either the enterprise edition or the standard edition. The standard edition is full-featured and ideally suited for medium-sized businesses. In our case, we will select the enterprise edition for the self-managing database.

Choosing database edition
Oracle home user
This option gives you the mandate to choose where you need to install your Oracle: ‘Use Virtual Account.’ You can choose this option if you do not need to install Oracle on your local machine. ‘Use Existing Window User’ will allow you to use an existing account from your local machine. You must be logged in to your administrator user on your computer for this option.’Create New Windows User’ this will allow you to create a new Windows user account.
Читайте также: