
Как удалить ispy с компьютера
Agent DVR is a standalone replacement for iSpy that runs as a service, uses less CPU and features a web user interface that is accessible from anywhere with no port forwarding required!
We recommend that you use either iSpy or Agent - you can use both but it may cause issues with device drivers and network access.
Tip: Click the button above to show/ hide the userguide index.
Using Agent
Agent does not have a windows forms user interface like iSpy does. The user interface is all browser based via the local portal, web portal or mobile applications
Once you have the local UI open you can start adding devices to Agent - see the edit icon to get started.
Agent has help built into it - click on the "?" icon at top right to access videos and other help resources.
Tip: Enable shortcut keys in Account menu - Theme Settings. "C" opens the Commands menu, "S" opens the server menu. Numeric digits open the various views. Enable Tool-Tips and mouse-over the bottom controls in the UI to show additional shortcut keys.
Any issues? First thing to check is the logs at /logs.html on the local server. That will give you details about any problems Agent is having. If that doesn't help please feel free to jump onto our Reddit group and ask a question - include the logs and steps to reproduce the problem if possible.
Supported Languages
The Agent DVR application has been translated into English, Čeština, Deutsch, Español, Française, Hindi, Italiano, Nederlands, Polskie, Português, Русский, عربي, 中文, 繁体中文, বাংলা, 日本
To change the language, click on Account - Language.
Installing
Download Agent DVR from here and run the installer. Agent runs as a console application (or as a service on Windows) on Windows 7+, Linux X64 (tested with Ubuntu 18.04+), OSX 64, Arm and Arm64 based operating systems (like Raspberry Pi).
Follow the setup instructions for your operating system on the download page
Troubleshooting
If the installer on Windows fails to complete and Agent doesn't start or you are having issues accessing Agent or you need to use functionality that isn't available when running as a windows service (like some GPU drivers and desktop monitoring) then you can run Agent from a command prompt:
- Stop the Agent service if it is running: Click Start - Run - Type "services.msc" - press enter. Right click "Agent" in the list and click Stop. You can prevent it from starting as a service when you reboot by right clicking on Agent, click Properties and set the startup type to "Disabled". Click Apply and OK.
- Open a console window: Click Start - Type "cmd", right click on "Command Prompt" and click "Run as administrator"
- Change directory to the Agent directory. Usually this would be "cd C:\Program Files\Agent"
- Run Agent DVR as a console application - type "Agent.exe" - press enter
Agent will then tell you if there are any problems starting and what local port it is running on. You can quit Agent at any time by pressing the enter key. When Agent is running in the console it is able to use more GPU devices and can record from the Desktop.
If there is an anti virus app or firewall blocking Agent from listening on a local port then you may need to add Agent.exe to a safe list or open the port it is listening on in the local firewall.
If you are using a Windows N variant you will need to install the media feature pack for Windows N
On Linux and Raspberry Pi your system may not have some required libraries installed and Agent may fail to start with an error like libcvextern.so could not be found. You will need to use ldd to find which libraries are missing. To do this, open a terminal window, change to the Agent directory and run ldd libcvextern.so (or whatever library is causing issues). The output should tell you which dependencies need to be installed. Please let us know what's needed and what operating system you are using so we can update our docs.
Corrupted Video? Agent defaults to using UDP to connect to cameras. UDP is a fast network protocol which prioritises real-time, low delay video. Unfortunately UDP doesn't have any error correction built into it so any electronic noise from faulty cabling to interference from power cables, amplifiers or other sources can result in corrupted video by the time the signal gets to Agent. You can switch to TCP instead which does have error correction built into it - but at the cost of some buffering and potential lag on the live feed. To switch to TCP instead, edit the camera, click to edit the Source on the General tab, select "FFMPEG" in the menu at top right and change the RTSP mode to TCP.
Stuttering Video? Some cameras (notably Reolink) emit frames in groups of audio and video which can result in stuttering live and recorded playback. To work around this, edit the camera, click to configure the videosource settings, select the FFMPEG tab and set a value for Max Delay (for example 4 seconds) and a value for Max Reorder Queue Size (for example 500).
Accessing Logs
Upgrading from iSpy
- Save your object list in iSpy (File - Save object list)
- Close iSpy (make sure it's not running in the task bar)
- Install Agent DVR
- Click on the Server icon in Agent DVR (top left), Backup/ Restore, Upload and choose the file you saved. Note this will only update your object list - you may need to adjust server settings manually.
- Click on the account menu in Agent DVR and Remote Access to pair it with the remote portal (optional)
- If you have multiple servers connected using the old version and the new version you'll need to swap between them using the account menu (top right of Agent DVR) and "Change Platform".
- It's recommended you uninstall iSpy from Add/ Remove programs after you have setup Agent DVR as they may conflict for device access.
Upgrading from Agent (original version)
- Stop the original version of Agent (If it's running as a service, click Start - Run - Type "services.msc" Find Agent in the list, right click -> stop).
- Install Agent DVR
- Click on the Server icon in Agent DVR (top left), Backup/ Restore, Upload and choose objects.xml from the Media/XML directory of the original Agent (usually C:\Program Files\Agent\Media\XML). Note this will only update your object list - you may need to adjust server settings manually.
- Click on the Server icon in Agent DVR and Remote Access to pair it with the remote portal (optional)
- If you have multiple servers connected using the old version and the new version you'll need to swap between them using the account menu (top right of Agent DVR) and "Change Platform".
- Once you have the new version working you can delete (or archive) the old version of Agent
Moving to a new Computer
You can move Agent to a new computer easily - just copy the Agent directory to the new PC and delete it from the old one.
If you get an in-use error when you try to delete it you can double click on "agent-uninstall-service.bat" in the Agent directory (on Windows) to close it and stop it from starting up and then delete it again.
If you have a basic subscription and have 2 instances of Agent connected to your account only one will be visible on the web portal - you will need to stop the first one for the other to connect successfully.
Remove an instance from my account
You can either just stop Agent running and delete it or if you want to keep it running just not connected to your account then:
- Stop Agent (If it's running as a service, click Start - Run - Type "services.msc" Find Agent in the list, right click -> stop).
- Delete the file Media/serial.txt
- Edit the file Media/XML/config.xml and remove the UserIdent element from that file and save it
- Restart Agent
Move instance to another account
Remote Access
Agent DVR uses WebRTC to setup remote connections so doesn't require any port forwarding setup and will work even over mobile internet connections. To connect remotely you will need to pair Agent with your iSpyConnect account. To do this, click on the account icon in the local web interface and "Remote Access". You'll be redirected to the online portal.
Just Subscribed?: Sometimes it takes a few minutes for the notification to come through from our payment processor. Check back later and try clicking on Remote Access in the local web interface to connect Agent to your account. If paying by echeque it can take a few days to clear - if you need access urgently and are waiting for the payment to clear then contact us and we may be able to apply a trial to your account.
No UI?: If you have downloaded Agent DVR to a VPS or a PC with no graphical UI you can still setup Agent for remote access by calling "Agent.exe register" on Windows or "dotnet Agent.dll register" on Linux/ OSX. This will give you a claim code you can use to access Agent from another PC.
Unsubscribe?: Just click on the Account menu, change subscription and cancel.
LAN Access
Agent uses WebRTC which uses random ports to connect over the network. This can cause issues if you have a firewall or antivirus blocking incoming connections. Webrtc generally uses ports over 50000 so if you have problems connecting over the local network try allowing a LAN port range of 50000 - 65535 in your firewall (or use our website).
To secure LAN access set a username and password in Server Settings - Local Server. If you forget this password you can reset it by stopping Agent and calling "Agent.exe reset-local-login" on Windows or "dotnet Agent.dll reset-local-login" on OSX and Linux.
Some browser extensions can also block access so if you have issues connecting locally try a different browser (Safari, Chrome, Firefox and the latest version of Edge should all work). Also try disabling any extensions and clearing your cache.
Uninstalling
If Agent is running as a service then stop the service:
- Windows: Click Start - Run and enter "services.msc". Find Agent in the list, right click it and click stop. Run agent-uninstall-service.bat in the Agent directory
- Linux: Call sudo systemctl stop AgentDVR
- Mac: Call sudo launchctl unload /Library/LaunchDaemons/com.ispy.agent.dvr.plist
To remove Agent DVR just delete the install directory (it is a portable application so doesn't install into the add/remove programs list in Windows). By default Agent DVR is installed to C:\Program Files\Agent on Windows. On Linux/ Mac OS it will be installed wherever you ran the install script.
Switching Accounts
Save your configuration from the Server menu using the Import/Export option. Then stop the Agent service and run the agent-reset.bat or agent-reset.sh command. Start Agent again and load back in your configuration and then click on Remote Access under the Server menu to connect to your new account.
Do you have trouble in completely uninstalling iSpy 4.7.6.0 from your system? Are you looking for an effective solution to thoroughly get rid of it off the computer? Do not worry! You came to the right place, and you will be able to uninstall iSpy 4.7.6.0 without any difficulty.
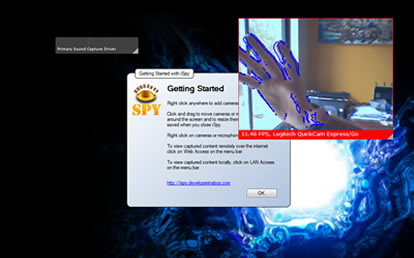
iSpy 4.7.6.0 iSpy uses your webcams and microphones to detect and record movement or sound.
iSpy uses your webcams and microphones to detect and record movement or sound and provides security, surveillance, monitoring and alerting services. With iSpy you can: Control cameras with PTZ. One-click or auto upload to youtube. Auto FTP to any servers. Listen to and monitor audio live over the network. Connect and monitor as many cameras and microphones as you like. Import and export object lists to share with colleagues. Connect multiple computers in a group and manage over the web Install iSpy Server and publish your webcam to other instances of iSpy, over your network and to the web Detect, highlight, track and record movement Customise movement detection areas on your cameras Detect and record sound Record on demand Save frames for timelapse Detect loitering Face Detection Run any program or send an email or SMS or MMS alert when movement or sound is detected Run any program or send an email or SMS or MMS alert when movement or sound is not detected (monitor machinery or staff activity) Receive email movement alerts with attached frame grab images from your webcams Periodically receive image grabs via email from your webcams Connect to any device, even webcams attached to other computers with JPEG, MJPEG, IP Cam, webcam and AVI file support Watch live and recorded media locally, over the web (through this website) and also via mobile devices Access and control iSpy remotely Password protect iSpy and hide it in the System Tray Schedule sound and video capturing to start and stop automatically Time-lapse record from any camera Motion track and count moving objects Connect multiple instances of iSpy and iSpy server running on different computers to this website and view all aggregated media online
However, many users have difficulties and problems away from the computer. Below we have listed possible problems when uninstalling iSpy 4.7.6.0. If you also have this problem, you can find a useful solution for this.
It seems that there are many users who have difficulty in uninstalling software like iSpy 4.7.6.0 from the system. And some of them get into trouble when uninstalling the software, and some of them can uninstall the software, but to get problems after removal. Some possible problems that people run into:
- iSpy 4.7.6.0 does not work as good as you thought.
- iSpy 4.7.6.0 can not be uninstalled
- iSpy 4.7.6.0 can not be completely uninstall and removed
- iSpy 4.7.6.0 or other similar software can not be installed or updated again on the computer
- The computer system runs much slower after iSpy 4.7.6.0 is uninstalled
Causes of the above problems :
- iSpy 4.7.6.0 does not appear in the program list of Add/Remove Programs
- The uninstaller of iSpy 4.7.6.0 can not completely remove all associated files
- There is some software that is not compatible with iSpy 4.7.6.0
- There are many remnants left in the registry and hard drive
- The .dll, .sys or other files shared with other software are deleted
Manually Uninstall iSpy 4.7.6.0 with Windows Add/Remove Programs.
Windows "Add/Remove Programs" offers users a way to uninstall the program, and each Operating system has a "Add/Remove programs" function.
- Click "Start menu" and run "Control Panel".
- Locate iSpy 4.7.6.0 (or ispyconnect) and click "Change/Remove" to uninstall the program.
- Follow the uninstall wizard and uninstall the program.
Manually Uninstall iSpy 4.7.6.0 with Build-in Uninstaller.
Most computer programs are installed with its build-in uninstaller that can also help uninstall the program.
- Click Start menu and move your mouse to All Programs.
- Find Search iSpy 4.7.6.0 folder and click on its Uninstaller.
- Follow its uninstaller and uninstall the program.
To run its uninstaller, you can also
- Go to the folder where the program is installed.
- Locate its uninstaller usually named as unins000.exe or uninstall.exe
- Double click on its uninstaller and follow it to uninstall the program.
Please know that Windows "Add/Remove Programs" and its build-in uninstaller can remove only the main executable program files, but not all program files and components. Some invalid files can be left in the registry and folders. To completely uninstall iSpy 4.7.6.0, you need to get rid of these remnants, otherwise, it will slow down your computer and block the installation of other incompatible programs.
To thoroughly delete its files, please follow the steps:
- Run Registry Editor
- Find and delete all registry entries of the program in HKEY_CURRENT_USER\Software\ispyconnect\, HKEY_LOCAL_MACHINE\SOFTWARE\ispyconnect\ and HKEY_LOCAL_MACHINE\Software\Microsoft\Windows\CurrentVersion\Run\
- Find and delete all files of the program in system folders C:\Program Files\ispyconnect\, C:\Document and Settings\All Users\Application Data\ispyconnect\ and C:\Documents and Settings\%USER%\Application Data\ispyconnect\.
NOTE: We recommend only for advanced computer users, manually edit the registry and remove iSpy because deleting any single registry error leads to a serious problem or even a system crash.
ISpy кейлоггер углубленного
После того, как это вредоносное вложение, которая является по существу погрузчик ISpy’s полезная нагрузка активирована на компьютере она падает полезной нагрузки в затемненный манере с следующие языки, используемые для ита €™ s сжатие:
Кроме того ISpy кейлоггер создает ключ со значением строки предварительно запрограммирован для запуска модуля, который отключает антивирусное программное обеспечение. Целевой ключ является следующее:
→Software MicrosoftWindows NT CurrentVersion параметры выполнения файла изображения
После того, как это было сделано, вредоносная программа ISpy запускает исполняемый файл, который может показаться идентичны официальным rundll32.exe файл.
Для кражи данных с зараженных компьютеров, ISpy кейлоггер использует три хорошо известных протоколов для передачи данных:
Для передачи данных журнала, ISpy также использует ита €™ cipher шифрование s пользовательских создан. Затем он отправляет данные на FTP-аккаунт, который обычно онлайн и принадлежит к кибер преступников. Он имеет полномочия этих учетных записей, которые он использует в сами файлы журнала или вредоносные файлы.
ISpy кейлоггер â €» заключение и инструкции по удалению
Поскольку ISpy является очень мощным и очень скрывали от программного обеспечения безопасности, как обычные и хорошо известных антивирусных программ, очень важно быть осторожным, что вы открываете онлайн. Как правило большинство погрузчиков, являются запутывание и распространения вредоносного по, как ISpy keylogger были заранее запрограммированы, чтобы быть незамеченным от самых известных антивирусных программ во время процесса инфекции.
Кроме того мы подготовили инструкции по удалению ниже которые помогут вам удалить ISpy кейлоггер с вашего компьютера. Но имейте в виду, что это может быть трудно вручную удалить этой вредоносной программы с компьютера, из-за многочисленных скрытых файлов и модулей.
Это основная причина, почему рекомендуется использовать передовые анти Кейлоггеры программного обеспечения, которое предлагает некоммерческих, дискретных и профессиональной защиты для защиты компьютеров от ISpy кейлоггер эффективно. Также рекомендуется использовать передовые анти вредоносного программного обеспечения в сочетании с этим для сканирования вашего компьютера и обнаружить каждый файл и модуль, связанный с вирусом, чтобы удалить его.
Вручную удалить ISpy с вашего компьютера
Внимание! Существенное уведомление об угрозе ISpy : ручное удаление ISpy требует вмешательства системных файлов и реестров. Таким образом это может привести к повреждению вашего ПК. Даже если ваши навыки работы на компьютере не на профессиональный уровень, возлюбленная €™ т беспокоиться. Вы можете сделать удаление всего за 5 минут, используя средство удаления вредоносных программ.
Agent is a standalone replacement for iSpy that runs as a service, uses less CPU and features a web user interface that is accessible from anywhere with no port forwarding required!
We recommend that you use either iSpy or Agent - you can use both but it may cause issues with device drivers and network access.
Installing
Download Agent from here and run the installer. You can choose to run Agent as a windows service or as a console application.
Agent will prompt you to pair with your ispyconnect account and when that is done you can access it from anywhere with an internet connection via the monitor

Important: iSpy and agent both use this portal. If you have both connected to the same account you will need to click to switch to the other portal from your account page. It will look like this:
If you have problems connecting Agent then run Agent.exe in windows and it will start as a console application and should tell you how to connect to it. If it says it is already running as a service then stop the service by clicking start - run and enter "services.msc". Find Agent in the list, right click it and click stop.
Uninstalling
If Agent is running as a service then stop the service (as above) and run agent-uninstall-service.bat in the Agent directory
To uninstall Agent just delete the Agent directory (Agent is a portable application so doesn't install into the add/remove programs list in Windows).
Using Agent
Agent does not have a windows user interface like iSpy does. The user interface is all online via our web portal or mobile applications
Once Agent is connected, login to the web portal (make sure it says "Agent" at the top. If not, click the link on the summary page to switch to the Agent portal). You should see a getting started message. To start adding cameras to Agent click on your server in the menu. Sometimes it might take a few seconds to connect to your server. Once it's successfully connected you should see "connected" or "completed" next to your server on your summary page:

Once it's connected you can then use the Add Device drop-down to start adding cameras:

Using in-built help

Agent has an inbuilt help system. Just ask a question and Agent will tell you how to do it.
Tip: Enter a keyword here to see available options, for example "cloud" or "youtube" (without the quotes).
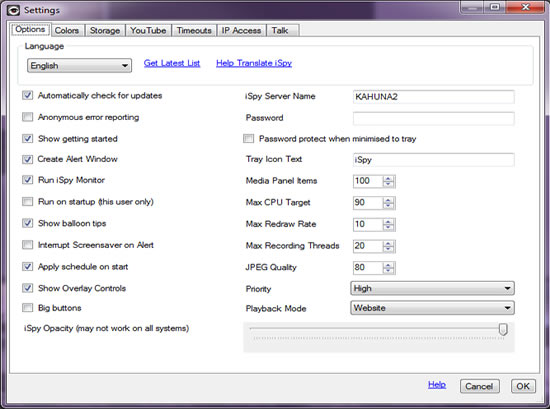
Access the settings panel from the toolbar button "Settings". Within Settings you can set a variety of options including security, storage management, color schemes, youtube account information, storage limits and timeouts. There are some other options that are only accessible from the context menu of the iSpy Surface - like "Fullscreen" and enabling and disabling the file menu, toolbar and status bar.
Languages
Thanks to a small army of volunteer translators iSpy is available in quite a few different languages. Feel free to choose the language you are most comfortable with either on the Getting Started panel (Help-> Getting Started) or within Settings (Options-> Settings). The language will be applied immediately. If you notice any translation mistakes and want to help correct them please let us know (click "Help Translate iSpy").
Password Protection
iSpy sits in your system tray when minimised to be as unobtrusive as possible. If you don't want other users of your computer to be able to control iSpy then set a password here. You can also change the tray icon text here to be something more innocuous than "iSpy".
Opacity
On systems with hardware accelerated graphics you may be able to set an opacity for iSpy - this is useful if you want to watch cameras without other people around you noticing it on your screen.
Colors
You can modify nearly all the colors in iSpy to create your own theme using the Colors tab in settings.
Storage Management
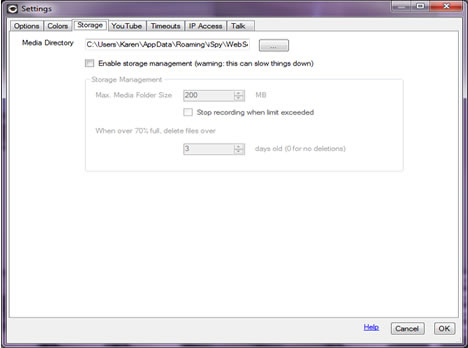
When left for a long time with a lot of cameras iSpy can end up taking up a lot of disk space. Storage Management enables you to set a limit on the size of the directory and automatically delete files to free up space. This does incur some overhead in processing - so we recommend manually using iSpyConnect to bulk delete media files.
The "size of the directory" is the size of all the files in the specified directory and all the sub-directories under that.
The maximum folder size is expressed in MB for those people who want that level of granular control. To express GB in MB just convert it by adding a 3 zeros to the end - i.e. 10GB is expressed as 10000 MB.
The deletion occurs when the amount of storage used is 70% of the maximum storage allotment. Then ispy will start deleting files over x days old until the storage amount falls below 70% of the total allocated.
For example, you have 10 gb of storage configured. You cross 70%. iSpy deletes recordings over x days old (oldest first) and your storage usage drops to 68%. Now storage management will not kick in again until it once again crosses 70% used of the allotted storage. When it does, this process repeats.
For a simple setup, set the storage allotment to whatever amount you want to allocate, then set the days setting to 1. This way it will pretty much ignore the days setting and operate only based on storage space vs storage allotment.
YouTube Synchronisation
iSpy supports both manual and automatic upload to YouTube. This is a great way of backing up your captured content and ensuring that even the theft of your computer won't remove the video of the theives in the act. The movies that are uploaded can be automatically set to private so you won't be broadcasting yourself over the web every time you walk past the camera.
Please note that iSpy doesn't verify your YouTube login information after you enter it here, so please make sure you have entered it correctly. If files are not appearing in YouTube then check the log file as failed uploads will appear in there, along with a reason for the failure.
Timeouts
This section deals with timeouts for MJPEG and the inbuilt iSpy web server. If you are getting frequent timeout errors in your log files then try increasing the relevant value here.
IP Access Control
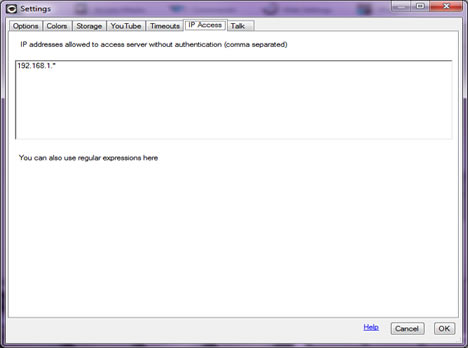
Select the microphone device you want to use when you are talking through cameras or ispyserver computers.
Joystick Support
iSpy can use your USB devices to control Pan/Tilt/Zoom and other functions. Select your joystick on this tab and use your joysticks axes and buttons to setup controls. You can also invert and center axes if you need to.
When using the joystick ensure that the camera control you want to control is highlighted within the iSpy user interface.
Читайте также: