
Как сделать stems в fl studio
For information on exporting stems in FL Studio please read ALL text below and review the step-by-step illustrations.
How To Export Audio Mixdown in FL Studio
Step 1
An eMasterSound Engineer will add the best effect from premium professional hardware and software plugins that out weight the cost to you. So, please remove all effects, compressors, and limiters including all processing when you export your Stems. If you have an instrument or vocal with an effect you would like to keep, you may do so on an FX track but, please remove any limiters on that track. Vocals must be completely dry with no effects, compressors or limiters. Also, make sure you name your Stems accordingly and in order.
Step 2
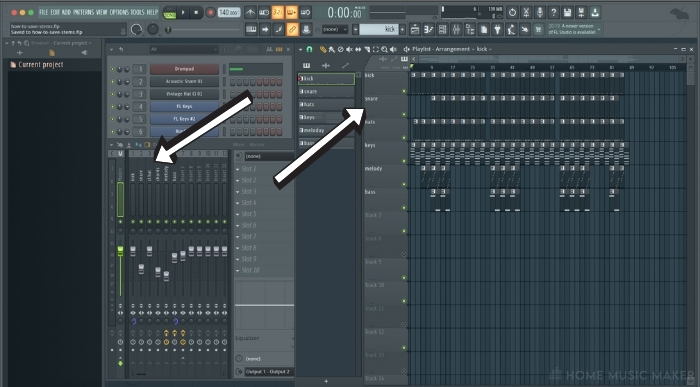
Ensure every track in your song is connected to a separate channel in the mixer. Follow the steps, and take your time to export Stems in FL Studio.
Refer to the image below with the connected this track named “Lex808_1” with channel 9 in the mixer.

Click on the track and then on the box on the right labeled FX, and change the number to a free channel on the mixer.

Great, all the track is connected to a different channel in the mixer.
Step 3
Export Stems
Select the pull-down: File > Export > Wav file

The dialog window will pop up for you to name and save it.
This exporting example is named Tropical Trap.
We recommend creating a new folder, and then name the same as your song name.
Right-click, and create a new folder, and then name it.

Best practices are to use the song name for the title the folder, and then put Stems in it.
Example: the song is Tropical Trap, the folder name is Tropical Trap (stems), and which contains all the exported Stems from Fl Studio in that folder.
Select the folder, and then Save to export your Stems.
Step 4
A window will pop up, then select Split Mixer Tracks.
Note that you can copy the same settings used here.

Step 5
Once you’ve done that, click Start, and you’ll soon be done.
Verify you have a folder with all the separate tracks from your song.
Sometimes i forget to link one track to its own mixer channel, so its missing a folder! Ouch.
Just follow the steps again.
Zip the Folder
If you have no idea what zipping a file means, check out this guide on “how to zip up your files.”
Congratulations!
You Are Ready for Mixing!
Don’t forget to use the same email address you specified during checkout so that we can send you your completed song.
FL STUDIO | In this tutorial we cover Export all Mixer Tracks and Export All Playlist Tracks and consider the benefits of each.. For full details on all the options discussed in this tutorial see this page in the manual.
TRY FL Studio OR BUY FL Studio
(Did you know? | FL Studio includes Lifetime Free Updates)
For more help getting started with FL Studio see this page.
Recent news overview
Fruity Granulizer was updated with the release of FL Studio 20.6 to include a shiny new sample visualization window. We.
Introducing FLkey* 37 & FLkey Mini | The ultimate range of MIDI keyboards for making music in FL Studio. With.
FL STUDIO 20.9.1 released. In response to the great feedback we received to the FL Studio 20.9 we are happy.
Dive into the history of PC multi-sample formats with the SoundFont Player! The SoundFont Player includes everything you need to.
Jayce Lewis | Drumsliced - The sound of a real drumkit in the studio, sliced, multi-miced, multi-layered for FLEX. Play.
Vintage Chorus was introduced with FL Studio 20.9 modelled after the Roland Juno 6's Chorus, known for its warm, analog sound. Vintage.
Pitch Shifter was introduced with FL Studio 20.9 providing a new and creative pitch shifting and formant manipulation effect for.
FL STUDIO 20.9 released delivering the awesome workflow features you have been waiting for. Propel your music into 2022 with.
FL STUDIO | TM88 (FL Studio Power User) - The producer behind hits like Lil Uzi Vert's "XO TOUR Llif3".
FLEX | We are excited to announce Drumful Treasure by WiseLabs. A free FLEX pack for FL Studio owners. Getting.
FL STUDIO Signature Sound | TM88 Track Breakdown - We're excited to open a new FL Studio Signature Sound series.
Visualizer Remix Contest | To celebrate the release of FL Studio 20.8.4, we've teamed up with Arturia, Producer Loops and.
SOUNDS | We asked what content you wanted and we heard you loud and clear. More samples, sounds and sonic.
FL STUDIO 20.8.4 introduced the Frequency Shifter effect. In this tutorial we explain how Frequency Shifting is different from Pitch.
FL STUDIO 20.8.4 | We are excited to announce native support for Apple Silicon CPUs, a new Frequency Shifter effect.
FL STUDIO MIXING | We asked you what tutorial to make next. You said Mixing! This time how reverberation or.
FL STUDIO MIXING | We asked you what tutorial to make next. You said Mixing! Today, the Stereo Imaging or.
FL STUDIO MIXING | We asked you what tutorial to make next. You said Mixing! Today, compression and other dynamics.
We have teamed up with Alan Walker ⚡ and Imanbek ⚡ to bring you the official Sweet Dreams Remix Contest.
FL STUDIO | Many people ask us what fruit is the logo? The original concept was designed by Didier Dambrin.
FL STUDIO EDISON | In part 3 of this 6 part series we cover two useful advanced processing options pitch.
FL STUDIO EDISON | Is the perfect sound design recording tool. The deep integration with FL Studio makes many audio.
FLEX | We are excited to announce two free FLEX libraries for FL Studio owners. Essential Guitars & Essential Bass.
FL STUDIO | With the frequent Covid 19 related lockdowns, online streaming has seen a huge growth over the 2020-2021.
FL STUDIO | Fresh from WiseLabs modular research facility, Analog Excellence FLEX library captures the raw energy of electrons flying.
FL STUDIO 20.8.3 | Free Maintenance Update. Since the 20.8.0 release our team have been busy perfecting your favorite DAW.
2021 Grammy Awards | We'd like to congratulate the FL Studio Grammy Gang on their 2021 success . Hit-boy: Best.
FL STUDIO | Hip hop & Trap is instantly recognizable by it's signature sounds and beat. In this video we.
FL STUDIO 20.8.2 | Mac Apple Silicon (M1 / Rosetta 2) support, improved workflow and free. FL Studio continues its.
FL STUDIO | What's the fastest way to add folders to the Browser? How do you find misplaced samples? Why.
FL STUDIO | Has many hidden gems. None more so than the free Patcher FX presets waiting for your audio.
FL STUDIO | Similar to the Keyboard Controller we covered here. The 'Envelope Controller' also generates automation data to control.
FL STUDIO | The 'Keyboard Controller' generates automation data to control modulation targets (knobs, sliders etc.) from Piano roll or.
FL STUDIO 20.8.1 | Faster, more precise and free. This is a maintenance update that squashes the bugs reported by.
FL STUDIO | In this video we cover the process of 'quantizing' notes, audio and automation. Did you know the.
FL STUDIO 20.8 | Introduced significant upgrades to Fruity Parametric EQ 2. We listened to your feedback bout what you.
FL STUDIO 20.8 | We were excited to introduce two new plugins free for all users - Frequency Splitter and.
FL STUDIO 20.8 | Faster, more precise and free. Get more control over your audio with the new Frequency Splitter.
FL STUDIO | Has an huge array of Audio Editors, creative Tools and Automation Controllers. In this video we take.
FL STUDIO 20.7.3 | Maintenance update. In the third maintenance update for FL Studio 20.7 we're happy to release more.
FL STUDIO | Has so many great instrument plugins it's sometimes hard to know where to start. In this video.
FL STUDIO | Newtime is an audio time-manipulation editor. Slice, warp, time-correct, quantize and groove vocals, instrumentals and other recordings.
FL STUDIO | Mixer Routing Getting Started. If you are new to FL Studio and wondering how routing, sends and.
FL STUDIO | ZGE Visualizer has become a hugely popular go-to-tool for creating music videos. We used it to create.
FL STUDIO 20.7.2 | Workflow enhanced! In the second maintenance update for FL Studio 20.7 we're happy to release a.
Jayce Lewis Studio Drum Tracks brings you the sound of real studio drums to mix into your FL Studio projects. 58.
FL STUDIO | In this tutorial we cover Export all Mixer Tracks and Export All Playlist Tracks and consider the.
We've released another a free FLEX pack to help keep you inspired and creative in your home studios. Please note, this.
FL STUDIO | In this tutorial we show the most important settings when exporting quality audio. For full details on.
FL STUDIO | In this tutorial we're back to basics and show how to work with the new workflow features.
FL STUDIO 20.7.1 | Is a maintenance update with improvements to Newtime, the Video Visualizer, Macros, MIDI Scripting and more (see below).
FL STUDIO 20.7 | Dominate YouTube, Instagram and Facebook with the new Visualizer, enjoy more freedom with unlocked Piano roll note colors and get set for unlimited.
Still locked in? Great, we've released another a free FLEX pack to help keep you inspired and creative in your.
There's nothing like fresh sounds to inspire creativity while you are locked in. We're excited to release FLEX | Atlantis by Black Octopus Sound. Evoke.
The FL STUDIO team encourage you to stay safe while we all ride out the CV-19 pandemic. So, we've released a free.
We're excited to announce the Alan Walker, K-391 and Ahrix ‘End of Time’ remix talent search. Get involved shaping the final track . Click here.
We're always excited about Dancefair, where expert producers share how they create hit tracks. We're gearing up for Dance fair 2020 with.
Phonon Collider FLEX Library by WiseLabs. 320 presets, each with all 8 macros mapped to a whole universe of exciting.
FL STUDIO has topped the MusicRadar Best DAW poll (again). Thanks everyone, for your support. So now it's onwards and upwards into 2020.
We are excited to release the Floor Shakers FLEX Library by SH-1, free to FL STUDIO customers. Just open FLEX and.
FL STUDIO 20.6.1 is a maintenence update to fix the issues reported with FL Studio 20.6. Although, as usual, the team.
Watch the full-length introductory FL Studio 20.6 video here FL STUDIO 20.6 introduces new ways to create Distortion, improved audio Time Warping.
FL STUDIO 20.5 introduced FLEX a free instrument plugin for all FL STUDIO editions. Now we are pleased to release ELECTRONICA by HISTIBE. DOWNLOAD.
FL STUDIO 20.5 introduced FLEX a free instrument plugin for all FL STUDIO editions. We are excited to release a new FREE FLEX library.
We are proud to release Eleanor Vocals Resynthesized for Harmor. Following our acclaimed Elle Vee, Victoriya, Tevlo, Veela & Lollievox Vocals.
We just concluded our annual developers conference, where we take time out from the daily routine to brainstorm the future.
Stems are simply audio files of each individual track or bus in your DAW. Exporting stems to audio can be helpful when sending your project to a professional mixing or mastering engineer. In this tutorial, you’ll learn how to export stems in FL Studio. Let’s get started!
Step 1: Proper Mixing
In order for you to successfully export stems in FL Studio, you’ll need to make sure you’ve properly routed the signals in your project. Each instrument, generator plugin, and audio sample used in the project will need its own Mixer track. From there, you can route them to busses which will form the stem files when rendered.
Make sure they are labeled properly in the Mixer. These will eventually become the stem file names. Refer to this tutorial on the Mixer for more information on Mixer track routing.

OCD is an advantage here…
Step 2: Stem Export Settings in FL Studio
Now that we’ve organized everything in the Mixer, let’s tell FL Studio where to send our stems and tweak our export settings:
Now, a window opens with rendering options. These settings are important!

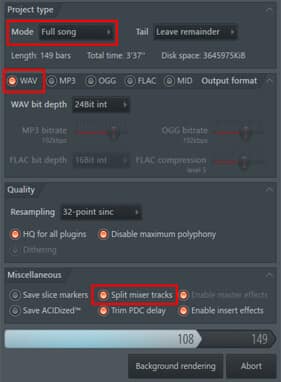
Project Type
- Set Mode to Full song – we want to export the stems for the entire length of the song.
- Set Tail to Leave remainder – this will continue the render length to capture decaying sounds such as reverb or delay at the end of the song.
Output Format
- The file type and format you should use will usually be .WAV at 24-bit resolution. 24-bit is the standard resolution for recording audio, and many mixing and mastering engineers would expect to receive your stems in 24-bit. That being said, there are some cases where you’d want to export to 32-bit – the best thing to do is ask your engineer!
- 32-bit is technically more accurate of a render and has a greater dynamic range, but the floating-point formats used can vary from DAW to DAW and you may run into compatibility issues.
Stem Export Quality
- The recommended setting for Resampling of audio during rendering is 64-point Sinc. Higher values will increase the quality, but also take longer to render your stems.
- HQ for all plugins should be checked
- Leave dithering unchecked – we’ll use this only for the final render if it’s even needed
Miscellaneous
- Split mixer tracks is arguably the most important setting for exporting stems in FL Studio. This setting creates your stems from each Mixer track. Make sure it’s checked.
- Save tempo information is also useful when exporting stems from FL Studio to another DAW. Make sure it’s checked, too.
Now, just hit the Start button and FL Studio will start crunchin’ numbers. Once the stem export is complete, you’ll hear a little jingle.
All that’s left to do is navigate over to your folder and choose which stems you want to keep. Usually, the mix engineer will set a limit on the number of stems you can send them. This is the time to be selective.
We hope you love the products we recommend. We may collect a small commission if you purchase through one of our links. This will not cost you anything extra. Thank you if you do. As an Amazon Associate, I earn from qualifying purchases.
To export stems in FL Studio, select the track you wish to export and click on the File menu at the top of the screen. Then select Export. Stems are usually one single instrument in a song as opposed to the entire song itself.
Exporting Stems In FL Studio
Engineer: “Can you send over the stems?”
Producer: “What are stems?”
Engineer: *mutes phone*
Engineer: *screams* “FOR THE EVER LOVING LOVE OF STEMS. ”
One of the most frustrating things about working on music in the modern world is not having entire, high-quality stems for a song. This is especially the case when working with another artist.
Stems are pivotal pieces of a song. They are one long audio file, usually exported/saved as a .wav; generally, each instrument in a track will be represented by one stem.
This tutorial will show you how to create and save stems, either one at a time or all at once in your FL Studio project.
What You Will Need To Follow This Tutorial
- FL Studio 12 or higher
- Computer with peripherals to control the FL Studio User Interface
- Time, motivation, patience, and attention
Before we start, let’s quickly go over what a stem is. If you already know this, then skip on to step one.
What is a stem?
A stem is usually one long audio file saved in .wav format. That’s it, that’s all.
The way stems are used, and referred to, is really what makes them unique.
The word “stem” used in the audio production and engineering world is a terminology that’s industry standard. This language helps people working together on a song understand that everyone is talking about the same thing.
As a producer matures and begins creating full songs, the organization of a project becomes critical.
Naming instruments, tracks, samples, loops, channels, busses, and so on is essential for individual producers and is paramount when more than one person collaborates on a song.
Generally speaking, a song consists of a handful of instruments, including drum elements, vocals, etc.
What We Are Doing When Saving Stems
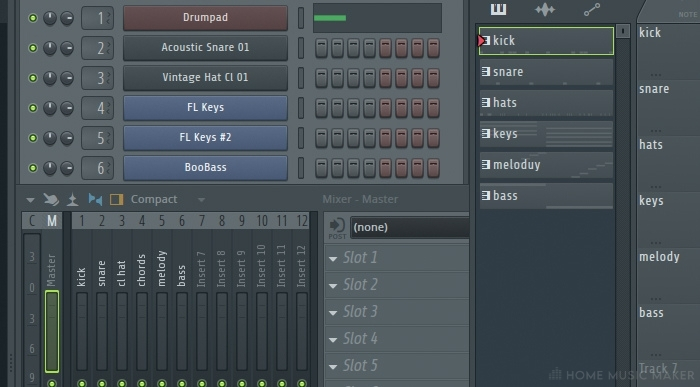
I’m going to use the format of a simple song that contains a kick, snare, hi-hats, piano chords, piano melody, and a bassline.
If you’re working with an existing project, try to mentally map this overall basic framework to the elements in your song. You most likely have some similar combination.
The most important thing to remember is group and organize similar pieces if you have multiple melodies for a single instrument.
You’ll do this by routing to a bus or manually exporting specific tracks in conjunction with one another.
There’s a balance that is learned over time regarding how to organize your stems on a granular level.
A key thing to remember is to keep the song elements grouped and named, so the person receiving the stems will understand how the project elements fit together to form the complete song.
This is the power of stems, portability of complete projects from one person to another.
The technical bits to follow are pretty straightforward and are purely a function of the DAW. The organization and naming of track elements require a human touch.
Step By Step Instructions On How To Export Stems From FL Studio
Step 1 – Open An FL Studio Project That Has Multiple Tracks And Channels
This is a close-up of the completed example FL Studio Project. A simple song, but there are several vital practices used that you’ll need to adopt in some form for your songs.
Notice how each Track in the Playlist and each Insert or Track in the Mixer are named according to their contents.
Each instrument will be routed to a mixer track, and each mixer track will be exported as a stem.
The name of the .wav file exported from FL Studio will match the name you used for the mixer track.
So not only does this help stay organized when you’re working on the project.
When you export all the mixer tracks at once, you’ll know what each of the .wav files contains just by looking at their names.
Step 2 – Route Every Channel You Want to be Exported As A Stem To The Mixer
When you add an instrument, it will be assigned to the master track.
You need to change this so that each instrument is mapped to a unique mixer track.
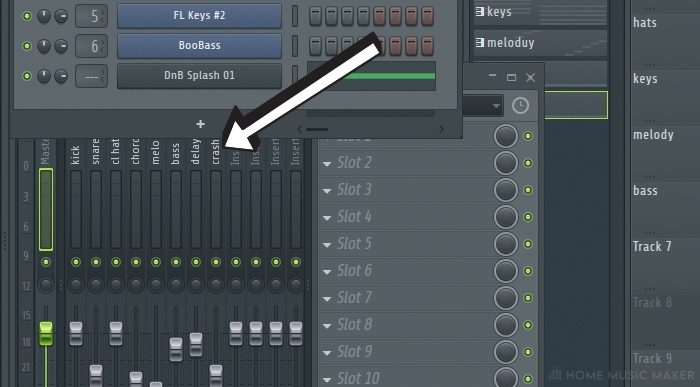
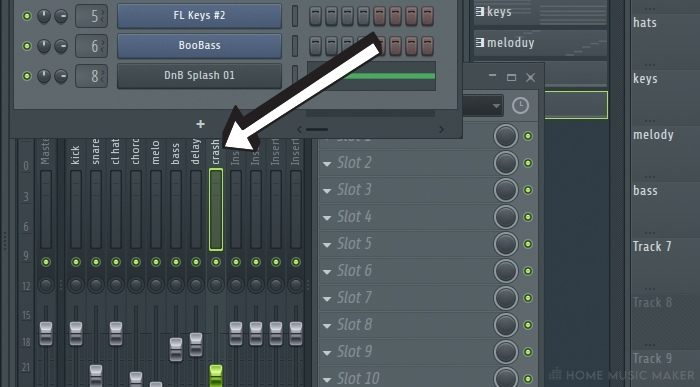
I’ve added a new crash cymbal to the project.
Notice how I named the track in the Playlist and the slot in the mixer that I’m planning on targeting with this new instrument.
The mixer track name is going to be the name of the stem file.
I’m going to show you how to do this in the next step. For now, get this process into your mind. Naming the different parts of the song is essential for many reasons.
Here is the new cymbal instrument added to the project.
The mixer track that’s targeted is the Master track.
We don’t want that; we want each instrument saved to its own stem.
Do this by changing the mixer track that’s assigned to this channel.
Hover your mouse above the — and use the mouse wheel to scroll to the desired mixer track.
You can also click, hold and mouse up or down to select a mixer track.
Again, assign each instrument or channel to a unique mixer track.
Later, as you learn more about how this works, you may route two instruments to an individual track.
Remember that those two instruments and anything you play with them will be rendered into one single .wav file stem.
You may have routing set up for your existing project. That’s fine. Just ensure that you’ll be saving each of the targeted mixer tracks as a stem file. You may want to make changes to your project at this time.
The goal here is to separate the different elements of the song to separate stem files so the song can be reassembled by another producer quickly following this format.
Some typical stems would contain all of the kicks or the snares or claps of a song.
Following this convention further, the bass, piano melody, and main chord progressions would also be stems.
I’ll show you how to reassemble the track later in the article, and if none of this is making sense, it should come together for you at that point.
pro tip
You may have noticed I skipped mixer track seven. I’ve used that for my delay bus!
You can route instruments to this track on the mixer, and the effect will be rendered into its own stem file.
This separates the wet instrument from the dry.
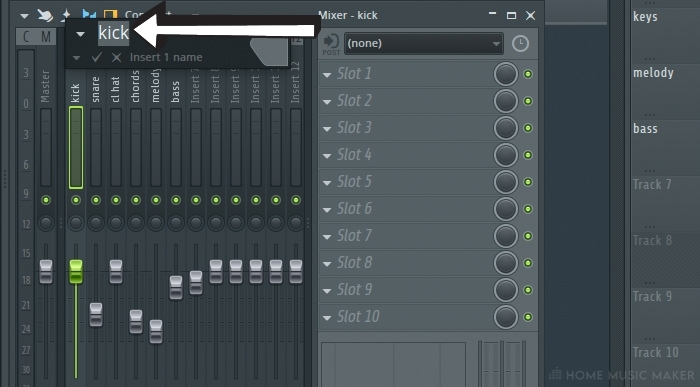
Step 3 – Name Each Mixer Track
Right-click on the Mixer track and then select Rename.
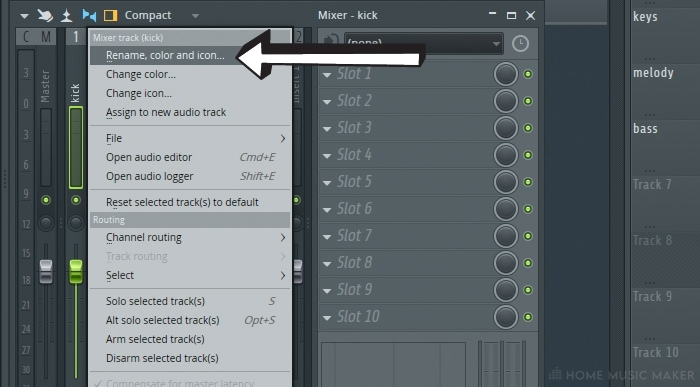
Enter a name that’s relevant to the song element related to this sound.
Repeat this process for every mixer track.
important
Remember the names used here will also be the name of the audio file that FL Studio will save..
Step 4 – Export The Stems Manually Or Batch Process
If you want a single stem of a single instrument, you can mute all tracks that you don’t want to be heard in the stem.
You can also combine multiple tracks into a single stem using this technique.
To view this video please enable JavaScript, and consider upgrading to a web browser that supports HTML5 video

Сохраненные дорожки композиции позволяют детально обработать их при сведении и мастеринге музыки. Передача рабочих проектов (в исходном состоянии) - не всегда эффективно в силу широкого спектра используемых плагинов/синтезаторов/эффектов, а также программ, доступных на рынке. Мы собрали базовые инструкции по быстрому решению данного вопроса.
Извлечь дорожки можно двумя способами:
- Ручной: выделите каждую дорожку с помощью кнопки "S" (solo) и экспортируйте в заданном формате путем стандартного сохранения аудио. Это требует некоторого времени, но также эффективно как и программное извлечение. При небольшом объеме, может выступать как основной и самый простой метод.
- Программный: современные DAW программы поддерживают экспорт дорожек, с сохранением обработок и эффектов (их предварительно необходимо отключить, если они не являются художественными авторскими идеями). Рассмотрим прямые пути среди самых популярных рабочих станций (будем обновлять по мере поступления запросов).
Важно заметить, дорожки экспортируются в том виде и формате, который Вы установили, потому для сведения и мастеринга, снимите все обработки, кроме автоматизации и FX. Полученный пак материалов, достаточно заархивировать, затем загрузить на любой файло-обменник (или прикрепить документом к электронному письму) и прислать в нам через контактную форму! Исходя из конечного объема, можно самостоятельно просчитать стоимость за работу в калькуляторе дорожек , отметив дополнительные услуги.
File -> Export -> Wave file. -> Создайте отдельную папку под дорожки проекта -> В выпавшем меню установите следующие значения: Mode = Full Song; Формат = wav; Битрейт = согласно тому, в котором трек создавался; В разделе Miscellaneous установить галочку на "Split mixer tracks" и нажать "Start", после чего программа самостоятельно извлечет материалы в должном виде.
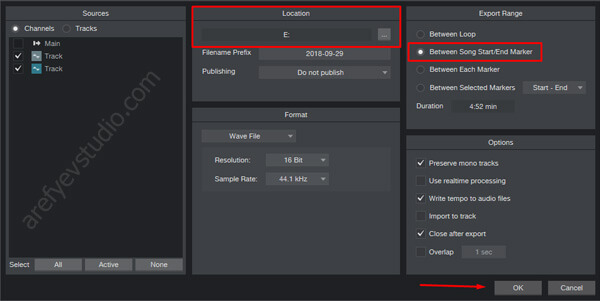
Установите маркеры на начало и конец композиции (учитывая затухающие хвосты реверберации и отражений, если они присутствуют). Затем: Song -> Export stems. -> В области Export Range выберите "Between Song Start/End Marker" -> Локацию сохранения -> OK.
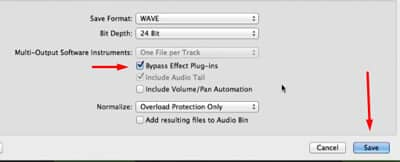
File -> Export -> All tracks as audio files. -> Создайте папку под материалы -> Установите значение "Bypass Effect Plug-ins" (прочие оставьте деактивированными) -> Normalize: Overload Protection Only -> Save.
File -> Export Audio/Video -> значение Rendered Track с "Master" необходимо сменить на "All Individual Tracks" -> Export (остальные настройки оставляем незатронутыми).
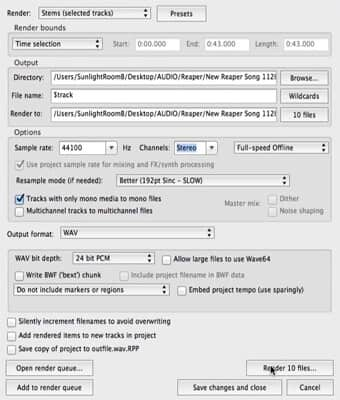
Данная программа представляет собой наиболее углубленный/сложный метод извлечения дорожек. Пошагово:
- File -> Render. (или горячие клавиши: Ctrl+Alt+R).
- В выпавшему меню, значение Sourse с "Master Mix" сменить на "Stems (selested tracks)".
- В Bounds (в ранних версиях программы - Render Bounds) - установите "Time Selection".
- В Directory выберите локацию сохранения материала, создав отдельную папку;
- В File name укажите "$track".
- Кнопка - Render ** file.
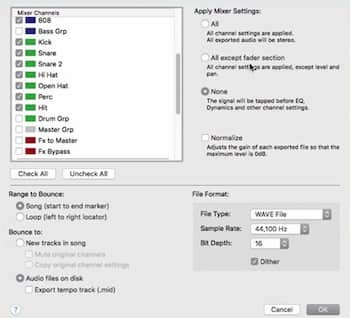
Установите маркеры на начало и окончание композиции. Затем: File -> Bounce Mixer Channels -> В окне "File Format" выберите Wave file; Под окном "Mixer Channels" нажмите Check All (выбрать все); В "Apply Mixer Settings" - All (сохранение с эффектами) / None (без эффектов) -> OK -> Выбор локации сохранения дорожек -> Choose. Готово!
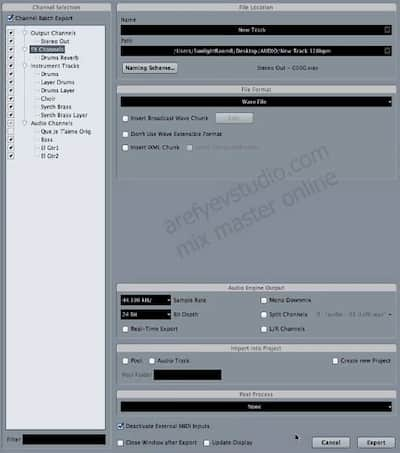
Перед сохранением, установите маркеры с первой до последней секунды проекта. Путь: File -> Export -> Audio Mixdown. -> поставьте галочку на Channel Batch Export (чтобы активировались все инструменты и дорожки) -> Установите название и папку сохранения -> Формат = Wave File -> Все остальные чекбоксы оставьте пустыми (кроме Deactivate External MIDI Inputs) -> Export.

File (в левом верхнем углу) -> Track Bouncing -> во вкладке Routing сменить "Master" на "All" -> OK -> Выбор локации сохранения -> OK.
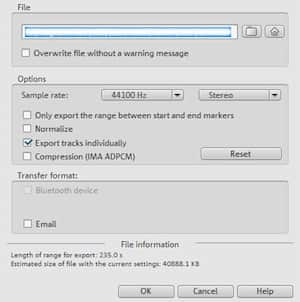
File -> Export -> Audio tracks as single WAV files -> В опциях необходимо убрать все чекбоксы, кроме "Export tracks individually -> Выберите папку для сохранения -> OK. Готово! Программа сама пронумерует поочередно все активные дорожки.
Читайте также: