
Как сделать спич бабл в фотошопе
A common addition that you might need to make to an image in Photoshop is the addition on some text. You might even need to make it look like someone is saying that text. Therefore you may need to know how ot create a speech bubble in Adobe Photoshop.
While there are a lot of very talented artists that can draw and create almost anything in Photoshop, some of us just don’t have that gift to be able to freely draw on a computer screen. This can extend to even very basic shapes, like a speech bubble.
Every time that I have tried to manually draw a speech bubble, it either looks like a balloon or some weird cloud. Fortunately there is a custom shape tool in Photoshop CS5 that can help to solve this specific problem. So continue reading our brief tutorial below to learn how to create a speech bubble in Photoshop CS5.
How to Create a Speech Bubble in Adobe Photoshop
- Open your image.
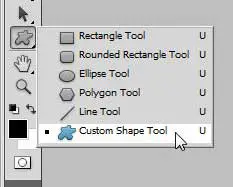
- Right-click the Shape Tool and choose Custom Shape Tool.
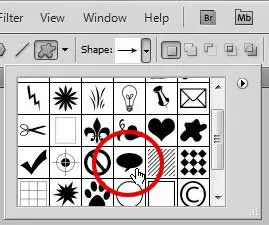
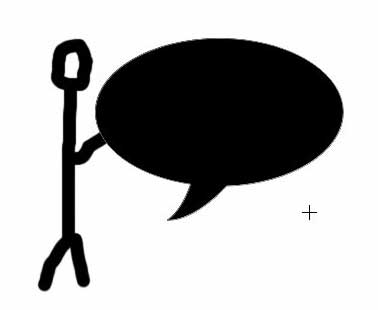
- Choose the Shape dropdown and select the speech bubble.
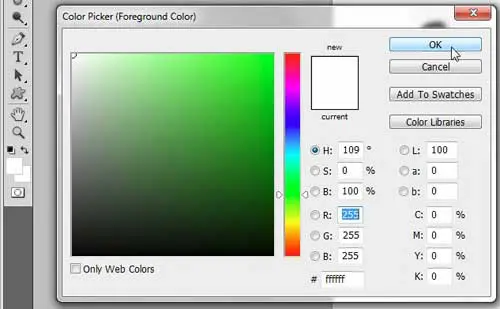
- Click the Foreground Color box, choose a color, then click OK.
- Draw the speech bubble on the canvas.
- Select the Move tool and position the speech bubble.
- Click the Type Tool.
- Adjust the Font settings.
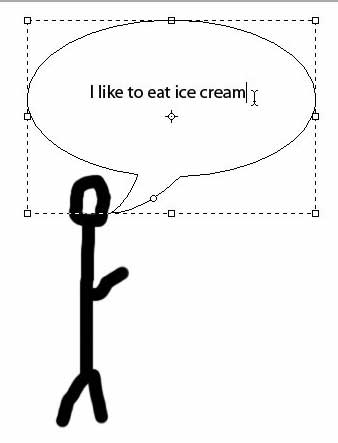
- Click inside the bubble and add your text.
Our article continues below with additional information on adding a speech bubble in Photoshop, including pictures of these steps.
How to Make Photoshop CS5 Speech Bubbles (Guide with Pictures)
I am going to be writing this tutorial with the assumption that you want to create a white speech bubble with black text. If not, then you can simply choose a different foreground color for your speech bubble and a different text color for the words that you are putting inside of the speech bubble before you create each respective element.
Step 1: Open the image to which you want to add a speech bubble.
Step 2: Right-click the Shape tool in the toolbox at the left side of the window, then click the Custom Shape Tool option.
Step 3: Click the drop-down menu to the right of Shape in the toolbar at the top of the window, then click the Speech Bubble option.
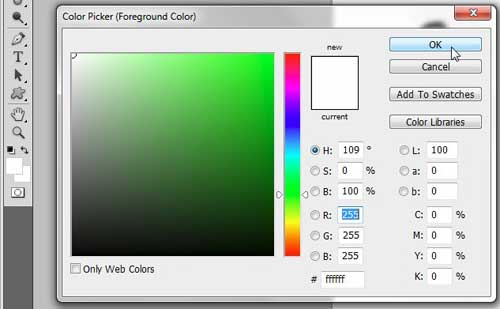
Step 4: Click the Foreground Color box in the toolbox at the left side of the window, click the top-left corner of the color picker to choose the color white, then click the OK button.
Step 5: Click near the location in your image where you want to insert the speech bubble, then drag your mouse to expand the size.
You don’t need to worry too much about being exact with your location, as Photoshop automatically creates the shape on its’ own layer, which allows you to freely move it.

Step 6: Click the Move Tool icon at the top of the toolbox, the click your speech bubble and drag it to the desired location.
Step 7: Click the Type Tool in the toolbox.
Step 8: Choose your font settings using the options in the toolbar at the top of the window.

Step 9: Click inside the speech bubble, then type the text that you want to add.
Depending upon the shape and size of your speech bubble, you may need to add some line breaks and spaces to properly position your text. You can move to a new line by pressing Enter on your keyboard, and you can add spaces by pressing the spacebar.
Be sure to save your image once you have finished customizing your speech bubble.
Are you having trouble figuring out how to go back and change the font on text that you have already created in Photoshop? The instructions in this tutorial can be helpful in pointing out the steps that you need to follow in order to edit and customize existing text layers.
Is your computer struggling to run Photoshop as smoothly as you would like? Maybe it’s time to upgrade to a new laptop. There are a number of options available that are both affordable and powerful, including this one available at Amazon.
Additional Sources
Matthew Burleigh has been writing tech tutorials since 2008. His writing has appeared on dozens of different websites and been read over 50 million times.
After receiving his Bachelor’s and Master’s degrees in Computer Science he spent several years working in IT management for small businesses. However, he now works full time writing content online and creating websites.
His main writing topics include iPhones, Microsoft Office, Google Apps, Android, and Photoshop, but he has also written about many other tech topics as well.


In the following Quick Tip you will learn how to create your own vector speech bubbles set. This tutorial is for beginners and will teach you basic shape building techniques in Illustrator plus some neat tricks to use with the Appearance panel. Let's get started!
Step 1
Create a 750 by 250px, RGB document. First, enable the Grid (View > Show Grid) and the Snap to Grid (View > Snap to Grid). Next, you'll need a grid every 5px. Go to Edit > Preferences > Guides > Grid, enter 5 in the Gridline every box and 1 in the Subdivisions box. You can also open the Info panel (Window > Info) for a live preview with the size and position of your shapes. Do not forget to replace the unit of measurement to pixels from Edit > Preferences > Unit > General. Al these options will significantly increase your work speed.


Step 2
Pick the Rectangle Tool (M) and create a 175 by 105px shape. Fill it with R=247 G=148 B=30 and go to Effect > Stylize > Rounded Corners. Enter a 30px radius, click OK and go to Object > Expand Appearance.


Step 3
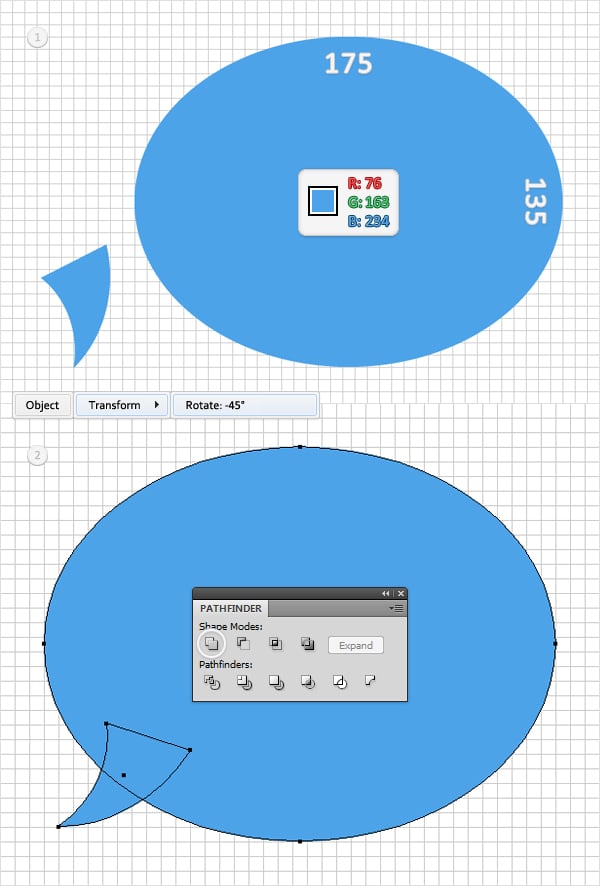
Continue with the Rectangle Tool (M), create a 30px square and fill it with the same orange color (R=247 G=148 B=30). Switch to the Direct Selection Tool (A) and focus on this new shape. Select the bottom anchor points and go to Object > Path > Average. Check the Both button and click OK.
Now, your square should turn into a triangle. Select it and go to Effect > Warp > Arc. Enter the data shown below, click OK and go to Object > Expand Appearance. Select the resulting shape and make a copy in front (Control + C > Control + F). Go to the Layers panel, find this copy and click on the little eye icon from the left. This will make your copy invisible. You'll need this copy later.


Step 4
Select the visible shape created in the previous step and place it as shown in the first image. The Snap to Grid will ease your work. Reselect the two, visible shapes and click on the Unite button from the Pathfinder panel.


Step 5
Pick the Ellipse Tool (L), create a 175 by 135px shape and fill it with R=76 G=163 B=234. Move to the Layers panel, find that invisible shape and turn it back to visible. Select it, replace the orange with R=76 G=163 B=234 and go to Object > Transform > Rotate. Enter a -45 degrees angle and click OK.
Place the resulting shape as shown in the second image. Again, the Snap to Grid will ease your work. Reselect the two, blue shapes and click on the Unite button from the Pathfinder panel.

Step 6
Pick the Ellipse Tool (L) and draw the seven ellipses shown in the first image. Once again, the Snap to Grid will ease your work. Fill them with R=57 G=181 B=74, Unite them and turn them into a compound path (Object > Compound Path > Make).


Step 7
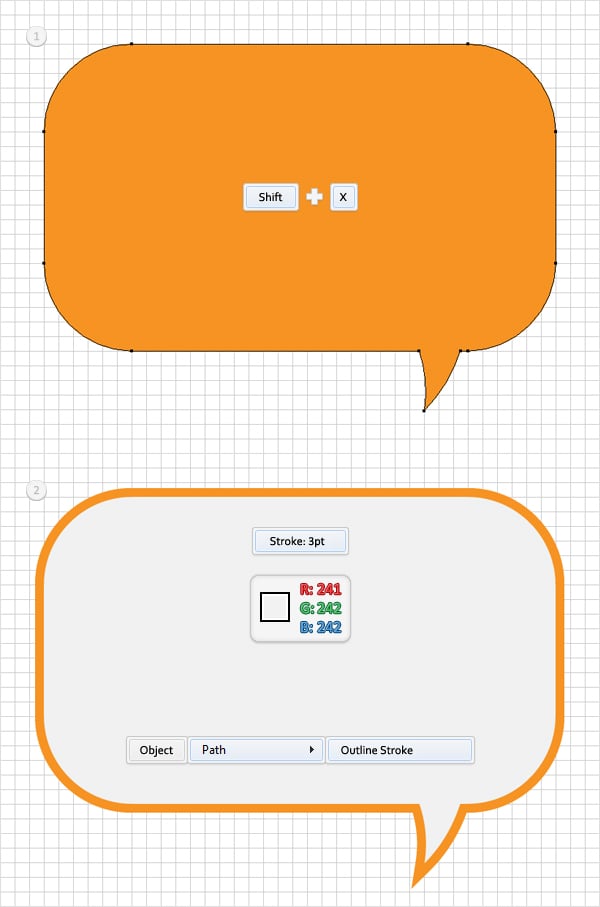
Return to the orange shape. Select it and press Shift + X. This will transfer the color properties from the fill to the stroke. Go to the Appearance and you should find a fill of none and a 1pt stroke. Select the stroke, align it to outside and increase the size to 3px then add R=241 G=242 B=242 for the fill.
Now, your shape should look like in the second image. Make sure that it's still selected and go to Object > Path > Outline Stroke. Go to the Layers panel and you will find a new group with two separate shape. One is the fill and the other the stroke.

Step 8
First, focus on the light grey shape. Select it and make two copies in front (Control + C > Control + F > Control + F). Select the top copy and hit the down arrow once. Thanks to the Snap to Grid your shape will move 5px down. Reselect both copies and click on the Minus Front button from the Pathfinder panel. Fill the resulting shape with white.


Step 9
Disable the Snap to Grid (View > Snap to Grid) then go to Edit > Preferences > General and make sure that your Keyboard Increment is set at 1px. Reselect the light grey shape and make two new copies in front (Control + C > Control + F > Control + F). Select the top copy and hit the left arrow and the top arrow twice. Reselect both copies and click on the Minus Front button from the Pathfinder panel. Fill the resulting shapes with R=209 G=211 B=212 and turn them into a compound path (Object > Compound Path > Make).


Step 10
Reselect the light grey shape and make two new copies in front (Control + C > Control + F > Control + F). Select the top copy and hit the left arrow and the top arrow five times. Reselect both copies and click on the Minus Front button from the Pathfinder panel. Fill the resulting shapes with R=230 G=231 B=232 and turn them into a compound path (Object > Compound Path > Make).


Step 11
Reselect the light grey shape and go to Effect > Stylize > Drop Shadow. Enter the data shown below and click OK.


Step 12
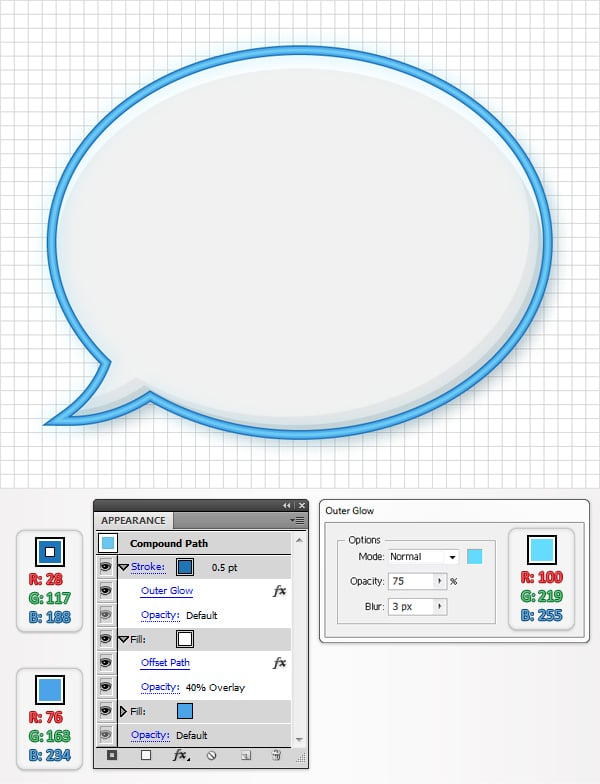
Move to the orange shape. Select it, go to the Appearance panel and click on the Add New Fill button (the little white square icon). Select this new fill, make it white, lower its opacity to 40% and change the blending mode to Overlay then go to Effect > Path > Offset Path. Enter a -1px Offset and click OK. In the end your path should look like in the following image.


Step 13
Keep focusing on the orange shape. Reselect it, go to the Appearance panel and add a stroke. Make it 0.5pt wide, set the color at R=241 G=90 B=41 and go to Effect > Stylize > Outer Glow. Enter the data shown below and click OK.


Step 14
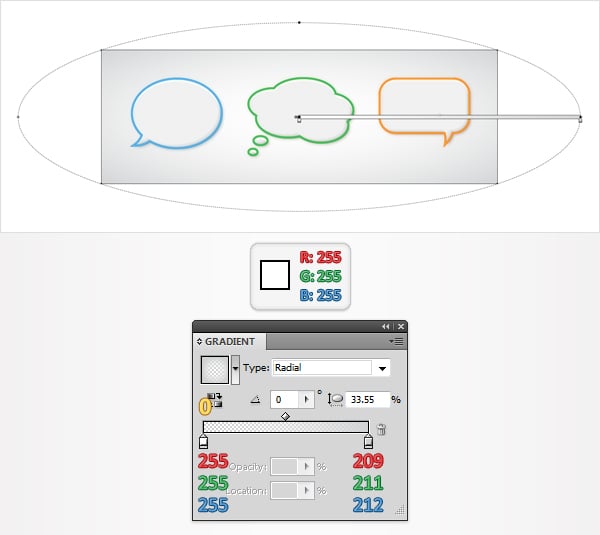
Move to the blue shape and repeat the techniques used in the last seven steps. You will only need to change the colors of the expanded stroke. In the following image you can find all the information that you'll need.

Same for the green shape.


Step 15
Finally, you can add a nice background for your speech bubbles. Pick the Rectangle Tool (M) and create a shape the size of your artboard. Fill it with white then add a second fill and use the radial gradient shown below. The yellow zero from the gradient image stands for opacity percentage.

Step 16
Reselect the shape created in the previous step and add a third fill. You will need a nice, built-in pattern for this final fill. Go to the Swatches panel, open the fly-out menu and go to Open Swatch Library > Patterns > Basic Graphics > Basic Graphics_Textures. This will open a new window with a nice set of built-in pattern.
Make sure that your background rectangle is still selected, go to the Appearance panel and select that final fill. Lower its opacity to 7%, use the USGS 19 Land Inundation pattern and go to Effect > Artistic > Film Grain. Enter the data shown below, click OK and you're done.


Conclusion
Now your work is done. Here is how it should look. Play around with some of the Appearance settings to come up with styles of your own. I hope you enjoyed this tut.

Хотя есть много очень талантливых художников, которые могут рисовать и создавать практически все в Photoshop, у некоторых из нас просто нет такого дара, чтобы свободно рисовать на экране компьютера. Это может распространяться даже на очень простые формы, такие как речевой пузырь. Каждый раз, когда я пытался нарисовать речевой пузырь вручную, он выглядит как воздушный шар или какое-то странное облако. К счастью, в Photoshop CS5 есть специальный инструмент для создания фигур, который может помочь решить эту конкретную проблему. Поэтому продолжайте читать наш краткий учебник ниже, чтобы узнать, как создать речевой пузырь в Photoshop CS5.
Photoshop CS5 Речевые пузыри
Я собираюсь написать этот урок с предположением, что вы хотите создать белый речевой пузырь с черным текстом. Если нет, то вы можете просто выбрать другой цвет переднего плана для вашего речевого пузыря и другой цвет текста для слов, которые вы помещаете в речевой пузырь, прежде чем создавать каждый соответствующий элемент.
Шаг 1: Откройте изображение, к которому вы хотите добавить речевой пузырь.
Шаг 2: Щелкните правой кнопкой мыши «форма» инструмент на панели инструментов в левой части окна, затем нажмите кнопку «Пользовательский инструмент Shape» вариант.
Шаг 3: Нажмите раскрывающееся меню справа от «форма» на панели инструментов в верхней части окна, затем нажмите «Диалоговое окно» вариант.

Шаг 4: Нажмите «Цвет переднего плана» на панели инструментов в левой части окна, щелкните в верхнем левом углу палитры цветов, чтобы выбрать белый цвет, затем нажмите «Хорошо» кнопка.
Шаг 5: Нажмите рядом с местом на изображении, куда вы хотите вставить речевой пузырь, затем перетащите мышью, чтобы увеличить размер. Вам не нужно слишком беспокоиться о точности своего местоположения, поскольку Photoshop автоматически создает фигуру на собственном слое, что позволяет свободно перемещать ее.
Шаг 6: Нажмите «Переместить инструмент» Значок в верхней части панели инструментов, нажмите на пузырь речи и перетащите его в нужное место.
Шаг 7: Нажмите «Тип инструмента» в наборе инструментов.
Шаг 8: Выберите настройки шрифта, используя параметры на панели инструментов в верхней части окна.

Шаг 9: Кликните внутри речевого пузыря, затем введите текст, который вы хотите добавить. В зависимости от формы и размера речевого пузыря может потребоваться добавить несколько разрывов строк и пробелов, чтобы правильно расположить текст. Вы можете перейти на новую строку, нажав «Войти» на клавиатуре, и вы можете добавить пробелы, нажав «пробел»,

Обязательно сохраните изображение, как только вы закончите настройку речевого пузыря.
У вас есть проблемы с поиском, как вернуться и изменить шрифт текста, который вы уже создали в Photoshop? Инструкции в этом руководстве могут быть полезны при указании шагов, которые необходимо выполнить, чтобы редактировать и настраивать существующие текстовые слои.
Ваш компьютер пытается запустить Photoshop так гладко, как хотелось бы? Возможно, пришло время перейти на новый ноутбук. Существует целый ряд доступных и мощных опций, в том числе этот на Amazon.
Обычным дополнением, которое вам может потребоваться внести в изображение в Photoshop, является добавление текста. Возможно, вам даже понадобится сделать так, чтобы это выглядело так, будто кто-то произносит этот текст. Поэтому вам может потребоваться узнать, как создать речевой пузырь в Adobe Photoshop.
Хотя есть много очень талантливых художников, которые могут рисовать и создавать в Photoshop практически все, что угодно, у некоторых из нас просто нет этого дара, чтобы иметь возможность свободно рисовать на экране компьютера. Это может распространяться даже на самые простые формы, такие как речевой пузырь.
Каждый раз, когда я пытался вручную нарисовать речевой пузырь, он выглядел либо как воздушный шар, либо как какое-то странное облако. К счастью, в Photoshop CS5 есть инструмент нестандартной формы, который может помочь решить эту конкретную проблему. Так что продолжайте читать наш краткий урок ниже, чтобы узнать, как создать речевой пузырь в Photoshop CS5.
Как создать речевой пузырь в Adobe Photoshop
- Откройте ваше изображение.
- Щелкните правой кнопкой мыши инструмент «Форма» и выберите «Пользовательская форма».
- Выберите раскрывающийся список «Форма» и выберите облачко с текстом.
- Щелкните поле «Цвет переднего плана», выберите цвет и нажмите «ОК».
- Нарисуйте пузырек с речью на холсте.
- Выберите инструмент «Перемещение» и разместите пузырек с текстом.
- Щелкните инструмент «Текст».
- Настройте параметры шрифта.
- Щелкните внутри пузыря и добавьте свой текст.
Наша статья продолжается ниже с дополнительной информацией о добавлении пузыря речи в Photoshop, включая изображения этих шагов.
Как сделать пузыри речи в Photoshop CS5 (Руководство с изображениями)
Я собираюсь писать этот урок, предполагая, что вы хотите создать белый речевой пузырь с черным текстом. Если нет, то вы можете просто выбрать другой цвет переднего плана для своего речевого пузыря и другой цвет текста для слов, которые вы помещаете внутри речевого пузыря, прежде чем создавать каждый соответствующий элемент.
Шаг 1: Откройте изображение, к которому вы хотите добавить пузырек речи.
Шаг 2. Щелкните правой кнопкой мыши инструмент «Фигура» на панели инструментов в левой части окна, затем выберите параметр «Инструмент нестандартной формы».


Шаг 4: Щелкните поле «Цвет переднего плана» на панели инструментов в левой части окна, щелкните верхний левый угол палитры цветов, чтобы выбрать белый цвет, затем нажмите кнопку «ОК».


У вас возникли проблемы с определением, как вернуться и изменить шрифт текста, который вы уже создали в Photoshop? Инструкции в этом руководстве могут быть полезны, указывая шаги, которые необходимо выполнить, чтобы редактировать и настраивать существующие текстовые слои.
Ваш компьютер изо всех сил пытается запустить Photoshop так плавно, как вам хотелось бы? Может пора перейти на новый ноутбук. Существует ряд доступных по цене и мощных опций, в том числе этот, доступный на Amazon.
Auto-suggest helps you quickly narrow down your search results by suggesting possible matches as you type.
- Home
- Photoshop ecosystem
- Discussions
- How can I Add a Speech Bubble in Pictures?
/t5/photoshop-ecosystem-discussions/how-can-i-add-a-speech-bubble-in-pictures/td-p/5385887 Aug 07, 2013 Aug 07, 2013
Copy link to clipboard
When I surf the Internet, I find a back-to-school promotion of Moyea , it requires me to add speech bubbles to the picture.
But I'm white-hand on PS, so how can I add speech bubble to a picture? Could you please help me?
Be kind and respectful, give credit to the original source of content, and search for duplicates before posting. Learn more
1 Correct answer
Hi KilLWeBbeR,You don't have to draw anything at all if you use the Custom Shape tool in Photoshop:With the tool selected, choose the speech bubble option from the "Shape" selection in the top part of the Application frame:Then just drag out a speech bubble and you are done!
Copy link to clipboard
You can use custom shapes tool and draw any type of speak bubble using it.
Be kind and respectful, give credit to the original source of content, and search for duplicates before posting. Learn more
Copy link to clipboard
Be kind and respectful, give credit to the original source of content, and search for duplicates before posting. Learn more
Copy link to clipboard
There are many ways you can add speech bubbles. One way is to draw your own using the shape tools; another way is importing an image of a standard empty bubble and adding your own text.
Here is a detailed tutorial demonstrating one way you can create bubbles: Photoshop Speech Bubble Tutorial - Youtube.
Be kind and respectful, give credit to the original source of content, and search for duplicates before posting. Learn more
Copy link to clipboard
You don't have to draw anything at all if you use the Custom Shape tool in Photoshop:
With the tool selected, choose the speech bubble option from the "Shape" selection in the top part of the Application frame:
Then just drag out a speech bubble and you are done!
Be kind and respectful, give credit to the original source of content, and search for duplicates before posting. Learn more
Copy link to clipboard
Thank you for your detailed tutorial. Really appreciate it!
That's exactly the speech bubbles I need.
[spam link removed]
Thank you again!
Be kind and respectful, give credit to the original source of content, and search for duplicates before posting. Learn more
Copy link to clipboard
Glad to have helped, but please do not use this forum as a place to spam links to your websites.
Be kind and respectful, give credit to the original source of content, and search for duplicates before posting. Learn more
Copy link to clipboard
Thanks, I watched the video and it was really helpful!
[spam link removed]
Thank you again!
Be kind and respectful, give credit to the original source of content, and search for duplicates before posting. Learn more
Copy link to clipboard
My CS6 (V 13.0 x64 on a MacBook) doesn't show a custom shape tool so I can't select it.
The place in your posted pictures shows that italic-like star shape on the left tool area where mine shows a rectangle. When I select the rectangle the upper tool bar Make: has "Selection", "Mask" and "Shape" grayed out.
The upper current tool rectangle on the left has no Custom Tool Shapes in the list (or text/speech bubbles) and the only similar shapes I see are "Starburst Color Target" and "Stitched Patchwork".
Custom shape tools aren't in any menu or sub-menu. Where do I get the custom shape tools?
Читайте также: