
Как сделать слайдер adobe xd

F
rom vacation rental listing sites, to online marketplaces or portfolios, the use of imagery in web and mobile design is prevalent across a variety of experiences. Images can provide valuable information to consumers, and add inspiration to a website.
What is a slider or carousel?
Sliders and carousels can take several forms, and depending on the aesthetic of the website or app, will look and behave differently in each implementation. However, at the core, it is typically a horizontal gallery of images, or banners that can either be clicked, or scrolled through, or automatically advanced like a slideshow with a time delay.
These are common on hero banners of product websites, video and tv streaming platforms, and image galleries, and are used to rotate through a few key features of content while not overwhelming a user with too much at once. If you’ve ever shopped online for clothing or other products you’ve likely interacted with a slider or carousel of product imagery.
Creating a simple slider
A basic slider consists of at least 2-3 images that move right to left across the screen either via a time delay, or the click of an arrow. Often these sliders will include an indicator of which image, or slide it is currently displaying.
Using a time-delay
To create a slider using time-delay, or automatic advancement, multiple artboards will be used to create the effect. Start by creating one artboard, either by manually drawing it with the artboard tool, or using a preset in Adobe XD.
Next, draw out the shape for the main image. This can be positioned however you please to fit your design, but for the purpose of this tutorial, draw out a 16:9 rectangle and have it fill about 80% of the width of the page.
Using the copy and paste function, or by holding option on Mac (alt on Windows) and clicking and dragging the original rectangle, make two copies of the rectangle, placing them to the right, with about 10px of spacing between each. Select all three, and create a group to ensure that they remain together when off-canvas.
At this point, images or other content can be added to the containers to complete the design. To keep things simple, this tutorial will use color to distinguish between the three slides, but the principles remain the same. If you’re adding additional content, be sure to group it accordingly, and ensure the group names are consistent across the artboards.
With the three rectangles created and positioned, copy the artboard twice so that there are now three identical artboards on the canvas. On the second artboard, position the slide group so that the middle slide is centered in the middle of the view. This can be done by selecting the group, and clicking on the Center alignment button at the top of the property inspector.
On the third artboard, position the third slide in the centre of the screen. To do this, simply drag the group, while holding shift, until the rectangle is centred on the page. Set a guide before positioning to ensure proper alignment.
Connect the screens
With the design complete, toggle to Prototype mode using the tabs at the top or the hotkey (Option+2 on Mac, or Alt+2 on Windows).
Selecting the first artboard, click and drag the blue arrow to Artboard 2. In the property inspector, select Time as the trigger, and use Auto-Animate as the action. Repeat the process from Artboard 2 to Artboard 3.
This configuration, with a 0s time delay will make the slides transition very quickly once the animation is complete. To make the animation more readable, and less overwhelming, apply a 2-4s delay under the time trigger settings, for both the animations.
When this prototype plays, it will now automatically transition between the slides, from 1 to 3.
However, you may notice it now stops at number 3 and does not repeat. To address this, first, a prototype link can be applied to Artboard 3, linking back to Artboard 1. This will now rewind the slider back to the start so it can begin its process once again.
Click to progress
The other approach to a slider is using manual interaction like a click to progress the sliders. To do this, having visible arrows above the sliders will be helpful in indicating that user interaction is possible.
The design setup for this approach is the same as it is for the time animated approach. Create 3 artboards, with the sliders repositioned for each transition. The key difference here is the trigger used for the prototyping of the interaction.
With the artboards setup, and the sliders positioned appropriately, the first step will be to create the trigger area for the tap. You could set a tap on the entire artboard to create the transition, but to add fidelity to the interaction, it is best to create a target area, like an arrow, to trigger the animation.
Start by drawing a rectangle on the right side of the slide in Artboard 1. Give this a gradient that goes from non transparent to transparent, starting from the outer edge. Use an icon plugin, or a vector icon like Streamline Icons, to add in a chevron or arrow pointing to the right.
Group all of these new elements into a group and call it Next or something indicative of its purpose. Copy that group, and apply a vertical flip to it, and position it to the left of the slide. You can choose to leave this option available (allowing backwards navigation of the slider) or turn the opacity down to hide it.
Next, copy and paste the arrow groups to the other artboards. In Adobe XD, pasting elements in the same position on multiple artboards is as simple as selecting all the artboards and clicking paste - elements will then be pasted in the precise same location as the original artboard.
Now, in prototype mode, select the right arrow group on Artboard 1, and connect it to Artboard 2. Set the trigger to Tap so that clicking on the arrow group will trigger the transition. Once again, make sure the action is Auto-Animate.
Repeat this step with the right arrow on Artboard 2. The reverse can also be created using the left arrows to go back to the beginning of the slider.
Creating a carousel slider
A carousel is a specific type of slider, which simply displays multiple images in each stage of the slide. This could be something that shows 4 images and progresses forward one image at a time when an arrow is clicked, or time progresses.
The approach for this carousel is the same, using multiple artboards, and displaying the desired content in each artboard. Auto-Animate will handle transitioning between the content.
Creating a slider component
If you’re using the Tap trigger to progress the slider, it can actually be created using component states, and built within a single artboard. Using a component for your slider will make it, and the mechanics, reusable across the design.
The process begins in the same way, with just Artboard 1, and three rectangles. This time, once the rectangles are grouped, create a component, either with the right click menu, or the hotkey (CMD+ K on Mac, CTRL+ K on Windows).
Now, in the component menu in the top right, click on the + next to Default State. Name the new state Slide 2. With this new state selected, reposition the group so the second slide is centred.
Once that state is set, click the + again and create Slide 3, positioning the third slide in the centre of the artboard this time. You should now be able to toggle through the states and see the rectangles reposition.
To connect these together in prototype mode, once again use the arrow approach, but instead of selecting another artboard as the destination, simply click on the blue arrow, and select the appropriate state from the dropdown on the right. From the first slide, select State 2, and from slide 2 select State 3 Etc.
Just like that you have a reusable slider component that can be used throughout your design, and using the drag and drop of components and images, slides can be easily overridden to create unique slides each time.
F
rom vacation rental listing sites, to online marketplaces or portfolios, the use of imagery in web and mobile design is prevalent across a variety of experiences. Images can provide valuable information to consumers and add inspiration to a website.
In this guide, learn how to create sliders and carousels using components and states in Adobe XD. To follow along, download the starter file and open it in Adobe XD.
What is a slider or carousel?
Sliders and carousels can take several forms, and depending on the aesthetic of the website or app, will look and behave differently in each implementation. However, at the core, it is typically a horizontal gallery of images, or banners that can either be clicked, or scrolled through, or automatically advanced like a slideshow with a time delay.
These are common on hero banners of product websites, video and tv streaming platforms, and image galleries, and are used to rotate through a few key features of content while not overwhelming a user with too much at once. If you’ve ever shopped online for clothing or other products you’ve likely interacted with a slider or carousel of product imagery. Read on to learn how to create a carousel and design an image slider.
Creating a simple slider
A basic slider consists of at least 2-3 images that move right to left across the screen either via a time delay, or the click of an arrow. Often these sliders will include an indicator of which image, or slide it is currently displaying.
Using a time-delay
To create a slider using time-delay, or automatic advancement, multiple artboards will be used to create the effect. Start by creating one artboard, either by manually drawing it with the artboard tool, or using a preset in Adobe XD.
Next, draw out the shape for the main image. This can be positioned however you please to fit your image slider design, but for the purpose of this tutorial, draw out a 16:9 rectangle and have it fill about 80% of the width of the page.
Using the copy and paste function, or by holding option on Mac (alt on Windows) and clicking and dragging the original rectangle, make two copies of the rectangle, placing them to the right, with about 10px of spacing between each. Select all three, and create a group to ensure that they remain together when off-canvas.
At this point, images or other content can be added to the containers to complete the design. To keep things simple, this tutorial will use color to distinguish between the three slides, but the principles remain the same. If you’re adding additional content, be sure to group it accordingly, and ensure the group names are consistent across the artboards.
With the three rectangles created and positioned, copy the artboard twice so that there are now three identical artboards on the canvas. On the second artboard, position the slide group so that the middle slide is centered in the middle of the view. This can be done by selecting the group, and clicking on the Center alignment button at the top of the property inspector.
On the third artboard, position the third slide in the center of the screen. To do this, simply drag the group, while holding shift, until the rectangle is centered on the page. Set a guide before positioning to ensure proper alignment.
Connect the screens
With the design complete, toggle to Prototype mode using the tabs at the top or the hotkey (Option+2 on Mac, or Alt+2 on Windows).
Selecting the first artboard, click and drag the blue arrow to Artboard 2. In the property inspector, select Time as the trigger, and use Auto-Animate as the action. Repeat the process from Artboard 2 to Artboard 3.
This configuration, with a 0s time delay will make the slides transition very quickly once the animation is complete. To make the animation more readable, and less overwhelming, apply a 2-4s delay under the time trigger settings, for both the animations.
When this prototype plays, it will now automatically transition between the slides, from 1 to 3.
However, you may notice it now stops at number 3 and does not repeat. To address this, first, a prototype link can be applied to Artboard 3, linking back to Artboard 1. This will now rewind the slider back to the start so it can begin its process once again.
Click to progress
The other approach to a slider is using manual interaction like a click to progress the sliders. To do this, having visible arrows above the sliders will be helpful in indicating that user interaction is possible.
The design setup for this approach is the same as it is for the time animated approach. Create 3 artboards, with the sliders repositioned for each transition. The key difference here is the trigger used for the prototyping of the interaction.
With the artboards setup, and the sliders positioned appropriately, the first step will be to create the trigger area for the tap. You could set a tap on the entire artboard to create the transition, but to add fidelity to the interaction, it is best to create a target area, like an arrow, to trigger the animation.
Start by drawing a rectangle on the right side of the slide in Artboard 1. Give this a gradient that goes from non-transparent to transparent, starting from the outer edge. Use an icon plugin, or a vector icon like Streamline Icons, to add in a chevron or arrow pointing to the right.
Group all of these new elements into a group and call it Next -- or something indicative of its purpose. Copy that group, and apply a vertical flip to it, and then position it to the left of the slide. You can choose to leave this option available (allowing backwards navigation of the slider) or turn the opacity down to hide it.
Next, copy and paste the arrow groups to the other artboards. In Adobe XD, pasting elements in the same position on multiple artboards is as simple as selecting all the artboards and clicking paste - elements will then be pasted in the precise same location as the original artboard.
Now, in Prototype mode, select the right arrow group on Artboard 1, and connect it to Artboard 2. Set the trigger to Tap so that clicking on the arrow group will trigger the transition. Once again, make sure the action is Auto-Animate.
Repeat this step with the right arrow on Artboard 2. The reverse can also be created using the left arrows to go back to the beginning of the slider.
F
rom holiday rental listing sites, to online marketplaces or portfolios, the use of imagery in web and mobile design is prevalent across a variety of experiences. Images can provide valuable information to consumers and add inspiration to a website.
In this guide, learn how to create sliders and carousels using components and states in Adobe XD. To follow along, download the starter file and open it in Adobe XD.
What is a slider or carousel?
Sliders and carousels can take several forms and depending on the aesthetic of the website or app, will look and behave differently in each implementation. However, at the core, it is typically a horizontal gallery of images or banners that can either be clicked or scrolled through, or automatically advanced like a slideshow with a time delay.
These are common on hero banners of product websites, video and tv streaming platforms and image galleries and are used to rotate through a few key features of content while not overwhelming a user with too much at once. If you’ve ever shopped online for clothing or other products you’ve likely interacted with a slider or carousel of product imagery. Read on to learn how to create a carousel and design an image slider.
Creating a simple slider
A basic slider consists of at least 2-3 images that move right to left across the screen either via a time delay or the click of an arrow. Often these sliders will include an indicator of which image or slide it is currently displaying.
Using a time-delay
To create a slider using time-delay or automatic advancement, multiple artboards will be used to create the effect. Start by creating one artboard, either by manually drawing it with the artboard tool or using a preset in Adobe XD.
Next, draw out the shape for the main image. This can be positioned however you please to fit your image slider design, but for the purpose of this tutorial, draw out a 16:9 rectangle and have it fill about 80% of the width of the page.
Using the copy and paste function or by holding option on Mac (alt on Windows) and clicking and dragging the original rectangle, make two copies of the rectangle, placing them to the right, with about 10px of spacing between each. Select all three and create a group to ensure that they remain together when off-canvas.
At this point, images or other content can be added to the containers to complete the design. To keep things simple, this tutorial will use colour to distinguish between the three slides, but the principles remain the same. If you’re adding additional content, make sure that you group it accordingly and ensure the group names are consistent across the artboards.
With the three rectangles created and positioned, copy the artboard twice so that there are now three identical artboards on the canvas. On the second artboard, position the slide group so that the middle slide is centred in the middle of the view. This can be done by selecting the group and clicking the Centre alignment button at the top of the property inspector.
On the third artboard, position the third slide in the centre of the screen. To do this, simply drag the group, while holding shift, until the rectangle is centred on the page. Set a guide before positioning to ensure proper alignment.
Connect the screens
With the design complete, toggle to Prototype mode using the tabs at the top or the hotkey (Option+2 on Mac or Alt+2 on Windows).
Selecting the first artboard, click and drag the blue arrow to Artboard 2. In the property inspector, select Time as the trigger and use Auto-Animate as the action. Repeat the process from Artboard 2 to Artboard 3.
This configuration, with a 0s time delay will make the slides transition very quickly once the animation is complete. To make the animation more readable and less overwhelming, apply a 2-4s delay under the time trigger settings, for both the animations.
When this prototype plays, it will now automatically transition between the slides, from 1 to 3.
However, you may notice it now stops at number 3 and does not repeat. To address this, first, a prototype link can be applied to Artboard 3, linking back to Artboard 1. This will now rewind the slider back to the start so it can begin its process once again.
Click to progress
The other approach to a slider is using manual interaction like a click to progress the sliders. To do this, having visible arrows above the sliders will be helpful in indicating that user interaction is possible.
The design set-up for this approach is the same as it is for the time animated approach. Create 3 artboards, with the sliders repositioned for each transition. The key difference here is the trigger used for the prototyping of the interaction.
With the artboards set-up and the sliders positioned appropriately, the first step will be to create the trigger area for the tap. You could set a tap on the entire artboard to create the transition, but to add fidelity to the interaction, it is best to create a target area, like an arrow, to trigger the animation.
Start by drawing a rectangle on the right side of the slide in Artboard 1. Give this a gradient that goes from non-transparent to transparent, starting from the outer edge. Use an icon plugin or a vector icon like Streamline Icons, to add in a chevron or arrow pointing to the right.
Group all of these new elements into a group and call it Next -- or something indicative of its purpose. Copy that group and apply a vertical flip to it and then position it to the left of the slide. You can choose to leave this option available (allowing backwards navigation of the slider) or turn the opacity down to hide it.
Next, copy and paste the arrow groups to the other artboards. In Adobe XD, pasting elements in the same position on multiple artboards is as simple as selecting all the artboards and clicking paste - elements will then be pasted in the precise same location as the original artboard.
Now, in Prototype mode, select the right arrow group on Artboard 1 and connect it to Artboard 2. Set the trigger to Tap so that clicking the arrow group will trigger the transition. Once again, make sure the action is Auto-Animate.
Repeat this step with the right arrow on Artboard 2. The reverse can also be created using the left arrows to go back to the beginning of the slider.
In this tutorial, we’re going to learn how to design a carousel slider in Adobe Experience Design CC (Adobe XD).
3. In the Property Inspector, also deselect the Border option by clicking the tick box, and also select a Fill colour of your choice.

4. Position the rectangle centrally on the artboard with the help of Adobe XD’s smart guides that appear to assist with alignment, and leave a small amount of room above the carousel slider, for where the website navigatation would appear.
5. Locate the image for your first carousel slide on your computer, Left-click and drag into Adobe XD on to the rectangle that we created in Step 2.
6. Next, select everything on the artboard by dragging over it with your mouse, and go to Object > Lock. This will lock the position of our slider so far, so that in the next few steps we don’t accidentally move anything when working on top of it. Select the same Lock option again, to unlock the objects.

7. Select the Pen Tool, Left-click and hold Shift to draw a diagonal line. Holding Shift will ensure that the line has an angle of 45 degrees. Draw a second line also holding Shift, but going back in the opposite director, to complete the shape of your arrow. This will be the primary means of navigation for our carousel slider.
8. Select your newly created arrow and go to Edit > Duplicate. Position one arrow on the left-hand side of your carousel, pointing left, and position the other arrow on the right-hand side, pointing right.
9. Lastly, we’re going to create the secondary navigation. Select the Ellipse Tool and hold Shift to draw a small circle.
10. With this circle selected, go to Edit > Duplicate, and move this duplicated circle slightly to the right of the first circle. Repeat as many times as necessary, depending on the number of carousel slides that you would like to include. Adobe XD smart guides will assist in spacing the circles an equal distance apart.

11. Select one circle, and give this circle a Fill colour of your choice – this is going to represent our ‘active’ carousel slide.
12. Select all of the other circles, select a colour, and reduce the Opacity of these circles in the Appearance options on the right-hand side. The goal here is to communicate to the user that one slide in particular is ‘active’ – and the other slides, although they are there to be viewed, are currently ‘inactive’.
13. Lastly, hold Shift and select all of these circles and go to Object > Group, and drag this group to position centrally within the carousel slider.

Creating Adobe XD slider is more accessible owing to the many features and tools offered to carry out the process. You can create sliders that make your design or interface more user-friendly. You do not have to create complicated sliders, but you create simple ones that act as a great inspiration to your projects in the future. With Adobe XD you enjoy various features and tools that make it easy to create the slider. Here is a guide on how to create Adobe XD slider by use of Adobe XD and Wondershare Mockitt, which is the best Adobe XD alternative.
How to Create Slider Animation in Adobe XD
The latest Adobe XD has an auto-animate feature that makes it easy to create adobe XD slider animation. With this feature, it becomes easy for you to design prototypes that have immersive animations. It is an easy-to-use feature because you just need to duplicate an artboard, change object properties like rotation, size, and position. After this, you can now apply the auto-animate action to create adobe XD slider prototype between artboards. Here are some of the simple steps to follow as you create adobe XD carousel slider.

Step 1: Begin with artboards for each state of your form
View the prototype for these states by pressing play at the top of Adobe XD.
Step 2: Make prototypes interactive
- Go to prototype mode
- Tap on the element you want to be interactive. You see a blue arrow at the right of the element.
- Click and drag the arrow to point at the artboard.
Step 3: Customise transitions
- Create richer interactions using the auto animate feature of adobe XD
- With auto animate, you find that the artboards are more reflective of how you want it to look on the web. The artboards do not fade between transitions, but the form resizes automatically and the elements will now shift up and down like they do in the browser.
Step 4: Toggle between radio buttons using auto-animate
- Click deselected radio button.
- Drag prototyping arrow to the artboard that shows how it looks when selected.
When you preview your prototype again, you will be able to see the auto-animate feature here. You will note how the active state indicator slides between the two buttons. This is a cool effect, and one that you can set up even if this is your first time doing it.
Step 5: Setting all other form fields to be interactive
- To set the other form fields to make them interactive, you should repeat the same steps between the other artboards. You just need to keep on dragging arrows from all the clickable elements to the artboards that showcase their related state. It is that simple.
When you preview the auto-animations in your prototype, you will be able to see the effects. You find that the active state slide between these radio buttons in an easy and smooth way. The good thing is that you do not require any kind of Adobe XD interactive slider animation software or skills. All you need is fast point and tap actions in Adobe XD.
How to Create Slider Animation with Adobe XD Alternative
There are many other Adobe XD alternatives you can use to create slider animation. The best you can use is Wondershare Mockitt. This is a tool that has gained a lot of popularity among many designers because of its efficiency when it comes to the creation of slider animation. The tool does not limit you to the platform you can use to create prototypes or apps. Besides, it also works perfectly in different systems such as Web browsers, Windows, Mac, and Ubuntu.

If you are working as a group, the tool also works perfectly as it allows several people to work on the same project at the same time. It also allows you to create slider animation with screen states. This is a great feature that gives you an opportunity to create animation by using state transition of the same screen.
The tool has an icon library that makes the entire process easy because it has more than one hundred icons that you can also use as you create your next slider animation. You can also have all the screens in a single place. This is a top feature the tool offers that makes it possible for you to view the entire workflow, do the required changes and also share the flows URL. There is also a rich text editor that helps you select italic, bold, change the color of your text, and set other styles.
Here is how you can build slider animation using this Adobe XD alternative:
Step 1: Create a blank prototype or from templates
Go to workspace, and click the "+ Create" > "Prototype", then you will see there are multiple devices you can choose to create a blank prototype. You can also see there are many templates that you can use to create a prototype.

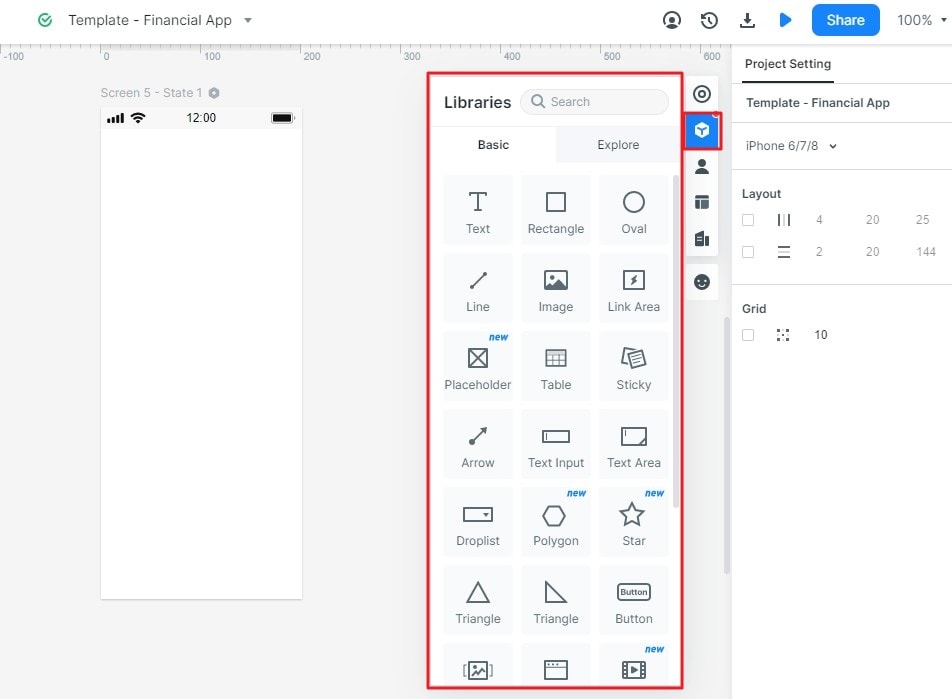
Step 2: Add widget
You can simply add widgets to the canvas. On the top-left quick toolbar, you can see there are rectangles, oval, etc. If you want to find more built-in widgets, you can choose from the right toolbar. You can double-click the widgets into the canvas or you can drag and drop them into the canvas.
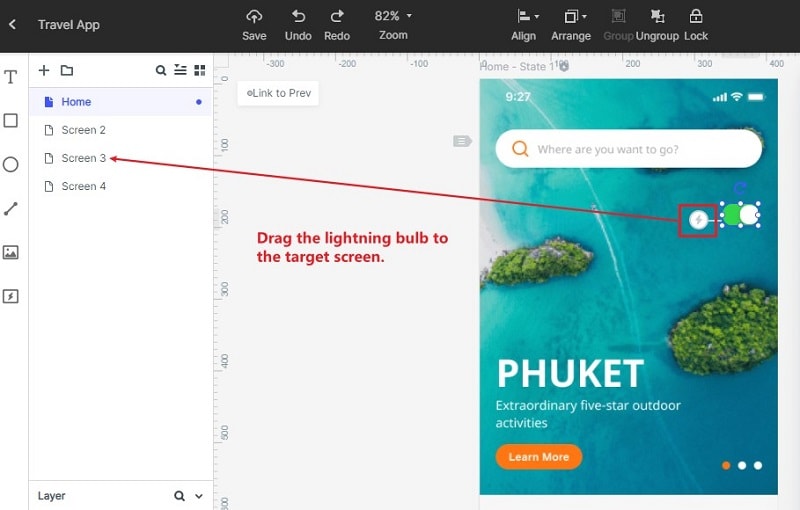
Step 3: Connect screens
After you finish all your screens, you can now create page transition, advanced page state, and animations. If you just want to connect screens, you can drag the lightning bulb into the target screen.
Step 4: Preview, share, and handover to the developer
You can preview the prototype you make like it is real. And then you can share the prototype with your clients and they can preview the prototype through a link you share. Finally, this tool allows the developer to check the download the code.
Читайте также: