
Как сделать сайдчейн в fl studio 20
В своей статье «Что такое sidechain» я рассказывал о том, как сделать сайдчейн в программе Cubase. Сегодня же я хочу показать как реализовать этот эффект в программе Image-line FLStudio. Коме того, я познакомлю Вас с плагинами, которые позволяют сделать сайдчейн в любом секвенсоре.
Существует несколько способов создания эффекта сайдчейн в программе FLStudio:
— Автоматизация громкости;
— Peak Controller;
— Gross Beat;
— Использование сторонних плагинов.
Автоматизация громкости
1.) В разрыв (Insert) канала, где необходимо сделать сайдчейн, вставляем плагин Fruity Balance

2.) Наводим курсор мыши на регулятор Volume и нажимаем правую клавишу. Из выпадающего меню выбираем пункт Create automation clip

3.) Изменяем форму кривой автоматизации

4.) Расставляем кривую автоматизации в нужные структурные участки трека

Сайдчейн с помощью плагина Peak Controller
1.) В Insert канала, где необходимо сделать сайдчейн вставляем плагин Fruity Balance
2.) В разрыв канала с управляющим сигналом (например, канал с бочкой) вставляем плагин Peak Controller

3.) Настраиваем Peak Controller следующим образом:
Если управляющий сигнал должен быть слышим (бочка), то стоит отключить функцию MUTE.

4.) Наводим курсор мыши на регулятор Volume во Fruity Balance и нажимаем правую клавишу. Выбираем пункт Link to controller…

5.) В окне Remove control settings в области Internal controller выбираем пункт Peak ctrl (название управляющего канала) – Peak и жмём клавишу Accept.

Сайдчейн с помощью Fruity Limiter
1.) Выбираем в микшере канал с управляющим сигналом (например, канал с бочкой). Наводим курсор мыши на стрелку (Enable send from…) и нажимаем левую клавишу мыши (направляем управляющий сигнал на нужный канал).
2.) В Insert канала, где необходимо сделать сайдчейн вставляем плагин Fruity Limiter

3.) Выбираем канал с управляемым сигналам (например, бас), открываем плагин Fruity Limiter и настраиваем его следующим образом:
Threshold: чувствительный (приблизительно -25 dB).

Сайдчейн с помощью Gross Beat
1.) В Insert канала, где необходимо сделать сайдчейн вставляем плагин Gross Beat


3.) Редактируем пресет под свои нужды

Использование сторонних плагинов для создания эффекта sidechain
Существует множество различных плагинов для создания эффекта сайдчейн, которые могут быть использованы абсолютно в любом секвенсоре. Вот одни из самых популярных:
— Nicky Romero Kickstart.
VolumeShaper позволяет прорисовывать кривую громкости по аналогии с плагином Gross Beat. Он имеет ряд пресетов, среди которых есть несколько для создания эффекта сайдчейн.

Плагин Kickstart от Nicky Romero имеет фиксированный набор кривых, которые могут быть использованы для создания различной продолжительности и глубины сайдчейн эффекта.

Лично мне нравиться плагин VolumeShaper3. Он очень удобный и гибкий в настройке.
Смотрите видео о том, как сделать сайдчейн.
Если понравилась статья, поделись с друзьями!
Добавьте свой комментарий. Отменить ответ
Комментарии: 3
Доброго времени суток.
Попробовал Я эти: «Cableguys VolumeShaper» и «Nicky Romero Kickstart» плагины на виртуальной студии LMMS, но вот проблема: одна и таже пария нот каждый раз по разному звучит на этих плагинах.
В чём конкретно разница?
Эффект создаваемый плагином VolumeShaper отличается от эффекта Kickstart?
Или же каждый новый такт партии звучит по разному?
Да, каждый новый такт партии звучит по разному. Но Я разобрался в чём проблема, Я в секвенсоре LMMS активировал функцию: «sync vst plugins to host playback» вроде теперь всё нормально воспроизводит.
Рубрики
Подписывайся на новые статьи
Онлайн курс
Электронная музыка
с нуля до PRO

Подробнее
Онлайн курс
Создание EDM в FL Studio

Подробнее
Нашли ошибку?
Выделите текст и нажмите Ctrl+Enter.
© Создание электронной музыки, 2011 - 2022. Все права защищены.
Мы используем файлы cookie, чтобы вам было удобнее пользоваться нашим сайтом.
Вы можете узнать больше о том, какие файлы cookie мы используем, или отключить их в настройках .
Этот веб-сайт использует файлы cookie, чтобы мы могли предоставить вам лучшие результаты вашего запроса. Информация о файлах cookie хранится в вашем браузере и выполняет такие функции, как распознавание вас, когда вы возвращаетесь на наш веб-сайт, и помогает нашей команде понять, какие разделы веб-сайта вы находите наиболее интересными и полезными.
Мы используем файлы cookie, чтобы анализировать трафик, подбирать для вас подходящий контент и рекламу, а также дать вам возможность делиться информацией в социальных сетях. Мы передаем информацию о ваших действиях на сайте партнерам Google: социальным сетям и компаниям, занимающимся рекламой и веб-аналитикой. Наши партнеры могут комбинировать эти сведения с предоставленной вами информацией, а также данными, которые они получили при использовании вами их сервисов.
Строго необходимые файлы cookie должны быть включены постоянно, чтобы мы могли сохранить ваши предпочтения в настройках файлов cookie.
Если вы отключите эти файлы cookie, мы не сможем сохранить ваши настройки. Это означает, что каждый раз, когда вы посещаете этот веб-сайт, вам нужно будет снова включать или отключать файлы cookie.

Сайдчейн, попросту говоря — это управление одним звуком по средствам другого звука. Чаще всего его применяться для избежания частотных конфликтов миксе и/или выделения того или иного инструмента. Для примера возьмем вот такой луп только из барабанов и баса, в котором изначально совсем нет сайдчейна, а затем, последовательно применяются 5 разных техник сайдчена, которые мы разберем. По прочтению этой стать вы научитесь укладывать с басом любой кик, каким бы он не был.
Что бы лучше понимать что происходит, я прикреплю проект, который можно скачать и открыть проект из статьи если у вас FL Studio 20.5.1 версии или выше.
Сайдчейн компрессия (Fruity limiter)
Наверное самый известный тип сайдчейна один из самых простых в исполнении благодаря заводскому плагину Fruity limiter. Сайдчейн компрессия подразумевает, что на каждый удар управляющего сигнала, на другой будет воздействовать компрессор, делая его тише.
В нашем примере управляющий сигнал — это кик на первом канале, а сайдчейн компрессию мы будем применять на бас, на 7 канале микшера.
Первым делом, нам нужно выбрать управляющий канал (кик) и от него, кликнуть правой кнопкой мыши на стрелочку внизу канала, который мы собираемся сайдчейнить (бас), выбираем опцию Sidechain to this track. Таким образом, мы послали сигнал от кика к басу. Такие связи между каналами называется посылами.


Во вкладке эффектов баса выбираем Fruity limiter. Переключаем его в режим компрессора с помощью кнопочки LIMIT | COMP. То что мы видим, главном окне, это наш сигнал баса. Что бы компрессор увидел сигнал, нам нужно выбрать посыл от кика.
Дальше следует стадия настройки компрессора — нам нужно добиться того, что бы сигнал баса частично или полностью (зависит от контекста трека) затихал при ударе кика.

Крутим ручки knee и ratio вправо, и thres (трешхолд)влево, до тех пор пока не будет достаточно. Выбираем столько, что бы кик прослушивался ярко, без лишнего гула. Обычно, сигнал баса не должен пропадать совсем, однако, все зависит от контекста трека.

Следующим шагом нужно настроить огибающую возврата громкости с помощью ручек Rel и Sustain, таким образом, что бы белая линия проходила без искажений.
Обычно, примерная настройка сайдчена у меня занимает примерно секунд 30, так что бояться здесь нечего, все довольно просто. Ко всему прочему, такой способ создает своеобразный ритм, который разбавит монотонность.
Настройка Fruity peak controller
Все последующие способы будут включать в себя работу с fruity peak controller. Fruity peak controller — это плагин который позволит редактировать огибающую линию управляющего сигнала, сделать ее более плавной и подходящей для сайдчейна.
С помощью ручек Vol, Tension и Decay, в секции Peak, настраиваем огибающую таим образом, что бы она была максимально похожа на прямоугольный треугольник, стараемся сделать его как можно короче острее в углах, при это сохранив вертикальную длину. Для каждого кика эта настройка будет отличатся, но разобраться довольно просто.

Сайдчейн громкостью (Fruity Balance)
Популярный вид сайдчейна, может быть применен, в ситуации если сайдчейн компрессия приносит в звук артефакты или искажения, а так же если, не удается точно настроить огибающие в лимитере.
Суть способа в том, что пик контроллер задает движение огибающей, к которой можно автоматизировать любые параметры, в данном случае громкость.
If you’re just getting started with music production in FL Studio, chances are you’ve heard the term sidechain or sidechain compression thrown around. Compression is one of the most popular tools used in professional audio recording, producing, and performances. So no matter what genre of music you listen to, your favourite songs are sure to use some sort of compression.
Generally speaking, most compressors work on their own and focus on controlling the output of a single channel in your mix. Sidechaining works a little bit differently, by making sure a particular sound is compressed, relative to other sounds or channels in your mix. In laymen terms, sidechain helps your leading elements stand out while ducking the volume of other sounds that get played at the same time.
If you’re still a bit confused, think of your favourite dance music tracks. You’ll notice that even though they have hard-hitting and catchy bassline synths, the kick drums always shine through and punch on every beat. This is because the producer has utilized sidechain compression in order to “duck” the clashing low-end frequencies on the bassline whenever the kick
In this article, we explain everything you need to know in terms of compression and sidechain. As well as a step by step guide on how to sidechain within FL Studio!

AVE PK-Fusion5 Studio Monitor Pair 5 Inch

FL Studio Producer Edition 20.6 Music Production Software

FL Studio 20.6 Fruity Music Production Software

Akai FIRE NS (No Software) MIDI Controller Workstation

Compression
To understand Sidechaining and Sidechain Compression in FL Studio, we must first cover the basics of Compression, and how to use a compressor. Compression originated in the early days of recording with the goal of maintaining a consistent output from vocalists. It’s a dynamic processing tool that’s used to keep your audio signal within a specific dynamic/volume range.
Essentially, compressors are useful for making your loud sounds softer. So you can boost the overall level of a track while narrowing the dynamic range. Resulting in a much cleaner, and more enjoyable mix.
Using a compressor on your FL Studio audio track starts by picking a volume level you always want your instrument to sound at (never louder, never softer). Then, you’ll set a compression level to determine how sensitive your effect will be. Resulting in every note played too quietly to be boosted into your volume range, and every note too loud to be softened to fit the range. So, your instrument will always be heard within the dynamic range you specified.
Even after reading this, you might still be a bit confused when you’re staring blankly at a compressor on your FL Studio project. So, we’ve outlined some of the most common terms to help you out!
Parameters on your compressor
Threshold
Perhaps the most important parameter on your compressor. Setting the threshold means that any sounds on the track louder than this will be reduced according to the ratio. While leaving sounds sitting lower than this level alone.
Ratio
The ratio determines the intensity of compression for sounds sitting above the threshold. Therefore, at a ratio of 2:1, any sound 2dB above the threshold will be reduced by 1dB. While at a ratio of 10:1, the sound will be reduced by 1.8dB. Therefore, the higher the ratio, the harder the compressor will work. It’s worth experimenting to find the ratio that works best for your sound.
Adjusting the peak parameter determines how your compressor perceives the loudness of the sound.
Attack/Release
Using the attack parameter on your compression allows you to determine how quickly the compressor engages. While the Release parameter will determine how quickly it shuts off.
The Knee determines the onset of your compression. Using a low knee on instruments like drums and guitar generally sounds better. While a higher knee placed on vocals can make your voice sound smoother and more natural.

Furthermore, using a multiband compressor can isolate multiple frequencies and compress them, while leaving other frequencies alone.
Sidechain Compression
Sidechain compression differs slightly from compression. It works to control the level of a particular sound, relative to other sounds within your mix. For example, the compression level of your bass track may be controlled by the volume of your kick drum. So, when your kick drum sounds, your bass becomes more compressed. Therefore, both sounds can keep cutting through the mix. Allowing the kicks to dominate the mix without clashing with the sound of the bass and creating a muddy signal. Therefore, providing a pulsating, and rhythmic dynamic to the sound.
Sidechaining has a number of different uses, so today we’ll explore just a few of its most common applications.
Dialogue Ducking
Since the introduction of sidechaining, Dialogue Ducking has been one of the most common uses of the technique. Automatically reducing the volume of music to make way for vocals. There are numerous examples showing dialogue ducking in action such as; when you’re at the supermarket and the music softens in order for somebody to make an announcement; and when the music drops in volume on the radio while the host speaks.
Vocal Mixing
Vocals are consistently the main focus of every song. You want your vocals to stand out, be loud enough, and be heard clearly. If your vocals are getting a little bit lost in the mix, you may be tempted just to turn them up. However, by sidechaining other tracks to your vocals, you can make sure that your other tracks quieten down to make room for your vocals. Letting your vocals shine while minimizing unwanted distortion or clipping.
Letting The Kick Punch
You’ll notice most Pop and Dance songs feature super punchy kicks and bass. Using these elements together without proper separation can be a recipe for disaster. Resulting in clashing frequencies and in turn, a muddy, unpleasant mix. Like the example above, in order to avoid this, you’d simply add a compressor to your bass track, while sending your kick’s signal to the sidechain input. Helping you to clear up the clashing frequencies and really make your kick drum pop!
To achieve a different and more stylistic effect; you can even sidechain other sounds like synths, leads, and even vocals to center your rhythm around the kick drum.
How To Use Sidechain in FL Studio
So, now to the nitty-gritty! How do you use sidechain in FL Studio? There are a few easy ways to sidechain in FL Studio, and we’ll go through 3 different methods you can use to get this done! We’ve even put together a handy infographic below that gives you a quick rundown on how to sidechain.
How to Sidechain with FL Studio’s Fruity Limiter
For the first and most typical sidechain setup, we’ll be using the Fruity Limiter inside FL Studio to sidechain your kick drum to a bass synth. In this technique, we’ll work to compress the bass signal whenever the kick drum plays.
Without any sidechain, your kick drum and bass synth are likely to clash with each other within certain frequencies. As a result, your kicks are probably getting lost in the mix and end up sounding much weaker than ideal. So once you’ve added the side chain, things are going to sound a lot cleaner.
Step 1. Add a Fruity Limiter
First up, you’ll want to open up and add a Fruity Limiter to the track you want to ‘duck’ under your kick. For instance, in this case, we’ll be ducking the kick under the Bass Synth track.

Step 2. Link the kick to the bass signal
We’ve added the initial Fruity Limiter, now we have to link the kick track to the bass synth track. To do this, simply select the Kick track, then right-click on the small arrow on your bass synth track.
That will then open up a menu window, where you can select the “Sidechain to this track” option.

Step 3. Basic Settings
Ok, everything has been added and linked together. It’s now time to tweak your settings and make sure everything is sounding as good as it can. Depending on how you’re using Sidechain, the settings are always going to be different. But we’ve given you a basic run down to get started before you fine tweak it to suit your sound!
So open up your Fruity Limiter, and start by changing it from LIMIT to COMP mode.
Next, you’ll want to change the number in the SIDECHAIN box to 1. Then, drop the THRESHOLD amount, and increase the RATIO until its starting to sound the way you’d like it to.
You’ll notice the kick and bass signals are now working together, and your sound is going to sound so much cleaner. But what else can you do to make your sidechain in FL Studio sound even better? There are a number of settings in your Fruity Limiter that are going to affect the way your compression sounds, so it’s worth playing around and tweaking it until it sounds perfect.
If you’re not sure what you’re doing, take another look at our explanation of the compressor parameters above!

Alternative Method – How to Sidechain in FL Studio using Automation
Alternatively, you can use the method of volume automation to perform a similar effect. Technically, this isn’t sidechaining, since the automation will control the volume of the signal you want to duck (in this case the bass) independent of the kick signal. Rather than being linked together using the Fruity Limiter.
This method is easy, but it can get a bit more tedious. However, it does allow for a lot more flexibility and control over your sound. In saying that, you’d only really use it over the Fruity Limiter technique if you were trying to create a specific sound effect that you couldn’t achieve otherwise.
For instance, you can choose between letting your effects such as your reverb and delay tail off while ducking the sound for an interesting effect. Or, apply the automation to your mixer track volume and completely silence the effects if you’d rather.
Step 1. Create a Fruity Balance Volume Automation Clip
First things first, you’ll want to head over to the mixer track you want to duck (In this case we’re ducking the Bass) and add an instance of Fruity Balance.
From there, we’ll want to link the volume knob to a separate automation clip. So right-click on the Fruity Balance volume knob, then select “Create Automation Clip” from the drop-down menu. You should now see a new automation clip appear in your playlist.
Step 2. Adjust the Automation Clip

Now what you’re going to want to do is shape the automation clip so we can achieve a similar ducking effect as the previous method. Essentially, we’ll be creating a hole in the frequency spectrum where the kick can fill in. So it’s important to take note where your kick drum starts, peaks, and ends. That will give you a good idea as to when to drop the volume of your bass synth and when to bring it back up again.
Step 3. Copy the automation
That’s basically it! Our automation has been created and you should be seeing (and hearing) a similar effect as you would using the Fruity Limiter. Now the only thing left to do is copy the automation pattern across your entire track where you want the effect to come into play. That’s unless you want to spend unnecessary amounts of time creating automation curves throughout your song.
Method Three – Gross Beat
Finally, the last and possibly the easiest option for side-chaining a specific pattern in FL Studio is done by using the Gross Beat plugin.
Step 1. Add an instance of Gross Beat to the mixer track you have your bass/lead synth/or other sound you want to duck
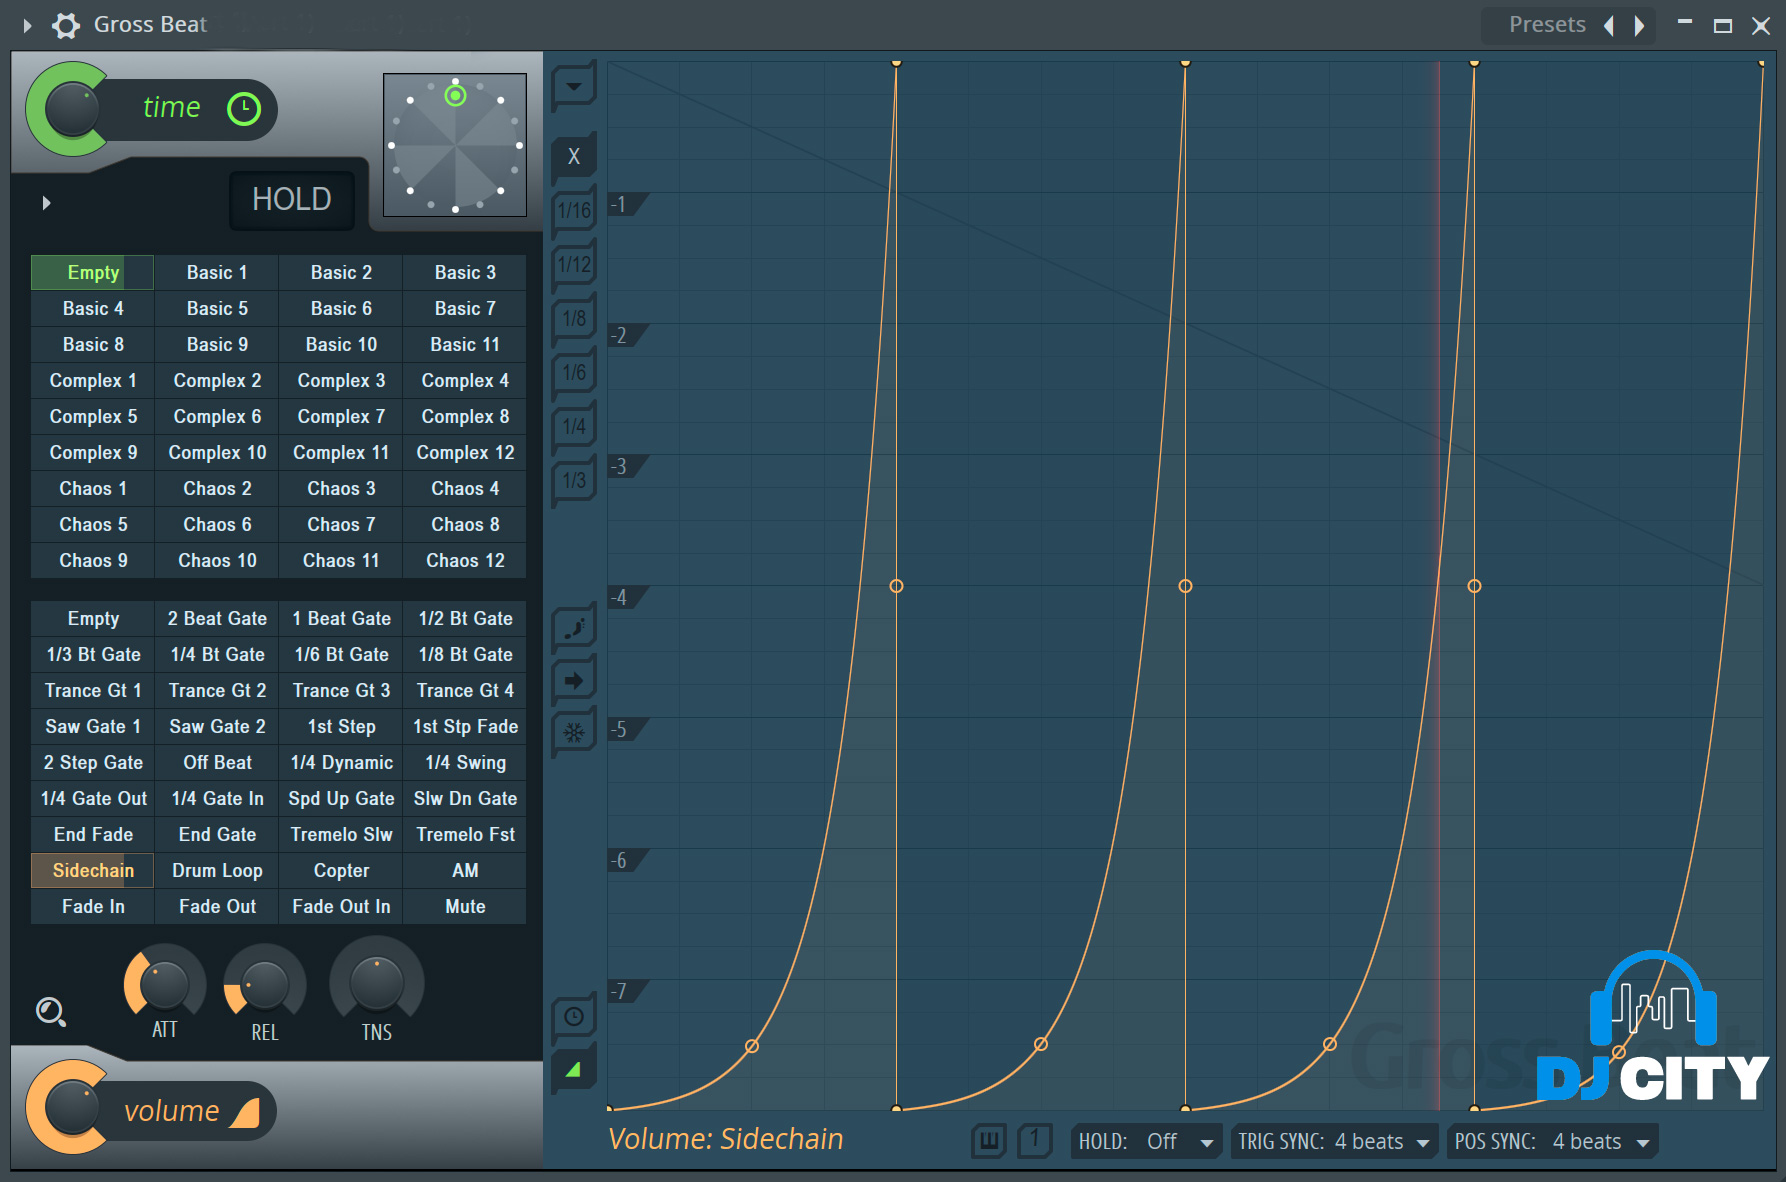
Step 2. Head into the Gross Beat plugin and select the sidechain option from the left hand side (See below)
This will automatically add a subtle sidechain effect to your track. From there, you can adjust the automation clip to your liking if you wanted to make a different pattern or change the intensity of the sidechain.
The Final Say
That’s it, three simple methods on how to Sidechain in FL Studio. Gross Beat is the easiest method for a simple sidechain pattern, while the Fruity Limiter gives you more control over your compression. Then you have the automation method that although not technically sidechaining and can get a little tedious, gives you even more flexibility over your sound. Hopefully you learned a thing or two and can use these techniques to make your tracks sound even better!

СВЕДЕНИЕ МИНУСОВ
Для тех, кто не знает.
Сайдчейн — необходимо добавлять для того чтобы приглушить бас когда играет бочка а т.е. убрать частотные конфликты между ними. Это в свою очередь приводит ваши ударные в более качовый результат. Сейчас я напишу в последовательном изложенном содержании, что и как нужно делать.
Во-начала, нам нужно составить ударные.
Для примера я составил простые ударные смотрите на рисунок ниже.
Темп этих ударных 95 BPM.
Во-вторых, нужно распределить ударные по каналам микшера.
Затем распределить по каналам в микшере и добавить на каждый канал бочки и баса плагины Fruity Parametric EQ 2 и Fruity Limiter как показано на рисунке ниже.
Дальше нам необходимо срезать средние частоты у бочки через Fruity Parametric EQ 2 (смотрите рисунок ниже).
Средние частоты находятся в районе 4. Мне по необходимости надо было еще срезать и низкие частоты в районе 1. Можете повторить также и посмотреть, как будет звучать у вас.
Далее переходим в Fruity Limiter.
Здесь нам нужно поставить немного компрессии (ratio — соотношение компрессии 4:1, thres — порог компрессии, где то на -12 -15 дБ.), а также увеличить линию уровня входа, чтобы как-то компенсировать уровень громкости.
После этих действий переходим на следующий канал 2. Здесь нам необходимо срезать низкие частоты у баса и подогнать его под бочку. Выглядит это так.
Дальше мы ставим немного компрессии.
И напоследок нам нужно сделать сайдчейн. Для этого выбираем, 1 канал, затем во 2 канале внизу нажимаем правой кнопкой мышки и выбираем нужный нам вариант.
После этого переходим в Fruity Limiter. Там выставляем в окошке сайдчейн канал kick. И подгоняем в этом плагине уровень входа (громкость) баса под бочку.
Конечно, есть другие способы сведения бочки и баса, но я решил написать именно этот, так как он, на мой взгляд, прост и хорош. Остальные методы будут рассмотрены в следующих статьях.
На этом наш урок завершается по сведения бочки и баса в fl studio. Если есть вопросы или пожелание пишите в комментариях.
Привет, меня зовут Сергей. Музыка для меня как хобби. Занимаюсь созданием Hip-Hop минусов в Fl Studio уже продолжительное время.
Если вам понравился этот материал, то поделись с ним с другими. Так вы поможете в развитии этого сайта и у меня будет стимул в дальнейшем развивать этот проект.
Читайте также: