
Как сделать make unique в fl studio 20
We hope you love the products we recommend. We may collect a small commission if you purchase through one of our links. This will not cost you anything extra. Thank you if you do. As an Amazon Associate, I earn from qualifying purchases.
If you want to use the ‘Make Unique’ feature in fl studio, you can Simply Click open up the drop-down options for either an audio sample or MIDI clip in the playlist view, and then select the ‘make unique’ option from the list.
What Is Make Unique In FL Studio
‘Make Unique’ is a handy tool for all FL Studio users, allowing you to quickly make a new copy of an audio clip or MIDI pattern.
Having this feature is excellent, as it allows you to quickly and easily make changes to parts of your song, allowing for variation to be added.
This FL Studio tutorial will look at how to use this feature for yourself and in which circumstances you will find it most useful.
Let’s jump straight in!
Step One – Selecting The Clip
First, you will want to make sure that you have located the correct audio or MIDI clip that you want to make a unique version of.
Be aware that when you use this feature, a new clip will not appear, but instead, the clip you select will become the new unique clip.
With this in mind, make sure that you are not about to remove the only version of a clip in your project.
Step Two – Make Unique
Once you have located the desired audio or MIDI clip from the piano roll, you can make a unique version of it.
To do this, simply click on the small waveform icon shown at the top left of the clip, which will open up a drop-down options menu. In the case of a MIDI clip from the piano roll, the waveform icon will be a small keyboard icon instead.
From this drop-down menu, select the ‘Make Unique’ option. Once selected, you will notice that a number will be added to the end of the clip name to signify which version it is.
You can now edit this clip separately from its original version.
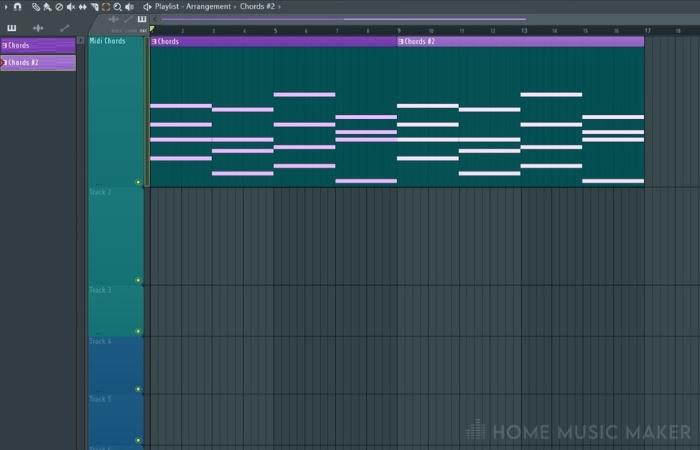
In the image above, you can see an example of what it looks like just after making a unique version of a MIDI clip, which is a chord progression in this case.
It is also worth noting that you can use this feature on an automation clip, which allows you to make new variations of these clips in an effortless manner.
When To Use Make Unique
There are many situations where you might want to use the ‘Make Unique’ feature. This section will look at some of the most appropriate times to use this tool.
One of the most practical uses of ‘Make Unique’ is to allow users to quickly and easily make adjustments to an audio file or MIDI clip so that you can add some variation. For example, quickly making adjustments to a drum pattern or drum loop that you have made in the step sequencer.
If it weren’t for this feature, you would instead have to make a new version of the clip manually, which would take much longer than simply making use of this feature.
You can also use this feature in other creative ways, such as adding additional layers of a sound into a song.
For example, you could use the ‘Make Unique’ feature on an audio clip, pitch up or down an octave, and then layer it with the original to give it more depth. You can use it on percussion to make a double or half-time version for variation.
Related Questions
Do You Have to Know How To Use the ‘Make Unique’ Feature?
Knowing how to use this feature is not essential; however, it is a great time saver if you are looking to quickly add adjustments to a new pattern or audio clip in your project.
Overall, it is worth your time to learn how to utilize this feature, as it will save you a lot of time in the long run as an electronic music producer.
Are There Other Ways of Cloning Clips in FL Studio?
There are multiple ways to make a copy of your clips in FL Studio. For example, you can use the pattern indicator in the top Hotbar to select the desired pattern and then click on the drop-down arrow to the left, opening up an options menu.
From there, you can select the ‘clone’ option to make a copy of that pattern. You can also right-click on the pattern or audio from the viewer to the left of the playlist, allowing you to clone the selected clip.
Do All DAWs Let You Use the ‘Make Unique’ Feature?
Ableton, Pro Tools, and Logic Pro feature the ability to quickly clone a pattern or audio clip to be adjusted separately. Any good modern digital audio workstation should have this feature.
Each of the DAWs may call this process by a different name, but they will all function identically in the way you use them.
What Are the Benefits of Using the Make Unique Feature?
Making the most of the ‘Make Unique’ feature will save you lots of time than manually creating a copy of the pattern you are trying to replicate.
It also allows you to add variation into your track with great ease to quickly iterate on your ideas when you are in the flow of creating a track. This is great for any electronic music production.
Does the ‘Make Unique’ Feature Work with MIDI and Audio?
You can use the ‘Make Unique’ feature to work with both MIDI and audio, and it can be of great use with either of these formats. It can arguably be more helpful with MIDI clips, as you can add more variation to a pattern either from the step sequencer or piano roll.
With that being said, this feature’s functionality will be the same whether you are using it for MIDI or audio.
Does the ‘Make Unique’ Feature Work in FL Studio 12?
Thankfully this feature has been in FL Studio since the earliest versions, so you will be able to utilize its features even if you are still using a much older version of Fruity Loops.
Can You Right-Click Bring up The ‘Make Unique’ Option?
When using the method discussed in the article, right-clicking will delete the clips you press on when in the playlist view. To bring up the drop-down options menu for the audio clip, you must click on the small waveform icon in the top left.
Final Words
You will now know how to utilize the ‘Make Unique’ feature in FL Studio, which is a great way to save time in Fruity Loops for any music production.
You can find different to get creative with this feature, so go and see what you can do with it!
To view this video please enable JavaScript, and consider upgrading to a web browser that supports HTML5 video

Алексей, монтаж, но отчасти. сначала в меню плейлиста выбери detached(это отвяжет плейлист от окна фл) - затем нажми среднюю иконку рядом с крестиком(там 3 иконки - свернуть, развернуть, закрыть)/ ну или клавишу enter
получишь плейлист на весь экран


Константин, подскажите пожалуйста, вот я напимсал мелодию, записал ее через эдисон. скинул в плейлист - и она стала звучать по другому со вкладкой Resample. Что это произошло? мне нравится звук. Как сразу добиться такого?
2. И как правильно чистить проект от мусора, от звуков которые не использую, или насмемплированые мелодии которые не использую
Здорова, ребята помогите пожалуйста разобраться с микшером
Проблема такая
Когда в новом проекте делаю Сенд канал он работает а в готовом проекте не хочет работать
Фл12

Добрый день всем, я пишу инструментальную музыку, и у меня часто возникает чувство, что струнные, что я использую, выдают сликшом резкий звук, либо же звуковая волна сликшом сильно вибрирует (вжумвжумвжум вместо вжжуууум). Кто может что посоветовать?
Работаю в фл студио

Здравствуйте, подключил midi контроллер EWI usb(духовой контроллер), но при работе с плагинами сила нажатия на мундштук воспринимается, как pitch, из за чего использование EWI становится невозможным. Подскажите, как это отключить?

Привет всем. Не судите строго, но как и многие хотел скачать бесплатную fl studio, но нигде найти так и не смог. Смотрел на Ютубе, там либо дэмки, либо лицензии, что и так спокойно можно скачать.
Знает кто-нибудь, где можно скачать и активировать? Я бы купил лицензию, но для России дороговато, ещё и в моем городе. Да и к тому же, вдруг ничего не выйдет и деньги уйдут в пустую.
Благодарю за помощь, надеюсь на адекватность😊
Make Unique is one of the most interesting and useful advanced features of FL Studio for creating sound variations in your projects. So if you want to know how to properly use this tool to make beats with a more modern and professional style, then you are in the right post.
Here I will show you a pretty comprehensive user guide where you will learn the secrets and tricks that renowned music producers use to create amazing audios. So let’s get started!
Table of Contents
What Does Make Unique Do?
In essence, Make Unique is an FL Studio Playlist processing technique, which allows you to edit and make sound variations from patterns, audio clips, and automations without affecting the properties of the original source.
Thanks to this, unnecessary repetitions in a beat can be avoided.
Advantages of Mastering this Technique
- It is excellent for cloning new sounds from another without affecting the qualities of the others.
- It allows you to modify audios and add small variations to them.
- It is useful to save more time when creating new clips.
- Helps speed up the workflow
- Allows you to modify events, increase speed, range, waveform or phase.
- Ideal for making modifications without having to alter the source pattern.
- Allows us to work in a more organized and cleaner way.
- Avoids errors and confusion when making arrangements.
- It is good to obtain original and high quality tracks.
- Avoids making inadequate repetitions in a beat.
How To Make Unique In FL Studio?
This utility will allow you to make parameter changes to previously designed sound elements without having to start the whole process from scratch.
It also gives the individuality needed to create the identity in question, which is very useful and appreciated for arranging.
Here’s how to make something unique in FL Studio quickly and easily.
1. Make a Sample Unique
This is normally used to create a new audio file in the playlist that contains all the properties of the sample we want to work with.
This will create a new audio element that has no relation with the original one.
This function basically consists of creating a copy of the sample, so in the end you will get the original and a duplicate.
- Leads
- Kicks
- Claps
- Drums
- Percussions
- Musical Instruments
- Sound Effects (SFX)
- Loops
- Vocals
- Risers
- Melodies
All of these can be used as audio clips when designing our arrangements.
Make Unique as Sample:
- Go to the playlist
- Choose the desired sample
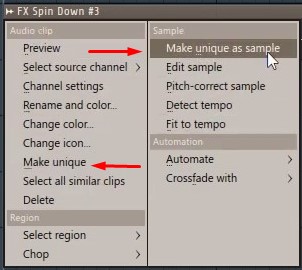
- Open the Tools Menu of the audio file by left clicking on it.
- Select the Make Unique as Sample option
- Press the YES button to start sound processing.
- Rename the file and save it to the path where you host your sample packs.
- Then, locate it in the sound library by going to the DAW browser
- Drag and drop it into the Playlist to use it.
How Do I Make Multiple Clips Unique In FL Studio?
Currently, FL Studio does not have Make All Unique functionality. This means that it is not possible to select all items in the Playlist at the same time. The only solution to this is to apply this tool one item at a time.
It is possible that this option will be included in future updates of the program.
2. Make a Pattern Unique
It is useful to create copies of some element of the Playlist and edit it leaving the original intact, as for example to take a pattern and make a modification to it.
In other words, we start from the same sound pattern, but we get 2 different sounding things depending on the amount of modulations we perform.
- Choose the desired pattern in the Playlist.
- Go to the options menu of the chosen audio file.
- Select Make Unique.
- Now the resulting pattern will have new properties.
Note: In case you need to modify and save a pattern as a separate file you can apply the Make Unique as Sample option without any problem, as explained above.
Video demonstration:
3. Make Unique with Shortcuts
So far, there is no hotkey combination in FL Studio that allows you to perform the Make Unique function instantly. Instead, you can use the shortcut Ctrl+Shift+B which has a similar effect and is useful to duplicate any item in the Playlist.
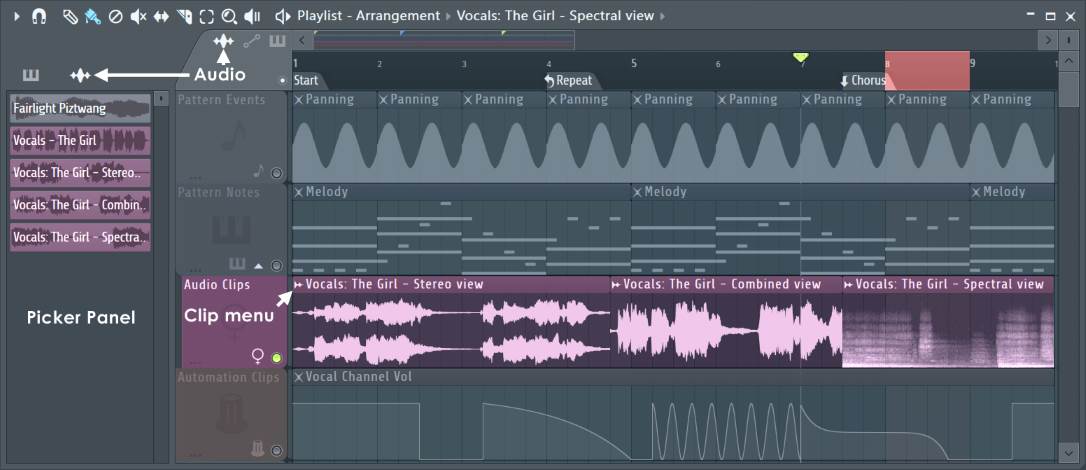
On the other hand, it can also be applied quickly and efficiently by using the audio clips menu (located in the upper left corner) and then selecting the Make Unique option.
In addition to the above, you can use as shortcuts the + and – keys of the numeric keypad of the PC to switch between the patterns you have in the Playlist while one of them is selected in the Channel Rack.
This is something that is appreciated since it helps to speed up the workflow significantly.
4. Automation Clip Cutting
Make Unique is a technique that you can use with any type of automation you want to try, and apply it to the Pitch, for example.
Imagine that you are working with a clip and you are going to be using it in several areas of the Playlist, but you need it to have certain characteristics that make it different from the others every time you insert it.
However, by automating it you will notice that every time you add effects to a particular audio file they will be automatically applied to all the others.
This is something we must avoid in order to preserve the quality of the track we are developing. So to achieve this successfully there are two ways that I will explain below:
A) Automated Elements
The first one consists of extending the automated file in the Playlist and drawing manually and little by little the effects that we are testing, copying progressively all the values.
This method is very tedious since it steals a lot of time that we could be using in other more important tasks.
In this scenario, I do not advise you to use this technique, because if you are working on something more complex the only fact of drawing repeatedly is counterproductive.
In fact, this can lead us to make rookie mistakes that could negatively affect the final quality of the project, which is something we don’t want.
B) Using Make Unique
The second and more recommendable endable, is to use this tool as I have been teaching in this entry to make things easier, by creating new audios with different parameters and effects, thus avoiding wasting time in the application of extra steps.
Knowing this is much appreciated, as it allows us to increase and streamline our workflow, thus helping us to acquire the necessary skills that an experienced producer has.
I also want to comment that the audios obtained from this process can be linked to an External Controller by means of the Remote Control Settings function.
This allows you to do many more modulations in a nice, fresh, and interesting way. This is a method that very few know about.
Tips and Tricks
A) The first tip is that we can chop up/trim a pattern we have without using Make Unique, getting the same result and no need to produce a new pattern or make repeats.
B) When saving an audio clip through this tool you must take into consideration that you have to place it in a folder of your PC where you are not going to move it to a different one, because if you do it FL Studio will lose the access path and it will not find it, throwing an error when loading it.
C) FX Spin Down: It is a utility that allows to edit and save in real-time the modified parameters of the source file. This has the advantage that while using the Make Unique option to clone, the original source file will remain intact.
This can be opened from the utilities menu of the audio clip in question or you can also work with it from the Channel Rack.
Why Can’t I Make Unique in FL Studio?
If Make Unique is not working or is disabled, it is mainly because this option is not available for use in the Demo and Fruity Edition versions of FL Studio.
So, What Can I Do if The Make Unique Option Is Disabled?
The answer is simple, you have to purchase one of the paid versions or use an alternative method such as duplicating.
The proper way to clone elements is to go to the Playlist and right-click on the desired pattern or audio clip and then select the Clone option (CTRL+B).
This is a very effective method, which allows us to obtain results similar to the one discussed in this article.
Make Unique F.A.Q.
Can I Make Unique in the FL Studio Demo?
The short answer is no. This option is restricted in the trial version of this DAW, because it is related to the project saving functionalities, so it is impossible to use it.
How to enable Make Unique in FL Studio 20?
The only way to enable this feature when it is greyed out is by purchasing one of the premium versions of FL Studio.
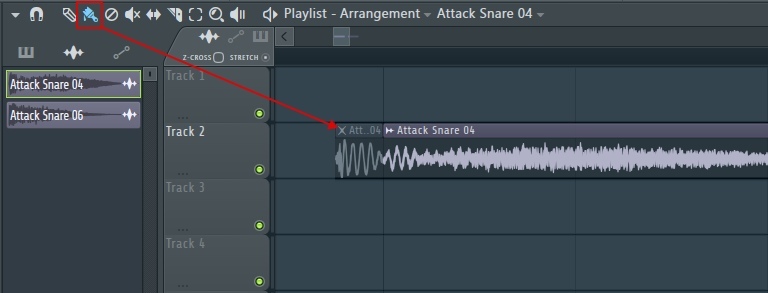
Аудио клипы это специальные версии инструментов Sampler. Назначение аудио клипов это отображение и запуск хранящихся в плейлисте сэмплов, где они по мере необходимости могут быть нарезаны и распределены. При желании, аудио клипы могут запускаться из пошагового секвенсора или пианоролла, хотя это действительно поднимает брови разработчиков программы, которые предпочитают использовать для этого инструмент Sampler. Для загрузки сэмплов как аудио клипов перетащить их в плейлист.
Содержание
Чтобы загрузить сэмпл как аудио клип перетащите сэмпл из браузера (или файлового брайузера) в плейлист. Если вы перетащите сэмпл в пошаговый секвенсор вы создадите инструмент Sampler. Хотя и аудио клипы и инструменты Sampler похожи, аудио клипы имеют только закладки SMP и MISC потому как их главная цель в том, чтобы посылать отображение аудио клипа в плейлист.
См. раздел Меню аудиоклипов для дополнительных опций клипа.
Переключатель фокусировки клипов (см. ниже), используется для фокусировки различных типов клипов. Это особенно полезно, когда клипы нагромождены, фокусировка клипов ставит выбранный тип клипа поверх всех для удобного выделения и редактирования. Чтобы выделить все наслоенные клипы используйте (Ctrl+левая кнопка мыши), затем они могут быть перемещены вместе.
- Щелчок правой кнопкой мыши по закладке - отображает меню аудио клипов.
- Zero-Cross (нулевое пересечение) - нарезка и изменения размеров будут сделаны в точке ближайшего пересечения нулевого уровня. Полезно, чтобы избегать щелчков в месте разреза. Примечание: Эта настройка будет, естественно, мешать вашей способности указать точные места разрезов.
- Stretch (растяжение) - когда вы выберите левый или правый край клипа и потащите, то клип будет растянут в соответствии с настройкой времени растяжения аудио клипа. Для поддержания высоты тона во время растягивания длины сэмпла, в поле Stretch Method выберите другую опцию, кроме Resample. Для получения более подробной информации о синхронизации аудио клипов с темпом проекта См. раздел Работа с функцией Time stretching/Pitch shifting.
В дополнение к стандартным способам редактирования применяемым ко всем клипам, которые описаны в основном разделе плейлиста. Аудио клипы обеспечивают следующие возможности:
- Make unique и Make unique as sample (сделайть уникальным и сделать уникальным как сэмпл) - в аудио клипах оригинальный звуковой файл используется повторно в новых аудио клипах. Но также можно использовать Make unique as sample (сделать уникальным как сэмпл), что клонирует оригинальный аудио клип и файл сэмпла на диске. Используйте это когда вы хотите физически редактировать/управлять данными сэмпла и изменять его в некотором роде.
- Автоматическое определение нарезки - чтобы нарезать аудио клип по ударам с использованием встроенного движка нарезки, откройте меню клипа (см. указатель мыши на главном скриншоте выше) и для автоматического определения выберите Chop > Dull/Medium или /Sharp.
- Нарезка на регионы - чтобы нарезать аудио клип на регионы, открыть меню клипа и из мню Chop выберите Regions (если волна не содержит регионы, эта команда отключена).
Две закладки, которые отображаются в настройках аудио клипа, подробно описаны в разделелах настроек инструментов:

Чтобы узнать больше об особенностях удаления щелчков, которые имеются при нарезке аудио клипа см. настройки Sampler - опции удаления щелчков.

Этот материал в разы ускорит и облегчит создание музыки, но только когда вы попробуете всё на практике.
Как преподаватель по созданию музыки, я ежедневно сталкиваюсь с тем, как вы неэффективно используете FL Studio.
Чтобы облегчить вам жизнь и в разы ускорить работу в FL Studio, я пишу для вас эту статью.
В статье используются сокращения: ПКМ, ЛКМ, СКМ — это правая, левая и средняя кнопки мыши соответственно.
Средняя кнопка мыши — колёсико. Его можно не только крутить, но и нажимать.
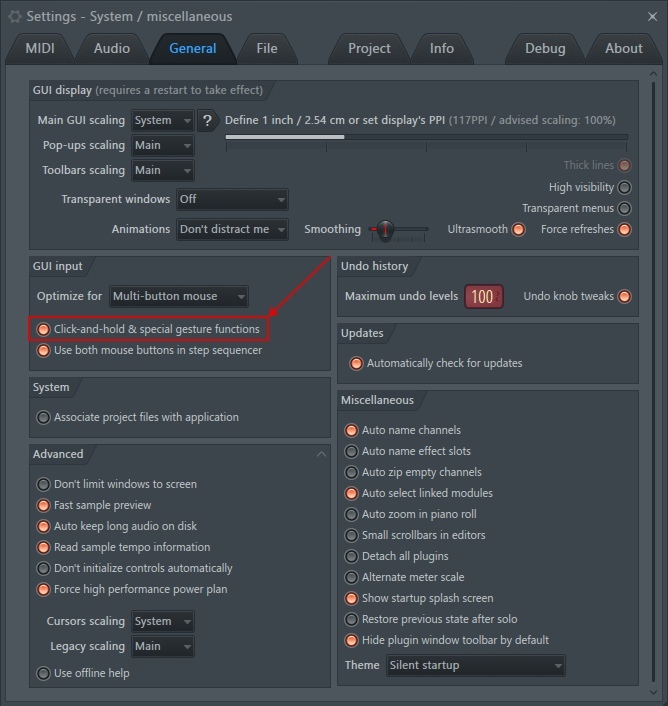
По-умолчанию в FL-ке отключены удобные, ускоряющие работу функции. Для того, чтобы их включить, в меню Options (горячая клавиша F10), на вкладке Global, активируй «лампочку» Click'n'Hold Special Gesture Functions:
Открой Playlist (F5) или Piano Roll (F7), нарисуй клип или ноту, щёлкнув ЛКМ. Представь, что её нужно разрезать пополам.
Раньше для этого нужно было найти глазами панель инструментов в верхнем левом углу, перевести туда курсор, выбрать инструмент нарезки Slicer, вернуть мышь обратно и разрезать. А потом - снова все те же операции, чтобы поменять Slicer обратно на Кисточку.
А теперь можно прямо на месте, рядом с нотой или клипом нажать ПКМ по пустому месту и удерживать её нажатой, пока кисточка не превратится в Slicer. А дальше, не отпуская ПКМ, провести по клипу или ноте в том месте, где нужно разрезать. Отпускаешь ПКМ - Slicer снова становится Кисточкой.
Это очень ускоряет процесс нарезки сэмплов / паттернов / нот.
Двойной щелчок ПКМ по пустому месту в плейлисте / пиано ролл активирует инструмент Mute. Он позволяет заглушать отдельные клипы / ноты, если вы не хотите их удалять насовсем.
При этом, как и в предыдущем пункте, не обязательно выбирать инструмент Mute в панели инструментов. Всё делается прямо на месте. Удобно.
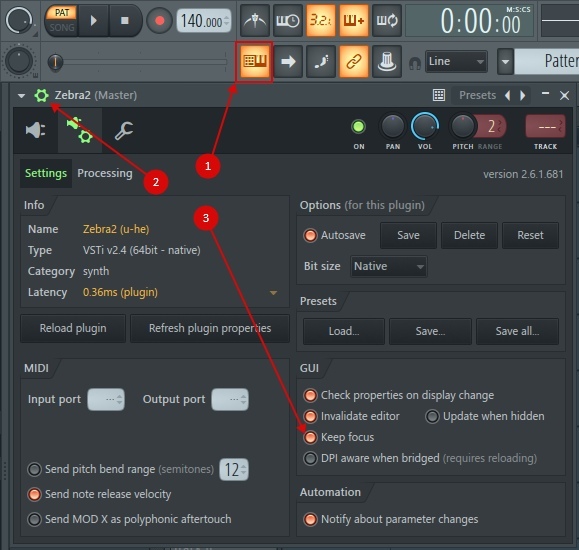
Если у вас нет MIDI-клавиатуры или она не подключена, можно использовать обычную печатную клавиатуру для игры на синтезаторах / сэмплерах (Ctrl+T или кнопка 1 на рисунке).
Нажимаешь шестерёнку в левом верхнем углу плагина и ставишь галочку Keep focus в разделе настроек:
Обычно мы записываем первоначальную идею в одном паттерне.
Чтобы разбить партии инструментов по отдельным паттернам, есть одна хитрая команда: Split by channel из контекстного меню списка паттернов.
То есть можно не заниматься рутинным вырезанием и вставкой партий в отдельные паттерны. Просто нажимаем Split by channel и уже в плейлисте расставляем получившиеся паттерны, чтобы трек развивался:

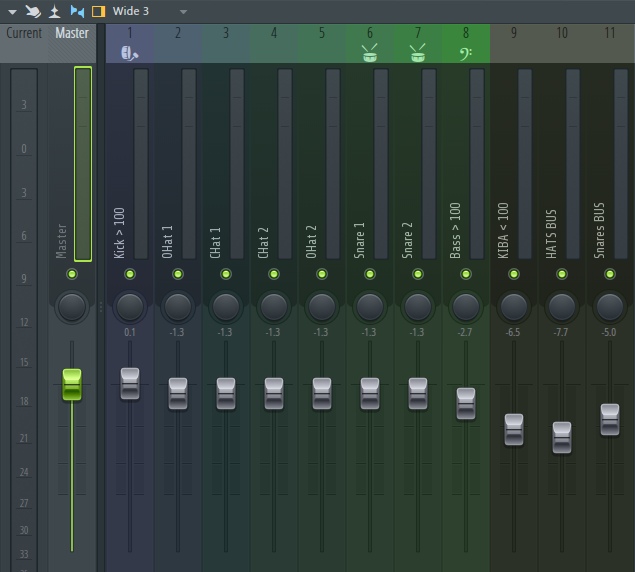
Точно так же можно одной комбинацией клавиш распределить инструменты по каналам микшера: Ctrl+Shift+L . Рекомендую перед этим сразу назвать и раскрасить инструменты, потому что они будут назначены на каналы микшера в том же порядке, с теми же названиями и цветами:
Удерживая Ctrl, можно обвести несколько нот/паттернов, чтобы их выделить. Не нужно менять инструмент «кисточка» на инструмент «выделение», просто удерживайте Ctrl и обводите.
Точно так же, нет нужды включать инструмент «лупа». Прокручивая колёсико мыши с зажатой клавишей Ctrl, можно уменьшить/увеличить масштаб там, где стоит курсор. В плейлисте можно ещё и вертикальный масштаб менять, удерживая Alt при прокрутке.
Если удерживать нажатыми клавиши Ctrl+Shift, можно выборочно выделять ноты, паттерны или каналы микшера. Или снимать выделение выборочно:
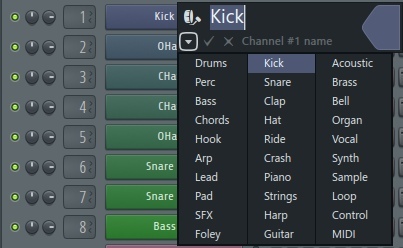
Когда хочешь назвать семпл по-другому, раскрасить канал микшера, переименовать паттерн или добавить картинку к названию инструмента, проще всего - щёлкнуть СКМ по названию.
Это работает где угодно в FL Studio. Позволяет переименовать, задать цвет и картинку любому инструменту / семплу / паттерну / плагину / каналу и т. п.
Для популярных инструментов - есть заготовки названий в левом нижнем углу текстового поля переименования.
Если сразу назвать и расставить инструменты, то потом можно двумя командами из пунктов 5 и 6, распределить их по каналам микшера и паттернам с теми же названиями.
Представьте: вы играли на MIDI- или компьютерной клавиатуре и получалось круто. Жаль, только, не записывалось. А повторить уже вряд ли получится. Знакомая ситуация?
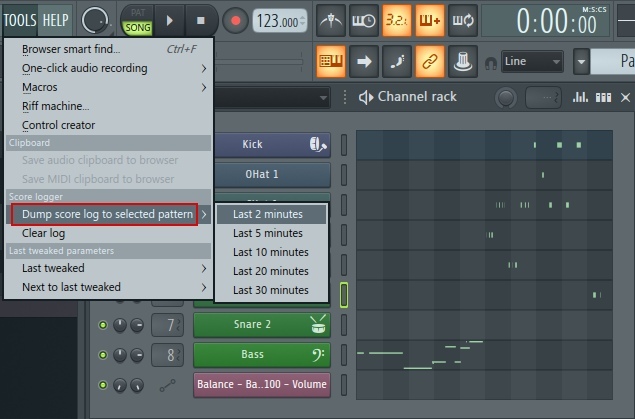
Тогда загляни в меню Tools. Там имеются весьма полезные функции.Функция Dump Score Log To Selected Pattern возвращает в текущий паттерн запись всех MIDI-событий, которые происходили на протяжении от 2 минут до получаса назад. Круто?!
Хотите разгрузить процессор? Заходите в Tools --> Macros --> Switch Smart Disable For All Plugins. Теперь плагины будут включаться только во время их использования.
Хватаешься за голову от хаоса в проекте? Руки опускаются при попытках всё это упорядочить? Давай удалим семплы, которые не участвуют в аранжировке.
Функция Tools --> Macros -->Select Unused Channels выделит всё, что отсутствует в плейлисте, но занимает место в стойке инструментов. Теперь можно удалить выделенные инструменты из стойки с помощью Alt+Delete.

Edison записывает звук с канала микшера. Можно записывать голос с микрофона или семплировать игру на синтезаторе.
Чтобы быстро добавить Edison, уже готовый к записи, открой микшер (F9), выдели канал микшера и нажми Shift+E. Теперь осталось лишь нажать Play в транспортной панели сверху (общей, а не в эдиссоне), а после записи — отключить красную кнопку Record в Edison.

Помните кнопку, которая превращает печатную клавиатуру в MIDI-клавиатуру? Нажмите по ней ПКМ и откроется меню выбора ладов/аккордов. Выберите, к примеру, блюзовый лад или арабский.
Нажимайте всё подряд, любые клавиши на компьютерной клавиатуре. Все ноты будут попадать именно в выбранный лад. Удивительно, но вы не сможете ошибиться! Это очень облегчает создание мелодий и живые выступления.
В режиме major chordmap или minor chordmap вы нажимаете одну клавишу, а играет - аккорд, даже если вы не учили сольфеджио и не умеете строить аккорды. Полезно, когда сочиняешь последовательность аккордов.
Найдите всего 4 клавиши, которые красиво следуют друг за другом, причём так, чтобы за последним снова хотелось услышать первый. И получите красивую гармонию.
Несколько раз повторите эту последовательность. А записать нотами сыгранную живьём последовательность поможет пункт 10 этой статьи!
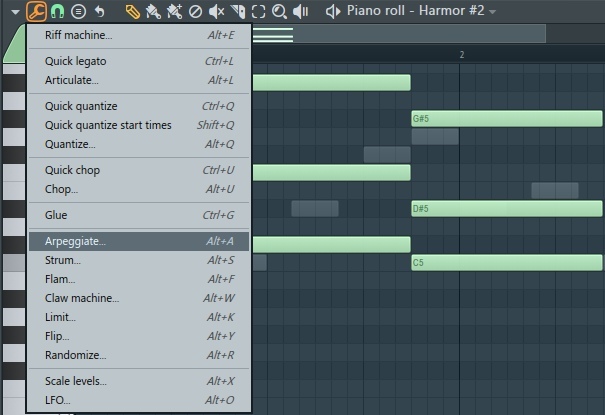
Используйте функции Piano Roll для автоматического создания арпеджио, быстрой нарезки ритмических рисунков, выравнивания и т. д. Меню с этими функциями открывается кнопкой гаечным ключом.
К примеру, вы записали 4 аккорда. Теперь их можно быстро нарезать в произвольном ритме с помощью комбинации Alt+U или превратить с помощью Alt+A в арпеджио. После чего ноты окажутся сгруппированными, но это не беда — комбинация Alt+G поможет разгруппировать их.
Автоматическое выравнивание нот по сетке (квантизация) включается тоже из этого меню (Alt+Q). Кстати, горячие клавиши можно всегда подсмотреть в этом меню и старайтесь использовать именно их. Эта привычка ускоряет рабочий процесс.
Если требуется быстро дотянуть все ноты друг до друга, воспользуйтесь функцией Legato из этого же меню (Ctrl+L). Удерживайте Shift для того, чтобы быстро двигать границу между двумя (и более) нотами. Вместо 4 действий (выделить, сократить, выделить, переместить), вы делаете всего одно движение.
Чтобы изменить общую громкость нескольких нот, не меняя соотношения громкостей между нотами внутри этой группы, нажмите Alt+X.
Это далеко не полный перечень фишек и хитростей, применяемых в FL Studio для быстрого воплощения самых смелых музыкальных идей.
В следующей статье я раскрою ещё 15 секретных фишек и приёмов работы, которыми обычно делюсь только со своими учениками.
Кстати! Если хочешь действительно совершить прорыв в написании музыки, прокачать и вывести на новый уровень своё звучание, изучить саунддизайн, сведение, мастеринг и даже научиться монетизировать творчество и сделать работу со звуком своей профессией, я с радостью научу всему, что знаю и умею сам. Вне зависимости от жанра музыки, возраста и опыта.
Просто запишись на пробный индивидуальный урок со мной в студии (если вы из СПб) или по Skype / Zoom, если вы из другого города.
Подписывайся на этот блог, чтобы не пропустить следующую часть этой статьи
Читайте также: