
Как сделать карту displacement в фотошопе
An in-depth evaluation of our member's project, Manos Vamvacoussis, "Villa" by K-Studio in Athens, Greece.
An in-depth evaluation of the project "Master Bedroom" by Yazan Al Hafi which didn't make it to enter the gallery due to our *Quality Standards.
An in-depth evaluation of the project "Master Bedroom in KSA" by Ahmed Nagdy which didn't make it to enter the gallery due to our *Quality Standards.
An in-depth evaluation of the project "Minimal Interior" by Karnvir Gulati which didn't make it to enter the gallery due to our *Quality Standards.
"I'm getting older, but I'm always being taught a lot" (Solon the Athenian, 600 BC). A true VW story concerning education in Architectural Visualization.
For many years we are trying to explain VW *Quality Standards and drive our members to the path of improvement. Sometimes just small tips while other times an in-depth explanation. Check it out!
It´s a question of vital importance for us to share the experience we´ve got from this project. We are sure that this information can help a large number of professionals to achieve a new level, to find power and desire to improve.
What I like about working in this field, is the fact I still learn something new every day. I'm sharing a few tips for Vray renderer which I think aren't so well known and they can be useful for VW *Members.
Our official *Member, Lucas Rodrigues, offers us a nice tip in order to import a model faster in your 3DS Max scene, check it out!
I would like to share these 3 little scripts to deal with UV in 3ds Max that I use daily in my work and I thought someone here could find them useful too!
We found these Great & Free Photography lessons and we would like to share them with our members, check it out!
If you are in creative industry, you first need to know some basic rules of the color and color theory.
Our official *Member, Lucas Rodrigues, offers us a nice tip in order to work with a proper color pallet for interior visualizations, check it out!
Our official *Member, Lucas Rodrigues, is giving us a nice tip in order to place pillows on a sofa by using Free Form tools in 3ds Max, check it out!
Making of article for a great set of images by our official *Member Ewelina Lekka. Sometimes, the only we need are some simple techniques, nice models and a great way of scattering in order to create pretty nice exteriors. Enjoy it!
We 've seen a lot of projects with a similar theme, villa in the forest. Nevertheless, when the artist's touch is unique and obvious, it makes all the difference. It's that moment when we look at the image and say: "This is nice!"
In VWArtclub we really enjoy artworks which doesn't look similar to each other. A few months ago, Filipe uploaded one of these in our official *Gallery and thus we asked him to share his work-flow with all of us. Enjoy it!
You can also select your interests for free access to our premium training:
In this article I will take you through seven steps on how to make a displacement map in Adobe Photoshop.
Using Photoshop displacement maps can add a new dynamic to how text and graphics look when added to a photo. If you simply add text on a new layer and use the Normal blend mode, it will appear quite separate from the photo.
Applying text or graphics using Photoshop displacement mapping makes the additional layer look more like it belongs in the image.
Let’s get on with this Photoshop tutorial.
Step 1: Open Your Background Texture Image
Choose a suitable photo you will use as the background for your text or graphic. The more contrast and texture the image has, the more noticable the effect will be.
If you are experimenting with adding a displacement map for the first time it will be helpful to choose an image with good contrast and texture.
The more contrast and texture your background image has the more pronounced the effect of the displacement map will be. If you choose an image with low contrast and texture you will have trouble seeing the effect at all.
Step 2: Convert the Image to Black and White
Open the Channels Panel and click on each of the channels to find which one shows the most contrast. Look to see if it’s the Red, Green or Blue channel that will enhance the look of the texture in your image the most.
For the image I am using to illustrate this article it is the Blue channel.
In this step you can also add more contrast. This is completely up to the style you and wanting to create. My background image is grungy, so I have manipulated the Levels to heighten the contrast.
Use Ctrl+L to bring up the Levels window. Drag the sliders on the left and the right in towards the center until your contrast level is where you want it.
Step 3: Save Your Image as a New Photoshop Document
Your image must be only 8 bits per channel. In the top menu select Image>Mode>Grayscale. Then select Image>Mode>8 Bits/Channel.
This black and white image will be the map you will use. You must now save the image as a new .PSD file.
Either Ctrl+Click or right click on the channel you have chosen and select Duplicate Channel. In Destination>Document, select New. Name your new document and click OK.
Make sure to store it somewhere you can find it easily because you will need to open it again in Step 6.
Step 4: Add a Gaussian Blur
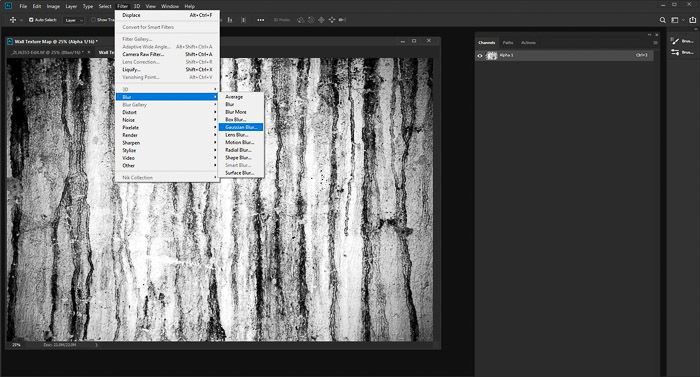
So your finished image will look more natural you need to add some blur. From the top menu select Filter>Blur>Gaussian Blur. Set the blur radius to 1 pixel.
This may vary depending on the resolution of your image. Save your image.
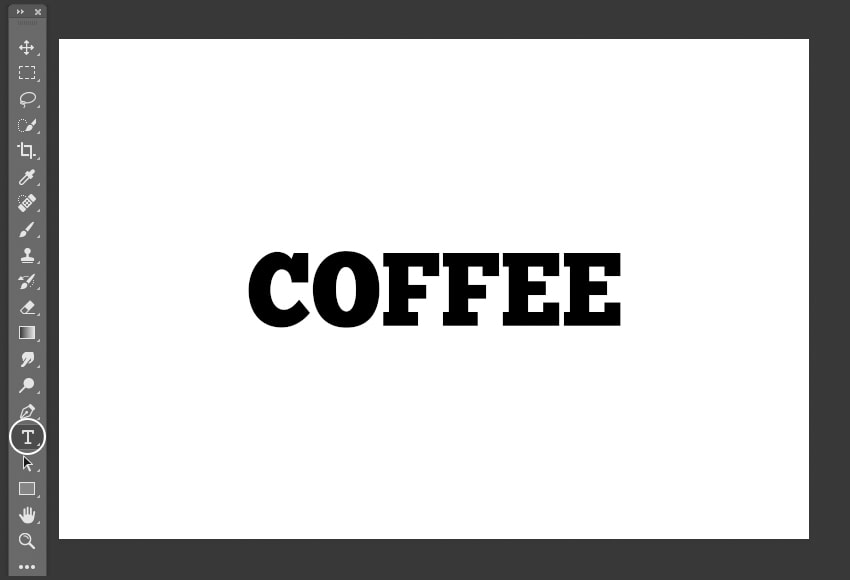
Step 5: Add Your Text Or Graphic
Go back to your original image and turn on all the channels again by clicking RGB in the Channels panel.
Type in the text or drag and drop your graphic and position it where you want it. Make this new layer the colour you want, or use black or white.
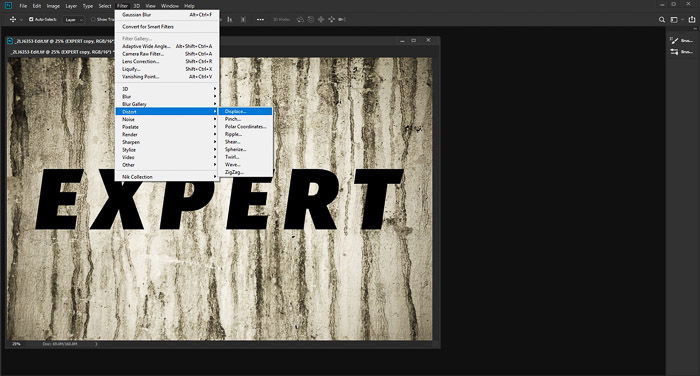
Step 6:Apply the Displacement Map
Convert your text/graphic layer to a Smart Object by using either Ctrl+Click or right clicking the layer in the Layers panel and selecting Convert to Smart Object.
Next go to the top menu and select Filter>Distort>Displace. Use the default settings and click OK. This will open a new window where you will choose the grayscale .PSD image you have just created. Select it and click Open.
Your text/graphic will now have the displacement map applied to it. Zoom into your image and view it at 100 percent.
This will allow you to best see the effect of the displacement map on your text or graphic.
Step 7: Refine the Look of Your Displacement Map
This is where you can tweak the look of your text/graphic to make it look more the way you want it. If the blend mode of the layer is set to Normal, it will most likely not look so great.
Experiment with various blend modes until you find one you want. Often the Overlay and Soft Light blend modes work well for a more natural look.
You can also duplicate the layer and change the blend mode and opacity for greater control.
Adding a Solid Color allows you to adjust the color. In the Create New Fill or Adjustment Layer in the Layers Panel select Solid Color and choose a colour that’s most suitable for your image.
On your text/graphic layer Ctrl+click on the layer’s icon in the Layers Panel. This will select only your text/graphic with the displacement map. Invert the selection using Ctrl+Shift+i.
With the solid colour layer selected, press delete. You will now see your text/graphic in the new colour. Experiment again with blend mode and opacity to alter it satisfactorily.
Alternative Uses for Photoshop Displacement Maps
Most commonly text and graphics have displacement maps added to them. You can also use other photos.
Using displacement mapping you can create, among other things, more realistic looking reflections, design packaging and add tattoos to people.
In this example I have clear cut a photo of a frangipani flower to use as a tattoo on the girl’s arm. Simply adding the flower image as a new layer without any adjustments looks very unnatural, as illustrated in the image above.
Adding the same photo by applying the steps I have outlined leads to a far more realistic result. You can see this difference in the image below.
Conclusion
Starting out with a clear idea in mind for how you want your finished photo to look after you have applied a displacement map is helpful. You need to know what you are aiming for.
This can be difficult when you are unfamiliar with the process. Try using this technique on a variety of different photos with text, graphics and other photos.
Experiment with various blend modes, layer opacities and colours. This will help you get a feel for the different alterations you can make to the process.
Practice each step and become familiar with the changes being made. When you have more of a feel for the amount of blur to add, what blend modes and opacity levels work best your creativity will flow more freely.

Have you ever tried pasting some text or other design onto a photo only to have it come out looking like it just didn’t belong?
That can be solved by using a displacement map. With it, you can adapt any element to an image by using the information from the texture underneath, similar to a clipping mask.
Once you apply a displacement map to the new component, it will seem like it goes up and down with every wrinkle, every crack, or every pore of the object it’s being placed on top of.
This tutorial will guide you step-by-step on the creation of a displacement map. Then I’ll show you how to apply it to create realistic composites. So let’s get started.
Table of Contents
What Is a Displacement Map?


Credit: Urban Sanden (background image) / Charlie Deets (dog image)
First, I should clarify what a displacement map actually is. It might sound very technical and probably daunting if this is your first time approaching it, but let me put you at ease.
A displacement map is nothing more than a greyscale version of your original image saved separately in Photoshop’s native format (PSD).
This can be used with the Displace Filter to add texture to different elements that you want to incorporate into your photo.
As with other image manipulation techniques, such as how to create a Radial Blur effect, how to change background color in Photoshop, or even how to mirror an image in Photoshop the explanation is often more complex than the execution – don’t worry. I’ll lead you through it.
When to Use Displacement Maps?
Ok, like I was saying, displacement maps allow you to really integrate different elements on a composite. I know this still sounds a bit abstract, so let me tell you some concrete examples.
Let’s say you’re working with a portrait and you want to give your subject a tattoo. If you simply paste in the design, it will be clear that it’s not part of the original. It might even look like your watermark or something completely unrelated.
Instead, if you could see how the graphics ‘wrap’ around the pores, the scars or the imperfections of the skin, then it would look realistic, because that’s how the ink of a tattoo reacts – it wouldn’t completely cover the skin.
Another common use of displacement maps is to add logos to products and objects.
For example, many photo retouchers that work with brands or e-commerce websites are already working on the images when the products are still in production.
So, you have the photograph of a prototype and you need to add the logo to make a preview image. For example, it might be a shirt that needs to have the logo on the chest area.
Then, the logo needs to be ‘distorted’ by the fabric’s weaving to look like it’s part of the shirt.
Of course, these are only some examples to explain when and why to use displacement maps in your photographic practice. There are all sorts of creative uses, so the sky is the limit.
Next, I’ll show you how you can create a displacement map, and then how to apply it. Once you know the technique, you’ll see that the creative juices will start flowing on their own.
How to Add a Displacement Map Using Photoshop
To follow along with the guide you just need to have a background image.
As I mentioned before, it’s your creativity that sets the limits so you can use any image you want. Just make sure it has enough texture, especially if this is your first time. That way you can clearly see the effect.
Also, you can grab a second image or graphic to place on the background. This is optional though because you can also use a type layer to add some text, or create a design using the Shape tool, etc. The choice is yours.
Step 1: Open your image

Credit: Annie Spratt
Open your background image in Photoshop. Make sure it’s in RGB mode, as the next step uses the channel section. You can see this by going to the menu Image and then clicking on the Mode sub-menu.
Step 2: Pick a channel

Go to the Channels panel. If you don’t have it active go to the menu Windows and activate it. Here you’ll see that your color image is labeled RGB because it puts together three channels: Red, Green, and Blue.
Click the eye icon to activate and deactivate each one of the channels and find the one that has more contrast. In my case, it’s the green channel, but this may be different for you.
Step 3: Duplicate the channel

To make a new document out of this channel, right-click on it and choose Duplicate Channel. This will open a dialogue box where you can choose the destination.
By default, it will be set to add the duplicate in the same document you’re working on. Change this to New from the drop-down menu. This way it will open as a separate file.
Name it Displacement Map. This can be done later on when you save it, but you can do it here so that you always know which document you’re working in.
Then accept the settings, and this greyscale image that comes from the channel you chose will open in a new tab.
Step 4: Add Contrast

This is an optional step. Depending on your image, it can be that even the most contrasted channel wasn’t enough. If this is the case then you can add the extra contrast now.
This can be done in several ways, you can adjust the Curves, Levels, or simply use the Brightness/Contrast tool.
It doesn’t matter which one you use – go with whichever is most comfortable for you. The amount of contrast is also a personal choice depending on your taste and the desired effect. You’ll get the hang of it after a few tries.
Step 5: Add Gaussian Blur

Now you need to blur your displacement map just a little. Open the Filters menu and choose Blur, Gaussian Blur.
This will open a dialogue box where you can set the amount of blur you want. Don’t overdo it, just add enough so your effect isn’t too extreme. Remember that the desired result is a realistic integration of the elements.
This is again a matter of choice depending on the look you want to achieve, as well as the size and resolution of your photo.
There is a preview window for you to check how the gaussian blur is affecting the photo. When you’re satisfied, click OK.
Step 6: Save your file
When you’re done, save this new document as a .psd file. If you named it during Step 3 then just save as it is. If not, name it now as ‘displacement map’.
You can call it what you like actually, but I recommend this name because this way it will be easy to find in the next part of the process.
Step 7: Add a smart object in the original file

You can now close the displacement map and go back to your original photo. Here you can add whatever it is you want to integrate into your composite: some text, a logo, or a second image.
If you’re creating this element in Photoshop, for example using the Shape or the Text tools, then you’ll need to convert them into smart objects.
When you create texts and vector graphics, Photoshop places them as a new layer. To find it just open the Layers panel.
Here you can go to the menu and choose Convert to Smart Object. You’ll notice the thumbnail icon will change.
If, instead, you decided to add a second image or to import the graphics, use the Place Embedded option from the File menu. This way it will be pasted directly as a smart object.
Step 8: Apply the displace filter

Now you can go to the menu Filters, Distort, Displace. From the dialogue box that this opens, choose the adequate values.
As a default, these will be set to 10. I always start with that, and most of the time this is good.
When you choose the values, it will open up a browser window. From there you need to select the displacement map file you created with the black and white image.
If you want to change the values from the Displace filter, just double-click on the filter from the Layers panel and it will open the dialogue box again. This is possible because you applied it to a Smart Object.
Ok, now your object is distorted, but usually this doesn’t mean it looks integrated. For this, you have to change the blending.
Step 9: Apply a blending mode

There are two ways to adjust how both layers interact. The first is to change the Blend Mode from the Layers panel.
Make sure the top layer is selected (the one with the smart object). Then, open the drop-down menu and start scrolling through the blending options. For example, Multiply or Soft Light work well for this effect.
Another technique that you can apply either in combination with the first one or as the only solution, is the Blend If tool.
To reach this, double-click on the layer, next to the name. This will open the Blending Options window. In it, you’ll see two sliders on the bottom right. These are the Blend If tool.
Start moving them until you find the result that you’re looking for, just make sure that the Preview option is checked. The top slider causes certain tones from the top layer to disappear, while the bottom slider makes visible certain tones from the underlying layers.
So move them both until you find the right balance. To smooth out any transition, you can ‘break’ the sliders by holding the alt key while dragging them. This will create a start and finish point for each one creating a better transition.
3 Quick Tips for Realistic Displacement Maps
- Always use the Blend If tool for a more professional result.
- You can use the Liquify filter if you need to follow the natural lines of the background.
- Consider the point of view and vanishing point of the original image.
Displacement Mapping | Final Words
That’s it! You’ll find that using a displacement map in Photoshop is done in a few steps but it opens up an infinite number of creative possibilities.
Don’t be afraid to try it out and experiment to see what unique results you can get!
What You'll Be Creating
В этом уроке вы узнаете, как создать текстовый эффект, используя карту смещения в Adobe Photoshop.
Я создал шаблон Text Destroyer с неограниченными текстовыми эффектами, используя ту же самую технику, который доступен в моём профиле на GraphicRiver.


Исходные материалы
Следующие исходные материалы были использованы для создания данного урока:
1. Подготавливаем Рабочий Документ
Шаг 1
Идём Файл – Новый (File > New), чтобы создать новый документ, с которым мы будем работать. Установите следующие значения: Ширина (Width): 2000 px; Высота (Height): 1500 px; разрешение 300 dpi.


Шаг 2
Нажмите клавишу “T”, чтобы активировать инструмент Горизонтальный текст (Horizontal Type Tool), а затем создайте любой текст на своё усмотрение.


Шаг 3

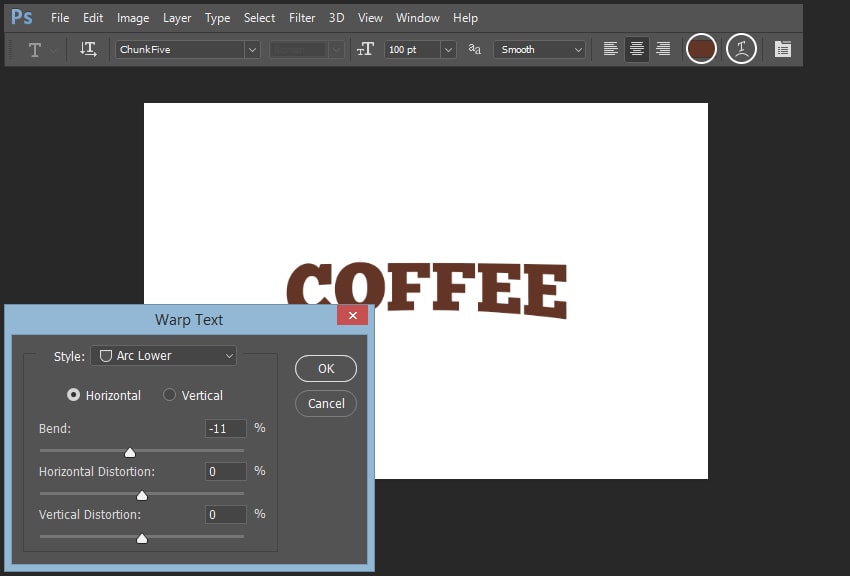

Шаг 4
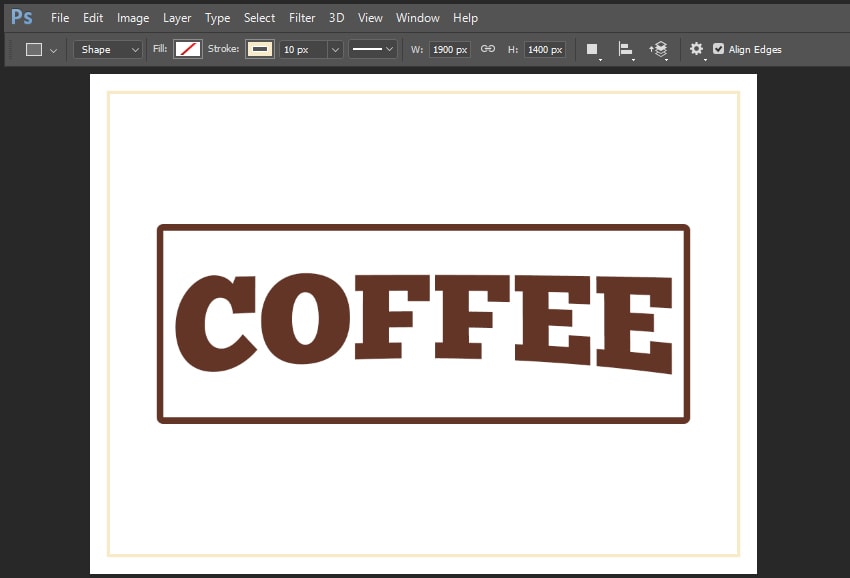
Нажмите клавишу “U”, а затем выберите инструмент Прямоугольник со скруглёнными углами (Rounded Rectangle). Создайте фигуру со следующими размерами: Ширина (Width): 1600; Высота (Height): 600; Радиус (Radii): 20 px для каждой стороны.


Шаг 5


Шаг 6


Шаг 7
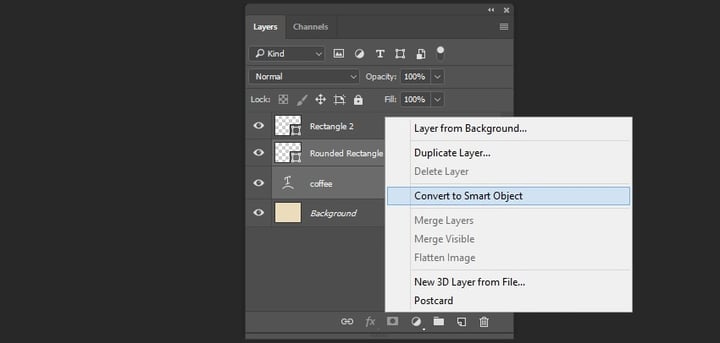
Выделите слой с текстом и слой с прямоугольником со скруглёнными углами, а затем щёлкните правой кнопкой мыши по выделенным слоям и в появившемся окне, выберите опцию Преобразовать в смарт-объект (Convert to Smart Object).


Шаг 8
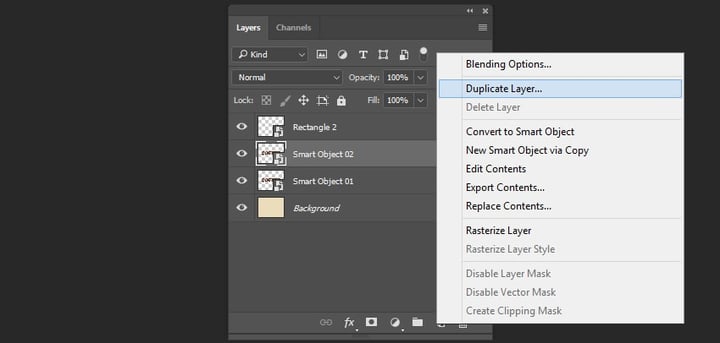
Таким же образом, преобразуйте второй прямоугольник в смарт-объект, как мы только что делали, а затем щёлкните правой кнопкой мыши по первому смарт-объекту, который мы создали ранее и в появившемся окне, выберите опцию Создать дубликат слоя (Duplicate).


2. Создаём Карту Смещения
Шаг 1
Откройте исходную Текстуру 01 в новом окне, а затем нажмите клавиши (Alt+Ctrl+I), чтобы увеличить размеры текстуры до 2000x1500. После этого, нажмите клавиши (Shift+Ctrl+S) и сохраните нашу текстуру в качестве .psd файла.
Шаг 2
Перейдите на слой со вторым смарт-объектом, а затем идём Фильтр – Искажение – Смещение (Filter > Distort > Displace), далее, выберите наш созданный файл .psd в качестве карты смещения со следующими настройками: Масштаб по Горизонтали (Horizontal Scale): 5; Масштаб по Вертикали (Vertical Scale): 5; Растянуть (Stretch To Fit); Повторить граничные пикселы (Repeat Edge Pixels). После этого, примените тот же самый фильтр с теми же самыми настройками для слоя с большим прямоугольником.


Шаг 3
Перейдите на слой с первым нашим смарт-объектом, а затем идём Фильтр – Искажение – Смещение (Filter > Distort > Displace), далее, выберите наш созданный файл .psd в качестве карты смещения со следующими настройками: Масштаб по Горизонтали (Horizontal Scale): 0; Масштаб по Вертикали (Vertical Scale): 900; Растянуть (Stretch To Fit).


Результат должен быть, как на скриншоте ниже:


3. Добавляем Текстуры на Рабочий Документ
Шаг 1
Теперь нам необходимо добавить текстуры, а также применить стили слоя к нашим эффектам. Выделите все слои, затем щёлкните правой кнопкой мыши по выделенным слоям и в появившемся окне, выберите опцию Создать новую группу (Create a New Group).


Шаг 2


Шаг 3


Шаг 4
Теперь нам необходимо поменять режим наложения для слоя с прямоугольником на Перекрытие (Overlay) в палитре слоёв.


Шаг 5
Перейдите на слой с группой слоёв, а затем нажмите значок Добавить слой-маску (Add a layer mask), чтобы добавить слой-маску.


Шаг 6
Откройте исходную Текстуру 01, а затем нажмите клавишу “M”, чтобы активировать инструмент Прямоугольная область (Rectangular Marquee Tool). Далее, выделите полностью текстуру, а затем нажмите клавиши (Ctrl+C).


Шаг 7
Удерживая клавишу (Alt), щёлкните кнопкой мыши по миниатюре только что созданной слой-маске, а затем нажмите клавиши (Ctrl+V), чтобы вклеить текстуру в качестве маски слоя.


Шаг 8
После этого, нажмите клавиши (Ctrl+I), чтобы провести инверсию маски.


Шаг 9
В заключение, мы добавим заключительные штрихи. Откройте исходную Текстуру 02, переместите данную текстуру на наш рабочий документ, расположив поверх всех остальных слоёв. Поменяйте режим наложения для данного слоя с текстурой на Умножение (Multiply). Далее, нажмите клавиши (Alt+Shift+Control+B), чтобы преобразовать текстуру в чёрно-белое изображение.


Отличная Работа, Мы Завершили Урок!
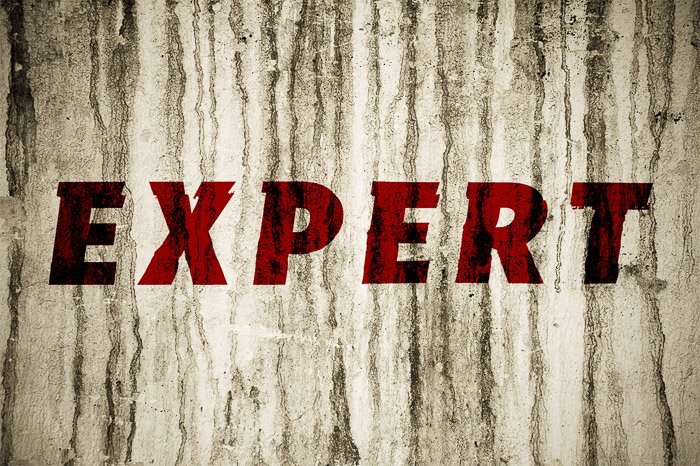
Поздравляю! Мы создали текстовый эффект, используя карту смещения, а также бесплатные текстуры. Вы можете увидеть итоговый результат на скриншоте ниже:


Если вы хотите создать похожие эффекты всего лишь за несколько кликов, тогда посетите страничку моего шаблона Text Destroyer в моём портфолио на GraphicRiver.
What You'll Be Creating
In this tutorial, you will learn how to create a text effect using displacement mapping in Adobe Photoshop.
I created a Text Destroyer with unlimited text effects using the same method for my GraphicRiver portfolio.
Tutorial Assets
You will need the following in order to complete this tutorial:
1. How to Prepare the Document
Step 1
Go to File > New and create a new file to work with. Use the following settings: Width: 2000 px; Height: 1500 px; 300 dpi.
Step 2
Click T to open the Horizontal Type Tool and create any text you want to use.
Step 3
Step 4
Click U and select Rounded Rectangle, and then create a shape with the following settings: Width: 1600; Height: 600; Radii: 20 px on each side.
Step 5
Step 6
Step 7
Select the text layer and the rounded rectangle layer, and then Right Click and select Convert to Smart Object.
Step 8
Convert the second rectangle to a Smart Object as we did before, and then Right Click on the first Smart Object and select Duplicate.
2. How to Create a Displacement Map
Step 1
Open Texture 01 in a new window and press Alt-Control-I to change the size of the texture to 2000x1500. After that, press Shift-Control-S and save our texture as a .psd file.
Step 2
Select our second smart object and go to Filter > Distort > Displace, and then select our psd. file as a displacement map with the following settings: Horizontal Scale: 5; Vertical Scale: 5; Stretch To Fit; Repeat Edge Pixels. After that, use the same filter with the same settings for the big rectangle layer.
Step 3
Select our first smart object and go to Filter > Distort > Displace, and then select our .psd file and use the following settings: Horizontal Scale: 0; Vertical Scale: 900; Stretch To Fit.
This is how our image will look after the manipulations listed above:
3. How to Add Textures to the Document
Step 1
Now we need to add textures and create layer style effects for our document. Select all the layers and then click on Create a New Group.
Step 2
Step 3
Step 4
Now we need to change the Blending Mode of the rectangle layer to Overlay in the Layers panel.
Step 5
Select the group of the layers and then click on the Create Mask icon.
Step 6
Open Texture 01 and click M to open the Rectangular Marquee Tool. Then select the whole texture and press Control-C.
Step 7
Alt-Right Click on the mask of the group and then Control-V to paste the texture as the mask of the layer.
Step 8
After that, press Control-I to invert the mask.
Step 9
Finally, to add the final touches, put the Texture 02 above all layers and change the Blending Mode to Multiply. Then press Alt-Shift-Control-B to convert the texture to black and white.
Awesome Work, You're Now Done!
Congratulations! You have created a text effect using a displacement map and free textures. Here is our final result:
If you would like to create similar effects in a few simple clicks, then check out my Text Destroyer item in my GraphicRiver portfolio.
Читайте также: