
Как сделать глитч эффект в adobe premiere
Монтажные переходы или просто переходы – это способ соединения отдельных монтажных кадров в ваших будущих роликов. Собственно, Adobe Premier Pro – одна из лучших программ, позволяющих это делать, поэтому в нашей статье – мы в подробностях расскажем и покажем вам, как и что нужно делать.
Как сделать переход
Сразу скажем, что благодаря многофункциональности программы – переходы можно делать самыми разнообразными, поэтому в сегодняшней статье – мы попытаемся рассказать и показать вам их все. Сразу скажем – вы сможете использовать любые переходы. Единственное – смотрите, чтобы переход был в тему видео. Например, если вы снимаете природу, то переход при помощи глитч-эффекта – будет смотреться максимально глупо.
Растворение
Первый переход, о котором мы хотим сегодня рассказать – это dissolve или растворение. Для этого – обратите внимание на левую нижнюю табличку и найдите там пункт Effects, сверху. Там вы должны будете выбрать пункт Video Translitions.

Собственно, в этой папке очень много различных переходов, но многие из них – выглядят устаревшими, поэтому мы рекомендуем вам использовать переходы из папки Dissolve. Собственно, выбирайте один из понравившихся переходов. Зажмите на нем ЛКМ и перетащите его на ваш стык, на 2 роликах, на таймлайне.

При необходимости – длительность перехода можно растянуть, по времени, выбрав мышкой край перехода на таймлайне и просто растягивая его в сторону.
Глитч-эффект
Такой переход будет смотреться круто, на различных игровых роликах или роликов, касающихся компьютерной техники.
Изначально – перематываем ролик ближе к переходу. За несколько кадров до него – обрезаем кусок лезвием и перетаскиваем его на второй слой, зажав Alt.

Копируем наше видео и в самом верху – находим иконку Window и там – выбираем пункт Lumetri Color.

В правой открывшейся табличке – экспериментируете с цветовой гаммой.

Ну а в левой табличке – вы можете сдвинуть, развернуть и т.д., ваше видео.

Тоже самое делаем и с началом второго видео, после перехода. Ну а для более сочного эффекта – можно наложить какой-нибудь звуковой эффект гличта, на момент перехода. Его мы зыкидываем на таймлайн, только уже снизу.

Собственно, весь прикол работы с глитч-эффектом заключается в том, что переход с ним – вы можете делать абсолютно свободно, так, как того требует ролик и вы сами.
Можно применять еще такие эффекты, как Motion, Light Leaks, Swipe. В принципе – работают они аналогичным образом, как и предыдущие, описанные нами. Все, что вам потребуется – это найти их в нижней левой табличке и применить их на ролике.
Плагины
А вот плагинами вам придется пользоваться много и постоянно. Ведь именно они позволяют добиться максимально крутого эффекта, не хуже, чем в случаях, которые мы описали вам выше.
Вот эти плагины –Film Impact и Handy Transitions for Premier Pro. Правда докачивать их придется уже отдельно, но и переходы там – достаточно крутые, а главное – их настолько много, и они настолько разнообразные – что вам нужно будет просто забросить их на стык и выровнять по времени.
![]()
Glitch Transitions for Premiere Pro are versatile and trendy transitions to use in your video projects. There’s a wide variety of different glitch styles, from impact hits to digital distortion, and all of them add a cool, edgy vibe to your videos. If you don’t want to create your own you can easily download Premiere Pro templates and add them straight into your project. So read on to discover some of the glitches you can use, and stay to the end of the article to learn how to use them in Adobe Premiere Pro.
Part 1: Full List of 30 Amazing Premiere Pro Glitch Transitions
1. Free Adobe Premiere Transitions
Choose from ten unique glitch transitions in this pack that you can download today for absolutely free. Each one has a lot of character and would work great with some digital noise sound effects.
2. Glitch Kit
No need to work in After Effects to get great results from these glitch effects. There are 100 ready-to-use modular scenes that can be combined to make completely unique transitions. This pack even comes with sound effects, and no plugins needed.
3. Glitch Transitions Templates
Get this amazing pack of 20 ready-to-use transitions that will add colorful and dynamic seamless glitch effects perfect for any video project. Upgrade the look and feel of your work and impress your audience.
4. Glitch Transitions
The six transitions in this pack are colorful, dynamic, and would work well in any kind of video project. Whether you’re making a promo video, TV commercial, or social media video, use these glitch transitions to step up the quality.
5. 14 Glitch Transitions
Choose your favorites and get creative with the diverse glitches in this premium pack. Each one has its own sound effect, and the results are dynamic and stylish. Perfect for any kind of video.
6. Glitch Shuffle Transitions
This is a fun repeating tile effect. There are 17 transitions to choose from in the pack, and none of them need plugins to work. The pack also comes with a video tutorial so you can download and get started right away.
7. Dynamic Glitch Transitions
Fast, fun, and bright. Whether you’re looking for a fatal system error, a 3D flip, or a distorted whip pan, it’s all here in this transitions pack. No plugins, no design knowledge needed, just download and import them into Premiere.
8. Glitch Transitions
There’s bound to be something among these 36 transitions to work with. Combine them with your video footage, images, or text to make some awesome dynamic glitch transitions and bring your project to life.
9. Disordered Transitions
Tear up your beautiful footage and morph it into another shot with these cool, edgy transitions. Break the mold of your corporate presentations by using some of the 14 glitches in this pack. No need to download any plugins, no need to learn After Effects.
10. No Signal Glitch Transitions
This pack is themed around security companies and bad video signals. Give your videos a techno-thriller style that combines text with footage in a fun, dynamic way. Simply download it and boot it up in Premiere Pro.
11. Chaos Transitions
Some really creative distortion styles in here. These glitch transitions work just as well on images as on videos, and they’re super easy to use. Try using it in your video portfolio to keep up the momentum.
12. Glitch Horror Transitions
10 horrific glitches guaranteed to send a shiver down your spine. Warp your images into one another using these glitches and scary sound effects to really spook your audiences. Great for horror trailers.
13. Digital Transitions
This pack is themed around high-tech, futuristic digital noise. Bright, colorful, and clean, the transitions in this download will get you between scenes in a really smooth, fun way. Simply download them and import them into Premiere Pro to start using them.
14. Pixel Glitch Transitions
The transitions in this pack are themed around digital pixels breaking up and falling apart, but the effect is so adaptable it can work with any kind of content. Whether you’re making a promo, TV commercial, or corporate presentation, use these glitches to step up the quality.
15. Extreme Glitch Transitions
Dynamic, creative, adaptable – what is there to not love about this transition pack? There are six different movements that can be customized and combined: offset, rotation, twirl zoom, distortion, and mix. What are you waiting for?
16. Cyberpunk Glitch Transitions
Turn up the neon lights and get to work with these awesome retro-modern cyberpunk glitch transitions. Perfect for any kind of futuristic video or portfolio that you want to add some dramatic bite to.
17. 13 Glitch Transitions
The abstract effects in this pack create a really cool future punk vibe. System error crashes and bad TV signals would look great in tech-related content.
18. Glitch Mirror Transitions
Music video? Sports video? Holiday video? Small business promo? Whatever you’re making you can definitely get some good use out of these glitch transitions. They’re dead easy to use directly within Premiere Pro, too.
19. Glitch Zoom Transitions
There are 20 stylish zoom transitions to play within this pack. Combine them with sound effects and bring your sports videos to life, or make an awesome opener for your YouTube channel.
20. Distortion Light Transitions
What do you get if you cross stylish glitches with beautiful light leaks? This incredible pack of distortion transitions, that’s what. Perfect for adventure sports videos or just anything you want to increase the quality of.
21. Game Glitch Transitions
Here’s a pack of super fun retro game effects. Pick your favorite from the 13 colorful, dynamic transitions on offer and just drag it onto the edit, no plugins required.
22. Liquid Glitch Transitions
Fluid, colorful, vibrant, what more do you need from a pack of transitions? Add these 12 clean effects to your Premiere Pro projects to dress up your YouTube videos, TV ads, or documentaries.
23. Glitch TV Transitions
Impact glitches with an added dash of TV static. There are 8 unique transitions in this pack, and you can start using them in Premiere Pro right away. No need for any After Effects knowledge, no need for any plugins.
24. Glitch Neon Transitions
Get from one scene to the next in colorful style with these awesome neon glitch transitions. Loads of light, loads of attitude, and a really creative way to mix up your videos and keep up the momentum.
25. Glitch Offset Transitions
These glitch overlays are fast-paced and work great in sports videos, action films, and music videos. Anything with a lot of camera movement will look fantastic with these dynamic transitions.
26. Pixel Sort Transitions
Sweep from one shot to another in a flurry of pixels with these transitions. These work well with images, video clips, or text, so they’re adaptable to most projects. Try them out in your presentations or showreels.
27. TransGlitch
Clean, smooth, and simple – the 16 transitions in this pack will work beautifully with any kind of video project or presentation. You can use them directly in Adobe Premiere Pro, so just download them and get started right away.
28. Fast Glitch Transitions
This pack includes 10 ready-to-use real tv glitch effects that will tie all your footage together seamlessly. Shift through your media with smooth and fast transitions. Easy to use, just insert your media in shots and render.
29. Glitch Transitions For Premiere Pro
With more than 90 transitions to choose from, this pack is definitely one to add to your editing arsenal. Create dynamic and impressive videos without spending hours and easily combine these glitch transitions to get a diverse and unique style.
30. 20 Digital Glitch Transitions
Infuse your videos with digital noise and animated distortion transitions for additional energy and intensity. Not only that, these 20 are so easy to use – apply them in 2 clicks, just by dragging and dropping them above your video.
Part 2: How to Use and Apply Glitch Transitions in Premiere Pro
Using these glitch transitions is super simple in Premiere Pro. To start with, you need to pick your favorite (which isn’t exactly an easy task!) and then download the pack. When you open up the Premiere Pro project you’ll find some existing sequences and placeholder images.
And that’s it! Remember to keep your projects tidy and title them correctly so you can find them easily later on.
Premiere Pro glitch transitions are a really exciting way to add some interest and movement to your projects. You don’t have to be a Premiere Pro expert to get great results, either. Thanks to these amazing transitions you can easily swap out footage and drag new sequences into the timeline all directly within Premiere Pro, keeping your workflow fast and tidy. Check out our other post on more glitch resources.

Premiere Pro CC comes jam-packed with everything you need to create your own custom glitches. With a few minutes and a little creativity, you can simulate a glitch in your footage, transitions, and titles. And in this tutorial, you’ll learn some quick & easy ways to produce custom glitch effects in Premiere Pro.
If you use them intentionally, they can make your video feel spooky, high-tech, and cool. So, let’s dive into how to achieve this look!
Part 1: 5 Free Glitch Presets from Motion Array
We like to give our readers lots of free stuff, and we make a lot of graphic elements for Adobe After Effects, but here’s a set of graphic elements for Premiere Pro. This is perfect for editors looking for a little something extra inside of their editing workflow.
You can also explore Motion Array’s 5 Premiere Pro Native Plugins designed as a drag-and-drop transition solution.
Glitch Presets Premiere Pro
That’s right, we are giving you 5 free glitch presets for Premiere Pro. Simply drop the presets on a photo, video, or text element to add digital noise to your shot. They are perfect for transitioning from scene to scene, for title sequences, or just to break things up a little.
Then take these bad boys for a spin yourself. They are completely free to download. And then they are yours. As always, use them for personal or commercial projects. Wear them out. Change them up. Go to town. Although they are really simple to use, we made a tutorial for you just to make it that much easier.
Part 2: How to Glitch Your Footage
You can create a wide variety of cool glitches in your footage using Adobe Premiere Pro’s built-in tools. The strobing glitch effect you’ll create below uses flickering distorted images and works great in small bursts throughout your clip, or just before a transition.
Step 1: Add Your Footage to the Timeline
If you’ve already begun editing your project, go ahead and skip this step, otherwise follow the instructions below to get started.
- Set up your project and sequence.
- In the Project panel, import the footage you would like to include in your video.
- Drag your footage into the timeline.
Step 2: Cut Out Frames from Your Footage
Glitches are defined by randomness in short bursts, so choose a small section of your footage and cut out individual frames to be glitched. Overall, try to keep your glitch less than 1 second long.
- Choose which part of your footage you’d like to glitch, and zoom in on the timeline.
- Using the Razor tool, cut out several frames in succession.
- Now switch to the Selection tool and delete some of the frames.
Step 3: Add Effects to Remaining Frames
If you preview your project now, you should see a strobe effect from the frames you’ve removed. To make this more “glitchy,” you can add effects to the remaining frames.
- Using the Selection tool, hold Alt and drag the remaining frames up to create a copy.
- Select one of the new copied frames and reduce its Opacity to 50% in the Effect Controls panel.
- Adjust the Position or Scale of the image.
- Repeat the previous steps with each of the remaining frames in your timeline.
- Experiment adding different effects to these frames. Try Arithmetic to modify RGB color channels.
Now move the playhead to the beginning of the timeline and press Space to check out your new glitch effect! If you’d like to make adjustments, feel free to keep changing the effects settings until you’re happy with the results.
Part 3: Make Your Text Glitchy
Sometimes static text is crucial for your project but can look a little boring. Adding occasional glitch effects to your titles is a great way to spice them up! Completing the steps below should only take a few minutes, and can really improve the production value of an otherwise banal title.
Step 1: Format Your Text
Before you get started glitching your titles, you’ll want to make decisions about the word content and formatting — as these will be very difficult to change later on.
- Using the Text tool, add your text by clicking in the Program Monitor and typing in the text.
- In the Effect Controls panel, you can adjust formatting properties such as size, font, and alignment.
- Finally, make sure your text is positioned correctly, and the anchor point is directly centered in the middle of the text.
Step 2: Copy Your Text & Add Effects
You can be creative and experiment with different effects if you like. We will walk you through how to create glitches with the Wave Warp effect.
- Duplicate your text layer by holding Alt and dragging it up to the next track. A copy of your text should appear above your original. This will be the layer you modify for the glitch effect.
- Search for Wave Warp in the Effects tab and drag that effect to your new text track.
- In the Effect Controls panel under Wave Warp, change Wave Type to Square.
Step 3: Adjust Effects for Each Portion of Glitch Text
Sudden, jarring transitions in the effects of your text are what creates a realistic glitch effect. Now that you’ve created a second text layer and added the Wave Warp effect, it’s time to slice it into pieces and adjust the effects on each piece.
- Using the Razor tool, cut small sections out of your glitch text layer. Make sure you’re zoomed in close to the timeline; each of these cuts should only be 1 or 2 frames long.
- Switch to the Selection tool and select one of the small clips you have just created.
- In the Effect Controls panel under Wave Warp, adjust the Wave Height, Wave Width, and Direction properties. We recommend always adjusting the Direction to multiples of 90.
- Repeat step 3 for each small clip in your glitch text layer. You can also try adjusting the Scale of some of the clips.
- Back to the original text layer in the timeline, use the Razor tool and remove any portion that is under the glitch text to prevent double images. Also, remove any extra text left in the glitch layer.
If you preview your text now, all your edits should combine to form a glitchy effect. You can choose to repeat this effect in different places throughout your video, such as when new text appears on screen, or just before cutting away to video footage.
Part 4: Add Sound to Enhance the Effect
Half of all video is audio, so don’t forget to add sound effects whenever you glitch! You can find your sound file of static or other glitchy noises online, or you can download the custom glitch sound effect we’ve provided.
- Prepare your own audio, or download a glitchy sound effect from Motion Array.
- Import the sound file into your Project panel.
- Drag the sound effect into the timeline, and trim it so it begins and ends with your glitch effect.
You can use this simple trick to add sound to any glitch effect, transition, or text you’ve created in your video. You can also layer different sounds on top of each other for some interesting results!
Part 5: Create Your Own Glitch Transitions
If you’ve already established a theme of glitch effects in your video project, then glitch transitions will fit right in. This RGB Shift transition simulates the “Chroma Aberration” effect associated with faulty displays.
Step 1: Load Your Clips into the Timeline
If you’re already in the middle of editing your project, you can move on to step 2; otherwise, follow the instructions below to get started.
- Import the video clips you’d like to include into the Project panel.
- Drag them into your timeline in the order you’d like them to appear. Make sure they’re on the same video track.
- Adjust the length and position of the clips in the timeline for your transition.
Step 2: Add Adjustment Layer Over the Transition Point
Adding an Adjustment Layer to a new track will allow you to include and animate effects that will span across both clips in your transition.
- Select the Project panel and then go to File >New >Adjustment Layer.
- Drag your new adjustment layer into the timeline, and position it, so it is centered above the two clips in your transition.
- Adjust the beginning and end points of your adjustment layer, so it is about .5s to 1s long, centered over the meeting point of your two video clips.
- In the Effects tab, search for Channel Mixer and drag that effect to the adjustment layer in your timeline to add the effect.
Note: Make sure you are adding Channel Mixer from Video Effects, not Audio Effects.
- Also, search for Transform and add that effect to your adjustment layer.
- Finally, with your adjustment layer selected, change the Opacity Blend Mode to Lighten in the Effect Controls panel.
Step 3: Duplicate Your Adjustment Layer
You will be using these adjustment layers to isolate the red, green, and blue from your video clips and shift their positions for the transition. Duplicating the adjustment layer allows you to modify each of these color channels independently.
- Hold Alt and drag your adjustment layer up to create a copy. Repeat this step until you have three adjustment layers stacked on top of one another.
- Select one of the adjustment layers, then in the Effect Controls panel under the Channel Mixer effect, adjust Red-Red to 0. Do the same for Green-Green, leaving only Blue-Blue at 100.
- Repeat the above step for each of your adjustment layers, but changing the color so that you have one red, green, and blue adjustment layer.
Step 4: Add Keyframes to Your Adjustment Layers
Having separated the color channels in the previous step, now you’ll shift their positions using keyframes to create the RGB Shift effect.
- With one of your adjustment layers selected, in the Effect Controls panel, under Transform, create a Position keyframe at the beginning, middle, and end of the clip.
- Adjust the Position attribute for the middle keyframe but leave the other two the same.
- Repeat the above two steps for each adjustment layer, moving the Position attribute in different directions. You should see your video’s red, green, and blue channels separate from each other in the Program Monitor.
Step 5: Adding Bursts of Static
To make this transition even more glitchy, you’ll be adding short bursts of static with the Noise effect by creating a new Adjustment Layer and cutting it into single frames.
- Create a new adjustment layer, drag it onto your timeline above your three current layers, and trim it to match the same timing.
- Find Noise in the effects tab and drag it to your new adjustment layer.
- In the Effect Controls panel, adjust the amount of noise in your adjustment layer to 100%.
- Zoom in close with the timeline and cut out several single frames across the duration of your transition. You can also choose to add WaveWarp to some of the frames.
- Select and delete all the remaining portions of your adjustment layer, so you just have a few frames of Noise throughout your transition.
Step 6: Scale Up to Avoid Black Edges
While adjusting the Transform Position of your adjustment layers in step 4, you may have noticed black edges appearing around your video. To fix this, you’ll simply need to zoom in by scaling everything up a few percent.
- Create a new adjustment layer, and drag it onto your timeline above your previous adjustment layers.
- Stretch this adjustment layer in the timeline, so it covers both video clips.
- Add the Transform effect to the adjustment layer and increase the Scale until the black edges are no longer visible during the transition.
This RGB shift is just one of many glitch-type effects you can use for your transitions. You can also try applying the custom effects from earlier in this tutorial to create new types of glitch transitions, as well.
Whether you’d like to download a premade template or build your own glitches from scratch, Premiere Pro has got you covered. Glitches are a great way to animate still text, spice up transitions, or add production value to your footage.

Glitch effects are everywhere these days. For cool cyberpunk and techno looks, you can’t beat a slick glitch effect. There’s several ways to do this but this tutorial is about the most effective, simplest method to achieve the aesthetic. In fact, not only will we give you a cool glitch effect to work with, we’ll even be putting in a glitch-like transition to add some extra punch.
Getting the Project Files
Overview
The first thing we’ll be doing is adding a VR Chromatic Aberration to an Adjustment Layer already provided for you. We’ll be, of course, modifying some settings and keyframing it. After that is another VR Chromatic Aberration added to some footage, keyframing that, then a final Mosaic effect to finish it off.
Let’s get started!
VR Chromatic Aberration
- In the Effects panel, type in VR Chromatic Aberration.
- Drag and drop that effect onto the Adjustment Layer in your project.
- Now, select the Adjustment Layer.
- Go to the Effect Controls panel in the top left and scroll down until you see the new effect that you just applied.
- Move the Playhead on the Timeline to 00;00;02;07.
- Ok, here we go! Next to Aberration (Red), hit the diamond shape to start keyframes.
- Change the value to 0.
- Do the same for Aberration (Green), hit the diamond shape for that one.
- Change the value to 0.
- Aberration (Blue), once more start keyframing with the diamond shape.
- And of course, change the value to 0.
- Move the Playhead to 00;00;02;12.
- Change the value of Aberration (Red) to 30.
- Change the value of Aberration (Green) to -80.
- Then change the value of Aberration (Blue) to 15.
- Now move the Playhead to 00;00;02;18.
- Change the value of Aberration (Red) to -25.
- Yep, change the value of Aberration (Green) to -10.
- And change the value of Aberration (Blue) to 60.
- Move the Playhead to 00;00;02;24.
- Now change the value of Aberration (Red) to 0.
- Change the value of Aberration (Green) to 0.
- Change the value of Aberration (Blue) to 0. Phew!
- Next to Auto VR Properties, check the box.
- In the dropdown menu that appears, choose the option Stereoscopic (Over/Under).
- Last thing to keyframe now. Move the Playhead back to 00;00;02;07.
- Next to Falloff Invert, click the box. This will set a keyframe for a bit of screen jitter.
- Hit the right arrow key twice to move ahead two frames.
- Once more, click the Falloff Invert box to set another keyframe.
- Repeat the prior two steps until you get to 00;00;02;24;
Your Effect Controls will look something like this:

Glitch Effect

- We’ll work on the glitching city footage next. Click the VR Chromatic Aberrations effect name within the Effect Controls panel.
- Hit Cmd-C (Mac) / Cntrl-C (PC) to copy the effect.
- Select the New York City footage.
- Cmd-V (Mac) / Cntrl-V (PC) to paste the effect.
- Now, in the Effect Controls panel for the New York City footage, the VR Chromatic Aberrations effect will have been pasted to the start of the footage. We want it a bit later, so drag out a selection rectangle over all the effect keyframes, like so:
- Move the Playhead to 00;00;03;06.
- Now, with the effect keyframes selected, drag them by clicking on any highlighted keyframe to where the Playhead is, 00;00;03;06.
- Great. One last effect here, so go to the Effects panel and type in Mosaic.
- Drag and drop the Mosaic effect onto the New York City footage.
- In the Effect Controls panel, make sure the box next to Sharp Colors is checked.
- With the Playhead still at 00;00;03;06; change Horizontal Blocks to 500.
- Change Vertical Blocks to 500.
- Move the Playhead to 00;00;03;15.
- Change Horizontal Blocks to 20.
- Alter Vertical Blocks to 10.
- Move the Playhead to 00;03;23.
- Change Horizontal Blocks back to 20.
- Finally, change Vertical Blocks to 10.
- Move the Playhead back to the beginning of the project, 00;00;00;00.
- Hit the Spacebar to preview your footage. You’ll see a glitchy transition between clips and a bit of glitching on the second clip. Neat, huh?
Conclusion
Now you have an awesome glitch effect at your disposal! You can change up the color channels on the VR Chromatic Aberration if you’d like to experiment with the effect, add another Mosaic effect, or put in some Gaussian Blur as well. Add a couple of more instances of the effect along the footage Timeline for an extended glitch, or add an Overlay layer of some static footage, to name a few ideas.
Learn Motion Graphics
We offer the best motion graphics training in NYC. Our expert instructors guide students step-by-step through projects with real-world applications. Classes are available live online and in-person at our Midtown office. Sign up today and start growing your career!
Related Resources

Premiere Pro Ghost Frame Effect
The ghost frame effect—popular in music videos—is a simple technique made by using the Posterize Time effect to displace frames in the footage before blending clips together. It’s cool, eerie, and adds instant style to otherwise plain footage.

Premiere Pro: Black & White Effect
Premiere Pro has a huge library of effects and tools to allow the user to create videos with a vintage feel. In this tutorial, we’ll be combining some layered footage with a single adjustable effect in an easy and quick method.

Premiere Pro VHS Effect
With this VHS effect, you can make any film you shoot appear like you dug it out of your attic and pulled off your camcorder. It involves a few identical layers with slightly altered Effects and a fun overlay layer to give it that totally tubular, radical '90s look.
Want to create a glitch effect without any plugins in Adobe Premiere Pro? Just follow the 3 easy steps in this video tutorial.
The glitch effect has become insanely popular in the past few years. It’s in music videos, promos, and all over social media. It’s easy to assume that this effect is hard to pull off, since most of the tutorials you see on creating the effect are made in After Effects, or they require you to buy an expensive plugin.
So if you don’t have much experience in AE, we’ve found the easiest glitch tutorial on the web from Peter McKinnon on how to create a glitchy transition in three easy steps using Premiere Pro. It’s pretty rudimentary, but it gets the job done quickly.
Let’s get started!
Step 1: Cutting up Your Clip
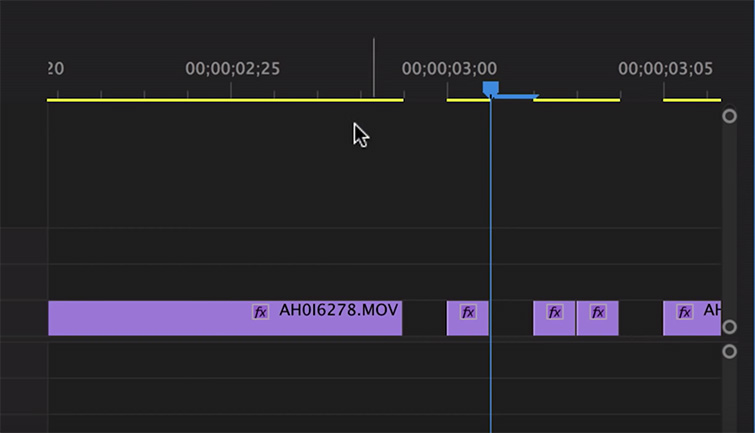
Import your clip, and throw it on to your timeline. To create a kind of strobe effect, slice up your clip a few frames at a time over a short distance. Then, delete some of the sliced up pieces to incorporate the “cut in and out” look. Make sure to switch it up to make it a bit random — make some cuts at only two frames, and the others at five frames.
Step 2: Duplication and Opacity Shifting
Now, when you’ve got your split-up timeline ready to go, take the clips that are still on your timeline and duplicate a second layer for all of them by holding Alt + Click, and dragging the duplicated clip to the V2 track in your timeline. From there, open up the video effects of the first duplicated clip. All you have to do is reduce the opacity to about 50%, and then shift the positioning just a little bit off of the original clip. This will create that ghosting effect people look for in a glitch. Move on over to your second clip and do the same, but this time zoom in a little bit using the scale tool to make this glitch a bit different from the first one.
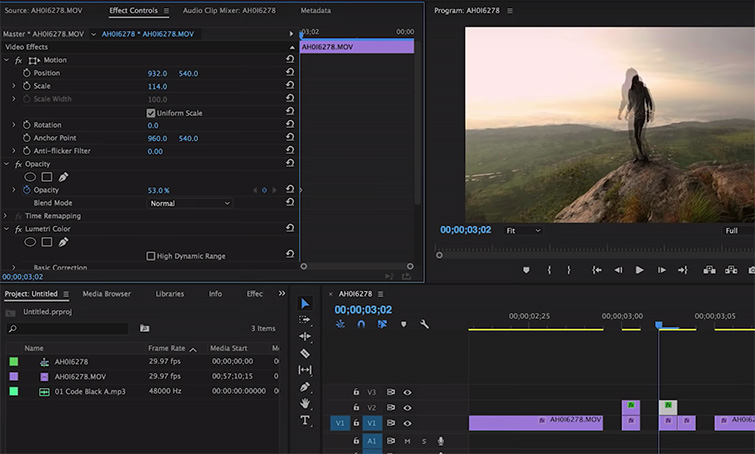
Step 3: RGB Splitting and Color Enhancing
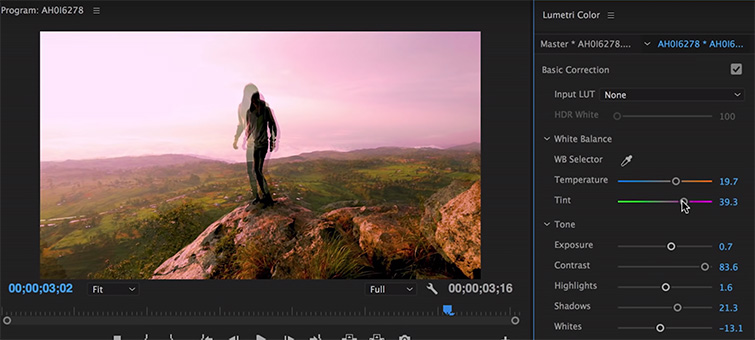
To make that glitch effect really soak in, shift the color of the V2 clip to make a cool RGB split effect. If you want to stay within Lumetri color for this, just go crazy with the saturation, tint, and exposure. Since the opacity is only at 50%, the intense color correction will blend in with the original clip to create the look you want.
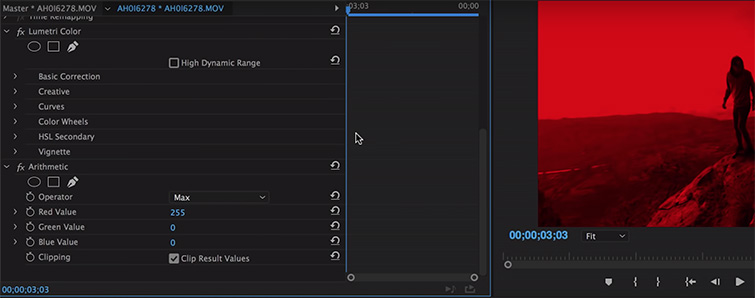
If you really want to shift the color to a deep RGB tint, throw on the Arithmetic effect from your effects panel. This effect will allow you to go deep into the RGB settings of your clip. Change the Operator dropdown settings to Max, and then shift the RGB color of your choice: Red Value, Green Value, or Blue Value. This will bring a heavy dose of stark color contrast to your glitched clip. To blend it in with the original clip, go to the opacity settings, and change it to Linear Color Dodge (add). This final blending cultivates an insane colorscape for your glitched-out sequence, adding to the surreal look you want.
Want to Try It Out in After Effects?
If you find this tutorial a little simple and want to customize your glitch even more, maybe it’s time to graduate to After Effects. Our own Josh Noel has a killer tutorial on how to really dive in to using the glitch effect on graphics and videos in AE, and incorporating RGB Splitting, Displacement Distortion, and Noise to hone in on that “fuzzed-up” glitch look you find in your grandma’s old VHS tapes. Check out the article or the video above to try it out!
In case you have no time to work on your own glitch effects, Shutterstock offers this powerful collection of glitch effects and transitions to use in your projects. These elements are drag-and-drop effects compatible with Premiere Pro and other NLEs.
Читайте также: