
Blender weight paint не работает
5 сен. 2017 в 18:56
I AM NOT TYPING LIKE THIS TO YELL I HAVE EYE ISSUES AND NEED TO TYPE LIKE THIS TO SEE BETTER. ANYWAYS. AS SAID ABOVE. I AM HAVING ISSUES WITH MY WEIGHT PAINTING. I KNOW THIS IS NOT THE BLENDER FORMS. BUT I FILL LIKE I GET MORE HELP HERE (NO OFFENSE TO ANYONE, JUST SAYING.) ANYWAYS. WHEN I WEIGHT PAINT A FINGER OR TWO ITS FINE SOMETIMES LIKE SAY WHEN I PAINT THE MIDDLE FINGER F MY CHARACTER OR RIGHT OR WHAT EVER IT IS I GO BACK TO POSE MODE AFTER I'M DONE AND SAY IF I POSE THE "LOWER ARM" OR "UPPER ARM" ONE OF THE HAND VERTICES OR ARM ONES WON'T MOVE AND IF I FIX IT ILL END UP HAVING TO FIX THE HAND ONE AND BASICALLY REDO IT ALL OVER AGAIN. CAN SOMEONE PLEASE TELL ME HOW TO STOP THE WEIGHT PAINTS FROM INTERFERING WITH TO HER WEIGHTS? AND I CHECK IN WEIGHT PAINT MODE AND SAY IF I SELECT THE FIRST MIDDLE FINGER BONE THE RIGHT VERTEX GROUP IS SELECTED CAN SOMEONE TELL ME WHY THE OTHER GROUPS ARE BEING EFFECTED WHEN I WEIGHT PAINT SOMETHING LIKE THAT? OR IS THIS NORMAL? PLEASE HELP THIS IS REALLY ANNOYING! ALSO I WANNA KNOW HOW TO MIRROR WEIGHTS AND VERTEX GROUPS OVER TO ANOTHER SIDE LIKE SAY THE FINGERS (WHEN I GET THEM FIXED) SO I WON'T HAVE TO DO MUTABLE TASKS. AGAIN PLEASE HELP. THANKS FOR READING HAVE A WONDERFUL DAY/NIGHT. ^_^ ALSO, PLEASE FORGIVE MY GRAMMAR/SPELLING IF THERE ARE ANY MISTAKES THANK YOU. AND P.S I AM SORRY TO KEEP BUGGING U GUYS WITH MY MODELING ISSUES. BUT IDK WHAT ELSE TO DO.
5 сен. 2017 в 19:33
Also, make sure you are painting, assigning, erasing, then selecting a second vertex assignment. Otherwise, you will be left with these sorts of weird mistakes. Believe me, most beginners in Blender make this mistake, and I am one of them. Mark them somehow to keep track.
The process is long and tedious, but it is always good to experiment. In addition, add a small animation in Blender to see how the deformations are looking when in motion.
Also, sorry for not answering your question using all caps the way you did (too lazy to write like that, and caps hurt my eyes).
5 сен. 2017 в 20:15
Also, make sure you are painting, assigning, erasing, then selecting a second vertex assignment. Otherwise, you will be left with these sorts of weird mistakes. Believe me, most beginners in Blender make this mistake, and I am one of them. Mark them somehow to keep track.
The process is long and tedious, but it is always good to experiment. In addition, add a small animation in Blender to see how the deformations are looking when in motion.
Also, sorry for not answering your question using all caps the way you did (too lazy to write like that, and caps hurt my eyes).
THANKS, I TRY TO PAY ATTENTION TO IT I EVEN BRING IN AN ACTUAL VALVE MODEL FOR REFERENCING. AND IT'S OK, BUT I WILL TRY TO BE MORE CAREFUL WITH IT. I JUST ASSUMED IT WOULD ALL HAVE TO BE RED FOR IT TO MOVE RIGHT. BUT I WILL LOOK INTO FIXING THE ISSUES AND HANKS FOR THE LINK ILL LOOK AT TI. ^_^ SO ABOUTT HE VERTEX GROUPS UR TELLING ME TO MAKE "SECOND" GROUPS LIKE THE ORIGINALS FOR IT TO WORK? AND ILL TAKE SCREENSHOS OF MY ISSUES IF I MUST, I CANNOT RECORD I DONT HAVE A SCREEN CAPTURE DEVICE
![]()
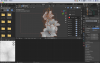
Hey anyone that reads this, hopefully you can help me. I am a amateur blender user as I've only been on it for a week now.
I recently followed a tutorial on youtube to learn how to put clothes on a character mesh rigged for animation, but I ran into an issue when I wanted to manually weight paint the clothes mesh.
I'm going to run you through everything I did, just incase I've done something wrong.

I started by selecting the clothes mesh and adding a 'Data Transfer' modifier. on the modifier settings I located the main body mesh (The Girls Body) in 'Source Object:'. I then hit the check button on 'Vertex Data', and then turned the vertex Groups(s) button on. then I clicked the 'Generate Data Layers' Button.

Now firstly I Selected the clothes mesh, held shift and then selected the armature. Then I pressed on the keyboard (Ctrl P) to apply 'armature deform with empty groups'

I then Selected the body mesh and then the clothes mesh and went into 'weight paint' mode. Now in the weight tools (on the left of the image) I applied 'transfer weights' (this opened the 'transfer mesh data settings). In these settings under 'source layers selection' I chose 'BY NAME'.

Now when I put the armature in 'pose mode' and re-select the clothe mesh to go back into 'weight paint' mode. when I select a bone I can see That the weight paint data Has been transfered from the main body mesh. But when I try to use the weight paint brush nothing happens.I'v tried all brush types (add, draw,subtract, mix etc.) Ive tried using 'face selection masking for painting. this didn't work. I've also tried enabling auto normalize, this didn't help either. and no matter what bone I select the issue remains.
![]()
I am not sure if it's cause my verts are too close together, or if it's possibly something else?
This is my armature tree
Everything is 1 mesh
The model only has about 36k poly's on it.


Model face Left

Model Face Right


![]()
I know this problem and I have faced it a lot of times before, as I am sure many others have.
There are several reasons that may cause this. However, this usually happens because the volume of some part of the model is too small to be properly assigned to a bone. This, in turn, is usually caused because you have small bones assigned to small fractions of the model. A particular example is rigging a face. Because the surface influenced by a bone is relatively small in a face rig, you usually get this error.
It is also often caused by asymmetry. In your case, I would say this is caused by the tail bones. You can easily test this by deleting a bunch of bones, such as the tail bones, and reapplying the automatic weighting.
How do you solve it? Often, all you have to do is to scale your entire model and the armature by a factor of 100, apply that new scale(ctrl + A), then finally run the automatic weighting again. You can scale it back after applying the automatic weights. Way too few people know simply scaling the model solves this, in no small part because the error message isn't just completely useless, it is also misleading, so this problem plages a lot of people.
Because of that, I usually model characters at a much larger scale than the default. It is also highly recommended [by me] to apply the scale before rigging the model.
![]()
![]()
Do you have a [Armature] modifier that is targeting the correct rig?
From what i see in the video it looks like its all failing to create a link between the armature and object (mesh data). This link is done through the [Armature] modifier.
Also make sure 'Lock Object Modes' in the 'Edit' menu (top of the screen) is unchecked.
If that is unchecked, and the modifier is properly targeting the correct armature, you should be able to set your armature to 'pose' mode then select your mesh, set it to weight paint mode, and right-click bones to select and paint their vertex group.
EDIT:
If you are coming from 2.78 and are wondering how to paint through a mesh (have a brush project through the mesh as if you were painting in x-ray). This can be done by adjusting the brush settings.
Under the 'Brush' Menu section in the 'sidebar' or 'tool settings', uncheck [] Front Faces Only In the 'Falloff' section, set 'Falloff Shape' from [Sphere] to [Projected].
I tried to do that, but nothing worked.
I'm sorry, but you need to explain an armature modifier. I'm assuming that you mean in the modifiers tab under deform. Though I looked at it and couldn't figure out what it did or how it would help me.
How create a link between the object and rig? I did parent them using automatic weights and they are connected. So, unless specific bones just suddenly disconnected from the rig and become their own rig, I'm not sure what happened.
I also couldn't find anything called 'lock object modes'. The closest I could find was a box just titled 'lock' in the settings for the bones. That box was unchecked.
I tried going from pose mode straight into weight painting, but it didn't work and while selecting the bone by right clicking sounds like the perfect solution, right clicking only brought up the brushes, so I couldn't select the bones.
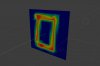
нужно покрасить с одной стороны плоскость а не на сквозь подскажите где там галочку какую поставить ?
ket tek
Активный участник
ни как не найду решение у меня частицы с двух сторон получаються((
Steve Cherk
Мастер
думаю там не плоскость надо делать, а солид модель с определенной, пусть небольшой толщиной. Тогда каждую сторону можно отдельно красить будет
ket tek
Активный участник
думаю там не плоскость надо делать, а солид модель с определенной, пусть небольшой толщиной. Тогда каждую сторону можно отдельно красить будет
ket tek
Активный участник
и не пойму почему на 2 стороны у меня частицы применяются , по идеи должно автоматом по одной стороне идти на плоскости
Steve Cherk
Мастер
надо не просто модификатором толщину, а чтобы геометрия была уже зафиксированная. Модификатор думаю не прокатит
Steve Cherk
Мастер
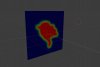
вот смотри, сделал плоскость и экструд небольшой. Толщину можно вообще до предела уменьшить. Но с каждой стороны рисует на своей стороне только
Вложения
ket tek
Активный участник
вот смотри, сделал плоскость и экструд небольшой. Толщину можно вообще до предела уменьшить. Но с каждой стороны рисует на своей стороне только
Sanekum
Знаток
Можно ещё режим выделения включить чтобы рисовалось только на выделенные вертексы
Но тут нужно не Weight рисовать, а настройки партиклов крутить Rotation\Velocity скорей всего скаттер их заставляет просто строго вверх расти, вот он и растут не там где надо, но так хз, нужно больше данных
ket tek
Активный участник
Посмотреть вложение 297165
Можно ещё режим выделения включить чтобы рисовалось только на выделенные вертексы
Но тут нужно не Weight рисовать, а настройки партиклов крутить Rotation\Velocity скорей всего скаттер их заставляет просто строго вверх расти, вот он и растут не там где надо, но так хз, нужно больше данных
решил проблему спасибо))) неделю наверно мучался . в скеттере делал ,а там надо было режим с zGlobal сменить на Hair тогда все норм оси правильно работают)
Читайте также: