
Amd v is disabled in the bios как включить
Virtual machines (or VMs, as they are commonly referred to as) are astounding things. You can use a virtualization program to create a virtual machine, and on a virtual machine, you can run an entire virtual computer – complete with its very own Operating System – in a window on your current system. Virtual machines are commonly used to try out different Operating Systems, test programs in a sandbox environment and to experiment with the features of a system without worrying about any repercussions. For virtualization programs such as VMware and Hyper-V to work on a computer, though, they need access to the hardware acceleration technology that comes built into almost all CPUs in this day and age.
The hardware acceleration technology built into Intel CPUs is known as Intel VT-X hardware acceleration and that in AMD CPUs is known as AMD-V, whereas other CPU manufacturers (such as AMD) bless their processors with different hardware acceleration technologies. In many cases, VT-X is, by default, disabled on Intel processors. Trying to run a virtual machine on a computer that has such a processor results in the virtualization app being used spitting out an error message that usually informs the user that the program needs hardware acceleration to function, but it looks as though they currently have the technology disabled.
Intel’s VT-X hardware acceleration technology can indeed be enabled and disabled at will, and all a user needs to do in order to enable or disable it is access to their computer’s BIOS or UEFI settings. This is true in the case of all of the iterations of Windows that are currently supported by Microsoft, including Windows 10 – the latest and greatest in a long line of Windows Operating Systems.
The process you need to go through in order to enable VT-X hardware acceleration on a computer varies slightly depending on whether the computer in question has a BIOS or is a UEFI computer. Computers that came with a version of Windows older than Windows 8 out of the box will almost always have a BIOS, whereas computers that came with Windows 8 or later out of the box are likely to have UEFI settings instead. The industry’s standard for computers is gradually but surely moving towards UEFI, so the newer a computer is, the likelier it is to have UEFI settings. To enable VT-X on a Windows 10 computer, you need to follow the steps mentioned below.

VT-x is disabled in the BIOS for all CPU modes (VERR_VMX_MSR_ALL_VMX_DISABLED
What is causing the VT-X is Disabled in the Bios for All CPU Modes (Verr_Vmx_Msr_All_Vmx_Disabled)?
We investigated this particular error message by looking at various user report and the solution that they used to fix the issue. This problem is not easy to fix since it occurs on both Windows and Linux. However, we managed to spot a few common scenarios that are known to trigger this particular error message:
- Virtualization Technology (VT-X) is disabled from BIOS – Most of the time, this particular issue occurs because VT-X is disabled from the BIOS level on the machine. A 64-bit host needs to have Virtualization Technology (VTx) enabled in the BIOS. On some machines, you’ll also need to enable Virtualization Technology Directed I/O (VTd).
- Your CPU doesn’t support VT-X / AMD-V – Another possible scenario is that your CPU is simply not equipped to support virtualization. This can occur with old setups that use an old CPU.
- PAE and NX are disabled on the host CPU – Several users have reported that the issue was resolved after they made sure that the virtualized CPU is configured to run with Physical Adress Extension (PAE) and NX.
- Allocated RAM is insufficient or exceeding the system’ capabilities – Changing the default Base Memory value has helped a lot of users encountering the same issue to resolve it entirely.
- 3rd-party security solution is interfering with VT-X Vt-D – There are several 3rd party AV clients that are known to cause interference with VirtualBox. Establishing a rule o uninstalling the Av client completely will resolve the conflict.
If you’re currently struggling to resolve this particular issue, this article will provide you with a list of quality troubleshooting steps. Below you have a collection of methods that other users in a similar situation have followed to get the issue resolved.
For the best results, follow the methods below in the order that they are presented until you encounter a fix that resolves the problem in your particular scenario.
Method 1: Verify whether your CPU supports VT-X/ AMD-V
Before you try anything else, let’s make sure that the system that you’re encountering the issue on is designed to accommodate VT-X (Intel) or AMD-V (AMD). If your CPU is old enough, it’s possible that it was simply not designed to support virtualization.
There are several methods that you can follow to verify if your CPU supports virtualization, but we’re going to take the easy route. SecurAble is a freeware that will help us determine your processor features and tell us whether virtualization is achievable.
Here’s a quick guide on downloading and using SecurAble to see whether your CPU supports virtualization:
-
Visit this link (here), scroll down to the download section and click on Download now.
In the event that the test showed that your machine does not support hardware virtualization, you will not be able to resolve the issue using the methods below.
Method 2: Enable Virtualization Technology (VTX) from BIOS
If you’re encountering the issue on a 64-bit host, keep in mind that you’ll likely need to enable Virtualization Technology (VTx) from your BIOS settings. On some motherboards, you will also need to enable Virtualization Technology Directed I/O (VTd)
Some motherboards come with this option enabled by default, but manual user intervention or 3rd party interference might disable it.
Note: Windows Hyper V can also be responsible from disabling VT-x on your computer.
Keep in mind that the exact menu options that involve the enabling VT-X or AMD-V will be different according to your motherboard. But in general, the steps are roughly the same. Here’s a quick guide on making sure that VT-X or AMD-V is enabled in your BIOS settings:

Enabling virtualization on an HP-based BIOS
On a Computer with UEFI
- Navigate to the Power options menu in the Settings charm (if you’re using Windows 8 or 8.1) or in the Start Menu (if you’re using Windows 10).
- Press and hold the Shift key on your keyboard.
- With the Shift key held, click on Restart. Doing so will get the computer to display the Boot Options menu when it boots up. Restarting with Advanced Boot options
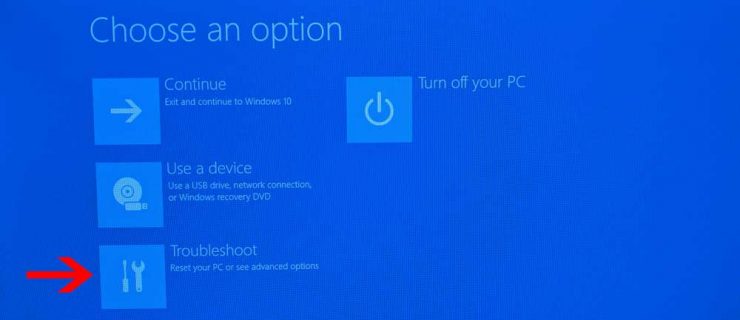
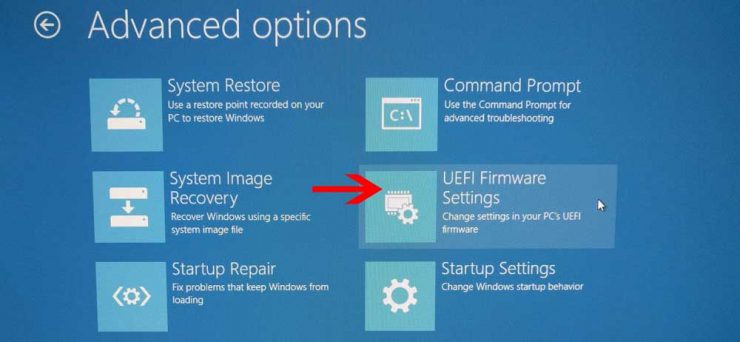
- When you see the BootOptions menu, click on Troubleshoot.
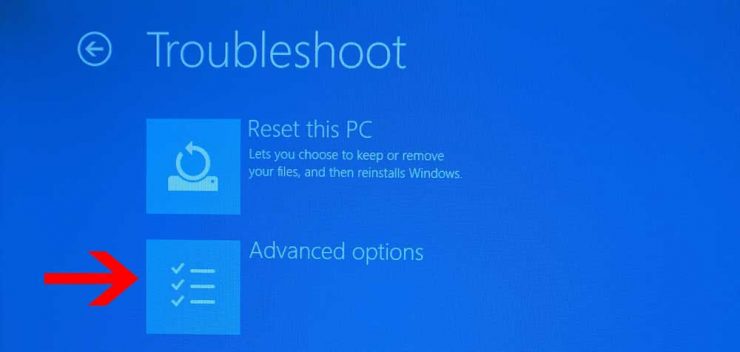
- Click on Advanced Options and then on UEFI Firmware Settings. UEFI Firmware Settings – Advanced options
Once you are inside your computer’s UEFI settings or BIOS, you can actually get to work on locating the option for VT-X hardware acceleration technology and enabling the feature. Simply look around in all of the BIOS’ or UEFI settings’ tabs and sections for an option for VT-X hardware acceleration – this option will be labeled something along the lines of “Intel VT-X“, “Intel Virtualization Technology“, “Virtualization Extensions” or “Vanderpool“.In most cases, this option is found under a Processor sub-menu of a Chipset, Northbridge, Advanced Chipset Control, or Advanced CPU Configuration main menu or tab.
Once you have located the option for VT-X hardware acceleration within your computer’s BIOS or UEFI settings, simply turn it on and VT-X hardware acceleration will be enabled. Be sure to save your changes and then exit the BIOS or UEFI settings (precise instructions for which you will be able to find inscribed somewhere on the BIOS or UEFI settings screen). When you get out of the BIOS or UEFI settings of your computer, your computer will boot up like it normally does.
Method 3: Enabling or Disabling PAE/NX from VirtualBox Manager
Several users struggling to resolve the same error message have reported that the issue was resolved entirely after they juggled with the Virtual device settings and enabled PAE/NX from the Settings menu. Some of them fixed their issue by Disabling PAE/NX from the Settings menu. You can check to see which one works the best for you.
This option determines whether PAE (Physical Adress Extension) and NX capabilities of the host CPU will be exposed to the virtual machine.
Although this is not guaranteed to work, it’s typically reported to resolve the issue on 64-bit computers that are confirmed to support hardware virtualization. Here’s a quick guide on enabling PAE/NX from Oracle VM VirtualBox:
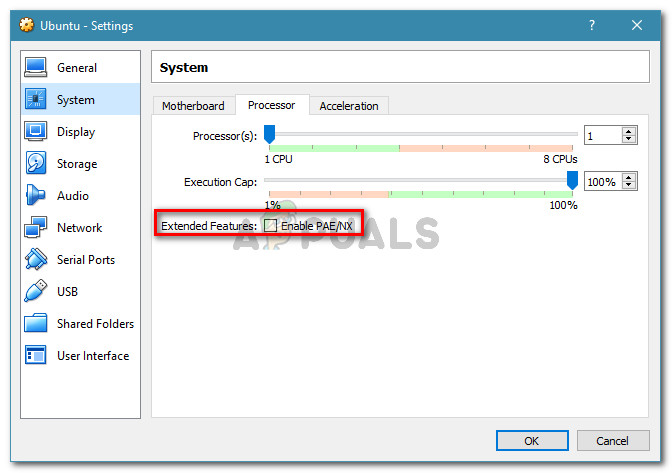
go to System > Processor and check the box associated with Enable PAE/NX
If you’re still seeing the VT-X is Disabled in the Bios for All CPU Modes (Verr_Vmx_Msr_All_Vmx_Disabled) error when attempting to start the virtual machine, keep in mind that some people reported they had this option enabled and disabling it fixed the error for them. We highly recommend you to try turning it off if it was already enabled. Now If that doesn’t help you as well, you can move to the next method.
Method 4: Increasing the RAM size
Several users encountering the same issue have reported that the issue was resolved after they increased the allocated RAM size and started the virtual machine again.
Update: Some users have reported that in their case, the fix involved actually reducing the allocated RAM size.
If the methods above have proven to be ineffective, follow the steps below to either increase or decrease the RAM size:
- Select the virtual machine that is giving you trouble and click the Settings icon. Accessing the Settings menu of the failing machine
- In the Settings window, go to System and access the Motherboard tab. Once you get there, increase the allocated memory (Base Memory) by adjusting the slider, then click Ok to save the changes. Enlarging the Base Memory
- Run the virtual machine and see if the issue has been resolved. If you’re still seeing the same error, return to the Motherboard tab using step 2 to and bring the Base Memory lower than what it was initially. Shrinking the Base Memory
- Run the machine again and see if the issue has been resolved.
Method 5: Preventing 3rd party antivirus from interfering with hardware virtualization
An unlikely culprit but one that has been identified to cause the issue times and times again is the 3rd party antivirus solution. Several users encountering the same issue have reported that in their case, Avast (or another 3rd party AV client) was triggering the error message.
As it turns out, several 3rd party security solutions are running something in the background to create a “sandbox” feature. This ends up locking up the virtualization features from being used by VirtualBox or a similar client.
If you’re using a 3rd party security client, disabling the real-time protection from it will not help you to resolve the issue. The same security rules will remain firmly in place whether your AV is actively running or not.
If you’re using Avast, you can prevent the security client from interfering with VirtualBox by going to Settings > Troubleshooting and unchecking the box associated with Enable hardware-assisted virtualization. Restart your system once you’ve made this change.

Disabling Avast’s hardware virtualization
If you’re using a different client, search online for the equivalent setting. But keep in mind that some 3rd party AV clients will not allow you to disable the sandboxing feature.
If that’s the case, the only solution is to uninstall your third-party AV completely from your system. You can do this easily by following this guide (here).

Привет, счастливые обладатели процессора AMD Ryzen. Я счастливый обладатель Gigabyte x470 aorus ultra gaming и AMD Ryzen 3600 и на примере этих комплектующих я покажу, как включить поддержку AMD-V в BIOS.
Если вы используете одну из систем виртуализации, к примеру Virtualbox, Vagrant или разрабатываете на Android Studio, то эти программы не заработают без включения AMD-V, либо заработают медленно.
К примеру, при запуске Vagrant будет вот такая ошибка:
Stderr: VBoxManage.exe: error: Not in a hypervisor partition (HVP=0) (VERR_NEM_NOT_AVAILABLE).
VBoxManage.exe: error: AMD-V is disabled in the BIOS (or by the host OS) (VERR_SVM_DISABLED)
VBoxManage.exe: error: Details: code E_FAIL (0x80004005), component ConsoleWrap, interface IConsole

При настройке Virtualbox вы увидите текст:
Функция аппаратной виртуализации включена для данной машины, но не поддерживается вашим хостом. Для обеспечения работоспособности машины она должна быть включена.

Все говорит о том, что нам нужно включить AMD-V, но как это сделать?
Далее смотрите скриншоты, возможно ваш BIOS будет немного отличаться, но на всех платах Gigabyte это действие будет одинаково. Вам нужно найти SVM Mode.


SVM Mode должен быть Enabled. SVM Mode это и есть AMD-V. Не забудьте сохранить настройки.
Почему такое странное название? Все просто SVM расшифровывается как Secure Virtual Machine, что в переводе на русский - защищенная виртуальная машина. Кто привык к процессорам от Intel, сейчас находятся в небольшом шоке :)

VT-x отключен в BIOS для всех режимов процессора (VERR_VMX_MSR_ALL_VMX_DISABLED
Что вызывает отключение VT-X в BIOS для всех режимов процессора (Verr_Vmx_Msr_All_Vmx_Disabled)?
- Технология виртуализации (VT-X) отключена в BIOS — В большинстве случаев эта конкретная проблема возникает из-за того, что VT-X отключен на уровне BIOS на компьютере. На 64-битном хосте должна быть включена технология виртуализации (VTx) в BIOS. На некоторых машинах вам также необходимо включить технологию виртуального ввода-вывода (VTd).
- Ваш процессор не поддерживает VT-X / AMD-V — Другой возможный сценарий — ваш процессор просто не оборудован для поддержки виртуализации. Это может произойти со старыми установками, которые используют старый процессор.
- PAE и NX отключены на главном процессоре — Несколько пользователей сообщили, что проблема была решена после того, как они убедились, что виртуализированный ЦП настроен для работы с Расширение физического адреса (PAE) а также NX.
- Выделенная оперативная память недостаточна или превышает возможности системы — Изменение значения базовой памяти по умолчанию помогло многим пользователям, столкнувшимся с той же проблемой, полностью ее решить.
- Стороннее решение безопасности мешает VT-X Vt-D — Существует несколько сторонних AV-клиентов, которые, как известно, создают помехи для VirtualBox. Установление правила полного удаления Av-клиента разрешит конфликт.
Если вы в настоящее время пытаетесь решить эту конкретную проблему, эта статья предоставит вам список шагов по устранению неполадок качества. Ниже представлен набор методов, которым другие пользователи в аналогичной ситуации воспользовались, чтобы решить проблему.
Для достижения наилучших результатов следуйте приведенным ниже методам в том порядке, в котором они представлены, пока не встретите исправление, которое решит проблему в вашем конкретном сценарии.
Способ 1. Проверьте, поддерживает ли ваш процессор VT-X / AMD-V
Прежде чем вы попробуете что-то еще, давайте удостоверимся, что система, с которой вы сталкиваетесь, предназначена для размещения VT-X (Intel) или же AMD-V (AMD). Если ваш процессор достаточно старый, возможно, он просто не предназначен для поддержки виртуализации.
Есть несколько методов, которые вы можете использовать, чтобы проверить, поддерживает ли ваш процессор виртуализацию, но мы собираемся пойти по простому пути. SecurAble — это бесплатная программа, которая поможет нам определить характеристики вашего процессора и сообщить, достижима ли виртуализация.
Вот краткое руководство по загрузке и использованию SecurAble чтобы увидеть, поддерживает ли ваш процессор виртуализацию:
Если вы подтвердите, что аппаратная виртуализация поддерживается, вы можете следовать приведенным ниже методам, зная, что один из них разрешит VT-X отключен в BIOS для всех режимов процессора (Verr_Vmx_Msr_All_Vmx_Disabled) ошибка.
Если проверка показала, что ваша машина не поддерживает аппаратную виртуализацию, вы не сможете решить проблему, используя методы, указанные ниже.
Способ 2: включить технологию виртуализации (VTX) из BIOS
Если вы столкнулись с проблемой на 64-битном хосте, имейте в виду, что вам, вероятно, потребуется включить Технология виртуализации (VTx) из ваших настроек BIOS. На некоторых материнских платах вам также необходимо включить Технология виртуализации, направленная на ввод / вывод (VTd)
Некоторые материнские платы поставляются с этой опцией, включенной по умолчанию, но ручное вмешательство пользователя или вмешательство третьей стороны может отключить ее.
Замечания: Windows Hyper V также может быть ответственным за отключение VT-x на вашем компьютере.
Помните, что точные пункты меню, включающие включение VT-X или AMD-V, будут отличаться в зависимости от вашей материнской платы. Но в целом шаги примерно одинаковые. Вот краткое руководство по проверке того, включен ли VT-X или AMD-V в настройках BIOS:
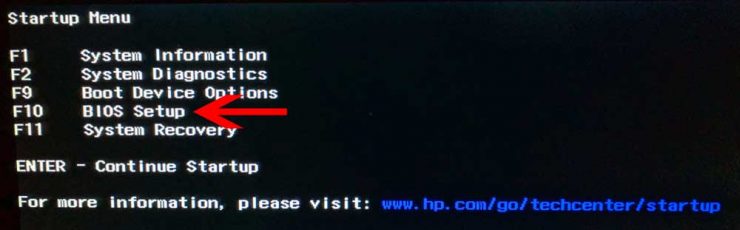
- Запустите свою машину и нажмите Ключ настройки несколько раз, пока вы не войдете в свой BIOS. Клавиша настройки обычно отображается на экране сразу после включения компьютера. Если вы этого не видите, попробуйте несколько раз нажать Клавиши F (F2, F4, F8, F10, F12) или Del key (компьютеры Dell) пока вы не поймете это правильно.
Нажмите [ключ], чтобы войти в настройкуЗамечания: Вы можете сделать поиск в Интернете с помощью вашего «* версия материнской платы * ключ BIOS », Чтобы спасти себя от экспериментов с различными комбинациями. - После того, как вы введете настройки BIOS, перейдите к Безопасность> Безопасность системы и включить Технология виртуализации (VTx) и / или Технология виртуализации DIrected I / O (VTd).
Включение виртуализации в BIOS на базе HP
Замечания: Имейте в виду, что имена или расположение могут отличаться в зависимости от вашей материнской платы. В некоторых версиях BIOS вам необходимо включить Технология виртуализации от Расширенные функции BIOS. На материнских платах на базе Intel вы можете включить виртуализацию с Дополнительно> Технология виртуализации Intel (R).
Если вы все еще сталкиваетесь с тем же VT-X отключен в BIOS для всех режимов процессора (Verr_Vmx_Msr_All_Vmx_Disabled) Ошибка, перейдите к следующему способу ниже.
Способ 3: включить PAE / NX из VirtualBox Manager
Эта опция определяет, PAE (расширение физического адреса) и возможности NX центрального процессора будут доступны виртуальной машине.
Хотя это не гарантированно работает, обычно сообщается, что проблема устранена на 64-разрядных компьютерах, которые подтверждены для поддержки аппаратной виртуализации. Вот краткое руководство по включению PAE / NX из Oracle VM VirtualBox:
Способ 5: предотвращение вмешательства стороннего антивируса в аппаратную виртуализацию
Оказывается, некоторые сторонние решения по обеспечению безопасности запускают что-то в фоновом режиме, чтобы создать функцию «песочницы». Это приводит к блокировке функций виртуализации от использования VirtualBox или аналогичного клиента.
Если вы используете сторонний клиент безопасности, отключение постоянной защиты от него не поможет вам решить проблему. Те же правила безопасности останутся в силе, независимо от того, активно ли работает ваш AV или нет.
Если вы используете Avast, вы можете предотвратить взаимодействие клиента безопасности с VirtualBox, перейдя в Настройки> Устранение неполадок и снимите флажок, связанный с Включить аппаратную виртуализацию. Перезагрузите систему после внесения этого изменения.

Отключение аппаратной виртуализации Avast
Если вы используете другой клиент, найдите в Интернете аналогичные настройки. Но имейте в виду, что некоторые сторонние AV-клиенты не позволяют отключить функцию песочницы.
В таком случае единственное решение — полностью удалить стороннее аудио-видео с вашей системы. Вы можете сделать это легко, следуя этому руководству (Вот).
Several users report getting the AMD-V is disabled in the BIOS (or by the host OS) (VERR_SVM_DISABLED) error message when trying to start a virtual machine using VM VirtualBox. Although this particular issue is mostly reported on Windows 7, Windows 8 and Windows 10, there are several reports of it occurring on Linux distributions.

AMD-V is disabled in the BIOS (VER_SVM_DISABLED)
Note: If you’re getting the VT-X is not available – VERR_VMX_NO_VMX error, follow this troubleshooting guide (here) instead.
What is causing the AMD-V is disabled in the BIOS error?
We investigated the issue by looking at various user reports. From what we were able to gather, there are several scenarios that will trigger the apparition of this particular issue. Here’s a list with common culprits that several other affected users have managed to identify:
- AMD-V is disabled from BIOS settings – In essence, the VERR_SVM_DISABLE error code is telling you that your PC does support AMD-V, but the host’s BIOS settings are currently disabling it.
- Microsoft Hyper-V is interfering with the AMD-V technology – If Hyper-V is enabled, it automatically means that the built-in virtualization technology was turned off. In this case, you’ll need to disable it on order to allow AMD-V to pe used.
- BIOS version doesn’t support this many CPU cores – As it turns out, the issue might get thrown by VM VirtualBox if the software is forced to create a virtual machine with more than 1 CPU core. In order to do this, it requires hardware virtualizations and will throw the error if the feature is disabled or unavailable.
- VM VirtualBox Bug – There are several reports of this error getting thrown on machines capable of supporting the hardware virtualization technology. In this case, the issue can typically be resolved by modifying some virtual-machine specific settings.
If you’re currently struggling to resolve this particular error message, this article will provide you with several troubleshooting guides. Below you have a collection of methods that other users in a similar situation have successfully used to get the issue resolved.
Keep in mind that the potential fixes below are ordered by efficiency and severity, so please follow them in order until you stumble upon a method that is effective in getting the issue resolved.
Method 1: Enabling AMD-V from the BIOS settings
AMD-V is the renamed trademark for Secure Virtual Machine Mode (SVM). The number one reason why the AMD-V is disabled in the BIOS (or by the host OS) (VERR_SVM_DISABLED) error occurs is because the AMD-V technology is disabled from your BIOS Settings.
Even though on most machines this option is enabled by default, a 3rd party interference or a manual modification might mean that it’s disabled on your computer.
Luckily, you can re-enable AMD-V by accessing your BIOS settings and re-enabling Secure Virtual Machine mode from the CPU Configuration settings.
But keep in mind that the steps of entering the BIOS will be different depending on your motherboard manufacturer. To access your BIOS, you will have to press the Setup key during the initial startup procedure. Typically, the setup key is either one of the F keys (F2, F4, F8, F10, F12) or the Del key (for Del machines). If you are unable to discover the Setup key yourself, keep an eye out during the initial startup procedure for any mention of it or search for specific steps according to your motherboard manufacturer.

Press the BIOS key during the startup procedure
Once you successfully enter your BIOS, look for an entry named Secure Virtual Machine Mode and make sure that it’s enabled. On the most popular BIOS version, it can be found in Advanced > CPU Configuration. Once you get there, make sure that Secure Virtual Machine Mode is Enabled, then save the configuration and exit your BIOS.
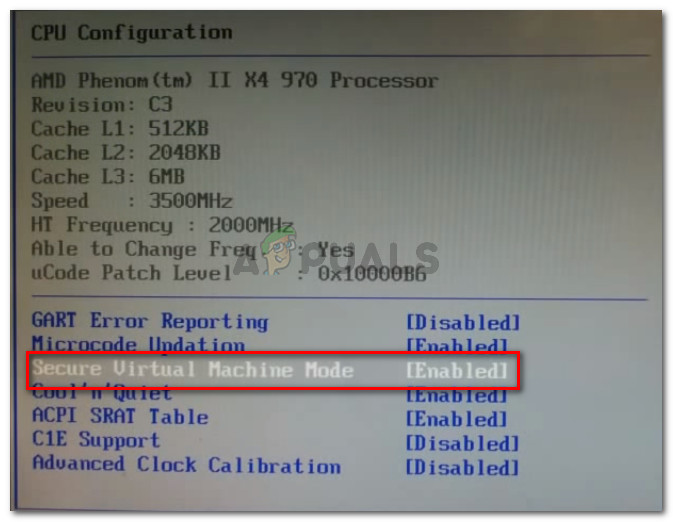
Make sure Secure Virtual Machine Mode is Enabled
Note: The exact location of this entry might vary according to your motherboard model. If Secure Virtual Machine Mode isn’t there for you, search for specific steps according to your manufacturer. On an Acer motherboard, you can re-enable AMD-V by setting AMD IOMMU to Enabled (you can find it inside the AMD I/O Virtualization Technology menu).
Keep in mind that in order for the change to be enforced, a machine restart is not enough. You’ll need to perform a cold boot. This means that you’ll need to power off your machine completely and then allow it to boot up from scratch.
Once the next startup is complete, open the virtual machine that was showing you the message inside VM VirtualBox and see if the issue is resolved. If you are still seeing the AMD-V is disabled in the BIOS (or by the host OS) (VERR_SVM_DISABLED) error, move down to the next method below.
Method 2: Disabling Windows Hyper-V
Several users encountering the AMD-V is disabled in the BIOS (or by the host OS) (VERR_SVM_DISABLED) error have managed to resolve the issue by disabling the Microsoft Hyper-V feature from the Add/Remove Windows features screen.
Microsoft Hyper-V is Microsoft’s own virtualization technology that is automatically enabled on most of the recent Windows version. This creates a problem because whenever Hyper-V is enabled, the built-in hardware technology is turned off (in this case (AMD-V). Since VM VirtualBox needs AMD-V or VT-X in order to run a virtual machine, you will get an error message instead of the actual VM.
Luckily, you can easily rectify this issue by following a set of simple instructions that will help you disable the Microsoft Hyper-V technology. Here’s what you need to do:
If you’re still encountering the AMD-V is disabled in the BIOS (or by the host OS) (VERR_SVM_DISABLED) when powering up your virtual machine, move down to the next method below.
Method 3: Changing the number of CPU cores to 1
If you have used the methods above to ensure that your machine has all the requirements to achieve hardware virtualization and the issue is still occurring, it’s very likely that the AMD-V technology id not supported by your current configuration.
Luckily, you can still fix the error with a few very simple steps of instructions. But first, let’s go over what’s causing the problem – Even if you haven’t customized the virtual machine settings that are displaying the error, the default settings might create the issue.
What happens is, the software assigns more than 1 CPU in the System settings, which forces the system to use hardware virtualization in order to start the virtual host. However, if your machine does not support it (you have a Quad-core AMD or something similar), the procedure will not complete successfully and you’ll see the AMD-V is disabled in the BIOS (or by the host OS) (VERR_SVM_DISABLED) error message instead.
Luckily, you can rectify this issue by changing the number of assigned CPUs to 1. This will most likely resolve the issue once and for all. Here’s what you need to do:
- Open Oracle VM VirtualBox, right-click on the machine that is displaying the error and then click on Settings. Right-click on the affected machine and click on Settings
- In the Settings of your virtual machine, go to the System tab (using the left-hand submenu) and access the Processor tab. Next, drag the slider associated with Processor(s) to 1 CPU and click OK to save. Processor and set the Processor slider to 1 CPU" width="672" height="473" />
Go to System > Processor and set the Processor slider to 1 CPU - Close the settings menu and restart your virtual machine. It should boot up without the AMD-V is disabled in the BIOS (or by the host OS) (VERR_SVM_DISABLED) error.
Method 4: Changing the Version to Windows 7 or Windows 2003 (if applicable)
Several Ubuntu (Linux) users that where using VM VirtualBox to run Windows XP or Windows 10 were also getting the AMD-V is disabled in the BIOS (or by the host OS) (VERR_SVM_DISABLED) error. The way they managed to resolve the issue is by changing the Guest OS settings so that the specified version is set to Windows 2003 or Windows 7.
Although there’s no explanation why this fix is successful, it seems to have helped a lot of users to regain the normal functionality of their virtual machines. Here’s a quick guide on changing the specified Version of your Virtual machine:
- Open VM VirtualBox, right-click on the machine that is displaying the error and choose Settings. Right-click on affected machine and click Settings
- In the Settings menu, go to the General submenu and then click on the Basic tab. Next, change the Version using the drop-down menu to either Windows 2003 or Windows 7 and hit Ok to save the changes. Changing the image version to Windows 7 or Windows 2003
- Start the virtual machine again and see if the boot procedure is successful without the AMD-V is disabled in the BIOS (or by the host OS) (VERR_SVM_DISABLED) error

Приложения виртуализации и контейнерирования, такие как VirtualBox и Docker, требуют включения аппаратной виртуализации. Это относится к VT-x на Intel и AMD-V на материнских платах AMD. На материнских платах AMD AMD-V включена по умолчанию. Однако на материнских платах Intel вы можете вручную включить VT-x из BIOS / UEFI. Кроме того, есть некоторые материнские платы, которые заблокированы и не позволят вам включить VT-x / AMD-V, в этом случае вам не повезло. Без лишних слов давайте рассмотрим, как включить аппаратную виртуализацию Intel VT-x в BIOS или встроенном программном обеспечении UEFI, чтобы можно было запускать виртуальные машины или контейнеры Docker.
Включить аппаратную виртуализацию
Если виртуализация оборудования не включена в вашем UEFI или BIOS, вы можете увидеть одну или несколько из следующих ошибок:
- На этом компьютере не включен VT-x / AMD-V
- Аппаратное ускорение VT-x / AMD-V недоступно в вашей системе
Если вы столкнулись с этой проблемой, читайте дальше, чтобы включить аппаратное ускорение в BIOS или UEFI.
Шаг 1а. Загрузите настройки BIOS на компьютере, отличном от UEFI
Во-первых, если у вас есть прошивка BIOS, вы увидите параметры загрузки в BIOS, отображаемые во время загрузки. Обычно это отображается в течение первых нескольких секунд загрузки. Esc, Del, F2, F11 и т.д. – некоторые из типичных клавиш, которые перенесут вас в настройки BIOS. Фактический ключ зависит от вашей материнской платы. Если это относится к вам, то вы можете получить настройки BIOS гораздо проще, чем если бы у вас была прошивка UEFI. Загрузите настройки BIOS и перейдите к шагу 2, чтобы включить Intel VT-x для виртуализации. Если это не относится к вам (у вас есть компьютер UEFI), попробуйте вместо этого шаг 1b.
Шаг 1б. Загрузитесь в настройках BIOS на компьютере UEFI
Большинство современных компьютеров с Windows (Windows 8 и 10) поставляются с UEFI, который имеет несколько расширенных функций. Но он загружает ваш компьютер так быстро, и нет никаких вариантов, чтобы вмешаться и заставить ваш компьютер загружаться в BIOS. Но не бойтесь, процесс все еще прост.
Сначала удерживайте клавишу Shift и нажмите перезагрузку из меню, как показано на рисунке ниже.

Клавиша Shift + перезагрузка – загрузка Windows с настройками UEFI
Во время перезагрузки вы увидите несколько параметров загрузки, как показано на скриншоте ниже. Выберите «Устранение неполадок».
Устранение неполадок в Windows UEFI
На следующем экране выберите «Дополнительные параметры», как показано ниже.
Расширенные настройки Windows UEFI
В списке «Дополнительные параметры» найдите и выберите «Настройки прошивки UEFI», как показано на рисунке ниже.
Настройки прошивки UEFI
При появлении запроса нажмите кнопку перезагрузки, чтобы перейти к настройкам прошивки UEFI.

Перезапустите в настройках UEFI Fimware
Теперь вы должны увидеть параметры загрузки BIOS, как показано ниже. В этом руководстве нажатие клавиши F10 приведет меня к настройке BIOS.
Войдите в BIOS Setup на компьютере UEFI
Шаг 2. Включите аппаратную виртуализацию Intel VT-x в прошивке BIOS / UEFI
Местоположение, в котором можно включить опции VT-x / AMD-v, будет зависеть от марки материнской платы. Просмотрите все, чтобы найти варианты виртуализации. В моем случае это было в разделе «Конфигурация системы». Найдя, выберите и включите аппаратную виртуализацию, как показано ниже.
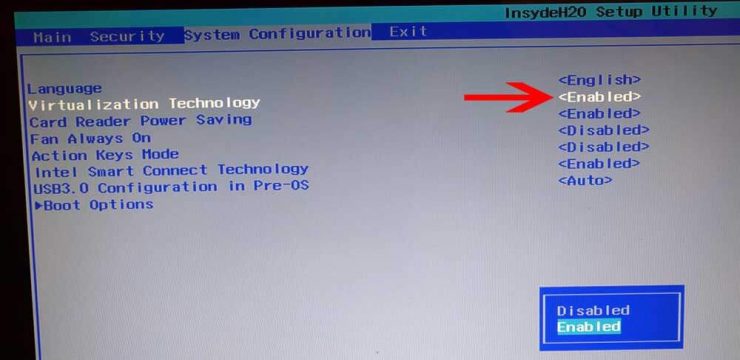
Найти и включить аппаратную виртуализацию VT-x / AMD-V в BIOS
Наконец, сохраните и выйдите из настроек BIOS / UEFI, как показано ниже.
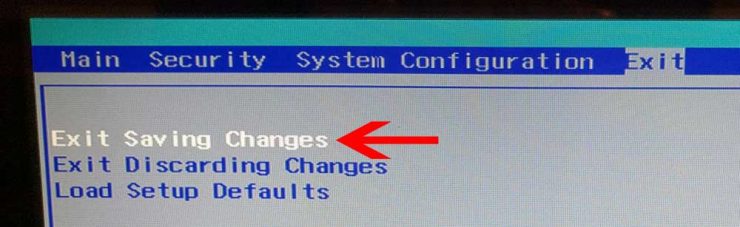
Сохранить настройки BIOS UEFI и перезагрузить
Шаг 3а. Убедитесь, что виртуализация оборудования включена в Windows
Если все идет хорошо, ваш VirtualBox или Docker Engine должен запуститься без ошибок. Вы также можете вручную проверить, включено ли аппаратное ускорение на ПК с Windows, как описано ниже. Нажмите «Ctrl + Alt + Del» и выберите «Диспетчер задач». В диспетчере задач найдите и выберите вкладку «Производительность», чтобы узнать состояние виртуализации.

Проверьте, включена ли аппаратная виртуализация
Обратите внимание, что в моем случае виртуализация установлена на Включено на рисунке выше.
Шаг 3б. Убедитесь, что виртуализация оборудования включена в Ubuntu
В Ubuntu вы можете проверить, включен ли Intel VT-x с помощью cpu-checker пакета. Сначала установите его с помощью следующих команд:
Затем проверьте состояние аппаратного ускорения в Ubuntu с помощью следующей команды:
Если аппаратная виртуализация включена, вы должны увидеть такой вывод:
Что после включения Intel VT-x / AMD-V?
Вот и все, теперь вы готовы к работе с VirtualBox, VMware или Docker. Прочтите наше руководство по домашнему серверу VirtualBox или руководство по ознакомлению с Docker, чтобы узнать, какой вариант лучше для вас. Если вы знаете, чего хотите, включите аппаратные расширения виртуализации VT-x / AMD-V и откройте новый мир возможностей.
Читайте также: