
Настройки микротик диск лайт 5
DISC Lite5 ac Outdoor 5GHz 802.11a/n/ac wireless device with a backfire type 21dBi integrated antenna and Gigabit Ethernet for longer distances
The DISC is a low cost high gain 5 GHz CPE. We have improved antenna design, added Gigabit Ethernet port and 802.11a/n/ac support to achieve even more speed on longer distances.
DISC Lite5 ac is equipped with 21 dBi dual chain antenna, 802.11a/n/ac integrated wireless, 716 MHz CPU, 256 MB RAM, 1x Gigabit Ethernet port and RouterOS Level 3 license. It comes complete with a power supply, Gigabit PoE injector and a mounting ring. The device is also compatible with our SXT mounting systems, including the quickMOUNT pro series.
The RouterOS Level 3 allows to use the DISC Lite5 ac as a CPE or for 5 GHz Point-to-Point links.
- DISC Lite5 ac-US (USA) is factory locked for 5170-5250MHz and 5725-5835MHz frequencies. This lock can not be removed.
- DISC Lite5 (International) supports 5150MHz-5875MHz range (Specific frequency range can be limited by country regulations).
Подключение usb HDD\SSD\flash диска к роутеру MikroTik
В состав тестового стенда будут входить элементы:
Настройка SMB
Настройка находится IP→SMB

allow-guests=no отключить гостевой доступ;
interfaces=Bridge-LAN сетевые ресурсы будут доступны только в локальном размещении(интерфейс Bridge-LAN)
High resolution images
Проверка скорости чтения\записи MikroTik SAMBA
При тестировании будет использоваться один файл, размер которого чуть менее 2Гб.
Отображение файла в MikroTik SAMBA

IPsec test results
- All tests are done with Xena Networks specialized test equipment (XenaBay),and done according to RFC2544 (Xena2544)
- Max throughput is determined with 30+ second attempts with 0,1% packet loss tolerance in 64, 512, 1400 byte packet sizes
- Test results show device maximum performance, and are reached using mentioned hardware and software configuration, different configurations most likely will result in lower results
The device has an operating system preinstalled and licensed. No separate purchase is necessary and the product is ready to use. The device includes free software updates for the life of the product or a minimum of 5 years starting from date of purchase..
Форматирование и инициализация HDD\SSD\flash
Настройка находится System→Disks

Файловая система FAT32 будет иметь ограничение на размер файла равный 4Гб. Чтобы не упираться в это ограничение будет использоваться файловая система EXT3.
После успешного форматирования, список Disk list будет иметь вид:

Wireless specifications
| Details | |
|---|---|
| Wireless 5 GHz Max data rate | 867 Mbit/s |
| Wireless 5 GHz number of chains | 2 |
| Wireless 5 GHz standards | 802.11a/n/ac |
| Antenna gain dBi for 5 GHz | 21 |
| Wireless 5 GHz chip model | IPQ-4018 |
| Wireless 5 GHz generation | Wi-Fi 5 |
Создание сетевой папки SAMBA
Настройка находится IP→SMB→Shares

Поддержи автора статьи, сделай клик по рекламе ↓↓↓
И вновь созданная папка будет доступна в общем списке(Files):

Проверка скорости чтения

Поддержи автора статьи, сделай клик по рекламе ↓↓↓
Есть вопросы или предложения по установке и настройке MikroTik SAMBA? Активно предлагай свой вариант настройки! Оставить комментарий →
The DISC is an outdoor wireless system with a built-in directional antenna. It can be used as a CPE or for Point to Point links.
Before you work on any equipment, be aware of the hazards involved with electrical circuitry, and be familiar with standard practices for preventing accidents.
Ultimate disposal of this product should be handled according to all national laws and regulations.
The Installation of the equipment must comply with local and national electrical codes.
This product is intended to be mounted outdoors on a pole. Please read the mounting instructions carefully before beginning installation. Failure to use the correct hardware and configuration or to follow the correct procedures could result in a hazardous situation for people and damage to the system.
Use only the power supply and accessories approved by the manufacturer, and which can be found in the original packaging of this product.
Read the installation instructions before connecting the system to the power source.
We cannot guarantee that no accidents or damage will occur due to the improper use of the device. Please use this product with care and operate at your own risk!
In the case of device failure, please disconnect it from power. The fastest way to do so is by unplugging the power plug from the power outlet.
It is the customer's responsibility to follow local country regulations, including operation within legal frequency channels, output power, cabling requirements, and Dynamic Frequency Selection (DFS) requirements. All Mikrotik radio devices must be professionally installed.
This is a class A device. In a domestic environment, this product might cause radio interference in which case the user might be required to take adequate measures.
Exposure to Radio Frequency Radiation: This MikroTik equipment complies with the FCC, IC, and European Union radiation exposure limits set forth for an uncontrolled environment. This MikroTik device should be installed and operated no closer than 20 centimeters from your body, occupational user, or the general public.
- Open the Ethernet door to connect an ethernet cable to the ethernet port, connect the other end of the ethernet cable to the included PoE injector.
- Plug the PoE injector into your network switch or ISP internet outlet.
- Plug the included power supply into the PoE injector to start up the device.
- Set LAN computer IP configuration to automatic (DHCP).
- Once connected to the wireless network, open https://192.168.88.1 in your web browser to start configuration, since there is no password by default, you will be logged in automatically.
- We recommend clicking the "Check for updates" button and updating your RouterOS software to the latest version to ensure the best performance and stability.
- Choose your country, to apply country regulation settings, and set up your password on the screen that loads.
The device only accepts 10-30 V power from Passive PoE injectors (one power supply and PoE injector are included).
Connecting to a POE Adapter:
- Connect the Ethernet cable from the device to the POE port of the POE adapter.
- Connect an Ethernet cable from your LAN to the LAN port of the POE adapter, please mind arrows for data and power flow.
- Connect the power cord to the adapter, and then plug the power cord into a power outlet.
The device comes bundled with a metal mounting ring, which can be used on either side of the product (two mounting slots available). The third, central mount point is compatible with the quickMount Pro (not included).

- One 10/100 Ethernet port, supporting automatic cross/straight cable correction (Auto MDI/X), so you can use either straight or cross-over cables for connecting to other network devices.
- One Integrated Wireless 5GHz 802.11a/n or ac (depending on model), 2x2 MIMO with a built-in directional antenna, max gain 21 dBi.
The reset button has three functions:
- Hold this button during boot time until LED light starts flashing, release the button to reset RouterOS configuration (total 5 seconds).
- Keep holding for 5 more seconds, LED turns solid, release now to turn on CAP mode. The device will now look for a CAPsMAN server (total 10 seconds).
- Or Keep holding the button for 5 more seconds until LED turns off, then release it to make the RouterBOARD look for Netinstall servers (total 15 seconds).
Regardless of the above option used, the system will load the backup RouterBOOT loader if the button is pressed before power is applied to the device. Useful for RouterBOOT debugging and recovery.
Package includes the following accessories that come with the device:
- DC ⎓ EU/US Switching Power Supply 24 V, 0.38 A, 9 W, Level VI, cable:1.5 m.
- POE Injector cable (POE) / Gigabit POE injector (GPOE).
- Hose clamp 40/60 w2 A2 9 mm.
The device supports RouterOS software with the version number at or above what is indicated in the RouterOS menu /system resource. We recommend using RouterOS 6.44.3 or newer on this device. Other operating systems have not been tested.


Use the MikroTik smartphone app to configure your router in the field, or to apply the most basic initial settings for your MikroTik home access point.
To avoid pollution of the environment, please separate the device from household waste and dispose of it in a safe manner, such as in designated waste disposal sites. Familiarize yourself with the procedures for the proper transportation of the equipment to the designated disposal sites in your area.
This equipment has been tested and found to comply with the limits for a Class A digital device, pursuant to Part 15 of the FCC Rules. These limits are designed to provide reasonable protection against harmful interference in a commercial installation.
This equipment generates, uses, and can radiate radio frequency energy and, if not installed and used in accordance with the instruction manual, may cause harmful interference to radio communications. Operation of this equipment in a residential area is likely to cause harmful interference in which case the user will be required to correct the interference at his own expense.
FCC Caution: Any changes or modifications not expressly approved by the party responsible for compliance could void the user's authority to operate this equipment.
This device complies with Part 15 of the FCC Rules. Operation is subject to the following two conditions: (1) This device may not cause harmful interference, and (2) this device must accept any interference received, including interference that may cause undesired operation.
Note: This unit was tested with shielded cables on the peripheral devices. Shielded cables must be used with the unit to ensure compliance.
This device and its antenna must not be co-located or operation in conjunction with any other antenna or transmitter.
IMPORTANT: Exposure to Radio Frequency Radiation.
This MikroTik equipment complies with the FCC, IC, and European Union radiation exposure limits set forth for an uncontrolled environment. This MikroTik device should be installed and operated no closer than 20 centimeters from your body, occupational user, or the general public.
Antenna Installation. WARNING: It is installer's responsibility to ensure that when using the authorized antennas in the United States (or where FCC rules apply); only those antennas certified with the product are used. The use of any antenna other than those certified with the product is expressly forbidden in accordance to FCC rules CFR47 part 15.204. The installer should configure the output power level of antennas, according to country regulations and per antenna type. Professional installation is required of equipment with connectors to ensure compliance with health and safety issues.
This device complies with Industry Canada licence-exempt RSS standard(s). Operation is subject to the following two conditions: (1) this device may not cause interference, and (2) this device must accept any interference, including interference that may cause undesired operation of the device.
Le présent appareil est conforme aux CNR d'Industrie Canada applicables aux appareils radio exempts de licence. L'exploitation est autorisée aux deux conditions suivantes : (1) l'appareil ne doit pas produire de brouillage, et (2) l'utilisateur de l'appareil doit accepter tout brouillage radioélectrique subi, même si le brouillage est susceptible d'en compromettre le fonctionnement.
This Class A digital apparatus complies with Canadian ICES-003.
Cet appareil numérique de la classe [A] est conforme à la norme NMB-003 du Canada.
CAN ICES-003 (A) / NMB-003 (A)

* Доступные частотные каналы могут различаться в зависимости от модели продукта и сертификации.
Информация о дате изготовления устройства указана в конце серийного номера на его наклейке через дробь. Первая цифра означает номер года (последняя цифра года), две последующие означают номер недели.
Продукты MikroTik, которые поставляются в Евразийский таможенный союз, оцениваются с учетом соответствующих требований и помечены знаком EAC, как показано ниже:
EFICIENCIA ENERGETICA CUMPLE CON LA NOM-029-ENER-2017.
Rango de frecuencia (potencia de salida máxima): 5725-5850 MHz (30 dBm). Los canales de frecuencia disponibles pueden variar según el modelo y la certificación del producto.
La operacion de este equipo esta sujeta a las siguientes dos condiciones:
Es posible que este equipo o dispositivo no cause interferencia perjudicial y.
Este equipo debe aceptar cualquier interferencia, incluyendo la que pueda causar su operacion no deseada.
Fabricante: Mikrotikls SIA, Brivibas gatve 214i, Riga, LV-1039, Latvia.
País De Origen: Letonia; Lituania; China (Republica Popular); Estados Unidos De America; Mexico.
Виробник: Mikrotikls SIA, Brivibas gatve 214i Рига, Латвія, LV1039.
Робоча частота (Максимальна вихідна потужність): 5470-5725 МГц (27 дБм).
Справжнім Mikrotikls SIA заявляє, що маршрутизатор відповідає основним вимогам та іншим відповідним положенням директиви 2014/53/EC, а також суттєвим вимогам Технічного регламенту радіообладнання, затвердженого постановою Кабінету Міністрів України від 24 травня 2017 року № 355.
Для експлуатації в Україні необхідно отримати дозвіл на експлуатацію у порядку, затвердженому рішенням НКРЗІ від 01.11.2012 № 559, зареєстрованому в Міністерстві юстиції України 03.01.2013 за № 57/22589.

The DISC is an outdoor wireless system with a built-in directional antenna. It can be used as a CPE or for Point to Point links.
Before you work on any equipment, be aware of the hazards involved with electrical circuitry, and be familiar with standard practices for preventing accidents.
Ultimate disposal of this product should be handled according to all national laws and regulations.
The Installation of the equipment must comply with local and national electrical codes.
This product is intended to be mounted outdoors on a pole. Please read the mounting instructions carefully before beginning installation. Failure to use the correct hardware and configuration or to follow the correct procedures could result in a hazardous situation for people and damage to the system.
Use only the power supply and accessories approved by the manufacturer, and which can be found in the original packaging of this product.
Read the installation instructions before connecting the system to the power source.
We cannot guarantee that no accidents or damage will occur due to the improper use of the device. Please use this product with care and operate at your own risk!
In the case of device failure, please disconnect it from power. The fastest way to do so is by unplugging the power plug from the power outlet.
It is the customer's responsibility to follow local country regulations, including operation within legal frequency channels, output power, cabling requirements, and Dynamic Frequency Selection (DFS) requirements. All Mikrotik radio devices must be professionally installed.
Exposure to Radio Frequency Radiation: This MikroTik equipment complies with the FCC, IC, and European Union radiation exposure limits set forth for an uncontrolled environment. This MikroTik device should be installed and operated no closer than 45 centimeters from your body, occupational user, or the general public.
- Open the Ethernet door to connect an ethernet cable to the ethernet port, connect the other end of the ethernet cable to the included PoE injector.
- Plug the PoE injector into your network switch or ISP internet outlet.
- Plug the included power supply into the PoE injector to start up the device.
- Set LAN computer IP configuration to automatic (DHCP).
- Once connected to the wireless network, open https://192.168.88.1 in your web browser to start configuration, since there is no password by default, you will be logged in automatically.
- We recommend clicking the "Check for updates" button and updating your RouterOS software to the latest version to ensure the best performance and stability.
- Choose your country, to apply country regulation settings, and set up your password on the screen that loads.
The device only accepts 10-30 V power from Passive PoE injectors (one power supply and PoE injector are included).
The device comes bundled with a metal mounting ring, which can be used on either side of the product (two mounting slots available). The third, central mount point is compatible with the quickMount Pro (not included).

- One 10/100 Ethernet port, supporting automatic cross/straight cable correction (Auto MDI/X), so you can use either straight or cross-over cables for connecting to other network devices.
- One Integrated Wireless 5GHz 802.11a/n or ac (depending on model), 2x2 MIMO with a built-in directional antenna, max gain 21 dBi.
The reset button has three functions:
- Hold this button during boot time until LED light starts flashing, release the button to reset RouterOS configuration (total 5 seconds).
- Keep holding for 5 more seconds, LED turns solid, release now to turn on CAP mode. The device will now look for a CAPsMAN server (total 10 seconds).
- Or Keep holding the button for 5 more seconds until LED turns off, then release it to make the RBDisc-5nD look for Netinstall servers (total 15 seconds).
Regardless of the above option used, the system will load the backup RouterBOOT loader if the button is pressed before power is applied to the device. Useful for RouterBOOT debugging and recovery.
The device supports RouterOS software version 6. The specific factory-installed version number is indicated in the RouterOS menu /system resource. Other operating systems have not been tested.
To avoid pollution of the environment, please separate the device from household waste and dispose of it in a safe manner, such as in designated waste disposal sites. Familiarize yourself with the procedures for the proper transportation of the equipment to the designated disposal sites in your area.
![]()
This equipment has been tested and found to comply with the limits for a Class B digital device, pursuant to Part 15 of the FCC Rules. These limits are designed to provide reasonable protection against harmful interference in a residential installation.
This equipment generates, uses and can radiate radio frequency energy and, if not installed and used in accordance with the instructions, may cause harmful interference to radio communications. However, there is no guarantee that interference will not occur in a particular installation. If this equipment does cause harmful interference to radio or television reception, which can be determined by turning the equipment off and on, the user is encouraged to try to correct the interference by one of the following measures:
- Reorient or relocate the receiving antenna.
- Increase the separation between the equipment and receiver.
- Connect the equipment into an outlet on a circuit different from that to which the receiver is connected.
- Consult the dealer or an experienced radio/TV technician for help.
FCC Caution: Any changes or modifications not expressly approved by the party responsible for compliance could void the user's authority to operate this equipment.
This device complies with Part 15 of the FCC Rules. Operation is subject to the following two conditions: (1) This device may not cause harmful interference, and (2) this device must accept any interference received, including interference that may cause undesired operation.
This device and its antenna must not be co-located or operation in conjunction with any other antenna or transmitter.
IMPORTANT: Exposure to Radio Frequency Radiation.
13 cm minimum distance has to be maintained between the antenna and the occupational user and 28 cm to the general public. Under such configuration, the FCC radiation exposure limits set forth for a population/uncontrolled environment can be satisfied.
Antenna Installation. WARNING: It is the installer's responsibility to ensure that when using the authorized antennas in the United States (or where FCC rules apply); only those antennas certified with the product are used. The use of any antenna other than those certified with the product is expressly forbidden in accordance with FCC rules CFR47 part 15.204. The installer should configure the output power level of antennas, according to country regulations and per antenna type. Professional installation is required for equipment with connectors to ensure compliance with health and safety issues.
This device complies with Industry Canada's license-exempt RSS standard(s). Operation is subject to the following two conditions: (1) this device may not cause interference, and (2) this device must accept any interference, including interference that may cause undesired operation of the device.
Le présent appareil est conforme aux CNR d'Industrie Canada applicables aux appareils radio exempts de licence. L'exploitation est autorisée aux deux conditions suivantes : (1) l'appareil ne doit pas produire de brouillage, et (2) l'utilisateur de l'appareil doit accepter tout brouillage radioélectrique subi, même si le brouillage est susceptible d'en compromettre le fonctionnement.
The device for operation in the band 5150–5250 MHz is only for indoor use to reduce the potential for harmful interference to co-channel mobile satellite systems.
Les dispositifs fonctionnant dans la bande de 5 150 à 5 250 MHz sont réservés uniquement pour une utilisation à l'intérieur afin de réduire les risques de brouillage préjudiciable aux systèmes de satellites mobiles utilisant les mêmes canaux
This Class B digital apparatus complies with Canadian ICES-003.
Cet appareil numérique de la classe [ B ] est conforme à la norme NMB-003 du Canada.
Заказать обратный звонок
Быстрая настройка моста на Mikrotik SXT Lite5, SXTSQ Lite 5
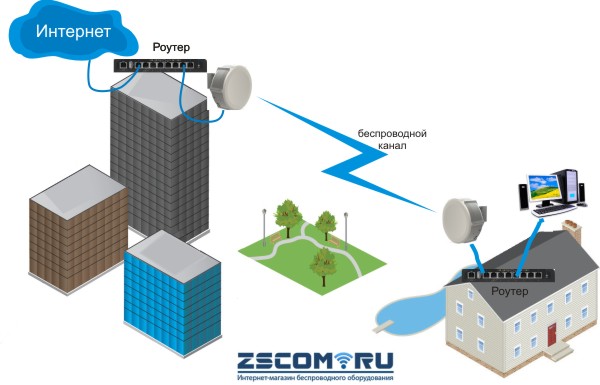
Как это работает? Схема решения -радиомост Mikrotik SXTsq Lite 5.
1. Подключите ваши Mikrotik SXT Lite5 к тому же маршрутизатору к которому подключен Ваш компьютер.
ПОЛНАЯ ВЕРСИЯ ДАННОЙ СТРАНИЦЫ ДОСТУПНА ТОЛЬКО ДЛЯ НАШИХ ПОКУПАТЕЛЕЙ
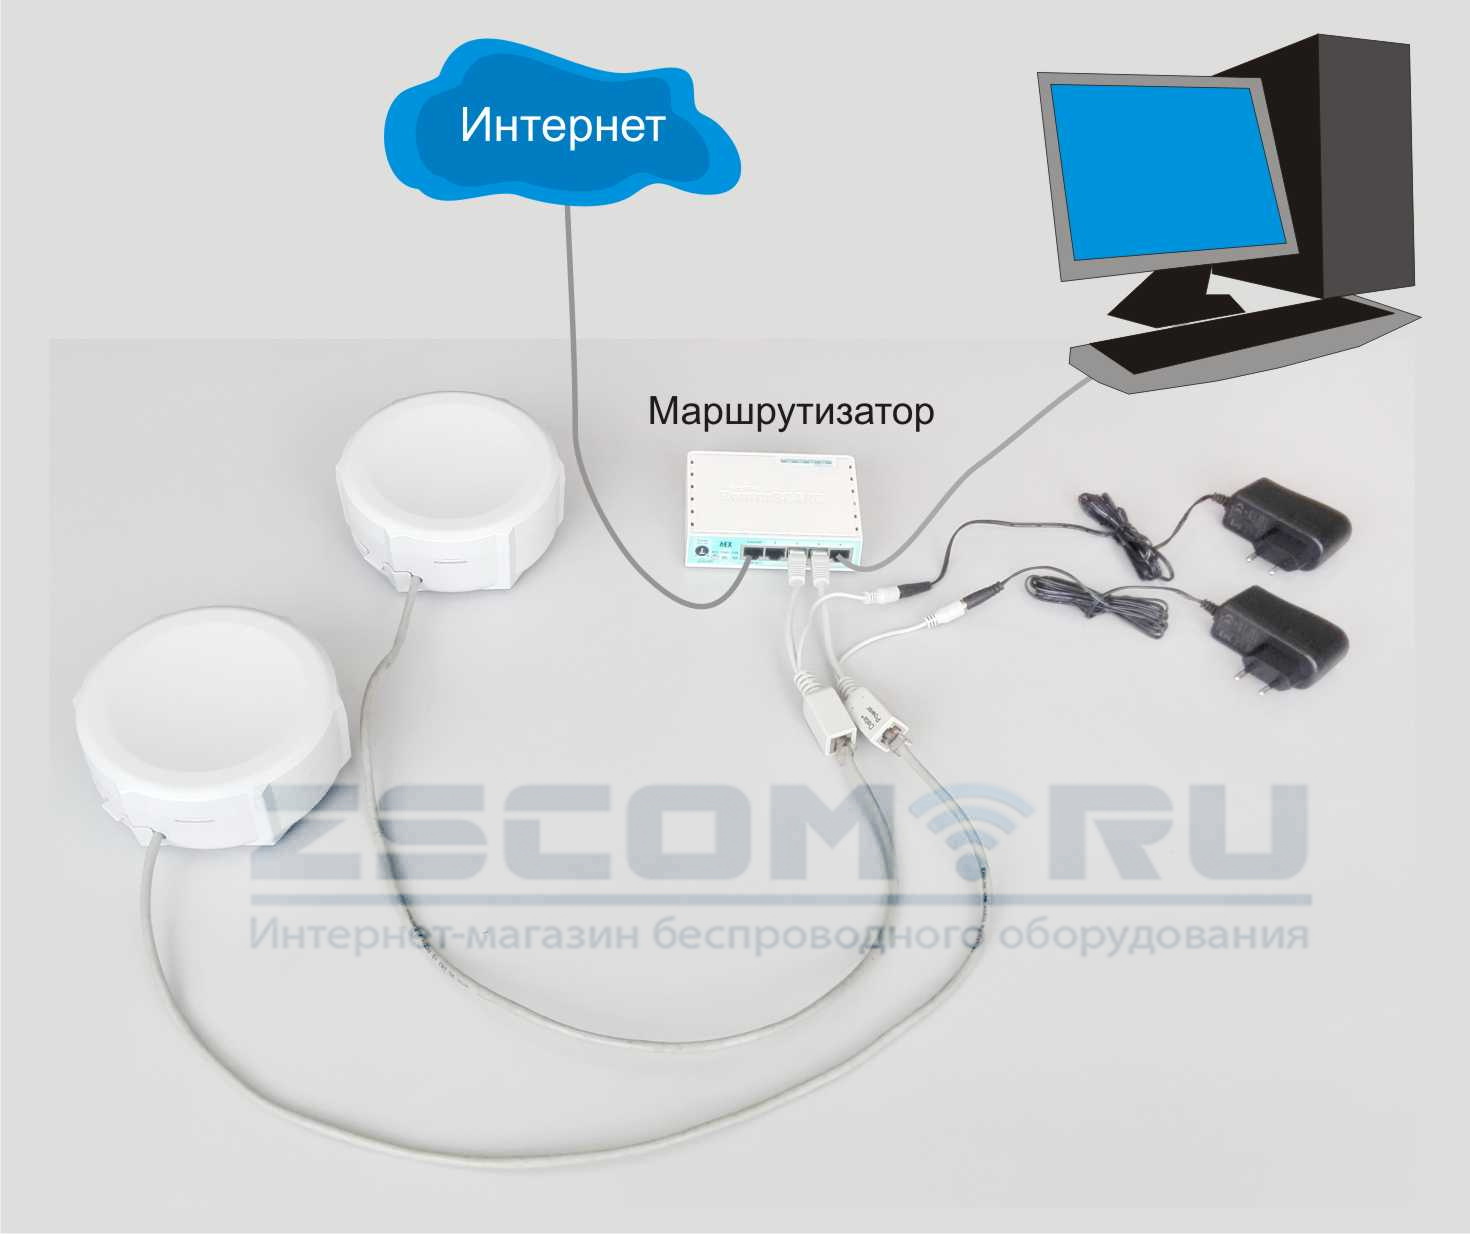
Желательно разнести точки доступа как можно дальше друг от друга! В идеале в разные комнаты, насколько позволяет длина патчкордов. Не нужно ложить их рядом на стол. На фотографии они лежат на столе для наглядности! При настройке не направляйте их друг на друга!
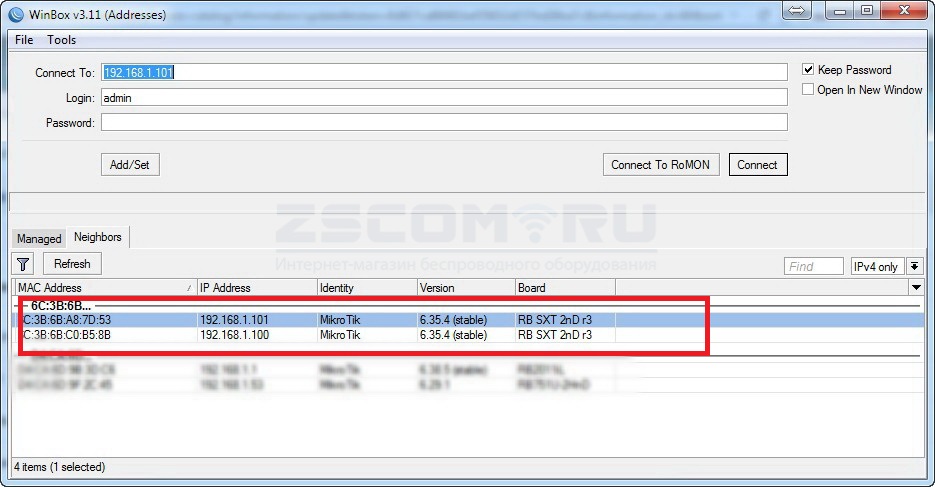
2. Скачайте программу WINBOX c сайта производителя и запустите ее
3. На вкладке Neighbors вы увидите ваши SXT Lite5
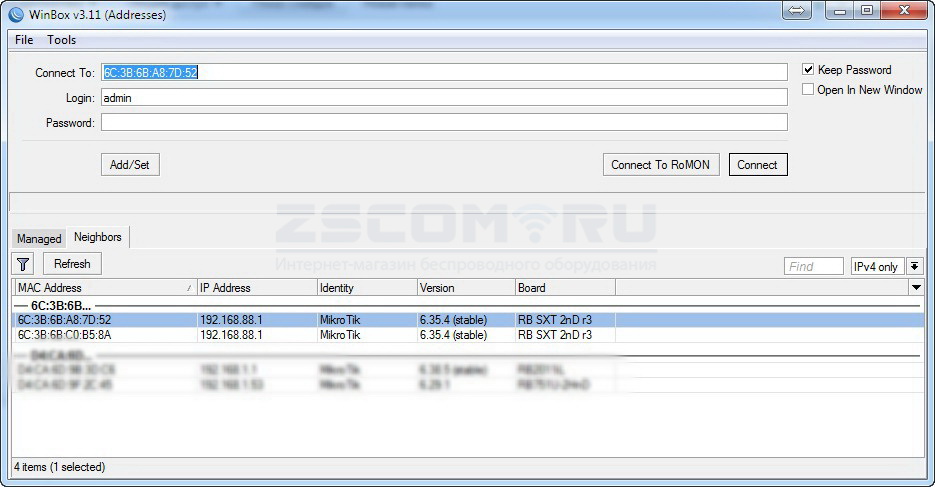
Выберите МАС адрес (не АЙПИ адрес. ) первого устройства и нажмите Connect. Выберите МАС адрес (не АЙПИ адрес. ) второго устройства и нажмите Connect.
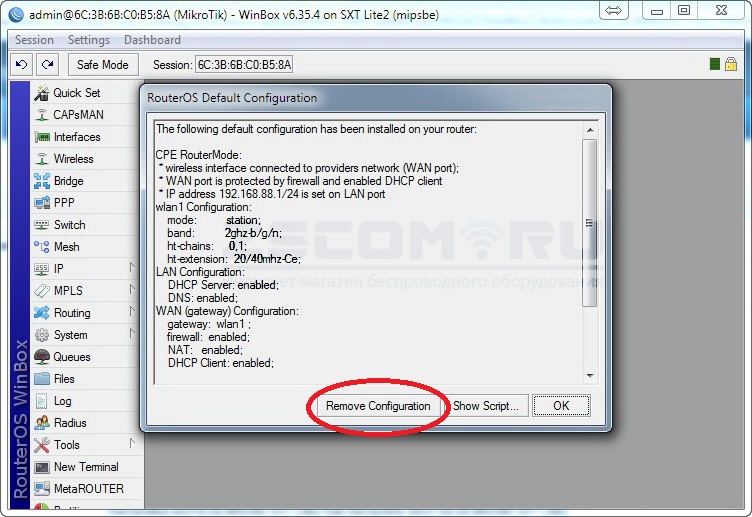
4. Когда откроется интерфейс , откажитесь от использования дефолтной конфигурации
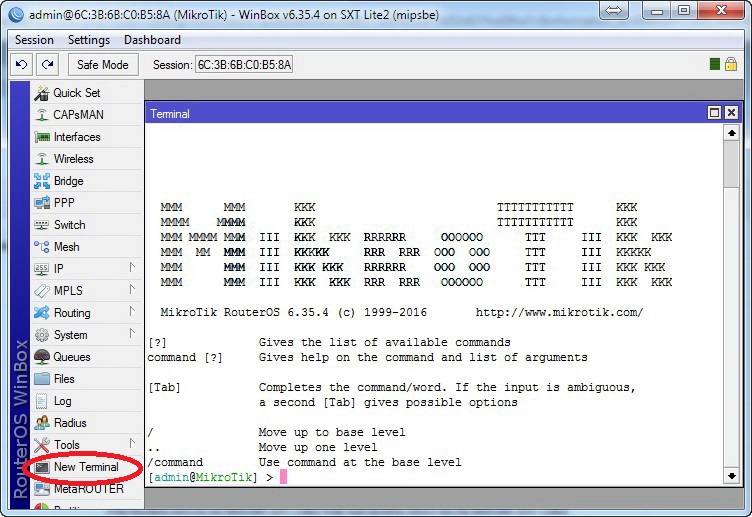
5. Откройте окно терминала
6.Настройка ТОЧКИ ДОСТУПА (SERVER AP)
Выделите и скопируйте в буфер обмена нижеследующий выделенный курсивом текст
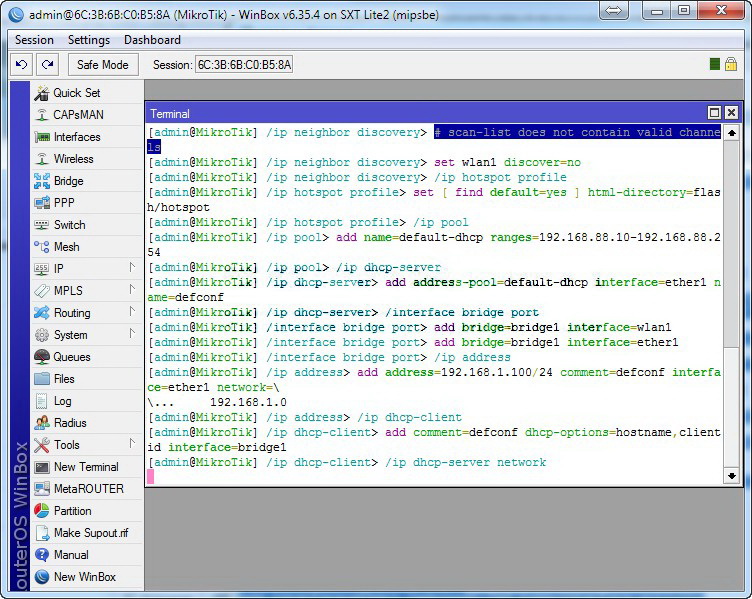
Перейдите в окно терминала и вставьте текст из буфера обмена, нажав SHIFT+INSERT
Вы увитдите примерно следующее.
Потом линк с точкой потеряется и вы увидите следующее окно. Нажмите Reconnect.
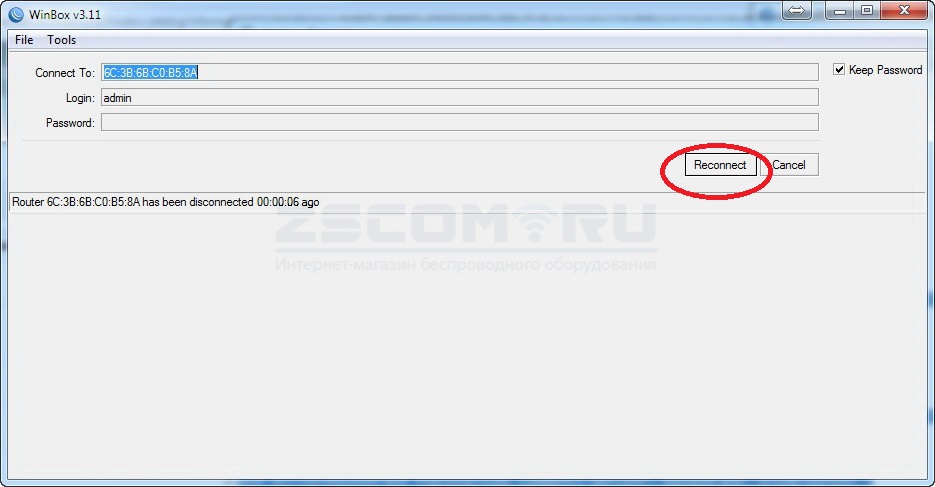
Если зайти по МАС адресу на устройство не удастся, то тогда повторно откройте список устройств Neighbors в Winbox'е и зайдите на него по айпи адресу.
Чтобы зайти на устройство Mikrotik SXTSQ Lite5 по айпи адресу, ваш компьютер должен быть с ним в одной подсети. В приведенных здесь конфигурациях точек доступа их адреса 192.168.1.100 и 192.168.1.101. Поэтому адрес сетевой карты вашего компа на время настройки должен быть 192.168.1.Х.
7. Настройка СТАНЦИИ (CLIENT AP)
Выполните шаги 4,5,6 для второй точки доступа.
Вот текст, который надо выделить и скопировать в окно терминала клиентской точки:
/interface bridge
add name=bridge1
/interface wireless
set [ find default-name=wlan1 ] band=5ghz-a/n channel-width=20/40mhz-Ce \
disabled=no frequency=5775 frequency-mode=superchannel mode=\
station-pseudobridge nv2-preshared-key=ogas795fde12 nv2-security=enabled \
scan-list=5775 ssid=MegafonAP43561 wireless-protocol=nv2-nstreme-802.11
/interface ethernet
set [ find default-name=ether1 ] name=ether1-local
/interface wireless security-profiles
set [ find default=yes ] authentication-types=wpa-psk,wpa2-psk group-ciphers=\
tkip,aes-ccm mode=dynamic-keys unicast-ciphers=tkip,aes-ccm \
wpa-pre-shared-key=************ wpa2-pre-shared-key=************
/ip pool
add name=default-dhcp ranges=192.168.88.10-192.168.88.254
/ip dhcp-server
add address-pool=default-dhcp interface=ether1-local name=default
/interface bridge port
add bridge=bridge1 interface=ether1-local
add bridge=bridge1 interface=wlan1
/ip address
add address=192.168.1.101/24 comment="default configuration" interface=\
ether1-local network=192.168.1.0
/ip dhcp-client
add dhcp-options=hostname,clientid interface=bridge1
/ip dhcp-server network
add address=192.168.88.0/24 comment="default configuration" gateway=\
192.168.88.1 netmask=24
/ip dns
set allow-remote-requests=yes
/ip dns static
add address=192.168.1.101 name=router
/ip firewall filter
add chain=input comment="default configuration" protocol=icmp
add chain=input comment="default configuration" connection-state=\
established,related
add action=fasttrack-connection chain=forward comment="default configuration" \
connection-state=established,related
add chain=forward comment="default configuration" connection-state=\
established,related
add action=drop chain=forward comment="default configuration" \
connection-state=invalid
/system clock
set time-zone-name=Asia/Novosibirsk
/system leds
set 0 interface=wlan1
/system routerboard settings
set cpu-frequency=600MHz protected-routerboot=disabled
8. После того как вы настроите оба устройства и зайдете на их интерфейсы управления, вы увидите , что линк установлен
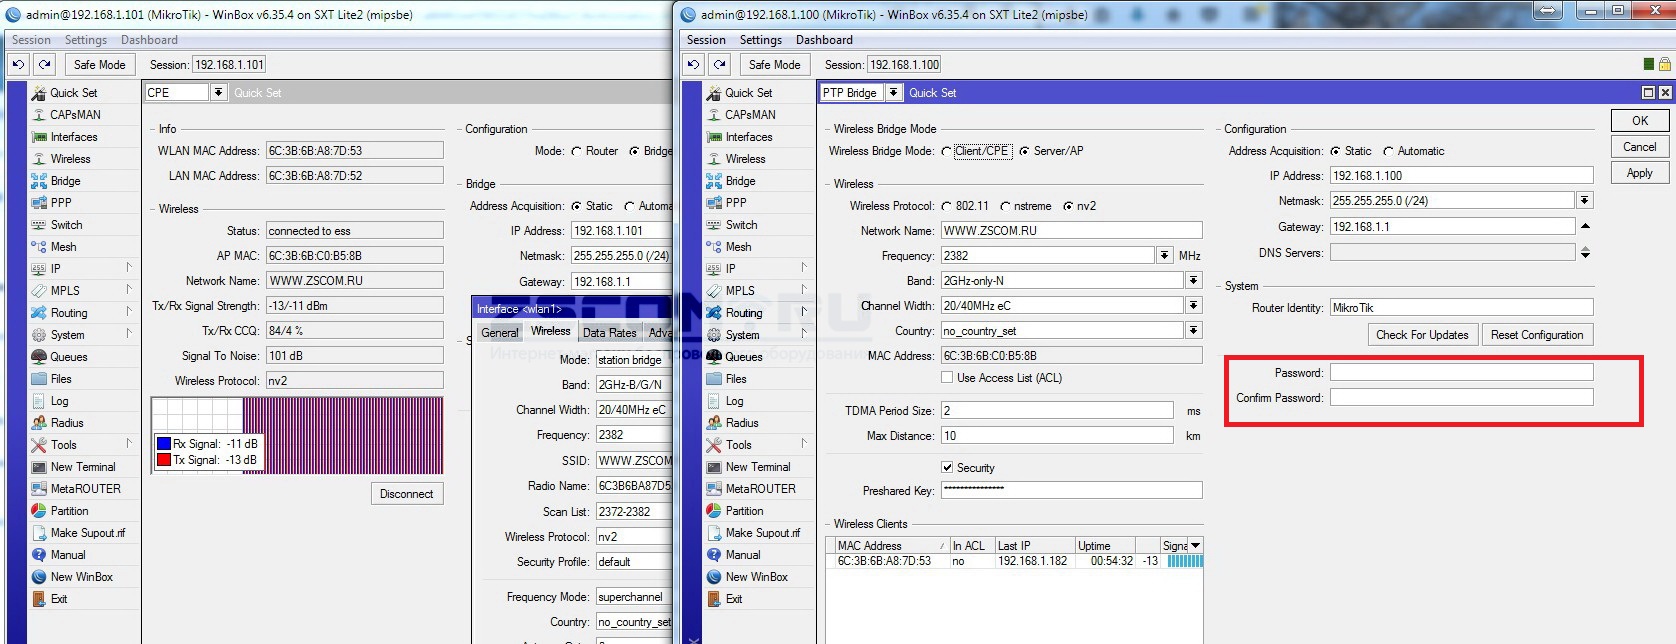
Все что вам остается, это установить пароли для доступа к интерфесам управления Mikrotik SXTSQ Lie 5.
9. Пояснения к конфигурации.
Устройства настроены в прозрачный мост и эквиваленты патчкроду.
Айпи адрес передающей точки - 192.168.1.100
Айпи адрес принимающей точки - 192.168.1.101
Адресное пространство вашей сети не должно совпадать с адресным пространством точек доступа. При необходимости вы можете добавить любые нужные вам адреса для доступа к точкам в пункте меню Ip/Adresses/+ .
Мост работает на частоте 5775 и по поллинговому протоколу nv2. Таким образом интерференция с домашними wifi сетями отсутствует.
Мощность радиомодулей установлена на 27dbm. Предельное расстояние для моста -5км. Оптимально использовать до 3-4 км.
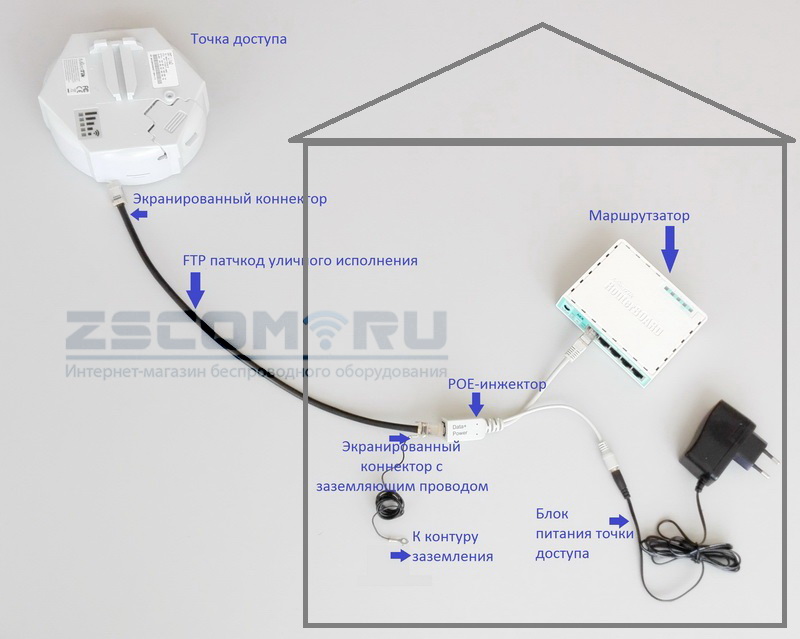
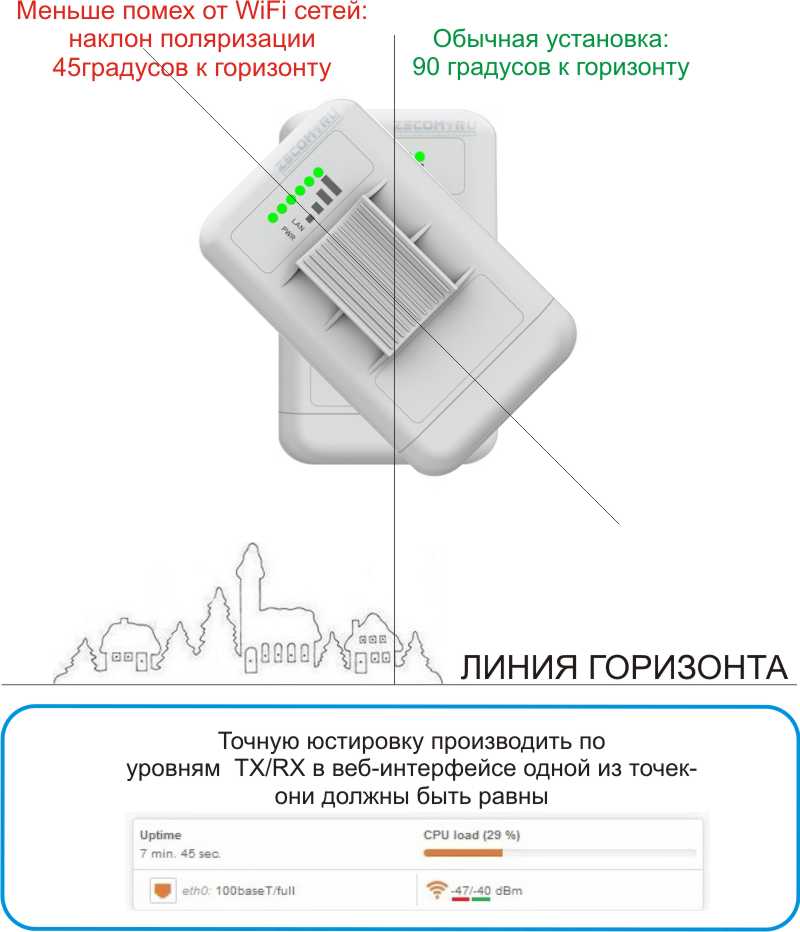
10. Монтаж и юстировка точек доступа Mikrotik SXTSQ Lite 5
Схема подключения.
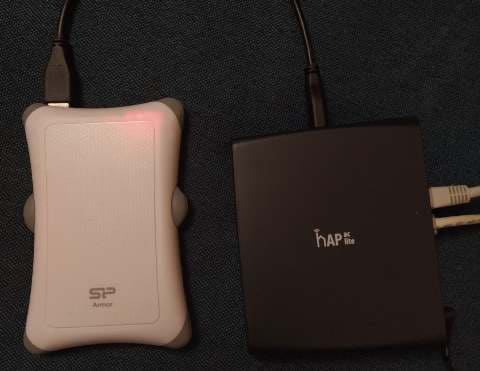
Если Вам понадобится домой маршрутизатор, то рекомендуем обратить внимание на Mikrotik hAP lite TC
Чистая зона Френеля - главное условие успешного установления беспроводного канала. Возможна, но не гарантирована работа моста и при наличии препятствий в зоне видимости (на отраженных волнах).
При выборе места монтажа учитывайте пожалуйста, что наша планета - круглая. Поэтому, для обеспечения прямой видимости между антеннами, их надо поднять на достаточную высоту. Дополнительную информацию можно получить здесь: Зависимость дальности прямой видимости от высоты антенн.
Если Вам помогла наша информация, Вы можете оставить отзыв о работе нашего магазина на Яндекс Маркете.
Проверка скорости записи

Wireless specifications
| 5 GHz | Transmit (dBm) | Receive Sensitivity |
|---|---|---|
| 6MBit/s | 25 | -96 |
| 54MBit/s | 21 | -80 |
| MCS0 | 25 | -96 |
| MCS7 | 20 | -75 |
| MCS9 | 18 | -70 |
Подключение сетевой папки MikroTik SMB на Windows ПК
Все действия будут производить со стороны ПК c ОС Windows.
Подключение к сетевой папке
![]()
Попытка записать файл

Powering
| Details | |
|---|---|
| Number of DC inputs | 1 (PoE-IN) |
| Max power consumption | 7 W |
| Cooling type | Passive |
| PoE in | Passive PoE |
| PoE in input Voltage | 10-30 V |
Specifications
| Details | |
|---|---|
| Product code | RBDiscG-5acD |
| Architecture | ARM 32bit |
| CPU | IPQ-4018 |
| CPU core count | 4 |
| CPU nominal frequency | 716 MHz |
| Dimensions | ⌀ 265mm, height: 80mm |
| RouterOS license | 3 |
| Operating System | RouterOS |
| Size of RAM | 256 MB |
| Storage size | 16 MB |
| Storage type | FLASH |
| MTBF | Approximately 100'000 hours at 25C |
| Tested ambient temperature | -40°C to 70°C |
| IPsec hardware acceleration | Yes |
| Suggested price | $69.00 |
Certification & Approvals
| Details | |
|---|---|
| Certification | CE, FCC, IC, EAC, ROHS |
| IP | IP54 |
Проверка подключения HDD\SSD\flash
Настройка находится System→Resources→Usb

Если в списке Usb устройств не отображается HDD\SSD\flash, можно попытаться перезагрузить Usb порт.
Настройка находится System→Routerboard→Usb Power Reset

SAMBA авторизация

Настройка MikroTik SAMBA(SMB сервер)
Samba — пакет программ, которые позволяют обращаться к сетевым дискам и принтерам на различных операционных системах по протоколу SMB/CIFS.

Ethernet
Добавление пользователя для доступа к сетевой папке
Настройка находится IP→SMB→Users

Included parts
Нужно настроить MikroTik SAMBA?
Подключение usbHDD\SSD\flash к роутеру MikroTik, создание сетевой папки, ограничение доступа с парольной авторизацией.
Как подключить usb HDD, SSD к MikroTik, создание сетевой папки

Краткое описание: инструкция по подключению usb HDD\SSD\flash к роутеру MikroTik. Также будет рассмотрен процесс создания сетевой папки SAMBA, создания пользователей и прав доступа. И в завершении сетевая папка будет подключена на Windows ПК и будет сделан замер скорости чтения\записи:
Ethernet test results
| RBDiscG-5acD | IPQ-4018 1G one port test | ||||||
| Mode | Configuration | 1518 byte | 512 byte | 64 byte | |||
| kpps | Mbps | kpps | Mbps | kpps | Mbps | ||
| Bridging | none (fast path) | 82,2 | 998.2 | 243,9 | 999.0 | 1484,8 | 760.2 |
| Bridging | 25 bridge filter rules | 82,2 | 998.2 | 243,9 | 999.0 | 359,2 | 183.9 |
| Routing | none (fast path) | 82,2 | 998.2 | 243,9 | 999.0 | 1488 | 761.9 |
| Routing | 25 simple queues | 82,2 | 998.2 | 243,9 | 999.0 | 506,3 | 259.2 |
| Routing | 25 ip filter rules | 82,2 | 998.2 | 240,8 | 986.3 | 242,9 | 124.4 |
- All tests are done with Xena Networks specialized test equipment (XenaBay),and done according to RFC2544 (Xena2544)
- Max throughput is determined with 30+ second attempts with 0,1% packet loss tolerance in 64, 512, 1518 byte packet sizes
- Test results show device maximum performance, and are reached using mentioned hardware and software configuration, different configurations most likely will result in lower results
Читайте также: