
Монтирование диска windows powershell
The PowerShell FileSystem provider lets you get, add, change, clear, and delete files and directories in PowerShell.
The FileSystem drives are a hierarchical namespace containing the directories and files on your computer. A FileSystem drive can be a logical or physical drive, directory, or mapped network share.
The FileSystem provider supports the following cmdlets, which are covered in this article.
Удаление разделов на диске
Чтобы удалить все разделы на дисках 1 и 2 без подтверждения, выполните команду:
Get-Partition –DiskNumber 1,2 | Remove-Partition -Confirm:$false

Для удаления с дисков всех разделов и полной очистки данных выполните команду:
Clear-Disk -Number 1 -RemoveData -Confirm:$false
Если на диски имеются OEM разделы (OEM раздел восстановления, EFI раздел , System Reserved) для их удаления нужно исползовать параметр RemoveOEM:
Clear-Disk -Number 1 -RemoveData –RemoveOEM
Следующая однострочная PowerShell команда инициализирует все новые подключенные диски типа RAW, создаст на них таблицу разделов и создаст раздел с файловой системой NTFS максимального размера. Ее удобно использовать при подключении нового диска:
Get-Disk |Where-Object PartitionStyle -eq 'RAW' |Initialize-Disk -PartitionStyle MBR -PassThru |New-Partition -AssignDriveLetter -UseMaximumSize |Format-Volume -FileSystem NTFS -Confirm:$false

10.01.2019

itpro

Windows 10, Windows 8

комментариев 29
В Windows 7 и Windows Server 2008 R2 появилась возможность создавать и подключать файлы виртуальных дисков (VHD/VHDX) прямо из консоли управления дисками (Disk Management). Такие виртуальные диски выглядят в системе как отдельные физические диски и могут использоваться для хранения произвольных данных. Существенный недостаток таких дисков — при каждой перезагрузке Windows приходится каждый раз вручную монтировать все VHD/VHDX файлы. Кроме того, право на монтирование файлов виртуальных дисков vhd есть только у администраторов компьютера, простые пользователи не могут самостоятельно подключить VHDx файл (каждый раз приходится вмешиваться администратору).
В этой статье мы покажем, как автоматически монтировать vhd/vhdx файл при загрузке системы, так, чтобы виртуальные диски были доступны и простым пользователям (не обладающих правами администратора)
В Windows отсутствует встроенная возможность автомонтирования vhd-файлов при перезагрузке системы, поэтому нам придется разработать собственный механизм монтирования. В этом нам поможет планировщик заданий Windows и утилита diskpart.
Итак, создадим текстовый файл (C:\Scripts\attach_vhd.txt) со следующим кодом:
select vdisk file="C:\vhd2\w10vhd.vhdx"
attach vdisk
select part 1
assign letter=K
exit
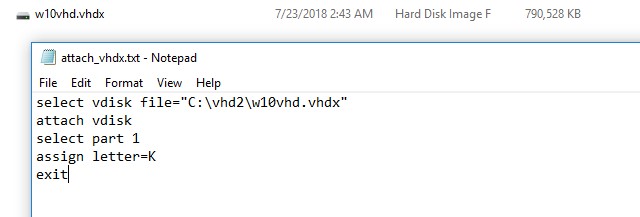
где:
C:\vhd2\w10vhd.vhdx – полный путь к VHD или VHDX образу диска
K –буква диска, которую нужно назначить VHD образу
Данный сценарий подключает указанный vhd файл, выбирает на нем первый раздел и назначает ему данную букву диска. Если на диске несколько разделов, измените код соответствующим образом, указав номер раздела, который нужно подключать.
Примечание. В целях безопасности желательно изменить NTFS разрешения на файл «C:\Scripts\attach_vhdx.txt», так чтобы простые пользователи не могли его изменить.

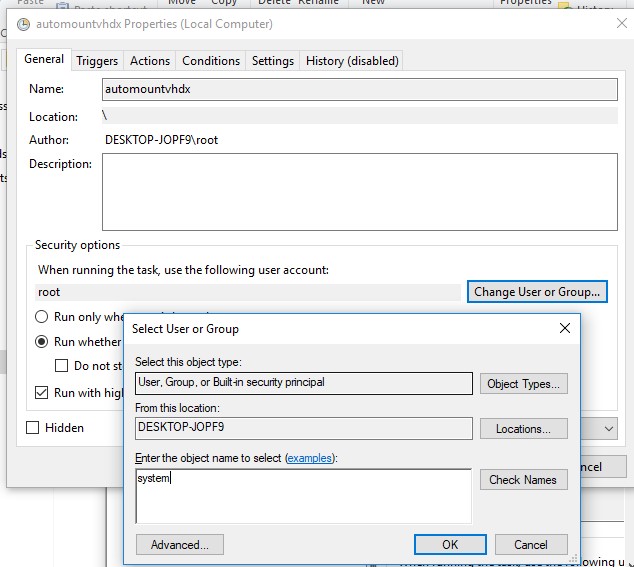
Запустите Windows Task Scheduler (Taskschd.msc) и создайте новое задание планировщика (Actions -> Create Task). Настройте его следующим образом:
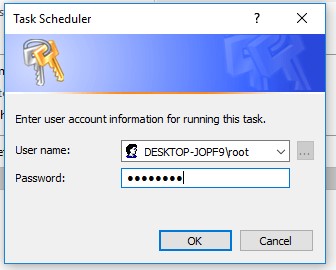
Чтобы задание выполнялось от имени системы, еще раз откройте его свойства и на вкладке General нажмите кнопку Change User or Group. В окне выбора пользователя укажите system и сохраните изменения.
Теперь при следующей перезагрузке компьютера указанный виртуальный VHDx диск будет смонтирован автоматически.
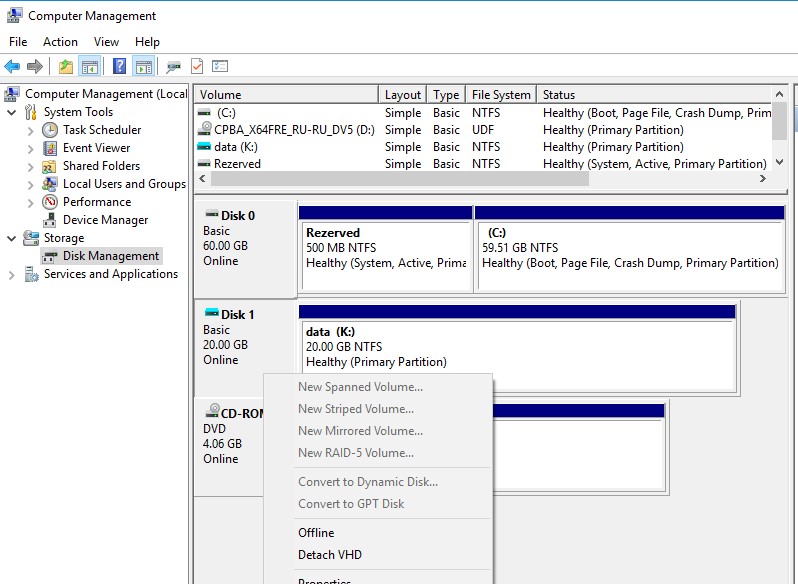
Примечание. Как правило, диск появляется в списке доступных дисков не сразу, а через 30-60 секунд после загрузки Windows.
Если вы хотите, чтобы виртуальный vhdx диск монтировался не в отдельную букву диска, а в папку, измените код в файле c:\Scripts\attach_vhd.txt на:
select vdisk file="C:\vhd2\w10vhd.vhdx"
attach vdisk
select part 1
assign mount="c:\mount"
exit
В результате выполнения данной команды виртуальный диск будет смонтирован в отдельный каталог на вашем физическом диске (в данном каталоге будет отображаться содержимое vhdx файла).

Можно смонтировать не только локальный VHD диск, но и диск из сетевого каталога через UNC путь.
select vdisk fils="\\192.168.1.100\share\shared.vhdx"
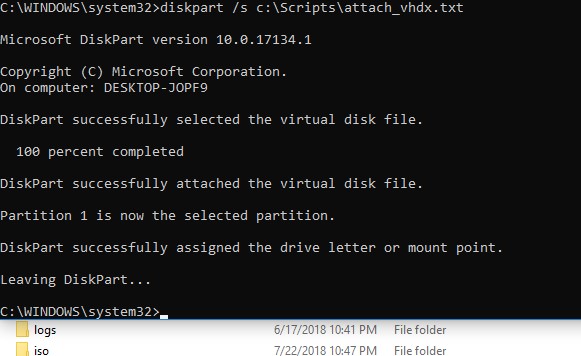
Для тестирования работы коды вашего скрипта автоматического подключения виртуальных дисков не обязательно каждый раз перезагружать компьютер, достаточно в командной строке с правами администратора выполнить команду:
diskpart /s c:\Scripts\attach_vhdx.txt
Если ваш код не содержит ошибок, то команда подключит vhdx файл и в системе появится новый диск.
Данные способы автоматического подключения виртуальных дисков работают как в Windows 10, так и в Windows 8.1 и Win 7.
Если вы больше любите PowerShell, можно автоматически смонтировать VHDX диск с помощью следующего PoSh скрипта в автозагрузке (для управления дисками изспользуются командлеты из модуля Storage):
mount-vhd -path C:\vhd2\w10vhd.vhdx –PassThru | Get-Disk | Get-Partition | Set-Partition -NewDriveLetter G
Диск Windows PowerShell — это расположение хранилища данных, доступ к которому можно получить так же, как к диску файловой системы в Windows PowerShell. Поставщики Windows PowerShell создают несколько дисков, например диски файловой системы (включая C: и D:), диски реестра (HKCU: и HKLM:) и диск сертификата (Cert:), а вы можете создать собственные диски Windows PowerShell. Эти диски очень полезны, но они доступны только в Windows PowerShell. К ним невозможно получить доступ с помощью других средств Windows, например проводника или Cmd.exe.
Windows PowerShell использует существительное PSDrive для команд, которые работают на дисках Windows PowerShell. Для получения списка дисков Windows PowerShell в сеансе Windows PowerShell используйте командлет Get-PSDrive .
Хотя отображение дисков в списке зависит от дисков в вашей системе, список будет выглядеть аналогично выходным данным команды Get-PSDrive , показанной выше.
Диски файловой системы являются подмножеством дисков Windows PowerShell. Их можно идентифицировать по записи FileSystem в столбце "Поставщик". (Диски файловой системы в Windows PowerShell поддерживаются поставщиком FileSystem Windows PowerShell.)
Чтобы просмотреть синтаксис командлета Get-PSDrive , введите команду Get-Command с параметром Syntax:
Параметр PSProvider позволит отобразить только диски Windows PowerShell, поддерживаемые конкретным поставщиком. Например, чтобы отобразить только те диски Windows PowerShell, которые поддерживаются поставщиком FileSystem Windows PowerShell, введите команду Get-PSDrive с параметром PSProvider и значением FileSystem:
Чтобы просмотреть диски Windows PowerShell, представляющие кусты реестра, используйте параметр PSProvider для отображения только тех дисков Windows PowerShell, которые поддерживаются поставщиком реестра Windows PowerShell:
С дисками Windows PowerShell также можно использовать стандартные командлеты расположения:
Вывод списка дисков и разделов на них
Прежде всего попробуйте вывести список дисков, доступных на логическом уровне в вашей системе. Для этого выполните команду:
Get-Disk | ft -AutoSize
Чтобы выбрать только системный диск, на котором установлена Windows, выполните команду:
Get-Disk | Where-Object IsSystem -eq $True | fl
Как вы видите, команда вернула следующие атрибуты системного диска (их также можно использовать в выборке):
Manufacturer : VMware
Model : Virtual disk
SerialNumber :
Size : 80 GB
AllocatedSize : 85898297344
LogicalSectorSize : 512
PhysicalSectorSize : 512
NumberOfPartitions : 2
PartitionStyle : MBR
IsReadOnly : False
IsSystem : True
IsBoot : True
Можно вывести только диски со статусом Offline:
Get-Disk | Where-Object IsOffline –Eq $True| ft –AutoSize

Если вам нужна информация о физических дисках (характеристики и состояние физических дисков на компьютере), используйте командлет Get-PhysicalDisk (ранее мы показывали как с помощью командлета Get-PhysicalDisk можно определить неисправный диск в Storage Spaces Direct и его использование при настройке отказоустойчивого хранилища S2D).

С помощью PowerShell вы можете определить тип подключенного накопителя SSD или HDD (обычно подключен через шину SATA) или USB флешка (тип UnSpecified).
0 TOSHIBA MK3775VSXP HDD SATA 500156374016
1 Samsung SSD 840 PRO Series SSD SATA 128060514304
Вы можете вывести список разделов на всех дисках:
Либо разделы только на указанных дисках:
Get-Partition –DiskNumber 1,2
Чтобы вывести список всех логических разделов в Windows выполните:

Moving files and directories
This command moves the c.txt file in the C:\a directory to the C:\a\aa directory:
The command will not automatically overwrite an existing file that has the same name. To force the cmdlet to overwrite an existing file, specify the Force parameter.
You cannot move a directory when that directory is the current location. When you use Move-Item to move the directory at the current location, you see this error.
Description
The Mount-DiskImage cmdlet mounts a previously created disk image (virtual hard disk or ISO), making it appear as a normal disk. This cmdlet requires the full path of the VHD or ISO file. If the file is already mounted, then the cmdlet will display the following error.
-- "The process cannot access the file because it is being used by another process."
To mount a VHD file, administrator privileges is required. Administrator privileges are not needed to mount an ISO file on Windows® 8. On Windows Server® 2012, only an administrator is allowed to mount or eject an ISO file.
To create and mount a VHD on a computer running Hyper-V, use the New-VHD and Mount-VHD cmdlets in the Hyper-V module (which is included in Windows 8 and Windows Server 2012 but not enabled by default). Alternatively, open Disk Management and then choose Create VHD from the Action menu.
View the ACL for a file
For more information about this object, pipe the command to the Get-Member cmdlet. Or, see FileSecurity Class.
Types exposed by this provider
Files are instances of the System.IO.FileInfo class. Directories are instances of the System.IO.DirectoryInfo class.
Getting files and directories
The Get-ChildItem cmdlet returns all files and directories in the current location. You can specify a different path to search and use built in parameters to filter and control the recursion depth.
To read more about cmdlet usage, see Get-ChildItem.
Copying files and directories
The Copy-Item cmdlet copies files and directories to a location you specify. Parameters are available to filter and recurse, similar to Get-ChildItem .
The following command copies all of the files and directories under the path "C:\temp" to the folder "C:\Windows\Temp".
Copy-Item overwrites files in the destination directory without prompting for confirmation.
This command copies the a.txt file from the C:\a directory to the C:\a\bb directory.
Copies all the directories and files in the C:\a directory to the C:\c directory. If any of the directories to copy already exist in the destination directory, the command will fail unless you specify the Force parameter.
For more information, see Copy-Item.
Managing security descriptors
Starting a program by invoking an associated file
Example 1: Mounting an ISO
This example mounts an ISO by specifying the image path.
Inputs
You can pipe a DiskImage object to the InputObject parameter.
Create a file
This command creates the log2.txt file in the C:\logfiles directory and then adds the "test log" string to the file:
Getting files and folders with specified attributes
Get the content of a file
This command gets the contents of the "Test.txt" file and displays them in the console.
You can pipe the contents of the file to another cmdlet. For example, the following command reads the contents of the Test.txt file and then supplies them as input to the ConvertTo-Html cmdlet:
You can also retrieve the content of a file by prefixing its provider path with the dollar sign ( $ ). The path must be enclosed in curly braces due to variable naming restrictions. For more information, see about_Variables.
Get System files
This command gets system files in the current directory and its subdirectories.
It uses the -File parameter to get only files (not directories) and the -System parameter to get only items with the "system" attribute.
It uses the -Recurse parameter to get the items in the current directory and all subdirectories.
Using the pipeline
Provider cmdlets accept pipeline input. You can use the pipeline to simplify task by sending provider data from one cmdlet to another provider cmdlet. To read more about how to use the pipeline with provider cmdlets, see the cmdlet references provided throughout this article.
Creating files and directories
Get Compressed and Encrypted files
This command gets files in the current directory that are either compressed or encrypted.
It uses the -Attributes parameter with two values, Compressed and Encrypted . The values are separated by a comma , which represents the "OR" operator.
Replace the content of a file
This command replaces the contents of the Test.txt file with the "test content" string:
It overwrites the contents of Test.txt . You can use the Value parameter of the New-Item cmdlet to add content to a file when you create it.
Renaming files and directories
Create a file with content
Creates a file called log2.txt in the C:\logfiles directory and adds the string "test log" to the file.
Cmdlets supported
Deleting files and directories
Managing file content
Get Hidden files
This command gets all files, including hidden files, in the current directory.
It uses the Attributes parameter with two values, !Directory+Hidden , which gets hidden files, and !Directory , which gets all other files.
dir -att !d,!d+h is the equivalent of this command.
Outputs
If you specify the Passthru parameter, this cmdlet outputs an object that represents the disk image that you mounted.
Rename a directory
This command renames the C:\a\cc directory to C:\a\dd :
Форматирование раздела из PowerShell
Отформатируем полученный раздел в файловой системе NTFS и зададим метку тома DBData:
Format-Volume -DriveLetter L -FileSystem NTFS -NewFileSystemLabel DBData -Confirm:$false

Navigating the FileSystem drives
The FileSystem provider exposes its data stores by mapping any logical drives on the computer as PowerShell drives. To work with a FileSystem drive you can change your location to a drive using the drive name followed by a colon ( : ).
You can also work with the FileSystem provider from any other PowerShell drive. To reference a file or directory from another location, use the drive name ( C: , D: , . ) in the path.
PowerShell uses aliases to allow you a familiar way to work with provider paths. Commands such as dir and ls are now aliases for Get-ChildItem, cd is an alias for Set-Location. and pwd is an alias for Get-Location.
Examples
Добавление новых дисков Windows PowerShell (New-PSDrive)
Добавить собственные диски Windows PowerShell можно с помощью команды New-PSDrive . Чтобы получить синтаксис для команды New-PSDrive , введите команду Get-Command с параметром Syntax:
Чтобы создать новый диск Windows PowerShell, необходимо указать три параметра:
имя диска (можно использовать любое допустимое имя Windows PowerShell);
PSProvider (используйте FileSystem для расположений файловой системы и Registry для расположений реестра);
корень, т. е. путь к корню нового диска.
Например, можно создать диск с именем Office, который сопоставляется с папкой, содержащей приложения Microsoft Office на компьютере, например C:\Program Files\MicrosoftOffice\OFFICE11 . Чтобы создать диск, введите следующую команду:
Обычно пути не зависят от регистра.
Ссылка на новый диск Windows PowerShell, как и на все диски Windows PowerShell, указывается по его имени, за которым следует двоеточие ( : ).
Диск Windows PowerShell может упростить множество задач. Например, некоторые наиболее важные разделы в реестре Windows содержат слишком длинные пути, что делает их громоздкими и сложными для запоминания. Сведения о критической конфигурации см. в разделе HKEY_LOCAL_MACHINE\SOFTWARE\Microsoft\Windows\CurrentVersion . Чтобы просмотреть и изменить элементы в разделе реестра CurrentVersion, можно создать диск Windows PowerShell, корень которого находится в этом разделе, введя:
После этого можно изменить расположение на диск cvkey: (как и для любого другого диска):
Командлет New-PsDrive добавляет новый диск только в текущий сеанс Windows PowerShell. Если закрыть окно Windows PowerShell, новый диск будет потерян. Чтобы сохранить диск Windows PowerShell, используйте командлет Export-Console для экспорта текущего сеанса Windows PowerShell, а затем используйте параметр PSConsoleFile файла PowerShell.exe для импорта. Также можно добавить новый диск в профиль Windows PowerShell.
Создаем разделы на диске
Чтобы создать новый раздел на диске используется командлет New-Partition. Создадим раздел размером 10 Гб и назначим ему букву диска L:
New-Partition –DiskNumber 1 -Size 10gb -DriveLetter L

Если раздел должен занимать все доступное место на диске, используйте атрибут UseMaximumSize. Для автоматического назначения буквы диска используется параметр AssignDriveLetter (иногда буква диска может автоматически на назначаться).
New-Partition –DiskNumber 1 -AssignDriveLetter –UseMaximumSize
Вы можете изменить назначенную букву диска так:
Set-Partition –DriveLetter L -NewDriveLetter U
Если нужно увеличить имеющийся раздел, сначала выведите доступное пространство для расширения для данного раздела:
Get-PartitionSupportedSize -DriveLetter L | Format-List
Потом можно увеличить размер раздела до максимального:
$MaxSize = (Get-PartitionSupportedSize -DriveLetter L).SizeMax
Resize-Partition -DriveLetter L -Size $MaxSize

Если нужно сделать конкретный раздел активным используется команда:
Set-Partition -DriveLetter T -IsActive $true
Delete files using wildcards
This command deletes all the files in the current directory that have the .xml file name extension:
Добавление и удаление дисков за пределами Windows PowerShell
Mounts a previously created disk image (virtual hard disk or ISO), making it appear as a normal disk.
Modify the ACL for a file
Dynamic parameters
Dynamic parameters are cmdlet parameters that are added by a PowerShell provider and are available only when the cmdlet is being used in the provider-enabled drive.
EncodingSpecifies the file encoding. The default is ASCII.
- ASCII: Uses the encoding for the ASCII (7-bit) character set.
- BigEndianUnicode: Encodes in UTF-16 format using the big-endian byte order.
- String: Uses the encoding type for a string.
- Unicode: Encodes in UTF-16 format using the little-endian byte order.
- UTF7: Encodes in UTF-7 format.
- UTF8: Encodes in UTF-8 format.
- UTF8BOM: Encodes in UTF-8 format with Byte Order Mark (BOM)
- UF8NOBOM: Encodes in UTF-8 format without Byte Order Mark (BOM)
- UTF32: Encodes in UTF-32 format.
- Default: Encodes in the default installed code page.
- OEM: Uses the default encoding for MS-DOS and console programs.
- Unknown: The encoding type is unknown or invalid. The data can be treated as binary.
Cmdlets supported
DelimiterSpecifies the delimiter that Get-Content uses to divide the file into objects while it reads.
The default is \n , the end-of-line character.
When reading a text file, Get-Content returns a collection of string objects, each of which ends with the delimiter character.
Entering a delimiter that does not exist in the file, Get-Content returns the entire file as a single, un-delimited object.
You can use this parameter to split a large file into smaller files by specifying a file separator, such as "End of Example", as the delimiter. The delimiter is preserved (not discarded) and becomes the last item in each file section.
Currently, when the value of the -Delimiter parameter is an empty string, Get-Content does not return anything. This is a known issue. To force Get-Content to return the entire file as a single, undelimited string, enter a value that does not exist in the file.
Cmdlets supported
Waits for content to be appended to the file. If content is appended, it returns the appended content. If the content has changed, it returns the entire file.
When waiting, Get-Content checks the file once each second until you interrupt it, such as by pressing CTRL+C.
Cmdlets supported
AttributesGets files and folders with the specified attributes. This parameter supports all attributes and lets you specify complex combinations of attributes.
The -Attributes parameter was introduced in Windows PowerShell 3.0.
The -Attributes parameter supports the following attributes:
For a description of these attributes, see the FileAttributes enumeration.
Use the following operators to combine attributes.
No spaces are permitted between an operator and its attribute. However, spaces are permitted before commas.
Cmdlets supported
DirectoryGets directories (folders).
The -Directory parameter was introduced in Windows PowerShell 3.0.
To get only directories, use the -Directory parameter and omit the -File parameter. To exclude directories, use the -File parameter and omit the -Directory parameter, or use the -Attributes parameter.
Cmdlets supported
The -File parameter was introduced in Windows PowerShell 3.0.
To get only files, use the -File parameter and omit the -Directory parameter. To exclude files, use the -Directory parameter and omit the -File parameter, or use the -Attributes parameter.
Cmdlets supported
HiddenGets only hidden files and directories (folders). By default, Get-ChildItem gets only non-hidden items.
The -Hidden parameter was introduced in Windows PowerShell 3.0.
To get only hidden items, use the -Hidden parameter, its h or ah aliases, or the Hidden value of the -Attributes parameter. To exclude hidden items, omit the -Hidden parameter or use the -Attributes parameter.
Cmdlets supported
ReadOnlyGets only read-only files and directories (folders).
The -ReadOnly parameter was introduced in Windows PowerShell 3.0.
To get only read-only items, use the -ReadOnly parameter, its ar alias, or the ReadOnly value of the -Attributes parameter. To exclude read-only items, use the -Attributes parameter.
Cmdlets supported
SystemGets only system files and directories (folders).
The -System parameter was introduced in Windows PowerShell 3.0.
To get only system files and folders, use the -System parameter, its as alias, or the System value of the -Attributes parameter. To exclude system files and folders, use the -Attributes parameter.
Cmdlets supported
NewerThanReturns $True when the LastWriteTime value of a file is greater than the specified date. Otherwise, it returns $False .
Enter a DateTime object, such as one that the Get-Date cmdlet returns, or a string that can be converted to a DateTime object, such as "August 10, 2011 2:00 PM" .
Cmdlets supported
OlderThanReturns $True when the LastWriteTime value of a file is less than the specified date. Otherwise, it returns $False .
Enter a DateTime object, such as one that the Get-Date cmdlet returns, or a string that can be converted to a DateTime object, such as "August 10, 2011 2:00 PM" .
Cmdlets supported
StreamManages alternate data streams. Enter the stream name. Wildcards are permitted only in Get-Item for and Remove-Item commands in a file system drive.
Cmdlets supported
Ignores newline characters. Returns contents as a single item.
Cmdlets supported
ItemTypeThis parameter allows you to specify the tye of item to create with New-Item
The available values of this parameter depend on the current provider you are using.
In a FileSystem drive, the following values are allowed:
- File
- Directory
- SymbolicLink
- Junction
- HardLink
Parameters
Mounts the VHD file in read-only or read-write mode. If this parameter is not used or you specify the Unknown parameter value for the VHD file, the VHD file is mounted in read-write mode.
ISO files are mounted in read-only mode regardless of what parameter value you provide.
| Type: | Access |
| Accepted values: | Unknown, ReadWrite, ReadOnly |
| Position: | Named |
| Default value: | None |
| Accept pipeline input: | False |
| Accept wildcard characters: | False |
Runs the cmdlet as a background job. Use this parameter to run commands that take a long time to complete.
| Type: | SwitchParameter |
| Position: | Named |
| Default value: | None |
| Accept pipeline input: | False |
| Accept wildcard characters: | False |
Runs the cmdlet in a remote session or on a remote computer. Enter a computer name or a session object, such as the output of a New-CimSession or Get-CimSession cmdlet. The default is the current session on the local computer.
| Type: | CimSession [ ] |
| Aliases: | Session |
| Position: | Named |
| Default value: | None |
| Accept pipeline input: | False |
| Accept wildcard characters: | False |
Prompts you for confirmation before running the cmdlet.
| Type: | SwitchParameter |
| Aliases: | cf |
| Position: | Named |
| Default value: | False |
| Accept pipeline input: | False |
| Accept wildcard characters: | False |
Specifies the path of the VHD or ISO file.
| Type: | String [ ] |
| Position: | 0 |
| Default value: | None |
| Accept pipeline input: | True |
| Accept wildcard characters: | False |
Specifies the input object that is used in a pipeline command.
| Type: | CimInstance [ ] |
| Position: | Named |
| Default value: | None |
| Accept pipeline input: | True |
| Accept wildcard characters: | False |
Specifies that no drive letter should be assigned to the VHD or ISO file after mounting.
| Type: | SwitchParameter |
| Position: | Named |
| Default value: | None |
| Accept pipeline input: | False |
| Accept wildcard characters: | False |
Returns an object representing the item with which you are working. By default, this cmdlet does not generate any output.
| Type: | SwitchParameter |
| Position: | Named |
| Default value: | None |
| Accept pipeline input: | False |
| Accept wildcard characters: | False |
Specifies the storage type of a file: ISO, VHD, VHDx, or Unknown. If the StorageType parameter is not specified or the Unknown type is provided, then the storage type is determined by file extension.
| Type: | StorageType |
| Accepted values: | Unknown, ISO, VHD, VHDX, VHDSet |
| Position: | Named |
| Default value: | None |
| Accept pipeline input: | True |
| Accept wildcard characters: | False |
Specifies the maximum number of concurrent operations that can be established to run the cmdlet. If this parameter is omitted or a value of 0 is entered, then Windows PowerShell® calculates an optimum throttle limit for the cmdlet based on the number of CIM cmdlets that are running on the computer. The throttle limit applies only to the current cmdlet, not to the session or to the computer.
| Type: | Int32 |
| Position: | Named |
| Default value: | None |
| Accept pipeline input: | False |
| Accept wildcard characters: | False |
Shows what would happen if the cmdlet runs. The cmdlet is not run.
| Type: | SwitchParameter |
| Aliases: | wi |
| Position: | Named |
| Default value: | False |
| Accept pipeline input: | False |
| Accept wildcard characters: | False |
Инициализация диска
В предыдущем примере вы видели, что один из дисков находится в офлайн состоянии и имеет разметку RAW в поле Partition Style. Попробуем инициализировать его, создать таблицу разделов и создать на нем новый раздел.
Прежде всего нужно перевести такой диск в онлайн:
Get-Disk | Where-Object IsOffline –Eq $True | Set-Disk –IsOffline $False
Теперь можно инициализировать этот диск (его индекс 1):
Initialize-Disk -Number 1

По умолчанию на диске создается таблица разделов GPT (GUID), если вам нужна именно MBR, выполните команду:
Initialize-Disk 1 –PartitionStyle MBR
Если на диске уже имеются данные, вы можете изменить таблицу разделов с MBR в GPT без удаления данных с помощью утилиты mbr2gpt.exe.
Чтобы не указывать номер диска, можно инициализировать все диски с таблицей разделов RAW:
Get-Disk | Where-Object PartitionStyle –Eq 'RAW' | Initialize-Disk
Обратите внимание, что диск может находится в статусе RAW при повреждении таблицы разделов. Вы можете попробовать восстановить таблицу разделов и данные на RAW диске так.
Удаление дисков Windows PowerShell (Remove-PSDrive)
Диски из Windows PowerShell можно удалить, используя командлет Remove-PSDrive . Командлет Remove-PSDrive прост в использовании. Чтобы удалить определенный диск Windows PowerShell, необходимо только указать имя диска Windows PowerShell.
Например, если вы добавили диск Windows PowerShell Office: , как описано в разделе New-PSDrive , вы можете удалить его, выполнив следующую команду:
Чтобы удалить диск Windows PowerShell cvkey:, также показанный в разделе New-PSDrive , используйте следующую команду:
Удалить диск Windows PowerShell легко, но его невозможно удалить, если он открыт. Пример:
Loop through the contents of a file
By default, the Get-Content cmdlet uses the end-of-line character as its delimiter, so it gets a file as a collection of strings, with each line as one string in the file.
You can use the -Delimiter parameter to specify an alternate delimiter. If you set it to the characters that denote the end of a section or the beginning of the next section, you can split the file into logical parts.
The first command gets the Employees.txt file and splits it into sections, each of which ends with the words "End of Employee Record" and it saves it in the $e variable.
The second command uses array notation to get the first item in the collection in $e . It uses an index of 0, because PowerShell arrays are zero-based.
For more information about Get-Content cmdlet, see the help topic for the Get-Content.
For more information about arrays, see about_Arrays.
Delete a file
This command deletes the Test.txt file in the current directory:
Add content to a file
This command appends the "test content" string to the Test.txt file:
The existing content in the Test.txt file is not deleted.
Create a directory
This command creates the logfiles directory on the C drive:
PowerShell also includes a mkdir function (alias md ) that uses the New-Item cmdlet to create a new directory.
Rename a file
This command renames the a.txt file in the C:\a directory to b.txt :
Invoke a file
The first command uses the Get-Service cmdlet to get information about local services.
It pipes the information to the Export-Csv cmdlet and then stores that information in the Services.csv file.
The second command uses Invoke-Item to open the services.csv file in the program associated with the .csv extension:
Create and set an ACL for a file
Getting help
Beginning in Windows PowerShell 3.0, you can get customized help topics for provider cmdlets that explain how those cmdlets behave in a file system drive.
To get the help topics that are customized for the file system drive, run a Get-Help command in a file system drive or use the -Path parameter of Get-Help to specify a file system drive.
10.01.2019
itpro
PowerShell, Windows 10, Windows Server 2016
Комментариев пока нет
В этой статье мы рассмотрим процесс управления дисками, разделами и томами из командной строки PowerShell. Все операции по работе с локальными дисками и разделами, которые вы привыкли выполнять с помощью графической консоли «Управление дисками» (diskmgmt.msc) или из командной строки утилиты diskpart.exe, вы можете выполнить из PowerShell. Командлеты управления дисками включены в модуль Storage, доступный в PowerShell 3.0. Мы посмотрим как инициализировать диск, создать на нем таблицу разделов, раздел и отформатировать его. Рассмотренные ниже команды будут работать в Windows 10 / Server 2016 и Windows 8.1/ Server 2012 R2 (в предыдущих версиях Windows придется сначала обновить PowerShell).
В Windows 10 в модуле Storage доступно 160 команд. Чтобы вывести все доступные команды управления дисками, выполните:
Get-Command -Module Storage

Важно. При работе с дисками и разделами на них из PowerShell нужно быть внимательным, чтобы случайно не удалить или отформатировать раздел с данными.
Syntax
Читайте также: