
Ds216 ii увеличение оперативной памяти
Select language:
The Synology DS216+II DiskStation comes with more than 1 GB RAM. As such, the DS216+II does exactly that which Synology designed it to do, it suffices for use as data storage. However, the lack of random access memory becomes noticeable when streaming films or using it as a surveillance station (camera monitoring). Thanks to the built-in Intel Celeron processor, the DS216+II can however be fitted with up to 8 GB of RAM.
IMPORTANT ADVICE
Upgrading RAM as shown here voids all warranties and guarantees by Synology. The upgrade takes place at own risk and I do not assume any liabilities for damages or loss of data.
Difficulty:
Choosing the Right Memory for a Synology NAS Upgrade
So, you have decided to upgrade the Memory/RAM on your Synology NAS. It is worth mentioning that different NAS drives require different memory types. All too often there are factors that are as follows:
Suitable memory moduls
As the Synology DiskStation is only compatible with certain memory slots, I have listed all compatible memory slot brands here. This ensures that my visitors do not have to deal with frustrations and problems when upgrading their random access memory. I have been able to personally test all memory slots many times and I can therefore give them my personal recommendation.
All specifications are exactly the same with the original memory modules. That’s the only way to ensure a smooth upgrade and a stable operation.
Synology DS216+II
8GB RAM:
Picking RAM
Synology lists the RAM compatible with each user-upgradeable model on their website. You can use this information to get the RAM specifications for your model Synology and then shop around for your preferred memory brand or a good price. Additionally, I have included lines to the third party crucial supported memory for a Synology NAS. Always be sure to check the compatibility before making your purchase, as Synology may have revised the hardware (see examples like the DS216+ and DS216+II).
VERY IMPORTANT – The Links used in the article below towards the correct unofficial memory are occasionally changed (beyond my control) as it will direct you to the site in your own region/country. MAKE SURE to check that the memory module (especially 16 and 32GB SODIMM modules) are DUAL RANK or ‘DR‘, as Synology NAS typically have trouble with SR/SINGLE RANK modules. Also, make sure for ECC Models, that the page listing is 100% ECC.
Компания Synology представила NAS-серверы DiskStation DS416 и DS216play, рассчитанные соответственно на четыре и два накопителя типоразмера 3,5 или 2,5 дюйма с интерфейсом SATA. По мнению производителя, они хорошо подойдут для использования в офисе и дома.

В сервере DS416 установлен двухъядерный процессор Annapurna Labs Alpine AL-212, работающий на частоте 1,4 ГГц, особенностью которого является встроенный блок шифрования. Конфигурация NAS включает 1 ГБ оперативной памяти DDR3, три порта USB 3.0 и два порта GbE с поддержкой агрегации. Накопители можно объединять в конфигурации Synology Hybrid RAID, Basic, JBOD, RAID 0, 1, 5, 6 или 10. Поддерживается горячая замена.
По данным производителя, скорость передачи данных в конфигурации RAID 5 в операционной среде Windows в режиме чтения достигает 221,05 МБ/с, в режиме записи — 139,51 МБ/с. При использовании шифрования скорость чтения достигает 146,5 MБ/с, скорость записи — 65,85 MБ/с. Габариты изделия — 165 x 203 x 233,2 мм, масса — 2,04 кг. Для охлаждения используется пара 92-миллиметровых вентиляторов. Уровень шума — 20,2 дБА.

В описании модели DS216play производитель выделяет способность преобразовывать в режиме реального времени видеопоток с разрешением 1080p, сжатый кодеком H.264, или видеопоток с разрешением 4K, сжатый кодеком H.265. Это позволяет направлять видеопоток 4К на цифровые телевизоры, проигрыватели, мобильные устройства и компьютеры без необходимости установки дополнительных аппаратных решений. Перекодирование выполняется аппаратным блоком с поддержкой H.265 (HEVC), MPEG-4 Part 2, MPEG-2 и VC-1, встроенным в двухъядерный процессор STM STiH412, работающий на частоте 1,5 ГГц.
Оснащение DS216play включает по одному порту USB 3.0, USB 2.0 и GbE. Средняя скорость составляет 107 МБ/с в режиме чтения и 91 МБ/с — в режиме записи в конфигурации RAID 1 в операционной среде Windows. Габариты этой модели равны 165 x 100 x 225,5 мм, масса — 0,88 кг.
Installation instructions
Step 1: Removing the front panel
First, we remove the rubber-mounted front panel, now we can see both hard drive slots.
Step 2: Removing the hard drive slots
The release button needs to be pushed to remove the hard drive slots, then the hard drive can simply slot be pulled out.
Step 3: Screw loose the fan grille
Now we loosen the four screws of the fan grille on the backside of the DiskStation and remove the fan grille.
Step 4: Loosen the case cover
ADVICE: This step is the most sensitive of the entire upgrade. Take your time and act with care.
- The case cover is locked in place to the frame of the hard drive cage with two locking lugs. We use two flat screwdrivers to loosen these. We simultaneously place these on the sides of both locking lugs and then use these to carefully press the casing outwards.
- When the locking lugs have been pressed outwards, the casing cover needs to be simultaneously moved backwards. It might be advisable in certain situations to ask a friend or family member for assistance. It is easier with four hands, should however be possible relatively effortless alone with some skill.
- The casting cover can be removed upwards as soon as it has been loosened and moved backwards. Now, the hardest part of this upgrade is done
Step 5: Removing the cooling fan
After we have removed the casing cover, we now need to remove the cooling fan of the DiskStation. To do so, we loosen the screw at the black angle mounting bracket, remove the connector of the fan cable from the board and remove the cooling fan.
Step 6: Removing the hard drive cage
We now need to dismount the metal hard drive cage to reach the socket for the RAM from the casing.
- Two screws with round heads are located on the top + bottom side each. We loosen these 4 screws with the Phillips-head screwdriver.
- The connection plate between the hard drive cage and the backside of the casing can be loosened directly with one single screw located on the hard drive cage. The screw at the back of the casing does not need to be removed.
Step 7: Replacing the random access memory
We have finally reached our goal; the RAM socket is right in front of us:
- The memory module is kept in place by a metal clip at the left and right-hand side. Both clips need to be carefully pushed outwards. Afterwards, the memory module lightly pops upwards and it can be removed from the socket.
- Now, the new memory module can be inserted. Press the memory module into the mounting at a light angle. Afterwards, push the memory module downwards, so that it snaps into the metal clips at the sides.
This article was helpful for you?
Please support Datenreise.de – Thank you!

Synology recently intoduced new, reasonably priced, 64-bit Intel processor based NAS model: DS216+. What makes it interesting to me is that this model support BRTFS filesystem and it also allow you to run Docker containers (among many other things) however memory is limited by 1 GB.
Synology also offers similar model with double number of CPU cores and double amount of memory (2 GB) for ~50% premium in price: ~$450 for DS716+ vs ~$300 for DS216+.
However, it is possible to upgrade memory in both models for up to 8 GB. Procedure for DS716+ is much simpler but cost of that unit is significantly higher.
Possibility to upgrade memory in DS216+ makes it a very good value for money: ~$335 for DS216+ with 8 GB RAM vs ~$485 for DS716+ with 8 GB of RAM.
Please note that some memory modules may not work with this unit. I strongly suggest to buy following module as it has been tested with DS216+ and DS716+:
Disclaimer: Memory upgrade most likely will void warranty. DS216+ unit disassembly is not as easy as in other models and you may potentially cause damage to it if you will attempt to follow guide below. Don't blame me if you'll break it.
But you will be fine. Just take your time and be gentle. It is not that hard to pull unit apart and then put it back together. It took me about 20 minutes but I spent most time figuring out how to remove various components and taking photos along the way. Again, don't rush. Take your time, be gentle and use common sense (don't apply too much force, etc).
What you need to do first is: power off unit, unplug it, remove plastic cover near hard drives and remove hard drives.
At the back of the unit unscrew 4 screws around fan and an extra screw in lower right corner.

Lay down unit on its side and take a look inside from side where hard drive were installed. See metal bar on top secured by 2 plastic clips? You will need to pull this bar slightly to "unlock it" and then push plastic cover slightly back. You should be able to pull it with just using your fingers. This is the only part in this guide where you need to apply little force but please be gentle. Take your time and be careful.
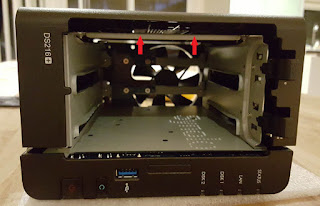
Red arrows pointing UP but you actually need to pull metal bar DOWN.
Then you should be able to remove that part of plastic cover completely. Just slide it out.
On a side of a chassis you will need to remove metal bracket secured by a single screw.

This is how it looks when removed


Just put it away for now. On other side on the unit you will need to remove plastic bracket which is "attached" to a fan. Again, you will need to unscrew just one screw.


Then you will need to remove fan which is connected to motherboard. Remove (pull) plastic connector from PCB and carefuly remove silver coloured tape attached to a cable. This tape is kind of "fragile" so be careful but its only function is to keep cable secure.


Then you need to remove 4 screw that hold chassis and plastic cover together.


Now is most delicate part. You will need to pull out chassis along with attached motherboard from plastic enclosure. Be careful, take your time and be gentle. Take a look from both sides and see how it is attached to enclosure.


Pull out chassis along with motherboard. This is how it should all looks like when done

Motherboard still attached to a chassis but that is fine. Take a look at motherboard
Вы знаете, что в Synology NAS оперативная память не большого объема и так уж случается, что ее бывает мало. Поэтому я и решил ее увеличить.
На данный момент у меня Synology DS220+ с 2Г памяти с магазина и возможностью увеличения до 6Г. Поэтому подбирать память я буду для него. Если у вас другая модель, то вам подбирать память надо самостоятельно.
Начнем с того, что до увеличения оперативной памяти система писала, что она задействована на 30% и я думал, что это вполне нормально. Вот скриншоты до увеличения оперативной памяти:
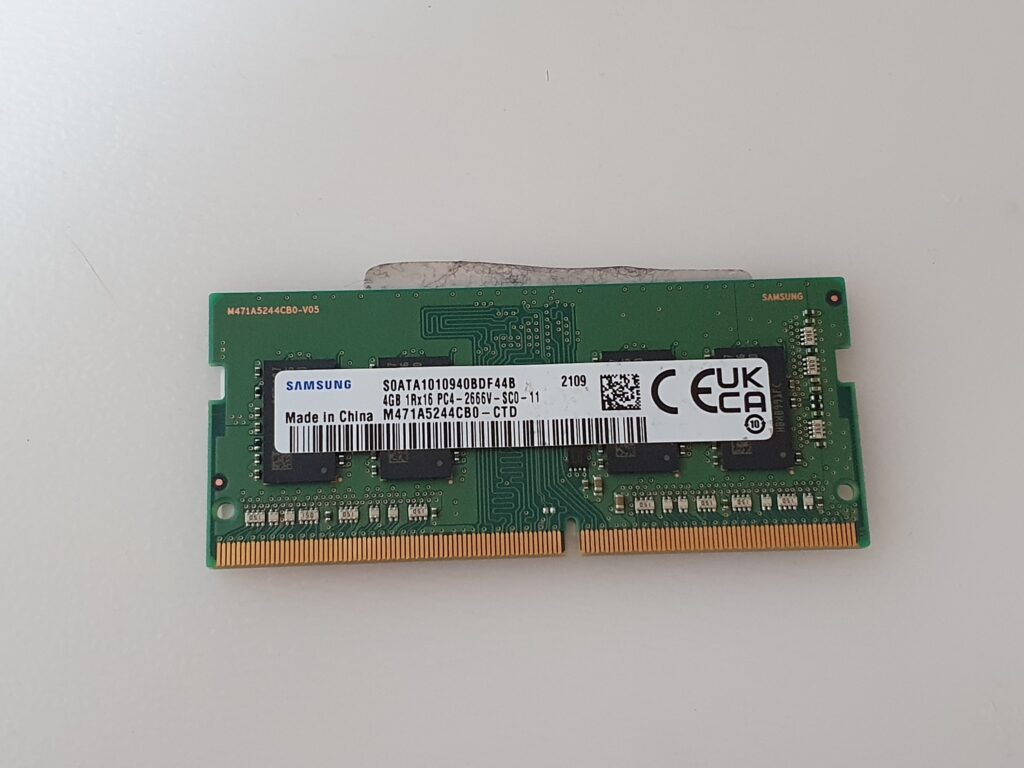
Как видно, в swap много данных, поэтому я и решил увеличить оперативную память, думая что таким образом swap будет пустой. На сайте производителя рекомендуемая память для моего Synology DS220+ D4NESO-2666-4G. А если поискать ее в интернете, то на момент написания статьи она стоит более 8000 рублей, что весьма дорого.
Поэтому я подобрал по характеристикам точно такую же, но уже за сумму в 4 раза меньшую Samsung [M471A5244CB0-CTD] 4 ГБ и купил ее в DNS.
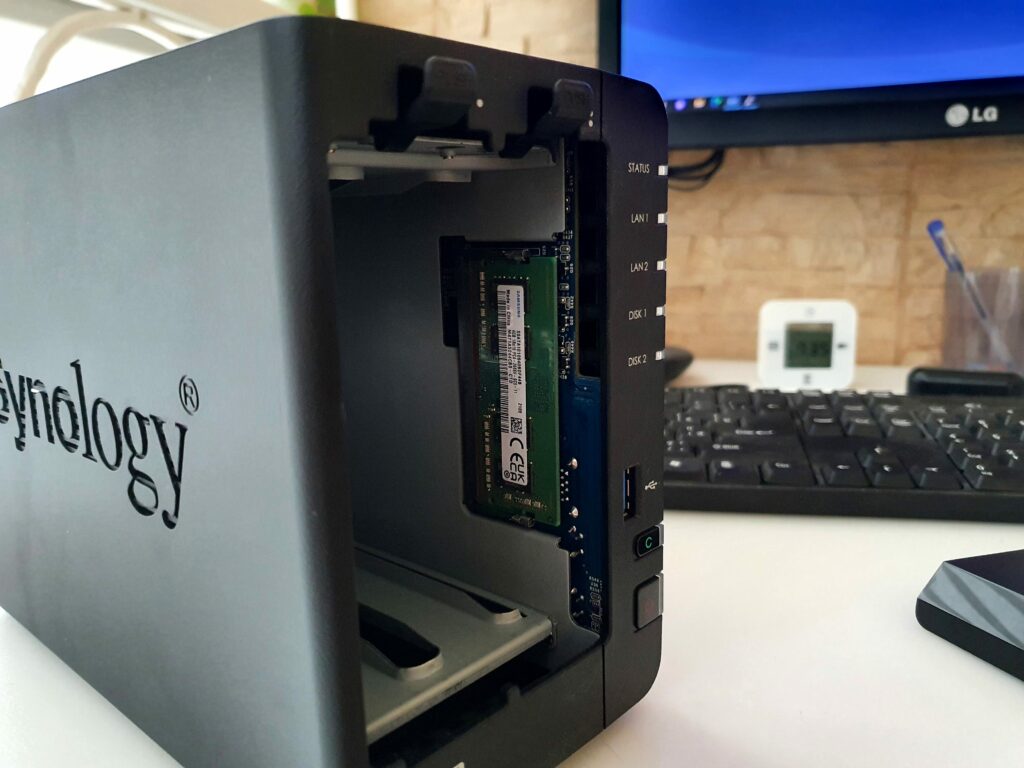
Установка не заняла много времени, память работает идеально как родная.
После это мой Synology NAS как будто зажил новой жизнью. Если раньше вроде бы все работало и не вызывало каких-то задержек, то теперь тот же moments открывается намного, намного быстрее. Я нисколько не пожалел, что увеличл оперативную память с 2Г до 6Г. И если раньше система писало, что занято до 70% оперативной памяти, то теперь данный показатель не выше 27%
Но на мое удивление swap все равно занят и не мало. Тогда я посмотрел в файле /proc/swaps распределение раздела подкачки и из чего он состоит. Я увидел, что 2Г это обычный swap раздел на диске, а еще есть два раздела zram0 и zram1. Поискав в интернете нашел следующее:
Как видим технология огонь. И теперь я понял, почему NAS Synology не располагает большим объемом оперативной памяти и вполне может работать на 2Г выполняя все свои функции.
Но все же, после увеличения оперативной памяти с 2Г до 6Г работать с NAS стало намного приятнее.
Я снял небольшое видео, желаю приятного просмотра
Posted on 9th May 2019 21st July 2021 by Rob Andrews 

![]()

34 comments

Everything you need to know about Upgrading Synology NAS Memory
If you have purchased a new NAS Drive in the last few months, then chances are that you would use it to the best if it’s abilities increasing the memory to the maximum in order to run more apps and allow more users to access the device at any time. The latest 2020 Generation of Synology NAS (the DS920+, DS420+, DS720+ and DS220+), much like the older gen devices, all arrive with the ability to upgrade the memory to 8GB, but some users like to push this limitation, using unofficial memory from brands like crucial or Kingston, installing bigger and faster memory. Generally speaking, Synology NAS has a long-standing reputation for being underpowered when compared to brands like QNAP and Asustor, at least out of the box, choosing to focus on their award-winning DSM software. This is changing a bit in 2019/2020 with the newer Synology drives featuring improved hardware choices, but still, for many, it seems a little underwhelming. One potential benefit that’s highlighted to improve performance considerably multiple users is to upgrade the RAM (Random Access Memory) in the Synology NAS drive. Today’s post will cover my thoughts on the usefulness of upgrading the factory-installed RAM, how to determine if a RAM upgrade is needed at all and exactly how to do this. Let’s start with the latter, do you need to upgrade RAM?
Tools
Three screwdrivers, that’s all the tools necessary to upgrade RAM. If these are readily at your disposal, you can directly start replacing the random access memory:
- 1x Phillips screwdriver (mid-sized)
- 2x flat screwdrivers
Is Upgrading the Memory on a Synology NAS worth it?
Many users will avoid updating default Memory on a Synology NAS server while it is still under warranty – thinking that “if it ain’t broke, don’t fix it”. However, If you are buying a Synology NAS that supports an official or unofficial user memory upgrade, there’s almost no reason not to do the upgrade. There are practically no disadvantages (none at all, if you buy official Synology Memory) and the benefits will be immediate. You can always wait till later on an upgrade when you notice a drop in performance, however, I would keep an eye on deal websites for your compatible DDR3 or DDR4 Synology NAS supported memory and then grab some when a bargain appears. I do wish some lower capacity NAS’ drives, such as the DS119j, DS218j and DS416slim (that arrive with much less memory soldered to the motherboard than their CPU can handle at maximum) were able to have their memory upgraded, as this becomes a tremendous bottleneck. There are cases where two drive bays are enough in terms of total available storage space (especially with 14TB Seagate and 16TB Toshiba NAS drives in-coming), so you will be able to run a lot of applications, for multiple users, but the rather comical 256MB, 512MB and 1GB memory available in these budget models is just not enough to run DSM to its full potential on these NAS and the result will be that most users will walk away with a very poor opinion of the Synology NAS experience.
How to Upgrade Synology NAS RAM
Let’s get down to business. First off, it is hugely important that you know that replacing the factory RAM will likely void the manufacturer’s warranty. So if you have purchased a new Synology NAS with the intent to upgrade the default memory, be sure to run it for a week or so without upgrading first to field test the NAS and make sure there are no pre-existing hardware problems. You can upgrade with OFFICIAL Synology memory, which will not invalidate your warranty, however, it is worth mentioning that Synology official memory is more expensive than the Crucial or Kingston memory counterparts. Pretty much all the Synology Desktop NAS drives are upgraded the same, so you can watch my RAM Upgrade of the Synology DS1019+ NAS below:
Upgrading the memory is often very simple indeed and simply a case of powering down the device, installing the new memory modules in the NAS (as long as you have access to them), then booting up the device. It may take a little longer than before to boot, as the new memory will be initialized, but you will not need to do any software configuration and the newly installed memory should appear in the resource monitor for immediate use.
IMPORTANT. PLEASE READ.
Although the Synology NAS memory upgrade process is very easy, it is also very easy to get wrong! It is worth remembering the following points
- Some Synology units have the RAM soldered onto the main internal board, so upgrading these will be impossible (without careful and tricky soldering which will no doubt void the warranty. Examples of Synology NAS that cannot have memory upgrades are DS119j, DS218J, DS118 and DS115j NAS to name but a few.
- If you are upgrading memory, it is always recommended to ‘pair’ the memory. So you should always have 2 equally sized (capacity) sticks of RAM in the slots. It is not necessarily the end of the world too, for example, mix a 2GB and 4GB Memory module (Synology themselves offer this as an official upgrade), but it is generally frowned upon.
- It is always worth checking your CPU or internal architecture in advance on the Synology NAS, as it may well limit the maximum amount of memory you can install. Sometimes you can exceed this (i.e. the DS1019+ with it’s Intel J3455 CPU has an official limit of 8GB and an unofficial limit of 16GB), but if in doubt, use my free advice section on the right of this page and ask me first.
Do you Need to Upgrade the Memory on your Synology NAS?
If you have bought or are considering buying a new Synology NAS and it has an accessible RAM slot (such as at the base of the device in the DS1819+ or tucked into the side of the HDD bays as found in the DS918+) slot then it is incredibly easy to buy a DDR3 or DDR4 memory module and upgrade the RAM during the initialization of the NAS. Crucial RAM is remarkably cheap these days and if you’re buying a Synology NAS model that can be upgraded, the user will almost certainly grow to benefit from the RAM.
If you’ve been using the NAS for a while, you can check your memory usage using the Resource Monitor found next to all your other applications. Like most modern operating systems, Synology Disk Station Manager (DSM 6.2 with DSM 7.0 soon in beta) will maximize memory performance so the amount of “free memory” may seem unusually small. Fear not, this is because of the way Synology have geared their OS to be as smooth as possible and DSM will keep old information in memory, for as long as possible, for faster access if it’s needed again in the near future. It can then see when you need further memory for more current concerns and then free up the memory if needed.

In order to genuinely work out if your NAS drive needs more memory, you will need to utilise your Synology device for a while and look at the Memory Monitor during a time of heavy access and usage. Make sure all the apps are running, being accessed/monitored and run all the software, media streams and backups that you normally would on a daily basis. Look at the utilization percentage, not free memory – as this will give you a much, MUCH better understanding of the memory that is required. The reason for this is that the resource monitor will exclude memory buffers and caching that DSM knows it can free up later. If the percentage is near 100%, then you will definitely, definitely need to upgrade in order to future proof as you will clearly you’ll benefit from more memory in your Synology NAS.

Another cool tip (thank you OSQuest) is that you should also change the “Type” filter at the top right of the resource monitor to Swap at look at its genuine utilization. If it’s not showing 0, then you are running out of physical memory at frequent times and Synology DSM is swapping to disk which hurts performance for all applications and users. Adding more memory will avoid this and improve performance across the board!
Читайте также: