
Блок питания corsair tx850m обзор
В очередном материале, созданном по методике массового тестирования БП, будут исследованы Corsair CS650M, CX750M и RM850 мощностью соответственно 650, 750 и 850 Вт. Они снабжены сертификатами эффективности 80 PLUS Bronze и Gold, выполнены по модульной схеме и отличаются хорошими характеристиками. Но смогут ли представители Corsair побороться за победу в своих мощностных категориях?
Оглавление
Результаты тестирования
Динамическое исследование кросс-нагрузочных характеристик говорит само за себя. Отклонения не превышают двух процентов, и те - находятся в не совсем типичной области работы.
В статическом режиме картина такая же радужная. Даже несколько перегрузив (102,3% от номинальных 850 Вт) устройство, мы видим что блок питания выдает напряжение с погрешностью не превышающей два процента по всем каналам! Напомним, что стандарт ATX допускает отклонения до 5%.
Субъективно блок питания Corsair TX850W производит впечатление чрезвычайно тихого. Легкий шелест появляется при значениях нагрузки около 500-600 Вт. Даже при работе на полную мощность шум блока питания вполне приемлем.
В завершение - еще один график от Corsair: КПД блока питания TX850W при различных питающих напряжениях, под различной нагрузкой. Отметим, что при питающем напряжении 115 В КПД несколько ниже (порядка 2-3 процентов).
ДОКУМЕНТАЦИЯ
Using Link with a Corsair AXi Digital Power Supply
The Corsair AXi Series PSUs have a lot of premium features. They use a digital signal processor for better performance, they're fully modular, and have a zero RPM fan mode at low loads. But one of the coolest things about the AXi power supplies, is their compatibility with the new Corsair Link software. Today, we take a look at the Corsair Link 2 software, or just "Link" for short, and more specifically how it gives you the ability to monitor AC input, DC output, the temperature and the fan speed of an AXi power supply.
The first thing I want to do is open up the "Graph" tab and set what I want to monitor in the "Config Panel" of this tab.

Above, you can see that I've checked boxes asking to have my two graphics cards' temperatures and fans graphed, as well as my CPU's temperature, the temperature of my AX860i power supply, as well as the AX860i's fan speed. I'm also monitoring the temperature of the coolant in the Hydro Series H100 that is cooling the CPU and the RPMs of the two fans cooling the H100's radiator.

While the system is idle, we can see that temperatures are relatively low. The AX860i is just barely over room temperature and therefore, the fan is not spinning.

Over on the "Power" tab, we see that the AX860i is only producing 107.3W as I sit here watching the Link software. It's pulling 117.8W from the wall, so our efficiency is 91%.
On this tab, we can also monitor our voltages, including the voltage of our AC mains, as well as current for each of our +12V outputs.
Finally, we see the AX860i's temperature and the fan RPM on this tab. This is the same information we saw on the "Graph" tab, but in a different format. The fan is still not spinning because the temperatures are still low, but if we wanted to increase the airflow within our chassis just a bit, we can manually turn the fan speed up.
We start on the "System" tab.

On this tab, we can see everything that Corsair Link 2 monitors, but if we click on the "AX860i Fan" icon on the left, a configuration panel opens up on the right. By default, we can see the fan mode is set to "quiet" which means the fan isn't going to spin at low loads. Changing this is easy.

The lowest setting is 40%, which equates to about 784 RPM. I can keep it like this and still not hear the fan. And the fan will still ramp up even faster automatically if needed. Let's turn it up even more to find out where I can start hearing the fan.

At 76%, the fan is spinning 1508 RPM. I can definitely hear that now. Well, that's enough of that. Let's put the PSU fan back into "quiet" mode, fire up Prime95 and Furmark and see what kind of power we produce and let the fan spin up all on its own.

Almost immediately, the temperatures of the CPU and graphics cards increase. Under this load, we start to see the power supply fan ramp up as well.

After some time under load, we see our temperatures level out, an increase in the graphics cards' fan's RPMs and the PSU's fan leveling off just over 500 RPM.

When we switch back over to the "Power" tab, we can see that our load has increased to 473.4W. We're now pulling 502.9W from the wall and our efficiency is increased to 94%. We can see that the amperage delivered on all of our +12V connectors has increased, the AX860i's temperature has increased very slightly, from 26.5 to 28.8°C, and the fan is now spinning at 556 RPM.

Of course, when you're gaming you're probably not going to be able to watch your load, temperatures and fan speeds while you're playing. For this reason, Corsair Link allows you to log whatever information you'd like to keep track of in a CSV file. Simply check the boxes of the components you want to monitor, browse to where you want to save the file and give the file a name and click "start logging".

Блоки питания CORSAIR TX-M Series™ отличаются качеством сборки промышленного уровня, эффективностью 80 PLUS Gold, чрезвычайно точной регулировкой напряжения и набором полумодульных кабелей.


Упаковка, комплектация, впечатления
На фронтальной стороне коробки Corsair TX850W находится черно-белая фотография сотовой вентиляционной решетки, нанесенная ярко-желтым цветом информация о модели и логотип производителя.
Тыльная сторона коробки отведена под детальное описание ключевых возможностей БП на английском, французском, немецком, итальянском и испанском языках.
На боковой стороне мы можем ознакомиться с нагрузочными характеристиками, зависимостью уровня шума вентилятора (в децибелах от нагрузки), также тут показан график КПД в диапазоне от 20 до 100 процентов нагрузки.
Внутри картонной коробки обнаруживаем полиуретановую коробку, предохраняющую корпус блока питания от механических повреждений.
Комплект поставки состоит из блока питания Corsair TX850W, упакованного в "фирменный" чехол, силового кабеля питания, кабельных стяжек, пакетика с крепежом, фирменной наклейки с логотипом Corsair, и бумажного руководства пользователя.
Блок питания Corsair TX850W имеет достаточно типичный дизайн для систем подобного класса: стальной корпус достаточной жесткости, с матовым покрытием черного цвета, 140-мм вентилятор системы охлаждения, почти во всю ширину корпуса.
На задней стороне расположен силовой разъем и выключатель напряжения. Вентиляционные отверстия на задней стенке выполнены в сотовом дизайне. Индикации работы устройства нет.
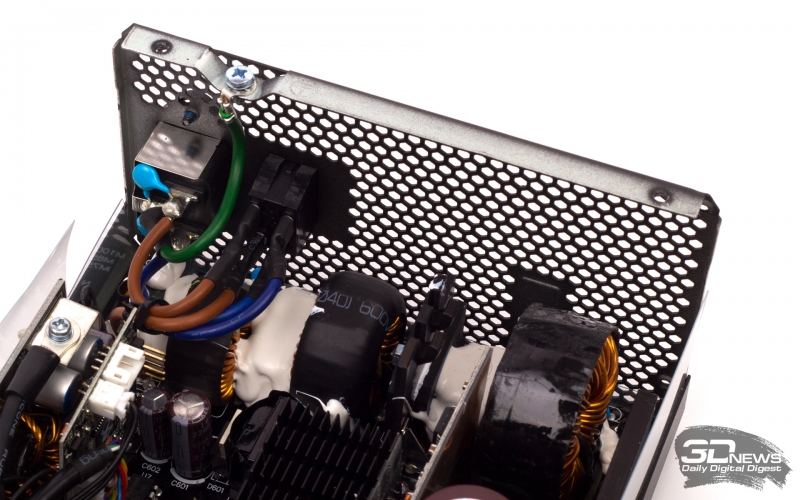
Внутреннее строение блока питания Corsair TX850W примечательно аккуратной пайкой, плотным монтажом всех элементов схемы на печатной плате, на которой также закреплены три теплоотводящих радиатора.
Использование A-PFC (Active Power Factor Correction) дает возможность использования блока в широком диапазоне напряжений (100 - 240В), что избавляет нас от архаичного переключателя диапазонов напряжений и в некоторой степени снижает требования к качеству сетевого напряжения.
Также в блоке используется двойная раздельная стабилизация выходного напряжения. Шины 5 В и 3,3 В получаются преобразованием из 12 В благодаря схеме на специальной плате, расположенной перпендикулярно основной плате устройства. К этой дочерней плате небольшого размера и крепятся выходные кабели. Схема первого стабилизатора скрыта от глаз радиатором черного цвета. Она выполнена с применением трех дросселей - по одному на каждое значение напряжения.
Конструкция обдувается 140-мм вентилятором HA1425H12B-Z производства ONG HUA на двух шариковых подшипниках, рабочие параметры вентилятора - 12 В/0,5 А. За организацию направленного воздушного потока отвечают усеянная сотами задняя стенка и пластиковая накладка, закрывающая половину вентилятора.
Участники тестирования
Итого
При поиске в интернете удалось найти этот блок в продаже. В среднем, за него просят 165-170 долларов, что для 850-ваттного блока питания можно считать хорошей ценой. Правда, гарантия, которую дают магазины, ограничивается 12-24 месяцами, что намного меньше заявленных производителем пяти лет. Возможно, пятилетний гарантийный срок (как указано в документации) дает компания Corsair, и конечному потребителю по истечению магазинного гарантийного обязательства придется искать фирменный сервисный центр Corsair. Блок питания Corsair TX850W мощностью 850 Вт продемонстрировал то, каким должен быть современный стабильный блок питания. Сертифицированный по современным стандартам 80PLUS, NVIDIA SLI, выполненный на качественной элементной базе, честно отрабатывающий заявленные характеристики, с удивительным гарантийным сроком и круглосуточной технической поддержкой, малошумящий и с высоким КПД блок питания вызывает только положительные эмоции. Если вы не нуждаетесь в модульном подключении кабелей, и вам требуется такая мощность, рекомендуем присмотреться к этому блоку питания.
Блоки питания CORSAIR TX-M Series™ отличаются качеством сборки промышленного уровня, эффективностью 80 PLUS Gold, чрезвычайно точной регулировкой напряжения и набором полумодульных кабелей.
Полумодульные блоки питания TX Series идеально подходят для настольных ПК базового уровня, где решающую роль играют низкий уровень шума, минимальное энергопотребление и максимальная простота установки. Все конденсаторы японского производства рассчитаны на температуру 105 °C и обеспечивают бесперебойную подачу питания и долговременную надежность. Эффективность, подтвержденная сертификацией 80 PLUS Gold, позволяет сократить эксплуатационные расходы и снизить тепловыделение. Плоские модульные кабели с черной оплеткой и четко обозначенными разъемами упрощают сборку системы и обеспечивают потрясающий внешний вид.


Благодаря высочайшей эффективности полумодульных блоков питания TX Series обеспечивается значительное снижение энергопотребления и эксплуатационных расходов. Меньшая теплоотдача позволяет уменьшить нагрузку на вентилятор, что позволяет снизить уровень шума.
Плоские кабели в черной оплетке имеют полумодульную конструкцию, что позволяет использовать только необходимые кабели и улучшает внешний вид системы. Четкая маркировка разъемов значительно упрощает и ускоряет процесс установки.


Каждый блок питания CORSAIR разработан проектной группой в Калифорнии и создан в точном соответствии с заявленными характеристиками. Пристальное внимание, которое уделяется разработке и проверке наших легендарных высокомощных источников питания, также уделяется и источникам питания TX-M Series, поскольку стабильность и надежность функционирования системы важны независимо от ее стоимости.
Вступление
В данном материале будут рассмотрены три блока питания компании Corsair – модели CS650M, CX750M и RM850. Ранее по массовой методике уже исследовались две подборки БП разной мощности Fractal Design (Tesla R2 650W, Integra R2 750W, Newton R3 800W, Integra R2 500W, Tesla R2 500W и Newton R3 600W), а также SilverStone (Strider 500 W, Strider Plus 600 W и Strider Gold 750 W) и Enermax (ETL350AWT-M, ERX630AWT и ERV850EWT-G).
реклама
На фоне этих производителей Corsair выделяется лучшей распространенностью в России, так что описываемые в данном обзоре модели несложно найти в продаже даже в глубинке. Кроме того, для каждой из них у нас есть прямые конкуренты из числа БП, протестированных ранее, так что вашему вниманию будет представлено интересное масштабное сравнение.
TX-M Series™ TX850M — блок питания мощностью 850 Вт с сертификацией 80 Plus® Gold
You'll save $00.00!
Блоки питания CORSAIR TX-M Series™ отличаются качеством сборки промышленного уровня, эффективностью 80 PLUS Gold, чрезвычайно точной регулировкой напряжения и набором полумодульных кабелей.
RETAILERS
Полумодульные блоки питания TX Series идеально подходят для настольных ПК базового уровня, где решающую роль играют низкий уровень шума, минимальное энергопотребление и максимальная простота установки. Все конденсаторы японского производства рассчитаны на температуру 105 °C и обеспечивают бесперебойную подачу питания и долговременную надежность. Эффективность, подтвержденная сертификацией 80 PLUS Gold, позволяет сократить эксплуатационные расходы и снизить тепловыделение. Плоские модульные кабели с черной оплеткой и четко обозначенными разъемами упрощают сборку системы и обеспечивают потрясающий внешний вид.


Благодаря высочайшей эффективности полумодульных блоков питания TX Series обеспечивается значительное снижение энергопотребления и эксплуатационных расходов. Меньшая теплоотдача позволяет уменьшить нагрузку на вентилятор, что позволяет снизить уровень шума.
Плоские кабели в черной оплетке имеют полумодульную конструкцию, что позволяет использовать только необходимые кабели и улучшает внешний вид системы. Четкая маркировка разъемов значительно упрощает и ускоряет процесс установки.


Каждый блок питания CORSAIR разработан проектной группой в Калифорнии и создан в точном соответствии с заявленными характеристиками. Пристальное внимание, которое уделяется разработке и проверке наших легендарных высокомощных источников питания, также уделяется и источникам питания TX-M Series, поскольку стабильность и надежность функционирования системы важны независимо от ее стоимости.
Corsair CS650M
Блок поставляется в картонной коробке средних размеров – 265 x 180 x 95 мм. Оформление традиционно для Corsair – по крайней мере, упаковка 600-ваттной модели CX600M (протестированной ранее) выглядела также.

К информативности не придерешься – на коробке приводятся изображения устройства, его краткое описание, таблица мощностных характеристик и перечень разъемов.
Упакован продукт Corsair достаточно надежно – корпус заключен в пакет «с пупырышками», все шнуры зафиксированы пластиковыми стяжками.

Комплект поставки включает в себя инструкции, шнур питания, и «милый сувенир» в виде флэшки (модели, судя по всему, могут отличаться – мне досталась очень неплохая «раздвижная» Voyager Slider на 16 Гбайт, интерфейс – USB 3.0).
реклама

Дизайн блока сложно назвать оригинальным, но выглядит устройство аккуратно.

Габариты – 149 x 139 x 86 мм, масса – 1960 г. Данная модель выполнена по полумодульной схеме: шнуры CPU и Mainboard являются неотключаемыми.

Блок оснащен кнопкой отключения питания.
Corsair CS650M снабжен 120 мм вентилятором с семилопастной крыльчаткой. Старый знакомый! Эта вертушка встречается на огромном количестве блоков самых разных производителей (не стоит забывать, что базы для своих устройств большинство фирм закупает всего на двух-трех основных заводах-производителях, так что это неудивительно).

Линия 12 В не разделена на виртуальные компоненты, максимальная сила тока на ней составляет 51 А, что соответствует 612 Вт мощности. По отношению к номиналу блока – это 94.1%, очень высокий показатель.

По линиям 3.3 В и 5 В в сумме можно подать до 130 Вт мощности, сила тока на этих каналах ограничена 25 А. Блок снабжен сертификатом эффективности 80 PLUS Gold, что в данной мощностной группе встречается не так часто.
Пластиковой оплеткой снабжен только основной шнур Mainboard, остальные представляют собой плоские шлейфы. Впрочем, это ни в коем случае не минус, такая форма удобна – провода легко изгибаются и не склонны к запутыванию.
Длина шнура питания материнской платы (Mainboard 20+4-pin) составляет 610 мм. Длина шнура питания процессора (4+4-pin) – 650 мм. Эти кабели являются постоянными – их нельзя отключить от корпуса блока.

Остальные провода – подсоединяемые.
реклама

Для подключения видеокарты предлагается использовать четыре разъема типа PCI-e 6+2-pin (закреплены попарно на двух шнурах длиной 740 мм). Это необходимо отметить как плюс: 650-ваттных моделей вполне достаточно для большинства систем SLI/CrossFire, однако многие производители почему-то забывают об этом.
- Два шнура с тремя разъемами SATA, длина – 650 мм;
- Шнур с четырьмя разъемами типа Molex, длина – 800 мм;
- Переходник Molex->Floppy, необходимый для подключения дисковода, длина – 120 мм.
Очень неплохой набор для модели этого класса.
В целом блок производит благоприятное впечатление. Отличные мощностные характеристики подкреплены наличием сертификата 80 PLUS Gold, продукт Corsair снабжен большим количеством разнообразных разъемов (отдельно отмечу четыре PCI-e) и выполнен по модульной схеме.
Подпишитесь на наш канал в Яндекс.Дзен или telegram-канал @overclockers_news - это удобные способы следить за новыми материалами на сайте. С картинками, расширенными описаниями и без рекламы.
Серия Corsair RMi во многом похожа на более дорогие Corsair HX и AX: пассивное охлаждение при низкой нагрузке, интерфейс Corsair Link, полностью модульное подключение кабелей. Только это 80 PLUS Gold, а не Platinum
Линейки RM и RMi во всем изобилии блоков питания, которые выпускает Corsair, являются золотой серединой. Однако середняк по стандартам Corsair все равно относится к высшей категории среди всех компьютерных БП, которые можно найти в продаже. Блоки питания Corsair RM/RMi соответствуют стандарту 80 PLUS Gold, а подключение кабелей у них – целиком модульное. При низкой нагрузке БП довольствуется пассивным охлаждением, полностью останавливая вентилятор.
А модели с буквой i в названии имеют несколько дополнительных преимуществ перед остальными:
- гарантия 7 лет – на 2 года больше;
- поддержка интерфейса Corsair Link;
- вентилятор на гидродинамическом подшипнике вместо подшипника качения;
- исключительно японские конденсаторы;
- работа на полной мощности при температуре 50 °C, а не 40 °C.
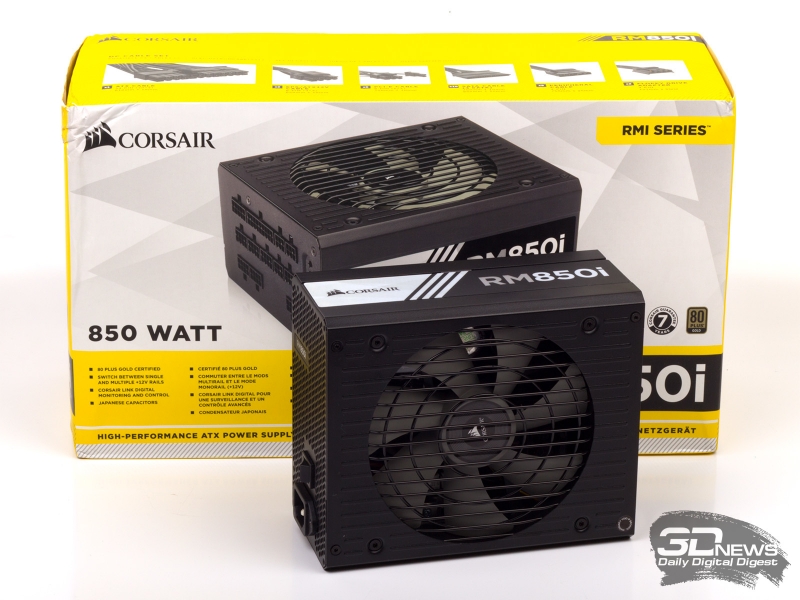
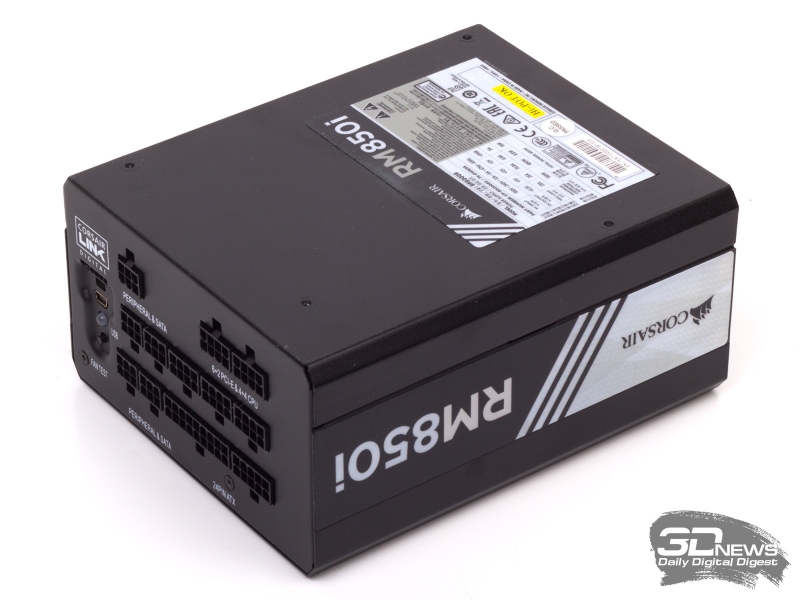
БП Corsair RMi доступны в конфигурациях на 650, 750, 850 и 1000 Вт мощности. Среди них мы выбрали третью модель по старшинству, обладающую номиналом 850 Вт. Corsair RM850i имеет одну физическую линию 12 В, через которую готов выдать свою полную мощность, хотя с помощью ПО Corsair Link можно создать вплоть до семи «виртуальных» линий с различными ограничениями на максимальный ток.
| Производитель | Corsair |
|---|---|
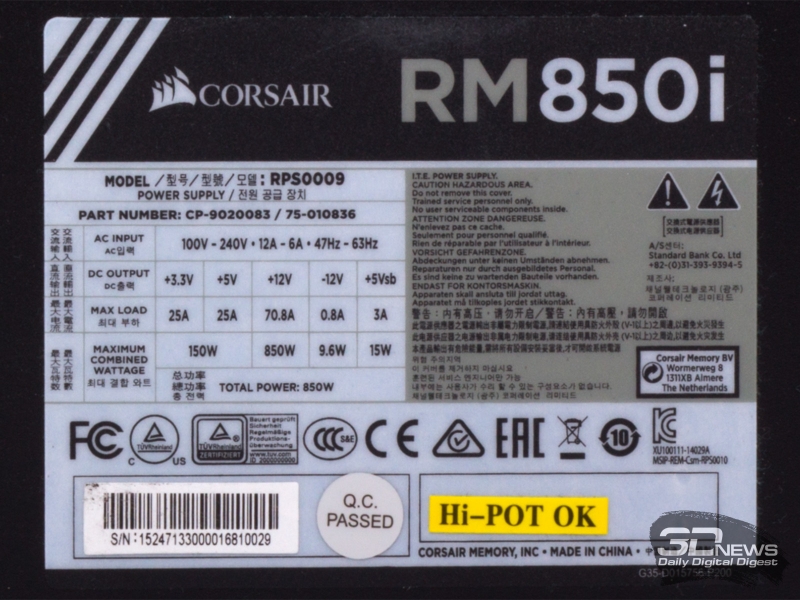
| Модель | RM850i |
| Подключение кабелей | Полностью модульное |
| Максимальная мощность нагрузки, Вт | 850 |
| Сертификация 80 PLUS | 80 PLUS Gold |
| Версия ATX | ATX12V 2.31 |
| Параметры электросети | 100-240 В, 12-6 А, 47-63 Гц |
| КПД | НД |
| PFC | Активный |
| Защита нагрузки | UVP (защита от понижения напряжения) |
| OVP (защита от превышения напряжения) | |
| OCP (защита от превышения тока) | |
| OPP (защита от превышения мощности) | |
| OTP (защита от превышения температуры) | |
| SCP (защита от короткого замыкания) | |
| Габариты, мм | 180 × 150 × 86 |
| Масса, кг | 1,98 |
| Наработка на отказ (MTBF), ч | 100 000 |
| Гарантийный срок, лет | 7 |
| Средняя розничная цена*, руб. | 12 100 |
* По данным «Яндекс.Маркета» на 09.09.2015.
Сам БП и набор кабелей размещены в двух отдельных мешочках. Помимо этого, в комплект поставки входит бумажная инструкция, гарантийный талон, стяжки для кабелей, наклейка на корпус ПК и винтики для монтажа блока питания.

Все кабели либо плоские, либо убраны в сетчатую оплетку.
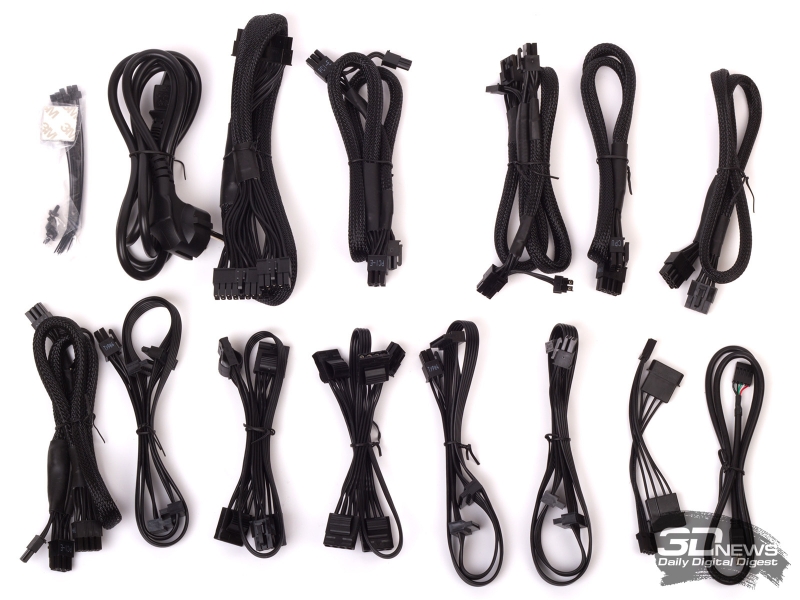
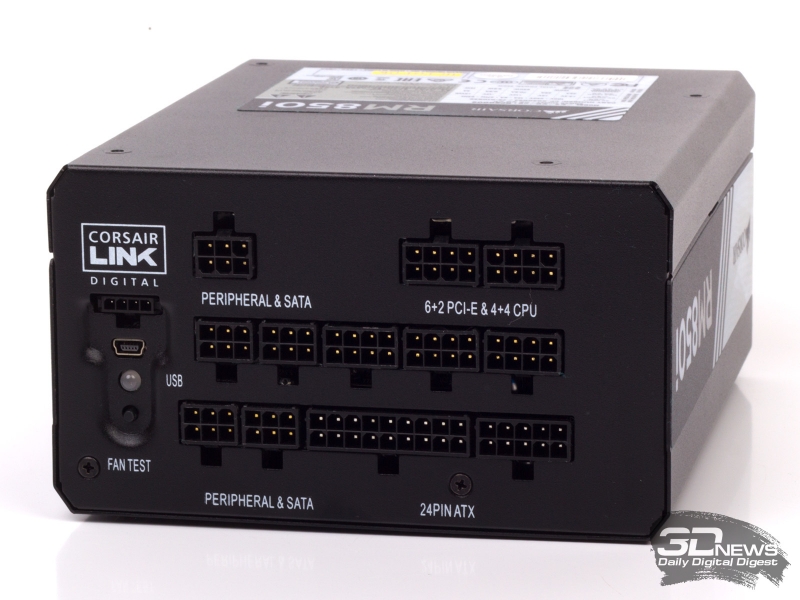
Набор разъемов питания:
- 1 × 24 (20+4) контакта;
- 2 × EPS12V (2 × ATX12V) – питание CPU;
- 6 × 8 (6+2) контактов – дополнительное питание плат PCIe;
- 10 × SATA;
- 8 × Molex;
- 2 × Floppy;
- 1 × Corsair Link.
Семейство RM/RMi унаследовало фирменный дизайн блоков питания Corsair — корпус увесистый и прочный. Более дешевые серии у этой фирмы выглядят намного проще.
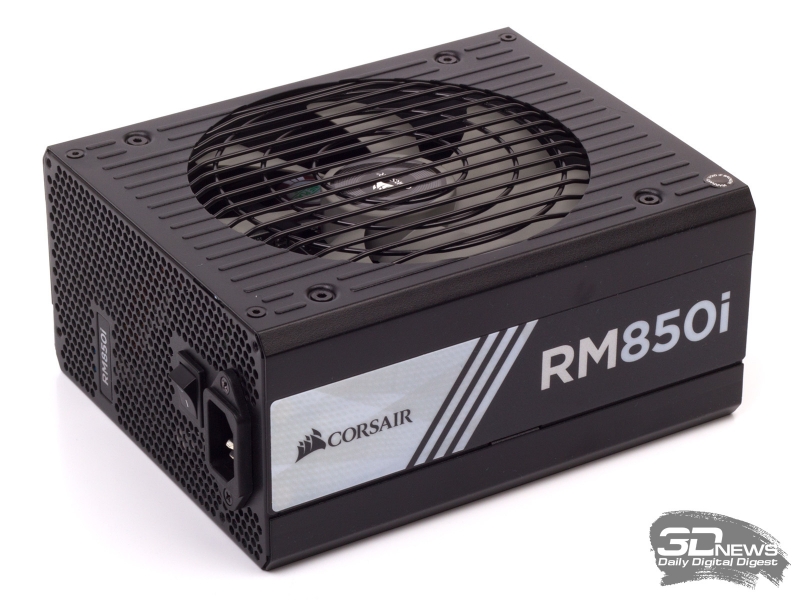
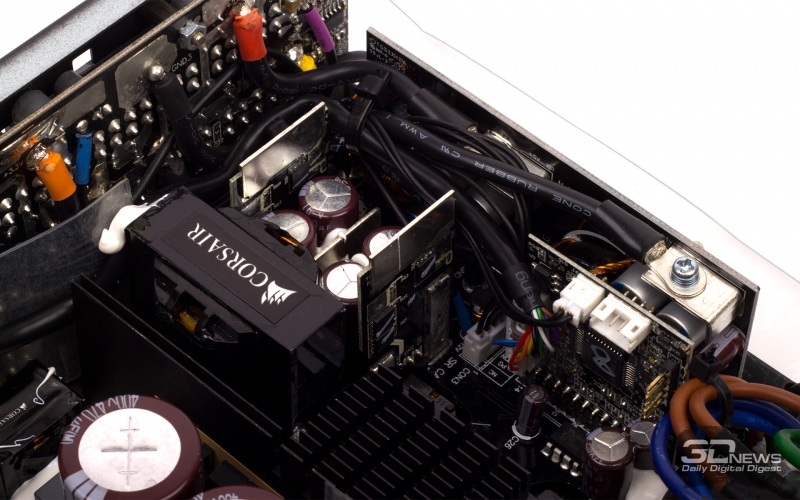
Интерфейс Corsair Link позволяет контролировать напряжения и токи с помощью датчиков в самом БП. Для соединения с материнской платой на корпусе есть стандартный разъем Mini USB. Кнопка рядом выполняет сомнительной полезности функцию – тест встроенного вентилятора.
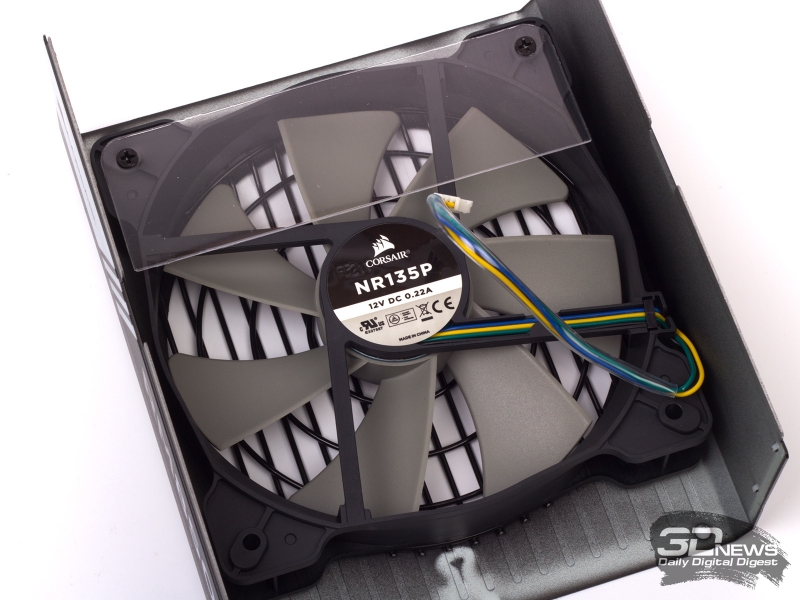
БП охлаждается вентилятором Corsair NR135P типоразмера 135 мм на гидродинамическом подшипнике.
Основная начинка изготовлена фирмой Channel Well Technologies (CWT).
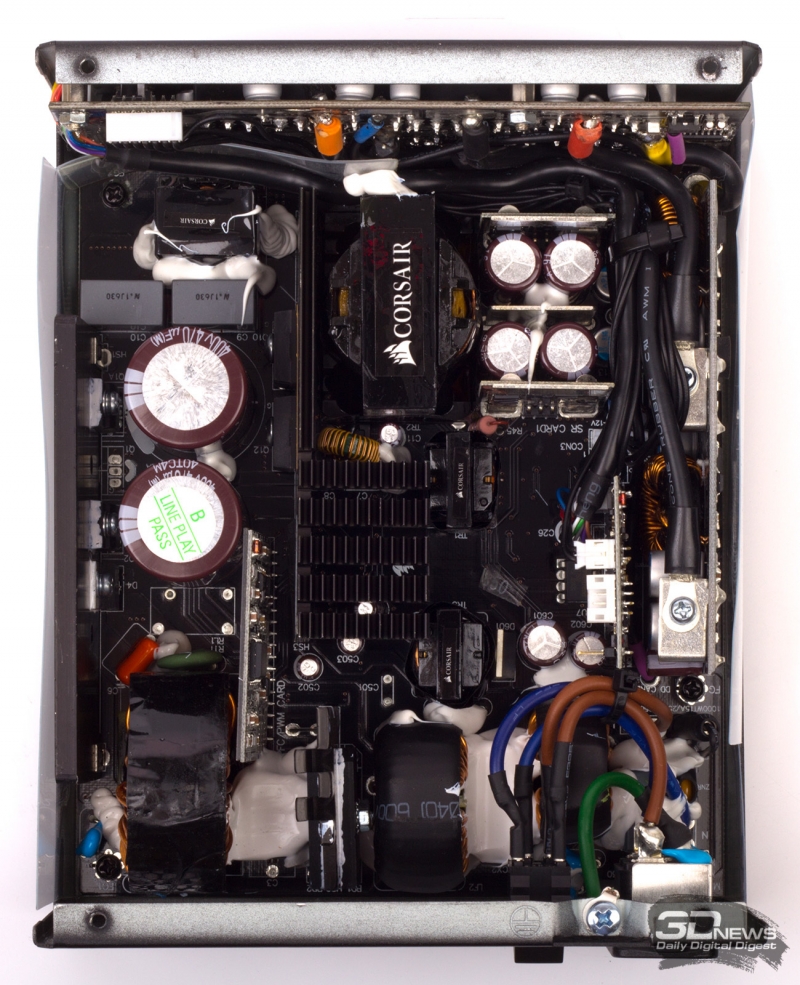
Топология основного преобразователя представляет собой резонансный вариант Full Bridge. Во вторичной цепи используется синхронный выпрямитель. Напряжение 12 В с единственной вторичной обмотки трансформатора конвертируется в 3,3 и 5 В с помощью DC-DC-преобразователей. Комбинация этих решений отличает наиболее эффективные БП среди всех, которые можно найти в продаже сегодня.
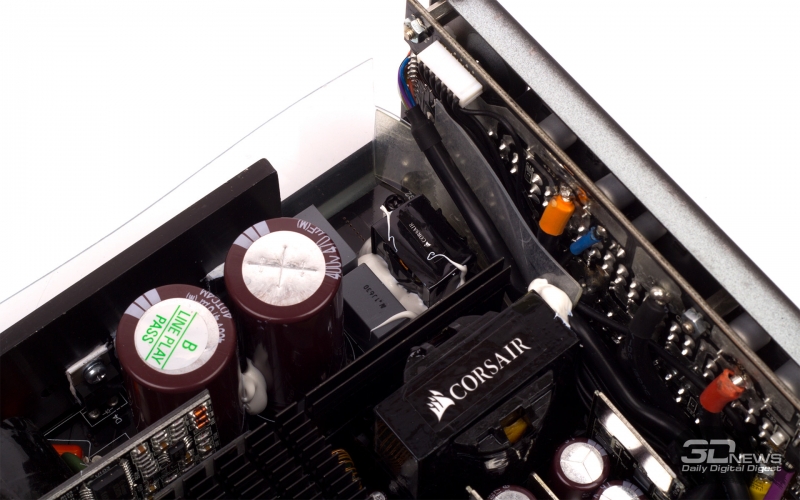
Для сглаживания пульсаций на выходе БП используются твердотельные и электролитические конденсаторы производства Nippon Chemi-Con. Часть из них распаяна прямо на дочерней плате, к которой подключаются кабели.
Методика тестирования, принятая в 3DNews, описана в отдельной статье, которая рекомендуется к прочтению для понимания принципов работы компьютерных блоков питания и их важнейших характеристик. Обращайтесь к ней, чтобы узнать, зачем нужен и как работает тот или иной компонент, упомянутый в обзоре, и как интерпретировать результаты тестирования.
Результаты тестирования
На отметке 20 % номинальной мощности КПД Corsair RM850i не дотягивает лишь 2 % до требований спецификации 80 PLUS Gold, но это вполне можно списать на погрешность ваттметра, который мы используем в измерениях. В остальной части диапазона мощности этот БП безупречен.

По данным производителя, при нагрузке меньше 40 % от номинала (340 Вт) БП должен охлаждаться пассивно (с учетом температуры воздуха 25 °C). В нашем тесте вентилятор запустился лишь на отметке 60 % мощности (510 Вт) и достиг скорости вращения 944 об/мин при максимальной нагрузке.

Кросс-нагрузочная характеристика блока питания не вызывает претензий: отклонение напряжений от номинала укладывается в 3 %. Единственное но: наш стенд не позволяет взять больше 60 А из шины 12 В, что задает предел мощности в 720 Вт. Однако если судить по исходным данным устройства и полученным результатам, в диапазоне от 720 до 850 Вт на шине 12 В Corsair RM850i едва ли подведет.

Амплитуда пульсаций на шинах 5 и 12 В даже при полной загрузке БП не превышает 20 мВ (при допустимых значениях 50 и 120 мВ соответственно).

Шина 12 В, высокочастотные пульсации

Шина 12 В, низкочастотные пульсации

Шина 5 В, высокочастотные пульсации

Шина 5 В, низкочастотные пульсации
Блоки питания Corsair RMi стандарта 80 PLUS Gold ощутимо дороже аналогично сертифицированных БП многих других марок. Однако производитель сделал все, чтобы оправдать наценку. Привлекательный дизайн, полностью модульное подключение кабелей, интерфейс Corsair Link, пассивное охлаждение при небольшой нагрузке, безупречная стабильность напряжений – в этом линейка RMi не уступает «платиновым» БП Corsair из серий HX и AX.
Производитель заявляет рабочие характеристики для эксплуатации при температуре вплоть до +50°C. Это относится как к выходным напряжениям, так и к работе вентилятора. Это особенно важно, ведь внутри корпуса работающего БП температура всегда выше комнатной, а с ростом температуры характеристики изменятся не в лучшую сторону. Так что заявленные параметры максимально приближены к рабочим условиям.
Understanding the Corsair AXi Series Digital Power Supplies
Replacing commonly used ICs with a digital signal processor in the Corsair AXi Series PSUs has many benefits. Today, I'm going to explain the functions of the components that are replaced within the Corsair Digital power supplies and how these changes benefit the end user.

The parts of the Corsair AXi Digital Power Supply that makes them unique when compared to other desktop power supplies is the absence of a PFC/PWM controller IC (integrated circuit) on the power supply's primary side and a supervisor IC on the power supply's secondary side. Both of these parts have been replaced with DSP, which stands for "Digital Signal Processor".
AXi PSUs still use what's called a "resonant mode" topology like a lot of modern day super-efficient power supplies, but typically in other resonant mode PSUs a PWM controller IC changes the power supply's switching frequency based on an analog signal derived from the load measured at the transformer. This makes the power supply more efficient at a wider range of loads compared to other power supply topologies, but doing this alone can affect ripple and noise and voltage regulation.

The resonant mode controller, shown above, is just about the only IC you'll find in an AXi power supply that you may also see in other high end power supplies.
The supervisor IC is the heart of the power supply's safety functions. Functions like OCP (over current protection, which is protection from any one output drawing too much current), OPP (over-power protection, which prevents overloading), OVP (over-voltage protection, which measures if voltage goes too high), UVP (under-voltage protection), and SCP (short circuit protection). Temperatures are also measured within the power supply and this is reported to the IC's OTP (over-temperature protection). If any value programmed into the IC is exceeded, the IC is instructed to shut down the power supply.

Above is a supervisor IC found in a Corsair GS800 power supply.
In an effort to improve voltage regulation (drops in voltage as loads increase), the information concerning the power supply's output voltage is sent back to the PWM controller via an analog signal. This information moves relatively slow when compared to the ever-varying loads of your typical PC, so voltage regulation is still not as good as it can be.

Above is the PWM/PFC controller from a Corsair GS800 power supply.
AXi power supplies improve on this analog system by using the DSP. Like a supervisor IC, the DSP measures all of the pertinent information on the secondary side, as well as taking the same measurements on the primary side as your typical PFC/PWM controller IC. This information is also analyzed by the DSP's microprocessor and adjustments are made to the different components of the power supply in an effort to improve efficiency while maintaining very tight voltage regulation and minimizing ripple and noise. Because the signals are digital instead of analog and an inherently homogeneous DSP system is used to analyze the information as opposed to multiple ICs, adjustments can be made much faster than can be made with the typical set of ICs found in other desktop power supplies. And since the DSP is analyzing all of the same outputs (and then some!), the DSP still has the ability to act as a supervisor IC and shut down the power supply if any values exceed what is considered "safe" for the power supply or your computer.

Here is an AX860i removed from the housing. This one PCB has all of the chips that are part of the DSP system.
Let's zoom in on some of the chips on this PCB. Shall we?

Above is a picture of the Freescale Digital Signal Controller found in the AXi series of power supplies. This chip handles what goes on on the primary side of the power supply.
This guy is responsible for the PFC (power factor correction) control, the PMW (pulse width modulation) control, monitoring of the AC input's voltage, current and wattage and logical on/off control, like shutting down for inrush, brownouts, etc.

Above we see two more ICs found inside an AXi series power supply. The chip on the bottom is the main MCU, or "MCU I". The chip on the top is a USB MCU, or "MCU II". These guys handle what goes on on the secondary side of the power supply.
The MCU I does what we call "housekeeping". It has a lot of the same functions as a supervisor IC in an analog controlled PSU. Things like OCP, OPP, OVP, etc. are all monitored by this chip. This chip also handles the PMBus (power management bus) and thermal monitoring and fan control. The MCU I also monitors the power on (soft on/off) and power good signals coming from the motherboard. On top of all of this, the MCU I also monitors the DC output for voltage drop, ripple and noise and communicates back to the DSP to address any issues that may come up.
The MCU II is the chip that allows the user to turn on/off the single/multiple +12V rail capability of an AXi PSU via the Corsair Link software. The self test function is also controlled by this chip.
Since the DSP accumulates all of this information about the power supply, and does so in real time, we can deliver it to the end user via our Corsair Link software. Power supplies have attempted to deliver similar information about the power supply to the end user in the past; either via software or displayed on a 5.25" bay LCD. But since the information about the power supply in these older units was accumulated via the PFC/PWM controller and supervisor IC, the information had to be converted to a digital signal before being displayed. This adds a good deal of cost and prevents the information from being delivered as close to real time as possible.

Using Corsair Link, we can monitor everything from AC input voltage, output wattage. even the current being delivered to each graphics card's PCIe controller! Above you can see I've enabled OCP on each modular connector (essentially making the AXi a multiple +12V rail power supply) and turned all of the limits down to 20A.
We can also keep track of the temperature inside the power supply and how fast the fan is spinning:

All in all, AXi Digital Power Supplies are so much more than your average desktop PSU on so many levels. By utilizing a DSP, Corsair offers improved efficiency while maintaining stable voltage output and minimizing unwanted ripple and noise. And because all of this information is maintained in a digital format, and output to the Corsair Link software interface is practically seamless!
Using Link with a Corsair AXi Digital Power Supply
The Corsair AXi Series PSUs have a lot of premium features. They use a digital signal processor for better performance, they're fully modular, and have a zero RPM fan mode at low loads. But one of the coolest things about the AXi power supplies, is their compatibility with the new Corsair Link software. Today, we take a look at the Corsair Link 2 software, or just "Link" for short, and more specifically how it gives you the ability to monitor AC input, DC output, the temperature and the fan speed of an AXi power supply.
The first thing I want to do is open up the "Graph" tab and set what I want to monitor in the "Config Panel" of this tab.
Above, you can see that I've checked boxes asking to have my two graphics cards' temperatures and fans graphed, as well as my CPU's temperature, the temperature of my AX860i power supply, as well as the AX860i's fan speed. I'm also monitoring the temperature of the coolant in the Hydro Series H100 that is cooling the CPU and the RPMs of the two fans cooling the H100's radiator.
While the system is idle, we can see that temperatures are relatively low. The AX860i is just barely over room temperature and therefore, the fan is not spinning.
Over on the "Power" tab, we see that the AX860i is only producing 107.3W as I sit here watching the Link software. It's pulling 117.8W from the wall, so our efficiency is 91%.
On this tab, we can also monitor our voltages, including the voltage of our AC mains, as well as current for each of our +12V outputs.
Finally, we see the AX860i's temperature and the fan RPM on this tab. This is the same information we saw on the "Graph" tab, but in a different format. The fan is still not spinning because the temperatures are still low, but if we wanted to increase the airflow within our chassis just a bit, we can manually turn the fan speed up.
We start on the "System" tab.
On this tab, we can see everything that Corsair Link 2 monitors, but if we click on the "AX860i Fan" icon on the left, a configuration panel opens up on the right. By default, we can see the fan mode is set to "quiet" which means the fan isn't going to spin at low loads. Changing this is easy.
The lowest setting is 40%, which equates to about 784 RPM. I can keep it like this and still not hear the fan. And the fan will still ramp up even faster automatically if needed. Let's turn it up even more to find out where I can start hearing the fan.
At 76%, the fan is spinning 1508 RPM. I can definitely hear that now. Well, that's enough of that. Let's put the PSU fan back into "quiet" mode, fire up Prime95 and Furmark and see what kind of power we produce and let the fan spin up all on its own.
Almost immediately, the temperatures of the CPU and graphics cards increase. Under this load, we start to see the power supply fan ramp up as well.
After some time under load, we see our temperatures level out, an increase in the graphics cards' fan's RPMs and the PSU's fan leveling off just over 500 RPM.
When we switch back over to the "Power" tab, we can see that our load has increased to 473.4W. We're now pulling 502.9W from the wall and our efficiency is increased to 94%. We can see that the amperage delivered on all of our +12V connectors has increased, the AX860i's temperature has increased very slightly, from 26.5 to 28.8°C, and the fan is now spinning at 556 RPM.
Of course, when you're gaming you're probably not going to be able to watch your load, temperatures and fan speeds while you're playing. For this reason, Corsair Link allows you to log whatever information you'd like to keep track of in a CSV file. Simply check the boxes of the components you want to monitor, browse to where you want to save the file and give the file a name and click "start logging".
Как и что мы тестировали
С момента нашего последнего тестирования методика исследования блоков питания, применяемая в лаборатории 3DNews, практически не претерпела изменений. Так что описание применяемого нами стенда, характера тестирования и принципа чтения графиков можно прочесть в одной из предыдущих публикаций, например, о блоке питания Lian Li MAXIMA Force PS-A750GB.
Understanding the Corsair AXi Series Digital Power Supplies
Replacing commonly used ICs with a digital signal processor in the Corsair AXi Series PSUs has many benefits. Today, I'm going to explain the functions of the components that are replaced within the Corsair Digital power supplies and how these changes benefit the end user.
The parts of the Corsair AXi Digital Power Supply that makes them unique when compared to other desktop power supplies is the absence of a PFC/PWM controller IC (integrated circuit) on the power supply's primary side and a supervisor IC on the power supply's secondary side. Both of these parts have been replaced with DSP, which stands for "Digital Signal Processor".
AXi PSUs still use what's called a "resonant mode" topology like a lot of modern day super-efficient power supplies, but typically in other resonant mode PSUs a PWM controller IC changes the power supply's switching frequency based on an analog signal derived from the load measured at the transformer. This makes the power supply more efficient at a wider range of loads compared to other power supply topologies, but doing this alone can affect ripple and noise and voltage regulation.
The resonant mode controller, shown above, is just about the only IC you'll find in an AXi power supply that you may also see in other high end power supplies.
The supervisor IC is the heart of the power supply's safety functions. Functions like OCP (over current protection, which is protection from any one output drawing too much current), OPP (over-power protection, which prevents overloading), OVP (over-voltage protection, which measures if voltage goes too high), UVP (under-voltage protection), and SCP (short circuit protection). Temperatures are also measured within the power supply and this is reported to the IC's OTP (over-temperature protection). If any value programmed into the IC is exceeded, the IC is instructed to shut down the power supply.
Above is a supervisor IC found in a Corsair GS800 power supply.
In an effort to improve voltage regulation (drops in voltage as loads increase), the information concerning the power supply's output voltage is sent back to the PWM controller via an analog signal. This information moves relatively slow when compared to the ever-varying loads of your typical PC, so voltage regulation is still not as good as it can be.
Above is the PWM/PFC controller from a Corsair GS800 power supply.
AXi power supplies improve on this analog system by using the DSP. Like a supervisor IC, the DSP measures all of the pertinent information on the secondary side, as well as taking the same measurements on the primary side as your typical PFC/PWM controller IC. This information is also analyzed by the DSP's microprocessor and adjustments are made to the different components of the power supply in an effort to improve efficiency while maintaining very tight voltage regulation and minimizing ripple and noise. Because the signals are digital instead of analog and an inherently homogeneous DSP system is used to analyze the information as opposed to multiple ICs, adjustments can be made much faster than can be made with the typical set of ICs found in other desktop power supplies. And since the DSP is analyzing all of the same outputs (and then some!), the DSP still has the ability to act as a supervisor IC and shut down the power supply if any values exceed what is considered "safe" for the power supply or your computer.
Here is an AX860i removed from the housing. This one PCB has all of the chips that are part of the DSP system.
Let's zoom in on some of the chips on this PCB. Shall we?
Above is a picture of the Freescale Digital Signal Controller found in the AXi series of power supplies. This chip handles what goes on on the primary side of the power supply.
This guy is responsible for the PFC (power factor correction) control, the PMW (pulse width modulation) control, monitoring of the AC input's voltage, current and wattage and logical on/off control, like shutting down for inrush, brownouts, etc.
Above we see two more ICs found inside an AXi series power supply. The chip on the bottom is the main MCU, or "MCU I". The chip on the top is a USB MCU, or "MCU II". These guys handle what goes on on the secondary side of the power supply.
The MCU I does what we call "housekeeping". It has a lot of the same functions as a supervisor IC in an analog controlled PSU. Things like OCP, OPP, OVP, etc. are all monitored by this chip. This chip also handles the PMBus (power management bus) and thermal monitoring and fan control. The MCU I also monitors the power on (soft on/off) and power good signals coming from the motherboard. On top of all of this, the MCU I also monitors the DC output for voltage drop, ripple and noise and communicates back to the DSP to address any issues that may come up.
The MCU II is the chip that allows the user to turn on/off the single/multiple +12V rail capability of an AXi PSU via the Corsair Link software. The self test function is also controlled by this chip.
Since the DSP accumulates all of this information about the power supply, and does so in real time, we can deliver it to the end user via our Corsair Link software. Power supplies have attempted to deliver similar information about the power supply to the end user in the past; either via software or displayed on a 5.25" bay LCD. But since the information about the power supply in these older units was accumulated via the PFC/PWM controller and supervisor IC, the information had to be converted to a digital signal before being displayed. This adds a good deal of cost and prevents the information from being delivered as close to real time as possible.
Using Corsair Link, we can monitor everything from AC input voltage, output wattage. even the current being delivered to each graphics card's PCIe controller! Above you can see I've enabled OCP on each modular connector (essentially making the AXi a multiple +12V rail power supply) and turned all of the limits down to 20A.
We can also keep track of the temperature inside the power supply and how fast the fan is spinning:
All in all, AXi Digital Power Supplies are so much more than your average desktop PSU on so many levels. By utilizing a DSP, Corsair offers improved efficiency while maintaining stable voltage output and minimizing unwanted ripple and noise. And because all of this information is maintained in a digital format, and output to the Corsair Link software interface is practically seamless!
ДОКУМЕНТАЦИЯ
Оглавление
Читайте также: