Zonealarm free firewall настройка
There are many threats on the Internet - hacker activity, viruses, and worms. The ZoneAlarm Firewall protects your computer from most of those threats. It defines three security zones - Trusted, Public, and Blocked.
By default, the Public Zone works in High security mode, and the Trusted Zone works in Medium security mode:
- High security mode for Public Zone lets you connect to network resources, but prevents other unauthorized network users and computers from accessing the resources on your computer and compromising your computer protection. Unknown networks and most wireless networks, even secured wireless networks, should be in this High security Public Zone.
- Medium security mode for Trusted Zone protects your computer from possible attacks on Windows networking services, but lets you share resources with other computers on the network. Networks you know and trust, such as your home or business LAN and known protected wireless networks, should go in this Medium security Trusted Zone.
- Blocked Zone - contains computers and networks you distrust. No traffic to or from this zone is allowed.
The ZoneAlarm Firewall is on by default as soon you as install ZoneAlarm software. You do not need to do anything, unless you want to change the default configuration, or to turn it off temporarily ("Turning the Firewall On and Off" on page 31). To learn how to change the default Firewall configuration, see Managing Basic Firewall Zone Settings.
Configuring Firewall Expert Rules
To add custom firewall protection to your PC, you can configure Firewall Expert Rules:
- Source - traffic source
- Destination - traffic destination
- Protocol - transport layer protocol
- Time - days and times
- Action - allow or block
- Rank - the priority order in the list of all expert rules
Expert Rules can be configured for specific groups based on:
- Host names and IP addresses
- Protocols and port numbers
- Days and times of access
If a group changes, all the expert rules that use it are automatically updated.
To get to Expert Rules and Expert Group configuration:
- Click in the ANTIVIRUS & FIREWALL panel of the ZoneAlarm software client.
- Click Settings in the Advanced Firewall section.
- Click Advanced Settings.
The Firewall Settings window opens and shows the Advanced settings. - From the navigation tree, select Expert Rules.
- After you configure Expert Rules and Expert Groups as necessary, click OK.
Начните работу с брандмауэром ZoneAlarm Free
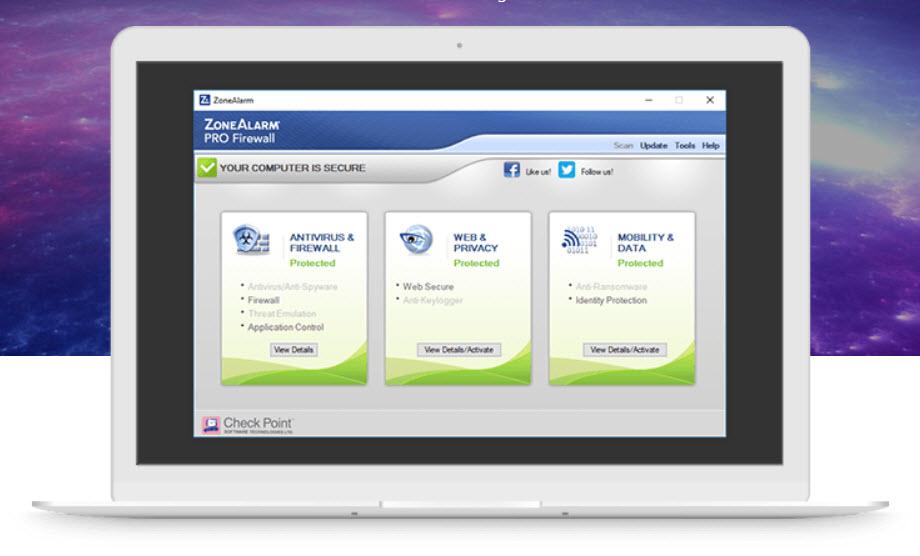
Это главный экран брандмауэра. Ячейки, отмеченные красным, - это те, которые мы собираемся рассмотреть более подробно.
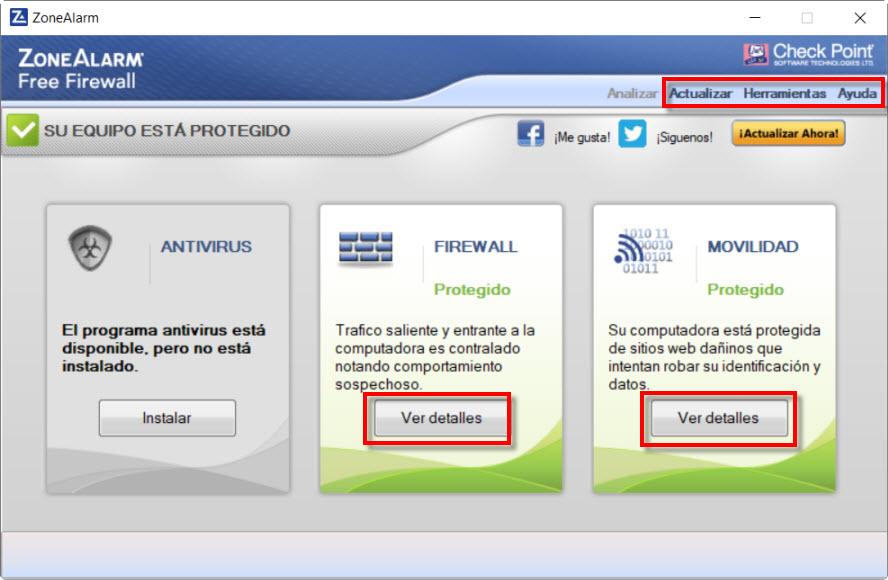
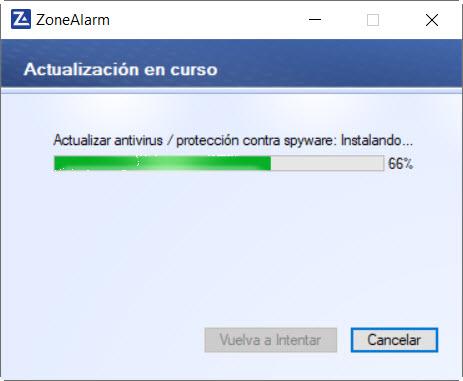
- Обновить : проверит наличие более свежих обновлений программы и приступит к их установке.
- Инструменты : здесь мы можем ввести лицензию, если перейдем на более платный продукт. У нас также есть игровой режим, чтобы настроить, как вы хотите, чтобы брандмауэр вел себя, когда мы играем. Кроме того, у нас есть запланированные задачи, в которых по умолчанию программа обновляется автоматически. В настройках у нас есть возможность установить пароль для программы, а также сделать резервную копию нашей конфигурации или вернуться к значениям по умолчанию. Наконец, у вас есть средства ведения журнала и диагностики.
- Справка : мы можем просмотреть серию руководств на английском языке и получить техническую помощь.
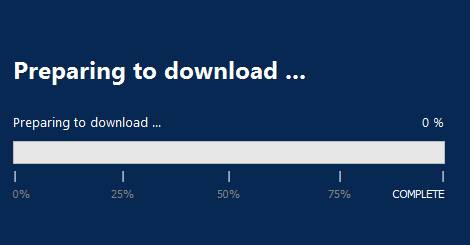
Первое, что мы сделали, как только запустили брандмауэр, - это обновить программу, чтобы убедиться, что на ней установлена последняя версия.
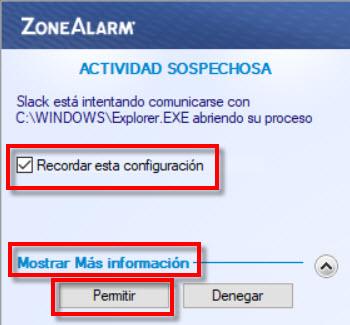
- Помните эту настройку : если вы оставите этот флажок установленным, каждый раз, когда происходит одно и то же, оно будет автоматически действовать следующим образом. Если у вас его нет, лучше всего деактивировать коробку и дать отказать. Если что-то не работает, вы знаете, почему, но, по крайней мере, перезапустившись в следующий раз, вы можете это изменить.
- Показать больше информации - Иногда он содержит информацию о том, для чего предназначена эта программа, и может помочь нам принять решение.
- Разрешить : позволит программе использовать Интернет.
- опровергать : не позволит программе использовать интернет.
Поскольку мы собираемся время от времени загружать файлы в облако, e-mail or Google Drive, мы собираемся настроить его, как показано на скриншоте выше.
Minimum requirements, download and installation of this free firewall
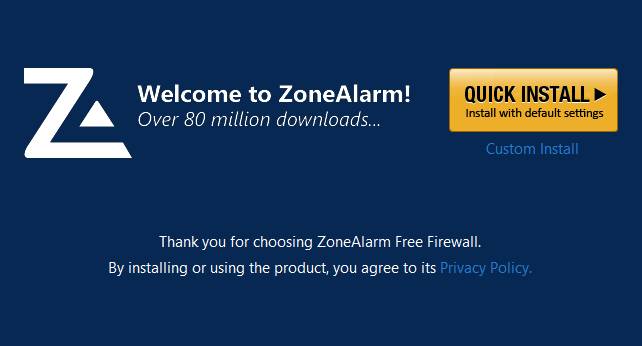
If we want to install the firewall, we will start by going to its website by clicking here . Then we will get a screen like this:
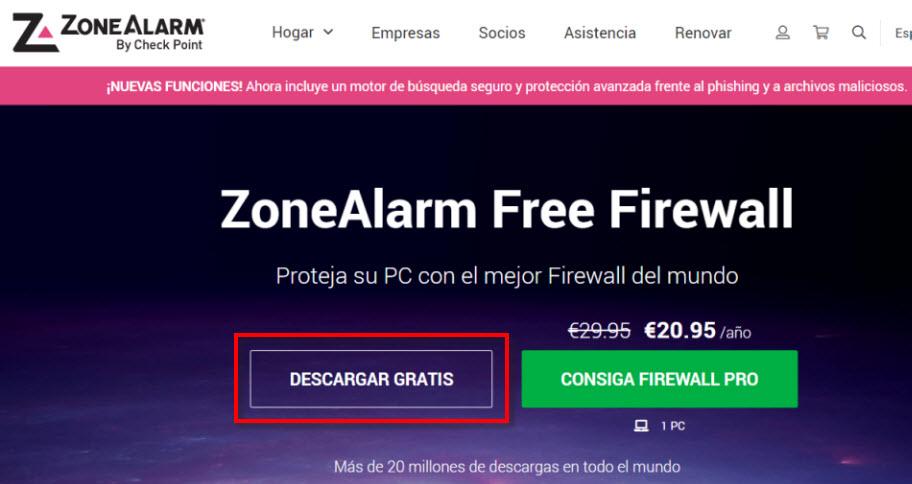
Now, what we have to do is click on « Download free «. The first thing we are going to do is run the installer, and then a screen like this will appear:
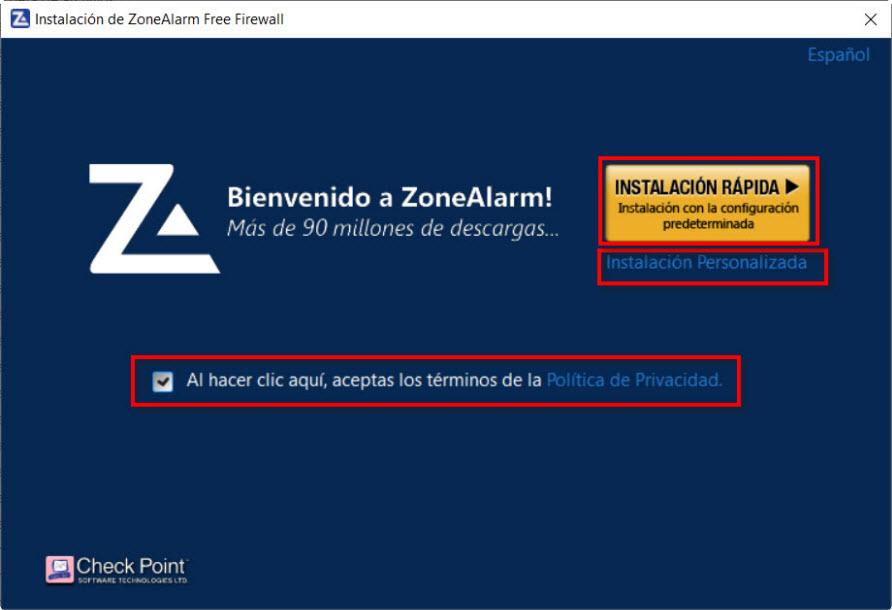
Here, we have to accept the privacy policy in order to use the program. Then it allows us to choose between two types of installation:
- Quick : it will make an installation with the default configuration.
- Personalized : in which it gives you the possibility to choose between several options.
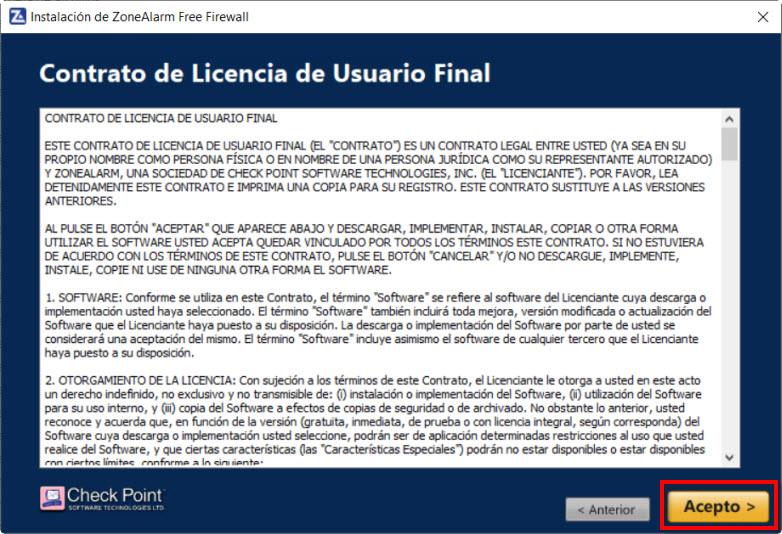
In my case, I have opted for the custom installation, in order to make decisions about how I want the ZoneAlarm Free firewall to be installed. Next, we have the license agreement and to give our consent to install the program, click on Accept .
This is the most important screen within the firewall installation:
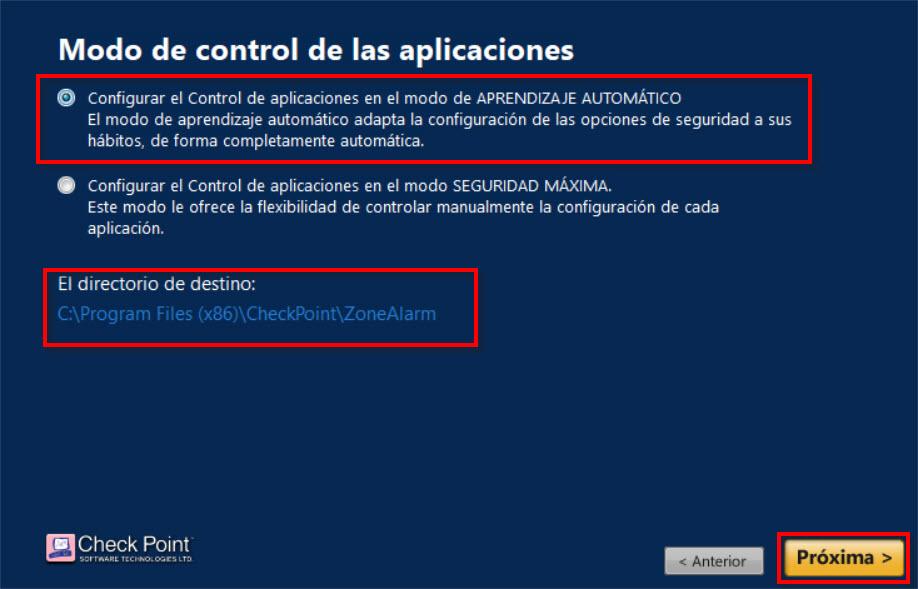
Here we recommend choosing to set app control in machine learning mode . As for the control, in the maximum security mode the way to control would be manual. This means that it will ask us more times for permission to perform actions, while, in the automatic, some are already accepted. As for the destination directory, it can be changed, but in our case we have chosen to leave it at the preset value. Once we have chosen the parameters we want, click on the Next button.
Then in ZoneAlarm Free firewall the following will appear:
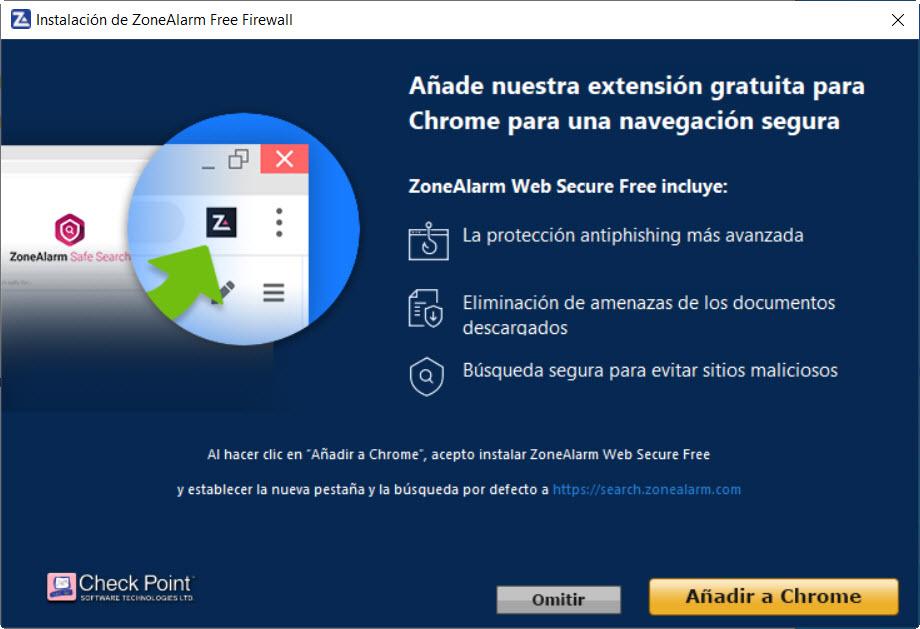
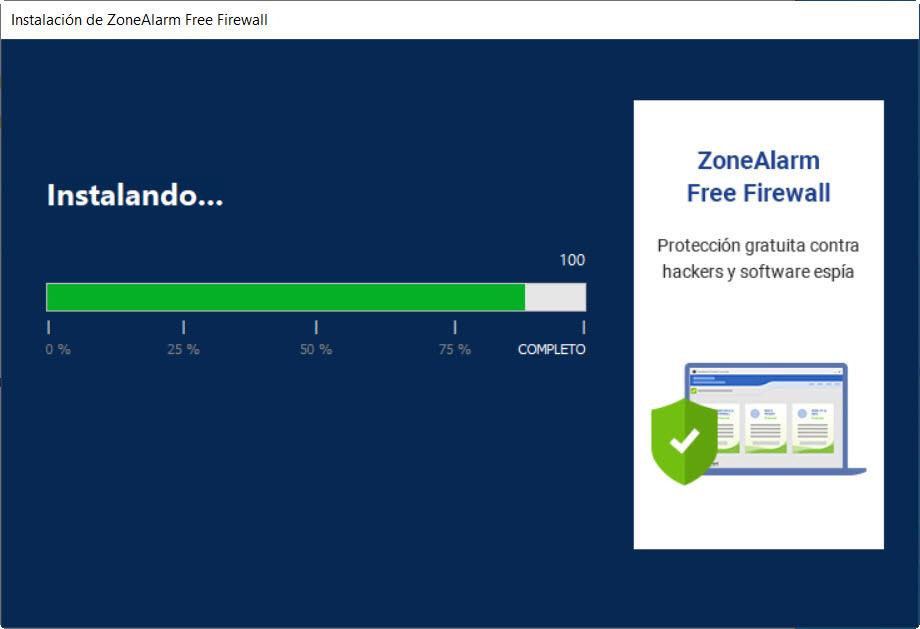
Now it’s your turn to decide if we want to install the ZoneAlarm Web Secure Free Google Chrome extension that we talked about earlier. Its installation is optional, and is at the discretion of each one. If you are not clear at the beginning of the tutorial, you have a link to install it later. Next, start downloading and installing the program, depending on your hardware and connection, it will take more or less.
The installation process will finish with this screen.
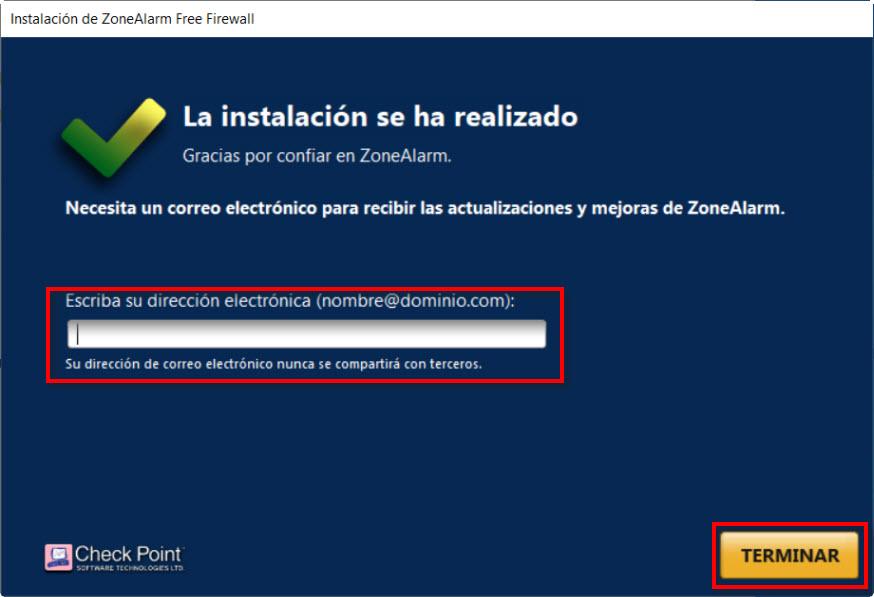
All we have to do here is put our e-mail and click on the Finish button.
Configuring Advanced Global Firewall Settings
To configure advanced global firewall settings:
- Click in the ANTIVIRUS & FIREWALL panel of the ZoneAlarm software client.
- Click Settings in the Advanced Firewall section.
- Click Advanced Settings.
The Firewall Settings window opens and shows the Advanced settings. - In the General Settings area, select or clear the configuration options as necessary:
Note: Do not select this option, unless you are aware of how your Internet provider handles fragmented packets. If you select this option, the ZoneAlarm software silently blocks all fragmented packets. It does not send alerts or create log entries.
What ZoneAlarm Free Firewall gives us
ZoneAlarm Free firewall is a free firewall that will allow us to protect ourselves against incoming and outgoing cyberattacks, block unwanted traffic and control which programs access the Internet. In addition, it will make us invisible to hackers, and it will also not help protect our private data.
This firewall will perform the following functions:
- Monitor programs looking for suspicious behavior, to offer us protection against cybercriminals and other online threats.
- Traffic monitoring thanks to a bidirectional firewall, which controls and observes the incoming and outgoing traffic of our network. Its objective is to make our PC invisible, and prevent spyware from exposing our data on the Internet.
- Early Startup Protection can alert us if we are running a trusted operating system or a dangerous rootkit.
- Anti-phishing protection to protect ourselves online while browsing the Internet.
- Safe Document Downloading offers to remove potentially malicious features from our file downloads, such as macros, embedded objects, and other harmful content.
On the other hand, we have ZoneAlarm Pro which is the paid version, which in addition to the above, offers us additional options. Among them we can highlight: advanced access protection, advanced settings control, component control, expert rules, 24/7 customer service and is ad-free. In addition, other free Checkpoint options that you may be interested in trying are Zone Alarm Free Antivirus and ZoneAlarm Web Secure Free, which is an extension for Google Chrome to keep us safe from various threats.
Configuration of «Firewall» and «Mobility»
If in the main screen of ZoneAlarm Free firewall we press See details, this screen will appear.
Understanding Firewall Logs
By default, ZoneAlarm software records all Firewall events in a log, and archives the log file every seven days. To change the logging settings, see Managing Alerts and Logs Settings.
To view Firewall Log events:
- Open the ZoneAlarm software client.
- From the Tools menu, select Logs.
The Alerts and Logs window opens, and shows the Log Viewer. - From the Select log type drop-down list, select Firewall.
The Log Viewer shows the Firewall log entries:
To control the number of entries in the Log Viewer:
Click and select the number of log entries from the Show Last drop-down menu:
To clear the Log Viewer entries:
To refresh the Log Viewer:
To add an IP address to a Security Zone:
- Select an entry in the Log Viewer table.
- Click Add To Zone.
The Add Zone window opens. - Select the Zone you want to add the IP address to - Trusted or Blocked.
- Add a description.
- Click OK.
To learn more about blocked traffic:
- Select an entry in the Log Viewer table.
- Click More Info.
The SmartDefense Advisor web page opens, and provides information about the selected blocked packet type.
All rights reserved. This product and related documentation are protected by copyright and distributed under licensing restricting their use, copying, distribution, and decompilation. No part of this product or related documentation may be reproduced in any form or by any means without prior written authorization of Check Point. While every precaution has been taken in the preparation of this book, Check Point assumes no responsibility for errors or omissions. This publication and features described herein are subject to change without notice.
RESTRICTED RIGHTS LEGEND:
Use, duplication, or disclosure by the government is subject to restrictions as set forth in subparagraph (c)(1)(ii) of the Rights in Technical Data and Computer Software clause at DFARS 252.227-7013 and FAR 52.227-19.
Всем привет) Вот собственно решил обзавестить защитой от различных интернет угроз. Зашел на сайт Sonikelf'a и прочел статьи про firewall'ы. Решил ставить ZoneAlarm, но возникла проблема. Вышла новая версия firewall'a, а на сайте статья описывает как настраивать старую)
В этом собственно и дело. Прошу помощи у знающих людей. Как настроить ZoneAlarm 11 версии. Если ошибаюсь проверьте
вот отсюда списываете логины Форумчан ,
и пишете письма , эдак не менее 100 , просите поддержать Вас и Ваш запрос .
Отправлять можно сразу по 5 адресам ,текст один , а получатели разные ,
я ещё года два просил об этом. как видите .
Пока не будет массового спроса на эту тему - ничего не тронется с места .
это называется спам. даже если это не предложение чего-либо, а просьба.
Виктор Михайлович, вы вроде взрослый человек, а советы даете детские.
Invictus, достаточно создать тему и ждать ответа. если сильно нужно, то можно писать в личку, но форумы не для этого. можно задавать вопрос на разных форумах. где то ответят быстрее. но следовать подобным советам не стоит. вызывает только негативную реакцию
прошу модеров простить за офтоп
Обычно,если Вам не нужно каких-либо тонких настроек, настраивать ничего не нужно.В фаерволе есть режим обучения.Включен по умолчанию при установке.Если трудности с английским -поставьте русифицированный.Посмотреть можно
Обычно,если Вам не нужно каких-либо тонких настроек, настраивать ничего не нужно.В фаерволе есть режим обучения.Включен по умолчанию при установке.Если трудности с английским -поставьте русифицированный.Посмотреть можно
ДЕД, с чем сравнивать, Вы его отправили к той статье, с которой он уже ознакомился, и о чем сообщил в своем первом посте?
Всех с Новым Годом)
В общем установил я ZoneAlarm 11 версии. Делюсь впечатлениями.
Во первых. Как и говорил snake особой разницы (между версиями) нет. Настроил.
Даже все программы (ну или почти) на обучение прошли.
Теперь минусы: Во первых. Существенно увеличилось время включения компьютера. А выключения более чем существенно)) около 4 минут выключается.
Во вторых грузит процессор. Да, да именно firewall. Но не всегда, а при включении utorrent. Включаю его (торрент) и процесс vsmon.exe грузит проц около 60%. Выключаю торрент и все нормально)
Характеристики компа вот такие: CPU: AMD Atlhon 64 LE-1640. RAM: 1.25 Gb. Video: ATI Radeon 256 Mb
В связи в этими двумя причинами и благополучно снес его (ZoneAlarm)
Поставил Outpost руководствуясь этой статьей.
Эту тему можно считать закрытой.
Всем помогавшим огромное спасибо и еще раз с Новым Годом Вас

Пользователей, держащих на страже своего компьютера фаерволл, становится с каждым днем всё больше и больше, но по-прежнему очень много остается людей без него, т.к. они не знают, что это такое, не понимают, зачем он нужен, не могут выбрать не "капризный", не способны его настроить и т.д. и т.п.
Сегодня я в общих чертах расскажу зачем нужен фаерволл и посоветую на мой взгляд если не лучший, то отличный уж точно.
Turning the Firewall On and Off
ZoneAlarm Firewall is on by default after you install ZoneAlarm software. You can turn it off and on, as necessary, for example, if you need to troubleshoot a connection.
To turn the Firewall on or off:
- Click in the ANTIVIRUS & FIREWALL panel of the ZoneAlarm software client.
- Move the Advanced Firewall ON/OFF slider to ON or OFF position, as necessary.
If the ZoneAlarm Firewall is on, the Advanced Firewall status line shows the message Blocks invasions and hacker activity, and the main status bar shows the message YOUR COMPUTER IS SECURE.
If the ZoneAlarm Firewall is off, the Advanced Firewall status line shows the warning Your firewall is not properly set, and the Fix Now button below. The main status bar shows the warning YOUR COMPUTER IS AT RISK, and the Fix Now! button next to it. Click one of the Fix Now! buttons to turn the Firewall on again.
Настройка «Сетевого экрана» и «Мобильности»
Если на главном экране брандмауэра ZoneAlarm Free нажимаем Смотрите подробности, появится этот экран.
Editing or Deleting Expert Rules
To edit or to delete an expert rule:
- In the Expert Rules configuration screen, select an expert rule.
- Do one of these:
- To delete the rule - click Remove, then Yes to confirm
- To edit the rule - click Edit
Add Expert Rule window opens. Change parameters as described in the Adding Expert Rules (on page 38) procedure.
- Click OK.
Что такое фаерволл и зачем он нужен. Интернет-защита
Фаерволл (англ. - FireWall ) - это программа, предназначенная для защиты Вашего компьютера от несанкционированного вторжения какого-нибудь хакера Пупкина из сети\интернета, просто от гуляющих вредоносных пакетов, замедляющих работу в интернете, червей, некоторых типов вирусов, пользующихся дырами в системе безопасности ОС (операционной системы).
В общем то, что не дает получить доступ к Вашему компьютеру без вашего ведома, а соответственно не позволяет нанести вред Вашему железному другу и Вам самим.
Помимо защиты от внешних вторжений весьма важен аспект контроля за программами. Поставили Вы, скажем, какую-то малоизвестную (новую) Вам программу, а тут фаерволл сообщает, что, мол, так и так, она пытается соединиться с таким-то сайтом и что-то там скачать или с сайта пытаются соединиться с ней и что-то с помощью неё сделать на Вашем компьютере. И вот благодаря всё тому же фаерволлу Вы сможете сразу это дело остановить или наоборот разрешить, если уверены в собственной безопасности. Без фаерволла же (он же брандмауэр) кто знает что может случиться: например, в описанной Выше ситуации в самом безобидном случае будет впустую потрачен Ваш трафик (причем, очень может быть, весьма огромный, т.к. Ваш компьютер могут использовать с целью рассылки вирусов, спама и т.д. и т.п.), а в случае пострашнее будут украдены Ваши пароли от сайтов, кошельков и всего остального.
Вообще самое главное из того, что делает фаерволл - это защищает открытые порты от сканирования и доступа к ним, в противном случае злоумышленник может легко получить доступ к Вашему компьютеру и делать на нём всё что угодно, получая доступ к любой информации. Читая эти строки, процентов 80%-90% пользователей спросят: "А кому нафиг сдался мой компьютер, зачем получать к нему доступ, качать с него информацию, рассылать спам, замедлять мою работу и вообще вредить, если они меня даже не знают?" Ответ прост: затем же, зачем некоторые люди пишут и распространяют вирусы, а именно просто, чтобы навредить или проверить свой навык в данной области. Такие уж они люди.
Чем и как защитить себя? Какой фаерволл стоит устанавливать?
Ну вообще в ОС семейства Windows есть встроенный брандмауэр (что-то вроде фаерволла), но толку от него, откровенно говоря, не очень много.
Вообще рынок фаерволлов довольно развит и существует их огромное множество, но я советую Вам пользоваться неплохим фаерволлом ZoneAlarm, о котором, собственно, и пойдет речь в этой статье. Платная его версия умеет удалять вирусы, spyware и ряд других гадостей, но, на мой взгляд, она довольно громоздка и тормозит систему, да и на каждое дело должна быть отдельная программа. А вот бесплатная его версия, которая представляет собой только фаерволл - это, на мой взгляд, чудесное сильное решение и отличный выбор.
Настройка и использование фаерволла Zone Alarm
После установки нам нужно попасть, собственно, в главное окно программы, где приступить к настройке программы.

Для того, чтобы его открыть, нажмите на синенькую иконку в трее (где часы) с буковкой Z . Теперь приступим к настройке фаерволла.
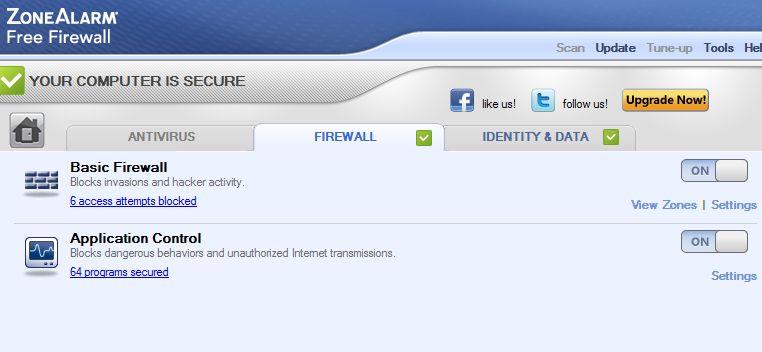
Жмакните в кнопочку " View Details " под квадратиком " Firewall ", дабы открыть вкладку с разделами фаерволла. Здесь нас интересуют две кнопочки Settings справа. Жмем первую, а именно ту, что находится напротив подраздела " Basic Firewall ".
Где я рекомендую поставить галочку " Lock hosts file ", что позволит защитить этот файл от перезаписи, а значит, спасет от возможных проблем с некоторыми вирусами-перенаправителями. Сделав оное, жмем в ОК и снова жмем по кнопочке " Firewall ", после чего выбираем вторую кнопочку " Settings ".
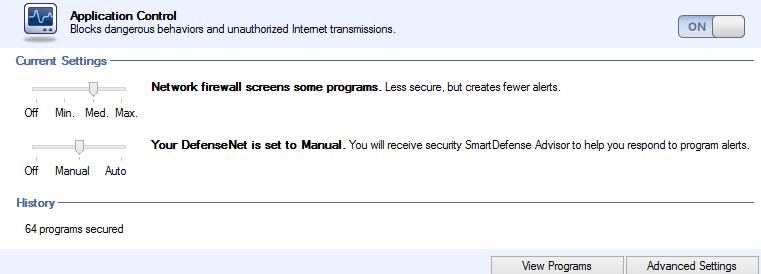
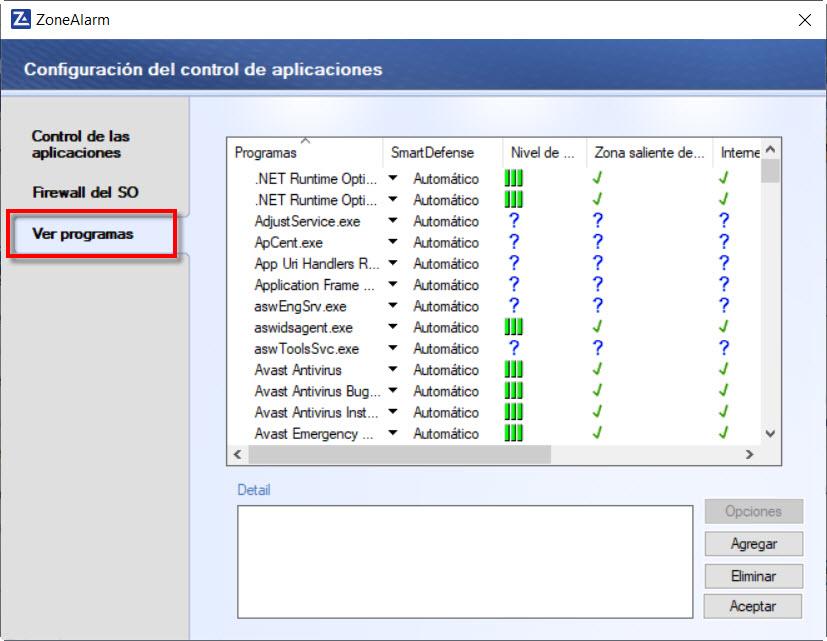
Здесь снова переводим ползунки в положение " Med " и жмем в кнопочку " View Programs ".
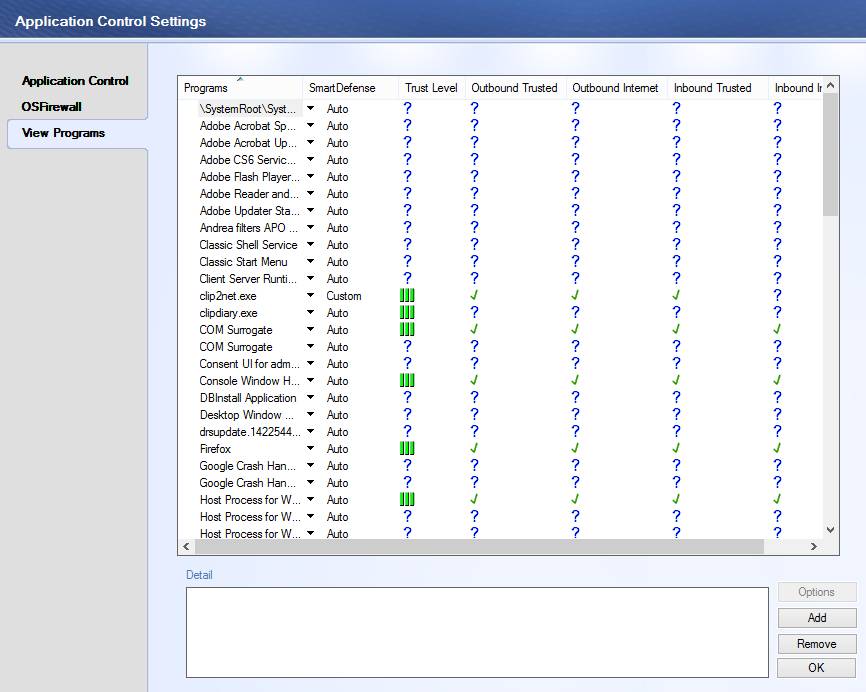
Эта вкладка отвечает за допуски в интернет, сеть и т.п. всех программ на Вашем компьютере. Если программы нет в списке, то Вы можете добавить её кнопочкой " Add ", указав на её .exe файл. Теперь что касается самого списка, а именно его колонок:
- Trust Level - отвечает за уровень доверия приложению и его доступа в системе куда бы то ни было;
- Outbound Trusted - грубо говоря, отвечает за исходящий трафик приложения в рамках локальной сети;
- Outbound Internet - аналогично, только за исходящий трафик приложения в интернет;
- Inbound Trusted - грубо говоря, отвечает за входящий трафик приложения в рамках локальной сети
- Inbound Internet - аналогично, только за входящий трафик приложения в интернет
По клику на знак вопроса в одной из колонок (ну, или не на знак вопроса, а на галочку/крестик или что там будет стоять согласно автоматической настройке) можно для всех, кроме первой, колонок задать параметр Allow (Разрешить), Deny (Запретить) или Ask (собственно, знак вопроса, т.е. пока не определились). Отсюда простой вывод - если Вы доверяете приложению, то можете смело во всех четырёх, начиная со второй, колонках, проставить галочки, т.е использовать пункт " Allow " и разрешить приложению доступ в интернет. Если не доверяете, то " Deny" , т.е. запретить. Если Вам нужен какой-то определенный вид трафика, то, само собой, часть разрешить, часть запретить.
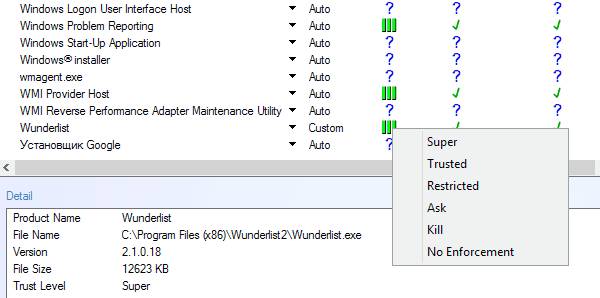
В первой же колонке есть пять параметров, а именно: Super (полные администраторские права), Trusted (доверенные права, т.е. почти полный уровень доступа на уровне исполнения пользователем), Restricted (ограниченные права), Ask (вопрос, т.е еще не определились), Kill (не позволяет приложение запускать вообще) и No Enforcement (что-то типа не исполнять, но вообще смысл этого параметра для меня остался туманным). Исходя из этих параметров, можно настроить работу почти любого приложения и его права в рамках системы.

Собственно, если возиться со всеми этими параметрами для Вас пока сложновато, то сделав вышеописанные настройки, а именно, проставив все упомянутые ползунки в параметр " Med. ", перезагрузите компьютер, после чего при попытке доступа приложения куда-либо, Вам будет выдаваться окошечко как на картинке выше с кнопочками " Allow " (разрешить) и " Deny " (запретить), а так же галочкой " Remember this setting " (запомнить выбор). Глядя на название программы и путь к ней, Вы можете определиться, понятно ли, что это за программа просится в интернет и запретить ей или разрешить доступ, а галочка " Remember this setting " позволит запомнить Ваш выбор и больше не будет спрашивать Вас о том, что нужно делать с этой программой. Если же выбор сделан неправильно, то, собственно, Вы можете перейти к списку программ и их прав, о котором я писал выше, а там вручную изменить параметры.
Прожив в таком режиме несколько недель и настроив доступ всех программ, которые установлены на компьютере, можете смело перевести ползунки в параметр " High ", запретив таким образом все лишние и ненастроенные соединения всего и вся, тем самым присекая вирусную и нежелательную активность чего бы то ни было на компьютере.
Ну и последнее и важное - это статистика. Открыв главное окно программы, перейдите по пути меню " Tools - Logs "
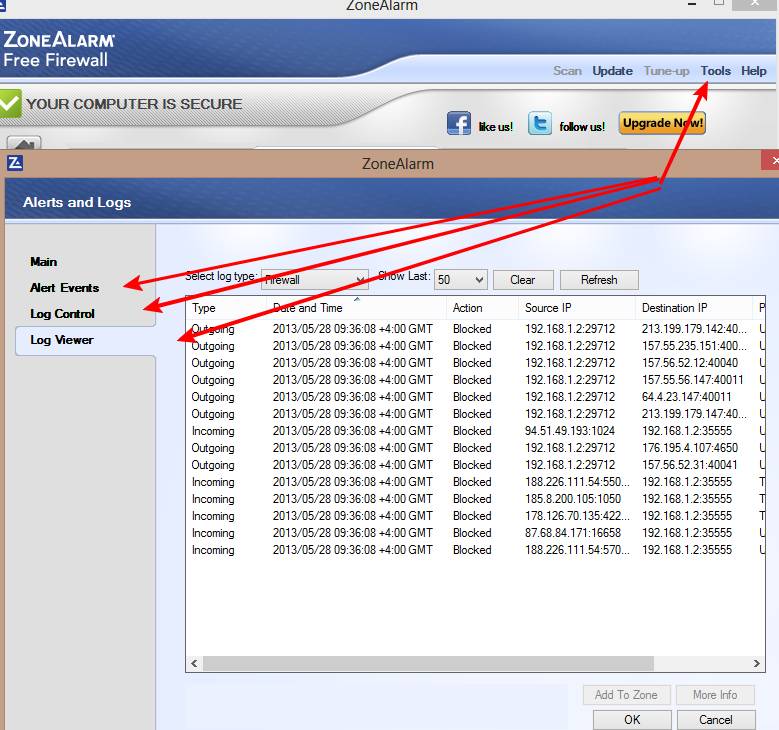
Здесь Вы сможете увидеть всю статистику по всему заблокированному, защищенному и пр.
Editing Hosts, IP Addresses, Ranges, and Subnets in Zones
To edit a host, an IP address, a range of IP addresses, or a Subnet in a Zone:
- Click in the ANTIVIRUS & FIREWALL panel of the ZoneAlarm software client.
- Click View Zones in the Advanced Firewall section.
The Firewall Settings window opens and the View Zones table shows. - Select the entry in the View Zones table.
- Click Edit.
The Edit Zone window opens. - Change the parameters as necessary.
- Click OK.
- Click OK.
Configuring Firewall Network Settings
To configure Firewall Network settings:
- Click in the ANTIVIRUS & FIREWALL panel of the ZoneAlarm software client.
- Click Settings in the Advanced Firewall section.
- Click Advanced Settings.
The Firewall Settings window opens and shows the Advanced settings. - In the Network Settings area, select or clear the configuration options as necessary:
| Include networks in the Trusted Zone upon detection. | Automatically assigns all newly discovered networks to the Trusted Zone. This setting gives the least amount of protection. |
| Exclude networks from the Trusted Zone upon detection. | Automatically assigns all newly discovered networks to the Public Zone. This setting gives the most amount of protection. |
| Ask which Zone to place new networks in upon detection. *for Windows XP only | Selected by default. For each newly discovered network, ZoneAlarm lets you assign that network to the Public Zone or to the Private Zone. |
| Automatically put new unprotected wireless networks (WEP or WPA) in the Public Zone *for Windows XP only | Selected by default. ZoneAlarm automatically assigns newly discovered unprotected wireless networks to the Public Zone. |
Customizing Zone Security Settings
You can further customize High and Medium security settings for the Trusted and Public security zones to allow or to block specific types of traffic based on protocol types and port numbers.
- Click in the ANTIVIRUS & FIREWALL panel of the ZoneAlarm software client.
- Click Settings in the Advanced Firewall section.
- Click Advanced Settings.
The Firewall Settings window opens. - From the navigation tree, select Trusted Zone or Public Zone.
Trusted Zone Security Settings or Public Zone Security Settings tab shows. - Select or clear High Security Settings and Medium Security Settings rules:
| High Security Settings | Medium Security Settings |
|---|---|
| Allow outgoing DNS (UDP port 53) | Block incoming NetBIOS (port 135, 137-9, 445) (selected by default for Public Zone) |
| Allow outgoing DHCP (UDP port 67) | Block outgoing NetBIOS (port 135, 137-9, 445) |
| Allow broadcast/multicast (selected by default) | Block incoming ping (ICMP Echo) |
| Allow incoming ping (ICMP Echo) | Block other incoming ICMP |
| Allow other incoming ICMP | Block outgoing ping (ICMP Echo) |
| Allow outgoing ping (ICMP Echo) | Block outgoing ICMP |
| Allow other outgoing ICMP | Block incoming IGMP |
| Allow incoming IGMP | Block outgoing IGMP |
| Allow outgoing IGMP | Block incoming UDP ports: (none) |
Note: Check this setting, then enter specific UDP ports, or UDP port ranges in the field below the table.
Note: Check this setting, then enter specific UDP ports, or UDP port ranges in the field below the table.
Note: Check this setting, then enter specific UDP ports, or UDP port ranges in the field below the table.
Note: Check this setting, then enter specific UDP ports, or UDP port ranges in the field below the table.
Note: Check this setting, then enter specific TCP ports, or TCP port ranges in the field below the table.
Note: Check this setting, then enter specific TCP ports, or TCP port ranges in the field below the table.
Note: Check this setting, then enter specific TCP ports, or TCP port ranges in the field below the table.
Note: Check this setting, then enter specific TCP ports, or TCP port ranges in the field below the table.
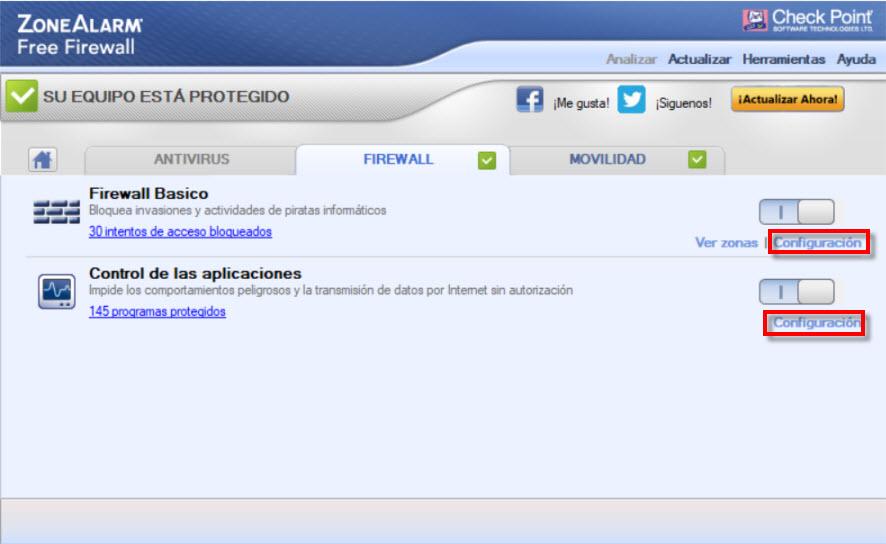
In Basic Firewall , if we click on configuration, we can configure the security level of the public area and our local network. If we click on Application Control , we can establish the security that we deem appropriate. It is best to leave things by default, unless we know what we are doing.
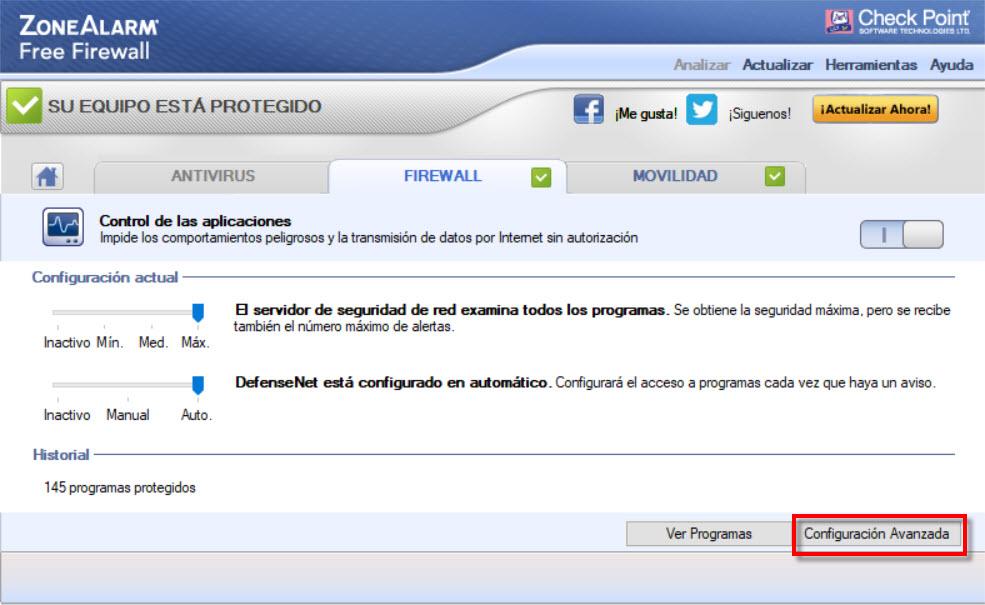
Here we must highlight Advanced configuration , that if we press the ” See programs ” tab we will be able to see the application rules.
Thus, for example, if we have given permission to a program that we should not, we can edit it so that it asks us again or delete it. Finally, if in Mobility we click on View details , Configure we will find this.
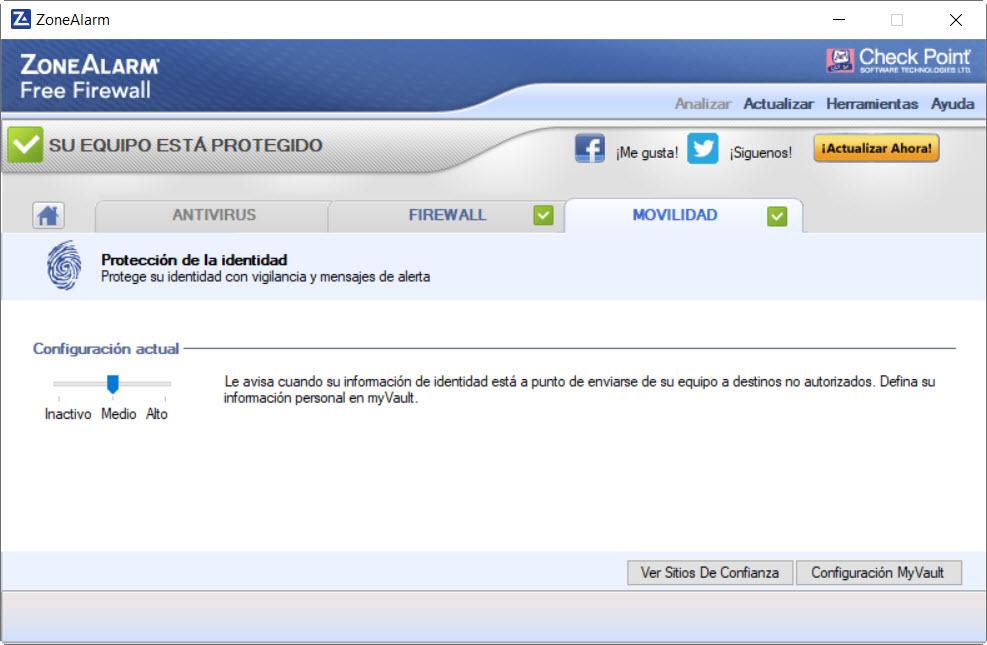
It is a section for the protection of identity. Here we find ” See trusted sites ” where we can add our own to PayPal and eBay. Then in “My Vault Settings ” you can protect your identity by putting a bank account, credit card and more. As you can see, ZoneAlarm Free firewall is a good free firewall option that you can try.
In Базовый брандмауэр , если мы нажмем на конфигурацию, мы сможем настроить уровень безопасности публичной области и нашей локальной сети. Если мы нажмем на Управление приложениями , мы можем обеспечить безопасность, которую сочтем необходимой. Лучше оставить все по умолчанию, если мы не знаем, что делаем.
Здесь мы должны выделить Расширенная конфигурация , что если мы нажмем " Посмотреть программы »Мы сможем увидеть правила приложения.
Таким образом, например, если мы дали разрешение программе, которую не должны, мы можем отредактировать ее так, чтобы она снова запрашивала у нас, или удалить ее. Наконец, если в Мобильность мы нажимаем на Посмотреть детали , Настроить мы найдем это.
Это раздел для защиты личности. Здесь мы находим » См. Надежные сайты », Где мы можем добавить свои собственные в PayPal и eBay. Затем в «Настройки моего хранилища» ”Вы можете защитить свою личность, указав банковский счет, кредитную карту и многое другое. Как видите, брандмауэр ZoneAlarm Free - хороший бесплатный вариант брандмауэра, который вы можете попробовать.
Hackers are always on the lookout to take advantage of our equipment. For that reason, they invent novel techniques, carry out phishing attacks, ransomware, and more. Users, to defend ourselves against these cybercriminals we need to protect ourselves in an adequate way. Thus, for example, the first thing we must do is keep our operating system updated so that cybercriminals cannot exploit its vulnerabilities. In addition, another interesting thing would be to add other protection systems such as a firewall, and if possible, also an antimalware. For this reason, today we are going to learn how to configure and install ZoneAlarm Free Firewall , a free firewall with which we will be more protected.
The developer of this software is Check Point, a company founded in 1993 and with a long tradition known for its firewall and VPN products. Therefore, we can rest assured that it is a trustworthy product, since they have maintained the prestige for a long period.

Минимальные требования, загрузка и установка этого бесплатного межсетевого экрана
Если мы хотим установить брандмауэр, мы начнем с перехода на его веб-сайт, нажав здесь . Тогда мы получим такой экран:
Теперь, что нам нужно сделать, это нажать на « Скачайте бесплатно «. Первое, что мы собираемся сделать, это запустить установщик, после чего появится такой экран:
Здесь мы должны принять политику конфиденциальности, чтобы использовать программу. Затем это позволяет нам выбирать между двумя типами установки:
- САЙТ : он выполнит установку с конфигурацией по умолчанию.
- Персонализированные : в котором вы можете выбрать один из нескольких вариантов.
В моем случае я выбрал выборочную установку, чтобы принять решение о том, как я хочу установить брандмауэр ZoneAlarm Free. Далее у нас есть лицензионное соглашение, и чтобы дать согласие на установку программы, нажмите на Принять .
Это самый важный экран в установке брандмауэра:
Здесь мы рекомендуем выбрать установку управление приложением в режиме машинного обучения . Что касается контроля, то в максимальная безопасность режим способ управления был бы ручным. Это означает, что он будет запрашивать у нас разрешение на выполнение действий несколько раз, в то время как в автоматическом режиме некоторые из них уже приняты. Для целевой каталог, его можно изменить, но в нашем случае мы решили оставить его на предустановленном значении. После того, как мы выбрали нужные параметры, нажмите на Далее кнопку.
Тогда в брандмауэре ZoneAlarm Free появится следующее:
Теперь ваша очередь решать, хотим ли мы установить ZoneAlarm Web Secure Бесплатно Расширение Google Chrome, о котором мы говорили ранее. Его установка не является обязательной и остается на усмотрении каждого. Если вы не поняли в начале урока, у вас есть ссылка, чтобы установить его позже. Затем начните загрузку и установку программы, в зависимости от вашего оборудования и подключения, это займет больше или меньше.
На этом экране завершится процесс установки.
Все, что нам нужно сделать здесь, это ввести нашу электронную почту и нажать на Завершить кнопку.
Adding Expert Rules
To add an Expert Rule:
- In the Expert Rules configuration screen, click Add.
The Add Expert Rule window opens. - Select the Rank.
- Enter a Name and Comments (optional).
- Make sure the State is Enabled.
- Allow - to allow the traffic that matches the rule criteria.
- Block - to block the traffic that matches the rule criteria.
- Source, Destination - click Modify > Add Location > [location option]:
- My Computer - this PC.
- Trusted Zone - computers and networks in the Trusted Zone ("Managing Basic Firewall Security Zone Settings" on page 31)
- Public Zone - computers and networks in the Public zone ("Managing Basic Firewall Security Zone Settings" on page 31)
- Any - any source/destination location, without restrictions (default)
- Host/Site - add a Description and a Host name, then click Lookup, and OK
- IP Address - add a Description and an IP Address, then click OK
- IP Range - add a Description, the first IP Address of a range and the last one, then click OK
- Subnet - add a Description, an IP Address and a Subnet Mask, then click OK
- Gateway - add a Description, an IP Address and a MAC Address, then click OK
- New Group - see how to add Location Expert Groups ("Adding Expert Groups" on page 39)
- Existing Group - select groups from the list, then click OK.
- Add Protocol - add a Description, select a Protocol, a Destination Port and a Source Port, then click OK
- New Group - see how to add Protocol Expert Groups ("Adding Expert Groups" on page 39)
- Existing Group - select groups from the list, then click OK
- Day/Time Range - add a Description, select From and To values for the Time frame, Days of the week, then click OK
- New Group - see how to add Time Expert Groups ("Adding Expert Groups" on page 39)
- Existing Group - select groups from the list, then click OK
Managing Basic Firewall Security Zone Settings
ZoneAlarm Firewall comes configured with optimal basic Firewall Zone settings. If you need to make changes to the basic settings, you can do these:
- Change the security levels of the ZoneAlarm Firewall zones (not recommended)
- Add a host, an IP address, a range of IP addresses, or a Subnet to a security zone
- Remove a host, an IP address, a range of IP addresses, or a Subnet from a security zone
- Edit a host, an IP address, a range of IP addresses, or a Subnet in a security zone
Managing Expert Groups
To manage Expert Groups:
- In the Expert Rules configuration screen, click Groups.
The Expert Group Manager window opens. - Do necessary procedures on Expert Groups:
- Add ("Adding Expert Groups" on page 39)
- Remove ("Editing Expert Groups" on page 41)
- Edit ("Editing Expert Groups" on page 41)
- Click OK to save and exit.
Adding Expert Groups
You can add Expert groups based on:
To add a Location Expert Group:
- Select the Locations tab.
- Click Add.
Add Location Group window opens. - Enter a Name and a Description (optional).
- Click Add.
- Select one of the options from the drop-down menu and enter the required parameters:
- Host/Site - enter a Description and a Host name, and click Lookup to find the IP address of the host
- IP Address - enter a Description and an IP Address
- IP Range - enter a Description, the first IP Address of the range and the last IP Address of the range
- Subnet - enter a Description, an IP Address and a Subnet Mask
- Gateway - enter a Description, an IP Address and a MAC Address of a gateway
To add a Protocol Expert Group:
To add a Time Expert Group:
- Select the Times tab.
- Click Add.
The Add Time Group window opens. - Enter a Name and a Description (optional).
- Click Add.
The Day/Time Range window opens. - Enter a Description.
- Select the From and To values for the Time. The default is Any.
- Select Days of the week.
- Click OK.
- Click OK.
Editing Expert Groups
To edit an Expert Group:
- Select the tab for the Expert Group category:
- Locations
- Protocols
- Times
Что дает нам бесплатный межсетевой экран ZoneAlarm
ZoneAlarm Бесплатный межсетевой экран это бесплатный брандмауэр, который позволит нам защитить себя от входящих и исходящих кибератак, блокировать нежелательный трафик и контролировать, какие программы обращаются к Интернету. Кроме того, это сделает нас невидимыми для хакеров и не поможет защитить наши личные данные.
Этот межсетевой экран будет выполнять следующие функции:
- Мониторинг программ ищем подозрительное поведение, чтобы предложить нам защиту от киберпреступников и других онлайн-угроз.
- Мониторинг трафика благодаря двунаправленному брандмауэру, который контролирует и наблюдает за входящим и исходящим трафиком нашей сети. Его цель - сделать наш компьютер невидимым и не дать шпионскому ПО раскрыть наши данные в Интернете.
- Защита от раннего запуска может предупредить нас, если мы используем надежную операционную систему или опасный руткит.
- Анти-фишинг защита, чтобы защитить себя в сети при просмотре Интернета.
- Безопасная загрузка документов предлагает удалить потенциально вредоносные функции из загружаемых нами файлов, такие как макросы, встроенные объекты и другой вредоносный контент.
![]()
С другой стороны, у нас есть ZoneAlarm Pro, платная версия, которая, помимо вышеперечисленного, предлагает нам дополнительные возможности. Среди них мы можем выделить: расширенную защиту доступа, расширенный контроль настроек, контроль компонентов, экспертные правила, круглосуточное обслуживание клиентов и отсутствие рекламы. Кроме того, вы, возможно, захотите попробовать другие бесплатные опции Checkpoint: Zone Alarm Free. Антивирус и ZoneAlarm Web Secure Free, который является расширением для Google Chrome чтобы уберечь нас от различных угроз.
Послесловие
Вот, собственно, и всё. Надеюсь, что необходимый минимум до Вас донесен, а в работе программы, не смотря на английский язык, Вы разобрались. Если же нет и будут какие-то вопросы, замечания, проблемы и прочее - говорите в комментариях ниже, обязательно чем смогу помогу.
Благодарю за внимание. Теперь Вам не страшен никакой хакер Пупкин и его злые нападения на Вашу собственность :)
Белов Андрей (Sonikelf) Заметки Сис.Админа [Sonikelf's Project's] Космодамианская наб., 32-34 Россия, Москва (916) 174-8226
Хакеры всегда ищут возможности воспользоваться нашим оборудованием. По этой причине они изобретают новые методы, проводят фишинговые атаки, программы-вымогатели и многое другое. Пользователи, чтобы защитить себя от этих киберпреступников, нам нужно защитить себя соответствующим образом. Таким образом, например, первое, что мы должны сделать, - это обновлять нашу операционную систему, чтобы киберпреступники не могли воспользоваться ее уязвимостями. Кроме того, еще одним интересным моментом было бы добавить другие системы защиты, такие как брандмауэри, если возможно, также антивредоносное ПО. По этой причине сегодня мы узнаем, как настроить и установить ZoneAlarm Free Firewall , бесплатный брандмауэр, с помощью которого мы будем более защищены.
Разработчик этого программного обеспечения - Check Point, компания, основанная в 1993 году и имеющая давние традиции, известная своими межсетевыми экранами и VPN продукты. Поэтому мы можем быть уверены, что это заслуживающий доверия продукт, так как они долгое время сохраняли престиж.
![ZoneAlarm Free Firewall]()
Changing Security Level Settings of Firewall Zones
To change the security level settings of the zones:
- Click in the ANTIVIRUS & FIREWALL panel of the ZoneAlarm software client.
- Click Settings in the Advanced Firewall section.
- Move the slider to one of the setting for the Public Zone - Off, Med., or High (default).
- Move the slider to one of the settings for the Trusted Zone. - Off, Med. (default), or High.
- See Protecting Your Computer with ZoneAlarm Firewall (on page 30) for more information on the security levels
- If you move the slider to Off position, the ZoneAlarm Firewall gets turned off. In this case, the main status bar shows the warning YOUR COMPUTER IS AT RISK. You can turn it on again through change of the security level to Medium or High, or by clicking the Fix Now! button in the main status bar
Configuring Advanced Firewall Settings
Advanced options let you further customize your firewall configuration. Here, you can:
- Configure general settings ("Configuring Advanced Global Firewall Settings" on page 35) based on protocols, packet types, types of services, and types of traffic. These apply to both - the Trusted Zone and the Public Zone.
- Configure network settings ("Configuring Firewall Network Settings" on page 36) to include newly detected networks in the Trusted Zone, so that traditional local network activities, such as file and printer sharing, are not interrupted.
Note - ZoneAlarm software detects only networks that your computer is physically connected to. Routed or virtual network connections are not detected.
Загрузка и установка фаерволла Zone Alarm
-
В первом окне выбираем пункт " Custom Install ", дабы настроить все параметры установки:
![zone alarm установка]()
![zone alarm установка 5]()
После чего проверяем, что снята галочка, и жмем в кнопочку " Finish ":
На сим процесс установки можно считать законченным и можно перейти к этапу настройки и использования сего фаерволла. Но перед этим перезагрузите, пожалуйста, компьютер.
Get started with ZoneAlarm Free firewall
This is the main screen of the firewall. The boxes marked in red are the ones that we are going to deal with in depth.
![]()
- Update : will check for a more recent program update and proceed to install it.
- Tools : here we can enter the license if we go to a higher paid product. We also have the game mode, to configure how you want the firewall to behave when we are playing. In addition, we have scheduled tasks, in which by default the program updates automatically. In preferences we have the option to set a password to the program, and also to make a backup of our configuration or return to the default values. Lastly, you have logging and diagnostic tools.
- Help : we can see a series of manuals in English and receive technical assistance.
One of the first things we did as soon as we started the firewall, was to update the program to verify that it had the latest version on.
![]()
With the latest version already on, we began to use the PC normally. One of the main functions of ZoneAlarm Free firewall is to notify us when a program wants to send incoming or outgoing traffic to my computer. So, for example, when I was using the file explorer to upload a file to the cloud, I got this screen.
![]()
- Remember this setting : if you leave the box checked, every time the same thing happens, it will automatically act like this. If you do not have it, the best thing is to deactivate the box and give to deny. If something doesn’t work, you know why, but at least by restarting next time you can change it.
- Show More Information – Sometimes it contains information about what that program is for and can help us make our decision.
- Allow : will let the program use the Internet.
- Deny : will not allow the program to use the Internet.
As we are going to occasionally upload files to the cloud, email or Google Drive, we are going to configure it as in the screenshot above.
Removing Hosts, IP Addresses, Ranges, and Subnets from Zones
To remove a host, an IP address, a range of IP addresses, or a Subnet from a Zone:
- Click in the ANTIVIRUS & FIREWALL panel of the ZoneAlarm software client.
- Click View Zones in the Advanced Firewall section.
The Firewall Settings window opens and the View Zones table shows. - Select an entry in the View Zones table.
- Click Remove. The Delete Confirmation window opens.
- Click Yes to confirm the deletion.
- Click OK.
Adding Hosts, IP Addresses, Ranges, and Subnets to Zones
To add a host, an IP address, a range of IP addresses, or a Subnet to a Zone:
- Click in the ANTIVIRUS & FIREWALL panel of the ZoneAlarm software client.
- Click View Zones in the Advanced Firewall section.
The Firewall Settings window opens and the View Zones table shows. - Click Add and select one of these:
- Host/Site
- IP Address
- IP Range
- Subnet
- From the drop-down menu select the Zone ("Protecting Your Computer with ZoneAlarm Firewall" on page 30) to which you want to add a new network or host:
- Blocked
- Trusted
- Public
- Fill in the required fields:
- Host name and Description for the Host/Site
Click Lookup to get the IP address for the host - IP Address and Description for the IP Address
- IP Range Start, IP Range End, and Description for the IP Range
- IP Address, Subnet Mask, and Description for the Subnet
- Host name and Description for the Host/Site
- Click OK.
The new entity shows in the View Zones table. - Click OK.
Читайте также: