
Vmware vcenter обновить dns
With the release of vSphere 6.7, The interface looks a bit different.
Thus , I thought I would do a write up on how to change a ESXi Host’s Hostname and DNS in vSphere 6.7 within vCenter.
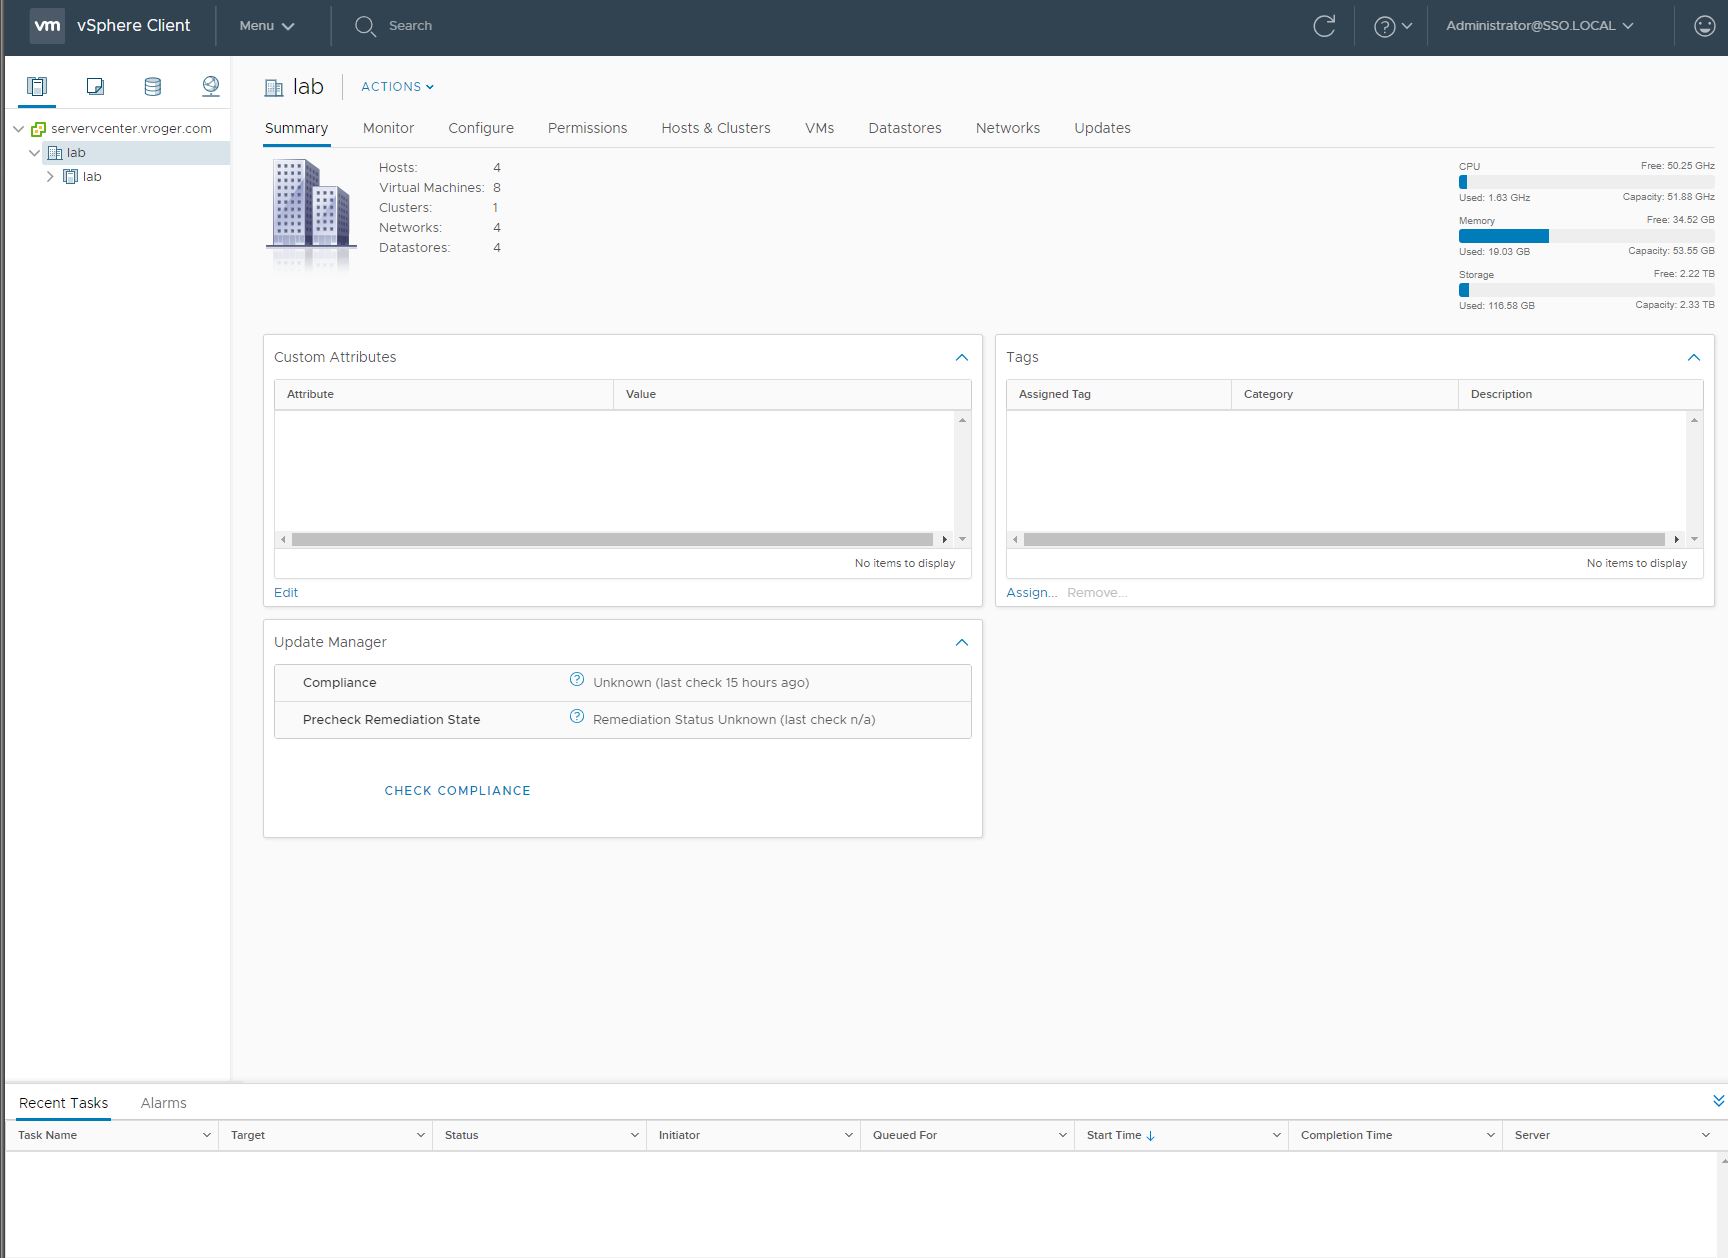
We are going to use the HTML 5 interface.
Lets expand to the host I just installed, and added to the cluster. In this case it is esxufss02.
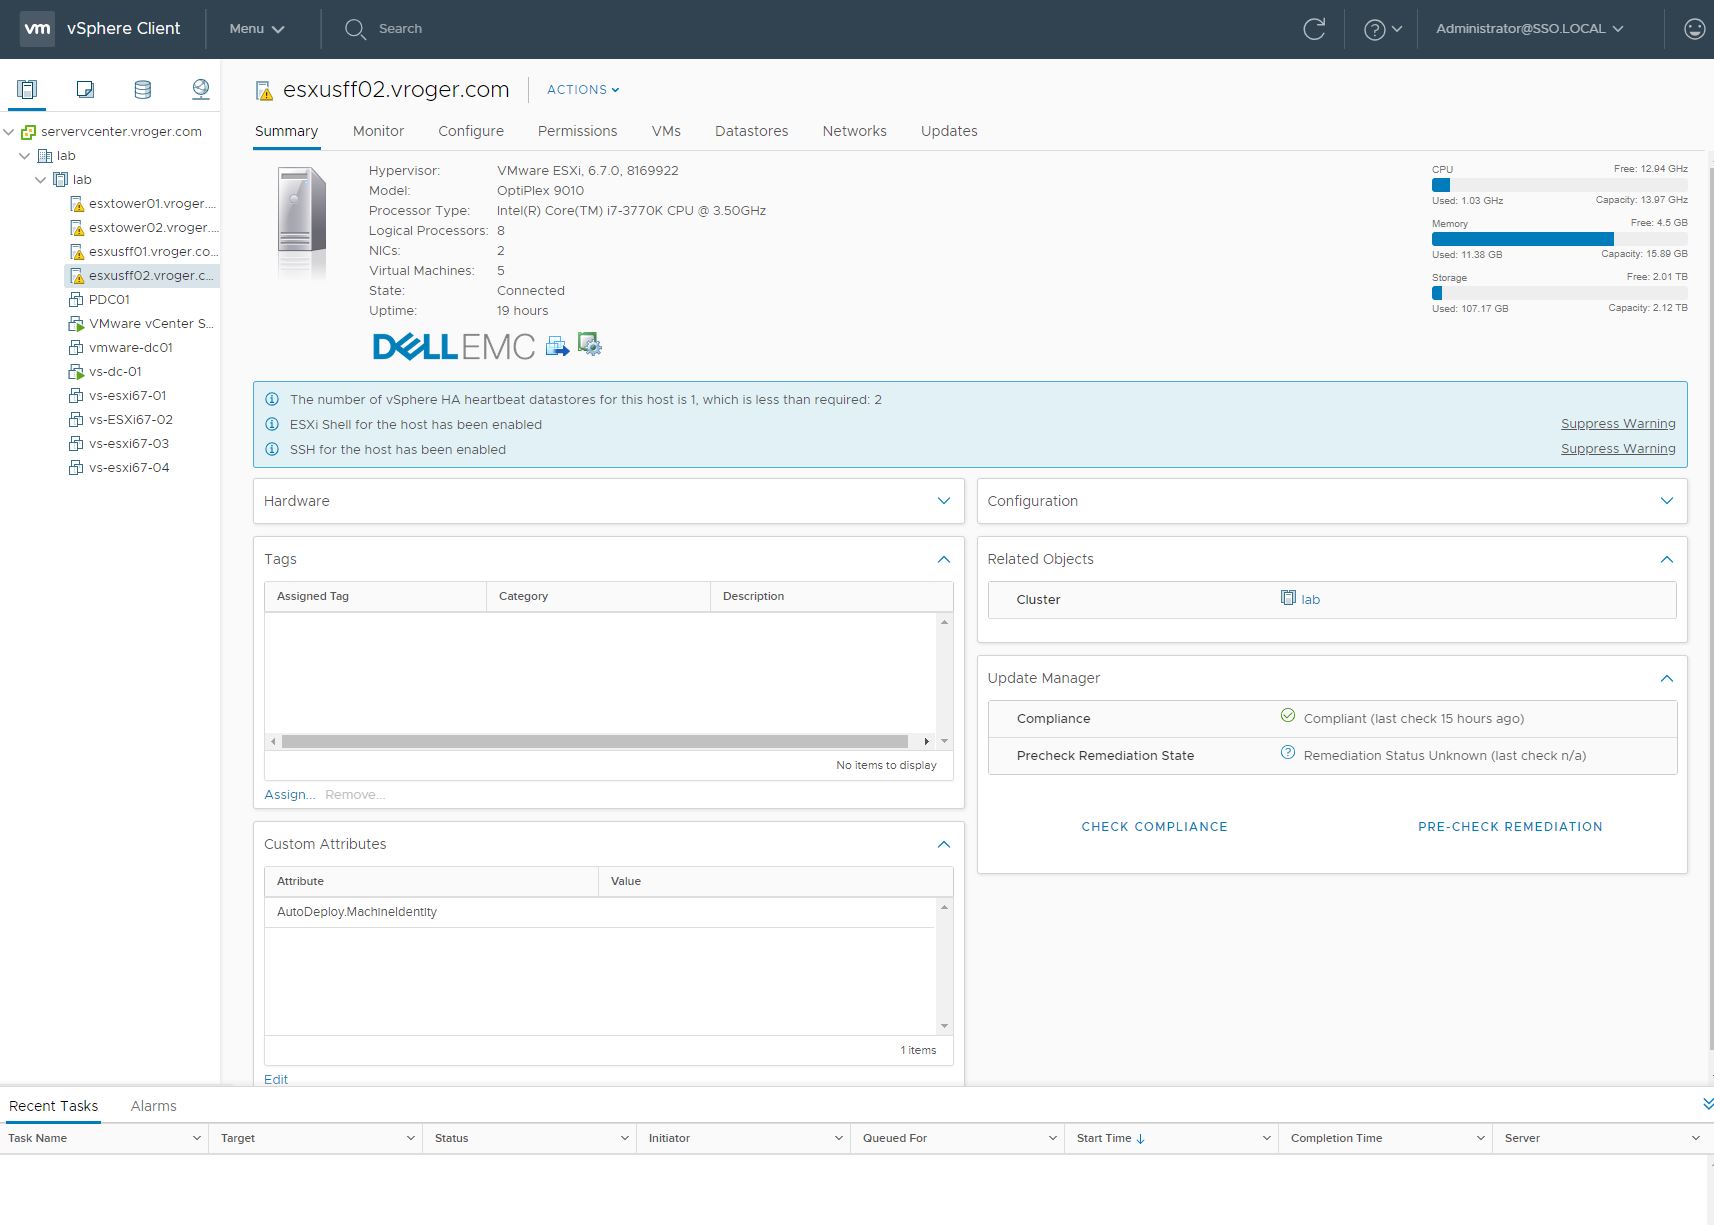
Next, Lets click the Configure Tab.
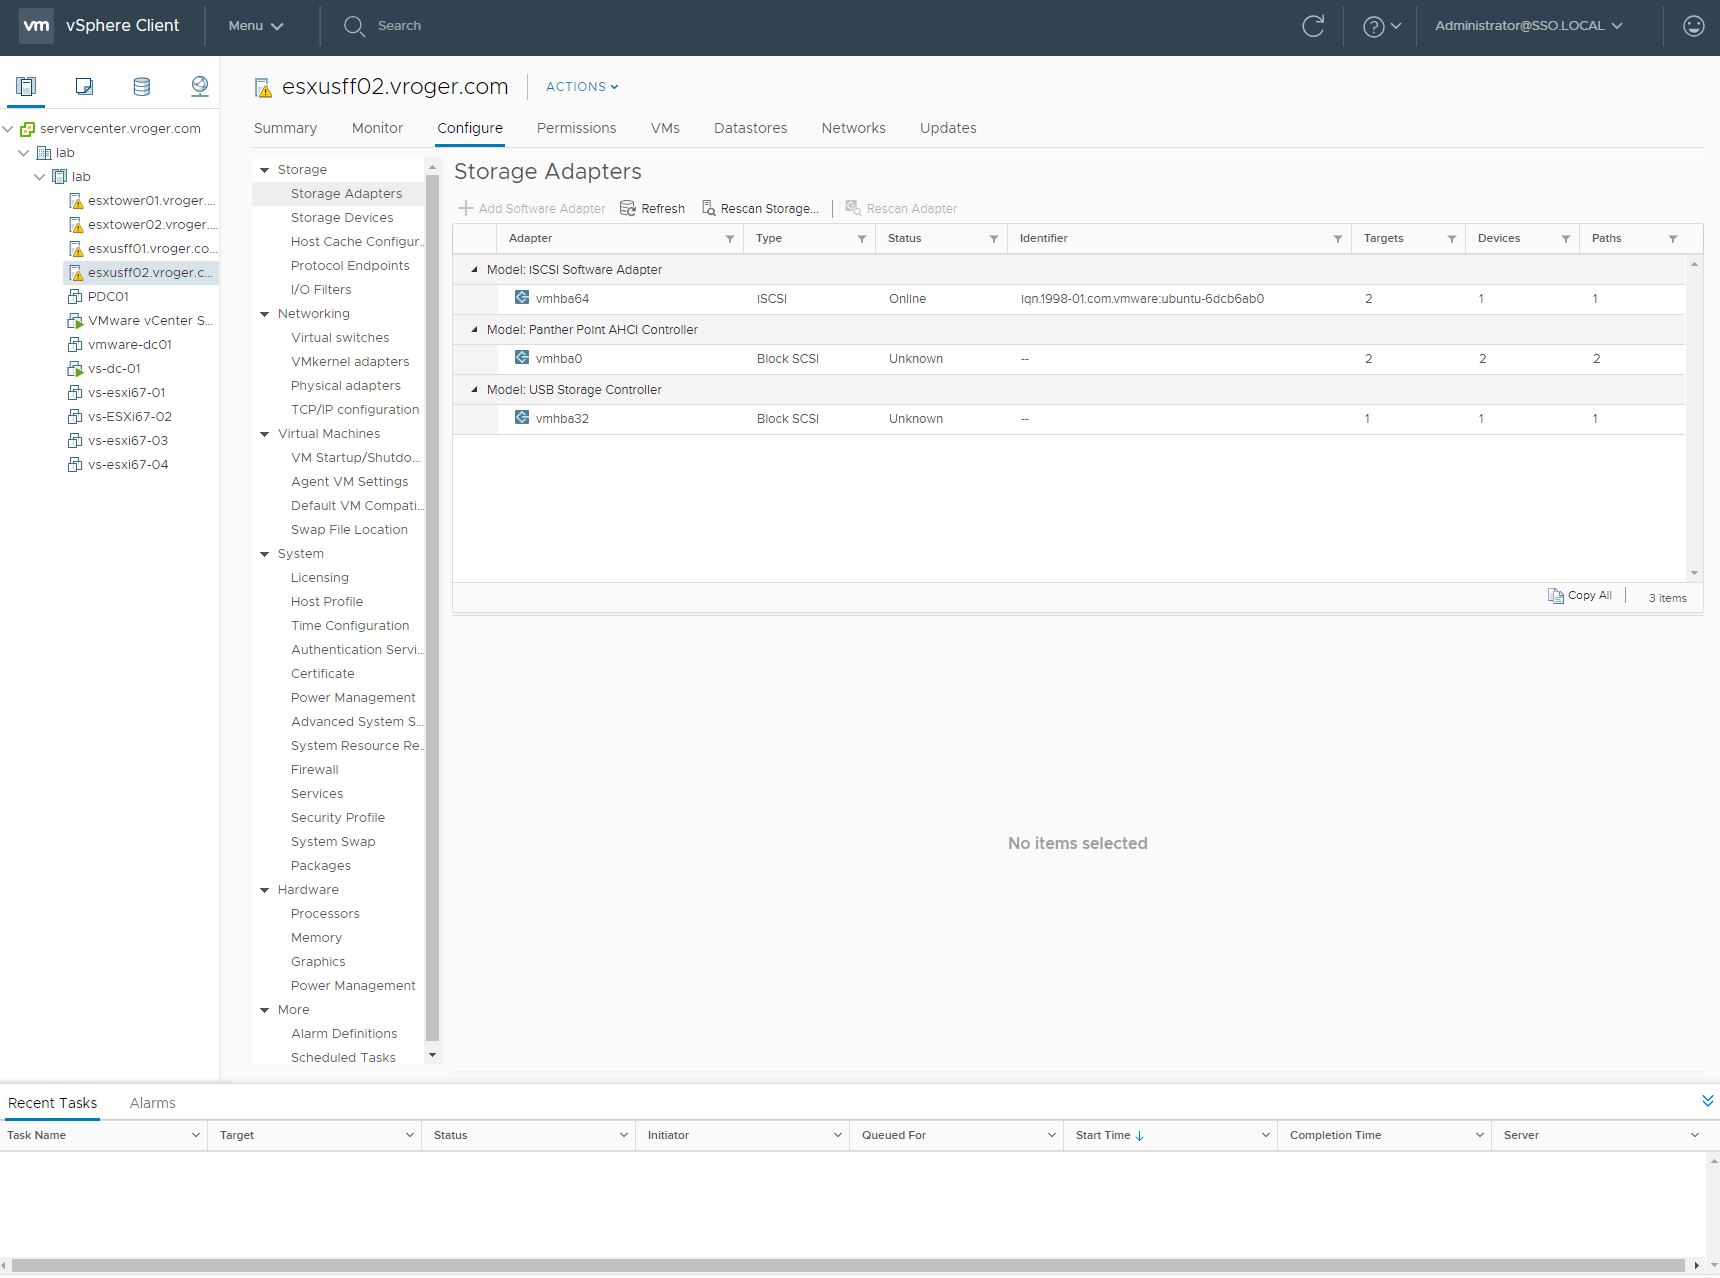
Next, Lets click into Networking > TCP / IP Configuration.

Next, Click Default under TCP/IP Stack. And Click Edit.
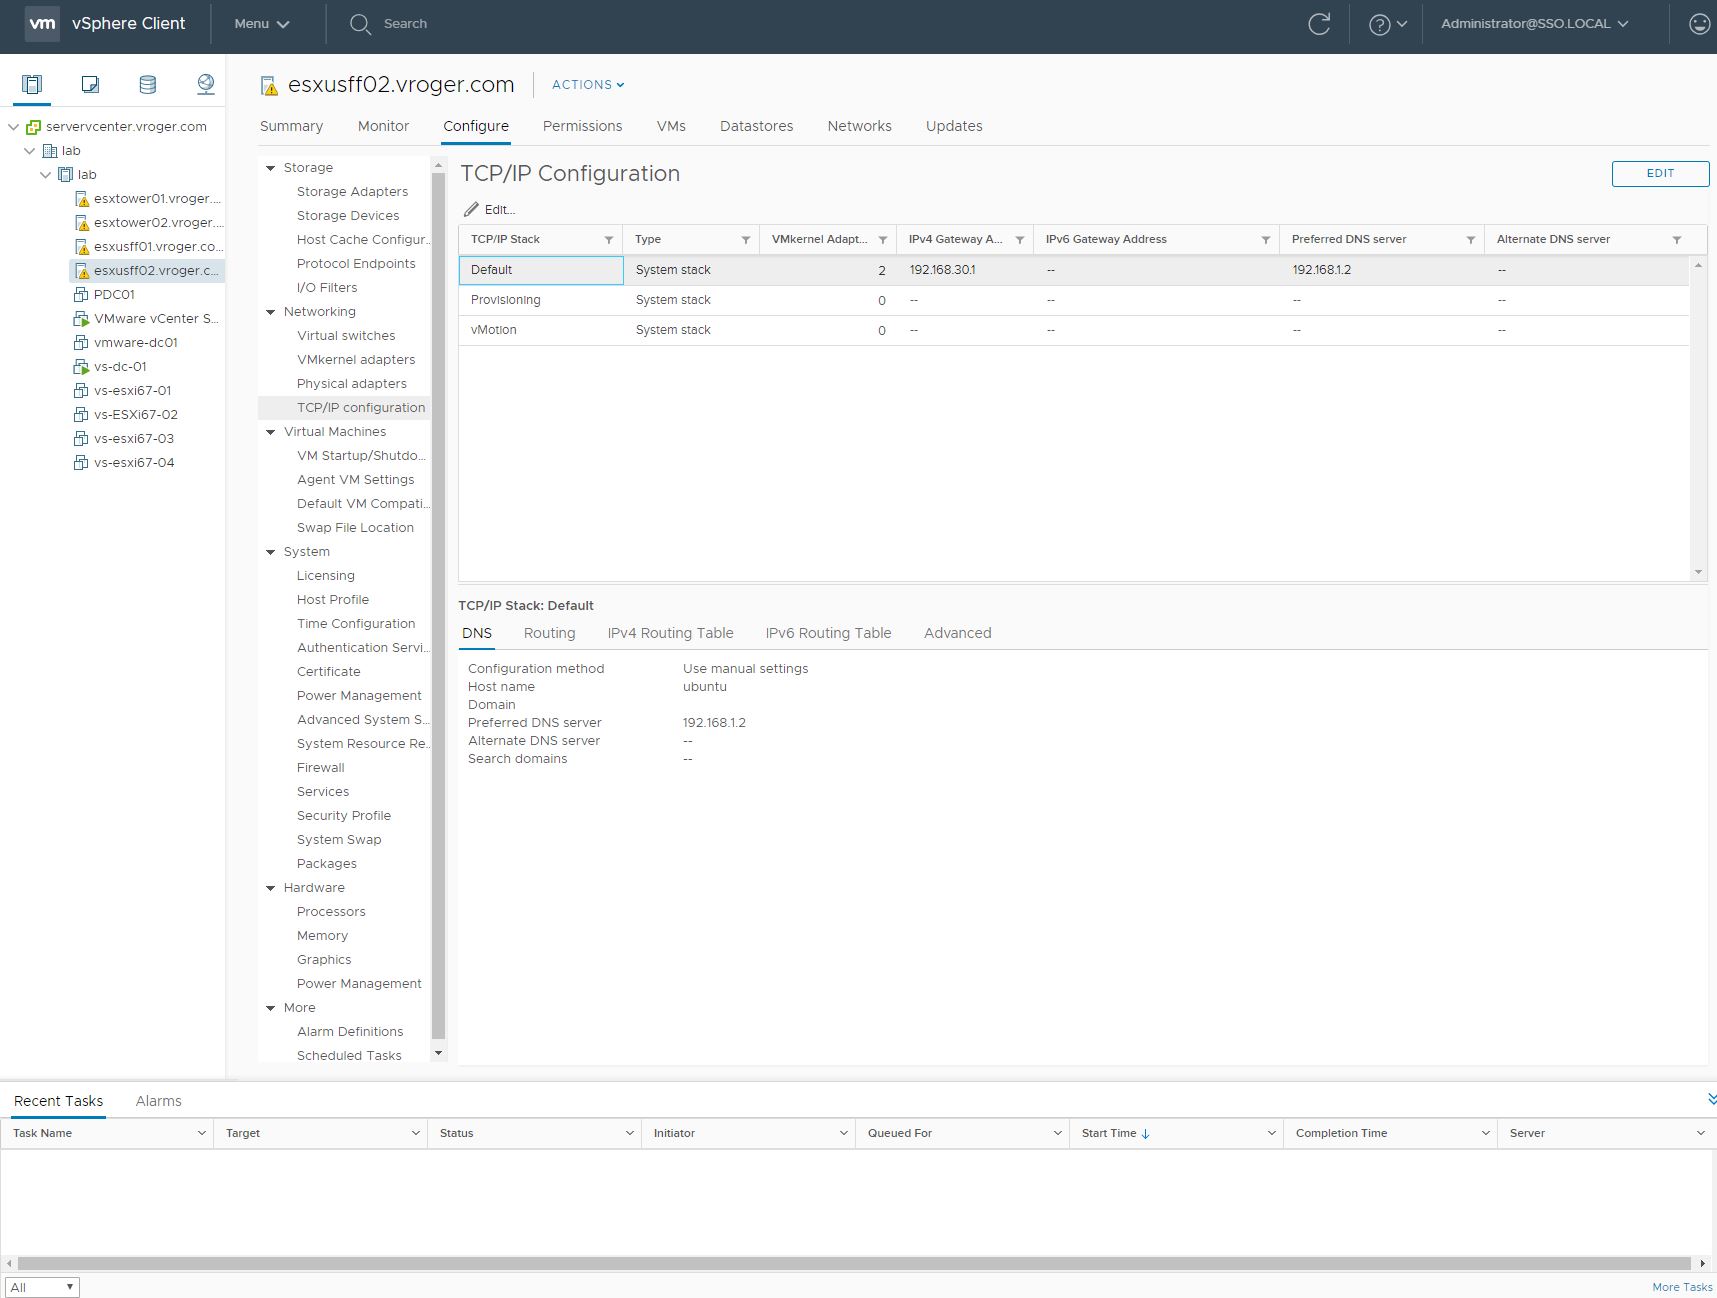
Next, enter the information, and click ok.


Roger Lund
VMware and Storage crazy man, vExpert, MN VMUG leader
E8 Storage Announces InfiniBand Support Extending High Performance Compute (HPC) Options for New and Existing Customers
The Hunt for the Best Wi-Fi: Netgear Orbi Testing
You may also like
Conclusion
That pretty much wraps it up for today. As we’ve seen, there are a number of advantages to joining ESXi to Active Directory. It makes user management easier while improving security across the board. In an upcoming post, I’ll go over a similar procedure this time targeting vCenter Server.
IntSights All-in-One Threat Intelligence Platform
XFD4 – Cisco Tetration
Recent Posts
StorCentric’s Retrospect Adds Anomaly Detection to Ransomware Protection in Retrospect Backup 18.5
Datadobi Enables CBX to Migrate Entire Distributed Data Storage Infrastructure
DH2i Closes 2021 As Another Year of Record Sales Growth, Product Innovation, and Strategic Partnership Development
Install Microsoft Windows Server 2022 on vSphere 7 Update 3
Installation of VMware vSphere 7 Update 3
Tag Cloud
Categories
Archive

report this ad
Recent Posts
StorCentric’s Retrospect Adds Anomaly Detection to Ransomware Protection in Retrospect Backup 18.5
Datadobi Enables CBX to Migrate Entire Distributed Data Storage Infrastructure
DH2i Closes 2021 As Another Year of Record Sales Growth, Product Innovation, and Strategic Partnership Development
Install Microsoft Windows Server 2022 on vSphere 7 Update 3
Installation of VMware vSphere 7 Update 3
Categories
Archives
@2019 - All Right Reserved. Designed and Developed by PenciDesign

Privacy Overview

This blog is something different for me as I got the success after 9 failure attempts.
Problem Statement – Implement the vCenter 6.7u3 without DNS and change the Hostname and DNS in later stage once the DNS server available
Use Cases: There could be a situation when:
- Need to make progress on vSphere Deployment but external services are not reachable due to network constraints.
- Need to migrate the vCenter from one Datacenter to another and need to change the Hostname of the vCenter to follow the new naming standard provided by client.
Please Note: It is always recommended to have the DNS before the vCenter Deployment, however this workaround is just to handle the above mentioned use cases. I have tested it on a greenfield installation.
Demonstration Setup – One ESXi Host, vCenter with Embedded PSC , DNS Server ( Only used at third Stage).
Stage 1: Install the vCenter first stage while selecting FQDN same as IP of the vCenter and DNS same as Gateway.
Please remember , don’t select any dummy IP for DNS, installation got failed thrice for me and put me on wait for 2-3 hours before error- use Gateway as DNS Server IP.

Stage 2 – Don’t forgot to enable SSH in stage 2.
vCenter server will be installed with name as ”photon-machine” in second stage. Edit the /etc/hosts file and add the vCenter IP against ”photon-machine”. you can see in the screen shots below – before ans after changes.


If you missed to add this entry , it will take ages to make progress and get failed at 70%. This is needed as there is no real DNS to find ”photon-machine” entry.


Now once the vCenter installed , access it and add the esxi host on which the vCenter installed – just to check that all is Good.
Stage 3 : -Change the DNS IP Address and Hostname of the vCenter to the real FQDN.
This is two step activity:
Step 1:- Change the DNS IP first
- Go to the Appliance management 172.168.10.100:5480
- on the networking tab – click on edit on the right top corner.
Note – No need to bring your DNS Server at this time, that will be in next step.
My DNS IP is 172.168.10.200


Note: On the completion of this step , vCenter ui may not be accessible as there is no record in DNS against ”photon-machine”, so no worries , go to the next step
I wanted to know if I am setting up a host-only vCSA server then during configuration of vCSA what DNS do I need to add ?
I have checked VM Workstation it does NOT have any DNS entry ?
I have tried it on NAT which has a DNS but the vCSA still cannot be accessed via the web UI, I found out this is a DNS issue by running via SSH command service-control --start vxpd.
As obvious I can ping the device and access it via SSH.
Enter to win a Bose Sleepbuds II and more!
Contest ends 2022-05-20 Contests Fill out the form fill, and answer a question in the thread! Contest Details View all contests
This issue is resolved via adding IP FDQN in host file and now it works from the host PC as well, in this case..
StorCentric’s Retrospect Adds Anomaly Detection to Ransomware Protection.
Time to test!
Single sign-on using Windows credentials
Next up is a video that shows SSO in action when using the old vSphere client. In addition, I also show where from ESXi is be joined to and removed from an AD domain.
Granting permissions on vSphere objects
Since ESXi is now an AD resource, permissions using AD security principals can be assigned to it and the vSphere objects it holds. In this next video, I demonstrate how to grant administrator access on a single VM to a user called gojira\jason. Access to any other vSphere object or view is denied.
The same can be carried out using the embedded host client. The caveat here is that you must explicitly type in the AD user account or group as AD resources are not exposed by the client, unlike the thick client which lists them in a drop-down box. This is something else the VMware development team are currently looking into and will implement if possible.

Figure 14 – Granting permissions using AD security principles via the embedded ESXi host client
Cohesity Connect Global User Conference Starts Next Week
Tales from real IT system administrators world and non-production environment
Configuring Active Directory
There’s little work to be done here. Just add A and PTR records for the ESXi host to the domain’s DNS zone as shown in Figure 1.

Figure 1 – Creating DNS records for ESXi on a Microsoft DNS server
Using the ADUC MMC console, create a security group called ESX Admins and add the AD users whom you want ESXi root privileges assigned to.

Figure 2 – Creating the ESX Admins security groups in AD
In reality, you can specify any AD group of your liking provided you amend the Config.HostAgent.plugins.hostsvc.esxAdminsGroup advanced setting as shown in Fig. 3.

Figure 3 – Specifying an alternative AD ESXi root user group from the embedded ESXi host client
Encryption for servers, workstations and devices
I would like to know how others are handling this, our auditors wants us to have all of our data encrypted on our servers, workstations, and devices.I want to know the best way to go about this and how well does it work with MS SQL server and our ERP syst.
Joining Active Directory
Now that the pieces are all in place, it’s just a matter of joining ESXi to the domain. To do this, I’ve used the embedded host client to make things a little bit interesting. If you wish, however, you can do the same via the ESXi command line or the thick client.
Using the embedded host client
- As per Figure 10, log in as root and select Manage from Navigator.
- Select Authentication (3) from the Security & Users tab (2).
- Next, click on the Join Domain button (4) and enter the AD domain name (5) and credentials (6) with the required rights to join computers to a domain. Make sure to abide by the formatting shown in the screenshot.
- Click Join Domain (7) from the Join Domain window. ESXi is added to Active Directory as per the highlighted fields in green.

Figure 10 – Use the host client to join ESXi to Active Directory
You can leave the domain any time by clicking on the Leave domain option.
Using the ESXi command line
Later versions of ESXi include the domainjoin-cli cmdlet from the likewise-open package which is also included with many Linux distros.
On ESXi 6.5, the command is executed from /usr/lib/likewise/bin. If you haven’t enabled the AD firewall rule mentioned earlier, you must temporarily unload the ESXi firewall – assuming it is enabled – for this to work. Failing this, you will get an Error: NERR_DCNotFound [code 0x00000995] error.
The cmdlet syntax is this: domainjoin-cli join administrator password. You can omit the password and type it in instead. Figure 11 shows how the first join attempt failed because of the firewall while a second attempt succeeded when the firewall was temporarily disabled.

Figure 11 – Joining ESXi to AD using domainjoin-cli
As per Fig. 12, you can run domainjoin-cli query to verify that the DC is reachable.

Figure 12 – Running domainjoin-cli query to verify correct AD functionality
From the AD side of things, you should see a new computer account created for ESXi under Computers.

Figure 13 – A computer account for ESXi is created in AD on joining the domain
Installation of VMware vSphere 7 Update 3
PART 4 : CONFIGURING DNS SERVER FOR VMWARE VSPHERE LAB
DNS server is a important role in the vSphere Lab, No lab is complete without DNS server. it is necessary in any environment for correct name resolution, I faced error in one of my earlier blog in absence of DNS server RESOLVED : FAIL TO DEPLOY OVF TEMPLATE - TASK CANCELED BY USER . In this article I am going to create A resource record and PTR resource record in DNS server, As this is my first DNS server (also an Active Directory), I am going to configure reverse lookup zone for IP to Hostname resolution also.
Open run and type dnsmgmt.msc as I run dsa.msc in Part 3 creating new user in AD. DNS Manager management console will open, expand hostname and right click Reverse lookup Zones, select New zone, it will start wizard.


Next screens are important one and they are interactive. I am using complete IP version 4 in my lab and currently using 192.168.33 Network ID. if i have another subnet i can add it later whenever required.

Next are allow only secure dynamic updates, for security reason keep this option default, it is also recommended for Active Directory. and next is Summary, once clicked finish, new reverse lookup zone will be created for 192.168.33. IP range.

Once the required entry done I am able to see the records in both the Forward and Reverse lookup zones.

ESXi implements the PAM or Pluggable Authentication Module framework which supports several authentication methods one of them being Active Directory (AD). This means that you can include AD as an authentication mechanism within your vSphere environments. The benefits are many but the ones that sticks out the most is being able to authenticate using an AD user account and using the same, including AD security groups, to grant permissions on vSphere objects. This voids the need to maintain and replicate local ESXi users and groups across multiples instances of ESXi. Single sign-on using Windows credentials is also a cool feature to have.
User management is also a breeze once AD authentication is enabled. Consider the case of a vSphere admin leaving for pastures green. With AD, it’s a simple matter of disabling his or her user account and you’re done. If on the other hand admins are sharing and using local root or similarly privileged accounts, this insecure practice would call for a password change across the board assuming security is something you cherish.
So, in today’s post, I’ll go over the process of joining ESXi 6.5 to Active Directory. My test setup consists of a single unmanaged ESXi 6.5 host and a Windows 2012 Domain Controller (DC) running DNS, a single forest / domain setup and hosting all FSMO roles.
Basic authentication deadline
Like many of you, I'm investigating the deprecation of basic auth in Exchange Online. We moved to Office365 about 2 years ago, moved our Outlook clients to the latest Outlook365 and had everyone recreate their phone email accounts. I knew I had some out.
DH2i Closes 2021 As Another Year of Record.
Requirements
Time synchronization: The time on the ESXi host and the DC must be in sync. To do this, configure both to use the same NTP source or simply configure the NTP service on ESXi to use the DC as a time source. By default, a DC holding the PDC Emulator role is also responsible for keeping time for the whole forest.
DNS Resolution: The ESXi host must be able to resolve the domain and domain controller(s) DNS names. The easiest solution to this is to add the IP address of a DC which is configured as a DNS server for that domain.
Root access: Create a group called ESX Admins on Active Directory. AD users accounts assigned to it are automatically granted root access on ESXi.
Firewall access: Make sure that there is no firewall blocking the following ports both UDP and TCP:
11 Replies


Denis Kelley
You configure host name, IP and DNS in the setup and then hopefully it registers with DNS in Active Directory.
Thats's my question, in the set up which DNS should I point to, the AD server DNS ?
Is it a MUST to have AD for this ?
As of now I have tried a server with DNS without AD, I'm testing one with AD as well.
But here is my understanding, chrome of my laptop does not communicate with vCenter Server VMWare Workstation, this means that the DNS of my laptop is needed isnt it ?
Plus I have come to know there are 2 methods to install, either the installer (GUI or CLI) or installit on ESXi, my question is how to set up the vCenter Server from the .ova file.
I have opened the file directly in workstation and doing it, am I following the correct method ? (I haven't read it anywhere if this is possible, just curious.
I completed the set and ran final test with 6.5 and 6.7 bot resulting in refused to connect error in the chrome browser. I have tied other browser as well can't connect.
I can ping the vCSA, can't access it through SSH either.
Anything I'm missing ?

Check the steps on the setup and see if you missed something:
This method is installing the VCSA on ESXi (nested), I 'm doing it by importing the OVA without ESXi, that is what I want to know if it is possible ?
Something strange is going on.
I installed vCSA on ESXi on VMWare (nested virtualization) and still it's not working ?!
DNS is working fine as the ESXi has connectivity and nslookup works fine for all the addresses.
huudrych wrote:
Something strange is going on.
I installed vCSA on ESXi on VMWare (nested virtualization) and still it's not working ?!
DNS is working fine as the ESXi has connectivity and nslookup works fine for all the addresses.
Any thoughts..
When I try to access the web client through FQDN:5480 I get a not found error.
When i try to access via IP I get refused to connect error.
I checked DNS, it resolves both forward and reverse lookups.
This issue is resolved via adding IP FDQN in host file and now it works from the host PC as well, in this case..
This topic has been locked by an administrator and is no longer open for commenting.
To continue this discussion, please ask a new question.
On premises Central password manager with granular access?
Hi,Looking to have on premises Central password management solution, where we can store all passwords securely, updated, giving access to users based on their requirements etc.Looking for on premises option, for paid option, prefer perpetual license.Thank.
Datadobi Enables CBX to Migrate Entire Distributed Data.
StorCentric’s Retrospect Adds Anomaly Detection to Ransomware Protection.
HPE’s new Alletra storage arrays enable cloud-native control.
Spark! Pro series 11th May 2022
Today in History: 1956 Elvis Presley's 1st entry on UK charts with "Heartbreak Hotel"On 10 January 1956, Elvis Presley made his first recordings for RCA Records at The Methodist Television, Radio and TV Studios, 1525 McGavock Street, Nashville. “Heartbrea.
Configuring ESXi
You can configure ESXi 6.5 several ways. These include the DCUI, the ESXi command line, PowerCLI or via the embedded ESXi host or thick client.
Enable the Active Directory Firewall Rule
While writing this post, I learned that the Active Directory All firewall rule on ESXi is disabled by default. This, of course, plays havoc with the AD integration process since ESXi won’t be able to reach the DC. Using the host client, enable the firewall rule as shown in Figure 4. Highlight the rule, right-click on it and select Enable.

Figure 4 – Enabling the Active Directory All firewall rule on ESXi
DNS Settings
The easy way to configure DNS settings on ESXi is via the DCUI or the thick client. This is shown respectively in Figures 5 and 6. From the DCUI, log in as root, press F2 and navigate to the DNS Configuration menu option and press Enter.
On the DNS Configuration window, add the IP address of a DC running the DNS service as a primary or alternate DNS server. The Hostname value must match the DNS A record created for the ESXi host in the domain DNS zone.

Figure 5 – Configuring the DNS settings on ESXi using the DCUI

Figure 6 – Configuring the DNS settings on ESXi via the thick client
NTP Configuration

Figure 7 – Managing the NTP service on ESXi via the thick client
Alternatively, SSH to ESXi, log in as root and edit /etc/ntp.conf using vi. Add the line server x.x.x.x as shown in Fig.8 where x.x.x.x corresponds to the IP address of the NTP server you wish to use, which in my case happens to be the DC itself. When you’re done, restart the ntp service by running /etc/init.d/ntpd restart as shown in Fig. 8.

Figure 8 – Adding an NTP time source via the command line and restarting the NTP daemon
Once SSH’ed to ESXi, carry out an nslookup test to see if the AD domain name can be resolved. As per my example, the AD domain name is gojira.local which correctly resolves as shown in Fig. 9.

Figure 9 – Running nslookup to check if the AD domain name resolves correctly
Robin.io and StorCentric Announce Hyperconverged Cloud-Native Solutions for.
Install Microsoft Windows Server 2022 on vSphere 7.
Dual Monitors with Same Resolution
Читайте также: