Установка octoprint на планшет
Guy Sheffer maintains “OctoPi”, a Raspbian (and thus Debian) based SD card image for the Raspberry Pi that already includes OctoPrint plus everything you need to run it:
- OctoPrint plus its dependencies for live viewing of prints and timelapse video creation, compatible with various USB webcams and the Raspberry Pi camera
Please note that the Raspberry Pi Zero and Zero W are not recommended explicitly since severe performance issues were observed, caused by the WiFi interface when bandwidth is utilized (e.g. the webcam is streamed), negatively impacting printing quality. See also here. The Zero 2 however is recommended.
Linux
For installing OctoPrint on Linux, please take a look at the setup instructions for Raspbian on the forum. They should be pretty much identical on other Linux distributions.
Stable OctoPi
OctoPi 0.18.0 & OctoPrint 1.7.3 SHA256: 5f84fca128c58035a9cedb1fb8144c13146d35d42362b5aff9186439fcb9c453
Raspberry Pi 3B, 3B+, 4B or Zero 2 strongly recommended, Raspberry Pi Zero/Zero W not officially supported!
Image compatible with Raspberry Pi A, B, A+, B+, 2B, 3A+, 3B, 3B+, 4B 1/2/4/8GB, 400, Zero, Zero W and Zero 2.
Installing OctoPi using the Raspberry Pi Imager
🤚 Before you begin
Read and follow these instructions precisely. Most importantly, leave the system username as “pi”, do not change it to anything else or OctoPrint won’t work!
If you haven’t already, download and install Raspberry Pi Imager on your computer
Find the OctoPi image under “Choose OS”, by selecting “Other Specific Purpose OS” > “3D printing” > “OctoPi” and then the “stable” version.
Open advanced options by clicking on the button with the gear, or by using the keyboard shortcut ctrl + shift + x and then:

Configure your wifi options: Set your SSID, password and WiFi country:

Change the system password in “Set username and password” by entering a new password to use for the system user “pi”. This is not the password you’ll use for logging into OctoPrint but one that you’ll have to use to log into your Pi via SSH should you ever need to. Leave the username as “pi”, do not change it to anything else!
Optionally: Change the configured timezone in “Set locale settings”
Optionally: Change the hostname in “Set hostname”
Install the image to your SD card, then plug everything in to your Raspberry Pi and boot it up. Do not format the SD card after installing, even if prompted to do so. This will break the installation and you will have to start over!
Please also refer to OctoPi’s README, especially the “How to use it” section.
Performance
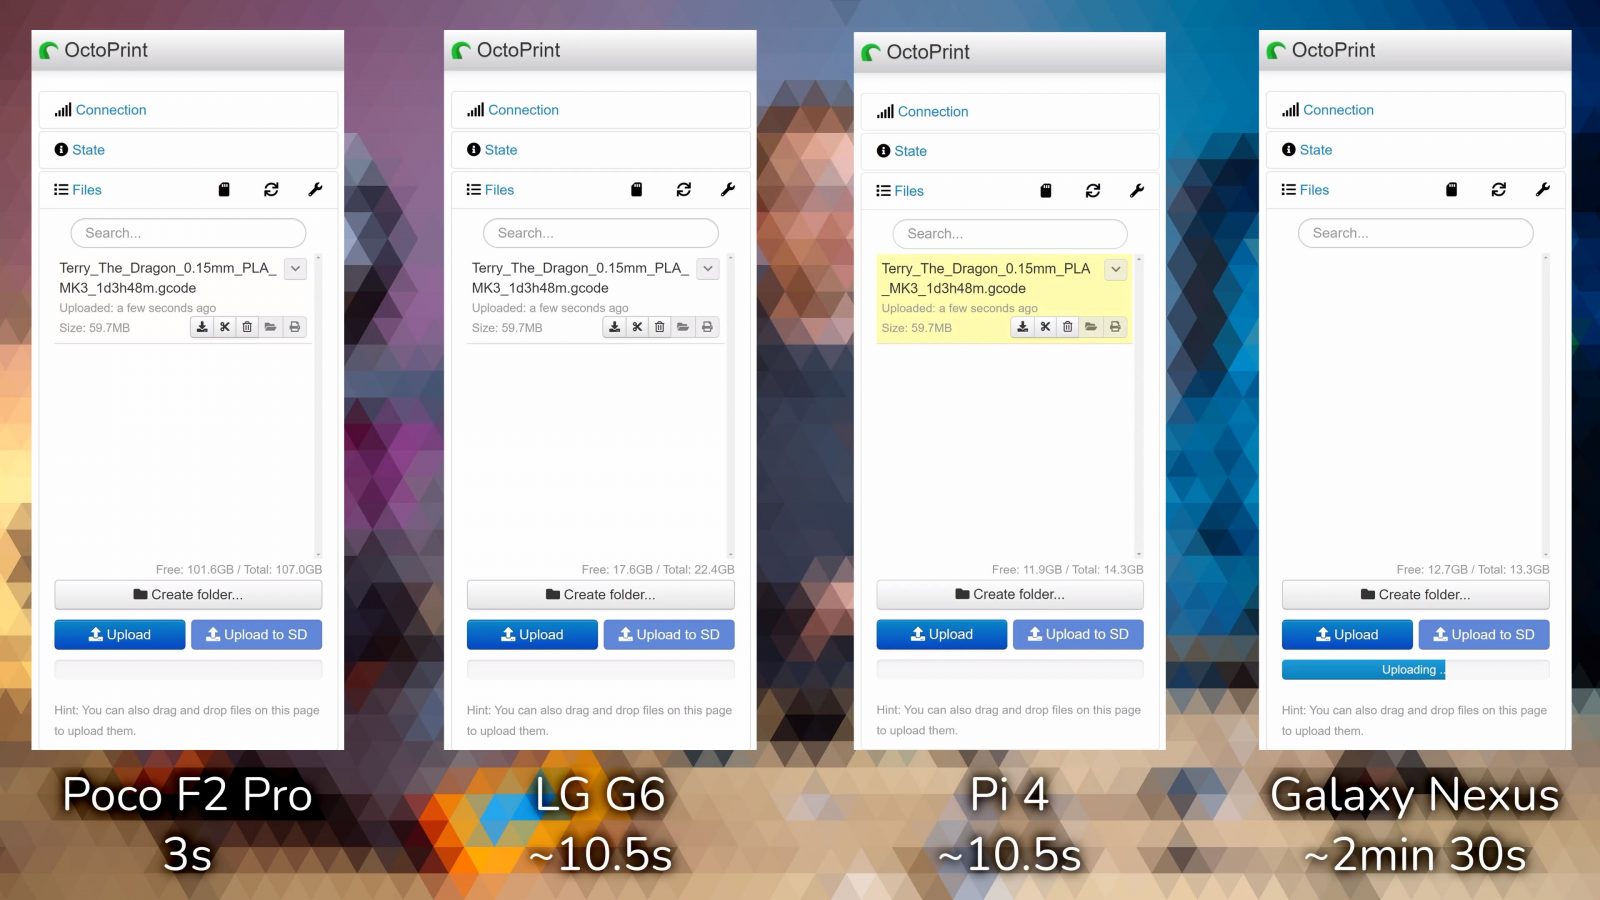
So what is it like actually using OctoPrint running on a phone? Well, it’s about as expected. Let’s start with performance. I tested how long it takes to upload a larger 60MB gcode file to get a general sense of how well things are working, and there are some real differences.
The Poco F2, the device with the most raw horsepower, finishes first at just three seconds until the upload is complete.
The LG G6 and Raspberry Pi 4 come in at 10 and 11 seconds, which is slower, yes, but still perfectly usable.
The Galaxy Nexus takes 2 minutes and 30 seconds. I mean, if you’re just using your slicer’s background upload and then have the print auto-start, that’s probably fine, but unless you’re just printing small, simple parts, that’s probably going to be pretty painful in the long run. All of this was tested 2m away from a WiFi 5 access point and after giving the phone and OctoPrint some time to calm down after starting up.
Now, for website load times, all three phones and the Raspberry Pi were almost instantaneous so I don’t know if there’s some caching going on or if OctoPrint’s interface is just that well optimized, but you still feel the difference in how long, for example, the settings menus take to save and just in general snappy-ness.
Now, that might not have disqualified the Galaxy Nexus yet, but because it’s also running a rather old version of Android – Cyanogenmod with Android 4.4 – the entire experience was rather buggy, too. I did get the camera feed working and the printer connected at the same time once, but between the app crashing, not seeing the printer’s USB interface, or just generally weirding out, it wasn’t fun to use. But hey, this thing is ten years old. I feel like anything just a bit newer would actually work.
And if we look at the experience you’re getting with the four-and-a-half-year-old LG G6 and the Poco F2 Pro from last year, it’s pretty much flawless. The only thing that I could find is that with the Poco, you can’t use these passive adapters, and you have to use a dongle dock with the power plugged in. The G6 works without the power plugged in, the Poco doesn’t, that might be down to the broken charge circuit, but once you figure that out, it’s literally just like any other OctoPrint install. The interface is snappy, it’s reliable, plugins work, and with stuff like OctoLapse now having access to the phones’ main cameras, you actually get really crispy time-lapses through that. It’s a really good experience.
I tried if there would be hiccups when you do stuff in the UI, or upload files while a print is going, but it’s just really smooth everywhere.
And as a bonus, you can even open up a browser on the phone, point it to localhost:5000 and you get the full OctoPrint interface, or a mobile-friendly one if you use the Touch UI plugin. You could even use a tablet and just have that be your main printer touchscreen.
I think Octo4a is a really good solution, to the point where honestly, if you’re just looking to get OctoPrint running, I would rather buy a cheap Android phone now than mess around with the Pi, printing a case for that, trying different USB cable because some aren’t reliable and so on. Octo4a works well, it’s pretty easy to set up, in the best case, you don’t even have to buy anything for it and give a second life to a used device. I like that.
If you like that, too, make sure to support OctoPrint and Octo4a – they’re projects that give away their work for free, so show them some appreciation if you find them useful.
Products shown (on Amazon):
Установка Octoprint на Orange Pi PC. Настройка управления питанием принтера, установка камеры. Настройка Telegram Notifications (1.5.0) для Octoprint и VPN для Orange Pi PC с использованием OPENVPN. Это не инструкция, а скорее мой блокнот дабы ничего не забыть.
Подготовка флешки с системой и установка ARMBIAN
Я купил на Ali вот такую Orange Pi PC H3 ССЫЛКА НА АЛИ

Буду использовать версию Armbian Buster (Debian). Для записи на флешку нам понадобится Rufus или Win32. Пишем флешку по инструкции — их в интернете море. Подключаемся к нашему одноплатнику через Putty. Авторизуемся под root, пароль 1234. И вводим все по порядку:
Для начала создадим пользователя octoprint
useradd -m octoprint
создадим пользователю пароль
passwd octoprint
добавим пользователя в группу sudo
adduser octoprint sudo
Теперь выходим из рутовой сессии и заходим через Putty новым пользователем octoprint
После чего выполняем
cd ~
sudo apt-get update
sudo apt-get upgrade
sudo apt-get install python-pip python-dev python-setuptools python-virtualenv git libyaml-dev build-essential virtualenv
Установка Octoprint
Ставим виртуальную среду
virtualenv venv
Для Питона 3
virtualenv —python=python3 venv
./venv/bin/pip install pip —upgrade
./venv/bin/python setup.py install
Создаем папку для конфигов
mkdir ~/.octoprint
Для того чтоб пользователь octoprint имел доступ к серийным портам добавим его в группы tty и dialout
sudo usermod -a -G tty octoprint
sudo usermod -a -G dialout octoprint
После этого можно попробовать запустить octoprint
~/OctoPrint/venv/bin/octoprint
После проверки закрываем octoprint Ctrl+C
Добаваляем Octoprint в автозагрузку
Обновление Octoprint в ручном режиме
Заходим на микрокомпьютер терминалом под пользователем octoprint
cd ~/OctoPrint/
git pull
./venv/bin/python setup.py clean
./venv/bin/python setup.py install
Можно перезагрузить только сервис OctoPrint
sudo service octoprint restart
Или перезагрузить весь микрокомпьютер
sudo restart
Перезагрузка Octoprint/Orange pi из меню Octoprinta.
sudo nano /etc/sudoers.d/octoprint-shutdown
пишем в файл
octoprint ALL=NOPASSWD: /sbin/shutdown
Ctrl+X, нажимаем Y и Enter
sudo nano /etc/sudoers.d/octoprint-restart
octoprint ALL=NOPASSWD: /bin/systemctl restart octoprint
Ctrl+X, нажимаем Y и Enter
И добавляем команды в разделе Server:
sudo shutdown -r now
sudo shutdown -h now

Для управления питанием принтера и камерой потребуется установка System Command Editor или редактирование файла config.yaml в ручную
Управление питанием принтера
Для этого нам понадобится модуль реле с Алика ССЫЛКА на АЛИ


Для подключния реле нам нужны контакты GND, +3.3B и контакт GPIO.25.

Реле включаем в разрыв провода питания 220В блока питания 3D принтера.
Есть один нюанс, при подключенной Orange pi к принтеру, питание на принтер приходит от сети 220в (через наше реле которым мы будем управлять), а еще через порт USB от Orange Pi. Если отключить через команду принтер, то он обисточится не полностью, мозги принтера останутся запитанными от USB Orange pi. Для исправления этой проблемы используем «изоленту». Просто заклеим в разъеме usb пин питания. После этого принтер будет отключаться полностью!

Скрипт отключения питания. Использует 25 ногу. Если используете реле как у меня на фото в начале статьи (инверсный вход) , они включаются при подтяжке управляющей ноги к земле и отключаются при появлении напряжения на ноге. Нужно вставить в скрипты poweroff.sh gpio write 25 1 и в poweron.sh gpio write 25 0
Скрипт отключени питания:
nano poweroff.sh
Ctrl+X, нажимаем Y и Enter
Ставим необходимые права:
chmod 755 poweroff.sh
chmod +x poweroff.sh
Скрипт включения питания:
nano poweron.sh
Ctrl+X, нажимаем Y и Enter
Ставим необходимые права:
chmod 755 poweron.sh
chmod +x poweron.sh
Запуск скрипта включения всего питания:
/home/octoprint/poweron.sh
Запуск скрипта отключения всего питания:
/home/octoprint/poweroff.sh
Или редактирование config.yaml:
cd .octoprint
nano config.yaml
Если раздел system: actions: уже есть, то добавить только пункты меню.
Ctrl+X, нажимаем Y и Enter. Соблюдая все отступы и знаки в точности.
Настройка автоматического отключения 3d принтера после завершения печати
Для включения этой функции нам потребуется отредактировать файл config.yaml
cd .octoprint
nano config.yaml
Ctrl+X, нажимаем Y и Enter. Соблюдая все отступы и знаки в точности.
Перезапускаем octoprint sudo service octoprint restart
Теперь будут корректно работать команды M81 (отключить питание) и M80(включить питание). Эти команды можно добавить или в слайсере или в самом Octoprint как GCODE выполняющйся после завершения работы:

Настройка WEB камеры в Octoprint
Выводим список доступных устройств
ls /dev/video*

Если запущен mjpg-streamer, закрываем его (Ctrl+C).
Чтобы разрешить ‘обычному’ пользователю доступ к устройствам video, надо добавить его в соответствующую группу.
sudo usermod -a -G video octoprint
После этого закрываем сеанс (exit) и подключаемся к Orange Pi заново.
Устанавливаем mjpg-streamer в систему. При этом исполняемый файл окажется в /usr/local/bin, плагины — в /usr/local/lib.
cd ~/
cd mjpg-streamer/mjpg-streamer-experimental
sudo make install
После установки можно его удалить из домашней папки (cd ~ && rm -rf mjpg-streamer).
Создаем скрипт запуска
cd
nano webcam-streamer
Делаем файл исполняемым :
chmod +x webcam-streamer
Перемещаем файл куда нужно :
sudo mv webcam-streamer /usr/local/bin/
Для запуска /usr/local/bin/webcam-streamer start
для остановки /usr/local/bin/webcam-streamer stop
Или редактирование config.yaml:
cd .octoprint
nano config.yaml
Если раздел system: actions: уже есть, то добавить только пункты меню.
Ctrl+X, нажимаем Y и Enter. Соблюдая все отступы и знаки в точности.
Telegram
При первой установке он мне выдавал ошибку Pillow. Поэтому перед установкой плагина выполним нехитрые действия:
sudo apt-get install libjpeg62-dev
sudo apt-get install zlib1g-dev
sudo apt-get install libfreetype6-dev
sudo apt-get install liblcms1-dev
pip install pillow
sudo apt-get update
sudo apt-get install python-pil
А дальше просто ставим плагин и настраиваем по инструкции
*Далее для 2020 не актуально, тетеграм разблокировали в РФ*
Но после установки он отказался работать без VPN, спасибо Роскомнадзору.

создаем папку home\octoprint\VPN
туда кидаем ваши сертификаты и ключи, у меня такие:
ca.crt
client.crt
client.key (в нем не забываем прописать пути до остальных сертификатов и ключей)
client.ovpn
ta.key
Устанавливаем клиент openvpn:
sudo apt-get install openvpn
Проверяем коннект к VPN:
sudo openvpn —config /home/octoprint/VPN/client.ovpn
Коннект появился, но Telegram не хочет работать:

sudo apt-get install resolvconf
sudo apt install openvpn-systemd-resolved (это тоже поставил)
cd /etc
сделаем бэкап файла resolv
cp resolv.conf resolv.conf.orig
Выполним команду — создаем жесткую ссылку
ln -s /etc/resolvconf/run/resolv.conf /etc/resolv.conf (не сработало) sudo ln -nsf ../run/resolvconf/resolv.conf /etc/resolv.conf
(это сработало)
в конце client.ovpn добавим
script-security 2
up /etc/openvpn/update-systemd-resolved
down /etc/openvpn/update-systemd-resolved
down-pre
Подключаться так openvpn —script-security 2 —config /home/octoprint/VPN/client.ovpn
Проверяем, если Telegram работает, закрываем в консоли соедениеие VPN Ctrl+C и настраиваем автозагрузку.
Создадим папку для скрипта:
cd ~
mkdir ./bin
cd ./bin
Создадим скрипт автозагрузки:
sudo nano script_auto_run
В файл впишем
Ctrl+X, нажимаем Y и Enter
Сделаем файл исполняемым:
sudo chmod 755 script_auto_run
Проверим как он запускается, выполнив
/home/octoprint/bin/script_auto_run
Если все хорошо, закрываем Ctrl+C
Теперь пропишем это в rc.local. Выполним команду
sudo nano /etc/rc.local

Там может быть много всего, или не быть ничего (если файл создан только что). Это не важно. Если там пусто, то просто допишите в конце exit 0, а перед ним
/home/octoprint/bin/script_auto_run
Ctrl+X, нажимаем Y и Enter
Перезагружаемся:
sudo reboot
В материале частично использованы наработки Sergey Irbis
Stable OctoPi
OctoPi 0.18.0 & OctoPrint 1.7.3 SHA256: 5f84fca128c58035a9cedb1fb8144c13146d35d42362b5aff9186439fcb9c453
Raspberry Pi 3B, 3B+, 4B or Zero 2 strongly recommended, Raspberry Pi Zero/Zero W not officially supported!
Image compatible with Raspberry Pi A, B, A+, B+, 2B, 3A+, 3B, 3B+, 4B 1/2/4/8GB, 400, Zero, Zero W and Zero 2.
Connect your phone to your printer and keep it charged
So, next up, the question is of course, how do you actually connect to your printer, because these phones don’t exactly have a USB port that you can just plug stuff into. Except that, they do. So Android phones generally support what is called USB-OTG, USB on-the-go, so with a simple adapter like this one, you can turn the USB port on the phone into a full-size and fully featured USB host port.
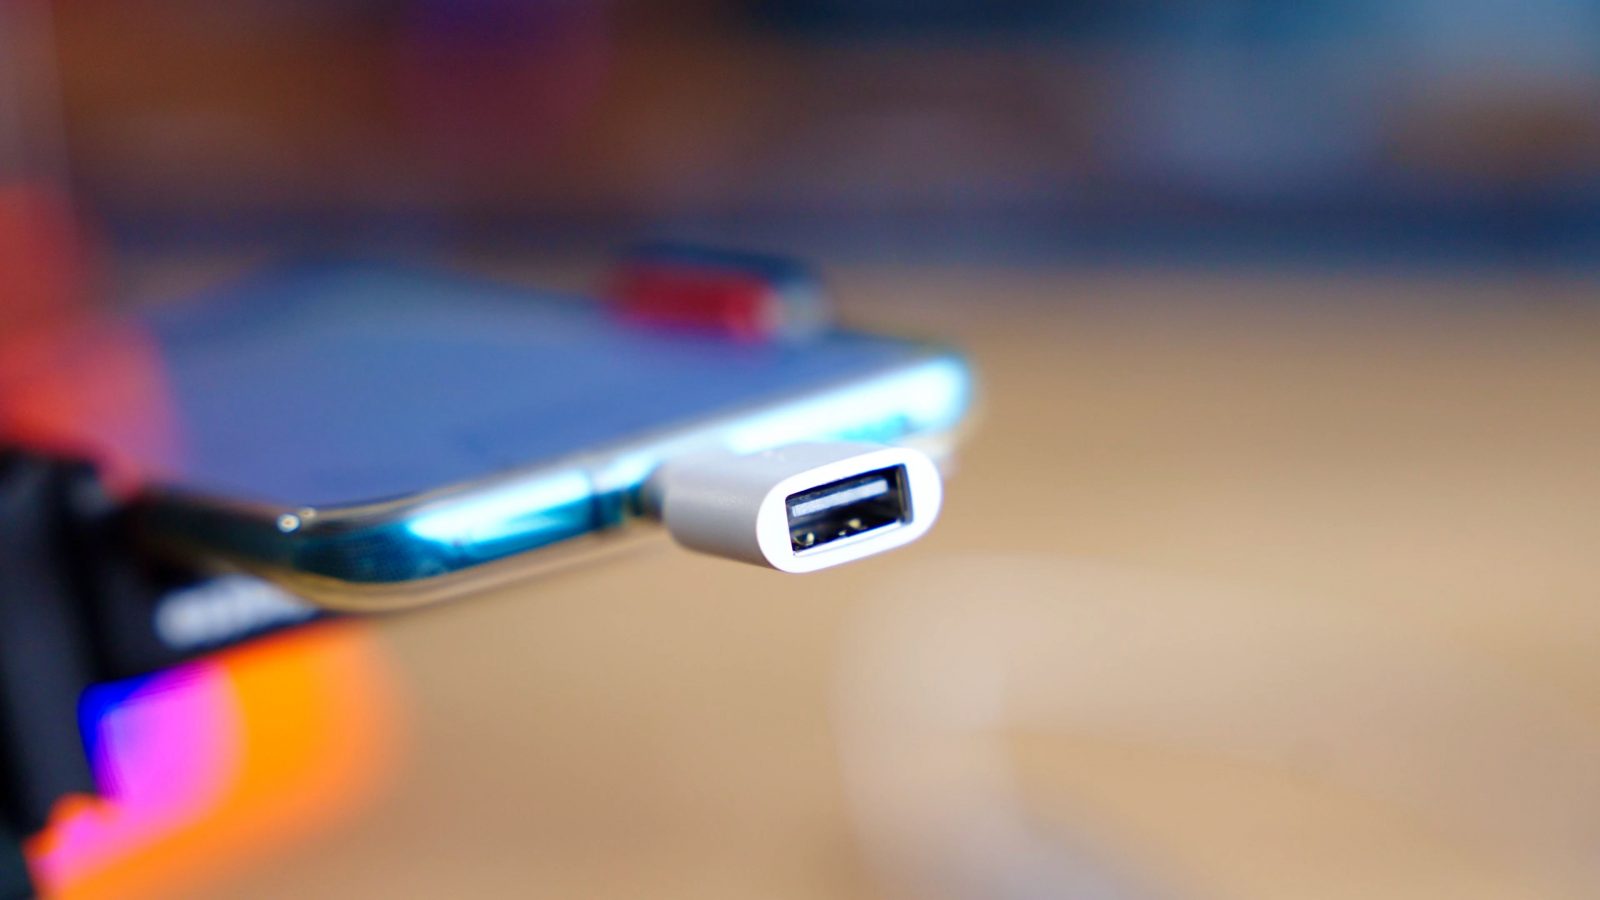
You can actually plug all sorts of stuff into this port, including USB hubs, thumb drives, Ethernet adapters, or webcams if you so desire. So this is really just a simple plug-and-play operation. You plug in the adapter, you plug in whatever device you want and you’re good.
But you may have noticed a little challenge with that: How do you keep your device charged? Because as is, you’re taking up the only option of supplying power to the phone – with the built-in USB port. With the POCO, of course, we have conveniently already worked around that by completely bypassing the regular charging circuit, but for normal devices, you can get either a little Y-cable for about 5 bucks, which gives you the USB host port, but it also lets you plug in your regular charger.
Make sure the cable you’re getting actually supports charging the phone, some just supply power to the device you’re connecting. For newer devices with a USB-C port, thanks to laptops not having ports anymore, you can now pretty easily find these dongle adapters now for about 10 bucks, which again, give you the host port, a USB-C power delivery charge port, and often also HDMI, which is probably not going to work on a phone, but you can also get them with a wired ethernet port built-in if you don’t want to rely on WiFi, and those Ethernet ports will work with your Android phone.
Alternatively, you could also use a wireless charging puck and fasten that to the back of your phone, but I have a feeling that that probably isn’t the best solution.
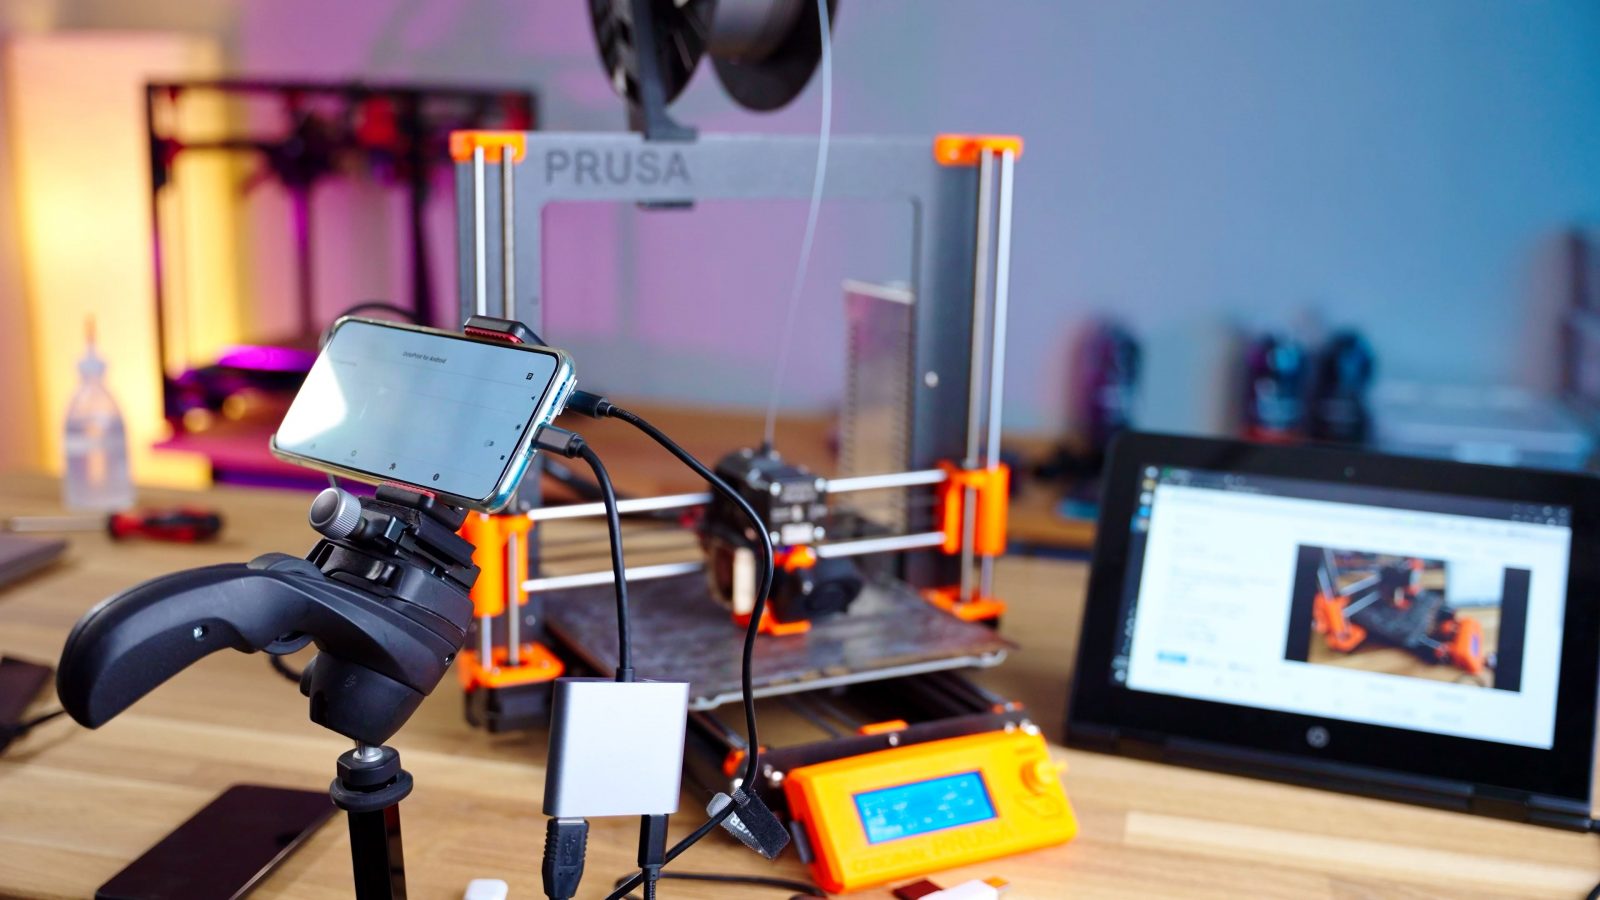
Since we’re going to be using the phone’s built-in camera as a webcam, we also need some way to mount it in a convenient location, and you can totally print a mount or use whatever solution you would have used for a webcam. I took a look through my camera rigging bin and picked out this super clamp, magic arm, and spring-loaded phone mount and now I can position this however I want.
Installing OctoPi
OctoPi is available through the Raspberry Pi Imager, which you can use to download and setup OctoPi. You can install it yourself, or alternatively simply buy one of the available
Установка Octoprint на Orange Pi PC : 5 комментариев
Исправьте команду «virtualenv venv» на «virtualenv —python=python3 venv», а то по умолчанию ставится Python 2.7 и вылезает ошибка при запуске октопринта zipp.py invalid syntax.
Підбір якраз те що треба, хочу реалізувати таке на orange pi zerp ltsc, обновіть будь ласка інструкції
для 3 версії пітона.
/venv/bin/python setup.py install
выдает ошибку про депрекайтед и необходимость PEP 517 инсталлятор
И все -тупик …
Запустил, но немного все по другому.
Питон 3 так как … а 2-й нет уже.
OctoPrint App for Android (beta version)
OctoPrint App for Android is an Android application for controlling one or more 3D printers (RepRap, Witbox, Hephestos, …) through an OctoPrint server. It is Free Software and released under the terms of the GNU General Public License, version 3.
This app is not yet finished and provided as a public beta for now. You are encouraged to give it a try and help improve it by contributing.
You are currently looking at the source code repository of OctoPrint App for Android.
What does it do?
The goal of this app is to provide a user friendly but powerful interface to your 3D printer, with full support for slicing and directly printing any STL models.
- Initial setup
- Automatic discovery of the OctoPrint Server
- Automatic setup of machine parameters for BQ Witbox and BQ Prusa i3 Hephestos & guided setup for any RepRap printer
- Easy connection to existing OctoPrint Servers through API Key entry or even fully automatically through the OctoPrint AppCompanion Plugin
![alt tag]()
- 3D model editing and slicing
- Rotating, scaling, duplicating, etc. - everything you need to get your model ready for printing
- Configure layer height, infill, support settings etc and store those slicing settings in handy profiles
- Preview the sliced GCODE in 3D
- Have the app slice your model automatically after each change you do (configurable)
![alt tag]()
![alt tag]()
- 3D model library
- STL and GCODE file management: Access and manage your files stored on the tablet, the OctoPrint Server and the printer’s SD card
- Preview your 3D models
- Linking of STL and GCODE files of previous print jobs for easy replication of them with equal settings
- Printing history
![alt tag]()
- Printing control
- Quick print of STL files with default slicing settings
- Video monitoring for multiple printers
- Basic printing actions (jogging the axes, extruding/retracting, adjusting the temperatures, pause, resume and cancel the print job…)
- Concurrent control of multiple printers
- 3D visualization of GCODE progress
- Get notified about the progress of your print jobs
![alt tag]()
The app can be installed downloading the apk of the latest release:
Please note that at the moment only Android tablets are supported. Installation of software from 3rd party sources needs to be enabled.
The app should work out of the box with the current OctoPi release 0.12.0 that includes OctoPrint 1.2 including working network discovery. If you are new to OctoPrint, this is the easiest way to get started. You’ll need a Raspberry Pi (Raspberry Pi B, B+ and Raspberry Pi 2 B are all fine) and an SD card. Please follow the setup instructions found on the page linked above. If you want the convenience of not having to enter your OctoPrint API key during setup of the connection between the app and your server, also make sure you install the OctoPrint AppCompanion Plugin through the Plugin Manager.
If you don’t want to use OctoPi 0.12.0, make sure you have the following:
-
or higher (current stable release - note that older releases of OctoPrint will not work). Please refer to the various setup guides available on OctoPrint’s wiki for instructions on how to install that.
- Optional: OctoPrint Discovery Plugin (bundled with OctoPrint 1.2), set up with pybonjour support as described on the wiki for the automatic network discovery to work properly.
- Optional: OctoPrint AppCompanion Plugin from the plugin repository
Please see the Contribution Guidelines for details on how to contribute to this project.
This application has been developed by BQ in close collaboration and full alignment with the OctoPrint project.
Image Downloads
Raspberry Pi Imager will download the latest version of OctoPi for you, but if you want to download the images yourself you can do so here.
Further resources
- For customizing OctoPi, take a look at CustoPiZer.
- Scripts to build the image yourself can be found in OctoPi’s Github repository.
Filip Grzywok maintains “Octo4a”, an Android app that allows you to use an Android based smart phone as an OctoPrint host. Root is not required!
Check out the Octo4a README for information on how to obtain the app, install and run it.
OctoPi Release Candidate
OctoPi 1.0.0rc1 & OctoPrint 1.7.3 Raspberry Pi 3B, 3B+, 4B or Zero 2 strongly recommended, Raspberry Pi Zero/Zero W not officially supported!
Image compatible with Raspberry Pi A, B, A+, B+, 2B, 3A+, 3B, 3B+, 4B 1/2/4/8GB, 400, Zero, Zero W and Zero 2.Download, install and configurate Octo4a
Let’s move on to software, and this is actually the easy part. All you’ve got to do is download the apk for Octo4a from github and install it. An apk is essentially an installer file for Android. Now, your phone is going to ask you whether you actually want to install this.
The thing is, typically you get your Android apps from the Google Play stores, but because of the way Octo4a works, it can’t actually be distributed through the Play store. Now, there, the apps are at least somewhat checked for whether they do malicious stuff or not. If you “sideload” an apk, you’re not getting any of those checks anymore, and it’s essentially the same as running some software you downloaded onto your Windows, Mac, Linux, BSD, Solaris, or TempleOS computer. I’ve written a couple of emails with Filip who makes Octo4a, and he seems like a nice guy, but just in case it turns out that he isn’t – don’t blame me. Octo4a is free open-source software, so while that’s not a guarantee that the apk is good, too, it’s a very good sign at least.
Once you’ve installed and opened up Octo4a, it’s going to pull a fresh version of all the files that OctoPrint needs to run as well as OctoPrint itself. There are a couple of things that you can – and still should – configure before you start diving into OctoPrint. So head over to the settings tab and hit “download dependencies” – plugins like Octolapse need some extra files to run, and if you don’t click this thing, you’re going to get an issue when you try to install Octolapse. Next, head down and configure your camera. I like to use a 1920×1080 resolution while limiting the fps to 15 – this is going to save a lot of bandwidth and processing power, but you still get a really crisp image for checking your prints and for time-lapses.
One thing that I got sometimes is that when I had the phone in portrait orientation and then rotated it into landscape while Octo4a was already fully running, it would actually show a portrait crop of your frame, so when you set up your phone, orient it correctly, and then turn on the camera server in Octo4a.
If you want, you can also enable “start on boot”, or even turn on SSH access into the OctoPrint environment, but you’re probably not going to need that.
In any case, you can now open up your favorite browser on your computer, point it to the address and port Octo4a shows you and you should get the OctoPrint interface we all know and love.
Now, honestly, from here on out, the setup is basically the same as with a regular OctoPrint install on a Raspberry Pi. Go through the setup assistant, pick a password, etc.
As I said, it’s a full-featured version, it can run plugins, you can do time-lapses, all of that. So for the rest of the setup, jump over to my latest video on OctoPrint – which I’m going to link to at the end of this video.
For now, there are a couple more details we’re going to need to address in Android so that Octo4a and OctoPrint actually run reliably. So the first thing is adjusting energy-saving options. Especially newer devices with custom Android builds like the Xiaomi devices have very aggressive power-saving measures once the screen turns off, so what can happen is that Octo4a, and with it OctoPrint, just get completely suspended, which, as you might guess, isn’t great when it’s running a print. Where exactly you’re going to find those settings is going to depend on your exact device, but make sure to check through the app list and check the settings for Octo4a, make sure it’s set to “unlimited” battery use and not to “optimized” or anything like that; then go in through the battery menu point in settings and, again, make sure to turn off any “adaptive”, “optimized” or “smart” options for the whole device and also check specifically for Octo4a again, and then if your device has some manufacturer-specific smart-ass assistant settings menu, that can often also hide some more power settings that could mess things up.
Octo4a also automatically asks you if you want to change one of the settings to allow it to always run in the background and you should definitely press “allow” here. The next screen to open up battery settings doesn’t really do anything yet, but if you dug through the menus and changed everything you could, you should be good here.
But if you then still run into issues with too aggressive power management, you could try enabling the option to always leave the screen on while the phone is plugged in, which you can do in Android’s developer options, but keep in mind that if your phone has an OLED screen because it’s going to leave the screen on, it’s probably going to have some pretty nasty burn-in after just a couple weeks of use. At least set it to minimal brightness if you do that.
Alternative Initial Setup
If you decide against using the Raspberry Pi Imager, here are some alternative steps to get started:
Flash the image to your SD card through whatever alternative means you’ve chosen.
With the SD card still attached to your computer, set up the Wifi connection using the octopi-wpa-supplicant.txt file on the root of the installed card when using it like a thumb drive. Important: Do not use WordPad (Windows) or TextEdit (MacOS X) for this, those editors are known to mangle the file, making configuration fail. Use something like Notepad++, Atom or VSCode instead or at the very least heed the warnings in the file. If your computer doesn’t see the card right away after flashing, try ejecting and inserting it again. Do not format the SD card after installing, even if prompted to do so. This will break the installation and you will have to start over!
Please also refer take a look at the full WiFi setup guide in the FAQ that also includes troubleshooting tips.
Plug everything into your Raspberry Pi and boot it up
Log into your Pi via SSH (it is located at octopi.local if your computer supports bonjour or the IP address assigned by your router), default username is pi , default password is raspberry . Run sudo raspi-config . Once that is open:
- Change the password via “Change User Password”
- Optionally: Change the configured timezone via “Localization Options” > “Timezone”.
- Optionally: Change the hostname via “Network Options” > “Hostname”. Your OctoPi instance will then no longer be reachable under octopi.local but rather the hostname you chose postfixed with .local , so keep that in mind.
You can navigate in the menus using the arrow keys and Enter . To switch to selecting the buttons at the bottom use Tab .
You do not need to expand the filesystem, current versions of OctoPi do this automatically.
You also do not need to manually enable the RaspiCam if you have one, that is already taken care of on the image as well.
Please also refer to OctoPi’s README, especially the “How to use it” section.
OctoPi Release Candidate
OctoPi 1.0.0rc1 & OctoPrint 1.7.3 Raspberry Pi 3B, 3B+, 4B or Zero 2 strongly recommended, Raspberry Pi Zero/Zero W not officially supported!
Image compatible with Raspberry Pi A, B, A+, B+, 2B, 3A+, 3B, 3B+, 4B 1/2/4/8GB, 400, Zero, Zero W and Zero 2.Use your old phones
The back is already off, so all I have to do is take off the plastic shroud, unsnap the connectors like little legos, and then solder in a little Li-Ion charger PCB directly to the battery terminals on the back. If you’re going to attempt something like this, please make sure you know what you’re doing or ask someone who does, because shorting out or damaging a lithium cell like this can go catastrophically wrong pretty easily.
So here we go, a “perfectly” usable Xiaomi Poco F2. I mean, I guess you could use it like that, it’s already abominably unwieldy as-is.
As a second phone, for reference as to how old and how weak of a phone you can still use I’m also going to throw in this Google Samsung Galaxy Nexus. This thing is from 2011, has a 1.2GHz dual-core processor and 1 GB of RAM. Performance-wise, it should be roughly comparable with a Raspberry Pi 2, which already isn’t exactly recommended hardware for running OctoPrint, especially once you start running plugins. And as a middle ground, I’m also going to chuck in an LG G6, which was already a very affordable phone brand new, but you can now get them used for next to nothing. 2. something GHz quadcore, 4GB of RAM. This should be about comparable or actually a bit faster than a Raspberry Pi 4.
Возможно Вас так же заинтересует:
Video
There’s also a video guide on how to get Octo4a up and running by Thomas Sanladerer.
There’s also an official OctoPrint Docker image, octoprint/octoprint . It is maintained by Brian Vanderbush and team on GitHub.
Please refer to its entry on dockerhub for more details on usage and configuration.
The generic setup instructions boil down to
More specific setup instructions for the most common runtime environments can be found below.
Image Downloads
Raspberry Pi Imager will download the latest version of OctoPi for you, but if you want to download the images yourself you can do so here.
Linux
For installing OctoPrint on Linux, please take a look at the setup instructions for Raspbian on the forum. They should be pretty much identical on other Linux distributions.
OctoPi Nightlies
You can also get the 32bit nightlies here or the highly experimental 64bit nightlies here.
Further resources
- For customizing OctoPi, take a look at CustoPiZer.
- Scripts to build the image yourself can be found in OctoPi’s Github repository.
Filip Grzywok maintains “Octo4a”, an Android app that allows you to use an Android based smart phone as an OctoPrint host. Root is not required!
Check out the Octo4a README for information on how to obtain the app, install and run it.
Windows
For installing the OctoPrint server on a Windows system, please take a look at the setup instructions for Windows on the forum.
For installing the OctoPrint server on a Mac, please take a look at the setup instructions for MacOS on the forum.
OctoPrint's development is made possible only through the financial support of its awesome supporters and
![3DPrinterOS]()
![Artillery 3D]()
![BigTreeTech]()
![BuildBee]()
![Creality]()
![Peopoly]()
![Raise 3D]()
![TH3D Studio]()
![The Spaghetti Detective]()
OctoPrint's development is made possible only through the financial support of its awesome supporters and
![3DPrinterOS]()
![Artillery 3D]()
![BigTreeTech]()
![BuildBee]()
![Creality]()
![Peopoly]()
![Raise 3D]()
![TH3D Studio]()
![The Spaghetti Detective]()
Guy Sheffer maintains “OctoPi”, a Raspbian (and thus Debian) based SD card image for the Raspberry Pi that already includes OctoPrint plus everything you need to run it:
- OctoPrint plus its dependencies for live viewing of prints and timelapse video creation, compatible with various USB webcams and the Raspberry Pi camera
Please note that the Raspberry Pi Zero and Zero W are not recommended explicitly since severe performance issues were observed, caused by the WiFi interface when bandwidth is utilized (e.g. the webcam is streamed), negatively impacting printing quality. See also here. The Zero 2 however is recommended.
Alternative Initial Setup
If you decide against using the Raspberry Pi Imager, here are some alternative steps to get started:
Flash the image to your SD card through whatever alternative means you’ve chosen.
With the SD card still attached to your computer, set up the Wifi connection using the octopi-wpa-supplicant.txt file on the root of the installed card when using it like a thumb drive. Important: Do not use WordPad (Windows) or TextEdit (MacOS X) for this, those editors are known to mangle the file, making configuration fail. Use something like Notepad++, Atom or VSCode instead or at the very least heed the warnings in the file. If your computer doesn’t see the card right away after flashing, try ejecting and inserting it again. Do not format the SD card after installing, even if prompted to do so. This will break the installation and you will have to start over!
Please also refer take a look at the full WiFi setup guide in the FAQ that also includes troubleshooting tips.
Plug everything into your Raspberry Pi and boot it up
Log into your Pi via SSH (it is located at octopi.local if your computer supports bonjour or the IP address assigned by your router), default username is pi , default password is raspberry . Run sudo raspi-config . Once that is open:
- Change the password via “Change User Password”
- Optionally: Change the configured timezone via “Localization Options” > “Timezone”.
- Optionally: Change the hostname via “Network Options” > “Hostname”. Your OctoPi instance will then no longer be reachable under octopi.local but rather the hostname you chose postfixed with .local , so keep that in mind.
You can navigate in the menus using the arrow keys and Enter . To switch to selecting the buttons at the bottom use Tab .
You do not need to expand the filesystem, current versions of OctoPi do this automatically.
You also do not need to manually enable the RaspiCam if you have one, that is already taken care of on the image as well.
Please also refer to OctoPi’s README, especially the “How to use it” section.
Installing OctoPi using the Raspberry Pi Imager
🤚 Before you begin
Read and follow these instructions precisely. Most importantly, leave the system username as “pi”, do not change it to anything else or OctoPrint won’t work!
If you haven’t already, download and install Raspberry Pi Imager on your computer
Find the OctoPi image under “Choose OS”, by selecting “Other Specific Purpose OS” > “3D printing” > “OctoPi” and then the “stable” version.
Open advanced options by clicking on the button with the gear, or by using the keyboard shortcut ctrl + shift + x and then:
![Advanced Options - Wifi Setup]()
Configure your wifi options: Set your SSID, password and WiFi country:
![Advanced Options - Wifi Setup]()
Change the system password in “Set username and password” by entering a new password to use for the system user “pi”. This is not the password you’ll use for logging into OctoPrint but one that you’ll have to use to log into your Pi via SSH should you ever need to. Leave the username as “pi”, do not change it to anything else!
Optionally: Change the configured timezone in “Set locale settings”
Optionally: Change the hostname in “Set hostname”
Install the image to your SD card, then plug everything in to your Raspberry Pi and boot it up. Do not format the SD card after installing, even if prompted to do so. This will break the installation and you will have to start over!
Please also refer to OctoPi’s README, especially the “How to use it” section.
OctoPi Nightlies
You can also get the 32bit nightlies here or the highly experimental 64bit nightlies here.
Installing OctoPi
OctoPi is available through the Raspberry Pi Imager, which you can use to download and setup OctoPi. You can install it yourself, or alternatively simply buy one of the available
Video
There’s also a video guide on how to get Octo4a up and running by Thomas Sanladerer.
There’s also an official OctoPrint Docker image, octoprint/octoprint . It is maintained by Brian Vanderbush and team on GitHub.
Please refer to its entry on dockerhub for more details on usage and configuration.
The generic setup instructions boil down to
More specific setup instructions for the most common runtime environments can be found below.
Windows
For installing the OctoPrint server on a Windows system, please take a look at the setup instructions for Windows on the forum.
For installing the OctoPrint server on a Mac, please take a look at the setup instructions for MacOS on the forum.
Подпишитесь на автора, если вам нравятся его публикации. Тогда вы будете получать уведомления о его новых статьях.
Отписаться от уведомлений вы всегда сможете в профиле автора.
Уже давно установил ОстоПринт на ноутбук. Ноут у меня старый, но рабочий (установлен Linux Mint), а с линуксом обрел новую жизнь, часто на нем работаю, а еще установил на него Fusion 360 и теперь вообще красота. Но далеко не всегда удобно сидеть возле принтера. Раскошелиться на Малинку или Апельсинку до сих пор не решился, но задался вопросом — а нельзя ли запустить дистрибутив линукса на телефоне и на нем Окту? У меня полно старых телефонов на андроиде, где-то экран разбит, где-то тач не работает, где-то марально устарел. Поэкспериментировав понял, что можно и даже не столь уж сложно.
Я в линукс системах совсем дуб, вот совсем-совсем, но все же получилось настроить абсолютно рабочий OctoPrint на смарте с Андроидом на борту. Один важный момент — для полноценной работы необходимо получить рут права на смартфоне. Благо сделать это очень просто — полчаса-час чтения на 4pda в ветке смартфона и готово.
![Осьминог в кармане или устанавливаем OctoPrint на телефон]()
К сожалению, подключать OTG устройства и одновременно заряжать смарт не получится, т.к. это физически невозможно из-за специфики работы otg, на сколько мне удалось выяснить. Если я не прав и кто-то в комментариях поправит меня и скажет как это возможно, тогда будет еще проще.
Итак, от батареи придется отказаться. Я припаял к контактной площадке подключения акб два провода, подключил (временно) к БП 12В понижайку (такую), выставил на ней 5В и ограничил ток в 3А, запустил телефон и все отлично работает. Правда, показывает 1% заряда, но нам это не страшно :) Хотя данные понижайки можно использовать для заряда Li-Ion батарей, возможно можно и батарею сохранить в телефоне, но я за безопасность. Так же, полагаю, хорошее ЗУ от телефона тоже пойдет. Я же, когда замоделю и распечатаю корпус под свой телефон с возможностью использовать как вторую камеру (об этом в самом конце) подключу его через эту же понижайку к БП принтера. В таком случае придется пожертвовать временем (для загрузки телефона), но это для меня не страшно.
![Осьминог в кармане или устанавливаем OctoPrint на телефон]()
Еще нам понадобится OTG хаб с дополнительным питанием, я купил на алике такой. Дешевый, но работает безотказно.
Ну и само собой понадобятся такие мелочи как 3D принтер, веб-камера (у меня Logitech C270, купленная на авито за 500р), блок питания от телефона для хаба, OTG переходник для вашего телефона.
![Осьминог в кармане или устанавливаем OctoPrint на телефон]()
Из описания: «Это приложение с открытым исходным кодом, предназначенное для автоматизации процесса установки, конфигурирования и запуска GNU/Linux дистрибутивов на платформе Android внутри контейнера chroot.»
Запускаем, переходим в настройки, ставим галочки на «Не отключать WiFi», «Блокировка сна», «Автозапуск» и ставим необходимую задержку, «Режим отладки», «Журналирование». Последние две помогут в случае, если возникнут ошибки.
![Осьминог в кармане или устанавливаем OctoPrint на телефон]()
Далее возвращаемся на главный экран программы, внизу справа давим на иконку конфигурации и настраиваем как у меня, за исключением пароля, разумеется (можно, конечно, и другие пробовать дистрибутивы и версии, но с этими настройками у меня все работает и команды консоли приведены именно для них):
Далее на главном экране приложения в верхнем левом углу тапаем на три точки и «Установить». Программа запросит рут права, подтверждаете и начинается установка дистрибутива.
По окончании установки подключаем по OTG наш хаб с подключенными к нему камерой, принтером (разумеется, если у вас не работает тач, то подключаем его вместе с подключенной к нему мышью еще до установки Linux Deploy, иначе как вы уго установите, сконфигурируете и запустите :D)
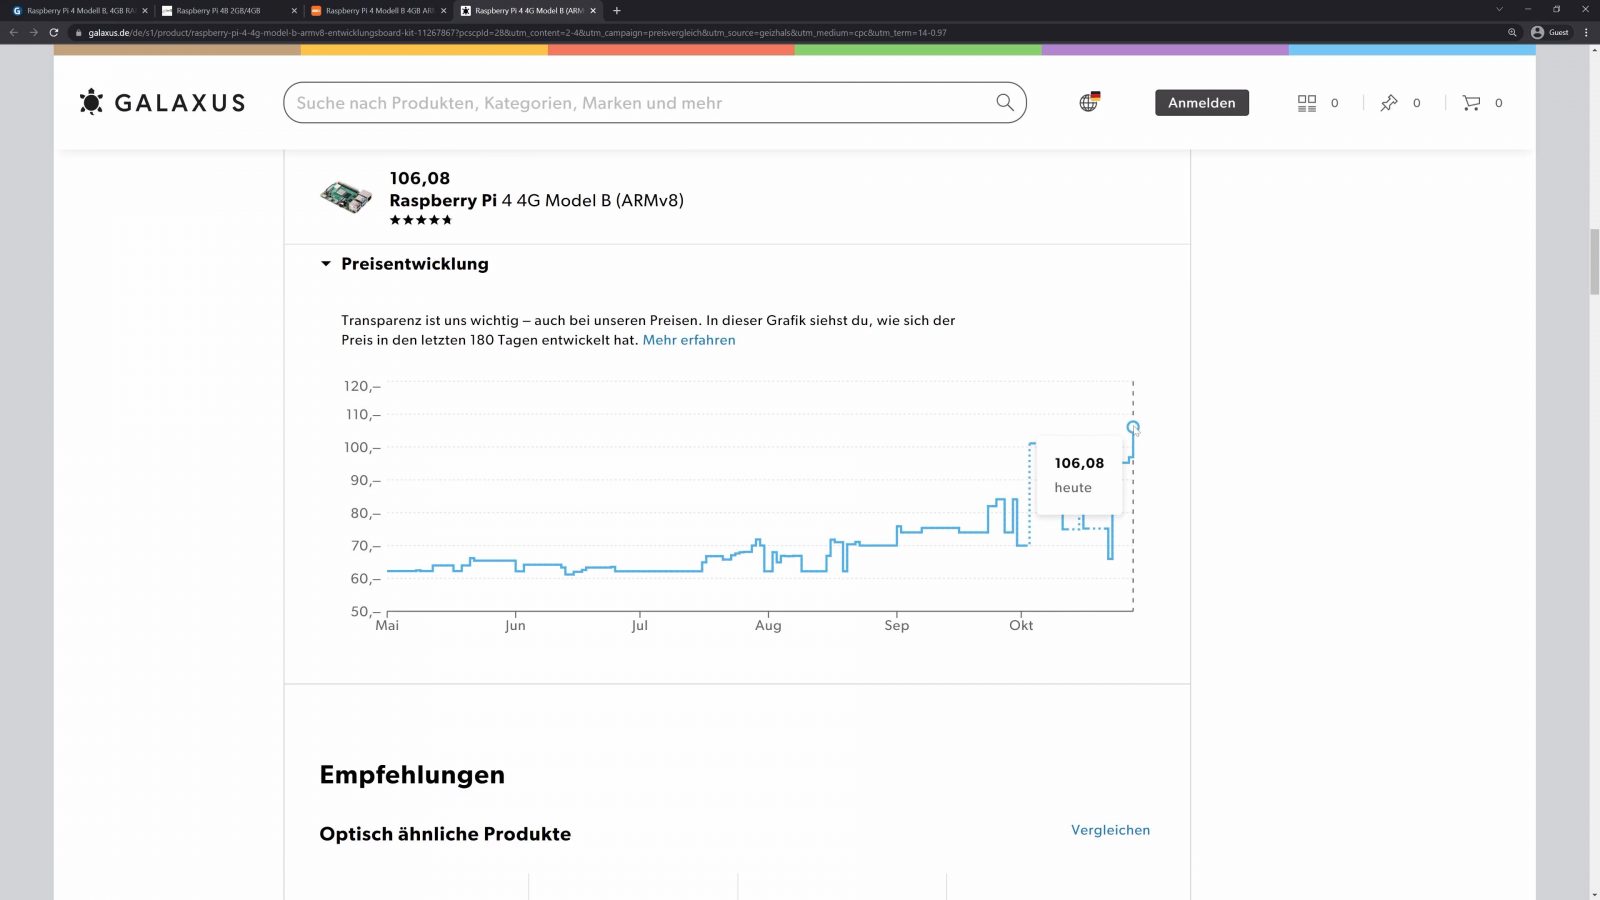
If you’ve tried to buy a Raspberry Pi recently, you’ll have noticed that that is actually quite hard to do right now.
For example, for the 4GB Raspberry Pi 4 that used to sell for around 50 bucks, the cheapest offer that actually has them in stock is starting to demand scalper prices closer to 100 bucks.
![]()
So if you want to run OctoPrint and still need a quality power supply and USB cable, a webcam, and SD card, you could end up spending close to 150 bucks.
But what if I told you there is a cheaper way. What if you could run OctoPrint on your old Android phone that you’ve got sitting around anyway? Or, in fact, you can easily buy a brand-new phone or tablet for what you’d be paying for a single Raspberry Pi and that is going to already come with a power brick, USB cable, and a much better camera built-in than what you’re going to get with any webcam. And that’s also going to give you a way of controlling OctoPrint without pulling out an additional device.
So today we’re going to try out Octo4a, which lets you run a full OctoPrint setup including plugin support and everything on pretty much any Android phone and the only thing you need is a USB adapter like this one for five bucks.
![]()
Читайте также: