
The cpu has been disabled by the guest operating system vmware что делать
Auto-suggest helps you quickly narrow down your search results by suggesting possible matches as you type.
- VMware Technology Network
- :
- Cloud & SDDC
- :
- VMware vSphere
- :
- VMware vSphere™ Discussions
- :
- The CPU has been disabled by the guest operating s.
ESXIProblems
- Mark as New
- Bookmark
- Subscribe
- Mute
- Email to a Friend
Using ESXI 6.7 u2 when trying to boot Oracle Linux server giving error attached . Plz help
Lalegre
- Mark as New
- Bookmark
- Subscribe
- Mute
- Email to a Friend
I can see also that on the vmware.log there are some issues about the CD/DRIVE unable to be mounted. What if you try to remove that device and also please make sure that the disk is using the SCSI 0:0 Controller.
ESXIProblems
- Mark as New
- Bookmark
- Subscribe
- Mute
- Email to a Friend
Now i removed CD/Drive and also changed the settings from SATA to SCSI 0:0 but now unable to boot and getting error as "Failed to power on VM. VMWare ESX cannot open the virtual disk "/vmfs/volume. for clustering. Verify that virtual disk was created using the thick option"
Attached logs for your reference:
nachogonzalez
- Mark as New
- Bookmark
- Subscribe
- Mute
- Email to a Friend
Hello, hope you are doing fine:
I've seen this error in the past when Virtual Machine faces CPU/Memory contention
In order to address a proper solution:
- Is the issue still going?
- Have you checked esxtop, vrops or perfcharts? (CPU Readty, Memory Balloning, IO Wait, etc)
- Is the VM sitting alone on the ESXi host?
- Can you share the VM memory/ CPU Resources?
Several users have been complaining about getting the “CPU has been disabled by the guest operating system” error when trying to play a virtual machine inside the VMware Workstation application. Most affected users report that the issue suddenly started occurring after the image was functioning fine for. This doesn’t seem like an OS-specific error since users have reported this occurring with Linux, MacOS and Windows images.

The CPU has been disabled by the guest operating system. Power off or reset the virtual machine.
What is causing The CPU has been disabled by the guest operating system error
We investigated this particular issue by looking at various user reports. As it turns out, there are several scenarios that will lead to the apparition of this particular issue. Here’s a list of common scenarios that are known to trigger this error message:
- The guest machine is not able to start correctly – The most common causes of this error is a disk configuration problem or a recent corruption problem to your guest machine that made it unusable.
- VT-X is not enabled from BIOS settings – Another reason why this issue occurs is when the VT-X technology (also known as Intel Virtualization) -which VMware Workstation needs- is disabled from the BIOS settings.
- CPU ID is breaching the license agreement – There are several scenarios in which the OS image can no longer start because the software is detecting an incompatible CPU. This can be resolved by masking the CPU ID.
If you’re struggling to resolve this particular issue, this article will provide you with a couple of troubleshooting methods that will help your cause. Below you have a few methods (with step-by-step instruction) that other users in a similar situation have successfully used to get the issue resolved.
For the best results, follow the methods below in order until you encounter a fix that is successful in resolving the issue for you. Let’s begin!
How do I fix the CPU has been disabled error?
Conclusion
If you’re trying to install macOS Catalina (10.15) or later via VMWare, it might not work because this software doesn’t have graphics acceleration. This makes the operating system almost unusable. So, you can either try some other software that can run a virtual operating system like VirtualBox or use a heavy system. But if you want to use VMWare, you can check their guide regarding this matter.
Plus, when it comes to running some operating systems as a virtual OS, each operating system has specific requirements. So, make sure to read all the requirements before trying any of the online solutions.
Passionate about all elements related to Windows and combined with his innate curiosity, Ivan has delved deep into understanding this operating system, with a specialization in drivers and driver troubleshooting. When he's not tackling. Read more
- A CPU has been disabled by the guest operating system error affects virtual machines sometimes.
- Causes can include wrong settings or outdated VMWare workstations.
- Resetting the virtual machine would be the first thing to do.
- Then, enabling virtualization in BIOS is another step to try.

To fix various PC problems, we recommend DriverFix:
This software will keep your drivers up and running, thus keeping you safe from common computer errors and hardware failure. Check all your drivers now in 3 easy steps:
Those of you trying to run a virtual engine in a VMware Workstation sometimes get a The CPU has been disabled by the guest operating system error. Notable causes of this error include inappropriate configuration of the VT feature (in BIOS), system corruption, incompatible CPU setup, disc configuration issues, and outdated VMware version among others.
The solutions presented below require a little knowledge of working with virtual machines or tinkering with system settings.
Method 2: Performing a CPU ID masking procedure
The “CPU has been disabled by the guest operating system” error can also occur if a security check disables the processor – if an unwelcomed processor is found. This typically happens if you try to move the image from a machine with an Ivy Bridge architecture to another with Sandy Bridge architecture (or vice versa).
Whenever this scenario occurs, your system will refuse to boot up the image unless the CPU ID is masked. This modification can be done pretty easily if you have VMware ESXi or a different premium product, but with VMware workstation, there is no GUI option to do this.
However, there is a way to mask the CPU ID by modifying the VMX file of the image. To do this, you’ll need a powerful text editor like Notepad++. Here’s a step by step guide on how to edit the VMX file of the image in order to resolve the “CPU has been disabled by the guest operating system” error:
- Make sure you have Notepad++ installed on your system. If you don’t, visit this link (here), and click on the Download button to download the installation executable. Downloading the Notepad++text editor
- Open the Notepad++ installation executable and follow the on-screen prompts to install it on your system.
- Once the text editor is installed, make sure that the State of your image is set to Powered Off (not suspended). You can do this by clicking the drop-down menu associated with the Play icon and choosing Shut down guest from the list. Making sure that the State of the Guest machine is set to Powered OFF
- Next, make sure that the guest machine is selected, then click on Edit virtual machine settings (from the right-hand pane). Click on the Edit virtual machine settings link
- In the Virtual Machine Settings menu, select the Hardware tab and then click on the Hard Disk (SCSI) device. Then, move over to the right pane and view the exact location of the Disk file. Either copy it or store it in your memory because you’ll need to get to that path in the next step. Hard Disk (SCSI) and view the location of the Disk file" width="708" height="355" />
Go to Hardware > Hard Disk (SCSI) and view the location of the Disk file - Open File Explorer (or the Finder app if you’re on Mac) and navigate to the Disk file location. You should see a bunch of different file types. Among them, you should find a file that has the .vmx extension. When you spot it, right-click on it and choose Edit with Notepad++. Right-click on the .vmx file and choose Edit with Notepad++
Note: If you’re on Windows 10 and you can’t see the extensions in File Explorer, access the View tab using the ribbon at the top and make sure that the box associated with File name extensions is checked.
If this method was not successful, move down to the final method below.
1. Reset the virtual machine
Not to disregard the system-recommended solution, we’ll be adopting this method as the first solution in this tutorial. The CPU has been disabled by the guest operating system error-message is aptly accompanied by a system-recommended solution, which reads Power off or reset the virtual machine.
Therefore, as the first line of action, try and power off or reset the workstation, and check if it resolves the issue.
If this fails, you can try and run the next troubleshooting technique to fix the error.
Method 3: Creating a new virtual machine
If the two methods above didn’t enable you to resolve the “CPU has been disabled by the guest operating system” error, you either have a disk configuration problem or you recently performed an operation that corrupted your virtual machine.
But regardless of what caused the error, you can resolve it by creating a new guest machine from scratch. But keep in mind that doing so means that you’ll lose any data stored within the guest machine.
If you decide to do this, here’s a quick guide on creating a new virtual machine:
You will be able to run the new guest machine without seeing the “CPU has been disabled by the guest operating system” error during the initial Boot procedure.

когда запускаю os x yosemite через виртуалку. вылазит такая ошибка. как решить?
The CPU has been disabled by the guest operating system. Power off or reset the virtual machine.
Для начала проверьте включена ли в BIOS аппаратная виртуализация (не все процессоры её поддерживают). Проверить можно этой утилиткой
Ну или напишите в комментах что за процессор на машине - тогда можно будет сказать поддерживает он её или нет. И да - даже если он её поддерживает - опция может быть выключена (на большинстве не серверных мат. платах эта опция по умолчанию отключена)
Если от утилиты MS получите что-то вроде
"This computer does not have hardware-assisted virtualization" можно забыть про нормальную работу виртуалок. По крайней мере будут проблемы у Windows 8/OSx.
Если аппаратная виртуализация включена, но всё равно такая ошибка - можно попробовать в файле имя_виртуальной_машины. vmx добавить следующую строку:
cpuid.1.eax = "0000:0000:0000:0001:0000:0110:1010:0101"
vmx открывается с помощь н-р блокнота. (текстовый файл по сути с настройками виртуальной машины)
Пробуй по английским сайтам поискать может чего найдешь, я вот нашел. Пытаюсь разобраться без знаний языка и установить правив конфиг vmware версия 15.
Мне удалось macOS catalina установить на вмваре под виндовс 10 на амд разен процессоре. Устанавливаешь вмваре 15, потом запускаешь патчер с командами "--install --download-tools" в терминале виндовс от администратора, найдешь Unlocker x64 версии 1.1.3, создаешь машину 15 жмешь расширенную и указываешь все по стандартному macOS 10.15, процессор 4 ядра 2 сменить на 4, образ 40гб выделить (по умолчанию), все next или далее, потом заходишь в настройки и выбираешь память 4096мб, образ iso по названию найдешь "macOS Catalina ISO 10.15.7 by GEEKRAR.com.iso", виртуализацию галочки ни одной не устанавливаешь, потом: vm>manage>change изменяешь на 10.х, open vm directory, редактируешь блокнотом .vmx, изменяешь virtualHW.version на 10. вконец добавляешь smc.version = "0"
потом это вконце: cpuid.0.eax = “0000:0000:0000:0000:0000:0000:0000:1011”
cpuid.0.ebx = “0111:0101:0110:1110:0110:0101:0100:0111”
cpuid.0.ecx = “0110:1100:0110:0101:0111:0100:0110:1110”
cpuid.0.edx = “0100:1001:0110:0101:0110:1110:0110:1001”
cpuid.1.eax = “0000:0000:0000:0001:0000:0110:0111:0001”
cpuid.1.ebx = “0000:0010:0000:0001:0000:1000:0000:0000”
cpuid.1.ecx = “1000:0010:1001:1000:0010:0010:0000:0011”
cpuid.1.edx = “0000:0111:1000:1011:1111:1011:1111:1111”
featureCompat.enable = “TRUE”
Только в конце установки отказаться от аккаунта и передачи данных. Установится стандартными средствами с cdrom'а как в макбуке. После, можно запускать его и патчить, настраивать, создавать флешку для установки на своем или другом компе. В макОС Интернет работает сразу же.
The error message: ‘The CPU has been disabled by the guest operating system’ is a virtual machine error message that occurs in VMware. This error message mostly occurs while trying to run a virtual operating system in VMware and its full form is:
This error message is not specific to any particular OS and processor’s family because users have faced this error message while installing images of Windows, Linux, and macOS operating systems on Intel and AMD CPUs. Here are some of the use-cases where this occurs most frequently:
Before getting to the fixes, you should have a better understanding of this error message. That is why we will first discuss the causes of this error message and, after that, we will get to the solutions. So, without any further delay, let’s get going.

Method 1: Enable VT-X (Intel Virtualization) from BIOS Settings
Since this is one of the most common scenarios, let’s start by ensuring that VT-X is enabled in your BIOS settings. Your machine might have shipped with VT-X disabled by default, a 3rd party application might have done it for you or you might have manually disabled the technology in the past.
In any case, every motherboard manufacturer will include an option to disable or enable the VT-X technology in their BIOS settings. It’s just a matter of finding out the exact path of doing so.
Keep in mind that the exact steps for accessing the BIOS setting will be different according to your motherboard manufacturer. But there is some common ground – you’ll need to press the BIOS (SETUP) key during the initial startup procedure to gain entry into your BIOS Settings.
Typically, the BIOS key is either one of the F keys (F2, F4, F8, F10, F12) or the Dell key (for Dell computers). If you don’t know your BIOS key, you can spot it during the very first screen (referred to as SETUP). Additionally, you can search for your specific BIOS key online according to your motherboard model.

Press the BIOS key during the startup procedure
Once you gain entry into your BIOS settings, you can typically find the Virtualization Technology entry listed as VTx/VTd. Enable it, save the changes in your BIOS settings and reboot your machine.
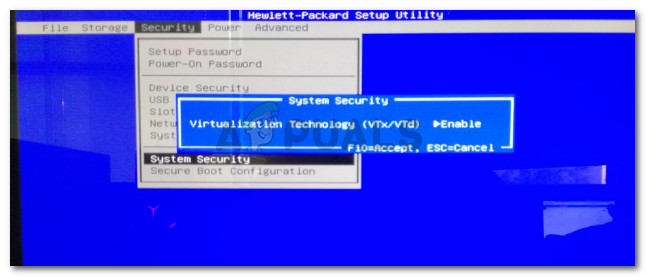
Enabling Virtualization Technology (VTx/VTd) from the BIOS Settings
At the next startup, open the same image in VMware Workstation and see if the issue has been resolved. If you’re still encountering the same issue, move down to the next method below.
How to Fix ‘The CPU has been disabled by the guest operating system’ Error Message?
The solutions to this error message vary from use case to use case. Therefore, before applying the steps of a solution, read its description to avoid any issues.
Solution 1: Adding the Configuration Keys for AMD Systems
and Changing the VM Hardware compatibility to ’10.x’
For People Facing this Issue of macOS Installation with AMD Systems
Apple doesn’t support operating system installation on non-Apple hardware. However, Apple is not the only one because, by default, VMWare Workstation Player also doesn’t support macOS installation. So, whether you have an Intel or AMD processor, and you need to install a macOS system, then adding configuration keys will do the trick.
Note: We have used the ‘16.0’ version of ‘VMWare Workstation Pro’ here
-
First of all, power off your virtual machine if it is on.
Step 1: Changing the ‘Hardware compatibility’ to ’10.x’
- Then, right-click on your virtual operating system, and from the drop-down menu, choose the ‘Manage’ option. After that, click on the ‘Change Hardware Compatibility’ option.
Note: You can change the ‘Hardware compatibility’ by opening the ‘.vmx’ file of the virtual operating system in Notepad and change the value of ‘virtualHW.version’ to ’10.’

Step 2: Adding the Configuration Keys for Virtual Machine
- Now, close the ‘VMWare Workstation Pro’ application and navigate to the virtual machine files. Then, right-click on the ‘.vmx’ file and choose the ‘Open with’< ‘Notepad’ options.
Note: Paste the above value with normal double-quotes because VMWare Workstation Pro will complain that the fancy double quotes are not a valid Boolean
This solution will solve this error message for the specified use case. But if you don’t want to perform these steps, you can use VirtualBox to install macOS as a guest operating system because it supports macOS installation by default. Moreover, if your use case is different, then try some other solution.
2. Enable virtualization in BIOS
Once this is done, check if the error is fixed in your virtual machine workstation. If it remains unfixed, there is probably another factor(s) in play, in which case, you can try the next solution.
Solution 2: Turning Off Windows Subsystem for Linux and
Virtual Machine Platform
If you’re trying to use ‘Arch Linux’ as a virtual operating system on the VMWare Workstation Pro installed on Windows (host) operating system and you’re facing the same error message, then you might have enabled the ‘Windows Subsystem for Linux’ and ‘Virtual Machine Platform.’ Here, turning them off will fix your issue.
-
First, go to ‘Control Panel’ on your (host) Windows operating system.
If this solution has fixed your issue, then good for you because it has helped others with a similar use case. But if it doesn’t work, then keep reading this discussion.
Why does this Error Message Occur?
After researching this error message for several days, we have found several reasons that could cause this error message. Here are the most common and relevant ones.
- Incompatible CPU: Sometimes the VMWare detects an incompatible CPU, which is why it shows you this error message. If this situation represents your case, you can solve it by masking the CPU ID.
- Disk configuration issues: This is the most common reason. Such issues might occur due to the recent changes you’ve made to the disk which has corrupted it containing the virtual machine and operating system.
- Incorrect Configuration keys: If you have an AMD system, then you have to use different configuration keys for your virtual machine. This is because AMD systems are different from Intel systems. If you don’t set the configuration keys according to your system, you will face this error message.
- Virtualization (VT-X) technology: VMWare Workstation needs this to run. If you have disabled this in your BIOS, you will face this error message.
- Cooling problems: Sometimes, the host operating system tries to cool down the system and, thus, prevents the user from running a virtual OS. In this case, the host OS prevents the user from displaying this error message.
So far, you have seen the probable reasons for the occurrence of this error message. Now, let’s get to the solutions to fix this error message.
Solution 3: Downgrading the ‘VMWare Workstation’ Application
If you’re getting this error message after upgrading the ‘VMWare Workstation’ to the latest version, then downgrade your VMWare Workstation version. This way, you won’t face this error message.
You can Google the query of ‘VMWare Workstation older version‘ and download an older version.
3. Mask CPU ID
- Download and install a powerful note editor (like Notepad++) on your PC.
- Launch the editor.
- Open your VMware workstation and set the VM’s ISO image State to Powered Off.
- Select the guest (virtual) engine, locate and click on Edit virtual machine settings.
- Navigate to the Hardware pane, locate and select Hard Disk (SCSI).
- Copy the Disk file path (at the top of the right-hand pane).
- Close the program and launch Windows Explorer (or File Explorer).
- Go under the VM’s file location, and check the File name extensions checkbox (Windows 10 only).
- On the displayed options, locate and right-click the file with the .vmx extension.
- Select Edit (with) Notepad++.
- Type the following at the bottom of the code file: cpuid.1.eax = “0000:0000:0000:0001:0000:0110:1010:0101.
- Apply changes and exit the program.
- Restart PC.
Relaunch your VM workstation and check if the issue is resolved. If not, you can try the next and final solution.
In such a case, the error might be associated with a security function, which disables an unverified/unsupported processor. This is common where the virtual engines are not compatible with each other, especially in their build (architecture). When this happens, with a disabled processor, the ISO image (of the VM) will not be recognized by the system.
masking the CPU identification tag can bypass this irregularity/inadequacy. Unfortunately, the VMware workstation lacks the graphical interface to run the masking procedure.
Nevertheless, reconfiguring the virtual machine‘s code file in a text editor, as shown above, might work.
4. Create another guest engine in VMware Workstation
- Launch the workstation; locate and click on Home
- On the displayed options, select Create a New Virtual Machine (the first option).
- In the next window, click on the Installer disc image file (iso) option, and tap the Browse option under it. This will load the image.
- Click Next at the base of the window.
- In the next window, fill in your details and click Next.
- Under the Virtual Machine window, fill in the boxes as appropriate.
- Click Next > Finish.
- Restart PC and check if the issue is resolved.
If, after trying the four techniques in this tutorial, the issue remains unsolved, you can as well consider third-party software that will help you out.
Hence, to create a virtual machine easily without spending too much time and effort, simply choose a suitable tool from the best virtual machines for Windows 10.
We hope that you managed to fix the error, though. Tell us which solution worked for you.

Still having issues? Fix them with this tool:
Pre-requisites
Let the Laptop Cool Down A Bit
If you use a laptop to run the virtual operating system and ‘VMWare Workstation’ shows the guest operating system disabled error message, then Windows might be shutting off some cores to save energy.
As we know, most laptops don’t have a better cooling system than desktops. So, let the laptop cool down a bit and try again after a few hours.
Enabling Virtualization in BIOS
As mentioned earlier, the disabled virtualization (VT-X technology) could be the reason for this error message. So, before getting to the main solutions, enable virtualization (VT-X technology).
Step 1: Checking Whether VTX-Technology is Enabled or Not
- First, check whether the VT-X technology is already enabled or not. So, go to the ‘TaskManager.’
Step 2: Enabling the VT-X Technology
- Now, search for the BIOS key of your system on the internet. But if you already know it, then skip this step.
Note: The user interface of BIOS varies from laptop to laptop. So, you can find mentioned settings according to your system
After that, exit by applying changes and run the VMWare application again to check if this tip has resolved this error message or not. If yes, then good for you. Otherwise, try the main solutions.
Читайте также: