Synology dns server настройка
Настройка Synology MailPlus сервера
Для начала его нужно установить через центр пакетов и указать интерфейс, на котором будет работать почтовый сервер, настроить домен и его MX запись, а потом выбрать создать новый сервер или импортировать настрйоки с существующего. Это можно сделать и потом.
Почтовый сервер MailPlus на Synology NAS
00:00 – Вступление
01:00 – Сравнение Mail и MailPlus
03:22 – Настройка MailPlus сервера
21:21 – Настройка DNS
29:08 – Интерфейс MailPlus клиента
35:01 – Заключительная часть
Решение проблемы доставки почты

Переходим в Доставка почты > Доставка и заполняем соответствующие поля, взяты с личного кабинета сайта вашего SMTP Raley:
So, here is a simple tutorial to set up the DNS on your Synology box.
There are, of course some prerequisites to all this:
- A Synology box. I have a DS1515+, but AFAIK any will work
- Your DNS addresses. All ISPs have their own, but you can get Google’s too
- An internet connection (no proxy preferably)
- Remember your DiskStation’s IP address
- Optional but recommended: make your DiskSTation’s IP address a static one. Your router should be able to do that.
Once you have that, you can log in on the DiskStation console and install the DNS server package.
Once it’s installed, make sure it’s up and running.
The configuration has two sides:
Sections below illustrate them.
The simplest configuration has only a few steps.
First, create a master zone:
- Domain type: “Forward Zone”
- Domain name: a made up domain name. I picked up “home.local” in case I’ll add other machines by name (e.g. server.home.local, diskstation.home.local)
- Master DNS Server: your DiskStation’s IP address (192.168.0.110 in my case)
Image below illustrates these settings:

Now you have a basic DNS server. However, if you set up your local machine to point to it and try to find an external site, it’ll fail. Hence…
Second, you need to configure a fallback DNS for looking up unknown names. The resolution tab in the DNS Server configuration has everything:

All you need to do is enable the resolution services and fill up the fallback DNS servers.
The idea is to point your machine to the IP address of the DiskStation (to use your freshly configured DNS service) – hence the advice above the IP address should be fixed. Since most if not all OS-es allow multiple DNS servers, you gain the most by having your DiskStation as the first entry.
Actual setting up your computer depends on your OS. Google has a nice description for all major OS-es, which you can adapt to use your own (ISP’s) servers.
You could add things like reverse zones, static names for local machines… However, all this falls out of the scope of this post.

I'm a big fan of the Ubiquiti UniFi networking gear, I wrote about how I was able to use their gear to provide micro-segmentation of my IoT devices from the rest of my network. However, one area that Ubiquiti really falls down on is internal DNS resolution of DHCP hosts. This is a problem they've had with their UniFi Security Gateway (USG) for quite some time, as documented here.
Basically, however your device identifies itself to the DHCP server on the USG is how it will be inserted into DNS. If there's a space, then there's a space (and resolution will fail). There is no where to configure a default domain name (search domain) and if you use a Fully Qualified Domain Name (FQDN), resolution will fail. If you have to manually assign an IP address, it will not register in DHCP, so resolution will fail. Finally, even if you specify an alias via the USG configuration, that alias will be ignored in favor of the way the host identified itself to the DHCP server initially (no matter how broken, like having spaces), and resolution will fail.
I eventually gave up on Ubiquiti ever properly fixing this issue. I, and others, reported it in November, Ubiquiti claimed, multiple times, to be fixing it and never did. So, I've decided to configure my Synology NAS to perform forward and reverse DNS for my internal network. I have several servers on my network, so constantly accessing them by IP address is just too much of an inconvenience.
Reverse Lookups
So we now have half a zone setup the other half will allow lookups the other way round. That is, where you have an IP address and you want to lookup the hostname. This is done by some applications to verify the "other" server is who they say they are. Such as mail servers checking for spammers.
Create a new zone this time a Reverse zone. The Domain name is a little weird here. The part you enter is the first three numbers from the IP address of your domain. 10.1.200.0 but reversed so I get 200.1.10. I also selected to use the Date for the serial format, again.


Update the SOA record to change the email address to something valid. The value it defaults to is NOT.

We will only need to add NS and PTR type record here. Create an NS record for the names server of our domain. Then create the PTR type records for mailserver, myblog and mythtvserver, along with the others you may need. For the NS type record we only need to first three numbers: 10.1.200 will become 200.1.10.
For the PTR type records we use the full IP address again this is added backwards. Meaning 10.1.200.4 will become 4.200.1.10.

Once you click finish again, check that all zones are running and that the sever is running.
Check it is working with dig. This time we use a command line option to tell it we are doing a reverse lookup, -x, and pass in the IP address.
That is your DNS server running.
Keeping Log Files Tidy
The log file for this script will over time get rather large filling up the system partition on your diskstation. As this is not Windows but running Linux we can sort that out by configuring a job that will compress and rotate the log files each week keeping the last four weeks.
As part of the work the install did was to copy over a logratate configuration file, dhcp-dns.
To check this is working you can force logrotate to run the config file. Change directory to the where your log files are and list the directory contents.
You should see something like this.
Run logrotate forcing our script to run right now. Then list the files in the log directory again.
We have a new log file and the old one has been renamed to dhcp-dns.log.1. This one is not compressed, due to the delaycompress option.
When logrotate is run next time we will see dhcp-dns.log.2.gz which is compressed. Try running it a few times to see how it works.
Points To Note
This DNS server will reply to any and all recursive queries from any IP. This is probably not what you want. You should also use the Limit source IP List setting found in the Edit Zone settings to limit the IP addresses that will get a response from your DNS.
Настройка DNS
Для начала нужно настроить MX запись в DNS. MX запись это тип DNS-записи, предназначенный для маршрутизации электронной почты с использованием протокола SMTP. Простыми словами, что бы другие сервера могли посылать вам почту, то есть эта запись нужна для входящей почты.
По мимо этого у этой записи есть еще поле приоритета от 1 до 255. Чем меньше число, тем выше приоритет.
Можно указать несколько MX записей с разным приоритетом, для резервирования почтовых серверов. Например, если первый сервер не примет почту или будет неисправен, то сервер отправитель отправит письмо следующему по приоритету серверу. Таким образом вы не потеряете входящие письма.
А вот для настройки исходящих писем требуется несколько других записей в DNS.
вашдомен.ru TXT "v=spf1 a mx ~all"
Как я понимаю абсолютно все публичные сервера проверяют эту запсь SPF поэтому она обязательна. А вот DKIM уже опционально, но если DKIM будет настроено, то вероятность доставки вашей почты возрастет в разы.
mail._domainkey.вашдомен.ru TXT "v=DKIM1; k=rsa; t=s; p="
Публичный ключь можно сгенерить так: Домен > Выбираем нужный домен > Редактировать – Общие > Дополнительно. Нажимаем кнопку создать ключь и вставляем этот ключь в DNS запись.

*На скрине выше ошибка, префик в этом поле указывается без точки и без domainkey.
- Так же обязательной записью является PTR. Эту запись может сделать только ваш провайдер на статичном IP адресе.
DNS Forwarders
In the screen shot I have added one of the DNS servers from open DNS 208.67.220.220. They also provide a secondary server 208.67.222.222. The second address I have used is from Google who also provide a freely available public DNS service. They also provide two servers 8.8.8.8 and 8.8.4.4. You could also use the DNS server values provided by your ISP. Note: The DNS servers from your ISP may stop working when you change ISP.

nohup broken on Diskstation
When I have tried to use nohup on my diskstation it has never worked. This means you can stop and start the service S99pollDHCP.sh as shown above BUT when you log out of the terminal the service will be killed. You can simply reboot your diskstation but as a Linux admin that seems over the top and very Windows but the alternative is clunky too!
Порты Synology MailPlus сервера
Что бы сервер мог получать почту нужно открыть SMTP порты на фаерволе и пробросить их на роутере NAT. А если вы хотите подключаться к серверу сторонними клиентами почты такими как например Thenderbird или The Bat то вам нужно открыть порты POP3 или IMAP на фаерволе и и пробросить их на роутере NAT.

Список портов для Synology Mail Plus сервера
I enjoy using Linux, I have to be paid to use Microsoft Windows.
Synology documentation sucks big time! It usually only states the blindingly obvious missing off any useful or helpful information.
This post will run through the harder parts of setting up DNS and DHCP on Synology NAS. It is a little tricky the first time you do this especially if you have not come across bind or bind9 before. It seems a little over the top or just plain weird. You will only really need this if you have some local servers, computers or other devices that need to be accessed.
We will be setting up the DNS for dragon.lab. It is the domain I use for testing out networking and for all my posts.
- Domain: dragon.lab
- IP address NAS: 10.1.200.3
- Netmask: 255.255.255.0
- Gateway: 10.1.200.1
- Servers:
- diskstation: 10.1.200.3
- mailserver: 10.1.200.4
- mythtvserver: 10.1.200.5
Install the DNS package for package manager. If you need help installing the DNS package do not even try this tutorial you are not ready yet. Learn the basics. Learn to swim before jumping into the middle of the river!
Once installed and running you will find the DNS icon in the main menu. Open up the configuration window to begin.
We will start by creating our Master Forward Zone. This is where you configure the lookups, where you know the hostname and want to find the IP address.
![synology_dns2]()
The screen print shows the values I will be using.
![synology_dns3]()
Note: I use a serial format of the date yyyymmddnn where the last two digits ‘nn’ are just a sequential number for changes I made by hand on a particular day. This serial number is used if you have a backup or slave DNS systems. It lets them know “something” changed, so they should pull the new config. Integer serials works just as well.
If you now click on the arrow by Edit and then click on Zone settings you will see the setting you just entered.
![synology_dns4]()
![synology_dns5]()
The the SOA record. (SOA = Start of Authority) is telling other DNS servers I’m the first and most important server for the domain dragon.lab. Not quiet true but close enough for us. we can edit the Email: value to a valid email address. I will use admin@dragon.lab. We can leave all the other numbers as they are as they are sane values.
![synology_dns3a]()
Okay, open up the Edit -> Resource Record window. This shows the values that are created automaticially from the information you have entered already.
![synology_dns6]()
You should see two entries. An NS type record and an A type record. Google explains these record types well. Take a look it will explain a few things.
To configure the zone we need one NS type record that points to the name server. We also need one A type record for each server or device in our domain. The NS type record was created already when we created the forward zone.
Let’s create some A type records. These point to an IP address. we will need to setup mailserver and the media server running mythtv called mythtvserver. Use the example below to create the others as well.
![synology_dns7]()
![synology_dns8]()
The mailserver also needs an MX type record so other mail servers know what hostname/IP address to connect to, when sending emails to a domain.
I did not enter anything in the name field as this MX type record is for the primary domain dragon.lab. It is for emails going to someone@dragon.lab.![synology_dns9]()
![synology_dns10]()
Using a CNAME type record means if you more your mailserver and by default your blog to a different IP address you only need to update the one A type record. You could however just have two A type records one for each name pointing to the same IP address.
Click finish to return back to the main DNS server window.
Open up the log tab and make sure the top two entries are all zones running and running. If they are not set to that, you did something wrong. Go back and give it another go.
![synology_dns16]()
Point the DNS server setting of a device or PC to your new DNS server and use ping to try out the A, CNAME and MX records we created. If you are running Linux or another proper OS with a dig command you can use that with the full hostname.
You will see from the above output:
- We were looking up mailserver.dragon.lab.
- We performed 1 query
- Receiving 1 answer in response.
- mailserver.dragon.lab has an A type record
- With an IP address of 10.1.200.4.
- The name server, NS, for the domain dragon.lab is ns.dragon.lab.
- That name server has an IP address of 10.1.200.3.
- The query was answered by 10.1.200.3 in 1 msec.
If that worked you are good to carry on. If not you did something wrong which needs to be fixed before you continue. Also worth a mention here. The Synology DNS is a caching name server. This means if you perform the same lookup within a few minutes of each other the DNS does not actually do the lookup it looks in its cache first, it can do this quicker then performing the lookup.
You can use the following command to find the MX records for a domain. Try it out for yourself.
Initial Installation
There is pretty good documentation from Synology on configuring your NAS for DNS, but I ran into several issues for proper configuration, so I decided to write this post to document how I was successful.
First step is to install the DNS Server package from Synology by going to the Package Manager and then selecting the Utilities category. Once there, you should be able to find the DNS Server package and click Install.
![DNS Server Install]()
Now that you have the DNS Server installed and running, it's time to configure it properly.
Dynamically updating DNS and DHCP on Synology NAS
This section will get DNS and DHCP on Synology NAS working together. If you use DHCP to automatically give out a valid IP address to a network attached device, probably from your broadband router or WiFi box, you will not be able to lookup hostnames to find their IP address as they are not registered with your shiny new DNS server. I found this rather useful script to Update Synology DNS records from DHCP IP address reservation. The documentation is good, and easy to follow.
I based the following on those scripts.
You will need terminal access to you Synology NAS, it can be turned on from the Control panel -> Terminal & SNMP in the terminal tab. Be careful with this if your Synology NAS is accessible via the internet then this may be a security problem.
All the files necessary to update your DNS after the DHCP server has given out a new address are available from here dhcp_dns_changes_synology.tgz. Download and untar the files into a convenient place. If this is you first install rename the file settings.example to settings. Edit the settings file with the details for your system. We will use the following:
That is all you should need to change. If I ever update the scripts all you need do is keep your existing settings file and overwrite the others. There is an install script which does some simple checks before copying files to the correct place. Take a look at it to see where things end up.
With the script /usr/local/etc/rc.d/S99pollDHCP.sh you can start, stop, restart or see the status of the service. The command line looks like this when run from a terminal on your diskstation.
You can now test it out by stopping any other DHCP servers you have running, probably on your broadband router, and then start up your one on the Synology diskstation. It's found under Control Panel -> DHCP Server. Highlight your active interface and then Edit. Then you will find a DHCP Server tab. I expect you can do the rest it is quite straight forward. Remember about jumping into the middle of a river?
With that running start up a device or PC that uses DHCP and you should see entries appearing in the file you redirected the out to. In my case it can be seen from an SSH terminal on diskstation with this command
If all goes well you can now use hostnames to connect or communicate with your other devices and you have a DNS and DHCP on Synology NAS working together.
Synology DNS кеширующий сервер
- 1) 00:06 – Начало
- 2) 02:04 – теория, для чего это нужно
- 3) 08:07 – Установка DNS сервера
- 4) 08:50 – настройка кеширующего DNS сервера
- 5) 13:10 – настройка локальной DNS зоны
- 6) 17:40 – настройка роутера \ DHCP сервера
- 7) 19:55 – настройка “представления” или расщепление горизонта
- 8) 24:17 – правильная настройка расщепления горизонта ))) (сорян за косяк)
- 9) 26:44 – завершение ролика
- 10) 27:20 – аналогичная настройка в AdGuard home, если вы им пользуетесь
- 11) 28:13 – ну теперь точно завершение ролика
Типы DNS записей:
- A Type: Адресная запись, соответствие между именем и IP-адресом (name -> IP)
- AAAA Type: Адрес в формате IPv6
- CNAME Type: Каноническое имя для псевдонима (alias -> name)
- MX Type: Адрес почтового шлюза для домена. Состоит из двух частей — приоритета (чем число больше, тем ниже приоритет), и адреса узла (domain -> mail server)
- NS Type: Адрес узла, отвечающего за доменную зону. Критически важна для функционирования самой системы доменных имён
- SPF Type: Указывает серверы, которые могут отправлять почту с данного домена
- SRV Type: Указание на местоположение серверов для сервисов
- TXT Type: Запись произвольных двоичных данных, до 255 байт в размере
- Яндекс DSN: 77.88.8.8 и 77.88.8.1 и другие интересные DNS сервера
- AdGuard DNS нефильтрующие: 94.140.14.140 и 94.140.14.141 более подробно на офф сайте.
- Google DSN: 8.8.8.8 и 8.8.4.4
Если вы хотете пользоваться своим DNS серверов за пределами свой домашней локально сети, то ваш DNS сервер будет выдавать всем клиентам, не важно где они находятся в локальной сети или в интернете, одинаковые IP адреса. Соответственно находясь в интернете вы получите локальный IP адрес Synology NAS и не сможете к нему подключиться. Для решения этой задачи есть функция “Представление”.
Представления – что это такое?
Сервер доменных имен предоставляет каждому клиенту настраиваемую информацию в соответствии с представлениями. Эта функция (иногда называемая DNS с раздельным горизонтом) может оптимизировать управление системой безопасности и конфиденциальной информацией записей зоны DNS.
Если у вас есть доменное имя, но вы хотите предоставить разные ответы на запросы из внешних и внутренних источников, можно создать различные представления с отдельными записями ресурсов.
Я не смогу описать, все что хочу текстом, да и голосом не очень получается, точнее получается не так как хочу. Поэтому рекомендую просмотреть мой видео ролик.
Сегодня я расскажу как настроить свой собственный почтовый сервер на базе Synology Mail Plus.
Я долго не хотел настраивать почтовый сервер, но когда настроил понял, что это очень легко. Настройку почтового сервера можно разделить на два этапа: Настройка самого сервера и настройка DNS записей для почтового сервера. Так как одно без другого не будет работать.
20 thoughts on “ DNS and DHCP on Synology NAS ”
This was terrific thanks so much, it’s been annoying me for months that I couldn’t get the DNS to keep a list of current devices on the network !
On tiny thing I had to change for the log rotate, I was getting the following error with verbose on :-
sudo logrotate –verbose –force /etc/logrotate.d/dhcp-dns
Ignoring /etc/logrotate.d/dhcp-dns because of bad file mode.I fixed it by doing the following chmod on the dhcp-dns file:-
sudo chmod 644 /etc/logrotate.d/dhcp-dns
and
sudo chmod 755 /volume1/homes/admin/logsThen i got what was expected.
Thanks for letting me know. I have updated the install.sh with those changes.
Thank you for the write-up. I just needed a lab DNS server to resolve my lab hostnames and let everything else query my wireless router. This blog was a big help in setting it up on my Synology!
Great write up, it installed smoothly! Thanks a lot, saves me a lot of time!
So when you decide to go for your own DNS server, you would typically also need to employ your own DHCP server.
Also keep in mind that the Synology DNS server does not support Dynamic A Records at this moment. So dynamic IP to an iPad will not be replicated in the DNS server once the IP is changed.
Thank you for your comment. You seemed to have missed the point of the post. The post is called “DNS and DHCP on Synology NAS” and not “Using some other DHCP server to talk to DNS on Synology” 🙂
dig always needs a full qualified domain name you cannot use short hostnames.
You should add the domain name you want to append to the hostname to the DHCP server in the DHCP server configuration on your Synology NAS.
The point of the post is to provide dynamic ‘A’ records to the Synology DNS server from the DHCP server ALSO running on Synology. And so an IP address provided via DHCP on a Synology NAS to any networked device including some Apple iDodad will work as expected.Thanks for the nice write up. Do you know if there is any difference in apply this to the Synology router (SRM) that is running DHCP and DNS? From my understanding SRM is based of an older version of DSM, but do not know for sure.
Sorry I was not as descriptive as I should have been.
I have the DHCP server and DNS running separately, and it works fine for what I add manually to the DNS. I was meaning do you think the scripts that have the DNS check the DHCP server to make everything match will work while on SRM and not DSM.
Sorry to say I have no knowledge of SRM. You will need to look at the lease files generated by the DHCP and the DNS (bind) zone files. if they are the same or similar in format to those use by DSM then it should be a reasonably simple task of porting it over.
Try reading the section DNS Forwarders towards the end of the post.
I too have a DHCP and NAS on the same Synology but I installed the Active Directory package. Without any changes 3 of 4 clients are registered in DNS with their dynamic IP address. One computer however isn’t. I’m not sure how these 3 clients are registered and why one is not. It looks DHCP is informing DNS of changes somehow.
Hi, thanks for this. I got this running on my Synology RT2600ac Router with firmware version 1.16. I had to install an SD card (USB attached disk would work fine too) so that the homes directory would be created .
/volume1/homes/admin/logs$ logrotate –force /etc/logrotate.d/dhcp-dns
error: cannot stat /etc/logrotate.d/dhcp-dns: No such file or directory/volume1/homes/admin/logs$ sudo logrotate –verbose –force /etc/logrotate.d/dhcp-dns
error: cannot stat –verbose: No such file or directory-rwxr-xr-x+ 1 root root 2661152 Dec 29 14:48 dhcp-dns.log
There is a big clue in the error message. 🙂
error: cannot stat /etc/logrotate.d/dhcp-dns: No such file or directoryIt looks like the file /etc/logrotate.d/dhcp-dns does not exist.
Also long command line switches generally have TWO ‘-‘ hyphens not one, giving the second error with verbose and force.
try
chmod 644 dhcp-dns
(logrotate did not run on my station when having 755, so this might help)Maybe the file Authorization is the Problem. I had a similar problem with the Message
“Ignoring /usr/local/etc/logrotate.d/dhcp-dns because of bad file mode”
After changing it worked.
chmod 644 dhcp-dnsThank you very much for this posting.
I do have a question regarding the IP address used for Mail Server and Media Server. I noticed that you used a different IP Address for each service on the a single DiskStation.
How do you change/assign an IP Address to a Service on the DiskStation? My assumption has been that all services on the DiskStation inherit the same IP Address as the Static IP Address assigned. To communicate with the individual services they all talk on a different port. Is that True in this case as well?
Ah, I see the problem. I expect you to have the the Mail Server and Media Server on different computers, not on a Synology NAS. 🙂 You cannot configure the mail server against hacking attempts that well on a Synology NAS or any other NAS. They are designed for storage use them for that.
В этом видео ролике я попытаюсь рассказать для чего дома нужен свой DNS и как его настроить.
DNS – это система доменных имен (domain name system) похожая на адресную книгу в Интернете, которая нужна для сопоставления значения имен доменов с IP -адресами, позволяя пользователям легко получать доступ к веб страницам, компьютерам и другим ресурсам в сети. По простому говоря находит IP адрес по имени.
![]()
Для начала надо сказать про кеширование DNS. Каждый DNS запрос должен пройти от вашего ПК к DNS серверу, который должен запросить у следующего DNS сервера, а тот у следующего пока они не дойдут то того DNS сервера, на котором прописан ваш домен. Скорее всего таких будет 3 или 4, но в обще никто не знает сколько таких следующих будет в вашем случаи. А на каждый такой запрос нужно время на обработку.
Эти все задержки могут сильно повлиять на скорость открытия интернет страниц на вашем ПК. К примеру интернет у вас быстрый, а страницы открываются долго. Так как на одной странице могут быть реклама, статьи, ссылки и многое другое с разными доменами и все эти домены нужно отрезолвить через DNS сервер.
Для решения этой задачи приходит на помощь кеширующий DNS сервер. Он работает так: все запросы проходящие через него он так же пересылает следующему DNS серверу, а ответы помещает в кеш и когда приходит точно такой же запрос, то он не пересылает его следующему DNSсерверу, а выдает из своего локального кеша. Это ускоряет в разы работу локального DNS сервера и загрузка сайта на ваш ПК выполняется быстрее.
![]()
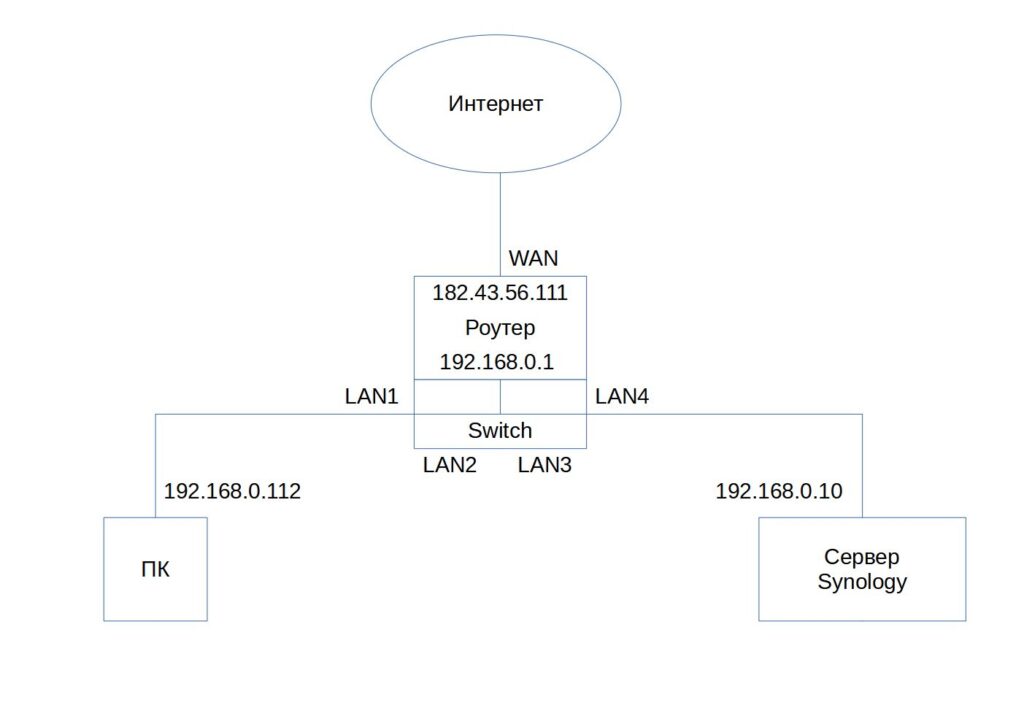
На схеме выше я постарался нарисовать стандартную домашнею локальную сеть. Я специально разделил роутер на две части на роутер и на коммутатор(switch). Если не настроить домашний DNS и подключаться к Synology NAS по доменному имени, то ваша локальная домашняя сеть будет работать не корректно. Трафик будет не коммутироваться через коммутатор, а пытаться маршрутизироваться заходя на роутер.
Роутер предназначен для маршрутизации трафика с WAN порта на LAN порты или наоборот, ему может быть трудно маршрутизировать с LAN в LAN. Из-за этого роутер может зависать, работать не корректно или скорость между ПК и Synology быть маленькой. Даже если у вас все хорошо работает, то это не значит что все сервисы будут работать одинаково хорошо. В общем настройка домашнего DNS поможет решить все данные проблемы и возможно забыть о проблемах с роутером раз и навсегда, кто знает.
Configuration
Resolution
Configuring the DNS Server is performed by accessing the Main Menu and then running DNS Server.
Once in the DNS Server configuration select Resolution and perform the following configuration:
- Check Enable resolution services
- Check Enable forwarders
- Configure Forwarder 1 (e.g. OpenDNS or Google Server)
- Configure Forwarder 2 (e.g. OpenDNS or Google Server)
- Note: I used the two OpenDNS servers in the below picture
- Set Forward policy to Forward First - this will forward requests on to your Forwarders if they are not found in the local DNS Zones, and then if they fail, look up the query in the root zones. If instead you wish to fail the resolution after forwarding, use Don't query root servers
- Optional: Check Limit source IP service if you wish to limit the client to specific hosts or subnets that are allowed to use your DNS server (I limited mine to my inside subnet)
![DNS Server Resolution Configuration]()
Master Forward Zone
Now that your DNS Server is up and running, it is time to configure a Master Zone for your internal network.
A Master Zone specifies that this server is authoritative for all of the Zone Records contained within it. A Secondary (Slave) Zone specifies that this server is authoritative, but is receiving the records from a remote server (the Master). A Forwarding Zone is one in which all queries are sent to a remote DNS server for resolution.
To create your Master Forward Zone select the Zones option from the DNS Server application, then click the Create button and select Master zone. Configure the Zone as follows:
- Domain type: Forward Zone
- Domain name: [ whatever domain name you'd like ]
- Master DNS server: [ your public IP address ]*
- Serial format: [ I prefer Date ]
- Limit zone transfer: [Checked]
- Limit source IP service: [Optionally checked]
![Master Zone Configuration]()
I personally check Limit zone transfer and then leave it blank, which is effectively preventing any Zone Transfers from your server (which is as it should be).
I also Limit source IP service, but for this one you'll have to go into the Source IP List and configure hosts or subnets that are allowed to query this zone. If you forget to do that and have this checked, your server will not respond.
Note: If you do not configure an IP address during this step, your zone will not load (see below for instructions on fixing it)
Clicking OK will save the zone. Now you can create some resource records!
Resource Records
Resource records provide the translation from a human-readable name to an IP address (and vice versa). To create a resource record in your Master Forward Zone:
Zone not loading
When I first configured DNS on the Synology, I did not put an IP address in for Master DNS server, which will still create the Zone record, but it will fail to load properly. If this happens you'll have to manually create the NS record on the zone by doing the following:
- Edit your Zone file
- Create an NS Type record
- Leave the Name portion blank
- Set the Host/Domain to ns.[DOMAIN], where [DOMAIN] is your domain name for the zone (should match the domain portion in the Name area).
This should now allow the domain to load properly.
Master Reverse Zone
A Reverse Zone is what translates IP addresses back into the names. This type of zone is optional, but it provides the ability for hosts to get human-readable names for connections that are made to it (e.g. to provide FQDN (fully qualified domain names) in log files, like for connections to a web server)
To create your Master Reverse Zone select the Zones option from the DNS Server application, then click the Create button and select Master zone. Configure the Zone as follows:
- Domain type: Reverse Zone
- Domain name: Reverse IP Notation for your subnet*
- Serial format: [ I prefer Date ]
- Limit zone transfer: [Checked]
- Limit source IP service: [Optionally checked]
![Reverse Zone Config]()
(*)Note: The Domain name for a Reverse Zone is actually the IP address subnet for which you want to provide records. In this example my internal network is 192.168.100.0/24, so my Reverse Zone is 100.168.192.in-addr.arpa. This is also for IPv4 subnets, if you wanted to provide Reverse lookups for an IPv6 subnet, you'd need to change the dropdown from .in-addr.arpa to .ip6.arpa.
Resource Records
Resource records for a Reverse Zone provide the translation from an IP address to a human-readable name. To create a resource record in your Master Reverse Zone:
Testing
The best way to test your new DNS configuration is by updating your DNS settings on your local desktop or laptop to use your new server. Under macOS you'd perform this by:
- Run System Preferences from the menu.
- Access the Network Preference Pane
- Select your active network adapter (probably Wi-Fi)
- Click Advanced.
- Select the DNS tab
- Delete any nameservers currently configured
- Add a new nameserver that is the IP address of your Synology
- Save your changes
Now you should be able to access your Synology using the new internal name.
If you'd prefer to test using Terminal then you'll want to use the dig command:
Where [server] is the IP address of your Synology. If it's working you should get a response that looks like this:
You should have a valid DNS answer in your ANSWER SECTION, if you don't see the IP address portion then you may have an issue with your Zone file and you should take a look at the logs on the DNS Server application to resolve.
You can also test the reverse DNS as well:
You've now successfully configured DNS for forward and reverse lookups on your Synology. The only step left is to ensure that the IP address of your Synology is being configured on your internal hosts, which you'll do on your DHCP server.
Читайте также: