
Routeros установка на компьютер
Я люблю маршрутизаторы фирмы Mikrotik, а так же RouterOS. В этой статье мы расскажем вам как установить Mikrotik RouterOS на компьютер. Установив RouterOS на свой ПК вы сделает очень быстрый и умный маршрутизатор (роутер).
Если вы покупаете роутер Mikrotik, то обычно его можно использовать непосредственно без необходимости установки RouterOS. Но если вы не хотите использовать роутер Mikrotik, а хотите использовать ПК в маршрутизатора.Тогда вам нужно установить RouterOS на ПК. Установить Mikrotik PC можно несколькими способами.
Варианты установки Mikrotik RouterOS на ПК
- ISO-образ — установка с помощью компакт-диска (CD) или флешки. Скачайте ISO-файл, который доступен, и запишите его на флешку или CD диск.
- Сетевая установка — эта установка выполняется через компьютерную сеть (LAN). Сетевую установку можно выполнить на операционной системе Windows 95/98 / NT4 / 2000 / XP/Windows 7/Windows 8 / Windows 10.
Из этих вариантов установки, первый с использования ISO — образа является самым популярным и наиболее широко используемым.Установить Mikrotik с помощью образа ISO довольно просто. Вам нужно только скачать ISO RouterOS и записать его на флешку или компакт-диск, далее установить на ПК. .
Загрузите ISO — файл Mikrotik. Чтобы скачать нажмите здесь .
Включая Уровень Лицензии 6, Вы даете согласие на использование RouterOS для обучения!
1. Скачав образ ISO его требуется записать его флешку или CD диск.
2. Настройте BIOS для установки операционной системы.
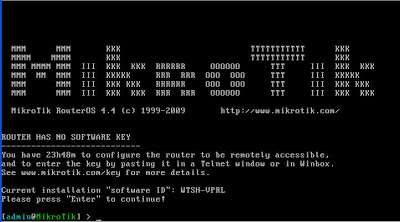
3. После настройки ваш компьютер загрузится с CD / DVD. В случае правильной загрузки образа, экран будет выглядеть следующим образом.
Serial console
Some devices come with a serial console that can be used to put the device into Etherboot mode. To do so, make sure you configure your computer's serial console. The required parameters for all MikroTik devices (except for RouterBOARD 230 series) are as following:
For RouterBOARD 230 series devices the parameters are as following:
Make sure you are using a proper null modem cable, you can find the proper pinout here. When the device is booting up, keep pressing CTRL+E on your keyboard until the device shows that it is trying bootp protocol:
At this point your device is in Etherboot mode, now the device should show up in your Netinstall window.
MikroTik devices are preinstalled with RouterOS, so installation is usually not needed, except in the case where installing RouterOS on an x86 PC. The upgrade procedure on already installed devices is straight forward.
Version numbering
RouterOS versions are numbered sequentially when a period is used to separate sequences, it does not represent a decimal point, and the sequences do not have positional significance. An identifier of 2.5, for instance, is not "two and a half" or "half way to version three", it is the fifth second-level revision of the second first-level revision. Therefore v5.2 is older than v5.18, which is newer.
RouterOS versions are released in several "release chains": Long-term, Stable and Beta. When upgrading RouterOS, you can choose a release chain from which to install the new packages.
- Long term: Released rarely, and includes only the most important fixes, upgrades within one number branch not add new features. When a Stable release has been out for a while and seems to be stable enough, it gets promoted into the Long Term branch, replacing an older release, which is then moved to Archive. This consecutively adds new features.
- Stable: Released every few weeks, includes all tested features and fixes
- Testing: Released every few days, only undergoes basic internal testing, should not be used in production

Требования для установки
Для установки операционной системы RouterOS понадобятся:
- компьютер x86 с процессором 100 МГц и выше, минимум 32 MB ОЗУ, жесткий диск минимум 64 MB;
- CD-ROM;
- диск CD-R или CD-RW;
- ISO образ операционной системы RouterOS;
- программа для записи ISO образов.
Manual upgrade
You can upgrade RouterOS in the following ways:
- Winbox – drag and drop files to the Files menu
- WebFig - upload files from Files menu
- FTP - upload files to root directory
- The Dude – See manual here
RouterOS cannot be upgraded through a serial cable. Only RouterBOOT is upgradeable using this method.
Suggestions
When using a RouterBOARD device, it is always suggested to upgrade it's RouterBOOT bootloader after RouterOS is upgraded. To do this, issue the command "/system routerboard upgrade"
NetInstall is the most commonly used installation tool. It runs on Windows machines or Linux with Wine ( superuser permissions are required).
NetInstall is also used to re-install RouterOS in cases where the previous install failed, became damaged or access passwords were lost.
Your device must support booting from ethernet, and there must be a direct ethernet link from the NetInstall computer to the target device. All RouterBOARDs support PXE network booting, it must be either enabled inside RouterOS "routerboard" menu if RouterOS is operable or in the bootloader settings. For this you will need a serial cable.
Note: For RouterBOARD devices with no serial port, and no RouterOS access, the reset button can also start PXE booting mode. See your RouterBOARD manual PDF for details.
NetInstall can also directly install RouterOS on a disk (USB/CF/IDE/SATA) that is connected to the Netinstall Windows machine. After installation just move the disk to the Router machine and boot from it.
User Interface
The following options are available in the NetInstall window:
Attention! Do not try to install RouterOS on your system drive. Action will format your hard drive and wipe out your existing OS.
RouterOS supports a lot of different features and since every installation requires a specific set of features supported it is possible to add or remove certain groups of features using the package system. As a result user is able to control what features are available and the size of the installation. Packages are provided only by MikroTik and no 3rd parties are allowed to make them.
List of packages
| Package | Description |
|---|---|
| advanced tools | Package contains advanced tools like netwatch, ip scan, wake on lan and others. |
| calea | Data gathering tool for specific use due to "Communications Assistance for Law Enforcement Act" in USA. |
| dhcp | Dynamic Host Control Protocol client and server. |
| gps | Global Positioning System devices support. |
| hotspot | |
| ipv6 | |
| mpls | Multi-protocol label switching support |
| multicast | Multicast PIM and IGMP proxy support |
| ntp | Network time protocol service |
| ppp | Enables all ppp type tunnel support (pppoe, sstp, pptp etc.) |
| routerboard | Allows to access and manage RouterBOARD specific settings. |
| routing | Dynamic routing protocols (OSPF, RIP, BGP) |
| security | Ipsec, SSH, secure winbox |
| system | RouterOS core package, enables basic routing, firewall, interface drivers etc. RouterOS cannot run without this package |
| ups | |
| user-manager | MikroTik's RADIUS server |
| wireless | Enables wireless drivers |
| wireless-fp | Enables wireless 802.11ac support |
| isdn | |
| lcd | 3rd party LCD pannel support. |
| kvm | Enables KVM virtualization |
| routeros | Combined RouterOS package. Includes system, hotspot, wireless, ppp, security, mpls, advanced-tools, dhcp, routerboard, ipv6, routing. |
Working with packages
Actions for executed commands will be applied only on restart. Until then, user can freely schedule or revert set actions.
| Command | Description |
|---|---|
| disable | Schedule package to be disabled after next reboot. All features provided by package will not be accessible. |
| downgrade | During reboot process router will try to force installation of uploaded packages on the router. Will prompt for reboot. |
| Outputs information about installed packages (version, package state, planned state changes, build date etc.) | |
| enable | Schedule package to be enabled after next reboot. |
| uninstall | Schedule package to be removed from the router. |
| unschedule | Remove scheduled task. |
For example list of available packages
Notice that we have wireless-fp package disabled and mpls package scheduled for disable
Операционную систему MikroTik RouterOS можно установить на компьютер x86 следующими способами: с помощью загрузочного диска или с помощью утилиты Netinstall, которая позволяет выполнить установку удаленно по сети.
В этой статье мы рассмотрим универсальную установку с помощью загрузочного диска, поскольку не все материнские поддерживают загрузку по сети.
Внимание! Установка RouterOS удалит все данные с жесткого диска. На жестком диске можно использовать только установленную операционную систему RouterOS. Сделать параллельную загрузку нескольких операционных систем нельзя. Лицензионный ключ RouterOS будет привязан к жесткому диску. Поэтому отключите лишние диски, которые могут быть очищены во время установки.
2. Ручное обновление прошивки
Обновить прошивку можно вручную. Для этого нужно скачать файл прошивки с официального сайта, скопировать его в роутер и перезагрузить устройство.
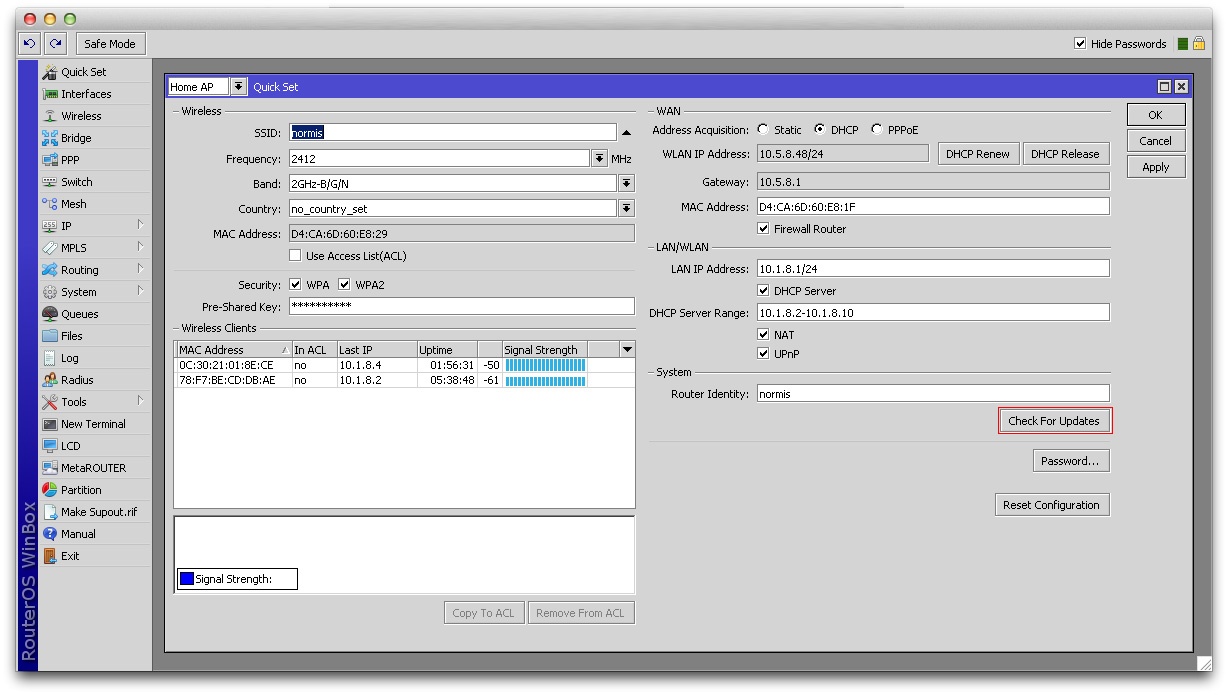
Перед обновлением MikroTik RouterOS посмотрите, какая версия операционной системы установлена в роутере.
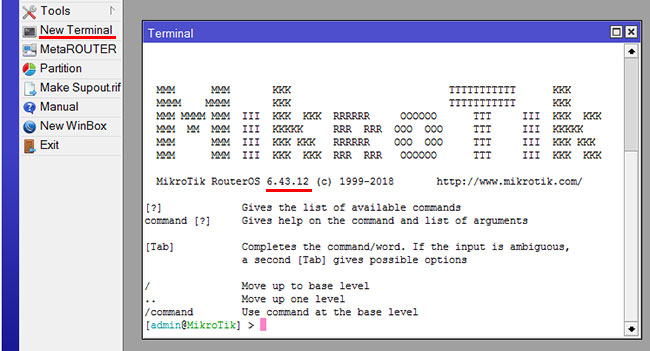
Выберите меню NewTerminal и в открывшемся окне вы увидите версию RouterOS. В нашем случае в роутере установлена RouterOS версии 6.43.12.
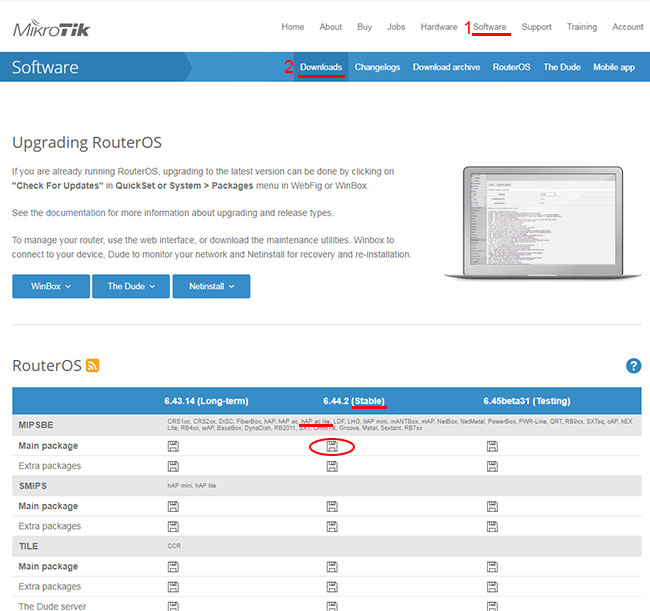
Скачаем последнюю версию прошивки MikroTik RouterOS:
Приступим к прошивке роутера MikroTik:
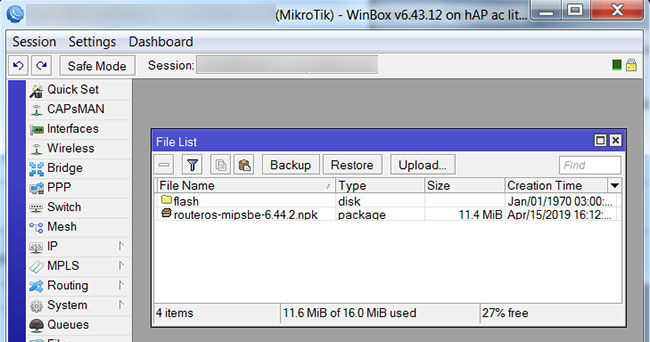
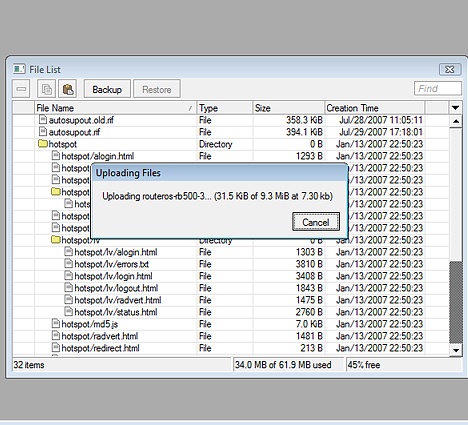
- В программе WinBox откройте меню Files.
- Откройте на компьютере папку, в которую сохранили файл прошивки с расширением .npk.
- Перетащите кнопкой мыши файл прошивки в окно File List программы WinBox.
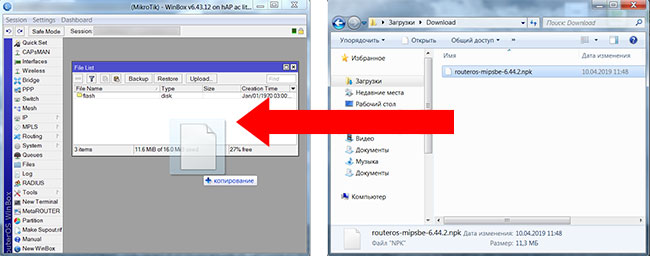
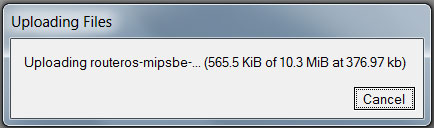
- Подождите, пока файл прошивки загрузится в роутер MikroTik.
- После загрузки, файл прошивки отобразится в окне File List.
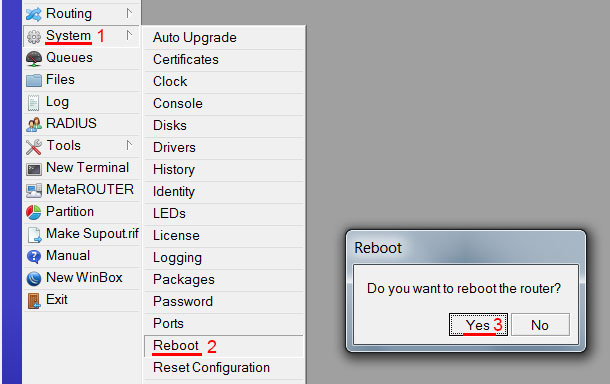
- Далее перезагружаем роутер через меню System - Reboot.
После перезагрузки откройте меню NewTerminal и проверьте версию RouterOS.
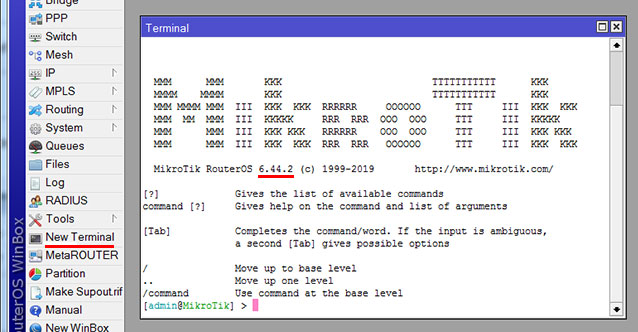
Как видим, операционная система MikroTik RouterOS обновилась до версии 6.44.2.
Если по каким-то причинам вас не устраивает работа новой прошивки, можно откатиться к старой прошивке, прочитав статью Как вернуть старую прошивку MikroTik.
Как зарегистрировать лицензию Mikrotik RouterOS
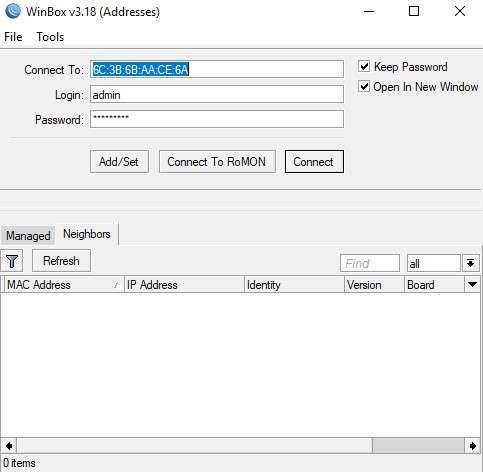
1. Откройте на своем ПК Winbox (если у вас нет Winbox тогда, скачайте здесь)
2. Войдите в систему Mikrotik RouterOS с помощью Winbox.
Внимание. Если у вас не получается зайти и вы видите ошибку: router does not support secure connection please enable legacy mode. Тогда прочтите эту статью Не заходит в Mikrotik legacy mode
4. В левой части Winbox нажмите кнопку “System” и нажмите кнопку “Licence”
5. Далее нажмите кнопку “Import Key” и выберите файл лицензии уровня 6 в папке который был в пакете ISO.
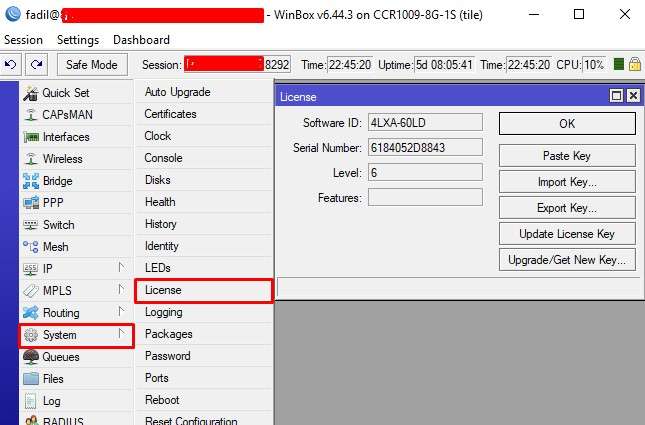
Поздравляю, теперь ваша лицензия Mikrotik 6-го уровня готова к тестированию и работе.
Netinstall is a tool for installing and reinstalling MikroTik devices running RouterOS. Always try using Netinstall if you suspect that your device is not working properly. The tool is available for Windows (with a graphical interface) and for Linux (as a command line tool).
In short, the Netinstall procedure goes like this: Connect your PC directly to the boot port (Usually Ether1, the port labeled BOOT or as otherwise indicated in the product manual) of the device you will be reinstalling. Turn on the device while holding the reset button until it shows up in the Netinstall tool.
Careful. Netinstall re-formats the system's drive, all configuration and saved files will be lost. Netinstall does not erase the RouterOS license key, nor does it reset RouterBOOT related settings, for example, CPU frequency is not changed after reinstalling the device.
-
Download Netinstall from the downloads page. If you are not sure which version you need, then you can always select the version that is marked as Current (stable);
Download the RouterOS Main package from the downloads page;
You must choose a RouterOS version. You can always select the version that is marked as Current . You must also select the architecture (ARM, MIPS, SMIPS, TILE, etc. ), but if you are not sure, then you can download the RouterOS package for ALL architectures, Netinstall will choose the right architecture for you.
Disconnect your computer from WiFi, Ethernet, LTE, or any other type of connection! Netinstall will only work on one active interface on your computer, it is highly recommended that you disconnect any other network interfaces in order to be sure that Netinstall will select the right network interface.
Configure a static IP address for your Ethernet interface, open Start, and select Settings :

Netinstall can run also on a local network, in such case you could skip setting a static IP address, but it is highly recommended that you set a static IP address if you are not familiar with Netinstall.
- Open Network & Internet and select Change adapter options


- Right-click on your Ethernet interface and select Properties

- Select Internet Protocol Version 4 (TCP/IPv4) and click Properties

- Check Use the following IP address and fill out the fields as shown in the image below

If you have a working router, then you can use it and skip the setting up a static IP part of this tutorial, but it requires you to know your LAN address since you will need to specify an unused IP address in your network for the network boot server. For this reason, it is recommended to apply a static IP address and follow this guide precisely, if you are not sure how to get these parameters out of your network.
- Open your Downloads folder (or wherever you saved the downloaded files) and extract the Netinstall .zip file to a convenient place


Make sure that the Ethernet interface is running and launch Netinstall.exe. If you followed the guide precisely, then you should not have any Internet connection on your computer, Windows 10 wants to verify all apps that it runs, but will not be able to do it since lack of an Internet connection, for this reason, a warning might pop up, you should click Run.

Netinstall requires administrator rights, there should be a window asking for permissions to run Netinstall, you must accept these permissions in order for Netinstall to work properly.
- Allow access for Netinstall in Public networks and configure Net booting settings and fill out the required fields as shown in the image below


The Client IP address must be unique! Don't use an existing IP address in your network, this also means that you should not use the computer's IP address as well. Use a completely different IP address from the same subnet.
- Connect your device to your computer using an ethernet cable directly (without any other devices in-between), plug the Ethernet cable into your device's Etherboot port.
- MikroTik devices are able to use Netinstall from their first port (Ether1), or from the port marked with "BOOT".

Some computers have a network interface (especially USB Ethernet adapters) that tend to create an extra link flap, which is enough for Netinstall to fail to detect a device that is in Etherboot mode. In such a case you can use a switch between your device and your computer or a router in bridge mode to prevent this issue.
- Power up your device and put it into e therboot mode
There are multiple ways how to put your device into Etherboot mode. Make sure you read the Etherboot manual before trying to put the device into this mode. Methods vary between different MikroTik devices.
- Wait for the device to show up in Netinstall, select it and press Browse. Navigate to your Downloads folder (or wherever you saved your RouterOS packages) and press OK


- Select your desired RouterOS version and press Install. Wait for the installation to finish and press "Reboot" (Devices without serial console have to be rebooted manually)
If you downloaded RouterOS packages for multiple architectures, then Netinstall will only show the appropriate architecture packages for your device after you have selected it. All unsupported packages will not show up in this window after you have selected a device.


If the installation does not start (progress bar is not moving or no status is shown), then you can try closing the Netinstall application and opening it up again or try to put the device into Etherboot mode again. If you are still unable to get Netinstall working, then you should try using it on a different computer since there might be an operating system's issue that is preventing Netinstall from working properly.
- You are done! Remove the device from power, remove the Ethernet cable, place the device back in your network and your device should be running properly now!
After using Netinstall the device will be reset to defaults (unless you specified not to apply default configuration). Some devices are not accessible through ether1 port with the default configuration for security reasons. Read more about Default configuration .
When using the Configure script option, it is suggested to introduce a delay before configuration execution.
The Linux version is a command line tool, which offers nearly the same parameters as the Windows counterpart.
Download the tool from our download page (links not literal):
The available parameters are as follows:
Etherboot mode is a special state for a MikroTik device that allows you to reinstall your device using Netinstall . There are several ways to put your device into Etherboot mode depending on the device you are using.
RouterOS
If your device is able to boot up and you are able to log in, then you can easily put the device into Etherboot mode. To do so, just connect to your device and execute the following command:
After that either reboot the device or do a power cycle on the device. Next time the device will boot up, then it will first try going into Etherboot mode. Note that after the first boot up, the device will not try going into Etherboot mode and will boot directly of NAND or of the storage type the device is using.
RouterOS mass upgrade
You can upgrade multiple MikroTik routers within few clicks. Let's have a look on simple network with 3 routers (the same method works on networks with infinite numbers of routers),
RouterOS auto-upgrade
Sub-menu: /system package update
RouterOS version 6 has new auto upgrade option. RouterOS checks amazon servers for information if new version is available and upgrades after upgrade command is executed. You can automate the upgrade process by running a script in the scheduler:
RouterOS can download software packages from a remote MikroTik router.
- Make one router as a network upgrade central point, that will update MikroTik RouterOS on other routers.
- Upload necessary RouterOS packages to this router (in the example, mipsbe for RB751U and PowerPC for RB1100AHx2).
- Add upgrade router (192.168.100.1) information to a router that you want to update (192.168.100.253), required settings IP address/Username/Password
- Click on refresh to see available packages, download the newest packages and reboot the router to finalize the upgrade.
The Dude auto-upgrade
Dude application can help you to upgrade the entire RouterOS network with one click per router.
- Set type RouterOS and correct password for any device on your Dude map, that you want to upgrade automatically,
- Upload required RouterOS packages to Dude files
- Upgrade RouterOS version on devices from RouterOS list. Upgrade process is automatic, after a click on upgrade (or force upgrade), the package will be uploaded and the router will be rebooted by the Dude automatically.
The Dude hierarchical upgrade
For complicated networks, when routers are connected sequentially, the simplest example is 1router-2router-3router connection. You might get an issue, 2router will go to reboot before packages are uploaded to the 3router. The solution is Dude groups, the feature allows to group routers and upgrade all of them by one click!
- Select group and click Upgrade (or Force Upgrade),
License issues
When upgrading from older versions, there could be issues with your license key. Possible scenarios:
- When upgrading from RouterOS v2.8 or older, the system might complain about expired upgrade time. To override this, use Netinstall to upgrade. Netinstall will ignore old license restriction and will upgrade
- When upgrading to RouterOS v4 or newer, the system will ask you to update license to a new format. To do this, ensure your Winbox PC (not the router) has a working internet connection without any restrictions to reach www.mikrotik.com and click "update license" in the license menu.
Reset button
The Reset can be found on all MikroTik devices, this button can be used to put the device into Etherboot mode. An easy way to put a device into Etherboot mode using the Reset button is by powering off the device, hold the Reset button, power on the device while holding the Reset button and keep holding it until the device shows up in your Netinstalll window.

If you have set up a Protected bootloader , then the reset button's behavior is changed. Make sure you remember the settings you used to set up the Protected bootloader, otherwise you will not be able to use Eterboot mode and will not be able to reset your device.
Установка RouterOS
Скаченный ISO образ записываем на CD диск. В Windows это можно сделать с помощью любых программ для записи дисков. В операционной системе Ubuntu программа записи дисков встроена в систему. Для записи ISO образа кликните правой кнопкой мыши на файле .iso и выберите Write to Disk (Записать на диск). После записи вы получите загрузочный диск с MikroTik RouterOS.

Далее в BIOS компьютера настройте загрузку с оптических дисков и вставьте записанный диск в CD-ROM.

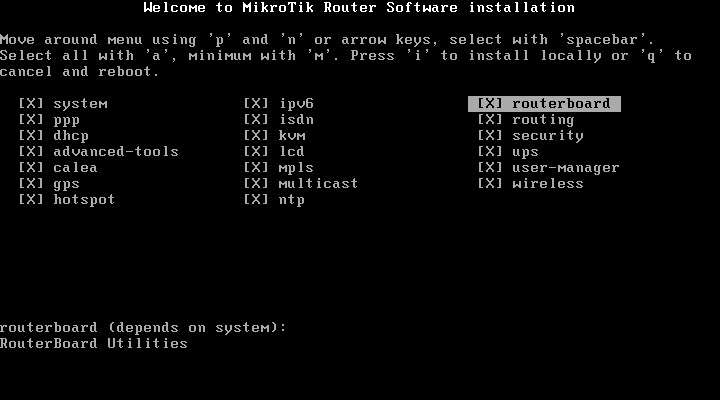
После перезагрузки компьютера появится окно, в котором необходимо выбрать пакеты RouterOS для установки.

Выберите пакеты, которые вы хотите установить. Нажав клавишу a, можно выбрать все пакеты. Клавиша m позволяет выбрать минимум. Для установки RouterOS нажмите клавишу i.
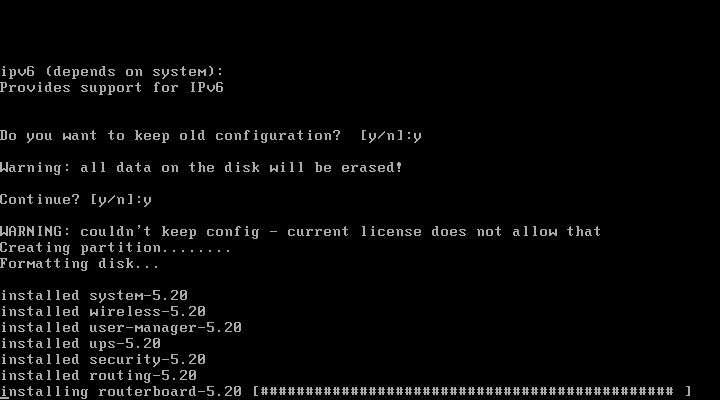
На вопрос Do you want to keep old configuration? ответьте n.
Дальше вас предупредят, что все данные на жестком диске будут удалены Warning: all data on the disk will be erased! Continue? Нажмите y.

Начнется процесс установки. По его окончанию нажмите ENTER для перезагрузки компьютера.

Далее извлеките из CD-ROM установочный диск и настройте в BIOS загрузку с жесткого диска.

После успешной загрузки MikroTik RouterOS с жесткого диска, появится окно с вводом логина и пароля. Стандартный логин admin без пароля.
В открывшемся окне будет указан индификатор установки software ID. Его используют, чтобы купить лицензию RouterOS Level4, Level5 или Level6.

Для покупки лицензии у вас есть 24 часа. Время считается тогда, когда компьютер находится во включенном состоянии. По истечении 24 часов вы не сможете использовать операционную систему RouterOS без ключа. Поэтому если вы собрались покупать лицензию RouterOS, запишите software ID и выключите компьютер, пока не купите ключ.
Если вы хотите познакомиться с возможностями RouterOS, то подключитесь к компьютеру с помощью удобной графической утилиты Winbox и продолжите конфигурирование.

Manual upgrade process
Using Winbox
Choose your system type, and download the upgrade package. Connect to your router with Winbox, Select the downloaded file with your mouse, and drag it to the Files menu. If there are some files already present, make sure to put the package in the root menu, not inside the hotspot folder! The upload will start.
After it finishes - reboot the device. The New version number will be seen in the Winbox Title and in the Packages menu
Using FTP
- Open your favourite FTP program (in this case it is Filezilla), select the package and upload it to your router (demo2.mt.lv is the address of my router in this example). note that in the image I'm uploading many packages, but in your case - you will have one file that contains them all
- if you wish, you can check if the file is successfully transferred onto the router (optional):
- reboot your router for the upgrade process to begin:
- after the reboot, your router will be up to date, you can check it in this menu:
- if your router did not upgrade correctly, make sure you check the log
Назначение пакетов Mikrotik RouterOS:
| Пакет | Назначение |
|---|---|
| advanced-tools | расширенные инструменты ping, netwatch, ip-scan, sms tool, wake-on-LAN |
| calea | инструмент для сбора данных для «Communications Assistance for Law Enforcement Act» в США |
| dhcp | Dynamic Host Control Protocol клиент и сервер |
| gps | поддержка GPS устройств |
| hotspot | управление HotSpot |
| ipv6 | поддержка адресации IPv6 |
| mpls | поддержка Multi Protocol Labels Switching |
| multicast | Protocol Independent Multicast — Sparse Mode; Internet Group Managing Protocol — Proxy |
| ntp | Network protocol client and service |
| ppp | MlPPP клиент, PPP, PPTP, L2TP, PPPoE, ISDN PPP клиенты и серверы |
| routerboard | доступ и управление RouterBOOT |
| routing | поддержка динамических протоколов RIP, BGP, OSPF и утилит маршрутизации BFD, filters for routes. |
| security | IPSEC, SSH, Secure WinBox |
| system | базовые возможности маршрутизации like static routing, ip addresses, sNTP, telnet, API, queues, firewall, web proxy, DNS cache, TFTP, IP pool, SNMP, packet sniffer, e-mail send tool, graphing, bandwidth-test, torch, EoIP, IPIP, bridging, VLAN, VRRP и др.). Также для платформы RouterBOARD — MetaROUTER | Virtualization |
| ups | поддержка источников бесперебойного питания APC |
| user-manager | MikroTik User Manager |
| wireless | поддержка беспроводных интерфейсов |
| isdn | поддержка ISDN |
| lcd | поддержка сенсорных LCD экранов |
| kvm | виртуализация KVM |
Выберите пакеты, которые требуется установить.
4. Выполните процесс установки Mikrotik, выбрав все опции которые доступны с помощью кнопки «a«. Теперь для установки Mikrotik нажмите кнопку » i «.
5. Подождите несколько минут, не завершится процесс установки. Если он уже завершен, нажмите клавишу Enter для перезагрузки
7. В случае успеха ПК отобразит командную строку Mikrotik Router OS. Это означает что все прошло успешно.
Теперь Mikrotik RouterOS установлен на вашем компьютере. Но его можно использовать только в течение 24 часов. Так как RouterOS все еще находится в пробном периоде. Чтобы иметь возможность сделать полную версию с использованием лицензии уровня 6, требуется выполнить регистрацию. Файл лицензии уровня 6 был в пакете ISO. Пожалуйста, найдите этот файл.
Сброс настроек RouterOS x86
Чтобы сбросить пароли и настройки операционной системы RouterOS, установленной на компьютере x86, необходимо загрузиться с установочного диска с RouterOS. Когда появится окно с выбором пакетов, нажать i и ответить n на вопрос Do you want to keep old configuration? Подтвердите сброс, нажав y.
Если роутер MikroTik подключен к интернету, то проще всего обновить прошивку через меню Quick Set или меню System - Packages. Откройте в программе Winbox любое из этих меню и нажмите кнопку Check For Updates.
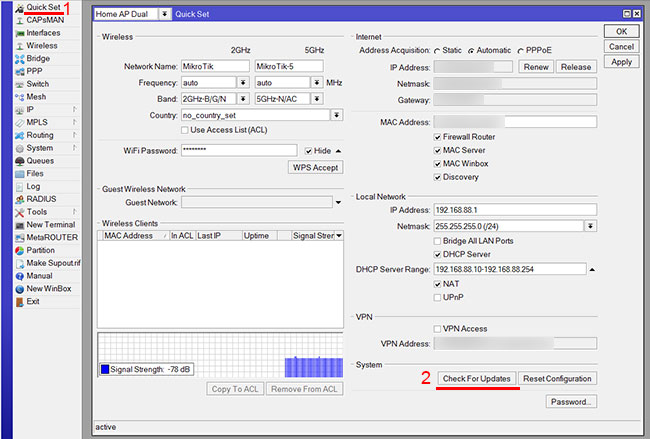
Обновление прошивки MikroTik RouterOS через меню Quick Set.

Обновление прошивки MikroTik RouterOS через меню System - Packages.
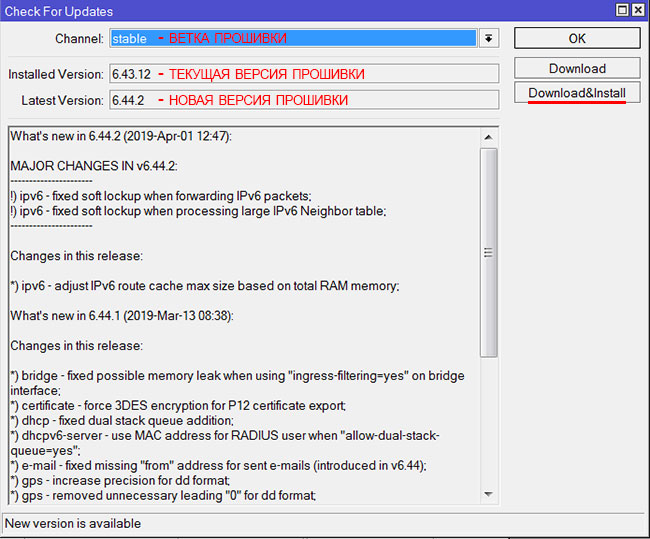
В следующем окне в списке Channel выберите из какой ветки взять новую прошивку.
MikroTik RouterOS имеет несколько веток с прошивками:
- long-term - самая надежная прошивка без новых функций.
В этой ветке прошивки тестируют более тщательно, исправляют найденные баги и критические уязвимости. Она больше подходит для организаций, где важна высокая надежность. - stable (по умолчанию) - стабильная прошивка с исправлениями, улучшениями и новыми функциями.
В этой ветке находятся хорошие прошивки, но они иногда включают специфические баги, которые могут стать критическими для крупных организаций. Для дома их можно ставить смело. - testing - включает самые новые функции, которые еще хорошо НЕ протестированы. Ставить только для тестирования новых функций. В организациях использовать нельзя.
- development - для разработчиков.
Далее нажмите кнопку Download&Install. После этого скачается прошивка и роутер перезагрузится для ее установки.
Standard upgrade
The package upgrade feature connects to the MikroTik download servers and checks if there is a new RouterOS version for your device.
After clicking the Upgrade button in QuickSet or in Packages menu upgrade window will open with current Changelog (if newer version exists) and buttons to download and install latest versions.
By clicking "Download & Upgrade", downloads will start and after successful download will reboot to install downloaded packages. Even if custom packages are installed, downloader will take that into account and download all necessary packages.


Читайте также: