
Render setup 3ds max настройки

Уникальность программ для 3D моделирования в том, что они позволяют создать нечто несуществующее. А существующее позволяют воссоздать, не поднимаясь с рабочего места. Но только лишь моделированием объектов современные программы не ограничиваются. Уже давно существует возможность создавать изображение объекта с помощью рендеринга. Говоря очень грубо, это аналог фотографии, сделанной прямо в программе моделирования. Благодаря системам рендеринга можно, например, превратить набор объектов в полноценный интерьер.
3. Настройки раздела Common
Это окно одинаково для всех программ рендеринга и содержит самые базовые настройки.
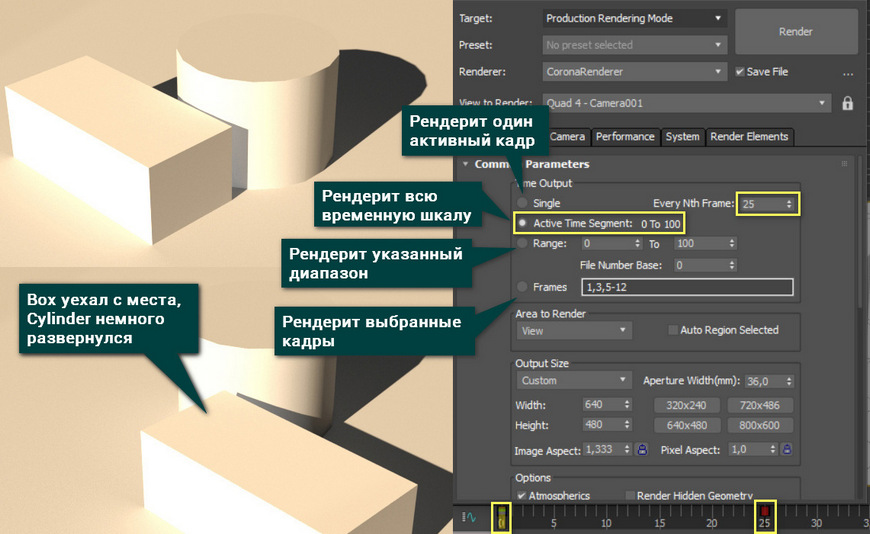
Time Output позволяет выбрать, сколько и какие кадры будут рендериться. Это скорее нужно для анимации или визуализации каких-то анимированных объектов.
Я приведу в пример 2 картинки, которые являются 0 и 25 кадром. Сохранились они автоматически с помощью функции Save File.
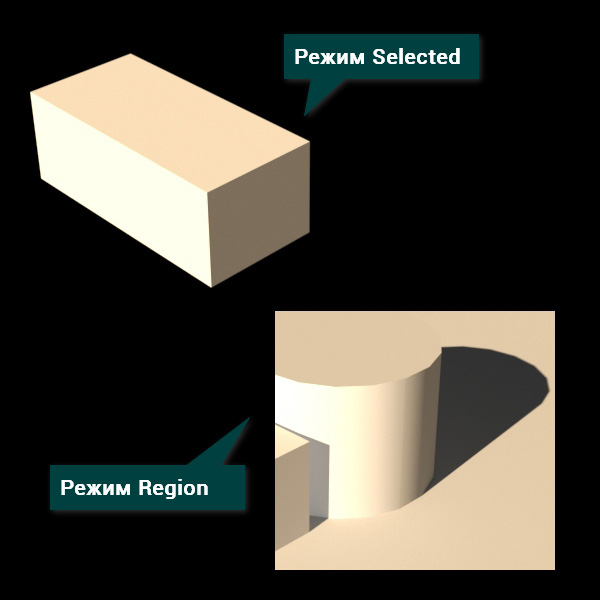
Area to Render позволяет рендерить не только то, что попадает в вид рабочей области, но и отдельные объекты, регионы и прочее.
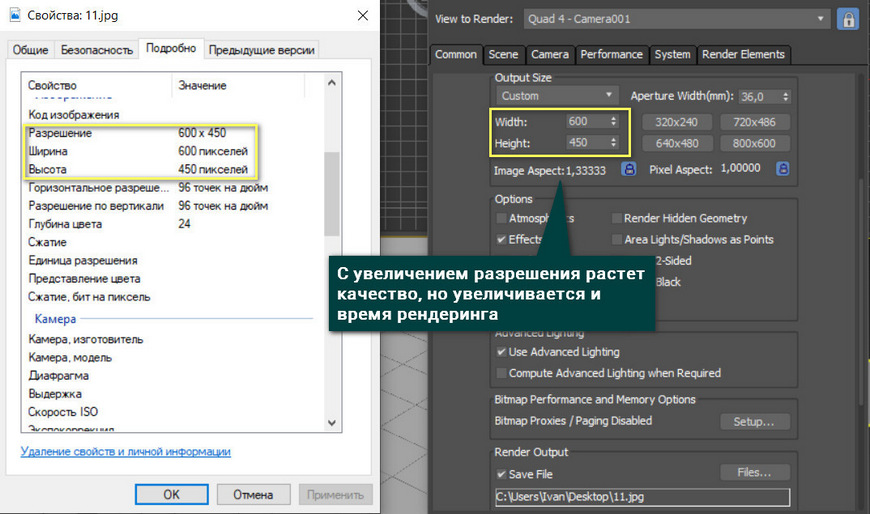
Output Size устанавливает размеры итоговой картинки в пикселях. Width и Height отвечают за число пикселей по ширине и высоте. Image Aspect равняется отношению ширины к высоте. Если поставить рядом с этим значением замок, то оба параметра разрешения будут меняться вместе, сохраняя отношение. Pixel Aspect определяет соотношение сторон пикселя. Его изменение влияет на разрешение, не учитывая Image Aspect. В свитке можно выбрать множество заранее настроенных разрешений.
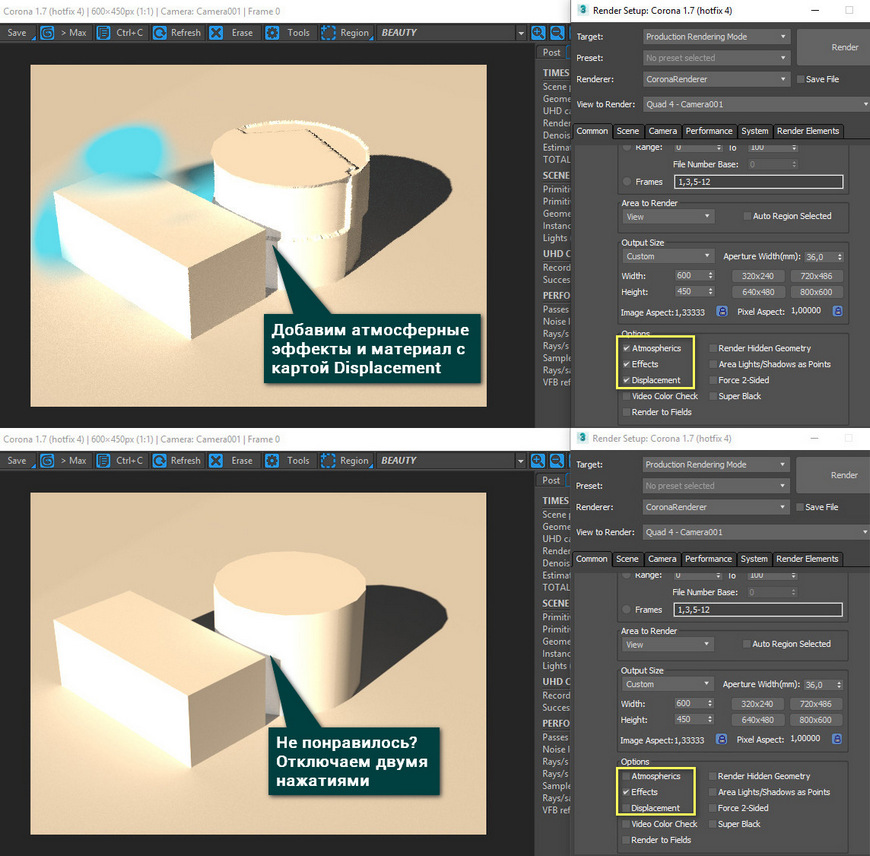
Options позволяет быстро включать и отключать отображение разных эффектов:
- Atmospherics – отображает атмосферные эффекты;
- Effects – отображает используемые эффекты;
- Displacement – отображает действие карт смещения;
- Video Color Check – включает контроль цветовой интенсивности по стандартам PAL и NTSC;
- Render to Fields – устанавливает режим полукадровой визуализации;
- Render Hidden Geometry – отображает скрытые объекты;
- Area Lights/Shadows as Points – изменяет визуализацию пространственных источников света и теней на точечные;
- Force 2-Sided – включает визуализацию поверхностей с двух сторон, уменьшая скорость рендеринга;
- Super Black – включает режим суперчерного цвета, который применяется для создания видеоизображений.
Use Advanced Lighting включает визуализацию непрямого освещения. Compute Advanced Lighting when Required позволяет пересчитать непрямое освещение. Это нужно при изменении геометрии сцены во время анимации.
Email Notifications – позволяет отправлять письмо на email по окончании рендеринга.
Scripts – дает возможность добавлять сценарии действий до и после визуализации.

Большая часть остальных меню будет зависеть от программы для рендера. Поэтому разбираться в них нужно конкретно при использовании какого-либо пакета. Но даже без этого программы будут визуализировать сцену. Если у вас стоит Corona Renderer, то можете расставить источники света и просто нажать на большую кнопку Render.
После создания объекта ли сцены в 3ds Max, их можно визуализировать. Визуализация в данном случае – это процесс создания 2D изображения на основе источника света и 3D объектов. Свет, попадая на объекты, отражается в виртуальную камеру и формирует картинку. В этой статье мы разберем создание изображения, используя программу Corona Renderer.
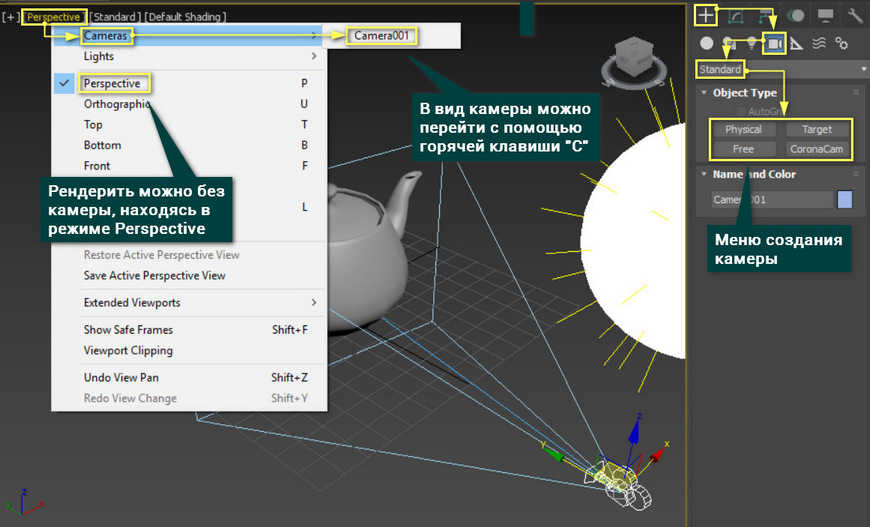
2. Установка камеры
Для рендера нужно создать точку обзора, из которой будет создан вид на будущее изображение. Точка обзора создается с помощью камер из меню Create – Cameras – Standard. Для перехода в вид из камеры нужно нажать горячую клавишу «C» или открыть окно вида, выбрать Cameras и нажать на камеру с нужным названием (Camera001). А какие камеры можно использовать вы узнаете из статей про объекты Physical Camera и Standard Camera.
Для рендеринга не обязательно устанавливать камеру. Достаточно будет перейти в режим Perspective. Камерой будет считаться вид на рабочую область 3ds Max.
3. Настройка и запуск рендера
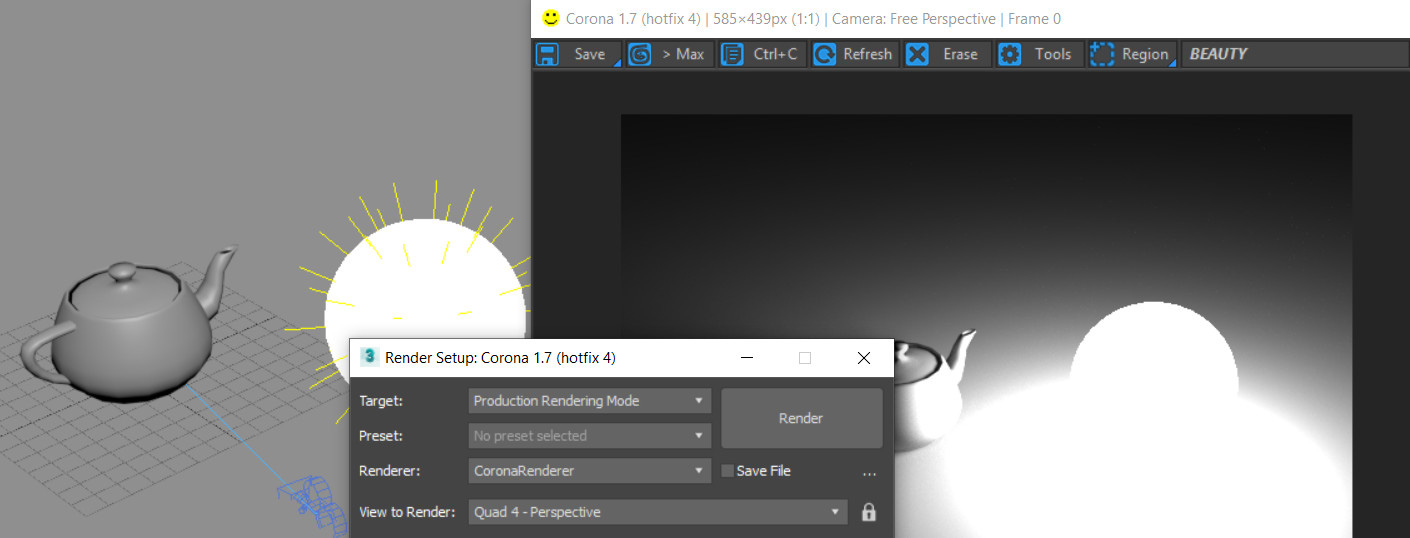
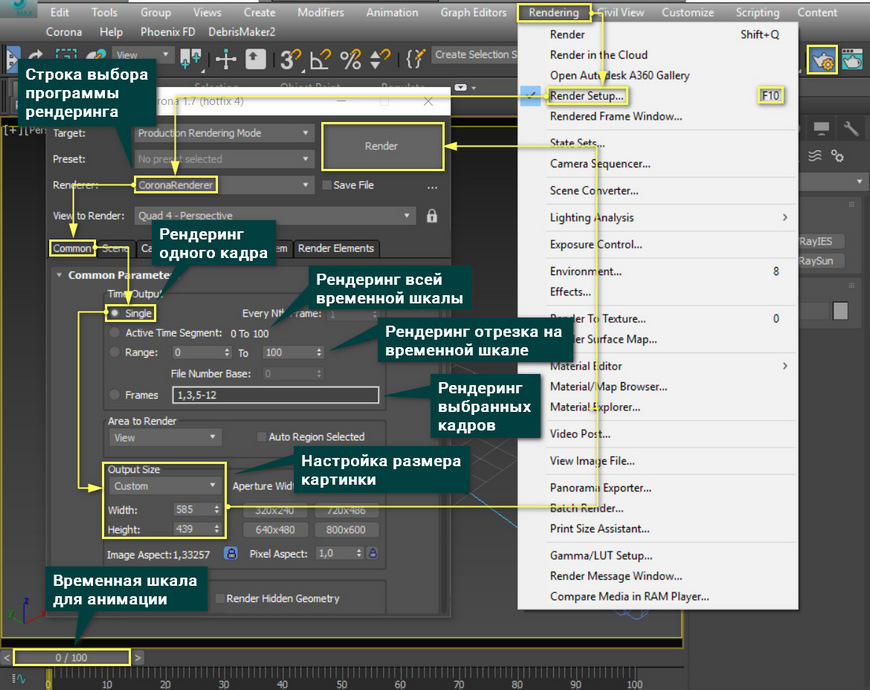
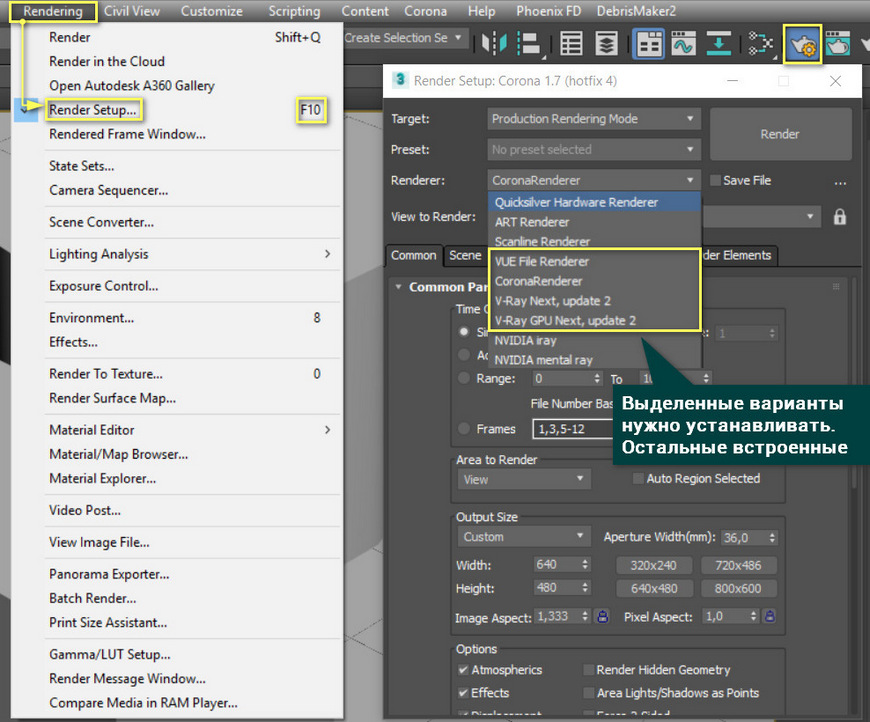
Чтобы настроить рендер, нужно открыть окно Render Setup кнопкой на панели Main Toolbar, через меню Rendering – Render Setup или нажать горячую клавишу «F10».
В открывшемся окне в строке Renderer нужно выбрать программу для рендеринга. В качестве примера – CoronaRenderer. Затем в разделе Common нужно установить, какой кадр нужно рендерить.
Single – рендерит один кадр, выбранный на временной шкале.
Active Time Segment – рендеринг всей временной шкалы. На примере это от 0 до 100, но если поменять длину шкалы, то значение 100 автоматически изменится.
Range – все кадры на установленном отрезке. Устанавливать можно как начальный, так и конечный кадр.
Режимы Active Time Segment и Range отлично подходят для анимации. Если в этих режимах воспользоваться функцией Save File и указать формат сохранения AVI, то все кадры будут сохраняться в единый видео файл. Так можно сделать видео-рендер анимации. А пример анимации можно увидеть в статье «Анимация и Motion blur в 3ds Max»
Frames – рендеринг отдельных кадров.
Теперь можно настроить размер финального изображения в разделе Output Size. Размеры Width и Height.
Если нажать Shift+F в рабочей области, то ее экран обрежется в соответствии с размером картинки. Это удобно для понимания области, которая будет видна на рендере.
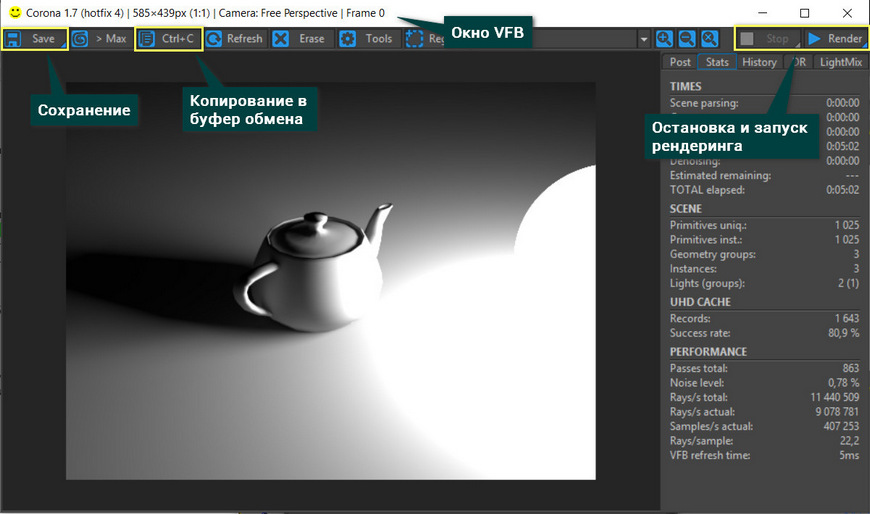
После установки размера можно нажимать на кнопку Render (сочетания клавиш Shift+Q). Окно VFB с картинкой, информацией и расчете, настройках и прочими кнопками откроется автоматически. Там же в этом окне будут кнопки для сохранения, копирования и прочих функций.
Перечисленное здесь – минимальный набор действий для визуализации объекта. Может меняться количество объектов, число источников света, типы камер. Но все популярные системы рендеринга для 3ds Max работают благодаря сочетанию перечисленных объектов. Кроме того, если на объекты наложить материалы. Материалы, назначенные объектам, будут отображены на рендере. А про настройку материалов и текстур вы узнаете из статей:

By:

Rendering creates a 2D image or animation based on your 3D scene. It shades the scene's geometry using the lighting you've set up, the materials you've applied, and environment settings such as background and atmosphere.
- Rendering menu > Render Setup
- Main Toolbar > Render Setup
- Rendered Frame Window > Render Setup
- Keyboard > F10
Rendering is multi-threaded and multi-processed on multiple-processor configurations. A two-processor or dual-core system can render in nearly half the time a single-processor system can.
Rendering can also take place on multiple systems by using a network.
The Render Setup dialog has multiple panels. The number and name of the panels can change, depending on the active renderer. These panels are always present:
Contains the general controls for renderering, such as whether to render a still image or an animation, setting the resolution of rendered output, and so on.
Contains the main controls for the active renderer.
Tip: Each renderer has different and unique capabilities. Based on these, you decide which renderer you want to use for each scene. It is a good idea to design materials with a particular renderer in mind.
Additional panels can appear, depending on which renderer is active. Renderer-specific controls are described in the section "Renderers." Additional renderers might be available as third-party plug-in components.
At the top of the Render Setup dialog are controls that, like those on the Common Parameters rollout, apply to all renderers. These are described below.
Note: Bitmap paging is always active and is managed automatically, enabling you to render scenes with large bitmaps, a large number of bitmaps, or very high resolution images (for example, 5,000 x 5,000 pixels or more).

- Production Rendering Mode (The default.) While active, clicking Render uses production mode.
- Iterative Rendering Mode While active, clicking Render uses iterative mode.
- ActiveShade Mode While active, clicking Render uses ActiveShade.
- Autodesk Rendering Mode Opens the controls for Autodesk Rendering Cloud rendering.
- Submit to Network Rendering Submits the current scene to network rendering. When you choose this option, 3ds Max opens the Network Job Assignment dialog.
This choice does not affect the state of the Render button itself, which you can still use to launch a Production, Iterative, or ActiveShade rendering.
Changing the render mode on this menu changes the comparable setting on the main toolbar Render flyout.
Preset drop-down list
Lets you choose a set of preset rendering parameters, or load or save rendering parameter settings. See "Preset Rendering Options."
Renderer drop-down list Lets you choose the active renderer.
This is an alternative to using the Assign Renderer rollout.
Render / Render Iterative / ActiveShade button Click to render the scene using the current target mode (aside from Network Rendering).
When ActiveShade is chosen, the name of this button changes to ActiveShade, and clicking it opens a floating ActiveShade window.
If the scene you're rendering contains bitmaps that cannot be located, a Missing External Files dialog opens. This dialog lets you browse for the missing maps, or continue to render the scene without loading them.
View to Render Shows the viewport that renders when you click the Render button. To specify a different viewport to render, choose it from the list or activate it in the main user interface.
The drop-down list contains all viewports available in all viewport layouts. Each viewport is listed with the layout name first, followed by a hyphen and then the viewport name. For example: "Row 1, Row 2 - Front." For this reason, to identify viewports easily, give your layouts meaningful names, such as Closeups.
Activating a different viewport in the main interface automatically updates this setting if Lock To Viewport (see following) is off.
Lock to Viewport: When on, locks the view to the one shown in the Viewport list. This enables you to adjust the scene in other viewports (which become active as you use them), and then click Render to render the viewport you originally chose. When off, Render always renders the active viewport.
By:

Rendering creates a 2D image or animation based on your 3D scene. It shades the scene's geometry using the lighting you've set up, the materials you've applied, and environment settings such as background and atmosphere.
The Render Setup dialog has multiple panels. The number and name of the panels can change, depending on the active renderer. These panels are always present:
Contains the main controls for any renderer, such as whether to render a still image or an animation, setting the resolution of rendered output, and so on.
Contains the main controls for the current renderer.
Additional panels can appear, depending on which renderer is active. Five renderers are provided with 3ds Max . Their controls are described in the section Renderers. Additional renderers might be available as third-party plug-in components.
At the bottom of the Render Setup dialog are controls that, like those in the Common Parameters rollout, apply to all renderers. These are described in this topic's Interface section, below.
Note: Bitmap paging is always active and is managed automatically, enabling you to render scenes with large bitmaps, a large number of bitmaps, or very high resolution images (for example, 5,000 x 5,000 pixels or more).
1. Сборка сцены
Прежде всего, необходимо создать объект и освещение для него. Без освещения рендер не сможет вести расчет и вместо картинки будет черный экран. В качестве объекты выступит Teapot. В качестве источника света – CoronaLight. Для создания чайника нужно перейти в Create – Geometry – Standard Primitives – Teapot. Источник света находится в Create – Lights – Corona – CoronaLight.
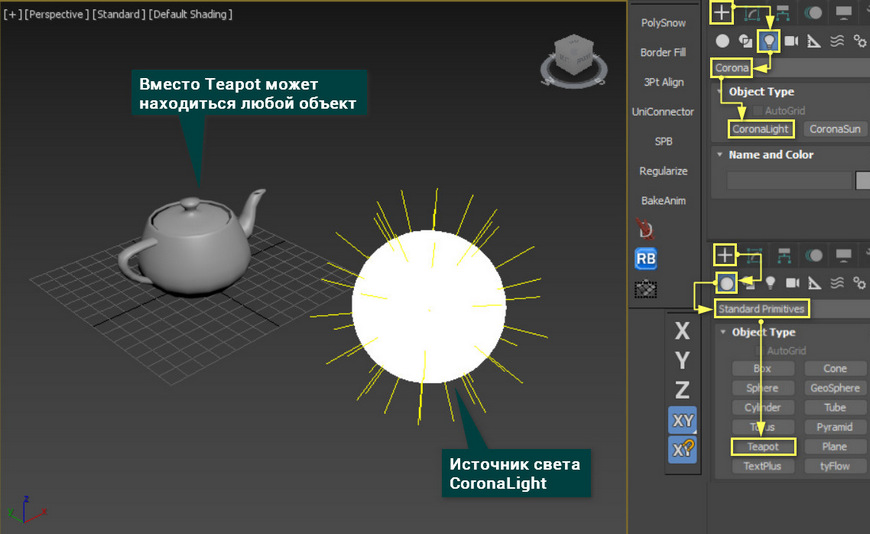
Для каждой системы рендеринга (Corona, V-Ray, Scanline, mental ray и т.д.) предназначены свои источники света. Сторонние программы добавляют в 3ds Max собственные источники. И редко одни программы воспринимают источники света от других программ. То есть используя V-Ray, нельзя устанавливать источник света CoronaLight.
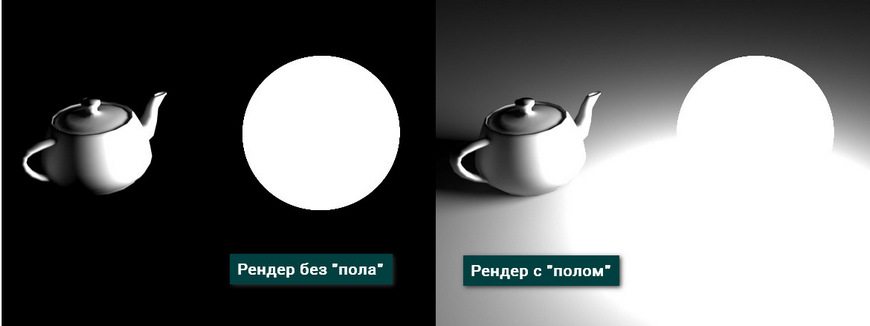
Объекту можно добавить «пол». Поверхность, на котором будет располагаться объект. Это изменит общее освещение, так как свет дополнительно будет отражаться от пола и попадать на объект.
Standard and ActiveShade Renderers
In 3ds Max , there are two different types of renderings. Production rendering is active by default, and is typically the one you use for finished renderings. This type of rendering can use any of the three aforementioned renderers. The second type of rendering is called ActiveShade. An ActiveShade rendering uses the default scanline renderer to create a preview rendering that can help you see the effects of changing lighting or materials; the rendering updates interactively as you change your scene. Rendering iwth ActiveShade is, in general, less precise than production rendering.
Another advantage of production rendering is that you can use different renderers, such as the mental ray or VUE file renderer.
To choose between production and ActiveShade rendering, use the radio buttons described in the Interface section, following. To change the renderer assigned to production rendering, use the Assign Renderer rollout.
Procedures
To render a still image:
By default, the rendering appears in a window.

Tip: To render a view without using the dialog, click ( Render Production or use Render Last (press F9 ).
To render an animation:
A configuration dialog opens that lets you set the options for the file format you chose. Adjust these settings or leave them at their defaults, and then click OK.
The configuration dialog closes, and on the Render Setup dialog Common Parameters rollout, the Save File toggle is now available and on.
Note: If you set a time range and do not specify a file to save to, the animation is rendered only to the window. This can be a time-consuming mistake, so an alert warns you about it.
Tip: To render a view without using the dialog, click ( Render Production) or use the Keyboard Shortcut F9 to Render Last.
1. Выбираем рендер
Это статья не про то, какую программу для рендера вам выбрать. Но скажу так: наиболее популярны в архитектурной визуализации VRay и Corona Renderer. Vray более гибкий в настройках, где-то быстрее работает. Corona Renderer дает отличное качество при минимальной настройке и более интуитивна. Обе эти программы необходимо сначала установить. В 3ds Max они устанавливаются как плагины. Однако программа имеет и встроенные пакеты для рендеринга.
Для того, чтобы начать пользоваться новым программным обеспечением нужно открыть окно Render Setup. Это можно сделать кнопкой в Main Toolbar (ссылка на статью Разбор кнопок панели Main Toolbar), с помощью Rendering – Render Setup или горячей клавишей «F10». В выпадающем списке Renderer как раз и выбирается нужная программа.
Чтобы не приходилось выбирать каждый раз заново, опуститесь в самый низ окна и откройте Assign Renderer – «…» – Ваш рендер – OK. В списке не отображается тот рендер, который стоял в окне Production до выбора. Замок рядом с Material Editor означает, что для редактора материалов будет выбрана та же программа, что и для визуализации. ActiveShade можно оставить без изменений. Нажимаем Save as Default.
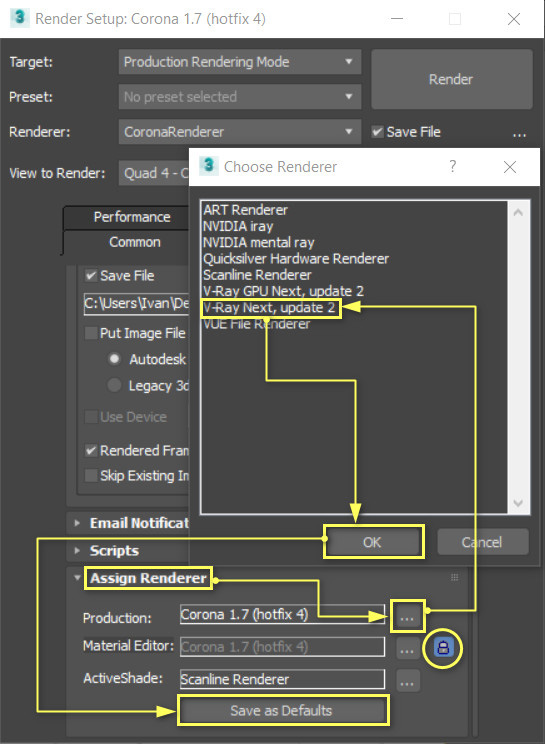
Таким же образом можно менять системы рендеринга между собой.
2. Преднастройка рендерера
Меню Target предлагает на выбор 5 типов рендеринга:
- Production – полноценный финальный рендер со всеми настройками
- Iterative – игнорирует некоторые настройки для быстрого рендера – наброска.
- ActiveShade – в какой-то мере это интерактивный рендер. Но у него есть более серьезные аналоги, встроенные в Corona и Vray.
- A360 Cloud – рендеринг в сервисе облачной визуализации. К сожалению, этот сервис имеет много ограничений.
- Network rendering - позволяет рендерить на нескольких компьютерах, объединенных в сеть.
Мы же будем использовать Production mode.
Свиток Preset позволяет создавать, загружать и использовать готовые настройки рендера, сохраненные ранее.
Большая кнопка Render запустит расчет сцены.
Перед началом рендеринга обязательно нужно создать поверхность (пол) и источник света!
Галочка Save File позволяет автоматически сохранить картинку после рендеринга. Ниже есть меню Render Output, где можно задать место сохранения файла, создать список сохраненных файлов или выводить на стороннее устройство.
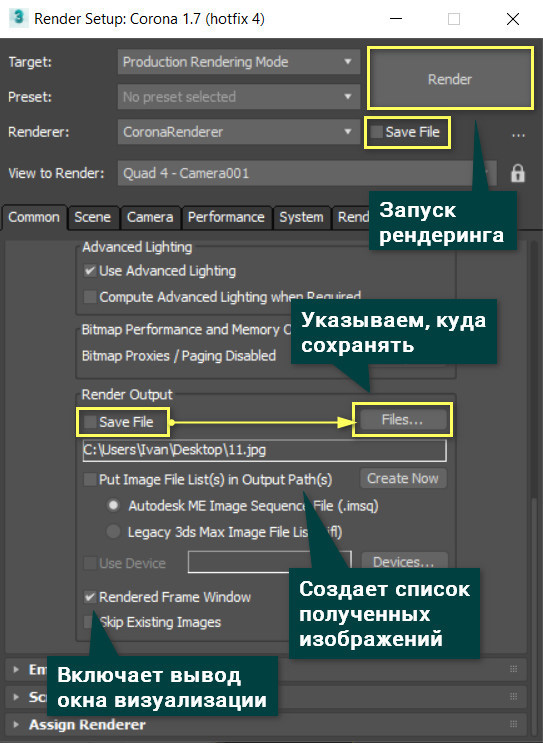
View to Render позволяет выбрать, какое из окон с проекциями нужно рендерить. Но при переходе из одного в другое меняется и область рендеринга. Для этого воспользуйтесь замком рядом. Он заблокирует переключения между окнами.
Rendering Progress dialog

When you click Render, a rendering progress dialog shows the parameters being used, and a progress bar. The rendering dialog has a Pause button to the left of the Cancel button. When you click Pause, the rendering pauses, and the button's label changes to Resume. Click Resume to continue with the rendering.
Note: The mental ray renderer does not support the Pause button. You can cancel a mental ray rendering, but you can't pause it.
By:
This command opens the Render Setup dialog, which lets you set the parameters for rendering. Rendering creates a still image or an animation. It shades the scene's geometry using the lighting you've set up, the materials you've applied, and environment settings such as background and atmosphere.

Rendering "fills in" geometry with color, shadow, lighting effects, and so on.
Rendering is multi-threaded and multi-processed on multiple-processor configurations. A two-processor or dual-core system can render in nearly half the time a single-processor system can.
Rendering can also take place on multiple systems by using a network. See Network Rendering. For the mental ray renderer, also see Distributed Bucket Rendering Rollout (mental ray Renderer).
Procedures
To render a still image:
The Render Setup dialog opens, with the Common panel active.
By default, rendered output appears in the Rendered Frame Window.
Tip: To render a view without using the dialog, click ( Render Production).
To render an animation:
The Render Setup dialog opens, with the Common panel active.
Typically, a dialog appears that lets you configure options for the chosen file format. Change settings or accept the defaults, and then click OK to continue.
The Save File checkbox turns on.
Note: If you set a time range and do not specify a file to save to, the animation is rendered only to the window. This can be a time-consuming mistake, so an alert warns you about it.
Tip: Once you have rendered the animation this way, you can render it again without using the dialog by clicking (Render Production) or pressing F9 .
Missing Mapping Coordinates
If the renderer finds a parametric object that requires mapping, it automatically sets its Generate Mapping Coordinates toggle before rendering the scene. The toggle remains set after the rendering is done.
In the following cases, however, 3ds Max is unable to supply mapping coordinates automatically:
- Non-parametric objects, such as imported meshes, don't have built-in coordinates.
- Some third-party (plug-in) objects aren't provided with mapping coordinates.
In these cases, 3ds Max is unable to render the scene completely. It displays a Missing Mapping Coordinates dialog that lists the objects the renderer couldn't map. To resolve the problem apply a UVW Map modifier to the objects that the dialog lists.
Note: If a material has Show Map In Viewport set when that material is assigned to an object, the object's Generate Mapping Coordinates toggle is set, if it was not previously set. (The state of Show Map In Viewport is saved with each material.)
Interface

From this drop-down list you can choose a set of preset rendering parameters, or load or save rendering parameter settings. See Preset Rendering Options.
View Shows the viewport that renders when you click the Render button. To specify a different viewport to render, choose it from the list or activate it in the main user interface.
The drop-down list contains all viewports available in all viewport layouts. Each viewport is listed with the layout name first, followed by a hyphen and then the viewport name. For example: Row 1, Row 2 - Front. For this reason, to identify viewports easily, give your layouts meaningful names, such as Closeups.
Activating a different viewport in the main interface automatically updates this setting if Lock To Viewport (see following) is off.

Lock View
When on, locks the view to the one shown in the Viewport list. This enables you to adjust the scene in other viewports (which become active as you use them), and then click Render to render the viewport you originally chose. When off, Render always renders the active viewport.
Renders the scene.
When ActiveShade is chosen, the name of this button changes to ActiveShade, and clicking it opens a floating ActiveShade window.
If the scene you're rendering contains bitmaps that cannot be located, a Missing External Files dialog opens. This dialog lets you browse for the missing maps, or continue to render the scene without loading them.
[Render button drop-down menu] Click the down-arrow to display a drop-down menu that lets you choose various rendering options.
- Production Render Mode (The default.) While active, clicking Render uses production mode.
- Iterative Render Mode While active, clicking Render uses iterative mode.
- Active Shade Mode While active, clicking Render uses ActiveShade.
- Submit to Network Rendering Submits the current scene to network rendering. When you choose this option, 3ds Max opens the Network Job Assignment dialog.
This choice does not affect the state of the Render button itself, which you can still use to launch a Production, Iterative, or ActiveShade rendering.
Changing the render mode on this menu changes the comparable setting on the Render flyout.
Читайте также: