
Raspberry pi установить teamviewer
TeamViewer offers the one of the most effective and efficient Raspberry Pi remote control solution. Easy to download and easy to use, this allows for your Raspberry Pi device to be accessed remotely with TeamViewer 24/7, from anywhere in the world. Your Raspberry Pi allows you to solve problems that matter to you using the power of digital technology and computing. When combined with the TeamViewer solution, there’s no limit to what you and your imagination can come up with! Take advantage of the full potential of your Raspberry Pi by connecting to it remotely using TeamViewer.

2.5+ Billion
40+ Million
> 500,00
> 200 Million
Why we love TeamViewer?
First of all, we love to use the Raspberry Pi without a screen for our Internet of Things projects i.e. headless configuration. We usually have a laptop with us, and we certainly want the laptop’s display to work with Raspberry Pi.
But that is not simply possible. This is where TeamViewer comes in. You can set up unattended access as well as set TeamViewer to auto start on boot. Also, unlike VNC to remotely access the Raspberry Pi over the internet requires a public static IP address while TeamViewer just requires ID and Password for the access. So you won’t have to worry about getting a public static IP address which can cost you a few bucks.
We are searching for the tutorials on installing TeamViewer, and we found some, but unfortunately, we found none of them worked for us. This was because we were trying to install the version that was available for normal computer processor not ARM processors.
Luckily there is a beta version of TeamViewer that is specially designed to work with Raspberry Pi 2, 3 and 4. However, Raspberry Pi Zero, as well as version 1, are currently not supported.
Настройка TeamViewer в Raspbian Lite
Raspbian Lite - это облегченная версия ОС, в которой есть только командная строка. Соответственно, настройку TeamViewer также надо делать через командную строку, что и мы сейчас сделаем.
Прежде, чем вы сможете получить доступ через TeamViewer к Raspberry Pi, необходимо будет назначить пароль удаленного доступа. Делается это ниже указанной командой, только заранее замените на тот пароль, который вы хотите использовать.
Храните пароль в безопасности, так как зная его, можно получить доступ к вашему Raspberry Pi, правда еще и надо знать ваш TeamViewer ID.
What are the equipment requirements to remotely access your Raspberry Pi using TeamViewer

In order to remote control Raspberry Pi computers, you will need to have the Raspberry Pi 2 or newer with an armv7 hardfloat. The Raspbian OS, a Debian-based Linux system, is required to run TeamViewer Host on the Raspberry Pi. In order for TeamViewer Host to run most efficiently, Raspbian 9 or newer should be installed on your device.
You will also need to have TeamViewer installed the device you will use to connect to your Raspberry Pi. Remember, TeamViewer can be used on all sorts of devices and operating systems: PCs, Macs or smart phones, iOS, Android, Linux or Microsoft. TeamViewer is also free for personal use. If you’re a business or organisation, there are still plenty of affordable plans to choose from. Plus, TeamViewer is scalable, so as your business or project grows, so too can your use of TeamViewer. Simply go to our downloads page, select the operating system your device is using, and follow the installation prompts.
How do you install TeamViewer Host for Raspberry Pi?
There are two easy ways to install TeamViewer Host so that you can remote control Raspberry Pi devices: By clicking on the download package link or by running the command in the command line.
TeamViewer provides DEB packages for Debian Linux systems like Raspbian. For Raspberry Pi, you can download the armv7 32bit TeamViewer Host package directly here.
Of course, you can also install the package using the command line. For DEB packages, run the following command line:
Добавление устройства в вашу учетную запись
Кроме ручного получения и добавления TeamViewer ID в вашу учетную запись, существует другой способ, в котором можно сразу подключиться к вашей учетной записи TeamViewer с добавлением Raspberry Pi в ваш список устройств удаленного доступа. Чтобы это сделать, выполните следующую команду:
Если вы в первый раз запускаете эту команду, то вас попросят согласиться с условиями, и после чего надо будет ввести данные своей учетной записи TeamViewer. Вводим логин, далее пароль.

В некоторых случаях может и выдать "Sign in failed! [Unknown reason]". И это тоже может оказаться нормальным. Проверяйте почту и все у вас получиться!


Итак, если все прошло успешно, то вам будет предложено добавить устройство как 'raspberrypi' в группу 'Мои компьютеры" вашего аккаунта. После принятия соглашения, должно получиться как на скриншоте.
Ну, собственно, вот и все, переходите в аккаунт вашего личного кабинета и наслаждайтесь результатом.
Ручной метод получения TeamViewer ID
По тихой добрались и до TeamViewer ID. Это уникальный идентификатор, который выдает сервер TeamViewer на устанавливаемом устройстве, он необходим для подключения к вашему Raspberry Pi. Давайте получим его следующей командой:
У вас должно получиться так, как показано на скриншоте. Вместо XXXXXXXX будет отображен ваш TeamViewer ID, сохраните этот номер для дальнейшего использования. Добавить вручную к вашей учётной записи TeamViewer, думаю, труда не составит.

Why we don’t like VNC much?
The first thing is that the VNC server has to be started manually (at least in our case) with certain resolution parameters so that it can fit our screen every time. This is a tedious as well as a very time-consuming task, and we don’t like that.
Update: You can use “sudo raspi-config” or Raspberry Pi Configuration on GUI to allow VNC to start automatically at boot. But still it do not allow you to connect to your Pi from anywhere in the world unless you have a static IP and have port forwarding enabled. And for sure it is not a secure way to implement that. 🙂
Also, another drawback of the VNC is that you can’t use the host screen directly. That means a virtual instance is created and then it can be accessed via VNC. As soon as we close the VNC server all the instances are destroyed.
What are the equipment requirements to remotely access your Raspberry Pi using TeamViewer
In order to remote control Raspberry Pi computers, you will need to have the Raspberry Pi 2 or newer with an armv7 hardfloat. The Raspbian OS, a Debian-based Linux system, is required to run TeamViewer Host on the Raspberry Pi. In order for TeamViewer Host to run most efficiently, Raspbian 9 or newer should be installed on your device.
You will also need to have TeamViewer installed the device you will use to connect to your Raspberry Pi. Remember, TeamViewer can be used on all sorts of devices and operating systems: PCs, Macs or smart phones, iOS, Android, Linux or Microsoft. TeamViewer is also free for personal use. If you’re a business or organisation, there are still plenty of affordable plans to choose from. Plus, TeamViewer is scalable, so as your business or project grows, so too can your use of TeamViewer. Simply go to our downloads page, select the operating system your device is using, and follow the installation prompts.
Using TeamViewer on a Headless Raspberry Pi Setup
1. Before you can access the Raspberry Pi from a TeamViewer client, we will first have to designate a password for the server.
We can do that by running the following command, where “ ” is the password that you want to utilize.
Make sure you keep this password secure as it will allow someone access to your Raspberry Pi if they manage to get your TeamViewer ID and its password.
2. Now that we have set a password for TeamViewer on our Raspberry Pi let’s now go ahead and retrieve the TeamViewer ID.
The TeamViewer ID is the ID that you will utilize to make a connection to the TeamViewer server sitting on the Raspberry Pi.
To retrieve the TeamViewer ID type in the following command into the terminal.
3. You will get a result from this command showing something like what we have below.
Where we have is where your TeamViewer ID will be, write this number down as you will need this to connect to your Raspberry Pi.
4. Alternatively, if you want to be able to connect to your Raspberry Pi through TeamViewer easier, then you can connect your device up to your TeamViewer account.
To begin this process, run the following command.
5. During the setup process, you will be asked to agree to the terms and conditions as well as enter the details of your TeamViewer account.
Entering your account details is so that TeamViewer can make a connection to it and allow you to gain access to your account through the TeamViewer interface easily.
Once you have completed the setup process you should now be able to connect to your TeamViewer server running on your Raspberry Pi.
You can skip to the Using TeamViewer to connect to your Raspberry Pi section to see how you can connect to your Raspberry Pi’s installation of TeamViewer.
How does TeamViewer work on Raspberry Pi?

Remote Raspberry Pi access can be done from any other device, whether it’s PC or Mac, or a phone using iOS, Android, or Microsoft. As long as this device has TeamViewer on it, and the Raspberry Pi has TeamViewer Host, establishing a remote connection is easy as pie. TeamViewer Host is a service that allows for the maintenance, control and management of the Raspberry Pi device using the TeamViewer remote control solution. This gives you the chance to use your Raspberry Pi to its fullest potential from anywhere in the world.
Plus, by using TeamViewer to remotely connect, you know that your personal information is secure, as TeamViewer adheres to strict security guidelines and makes use of AES (256-bit) encryption.
Using TeamViewer from the GUI on the Raspberry Pi
1. Upon installing TeamViewer to your Raspberry Pi, you will be greeted with the screen below asking you to accept TeamViewer’s license agreement.
To continue with this guide, you will need to click the Accept License Agreement button.

2. Once you have agreed to the license agreement, you will be returned to the desktop.
To open up the Teamviewer host software click the TeamViewer icon in the taskbar as shown in the screenshot below.
3. In this screen, you need to decide whether you want to associate your Raspberry Pi with your TeamViewer account or to set a password and connect by using the TeamViewer ID.
If you want to rely on using the TeamViewer ID go ahead and click set a personal password. (1.) to load the options menu. If you select this option make sure you skip to step 5 of this tutorial.
If you decide to utilize your TeamViewer account to connect to your Raspberry Pi go ahead and click the Grant easy access (2.) button. If you select this, move on to step 4 of this tutorial.

4. If you have decided to connect your Raspberry Pi’s TeamViewer host to your TeamViewer account, you will now be asked to “Assign your account“.
This process will connect your device to your TeamViewer account allowing easy access. All you need to do is enter your Email as well as your Password (1.)
Once you have entered all your information, you need to click the Assign button (2.). Clicking the button will finalize the connection and associate the device.
Now you can move on to Step 6 of this Raspberry Pi Teamviewer tutorial.

5a. If you have decided to rely on using the TeamViewer ID, you will need to set a password.
Upon clicking “set a personal password.” in step 3, you will now be shown the TeamViewer options menu.
Within this menu click the “Security” tab as shown in the screenshot below.

5b. On this screen set your password under the Personal password (1.) section. Make sure you keep this secure as someone could gain access if they obtain it and your TeamViewer ID.
Once you have set your password, press the Apply button.

5c. Once you have set your TeamViewer personal access password, you should now be greeted by the default TeamViewer interface as shown below.
Here you will be shown your TeamViewer ID, using this ID and the password you will be able to connect to your Raspberry Pi by utilizing the TeamViewer software.

Installing TeamViewer to the Raspberry Pi
1. To install TeamViewer to your Raspberry Pi, we will have first to ensure that our package list and all installed packages are up to date.
You can achieve this by running the following command.
2. With the Raspberry Pi now entirely up to date. Let’s go ahead and download the software package from Teamviewer’s servers.
As we are already using the command line, we can do that by running the following command. This command will use wget to download the .deb file from TeamViewer’s server.
A .deb file is a package file designed for the Debian systems package management system. The .deb file is an archive containing all the files that we need for TeamViewer.
3. Now that we have the TeamViewer deb file available on our Raspberry Pi lets go ahead and install it by running the following command.
To install the TeamViewer deb package, we will be making use of the dpkg utility which is the base of the Debian package management software.
4. Upon running the above command, you will notice a bunch of errors about specific packages not being installed.
To fix this, we will have to make use of our package manager to repair the “broken install”.
The apt package manager will automatically detect the missing packages and attempt to download the best versions available for the software.
Now let’s utilize the apt tool by running the command below.
5. TeamViewer should now be up and running on your Raspberry Pi. The software is automatically set up so that it will start up on boot, so you do not have to worry about that.
In the next two sections, we will explore utilizing TeamViewer on both a GUI setup and a headless setup.
With TeamViewer, you can access your Raspberry Pi even if you are running a lite version of Raspbian that only has the command line. TeamViewer is setup to share the command line screen as well.
Установка TeamViewer
Прежде чем начать, убедитесь, что на вашей Raspberry Pi обновлены все пакеты до актуального состояния. Для этого введите следующую команду:
Используем команду wget и загрузим с сервера TeamViewer.deb пакет, предназначенный для Debian, после чего сразу же установим, используя утилиту dpkg:
После проделанных манипуляций, TeamViewer будет запускаться с системой по умолчанию. Вам осталось настроить его под себя, чтобы можно было удаленно подключаться к вашей плате Raspberry Pi. Как это сделать, я распишу ниже в следующих двух разделах, где будет рассмотрено использование TeamViewer как для версии Raspbian с командной строкой, так и с графическим интерфейсом.
For Headless Access
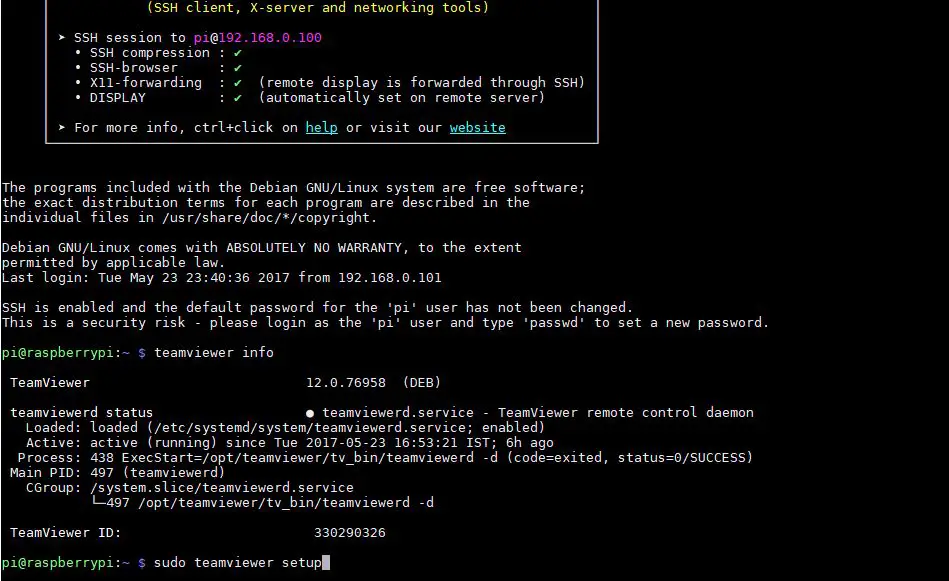
- Connect to your Raspberry Pi via SSH.
- To find out the id, you can type “teamviewer info” or to setup headless access you can type “sudo teamviewer setup”.
So that was very easy. We hope that you have enjoyed this tutorial and you were able to install TeamViewer successfully on your Raspberry Pi. If you encountered any problem while performing the installation, then do let us know using the comment section below.
Also, don’t forget to share it with your friends who are using or are interested in Raspberry Pi tutorials and Internet of Things.
Если нужно отключить автозапуск
Если вам нужно, чтобы TeamViewer не запускался автоматически, то удалите службу автозапуска выполнив следующую команду:
После этого, чтобы запускать, необходимо постоянно применять команду:
А как же потом? А вот так.
Recommended
How does TeamViewer work on Raspberry Pi?
Remote Raspberry Pi access can be done from any other device, whether it’s PC or Mac, or a phone using iOS, Android, or Microsoft. As long as this device has TeamViewer on it, and the Raspberry Pi has TeamViewer Host, establishing a remote connection is easy as pie. TeamViewer Host is a service that allows for the maintenance, control and management of the Raspberry Pi device using the TeamViewer remote control solution. This gives you the chance to use your Raspberry Pi to its fullest potential from anywhere in the world.
Plus, by using TeamViewer to remotely connect, you know that your personal information is secure, as TeamViewer adheres to strict security guidelines and makes use of AES (256-bit) encryption.
If you Have a Display/Monitor and GUI Access
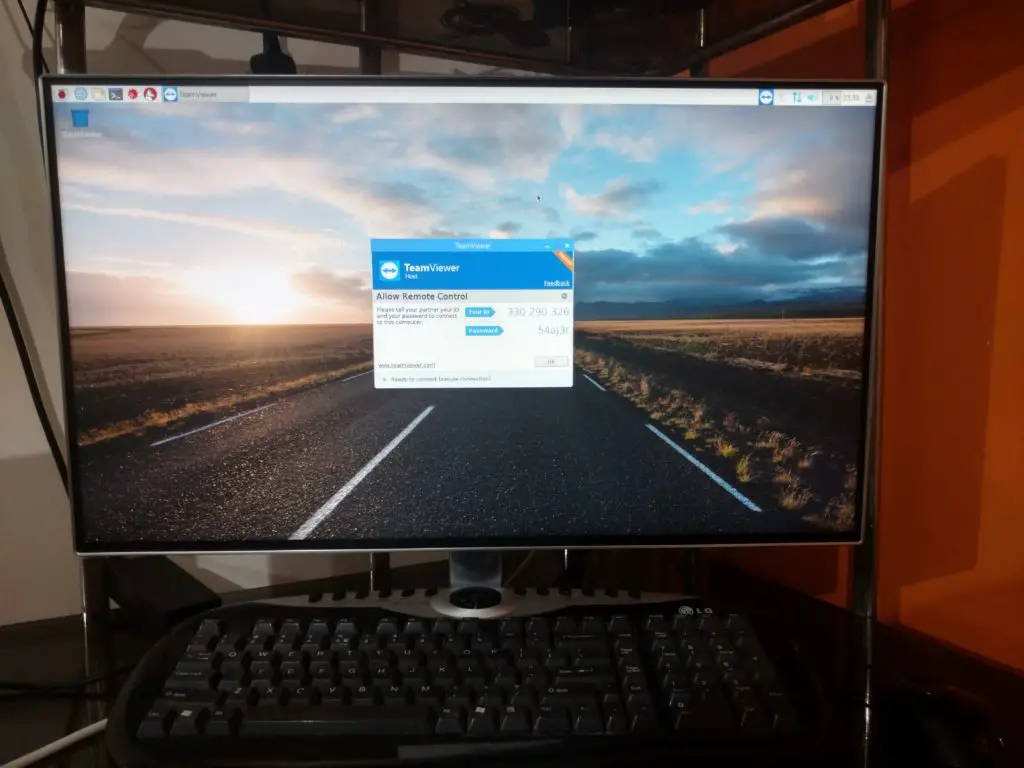
- You can simply open the TeamViewer from the menu -> Internet -> TeamViewer or if it’s already running then you can see the little TeamViewer logo in the top taskbar.
- Note down the ID and Password. Now you can connect to your Raspberry Pi from anywhere.
- From the settings menu, you can also set up unattended access and set a permanent password to access it.
Optional
Using TeamViewer to Connect to your Raspberry Pi
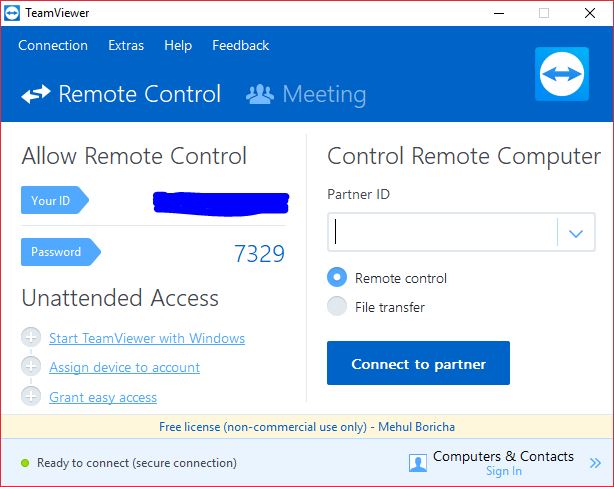
1. With TeamViewer now set up on your Raspberry Pi we can now move onto connecting to it.
To connect to it, you will require a device with the TeamViewer client installed, whether it be a Windows PC or most other devices.
You can download TeamViewer by going to the TeamViewer website. Once installed continue to the next step.
2. Now with TeamViewer loaded you will be able to either enter the TeamViewer ID (2.) and connect to your Raspberry Pi that way.
Or if you connected your Raspberry Pi to your TeamViewer account, you will be able to double-click it in your connections list to connect to the device.

3. Once you have connected to your Raspberry Pi using TeamViewer, you will be greeted by either your desktop or the command line depending on what version of Raspbian you are utilizing.
If everything connected properly, then you have now successfully setup TeamViewer on your Raspberry Pi.

By now you should have everything working perfectly. If you have any feedback on this Raspberry Pi TeamViewer tutorial, then please don’t hesitate to leave a comment below.
TeamViewer - это проприетарное программное обеспечение для удаленного управления, совместного использования рабочего стола, онлайн-встреч, веб-конференций и передачи файлов между компьютерами. Проще говоря, установив его, можно с любой точки планеты подключиться к вашему устройству, используя только ID и пароль.

TeamViewer доступен в различных версиях, но для нашей задачи мы будем использовать серверную версию HOST, которая используется только для доступа к удаленным компьютерам, что делает его идеальным решением для таких целей, как техобслуживание и удаленный мониторинг.
Я не буду здесь расписывать как настраивать TeamViewer в графической версии Raspbian, тем более, рассказывать как подключаться через другой компьютер, таких инструкции в интернете полно! Кому надо - разберется. Скажу только одно, что установка в графической версии идентична и ставить надо тоже через командную строку!
Удаление TeamViewer с вашего устройства
Возможно вам когда-нибудь понадобиться удалить teamviewer со своего Raspberry Pi, для этого воспользуйтесь следующей группой команд для полного удаления и очистки системы от не нужных хвостов:
Personally, we have tried installing VNC as well as much other software that can provide remote GUI access to the Raspberry Pi, but we were quietly not satisfied with it. So here in this tutorial, we are going to install TeamViewer on Raspberry Pi within a minute.
Table of Contents
Steps to Install TeamViewer on Raspberry Pi
First of all, make sure that your Raspberry Pi meets the following requirements
Protect Your Online Privacy With Surfshark
[The VPN that we use here at Tech Arrival]
- It has at least 35MB of disk space.
- You have Raspbian 8.0 Jessie with X-Server or Framebuffer VT.
Before starting here is what we have used in the tutorial:
- First of all download the latest TeamViewer host from this link.
- Now transfer the deb file to your Raspberry Pi and open up the terminal.
- Install the deb file like we do on the Ubuntu. The command is “sudo dpkg -i filename.deb” or just simple use “apt install ./filename.deb” as instructed in TeamViewer manual.
- Let the process complete. Now there will be several unmet dependencies.
- To fix this first type “sudo apt-get update” and wait until all the packages details are downloaded.
- Now use “sudo apt-get -f install” to install all the dependencies or use “sudo apt-get -f upgrade” to install dependencies as well as upgrade other modules.
- You are good to go. By default, the TeamViewer will start at the boot, and you can also connect it using the headless mode.
- Type “teamviewer help” for more details.
After the installation here is something you can do:
Equipment
Below is all the equipment that you will need for setting up TeamViewer on your Raspberry Pi.
Необходимые компоненты
- Плата Raspberry Pi 2 или выше (купить на AliExpress).
- Рабочее соединение с сетью интернет.
Мы использовали протокол SSH для доступа к Raspberry Pi, вы можете использовать любой другой удобный вам способ.
In this Raspberry Pi TeamViewer tutorial, we will be showing you how to set up and connect to TeamViewer on the Raspberry Pi.

For those who do not know what TeamViewer is, it is proprietary software that is hugely popular for sharing desktops as well as giving others remote access to the device. It is heavily used by support teams as it can make diagnosing and fixing problems a lot easier.
The version of TeamViewer that we will be installing to the Raspberry Pi is called TeamViewer Host. Unlike standard versions of TeamViewer, it is purely designed to receive connections and act as a server.
You can not use TeamViewer on your Raspberry Pi to connect to other TeamViewer clients, but others can connect to it.
To install TeamViewer on the Raspberry Pi, you will have to be utilizing a Raspberry Pi 2 or newer running Raspbian Jessie or newer.
This means that the TeamViewer software should work for the vast majority of people unless you are running a now somewhat outdated version of the Raspberry Pi.
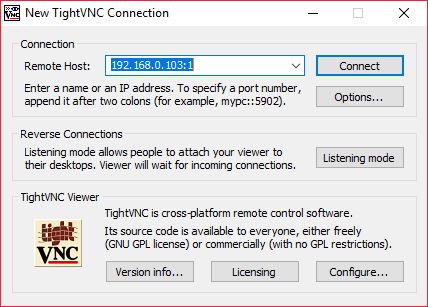
There are other methods of connecting to your Raspberry Pi remotely such as using VNC server. For pure terminal sharing you can use something like tmate.
How do you install TeamViewer Host for Raspberry Pi?
There are two easy ways to install TeamViewer Host so that you can remote control Raspberry Pi devices: By clicking on the download package link or by running the command in the command line.
TeamViewer provides DEB packages for Debian Linux systems like Raspbian. For Raspberry Pi, you can download the armv7 32bit TeamViewer Host package directly here.
Of course, you can also install the package using the command line. For DEB packages, run the following command line:
В настоящее время TeamViewer является одной из самых популярных программ для удаленного управления компьютерами и различными устройствами. Он позволяет наглядным образом видеть и управлять удаленным рабочим столом другого компьютера. TeamViewer находит широкое применение в коллективах (командах), разбросанных по всему миру, но трудящихся над одной общей задачей. Он крайне удобен в ситуациях, когда опытный сотрудник помогает с настройкой каких либо процессов на удаленном компьютере менее опытного сотрудника, или помогает ему с поиском возникших проблем. Также TeamViewer приобрел бешеную популярность в 2017 году, когда начался бум майнинга криптовалют и майнеры стали использовать его для удаленного управления своих майнинговых ферм на видеокартах. Потом, кстати, TeamViewer стал ужесточать свои правила в отношении майнеров и они постепенно заменили его на другие аналогичные программы, но, тем менее, он по прежнему является лидером среди программ подобного типа.

В данной статье мы рассмотрим установку программы TeamViewer на плату Raspberry Pi для удаленного доступа к ее рабочему столу из любой точки Земли, где есть доступ в сеть Интернет. Но здесь необходимо отметить, что официальная программа TeamViewer не поддерживает плату Raspberry Pi, поэтому в этом проекте мы вместо нее будем устанавливать программу TeamViewer Host. Она обладает практически теми же функциями, что и официальная программа, но рассчитана только на работу со входящими соединениями. То есть рабочий стол Raspberry Pi будет доступен с любых компьютеров, но с самой платы Raspberry Pi вы не сможете управлять никакими компьютерами.
Читайте также: